
9
Add JavaFX to Web Pages with Applets
“Civilization advances by extending the number of important operations which we can perform without thinking of them.”
—Alfred North Whitehead
JavaFX and Applets
JavaFX makes applet development and deployment easy!! I know what you are thinking: “Applets, aren’t they those things we heard about 10 years ago when Java was brand new? Aren’t they slow and unreliable?” Well not anymore. Since the release of Java 6 update 10, the entire applet framework has been redone and JavaFX leverages this to make it possible to run any JavaFX application as an applet without code changes. To start with, let’s see how easy it is to deploy a JavaFX application as an applet within an HTML page. Next, we will explore a new feature that allows you to drag the applet off the HTML page and onto your desktop. Then we will cover interaction between JavaFX and JavaScript. We will also cover Java Web Start, which is another way to easily install a JavaFX application from an HTML page directly to the desktop.
Deploying a JavaFX Application as an Applet
The first step is to write your JavaFX application. For now, there is nothing out of the ordinary you have to do. Furthermore, you can run and test your JavaFX application just like any other JavaFX application. After you are satisfied that your application is working as desired, you can deploy it to a Web page.
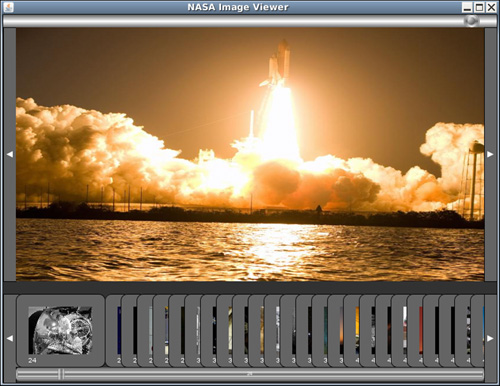
The example we are going to use is the NASA Image Browser application that can be found on the book’s Web site. This application fetches the RSS feed of the “images of the day” from the US National Aeronautics and Space Administration (NASA) Web site and builds a thumbnail view of all the images; as you select a thumbnail, a higher resolution image is then fetched and displayed from the NASA Web site. When this JavaFX application is run as a standalone application, it looks like a normal JavaFX application, as shown in Figure 9.1.
Figure 9.1 NASA Image Browser – Standalone Application
To deploy this as an applet in an HTML page, there are three steps:
1. Sign the application JAR file.
2. Create the JNLP (Java Network Launch Protocol) descriptor file.
3. Add JavaScript code to the HTML source.
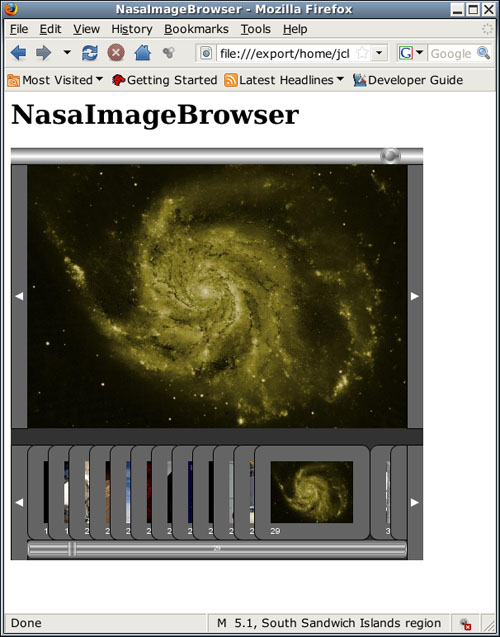
After this is done and when the HTML page is displayed in the browser, the JavaFX application will start and display within the browser page. Figure 9.2 shows the same application running within an HTML page using the Firefox browser.
Figure 9.2 NASA Image Browser – Applet in Firefox
There are basically two ways to do these three steps. Use NetBeans IDE for JavaFX or do the steps manually, either from the command line or implement them in an Ant build file.
NetBeans IDE for JavaFX
The easiest way to do all this is to use NetBeans IDE for JavaFX. When you build the JavaFX project with NetBeans IDE for JavaFX, these steps are done automatically. The JAR is signed, the JNLP file is generated, and a sample HTML page is produced that can be copied into any HTML source file.
There are some parameters to assist in this. Right-click on the NetBeans Project and select Properties. Then click on Application. Figure 9.3 shows the NetBeans properties window for defining applet properties.
Figure 9.3 Applet Generation Parameters

The Name field defaults to the Project Name; you can set your company as the Vendor, set the applet’s Width and Height, mark it as Draggable, do a Self Signed Jar file, and indicate that you want to support Pack200 Compression. Draggable is a new applet feature that we will discuss a little later in this chapter. Pack200 Compression allows the JAR file to be compressed to a smaller size to minimize download time when starting the applet.
As a part of the applet security model, we need to sign the JAR file in order to have broader permissions to run the application on the user’s platform. When the applet is first loaded, the Java Plug-in module will identify the provider of the applet, verify the JAR file has not been tampered with, and ask the user if he grants permission to run the applet on his platform. The JNLP deployment file also has a security section that helps govern security permissions. The NetBeans IDE sets this to “all-permissions.” There is more on security later in this chapter.
When the project is built, besides generating the JAR file, two JNLP deployment files will be generated, one used for applet deployment, and the other used for Java Web Start deployment. Java Web Start uses the same protocol as applets, but allows the user the ability to start the application from his desktop without using the browser, even though the application itself is downloaded. These will be explained in detail in the next sections. Besides the JNLP deployment files, a sample HTML file is produced with the appropriate JavaScript code to launch the applet. This file can be used for testing, and the JavaScript launcher code can be copied into any HTML source file.
For our NasaImageBrowser application, the following files are generated:
• NasaImageBrowser.jar
• NasaImageBrowser.jar.pack.gz
• NasaImageBrowser.html
• NasaImageBrowser_browser.jnlp
• NasaImageBrowser.jnlp
Upon opening the NasaImageBrowser.html page in a browser, the appropriate JAR’s files for the application and JavaFX will be downloaded and cached on the user’s machine. Then the application will run in the HTML page as shown in Figure 9.2. One of the enhancements that the new applet framework provides is this local caching mechanism. As long as the version for a JAR file does not change, it does not need to be downloaded each time, thereby improving the user’s experience with quicker startup times. Also, if the user does not have the correct version of Java installed on her machine, she is prompted to download the correct Java JRE version.
Manual Generation to Support JavaFX Applets
If you are not using NetBeans IDE for Java, you will need to sign the JAR file manually and create the JNLP deployment and HTML files by hand. Let’s look at the signing steps.
Signed JAR
To sign the JAR file, first you need to create a new public/private key pair stored in a new keystore using the Java command keytool. For example, you may create a keystore in the current directory, named myKeystore, with a store password and a key password of password. The store password is the password that protects the integrity of the keystore. The key password protects the private key. The alias myKey identifies this new entry in the keystore. The dname entry is the X500 Distinguished Name and identifies the entity that is signing the applet. Typically, when the user attempts to start the JavaFX applet, this name is presented to the user and the user must accept it before the applet will actually start. For more information, consult the Java documentation for the keytool command.
![]()
After the key is generated, you need to create a self-signed certificate, again using the Java keytool command.
![]()
Lastly, you need to sign the JAR file with a self-signed or a trusted certificate by using the Java jarsigner command.
![]()
All these examples assume you are in the same directory as the directory containing the NasaImageBrowser.jar file.
JNLP File
The new applet browser plug-in software leverages the Java Network Launching Protocol (JNLP) first introduced with Java Web Start. Java Web Start allows you to start an Internet Java application outside of the browser. This capability is now being applied to applets themselves, so that applets no longer run within the browser application, but rather run in a background Java process with a window on the browser page. Using JNLP makes dealing with issues like security and runtime settings easier to maintain in a downloadable form.

To run a JavaFX applet, it is necessary to create a JNLP XML file that defines the required resources, security settings, and applet configuration properties for deployment. By default, the javafx() JavaScript function, defined in the next section, defines this filename for this JNLP deployment file to be the concatenation of the applet name with _browser.jnlp. For the NASA Image Browser application, this is NasaImageBrowser_browser.jnlp. This can be changed to point to another name by including a "jnlp_href" launch parameter in the JavaScript function, javafx(). This is described in the next section, JavaFX Applet Launch JavaScript.
There are four main sections to the JNLP XML, <information>, <security>, <resources>, and <applet-desc>. These are shown in Listing 9.1.
Listing 9.1 JNLP XML File

<jnlp> codebase Property:
In the main <jnlp> tag, codebase is an optional property that tells the system to locate any resources defined in the JNLP file. If the codebase property is not specified, the JNLP file inherits the codebase from the HMTL document. The recommendation for the codebase property when a JNLP is used with an applet is either to not specify one in the JNLP file so that the codebase is inherited from the HTML file or to specify an absolute codebase. By not specifying a codebase, the JNLP file is more portable when moving it from one server location to the next. The NetBeans IDE for JavaFX generates an absolute codebase property within the <jnlp> tag, so when placing the files into production, it either has to be changed or removed.
<information>
The <information> element identifies the application and its source. The key element under <information> is <offline-allowed>. If this is set, the applet can be run when the system is off the network. When the system is connected to the network, the applet framework will automatically check for updates. If <offline-allowed> is not specified, the application can only be run when the system is connected back to the applet’s source location.
<security>
The <security> element defines the security permissions the applet is allowed to have. Each applet, by default, is run in a security-restricted environment. If <all-permissions> is defined, the applet will have full access to the user’s machine. In this case, the JAR files must be digitally signed and the user is asked whether to grant this permission prior to the applet running.
<resources>
The <resources> element identifies the resources needed for running the applet. This includes specifying which versions of Java are required to run the applet. This section also identifies all the archive files needed by the applet.
<applet-desc>
The <applet-desc> element defines the properties for the applet. There is some overlap with these settings and the settings set from the HTML page using the JavaScript code defined in the next section. The overlap is resolved as defined in Table 9.1.
Table 9.1 Precedence Rules for <applet> HTML Tag and JNLP Settings

For more information on the JNLP XML and how it applies to applets, go to http://java.sun.com/javase/6/docs/technotes/guides/jweb/applet/applet_deployment.html#jnlp_href. For a detailed description on the JNLP XML, go to http://java.sun.com/javase/6/docs/technotes/guides/javaws/developersguide/syntax.html.
JavaFX Applet Launch JavaScript
To make JavaFX applet deployment easier and portable across browsers, Sun has developed a JavaScript function for launching JavaFX applets. This JavaScript function is defined as javafx(launchParams, appletParams). The second parameter, appletParams, is optional. To include this JavaScript code into your HTML page, you must first reference it. The standardized location for this JavaScript code is http://dl.javafx.com/dtfx.js. An example of using this in an HTML page is
<script src="http://dl.javafx.com/dtfx.js"></script>
Including this script provides JavaScript functions for automatic checking for the correct Java version and defines the JavaScript function for loading the appropriate JavaFX runtime archive files.
To use the JavaFX launch function, javafx(), in an HTML page, include it within a JavaScript section as shown in Listing 9.2.
Listing 9.2 JavaScript for Launching JavaFX Applet in a Browser

Listing 9.3 shows using the JavaFX Applet launcher function in an HTML page. The JavaScript code for the applet is shown in bold and includes two script sections.
Listing 9.3 JavaFX Launcher Script in HTML Page

The second <script> tag invokes the javafx deployment function defined in the JavaFX deployment script file. This deployment function may have two arguments. The first contains the launch properties for the applet, and the second parameter set contains any parameters available to the application. In this example, only the launch properties are used. By default, this launcher will use a "jnlp_href" of "NasaImageBrowser_browser.jnlp".
Table 9.2 lists the possible launch properties.
Table 9.2 JavaFX Applet Launch Properties

Developer Tip:
![]()
There is a special launch property, display_html, used for debugging your settings. When this is set to true, instead of launching the applet, the generated HTML code is displayed in the browser. This is useful to determine exactly what is being sent to the browser and to figure out if any settings are wrong.
Listing 9.4 shows an example that adds an applet parameter, isApplet, that will be used by the NasaImageBrowser application to determine whether it has been launched as an applet or as a standalone application. We will see how this is used later in this chapter when we discuss dragging the applet off the browser to the desktop. There is also a launch property to indicate the applet is draggable.
Listing 9.4 Draggable Applet

The next section will explore how to take advantage of a new feature that lets you “undock” the applet and move it off the browser onto the desktop. We have just shown that we need to set the launch attribute, draggable, in the preceding example. We also added an applet parameter, isApplet, that will be used by the NASA Image Browser application to determine whether it was started as a standalone application or as an applet in a browser.
Undocking from the Browser
You might be asking, “What is this Undocking feature?” Basically, it allows you to click on the application and drag it off the browser to anywhere on your desktop. Figure 9.4 shows the NASA Image Browser after it has been dragged off the Firefox browser. It is now undocked from the browser and will continue to run even if the user exits the browser.
Figure 9.4 Undocked NASA Image Browser Applet

To allow this feature, we have to make some code changes to our application. First, we have to add a javafx.stage.AppletStageExtension object to the stage for the viewer. The most important variable in AppletStageExtension to enable dragging the applet off the browser is to define a function for should-DragStart. When this function is invoked, it returns true if an undocking drag is allowed. In our case, we first check to see if the "isBrowser" script variable is true. "isBrowser" is set if the Applet Parameter "isApplet" is set in the HTML JavaFX launcher function. From JavaFX, you set this using the javafx.lang.FX getArgument function.
![]()
Next, you check to see if the primary mouse button is down. Lastly, because the user can use the mouse in the application to select images to view, you restrict this drag operation to the “bar” area at the top of the display. You could have done this differently by just changing the logic defined in the shouldDragStart function. For example, you could have used the secondary mouse button and changed the area to the entire application. This is demonstrated in Listing 9.5.
Listing 9.5 Draggable Applet – JavaFX Code

The useDefaultClose variable indicates whether to use a default close mechanism or whether the close should be under the control of the developer. We have chosen to implement our own close button so we will set this to false. The default is true. When the application is “closed,” it actually docks back into the browser page, if the page is still visible.
In our application, we use a ControlButton to close the application. There are two important concepts here. One is that the ControlButton is only visible when the application is not docked to the browser. Figure 9.5 shows the close button.
Figure 9.5 Close Button

Listing 9.6 shows the implementation of the close button.
Listing 9.6 Close Button

The second concept is that when the button is clicked, the action calls the stage’s close() function. The stage.close() function then causes the application to be again docked to the browser page, if that page is still visible. Figure 9.6 shows the application redocked. Notice the close button does not show when it is docked.
Figure 9.6 Docked Applet

JavaFX and JavaScript Interaction
Interaction between a JavaFX applet and JavaScript on the HTML page is fairly simple and two-way interaction is supported. From the JavaFX applet, you can invoke arbitrary JavaScript on the Web page. On the other hand, from JavaScript on the Web page, you can get and set variables and invoke functions on the JavaFX applet.
JavaFX to JavaScript
First, let’s discuss the JavaFX to JavaScript interaction. The javafx.stage.AppletStageExtension class that we used in our “undocking” exercise earlier also contains a function, eval(), that takes a string argument of JavaScript code. This is executed in the HTML document that hosts the JavaFX applet. If the Java-Script code returns an object, eval() returns it. Let’s look at an example using the NASAImageBrowser applet.
First, let’s add a read-only text field to the HTML page, identified as "numPics". This field will hold the total number of pictures that the NasaImageBrowser applet currently has. The HTML code is in Listing 9.7.
Listing 9.7 HTML – Input Type “id”

To update this field from the JavaFX code, we bind a variable to the size of the image list. When the image list size is updated, we invoke a JavaScript function that sets the value of the read-only field, "numPics". The JavaFX code is in Listing 9.8.
Listing 9.8 JavaFX Script – Locate JavaScript Item by ID

The applet variable is assigned to the AppletStageExtension when we created the stage, as shown in Listing 9.9.
Listing 9.9 JavaFX Script – AppletStageExtension

When the HTML page is first loaded and the JavaFX applet starts, this number rapidly updates as the applet processes the returned XML from the NASA site.
Let’s add another HTML input field that displays the current picture index. Besides showing the current picture index as set by the JavaFX applet, this field also allows the user to enter an arbitrary index and then click the Set Current button to send the index to the JavaFX applet. We will be discussing this feature when we talk about JavaScript communicating with JavaFX.
The HTML code is in Listing 9.10.
Listing 9.10 HTML – currentIndex Input Field

The JavaFX applet code is in Listing 9.11.
Listing 9.11 JavaFX Script – Access HTML Field currentIndex

Figure 9.7 shows the new HTML page, with the two fields numPics and currentIndex. The JavaFX applet has already updated the Number of Pictures and the Current Picture Index.
Figure 9.7 JavaFX – JavaScript HTML Page

As you can see, calling JavaScript from JavaFX is fairly simple to implement. Now let’s explore the other way, JavaScript to JavaFX.
JavaScript to JavaFX
Calling JavaFX from JavaScript is fairly straightforward, but there are some rules that you need to follow.
First, you need to add an id launch parameter to the javafx launch function. We will use "app" as the id, and this lets us refer to the applet in our JavaScript code as "document.app". If we had chosen a different ID, let’s say "myApplet", access to the JavaFX applet would be with that code, as in "document.myApplet". The HTML for this is shown in Listing 9.12.
Listing 9.12 HTML – Define Applet “id”

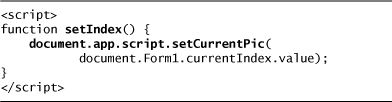
Next, we will define a JavaScript function, setIndex(), to set the current index from the currentIndex <input> field that we previously defined in the HTML page. This function calls a script function on the JavaFX applet, passing in the value taken from the currentIndex <input> field. The JavaFX function then takes this value and sets the current index, and the display updates. The public script variables and functions are then accessed using the script keyword "document .app.script". The JavaScript code for this is in Listing 9.13.
Listing 9.13 HTML – JavaScript
The JavaFX code for the setCurrentPic function is in Listing 9.14. Notice that it is necessary to use the javafx.lang.FX.defAction() function. This makes sure that the changes to the JavaFX classes are done on the JavaFX Main processing thread. Without this, you can expect erratic behavior and possibly exceptions.
Listing 9.14 JavaFX – deferAction()

You can also set and get any public script variables defined in the JavaFX applet. In the next example, we want to change the fill script variable in the NASAImageBrowser applet to silver. The JavaScript code in Listing 9.15 shows how to do this.
Listing 9.15 HTML-JavaScript Access Public JavaFX Variables

The Packages per-Applet keyword provides JavaScript access to the JavaFX and Java packages visible to the JavaFX applet. In the preceding example, we accessed the script variable, SILVER, from the javafx.scene.paint.Color class.
You can also use the Packages keyword to instantiate new Java objects in the JavaScript code. Instantiating JavaFX objects within JavaScript is not currently supported. Listing 9.16 shows how to do this.
Listing 9.16 HTML-JavaScript – Instantiate Java Objects

The main restriction when accessing JavaFX applets from JavaScript is that you can only directly access the public script variables and functions defined for the JavaFX applet. If you need to access instance variables or functions, you need to create a script level variable or function that lets you get to the instance. For example, the JavaFX code could be structured as shown in Listing 9.17.
Listing 9.17 JavaFX – Accessing Instance Variables via Script Variables

JavaScript can then access the instance via the myInstance script variable. For example, the JavaScript code could be
var theAppletInstance = document.app.myInstance;
This JavaScript variable, AppletInstance, could then be used to access the instance variables and functions contained in the JavaFX MyApplet class.
Java Web Start
Java Web Start is a technology that allows you to start a networked application from an HTML Web page or directly from the desktop. This is an alternative way to distribute your applications without having to go through a specific install process. The first time you launch a Java Web Start application, all the necessary files are downloaded off the network and cached locally on your computer. If there are updates, Java Web Start automatically pulls down the updated files. As a result, you do not have to worry about distributing updates to your customers. When they run the application, the Java Web Start will make sure they have the most up-to-date version.
The applet framework we just covered is based on Java Web Start, so there will be a lot of commonality between the two. The first step is to create your application, test it, then create signed JAR files for the application. These steps are the same as those we covered in the section for JavaFX applets. For creating signed JAR files, see the section under Java Applets, Manual Generation, Signed Jars. Of course, if you build your distribution with NetBeans IDE for JavaFX, the IDE does this automatically for you.
The next step is to create a Java Network Launch Protocol (JNLP) deployment file. This is similar to the way we created a JNLP file for JavaFX Applets that we discussed previously in the Deploying a JavaFX Application as an Applet section of this chapter. However, there is a difference in one area. Instead of having an <applet-desc> section under the <jnlp> tag, there is an <application-desc> section.
The <application-desc> contains a main-class attribute that points to the main JavaFX class, and may have zero or more <argument> elements for passing the equivalent of command-line arguments to the JavaFX application. Listing 9.18 shows an example <application-desc> section.
Listing 9.18 JNLP – <application-desc>

Except for swapping out the <applet-desc> section for the <application-desc> section, the JNLP deployment file for applets is identical to the one for applications. Using the NASABrowserImage application, the Java Web Start JNLP file is shown in Listing 9.19.
Listing 9.19 JNLP Deployment File for Java Web Start Application

Using Java Web Start, there are three ways to launch the application. First is to embed a link to the JNLP deployment file in a Web page, which could look like this:
<a href="dist/NasaImageBrowser.jnlp">Launch with Java Web Start</a>
The second way is to associate the Java Web Start mime type, application/x-java-jnlp-file, to the JNLP file type (.jnlp) in your operating system. Then, when the user clicks on the JNLP file, the application will automatically start. This association should have been set up when Java was installed on the platform.
The third way is to create a desktop launcher. If you include the <shortcut> hint in the <information> section of the JNLP file, the Java Web Start system creates a desktop launcher. Depending on configuration settings for Java Web Start, it probably will ask the user’s permission to do this first. For more information on all the capabilities for Java Web Start, go to http://java.sun.com/javase/6/docs/technotes/guides/javaws/index.html.
Chapter Summary
In this chapter, we covered the steps to create a JavaFX applet and Java Web Start JavaFX application. We also covered how to interact with the Web page using the JavaScript to JavaFX bridge. The essence of this is that the JavaFX applet model has been totally rewritten to be based on Java Web Start. This allows applets to now take advantage of the caching mechanisms inherent in Java Web Start, and thus speed up applet startup time. This framework also has built in automatic version and update support, so the user always has a current and consistent set of libraries to ensure reliability. Also, this new framework removes dependencies on the underlying browser, so now applications can be consistent across different browser types. Many of the shortcomings of the old applet model have been fixed.
JavaFX helps abstract out interactions with the underlying framework, so now applet and Java Web Start deployments are relatively simple and easy. Also, because both frameworks are based on the same underpinnings, the same JavaFX code can run, untouched, as a standalone application, a Java Web Start application, or a JavaFX applet.
In the next chapter, we will explore an architectural pattern for Web Services, called Representational State Transfer, commonly known as REST. This will allow us to take what we have just learned for JavaFX applets and Java Web Start, and employ them in a full Web Services architecture.