
8
Include Multimedia
“But theater, because of its nature, both text, images, multimedia effects, has a wider base of communication with an audience. That’s why I call it the most social of the various art forms.”
—Wole Soyinka
Multimedia
Multimedia is the application of multiple means to present content. Conventionally, the media components include text, interactive controls, special effects, pictures, animation, audio, and video. We have already covered text and interactive controls in Chapter 5, Create User Interfaces; special effects in Chapter 6, Apply Special Effects; and animation in Chapter 7, Add Motion with JavaFX Animation. In this chapter, we will focus on images, sound, and video.
Images
Loading and displaying images in JavaFX is quite simple. First, you create an Image object, javafx.scene.image.Image, and then you create an ImageView, javafx.scene.image.ImageView, to show the image on the display.
Minimally, you can create an Image object by just supplying a URL to the location of the image. The URL may be local, beginning with a file: protocol, or remote, using an Internet protocol like http:. For example, to load an image from the directory of the current script file, in the figures subdirectory, you would use the built-in __DIR__ variable.
![]()
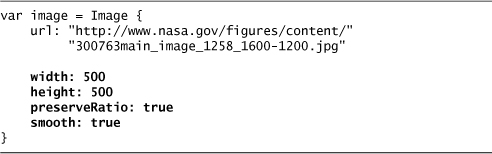
If you want to size the Image, you can specify the desired width and height, and also specify whether the aspect ratio of the image should be preserved. The smooth variable indicates whether to use a better quality scaling algorithm or a faster one. When smooth is set to true, its default value, the scaling will be of higher quality; when set to false, scaling occurs faster, but with lesser quality. This is demonstrated in Listing 8.1.
Listing 8.1 Image Sizing

Similar geometry variables, fitWidth and fitHeight, are also available on the ImageView, and these will be discussed a little later in this chapter. This is an alternative way to scale the image.
Because the image may be located on a remote system—maybe it is just large or maybe there are a lot of images to load—it may take some time to load the image. If you do not want to wait for the image to load when you create it, you can set the flag, backgroundLoading. When you use this option, you can also specify a placeholder image that will be shown while the main image is downloading. Presumably, this placeholder image will have already been loaded and will be ready before the primary image is loaded. This is shown in Listing 8.2.
Listing 8.2 Background Loading
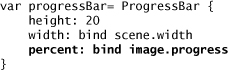
While the image is loading, the Image has a property, progress, that holds the percentage progress of the loading operation. This number is expressed as a number from 0.0 to 100.0. You can use this, for example, to bind to a ProgressBar node to display the progress.
Supported image formats vary by platform; however, on a desktop, the minimum supported formats are listed in Table 8.1 as defined in the javax.imageio package.
Table 8.1 Java Desktop Standard Image Formats

Developer Tip:
![]()
With Java 1.6, the javax.image.ImageIO class has three methods that list the supported image types on a given platform. ImageIO.getReaderFormatNames() returns the list of supported format names, ImageIO.getReaderFileSuffixes() returns the registered image file extensions, and ImageIO.getReaderMIME-Types() returns the mime types.
If an error is detected during the image loading process, the error variable will be set to true. This lets you know that an error has occurred, but it does not let you know why the error happened. From personal experience, the most common error is an invalid url, so the runtime system cannot locate the image data.
Developer Warning:
![]()
One common error is inserting a spurious slash (/) character after the __DIR__ built-in variable. For example, instead of the correct
url: "{__DIR__}figures/myImage.gif" // CORRECT
you type the spurious slash as in
url: "{__DIR__}/figures/myImage.gif" // INCORRECT
As a result, the runtime system cannot locate the image file because __DIR__ already ends in a slash (/) character, and you end up with double slashes (//). This issue has been raised on the JavaFX forums, and hopefully a fix will be implemented to handle this automatically, but in the meantime be careful with this.
Now that we have an Image object, to view the image on the display, we need to create a javafx.scene.image.ImageView. An ImageView is a scene graph node that displays an image. Of course, one of its instance variables is image. Using the image object we just created, we create an ImageView.
![]()
This creates a view that takes on the size of the underlying image. If the underlying image is 100×100 pixels, the view will be sized accordingly. If you want to have the image display with another size, you need to use the fitWidth and fitHeight instance variables. Also, if you want to preserve the original aspect ratio for the image, set preserveRatio to true. Just like the smooth variable in the Image object, ImageView has a smooth variable. When smooth is set to true, scaling will favor image quality over performance. On the other hand, when smooth is false, scaling favors performance over quality. An example of doing this is shown in Listing 8.3.
Listing 8.3 ImageView Sizing

To improve performance, the ImageView can be cached in memory as a bitmap. Do this by setting the variable cache to true. Caching improves performance at the expense of memory. However, on some platforms with graphical processing units (GPU), caching may not provide any benefit to performance at all. We suggest that you try it either way and see if it helps.
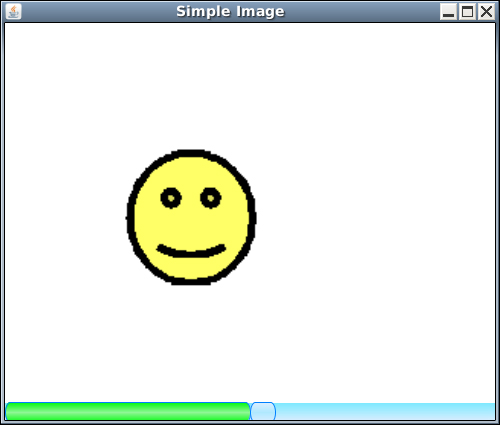
Putting this all together in an example, SimpleImage, that is available on the book’s Web site, we produce the displays in the figures that follow. In SimpleImage, we used an image from the US National Aeronautics and Space Administration (NASA) Web site. At first, we see the Smiley face image and the progress bar shows partial progress. Figure 8.1 shows the Smiley Face image and the progress bar while the main image from NASA is loading.
Figure 8.1 Placeholder Display While Loading NASA Image
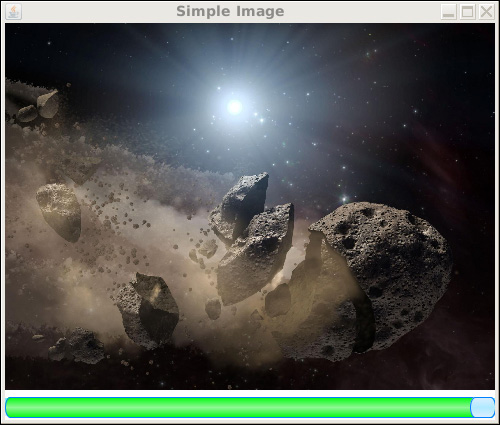
After the NASA image has loaded, the picture is shown and the progress bar shows full completion, as shown in Figure 8.2.
Figure 8.2 NASA Image Display
If you want to only display part of the image, you can create a viewport. A viewport is a rectangular area within the image’s coordinate system prior to any transformations like scaling. You specify the viewport by using the javafx.geometry.Rectangle2D class. This is illustrated in Listing 8.4.
Listing 8.4 Viewport
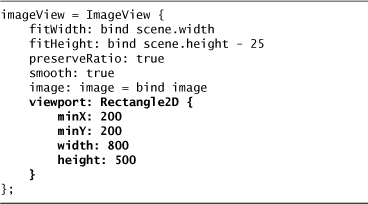
This produces a view of only a portion of the original image, as depicted in Figure 8.3.
Figure 8.3 NASA Image Display Using Viewport

Media—Audio and Video
In JavaFX, there is really no distinction between audio and video. They are both considered playable media, and the same JavaFX classes are used for both types.
In line with this, there is one media class, javafx.scene.media.Media, that points to the audio or video location. This class also provides meta-data about the media, like duration, possible width and height resolution, and possible information like artist, title, and so on. The amount of meta-data varies based on the underlying media format.
There is a player, javafx.scene.media.MediaPlayer, that controls the play of the media. Do not confuse this with the conventional view of a Media Player application with skins and such that runs on your computer. The javafx.scene.media.MediaPlayer is just a class that allows a program to do control actions, like play, pause, resume play, and so on. Your job is to use these classes and the rest of JavaFX to create your own cool Media Player application.
For video, there is a viewer class, javafx.scene.media.MediaView. This is a node that you can place in your scene along with other nodes to actually view the video.
To support audio and video playback, JavaFX uses three underlying frameworks. For cross-platform support, including mobile phones, JavaFX uses the On2 VideoVP6 framework from On2 Technologies. For Windows, JavaFX uses the DirectShow framework from Microsoft; for Mac OS, JavaFX uses the Core Video by Apple. Table 8.2 shows the audio/visual formats supported on each platform.
Table 8.2 Supported Media Formats

Table 8.3 shows the Audio codecs supported on each platform.
Table 8.3 Supported Audio Codecs
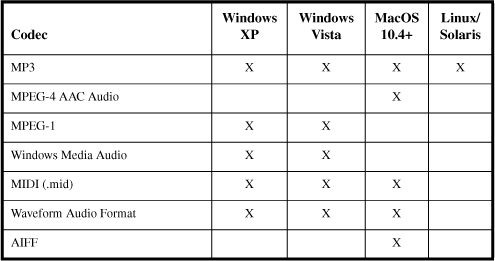
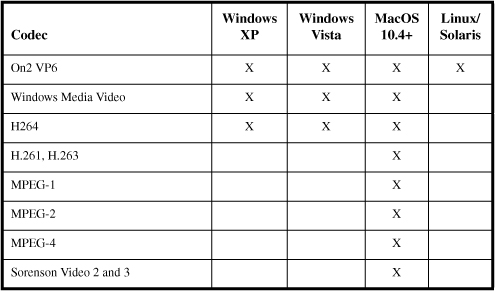
Table 8.4 shows the Video codecs supported on each platform.
Table 8.4 Supported Video Codecs
To develop a media application, you must first create a javafx.scene.media.Media object with the URL source that points to the location of the audio or video data. The onError function is called if a media error is encountered. These errors might include media that cannot be located or the media format is unsupported on the platform.

After the media object is created, you can query it for certain information. The duration specifies the total time for playing the media. The height and width may tell you the resolution of video media unless it cannot be determined, for example if it is a streaming source or is only audio. The variable metadata holds any information about the media, such as title and artist. The actual information varies depending on the media handler.
Next, you need to create a javafx.scene.media.MediaPlayer object. Note that the MediaPlayer has no visual capability, and you need other scene graph nodes for the user to control the play. Listing 8.5 shows how to create a MediaPlayer.
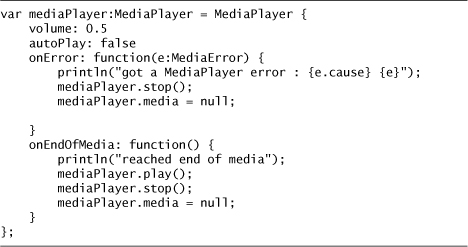
This merely creates the player; to use it, you have to set the media variable to a Media object that points to a source, then invoke the play(), pause(), or stop() functions to control play. There are several instance variables that you may set on the MediaPlayer. If autoPlay is true, playing will start right away. The variables balance, fader, and volume control the left-to-right setting for the audio, the front-to-back audio setting, and the sound volume. The mute variable toggles the sound off or on. The onError and onEndOfMedia functions are invoked when an error occurs or the end of the media is reached. The rate specifies the play speed, 1.0 being normal speed. There are also functions and variables to report status, buffering state, and start, stop, and current time settings.
For audio playback, this is all you need to use audio in your application. However, for video playback, you need a view node, the javafx.scene.media.MediaView. Listing 8.6 shows how to create a MediaView that can display the video.
Listing 8.6 MediaView

The MediaView provides a place for the video part of the media to be displayed, similar to what we did for images, and you can set the view’s fitWidth and fitHeight, smooth, viewport, and preserveRatio properties. If you do not set these, the window will assume the geometry suggested by the underlying media stream. There are also several properties that can be examined that indicate whether the media view can be rotated or sheared.
The MediaView is a scene graph node that may be placed into the scene graph tree along with other nodes. The example application, Media, on the book’s Web site shows a complete player that allows you to view a video from the US National Park Service. When displayed, this application has a viewport in the upper part of the display, showing people rafting down a river. This is shown in Figure 8.4.
Figure 8.4 US National Park Service Video
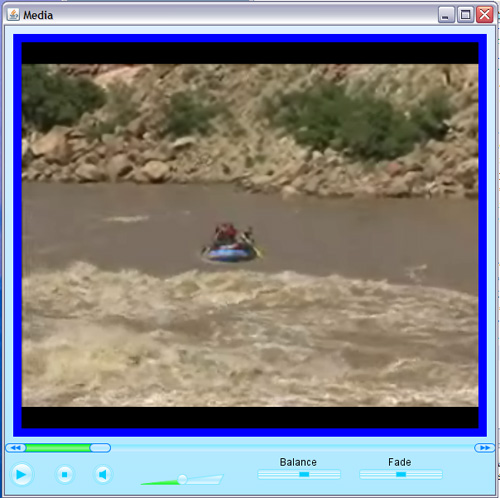
Let’s examine the interaction of the progress bar immediately below the video as shown in Figure 8.5.
Figure 8.5 Video Play and Progress Bar Interaction
![]()
This progress bar shows the elapsed percent of the video playback. This is done by binding the media player’s current time to the ProgressBar as illustrated in Listing 8.7. The percent elapsed time is calculated by dividing the media player’s currentTime by the total duration of the media.
Listing 8.7 MediaPlayer – ProgressBar

The left part of the ProgressBar has a button that rewinds the media by 10 seconds each time it is pressed. This is an action of the ProgressBar called rewind. Notice that the player must be paused, the currentTime is then set, and play is resumed. Listing 8.8 is an example of how to implement this.
Listing 8.8 MediaPlayer – Rewind

The button to the right of the ProgessBar causes the rate of play to be increased by 0.5 each time it is pressed. If the play is running at normal speed, the rate is 1.0. After pressing the right button once, the new rate will be 1.5. Pressing it again, the new rate will be 2.0, or 2 times the normal rate. This is done up to a maximum of 3x, when it is then reset to 1.0. Listing 8.9 shows how this may be done. Again, notice that the player must be paused while changing the rate.
Listing 8.9 MediaPlayer – Fast Play

There is a knob at the head end of the progress part of the progress bar. Progress is noted as a darker color to the left of the knob. The user can drag this knob back and forth to reset the play backward or forward to another position, and play will resume from there. The code that handles this is in Listing 8.10.
Listing 8.10 MediaPlayer – Seek

When the knob is dragged, the ProgressBar calculates the new percentage and the seek function multiplies this by the total media duration to set a new currentTime for the player.
Now let’s examine the bottom controls, as shown in Figure 8.6.
Figure 8.6 Video Play and Player Controls
![]()
The left button toggles the play of the media. If the player is stopped or paused, play begins. If the player is running, play is paused. The next button stops the play and resets the media back to the beginning. The third control mutes the sound. These are followed with the volume, balance, and fade controls.
The first three controls are rather simple to implement. For the first one, if the player is stopped or paused, invoke the play function on the media player. Otherwise, invoke the pause function. The next button merely invokes the stop function. The third control just toggles the media player’s mute variable. Listing 8.11 contains the code snippet with only the media player interaction shown.
Listing 8.11 Media Control
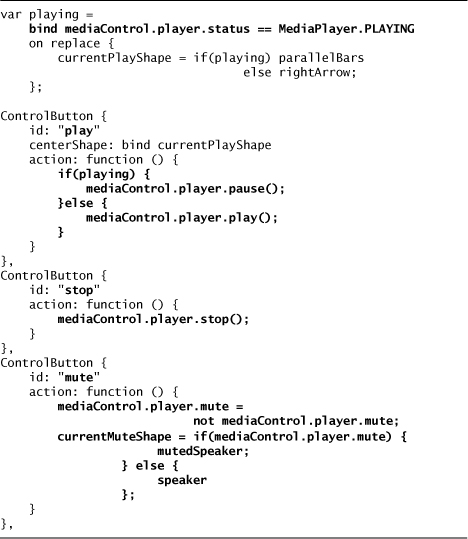
The play button changes its internal symbol depending on whether the media player is playing. A triangle is shown if the player is stopped and parallel bars are used when the player is playing. The mute button toggles its symbol based on the player’s mute variable.
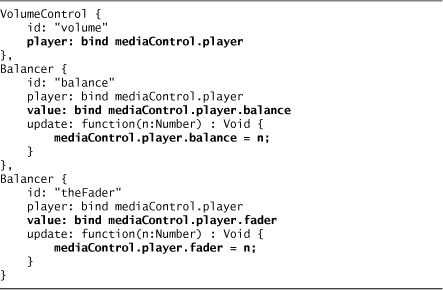
The volume control binds to the player’s volume instance variable and when the user drags the knob, the volume is adjusted from quietest at 0.0 to loudest at 1.0. Similarly, the balance and fader controls adjust their values from -1.0 to 1.0, with 0.0 being equal left and right or front to back settings. Listing 8.12 contains the code snippet for this.
Listing 8.12 Volume Control
This example is focused on showing interaction with the MediaPlayer using a MediaView to see the video portion. You can also use this player with audio files, such as your favorite MP3 song. The only difference is the viewer part will appear black because, of course, an audio media will have nothing to see.
The purpose of this example was to demonstrate the interaction of other UI components and the MediaPlayer; as a result, this example is limited. For instance, this example program allows only one hard-coded source URL for the media. A more robust application would load a list of media from a data source or would allow one to enter the URL. Concepts like playlists and sequential play could also be supported.
Chapter Summary
In this chapter, we covered how to include images and sound and video in your applications. For images, we examined the javafx.scene.image.Image and javafx.scene.image.ImageView classes. For sound and video, we discussed the Media and MediaPlayer classes in the javafx.scene.media package. Lastly, for videos, we showed how to use the MediaView class to present the video within a display. We also demonstrated how to use these classes in an application.
We have now covered all the basic components to make a JavaFX application. Next, we will start putting this to use. First, we will examine how to use JavaFX applications on Web pages followed by a discussion of using JavaFX in RESTful applications.