
7
Add Motion with JavaFX Animation
“Animation is not the art of drawings that move but the art of movements that are drawn.”
—Norman McLaren
Computer Animation
In traditional hand-drawn animation, a lead animator draws key drawings in a scene. These are the most important actions and represent the extremes of the action. The idea is to provide enough detail to present the main elements of movement. Next, the animator decides how long each action should last on the screen. After this is done, these key drawings are passed to assistant animators who draw the inbetween frames to achieve smooth movement. The action duration dictates how many inbetween frames are needed. This process is called tweening, which is short for inbetweening.
Borrowing from the traditional animation process, computer animation is a time period sliced with key frames. However, instead of using assistant animators, the computer does the tweening process by applying mathematical formulas to adjust the position, opacity, color, or other aspects required for the action. The computer decides how many inbetween frames are required based on the timing constraints placed between two key frames.
The primary property of animation is time, so JavaFX supports the time period of an animation sequence with a timeline. The JavaFX class that represents animation actions spread across a time duration is javafx.animation.Timeline. Key frames, javafx.animation.KeyFrame, are interspersed across the timeline at specified intervals, represented by time durations, javafx.lang.Duration. These key frames may contain key values, javafx.animation.KeyValue, that represent the end state of the specified application values such as position, opacity, and color, and may also include actions that execute when the key time occurs. Key values also contain a declaration of which mathematical formula, or interpolator, javafx.animation.Interpolator, should be used in the tweening process.
Figure 7.1 demonstrates the key frames within a timeline that mimics the rise and setting of the sun or moon. Each disc is at a specific location at the respective key frame time. At the start, 0 seconds, the disc is on the left hand side at its lowest position. At 200 seconds, the next key position is a little further right and higher. At 500 seconds, the disc shape is at its zenith. At 800 seconds, the disc is lower and to the right, then at 1,000 seconds, it is setting off the horizon. In the actual animation, the disc smoothly moves in an arc from left to right, over 1,000 seconds.
The timeline represents the animation sequence, and can be started, paused, resumed, and stopped. It is also possible to choose the point in time to start or resume the animation, which enables an application to implement features found in a Videocassette Recorder (VCR) or Digital Video Recorder (DVR) such as play, pause, stop, rewind, and fast forward.
Figure 7.1 Timeline Showing KeyFrame Positions of a Moving Disc Shape

The next few sections cover these animation classes and demonstrate their use. After that, we will revisit our Eclipse animation example based on the graphical objects we created with the JavaFX Production Suite in Chapter 2, JavaFX for the Graphic Designer.
Timelines
A timeline provides the ability to update animation associated properties over a period of time. A timeline is defined by one or more sequential key frames ordered by their respective time within the timeline. The animation properties are then changed over the time period using a mathematical formula to a new target value.
A timeline may move either forward or backward in time. Also, it may play its cycle one or more times, or even indefinitely. You can specify that it alternates direction for each cycle so that it plays forward then backwards. You can also speed up or slow down the rate of play. Timelines can also be paused, resumed, or stopped. In addition, you can set when to start or restart, either at the beginning or at some intermediate point within the timeline.
A sample Timeline object literal is shown in Listing 7.1 with the key points highlighted. The KeyFrame syntax will be covered in the next section.
Listing 7.1 Timeline Object Literal
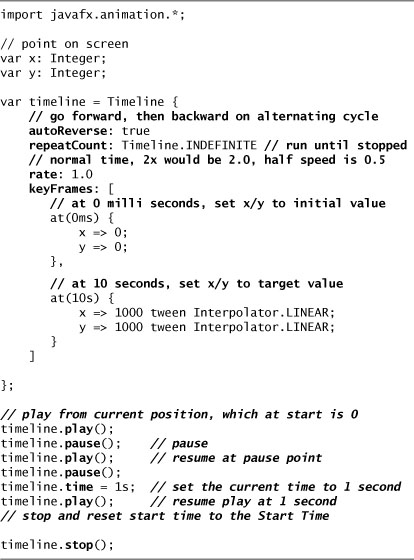
When the timeline plays, it starts, by default, at time zero; then, while it progresses to the next specified time (10 seconds in the preceding example), the interpolators for each target value are repeatedly invoked so that the animation can provide a smooth transition from the original value to the final target value. The runtime system decides how to break up the interval between key frames in order to have smooth movement; however, this can be influenced by load and capabilities of the client’s machine. Insufficient compute power may result in jerky animations.
The function play()starts the timeline from its current position. There is also a playFromStart() function that always starts at the initial position. The function, pause(), stops the play at the current position, and a subsequent play() resumes the timeline from that position. Finally, the stop() function stops the play and resets the timeline to the initial position.
By default, autoReverse is turned off, so the timeline only progresses forward, repeatCount is 1.0, so that the timeline only cycles once, and the rate is 1.0, so the animation runs at normal speed.
You can examine several instance variables to determine the current state of the timeline. First, the instance variable, running, indicates whether the timeline has been started or stopped. Notice that a paused timeline is still in the running state, but the paused instance variable is true. To detect that the timeline is playing, it is necessary to check running for true and paused for false.
The currentRate instance variable indicates the current speed and direction of play. A negative currentRate indicates the timeline is playing backwards. Therefore, if autoReverse is set to true, you can determine whether the timeline is currently playing forward or backward from the currentRate value. To set the play rate, use the rate instance variable. Again, if the rate is negative, the timeline will play in reverse.
You can tell the current instant of playback using the time instance variable. Also use this instance variable to set the specific time to resume play. If you want to resume play halfway through the time sequence, then you can set the time value to one half the total duration. Then when you instruct the timeline to play, it will play from that point. Another way to use the time variable is to increment the time to jump forward or decrement it to jump backward in the animation. For example, if you define a button to skip forward 10 seconds, you can increment the time by 10 seconds or actually by 10,000 milliseconds. To set the timeline to the beginning, you can set the time variable to zero (0). To set it to the end, set the time variable to the end duration for the timeline. This is useful if you want to play the timeline in reverse from the end.
The instance variable, interpolate, is by default set to true and means that when the timeline plays, the system will split up the interval between time frames and invoke the key target value interpolators. If the timeline is not using interpolations, but perhaps only uses actions, there may be a performance improvement to set interpolate to false. This is because when interpolate is false, the timeline does not have to do the tweening steps between key frames.
Key Frames
A key frame defines a pivotal timing event with values that are tweened, or interpolated, along the timeline. The key frame contains a time value within the timeline, along with optional items. These items are associated target values called key values, an action that is executed when the time is reached within a play, or a sub timeline that starts when the key frame’s time within the timeline is reached. There is also an indicator identifying whether the action function can be skipped if the timeline is running behind schedule.
A KeyFrame may be defined using the object literal syntax for creating any JavaFX object, or may use a special short-cut syntax. First, let us cover a few basics.
Duration
A javafx.lang.Duration is an object that defines a time interval. To simplify creating durations, JavaFX supports time literals. In the previous timeline example, there were two time literals, 0ms, zero milliseconds, and 10s, for ten seconds. To declare a time literal, use a number followed by a time unit. The possible units of time are ms for milliseconds, s for seconds, m for minutes, and h for hours. The number may be either an integer or a decimal number. For example, 1500ms is equal to 1.5s.
You can also do arithmetic functions on time literals. For example:

Duration objects are immutable, so they cannot be changed once created. In the preceding examples, each time literal argument within the arithmetic expression represents a distinct Duration instance and another distinct instance represents the result.
Besides using the time literals as shown here, you can also create Duration objects using the function valueOf(), passing in milliseconds as the parameter. The following all equal a duration of 10 seconds:

Sometimes, it is useful to declare a Duration object that can later be bound within an expression. This is useful if you want to dynamically change the time of the timeline. Perhaps you want to allow the user to change the animation from 5 seconds to 15 seconds. When doing this within a timeline, this duration object is automatically bound. This is illustrated in Listing 7.2.
Listing 7.2 Duration Variable

Now, if the application needs to change the duration of the timeline, one merely has to change the duration variable to a new duration. Please note that it is important to declare the duration variable before the timeline is declared.
Key Values
Key values are declared using a special syntax:
target => value tween interpolator
Target is the target variable that will be changed, value is the target value that the target variable assumes when the key frame time arrives, and interpolator is the Interpolator to use. So in the preceding example, the x variable is zero at 0 seconds, and then 1000 at 10 seconds. This value uses a linear, or constant rate of change, interpolator over the 10-second interval. The => operator indicates that the variable will transition to the value during the time slice. The tween keyword identifies the Interpolator to use during tweening. If no tween and interpolator is given, a discrete interpolator is the default. This means the value instantly changes from 0 to 1000 when the key frame’s time is reached.
Key Frames
The class, javafx.animation.KeyFrame, represents a key frame within the timeline. Each key frame has a time in the form of a duration, zero or more key values, an optional action function that is executed when the play arrives at the key frame’s time, and zero or more sub timelines that start to play when the key frame’s time is reached.
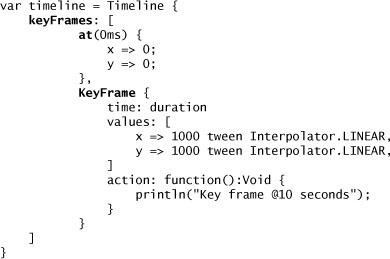
As previously mentioned, there are two ways to declare a key frame. One way is to use the normal JavaFX object literal syntax for the KeyFrame object.

The time instance variable contains the duration within the timeline that the key frame represents. Next, there are the set of zero or more key values, followed by an optional action function. Lastly, there is an optional sequence of sub timelines represented by the timelines instance variable. By default, time is set to 0 seconds, values and timelines are empty, and the action instance variable is null. There is another instance variable, canSkip, that indicates that the timeline can skip the defined action if it is running behind schedule.
Sub timelines allow you to nest timelines within other timelines and allow you to break up complex animations into smaller, more manageable parts. Each sub time-line’s starting point is relative to the parent timeline’s key frame time. Sub timelines are useful if you have several discrete animations controlled by a master animation. Also, sub timelines are useful if you want more than one animation to start at exactly the same time—for example, if you want to animate two motions at once.
The second form for declaring a KeyFrame is a shortcut version of the object literal syntax. This takes the form of using the at keyword with a time literal within parenthesis. The key values are contained within the following curly braces. Notice the semicolon rather than a comma after the key value statements.

This is a concise way for declaring the majority of KeyFrames. However, there are limitations. First, when using this syntax, there is no way to include an action function nor include sub timelines. Second, the syntax only allows time literals, so another duration variable cannot be used for specifying the time. Nonetheless, when creating timelines, you can intersperse this concise syntax with the full object literal syntax for those key frames requiring the extra features. The following code snippet shows this.
Interpolation
Interpolation is the process of estimating values between two known values. This section describes how interpolation is applied to animation and discusses how interpolation is supported in JavaFX. Let’s start by examining the “tweening” process and how it is applied to computer animation.
Tweening
As we already mentioned, tweening is the process of filling in the “inbetween” frames between two key frames. In JavaFX, the runtime system takes the time interval between two key frames and breaks it up into smaller periods so that the animation appears smooth. Each of these smaller chunks of time is represented as a percentage of the overall time period using the value range 0.0 to 1.0. Interpolation is based on calling a mathematical function for each of these discrete time chunks, increasing the percentage of elapse time with each invocation.
When the runtime system invokes the interpolation function, it passes the starting value for the variable being interpolated, the ending value, and the fractional time percentage. Based on these input values, the interpolator calculates the value that the variable should contain at that instant.
A common way to interpolate is to provide a mathematical function that represents a drawn curve between 0.0 and 1.0 for the time, and 0.0 and 1.0 for the value. The output of this function represents the fractional change in the value between the start value and the end value for the target variable. This pattern of interpolation is quite common; to facilitate it, JavaFX provides the javafx.animation.SimpleInterpolator abstract class. All the standard interpolators extend SimpleInterpolator, and later in this chapter we will show an example of creating a custom interpolator based on it.
Standard Interpolators
The JavaFX platform provides a set of standard interpolators that handles most types of animation. The standard interpolators are defined in javafx.animation.Interpolator. They are
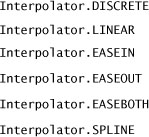
The next few sections discuss each of these interpolators.
Discrete
A DISCRETE interpolator jumps instantaneously from one value to the next. The target variable instantly assumes the target value when the key frame’s time is reached. This is the default interpolator if none is provided.
x => 1000 tween Interpolator.DISCRETE
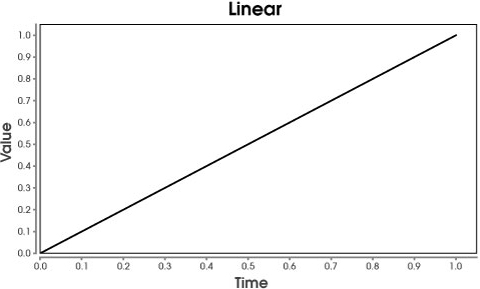
Linear
A LINEAR interpolator changes the variable from the start value to the target value at a constant rate of change over the time period. Using a vehicle’s velocity as an analogy, this would be the same as the vehicle traveling at a constant speed over the time frame.
x => 1000 tween Interpolator.LINEAR
Ease In
An EASE IN interpolator initially accelerates the rate of change in the target value until a constant rate is achieved, then maintains that constant rate of change. This is analogous to a vehicle accelerating after stopping at a traffic signal and then reaching the speed limit; then, it maintains the speed limit.
x => 1000 tween Interpolator.EASEIN
In the JavaFX implementation, the acceleration phase is during the first 20 percent of the time period.
Ease Out
An EASE OUT interpolator is the opposite of the ease in interpolator. It initially starts with a constant rate of change; then, toward the end of the time period, it decelerates. This is analogous to a vehicle operating at the speed limit, then applying the brakes as it comes to a traffic light.
x => 1000 tween Interpolator.EASEOUT
In the JavaFX implementation, the deceleration phase is during the last 20 percent of the time period.
Ease Both
An EASE BOTH interpolator is the combination of ease in and ease out. The rate of change increases until a constant rate of change is achieved, then near the end of the time period, the rate of change decelerates. This is similar to a vehicle accelerating from one traffic signal to the speed limit, travelling at a constant speed, then braking and decelerating as it approaches the next traffic signal.
x => 1000 tween Interpolator.LINEAR
In the JavaFX implementation, the acceleration phase is the first 20 percent of the time period and the deceleration phase is during the last 20 percent of the time period.
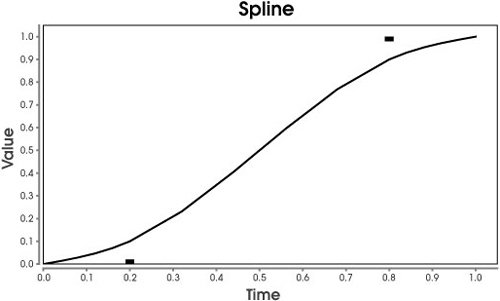
Spline
A SPLINE interpolator uses a cubic spline shape to dictate the acceleration and deceleration phases over the time period. SPLINE() returns an interpolator based on the control points that are specified as parameters to the SPLINE function. The anchor points are statically defined as (0.0, 0.0) and (1.0, 1.0). The control points range in value from 0.0 to 1.0.
x => 1000 tween Interpolator.SPLINE(x1, y1, x2, y2)
When the cubic spline is plotted, the slope of the plot defines the acceleration at that point. As the slope approaches vertical, the acceleration increases; when the slope of the plot approaches horizontal, the motion decelerates. If the slope of the line at a point is 1.0, the interpolation is moving at a constant rate of change.
Figure 7.2 shows the spline plot equivalent to the LINEAR built-in interpolator. This reflects a constant rate of change, as the slope for the entire line is 1.0.
Figure 7.2 Linear – Cubic Spline for Linear Interpolation
The control points for the spline are (0.25, 0.25) and (0.75, 0.75), which results in a straight line with a slope of 1. This represents a constant speed from the start of the time period to the end.
x => 1000 tween Interpolator.SPLINE(0.25, 0.25, 0.75, 0.75)
Figure 7.3 represents the plot for an ease both interpolation. Here the control points are (0.2, 0.0) and (0.8, 1.0).
Figure 7.3 Ease Both (%20) – Cubic Spline
x => 1000 tween Interpolator.SPLINE(0.2, 0.0, 0.8, 1.0)
Notice that the slope is flat near the beginning and end of the plot. So the motion will start slow and accelerate for the first 20% of the time period, stay at a constant speed until the last 20% of the time period, when it will decelerate.
By using the Interpolator SPLINE() function, you can easily create unique interpolation behavior. However, for performance reasons, stick to the predefined interpolators if that is what you want.
As part of the software available on the book’s Web site (http://jfxbook.com), there is a SplineDemo.fx file that lets you play with the spline parameters and immediately see the resulting impact on the animation.
While using a cubic spline affords much flexibility, there are times where even that does not satisfy the animation requirements. This is when a custom interpolator comes into play.
Writing a Custom Interpolator
Besides providing support for the built-in interpolators and the cubic spline interpolator, if you need custom interpolation, you can either extend javafx.animation.SimpleInterpolator or javafx.animation.Interpolator.
SimpleInterpolator
SimpleInterpolator does more of the internal pluming for you. All you have to do is implement the curve function. The implementation of curve returns a fraction of the amount to change the start value as it migrates to the target value.
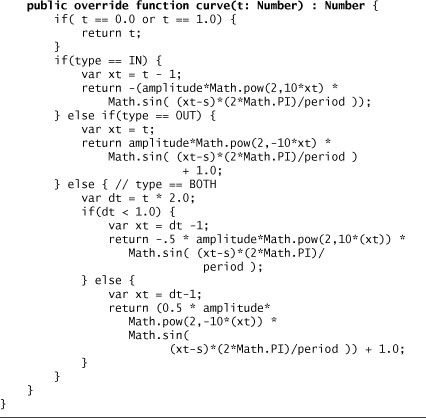
public function curve(t:Number) : Number
The parameter, t, represents the fraction of time that has elapsed in the current interval, where 0.0 is the start of the interval and 1.0 is the end of the interval. This result centers around the range, [0.0..1.0]. Nonetheless, this number is not constrained by this range—for example, the curve function could return -0.1 or 1.1 if the interval movement fluctuates beyond the original start and end values.
To demonstrate this, we will go through an Elastic Interpolator based on the elastic interpolator defined in the The Yahoo! User Interface Library (YUI) (http://developer.yahoo.com/yui/docs/Easing.js.html). The main difference between the two implementations is that the Yahoo JavaScript version translates directly to the actual values based on the elapsed time, whereas the JavaFX version deals with the percentage of elapsed time, and therefore returns a percentage change for the target value.
The actual implementation is shown in Listing 7.3.
Listing 7.3 Elastic Interpolator
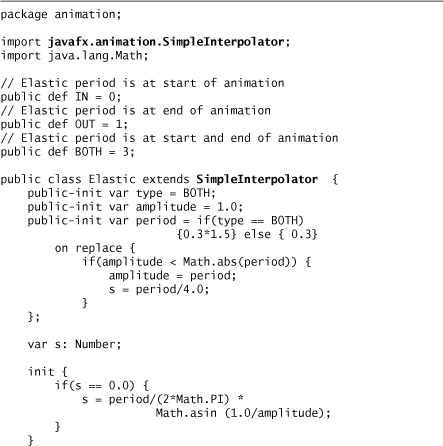
Elastic is similar to bounce or spring effects, but gives a snap out/in effect. There are three flavors for Elastic: IN focuses the elastic movement at the start of the animation, OUT focuses on the end of the animation, and BOTH focuses on both ends of the animation.
The elastic graphs are shown in the following three figures. Figure 7.4 shows the Elastic IN graph where the animated movement snaps into its final location.

Figure 7.5 shows the Elastic OUT graph where the movement jumps out of its original position then smoothly moves to its final location.
Figure 7.5 Elastic OUT
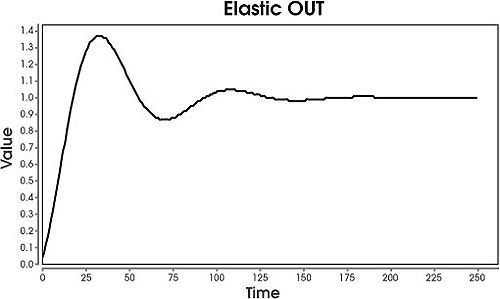
Figure 7.6 shows the Elastic BOTH graph where the movement jumps out of its original position and then snaps into its final position.
Figure 7.6 Elastic BOTH

Interpolator
One of the constraints of the SimpleInterpolator is that target and start values need to differ by a certain amount to actually see any movement. This is because the curve() value is fractional from 0.0 to 1.0 and is multiplied by this difference to obtain the actual change in value. Obviously, if the start value is the same as the target value, the fractional result would always be multiplied by the zero difference, so there would be no movement at all.
What if you want a shaking effect, without the object actually ending at a new location? In this case, the start values and end values are the same, but during the time interval, the object shakes back and forth. This is exactly what happens with the eQuake Alert plug-in to the Firefox browser. With eQuake Alert, when an earthquake of a certain magnitude occurs, the entire Firefox browser shakes with an amplitude based on the magnitude of the earthquake. You cannot use SimpleInterpolator for this kind of animation. You must create a custom interpolator that extends javafx.animation.Interpolator and implements the function interpolate().
![]()
The parameter startValue is the starting value for the target variable at the beginning of the time slice represented by the KeyFrame, endValue is the ending value, and fraction is a number from 0.0 to 1.0, which represents the fraction of time within the time period. This function returns the interpolated value for that instant. Actually, SimpleInterpolator, itself, extends Interpolator and implements its own version of interpolate() that ends up calling the abstract curve() function. Let’s examine an example for shaking.
A perfect mathematical formula for doing a shake is a Bessel function. Figure 7.7 shows the graph of the Bessel function, where the shaking effect is greatest at the beginning of the animation and calms down as the animation progresses.
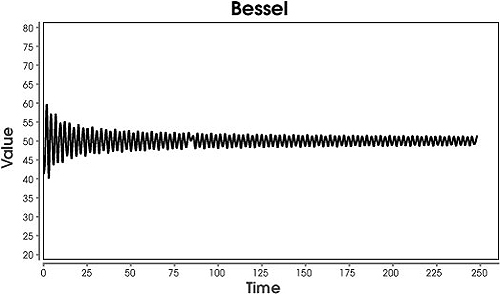
Basically, we need to call the Bessel function when the animation runtime calls the interpolate() method. However, it is not that straightforward, and there is a little plumbing that needs to be created. The following code snippet in Listing 7.4 illustrates this. (The full listing is on the book’s Web site, http://jfxbook.com.)
Listing 7.4 Bessel Interpolator
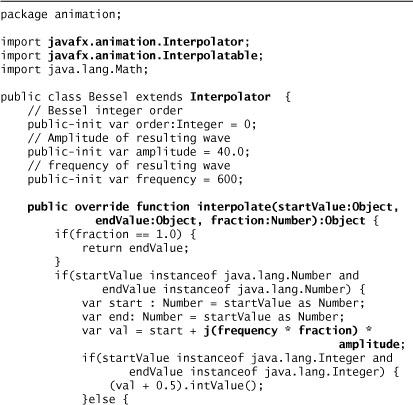
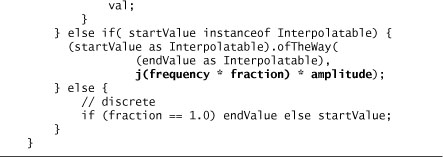
The function, j(), is the Bessel function.
Interpolatable
You may have noticed that we checked for the start and end value types and if they were not numeric, we checked to see if they implemented Interpolatable. The abstract class javafx.animation.Interpolatable allows a class to participate in Interpolation even if that class is not inherently numerical. To do this, the class must implement the function
ofTheWay(endVal:Object, t:Number) : Object
The classes javafx.scene.paint.Color and javafx.scene.shape.Shape are two examples of JavaFX classes that implement Interpolatable. Color allows the color to morph from the starting color to the end color by changing its red, green, blue, and opacity a fractional amount toward the end color. Shape allows the beginning shape to morph into the end shape.
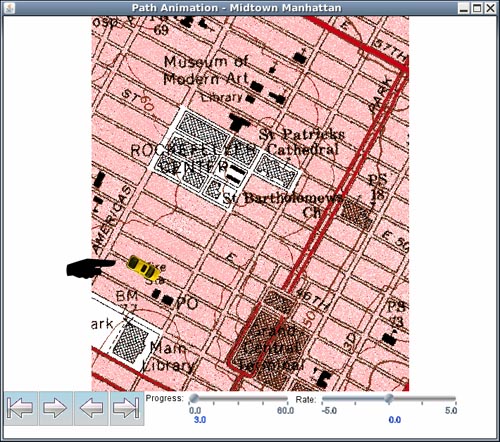
Path-Based Animation
Path-based animation is the concept of a graphical asset traveling along a path. An example is a race car traveling along a race track, or a car driving within a city.
Conceptually, path-based animation has two components: a graphical asset that will travel the path, represented by a javafx.scene.Node class, and a route, represented by a Path, javafx.scene.shape.Path or javafx.scene.shape.SVGPath. To create the actual animation, use the javafx.animation.transistion.PathTransition class. To illustrate this, let’s use an example of an automobile travelling the streets of midtown Manhattan in New York City.
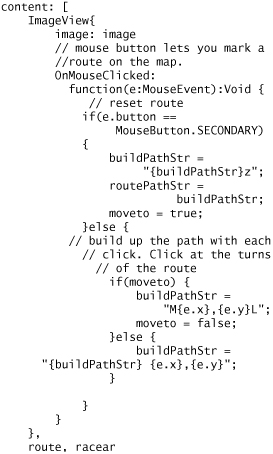
First, locate an image for the map of midtown Manhattan, the image in the example is from the United States Census Bureau and is located from http://www.census.gov/geo/www/tiger/tigermap.html. Next, calculate a route on the map for the animation. One way to do this is to display the map using JavaFX, and then add an onMouseClicked function to print the coordinates where the mouse is clicked. Then, mark the route by clicking at major transition points along the route. Include these points either in a javafx.scene.shape.Path or javafx.scene.shape.SVGPath. The example uses an SVGPath.

In an SVGPath, the code letter M means moveto, L means lineto, and z means closepath. After a lineto code is entered, it automatically applies to adjacent uncoded point coordinate pairs. In this example, the route is made invisible with the TRANSPARENT fill and stroke instance variables. If desired, you can use the stroke to visibly show a route. For example, to demonstrate a yellow highlighter, use

Next, we need a graphical asset that will move along the path, and this is defined generically as a javafx.scene.Node. In the example, we used an image of an automobile.

Lastly, we need to define a path animation using javafx.animation.transition.PathTransition.
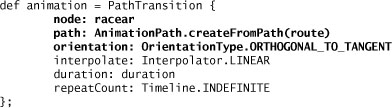
Notice the orientation instance variable. By setting this to ORTHOGONAL_TO_TANGENT, the race car image rotates to match the path while traversing the route. The other option is to set this to NONE, the default. When orientation is set to NONE, the race car will not rotate at all. Obviously, for an object like a race car that has inherent direction, this is probably not desirable. However, if you have a node that does not imply direction, like a Circle, then setting it to NONE would be sufficient.
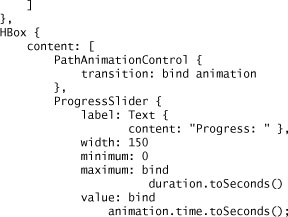
The last step is to create the presentation showing the map of midtown Manhattan, and adding the race car image and the route.

Using the animation variable, you can control the play of the animation similar to regular types of timelines. Figure 7.8 shows the map of midtown Manhattan, New York City, with a car image on the street. In this animation, the car travels along a route on the map.
Figure 7.8 Path Animation on Map of Midtown Manhattan
Listing 7.5 shows the main code for traversing the map. The full example, PathAnimation, can be downloaded from http://jfxbook.com.
Listing 7.5 Path Animation


Total Solar Eclipse Examples
The total solar eclipse provides a good example of animating movement along with visual changes. During a total solar eclipse, the moon moves across the sun causing a period of darkness during daytime. There are also effects on the sun, with a sun burst visible right before and right after totality. Presented here are two examples of basically the same animation. The first one is based totally on JavaFX shapes, whereas the second example uses the graphical objects generated using JavaFX Production Suite we covered in Chapter 2, JavaFX for the Graphic Designer. From Chapter 2, there were five main graphical objects: BlueSky, DarkSky, Moon, Sun, SunBurst, and Totality. These are used in both animations, but with different implementations.
JavaFX Shapes
This example implements the total eclipse only using JavaFX shapes and effects. The first task is to create custom nodes for each of the main graphical objects: BlueSky, DarkSky, Moon, Sun, SunBurst, and Totality. Each of these objects extends javafx.scene.CustomNode and implements the abstract function create() from CustomNode.
BlueSky and DarkSky are both rectangular shapes. BlueSky has a LinearGradient fill pattern from light skyblue to white. DarkSky has a black fill pattern with random pattern of circles that represent stars. Listing 7.6 shows the implementation for BlueSky.
Listing 7.6 BlueSky

DarkSky is shown in Listing 7.7.

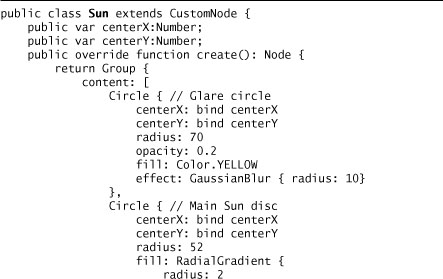
The Sun is composed of three concentric circles. In the center of the Sun is a pure white circle. Next, there is a circle with a RadialGradient using a center color of white transposing to yellow. Both of these circles use a GaussianBlur effect to blend and smooth the color’s edges. The most outer circle is a translucent yellow to represent a glare effect around the Sun. Listing 7.8 presents an implementation for the Sun.

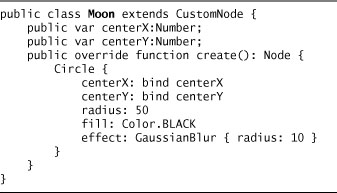
The Moon is merely a black circle with a GaussianBlur effect to blend and smooth the edges, as implemented in Listing 7.9.
Listing 7.9 Moon
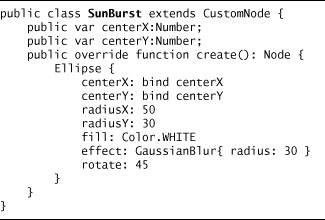
The SunBurst is an ellipse with a white fill, again using a GaussianBlur effect to diffuse the color. This is illustrated in Listing 7.10.
Listing 7.10 SunBurst
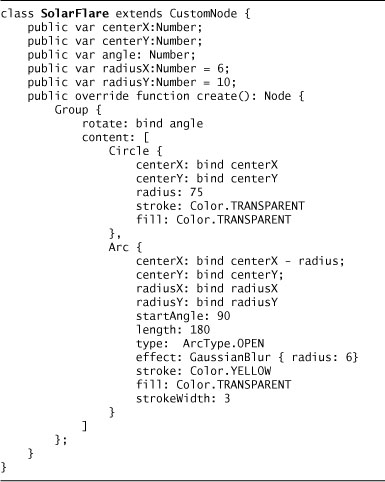
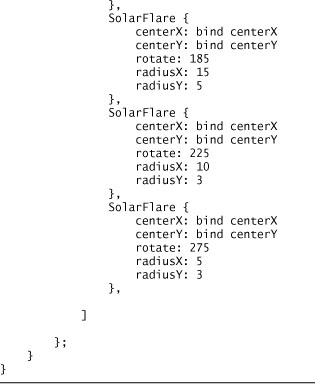
Totality is a set of solar flares rotating around the center point of the Sun outside of its main diameter. The SolarFlare is an Arc with a GaussianBlur effect to diffuse the yellow color. Listing 7.11 shows the SolarFlare class.
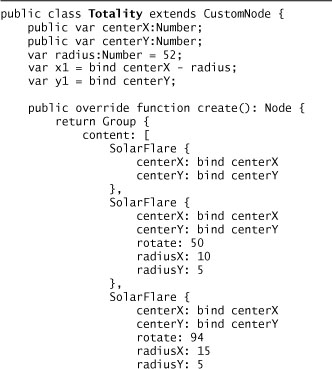
The next listing, Listing 7.12, shows the Totality class that contains six SolarFlares of various sizes rotated around the core disc of the Sun.
Listing 7.12 Totality
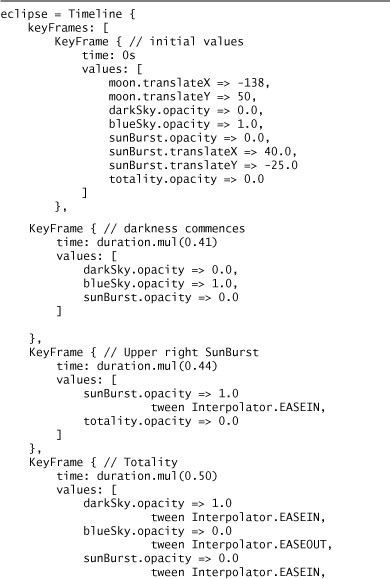
To start the animation, the Sun, Moon, and BlueSky are visible with the Moon left and lower from the Sun. The Moon starts moving along a linear path that intersects with the Sun. Figure 7.9 shows the Moon partially covering the Sun. The Moon’s movement is done by transitioning the Moon’s translateX and translateY instance variables along a linear path.
Figure 7.9 Solar Eclipse, Moon Intersecting with Sun

As the Moon nears totality, the DarkSky with stars begins to appear along with a SunBurst at the upper right, the so-called diamond ring effect. This is done by transitioning the opacity for the BlueSky to zero, while transitioning the opacity for the DarkSky and SunBurst to 1.0. This is shown in Figure 7.10.
Figure 7.10 Solar Eclipse, Partial with Diamond Ring Effect

At totality, the Moon completely covers the Sun. The SunBurst disappears and Totality becomes totally visible along with the DarkSky. Figure 7.11 displays the animation at Totality.
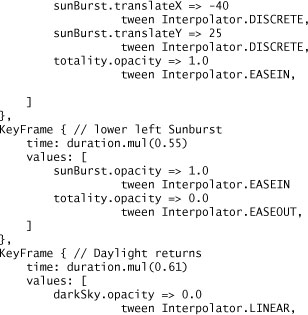
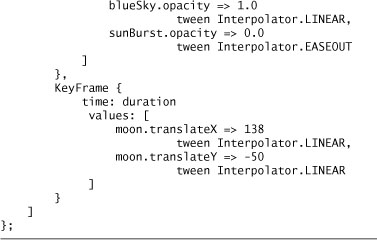
After totality, the SunBurst moves from the upper right of the Sun to the lower left, and the animation starts to fade out the DarkSky while fading in the BlueSky. Finally, the Sun is in full view and the Moon has moved off the Sun’s disc.
Figure 7.11 Solar Eclipse, Totality with Solar Flares

The timeline for this is shown in Listing 7.13.
Listing 7.13 Solar Eclipse Timeline
JavaFX Production Suite
Using the output from the JavaFX Production Suite example from Chapter 2, the animation is very similar. However, instead of creating custom nodes for the Sun, Moon, and so on, we use the graphical assets generated from Adobe Illustrator.
First, you need to generate the UI Stub from the Eclipse JavaFX archive file that we produced in Chapter 2. To do this, copy the JavaFX archive file to a NetBeans IDE Project. Then, right-click on the JavaFX Archive File and select Generate UI Stub. Figure 7.12 shows the menu selection to generate the UI Stub files.
If necessary, edit the UI Stub’s location and package, and then press OK to generate the Stub. This is shown in Figure 7.13.
Figure 7.12 Generate UI Stub

Figure 7.13 Generate UI Stub Dialog

The key parts of the UI Stub JavaFX file are

Notice that there are instance variables created for each of the graphical assets to be used in the animation. To use these assets, merely instantiate an instance of EclipseUI, and then access each of the assets as required. For example, to initialize EclipseUI and then set initial state for each of the graphical assets:
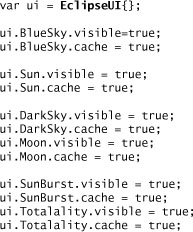
Notice that the cache instance variable was set to true on each of the assets. This indicates to the JavaFX runtime system that the image produced by the node can be internally kept as a bitmap and may result in a performance improvement when displaying on the screen. This improvement may be quite noticeable when moving or otherwise manipulating objects in an animation. However, any improvement may be dependent on the underlying graphics processing unit (GPU) and its capabilities. You may want to experiment with both settings to see what works best.
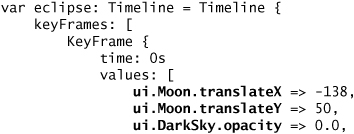
The animation is exactly the same as in the JavaFX shape implementation described previously. The only difference is instead of using the object directly, you access the graphical node through the EclipseUI instance. For example:
Chapter Summary
This chapter discussed the basics of animation in JavaFX. We covered the classes used to define animation and discussed how to use the standard interpolators. We also described how to create a custom interpolator. Next, we walked through an example of path animation by demonstrating a race car travelling the streets of midtown Manhattan in New York City. Lastly, we walked through a complex animation of a total eclipse using both JavaFX shapes and graphical assets produced from Adobe Illustrator using JavaFX Production Suite.
In the next chapter, we cover more “cool” multimedia features, including images, sound, and videos.