
1
Getting Started
“The way to get started is to quit talking and begin doing.”
—Walt Disney
Installing the JavaFX Platform
In this chapter, you will learn how to install the JavaFX Script Software Development Kit (SDK) either in a command-line environment or with an Integrated Development Environment (IDE). You will also develop your first JavaFX Script application, compile it, and run it.
The JavaFX Script programming language comes in a Software Development Kit (SDK), based on Java Platform, Standard Edition (Java SE) 1.6. So you will need the following:
• The latest Java SE Development KIT (JDK) for your operating system (Java SE 6 Update 10 or later; for Mac, latest Java for Mac OS X 10.5).
• The NetBeans IDE for JavaFX 1.2, Eclipse Plugin for JavaFX, or the JavaFX Software Development Kit (1.2) for your environment. The NetBeans IDE for JavaFX 1.2 is available for Microsoft Windows XP, Microsoft Vista, Apple Mac OS X Leopard, Linux, and OpenSolaris x86 (available late 2009).
• Optionally, the JavaFX Production Suite graphical toolkit for exporting JavaFX files from Adobe Illustrator CS3, Adobe Photoshop CS3 and converting Scalable Vector Graphics.
For starters, you need to make sure you have the latest Java SE Development Kit (JDK) installed. If you want to take advantage of the new Applet features that JavaFX facilitates, you will need Java SE 6 Update 10 or later. If you are running Windows, Linux, or Solaris, you can download the latest Java Development Kit from http://java.sun.com./javase/downloads/index.jsp. If you use Mac OS X, download the latest Apple release for the Java Platform from http://developer.apple.com/java. As of writing this chapter, Java for Mac OS X 10.5 Update 3 now supports Java 6 Update 7. This release from Apple still does not support the Applet drag feature described in Chapter 9, Add JavaFX to Web Pages with Applets.
To create your first JavaFX Script application, you have several options. First, you can download the NetBeans IDE for JavaFX 1.2 based on NetBeans IDE 6.5 from http://javafx.com. Or, from the same site, you can download the JavaFX SDK and use your favorite editor, compile and run the JavaFX application from the command line. If you choose to use Eclipse, download the JavaFX Plugin for Eclipse from http://kenai.com/projects/eplugin after downloading the JavaFX SDK.
There is also a set of tools and plug-ins for designers to export graphical assets into JavaFX applications, the JavaFX Production Suite. These will be discussed in more detail in Chapter 2, JavaFX for the Graphic Designer, from http://www.javafx.com.
Setting Up NetBeans IDE for JavaFX 1.2
You can install the NetBeans IDE for JavaFX 1.2 directly from javafx.com. There are installers for Microsoft Windows XP, Microsoft Vista, Macintosh, Linux, and Solaris x86. After NetBeans IDE is installed, launch the NetBeans IDE. There should have been a desktop launcher created during the install process. To create your first project, do the following:
1. Launch NetBeans IDE for JavaFX.
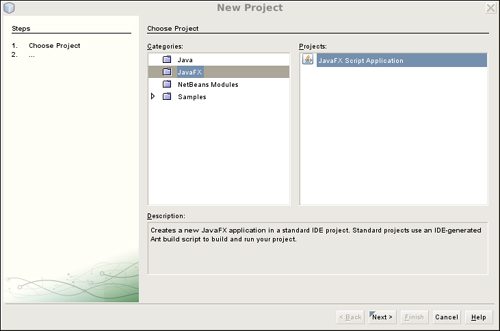
2. Start the New Project wizard by choosing File | New Project from the main menu.
3. In the New Project wizard, select JavaFX Category and JavaFX Script Application project type.
Figure 1.1 shows what the NetBeans IDE looks like when creating a new JavaFX Project.
4. In the Name and Location window, type in the Project Name, MyFirstJavaFXApplication. Change the location for the project files, if you want, then press Finish.
Figure 1.2 shows the Name and Location window.
Figure 1.2 New JavaFX Project – Name and Location

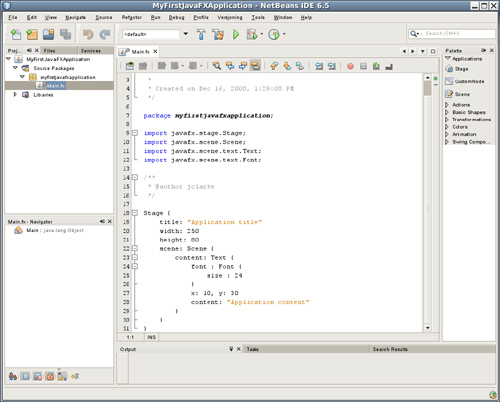
NetBeans IDE then creates the project directory in the specified project folder and gives it the same name as your project, MyFirstJavaFXApplication. In Figure 1.3, notice the Main.fx class file below the myfirstjavafxapplication package in the Source Packages node. This file was created because you left the Create Main File checkbox checked when you created the project. Use this file to create your simple first application. Figure 1.3 shows the editor window for the Main.fx source file.
Figure 1.3 New JavaFX Project – Main.fx Editor Window
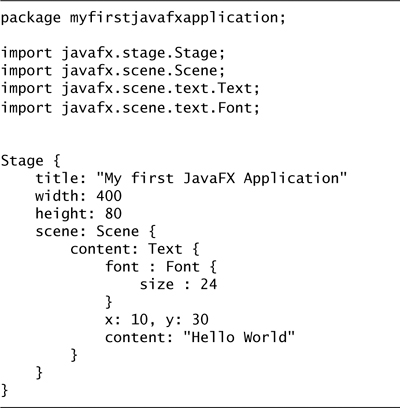
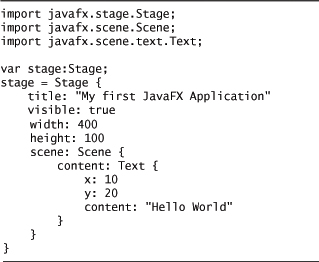
The Main.fx file will have skeleton code that displays a window with some text. You need to modify this code. Like all good “Getting Started” chapters, let’s do the proverbial Hello World example. We’ll cover the details later, but the code in Listing 1.1 will show a window on the desktop, with “Hello World” displayed.
Listing 1.1 Simple Hello World Application
To view the resulting screen while editing the file, use the JavaFX Preview mode. To enter the preview mode, click on the Preview icon at the top left of the Main.fx editor (see Figure 1.4). This opens a new window on top of the Main.fx editor window and lets you see what the screen will look like as you type in your changes. Figure 1.4 shows the preview window.
Figure 1.4 JavaFX Preview Mode

For example, let’s change your application to scale Hello World by a factor of 4. This is done by using the scaleX and scaleY attributes for the Text element. These attributes will cause the Text to scale 4 times anchored from its center point. Figure 1.5 shows the changes instantly in the preview window.
Figure 1.5 JavaFX Preview Mode – with Modification

By using Preview mode, you can quickly see the impact of your changes. It allows you to test new effects out without having to cycle through the edit, compile, run loop for each iteration of changes. As soon as you type the change, the screen updates with the latest view.
Hello World is kind of boring, so let’s have some fun and spice it up. We’ll add a gradient background, make the font bigger, and add a reflection effect. Using the original example for Hello World, you add the code to get your desired effect. You will learn what each part of this new code does in later chapters, but for now we want to show you what is possible. Figure 1.6 shows this far more interesting Hello World example.

Listing 1.2 shows how this was done. It is actually quite simple and concise. That is the beauty of the JavaFX Platform.
Listing 1.2 Cool Hello World Application

Distributing the Application
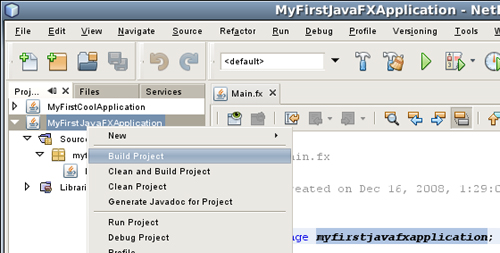
To compile the entire project, click on the Project MyFirstJavaFXApplication in the Projects tab on the left of the NetBeans IDE screen. When the project is highlighted, click with the right mouse button to bring up a menu of options, select Build Project. This automatically saves all updated source files for the project, compiles the JavaFX Script and any Java source files, and then places the class files into a Java Archive (JAR) file underneath the dist directory. Besides generating the JAR file to run the application locally either from a desktop launcher or command line, it also generates support files for using the application as a Java Applet in a browser and for using it with the Java Web Start launcher either within a browser or from the desktop. These two options will be explained in detail in Chapter 9. Figure 1.7 shows the project menu with the Build Project item selected.
Figure 1.7 Build JavaFX Project
After your application is completed, built, and ready to be deployed, you can build an archive file using the entire contents of the dist directory. Common tools for this are zip and tar. Another option is to include these files in an install tool.
To run the application, make sure the JavaFX SDK is installed, then install the distribution, and run the following command:
![]()
Using this command, you can easily create desktop launchers to run your application. Or you can use the Java Web Start by launching the dist/MyFirstJavaFXApplication.jnlp file.
Developer Warning:
![]()
The -jar option to execute directly from the JAR file does not currently work with JavaFX; however, this is a known bug and will be addressed in a future release.
There is also a means for deploying JavaFX applications via the World Wide Web using Java Applets or the Java Web Start protocol that we will discuss in Chapter 9. The MyFirstJavaFXApplication.html, MyFirstJavaFXApplication.jnlp, and MyFirstJavaFXApplication_browser.jnlp provide example files that may be used for this.
Command Line
If you want to develop without the NetBeans IDE for JavaFX 1.2 development kit, download the JavaFX SDK from www.javafx.com. There are installers for Microsoft Windows XP with Service Pack 2 and Vista, Apple Mac OS X 10.5.2, Linux, and OpenSolaris.
Table 1.1 JavaFX SDK Installation
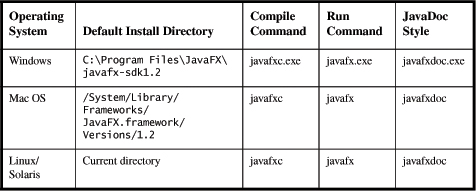
Install the packages, and there will be executable programs for compiling the JavaFX Script source, running the JavaFX Script application, and for generating JavaDoc style documentation (see Table 1.1).
To run your first application, these are the basic steps:
1. Use your favorite editor and save the source for your program to a file.
2. Run the JavaFX compiler, javafxc, using this source file to create Java class files.
3. Run the application using the javafx command.
4. Optionally, create a JavaDoc style documentation for your program.
Duplicating the Hello World example discussed in the NetBeans IDE for JavaFX 1.2 section, create a file using your favorite editor with the following content as shown in Listing 1.3.
Listing 1.3 Hello World Application – Editor Version
Save this to MyFirstApp.fx, then compile using the javafxc command. (Make sure the SDK bin directory is in your command path.)
![]()
This produces one or more class files in the current directory. Next, run the first program by using the javafx command:
$ javafx MyFirstApp
If all goes well, you should see something similar to Figure 1.8.
Figure 1.8 JavaFX SDK Hello World

There you have it: your first JavaFX Script application. You are now ready to move on to more interesting content.
The javafxc compiler command is very similar to the javac compiler command. Accordingly, the javafxc command uses the same format and options as the Java compiler command. The basic format of the javafxc command is
$ javafxc <options> <source files>
The javafx runtime command is actually a wrapper that invokes the standard java command that includes the JavaFX Script jar files. Because the JavaFX compiler produces standard Java class files, you can include these class files, along with any other JavaFX or Java class files, in a Java Archive (JAR) file. To include these JAR files when running your JavaFX application, you just add these jar file locations to your classpath when invoking the javafx command.
$ javafx -cp directory/MyJarFile.jar MyFirstApp
Now you have the basics for getting your JavaFX Script application up and running from the command line. This will suffice for small applications, but as your application grows in size and complexity, you will quickly find that using the command-line option becomes more cumbersome and complex. When your project becomes this large, you may want to consider the NetBeans IDE for JavaFX 1.2, Eclipse IDE with the JavaFX Plugin, or a build tool such as Apache Ant.
Listing 1.4 Sample Ant Build.xml File
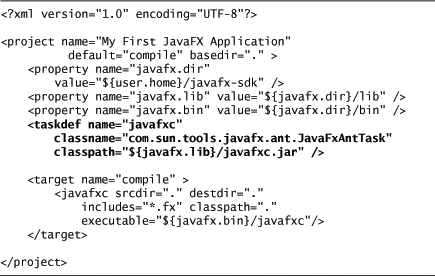
To build the first application, change the directory to the directory where you saved the MyFirstApp.fx file, copy or save the build.xml file to this directory, and then execute the ant command:

Eclipse
If you prefer to use the Eclipse IDE, you need to first download and install the JavaFX SDK for your environment from http://javafx.com. Next, you need Eclipse 3.4 or later; Eclipse IDE for Java EE Developers is recommended. Lastly, you need to download and install the Eclipse plug-in for JavaFX from http://kenai.com/projects/eplugin. To install the Eclipse plug-in for JavaFX, just unzip it in the directory where Eclipse is installed. For example, if Eclipse is installed in C:Program Fileseclipse, unzip the Eclipse plug-in for JavaFX from the directory, C:Program Files.
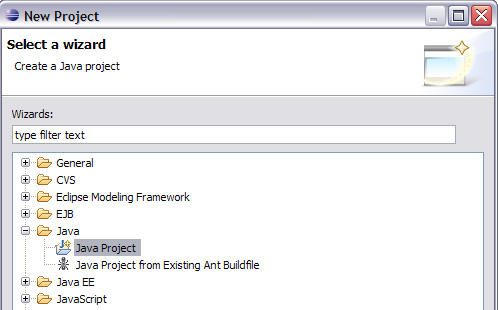
To create your first JavaFX project, launch Eclipse. From the workbench space under Project Explorer, right-click and select New | Project. Figure 1.9 shows the New Project menu selection.
Figure 1.9 New Eclipse Project

Next, create a Java Project by selecting Java | Java Project from the New Project wizard. Figure 1.10 shows this window with the selections.
Figure 1.10 New Project Wizard
Name the project—for example, MyFirstJavaFXProject. Figure 1.11 shows the Create a Java Project window with the project name entered.
Figure 1.11 Create a Java Project Window

This creates a project with a Java Perspective; next, we have to add a JavaFX Nature. To do this, right-click on MyFirstJavaFXProject and select JavaFX | Add JavaFX Nature. Figure 1.12 shows the menu for adding a JavaFX Nature to the project.
Figure 1.12 Add JavaFX Nature

The first time you add JavaFX Nature to a project, you may be asked to confirm or set several configuration questions. Most importantly, if you did not install the JavaFX SDK in the default location, you need to enter the actual location where it is installed on your system. Also, you need to make sure that the Java environment is pointing to use Java 6 Update 10 or later.
To create the Hello World JavaFX Script, first create a package by selecting New | Package. In this example, we named the package myfirstjavafxapplication. Figure 1.13 shows the menu selection for adding a new package to the project.
Figure 1.13 Add Package

The next step is to create an empty JavaFX Script. Do this by right-clicking on the package name and selecting New | Empty Script. Figure 1.14 shows the menu selection to add a new script file to the project.
Figure 1.14 Create Empty JavaFX Script
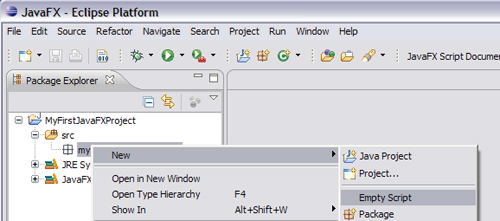
Figure 1.15 shows the new Script wizard for the new script file with the script name Main entered.
Figure 1.15 Create JavaFX Script Dialog

Give the script a name, Main, and click Finish. This creates an empty script file called Main.fx. Edit the script file with the Hello World example and save it. To run it, select the Run icon and the application window should appear. Figure 1.16 points out the Run icon from the tool bar, with the running application displayed.

One main difference between NetBeans IDE for JavaFX 1.2 and the JavaFX plug-in for Eclipse is there is no Preview mode for JavaFX in Eclipse. However, it is easy to run the application to see what the screens look like while developing.
This section concludes the basics for getting started with Eclipse. For more detailed information and configuration options, check the documentation that is available with the Eclipse plug-in for JavaFX. The documents contain detailed instructions for installing the JavaFX plug-in and configuring Eclipse for the first time to recognize JavaFX files. After Eclipse is configured for JavaFX, development is similar to the NetBeans IDE for JavaFX 1.2.
Chapter Summary
This chapter has shown you how to get started writing your first JavaFX application. It has detailed how to download and install the NetBeans IDE for JavaFX 1.2, the Eclipse plug-in for JavaFX and the JavaFX SDK, how to write and compile a simple JavaFX program, both from the command line and using the NetBeans IDE for JavaFX 1.2, and how to distribute that program to an end user. It has also provided a small glimpse of what is possible with the JavaFX Platform.
From here, we will explore the JavaFX Platform in greater detail and describe the major capabilities that you can leverage in your applications. Throughout the next few chapters, we will cover concepts required to build a straightforward animation, a total solar eclipse. This allows us to explore animation, graphics, and special effects. We will also explore a Sudoku application written in JavaFX Script. This application demonstrates some of the key features of JavaFX Script including data binding and triggers. The next chapter starts us off by looking at JavaFX from a graphic designer’s eyes.