
2
JavaFX for the Graphic Designer
“Creativity is allowing yourself to make mistakes. Art is knowing which ones to keep.”
—Scott Adams
Graphic Design and JavaFX
In a JavaFX environment, the goal for the graphic designer is to use his or her creativity to forge graphical assets and then export them for JavaFX in the form of JavaFX Objects. First, the graphic designer helps to design the visual presentation and then often generates his or her designs using various symbols, drawings, texts, images, colors, and special effects. After the graphic designer generates the graphical assets in the form of JavaFX Objects, it is up to the application developer to use those graphical objects in a Rich Internet Application.
Typically, graphic designers use specialized design tools to develop graphical assets. Of these, Adobe Illustrator CS3 and Adobe Photoshop CS3 are the most popular. Another common graphical format is Scalable Vector Graphics, or SVG, and most graphic design programs provide SVG export capabilities.
This chapter discusses the process that the graphic designer will need to follow to export his artwork to a form that can be used in JavaFX. Specifically, we describe the procedure to export graphical assets from Adobe Illustrator CS3 and Adobe Photoshop CS3. In addition, we discuss the SVG to JavaFX Convertor utility to convert Scalable Vector Graphic files to JavaFX.
The graphical assets described in this chapter will later be used in Chapter 7, Add Motion with JavaFX Animation. This chapter focuses on the graphic designer, and what he or she needs to do to generate graphical objects. Chapter 7 focuses on the JavaFX programmer and what he or she needs to do to use those objects in an application.
JavaFX Production Suite
The JavaFX Production Suite is a set of tools for converting graphics to a format that can be used for JavaFX applications. You can download the JavaFX Production Suite from the JavaFX Web site (http://www.javafx.com) and it supports Microsoft Windows XP, Service Pack 2, Microsoft Vista, and Macintosh OS X 10.4+ on Intel. If you already have Adobe Illustrator CS3 or Adobe Photoshop CS3 installed, simply execute the binary installer for JavaFX Production Suite and the appropriate Adobe plug-ins will be installed on your system. These plug-ins allow you to export from the respective Adobe products to a format that can be processed by JavaFX. Let’s see how this works.
In our example, we want to create an animation of a solar eclipse. In this animation, there is, of course, the Moon in its orbit; but, also, the Sun goes through several phase changes as the eclipse approaches totality and subsequently returns to normal. We will use this example in Chapter 7 when we explain how to implement animations in JavaFX. However, let’s first look at the graphical assets required for this.
Adobe Illustrator CS3
Using Adobe Illustrator CS3, we need two backgrounds: one is the blue sky as normally seen in daylight and the second is a dark sky with stars. As the eclipse progresses to totality, the blue daylight sky will fade out while the dark sky will fade in, peaking at totality, before the process reverses itself. To accomplish this, you need to create a separate layer for each background: one called jfx:bluesky and the other jfx:darksky. The naming convention jfx:layerName will help later when we export the layers to JavaFX.
Graphical layers are discreet graphical assets that can be layered on top of each other to provide a combined visual effect. This is analogous to using a clear film representing each layer. Each film will contain its graphical components so that when you lay one film over another you get a combined visual. For animations, you can take a foreground layer on top of a background layer and then, over time, move the foreground layer across the background layer.
The jfx:bluesky and jfx:darksky layers are illustrated in Figures 2.1 and 2.2. These figures are available in full color at our Web site, http://jfxbook.com.

Figure 2.2 DarkSky Layer

Now that the background layers are complete, we then create a layer that merely holds the darkened moon. This is basically a blurred black circle. Figure 2.3 shows this layer.
Figure 2.3 Dark Side of the Moon Layer

For the Sun, there are three layers representing the eclipse phases: the normal Sun, the moment just before totality where a final burst of light is seen, and totality. The normal Sun is a blurred yellow circle with a white center. The Sun Burst is a basic ellipse with a white center and a surrounding halo effect, rotated 45 degrees. This particular image will be at the edge of the dark moon, right before and right after totality and is commonly called the diamond ring effect. Totality view will be a center white circle with a halo effect. There are some yellow curve lines added to represent solar flares that only appear during totality. The sun layer is illustrated in Figure 2.4 and can be seen in color at http://jfxbook.com.
Figure 2.4 Sun
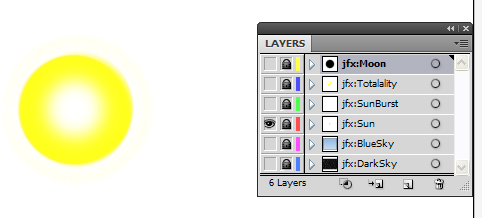
Figure 2.5 shows the Sun Burst layer. This is the layer that is shown in the diamond ring effect immediately before and after totality.
Figure 2.5 Sun Burst
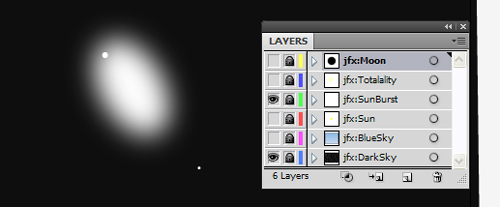
Figure 2.6 shows the Totality layer.
Figure 2.6 Sun Totality
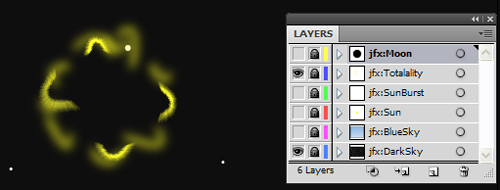
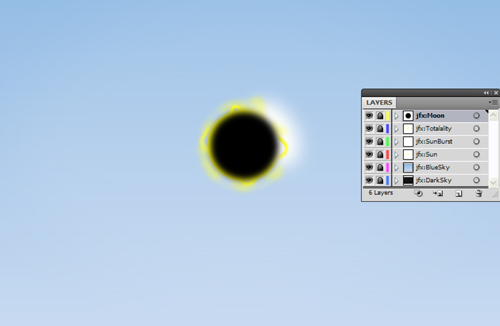
Figure 2.7 shows the combined layers for the moment before totality, commonly called the diamond ring effect. These include the layers DarkSky, Totality, Sun Burst, and Moon, respectively. When combined on top of each other, these look like Figure 2.7.
Figure 2.7 Solar Eclipse Diamond Ring Effect

Figure 2.8 shows the view at totality. This includes the layers DarkSky, Sun, Totality, and Moon.
Figure 2.8 Total Solar Eclipse View

For this entire solar eclipse animation, there are six exported layers: jfx:Moon, jfx:Totality, jfx:SunBurst, jfx:Sun, jfx:BlueSky, and jfx:DarkSky. To implement the animation, the backgrounds will be jfx:BlueSky and jfx:DarkSky. As the Moon starts to cover the Sun, the BlueSky layer fades out of and the DarkSky layer fades into view. As the Moon nears total coverage over the Sun, the Sun Burst layer becomes visible, and then the Totality View replaces the Sun Burst view. This whole process reverses itself as the Moon moves out of the Sun Disc. The primary objects are the Moon and the Sun, with the Sun going through three phases. In Adobe Illustrator CS3, the combined screen with all layers visible is shown in Figure 2.9. The full color view of all these layers can be seen at http://jfxbook.com.
Figure 2.9 All Layers View
To use these layers in JavaFX, you need to export them. By default, only layers with the prefix jfx: (case does not matter) will be exported. This allows the graphic designer to specifically identify those layers that should be exported for use in JavaFX, while allowing the designer the ability to name other layers for his/her own purposes. This default behavior can be overridden by unchecking the Preserve “JFX:” IDs Only option when exporting.
To export the layers, from Adobe Illustrator, choose File | Save for JavaFX; this brings up the JavaFX Export Options window. Figure 2.10 shows the menu for this.
Figure 2.10 Save for JavaFX

From this window, you have the option to show the preview of the exported JavaFX file, choose to only export ‘JFX:’ layer IDs (the default) or all IDs, or choose to embed the fonts in the exported file. To actually save the JavaFX exported file, depress the Save button, and the plug-in creates a JavaFX archive files with an .fxz extension. This file contains the exported graphics in an optimized format. Figure 2.11 shows the JavaFX Export Options window.
Figure 2.11 JavaFX Export Options Window

Figure 2.12 shows the Save for JavaFX dialog.
Figure 2.12 Save for JavaFX Dialog

We will explore this generated code in detail in Chapter 7, but for now simply know that there is a direct correlation from the Adobe Illustrator layers and objects created in the JavaFX exported code. For our solar eclipse example, there will be JavaFX Objects for the Moon, Sun, SunBurst, Totality, BlueSky, and DarkSky. These objects were exported, because we named them all with a jfx: prefix when we created the layers in Adobe Illustrator.
Adobe Photoshop CS3
Exporting to JavaFX in Adobe Photoshop is similar to how it is done in Adobe Illustrator. First, create the images for each layer, then export to JavaFX archive format. Figure 2.13 shows the layers we created with Adobe Illustrator in the previous section, but now they are loaded in Adobe Photoshop. To do this, save the Adobe Illustrator graphics to Photoshop format, then load into Photoshop. You will notice that the same layers for DarkSky, BlueSky, and so on are shown. Figure 2.13 shows these layers as presented in Photoshop. A full color view is available at http://jfxbook.com.
Figure 2.13 Photoshop Eclipse Layers

To export to JavaFX, select File | Automate | Save for JavaFX, as shown in Figure 2.14.
Figure 2.14 Save for JavaFX

This brings up a JavaFX Export Options window as shown in Figure 2.15.
Figure 2.15 JavaFX Export Options Window

Just like we did for Adobe Illustrator, from this window, you have the option to show the preview of the exported JavaFX file, choose to only export JFX: layer IDs (the default) or all IDs, or choose to embed the fonts in the exported file. To actually save the JavaFX exported file, depress the Save button, and the plug-in creates a JavaFX archive file with an .fxz extension. This file contains the exported graphics in an optimized format. One major difference from the JavaFX export produced from Adobe Illustrator is that the graphical objects that the PhotoShop JavaFX plug-in produces are rasterized, so PhotoShop generates a larger JavaFX Archive file. Figure 2.16 shows the dialog for exporting the PhotoShop layers for JavaFX.
Figure 2.16 Save for JavaFX Dialog

In the File Name field, enter the exported filename. In the Save as Type field, select JavaFX Content File (.fxz), and click Save to save the file. Later in Chapter 7, the developer will use this file to create an animation for the solar eclipse.
Scalable Vector Graphics
Scalable Vector Graphics (SVG) is an open and free standard language for describing two-dimensional graphics using The Extensible Markup Language (XML) developed under the World Wide Web Consortium (W3C) process (http://www.w3.org/Graphics/SVG/). SVG provides for vector graphic shapes using paths of either lines or curves, images, and text.
JavaFX Production Suite includes an SVG conversion utility that converts SVG graphic files to JavaFX Archive File format. To demonstrate, we saved the solar eclipse images we created previously in the Adobe Illustrator section to an SVG file, Eclipse.svg. To run the conversion utility in Windows, select Start | All Programs | JavaFX Production Suite | SVG to JavaFX Converter as shown in Figure 2.17.
Figure 2.17 SVG to JavaFX Converter

This opens the SVG Converter tool. This tool has an option to only export JFX: layer IDs (the default) or all IDs. Figure 2.18 shows the SVG to JavaFX Graphics Converter window.
Figure 2.18 SVG to JavaFX Graphics Converter Window

Select the SVG source file, Eclipse.svg, and then enter the output file, Eclipse.fxz. This creates a similar JavaFX archive file as when we exported to JavaFX directly from Adobe Illustrator.
Chapter Summary
In this chapter, we learned how to create graphical assets. The JavaFX Production Suite is a set of tools to assist in creating JavaFX graphical objects created in Adobe Illustrator, Adobe Photoshop, and Scalable Vector Graphics. Besides the example demonstrated here, there are many samples available with JavaFX Production Suite. These are located under the install directory, in the sub-directory named Samples (Windows: C:Program FilessunJavaFX Production SuiteSamples).
In the next chapter, Chapter 3, JavaFX Primer, we explore the domain of the JavaFX programmer. This starts with a detailed description of JavaFX language syntax and some basic features.