
Chapter 1
Setting Up Everything
Okay, so you’ve got your Onion Omega2 or Omega2+ in front of you. Let’s see how we go about setting it up so we can interface with it and program it.
There are two ways to set it up for the first time: either the GUI way using a browser or via the command line. Onion suggests using the browser for simplicity’s sake, so we’ll outline those steps first.
As I mentioned in the introduction, I’m going to assume not only that you have an Omega2 or 2+ board, but also that you purchased a dock to make things easier. Start by plugging your Onion into the dock, making sure not to bend any of the header pins. First, place the board over the dock and align all the pins with the holes. Make sure the board is level and not at an angle. Then, gently but firmly push down on the center of the Omega2 board so that both rows of pins have the same pressure on them. You don’t want one side to get more pressure than the other—that’s how pins get bent.
Make sure that you don’t plug it in backward, either—in the case of the power dock, the side of the O2 with the mounting holes should sit atop the JST power connector. In the case of the breadboard expansion dock, that side should be opposite the microUSB port. In both cases, the shape of the Onion, with its diagonal cutouts at two corners, sort of matches the board it’s plugged into (Figure 1-1).

Figure 1-1: Matching corners on the Omega2
Now connect some power to your board, via either the microUSB cable or lithium-ion (Li-ion) battery, and turn on the power switch (if the dock you’re using has one). The switch isn’t labeled, so if the tiny orange LED on your O2 lights immediately, it’s (obviously) powered on. It should start blinking in a few seconds; after about a minute, it should have finished booting. The orange LED will stop blinking on most O2s when the boot sequence is complete; mine continued to blink for about 5 minutes on first boot, though it was finished booting. (On subsequent power cycles, it stopped blinking after about a minute.)
When the light is solid or it’s been about 60 seconds (whichever comes first), you’ll be able to access your Onion through a browser window and a wireless connection. If you’re using a Windows machine, you’ll need to install Apple’s Bonjour Print Services (https://support.apple.com/kb/DL999), which allows Windows computers to discover and connect to Bonjour-enabled printers. If you’re using a Mac, you should be set to go, and the same with a Linux box. The screenshots you’ll see here are on a Mac.
Go to your WiFi menu and look for your Omega2’s wireless network. It will be named “Omega-XXXX,” where the last four characters are the last four characters of the MAC address on the sticker on your Onion’s metal shield. So if your sticker reads MAC: 40A36BC1BCD3, the wireless network you’re looking for will be Omega-BDC3 (Figure 1-2). Connect to that network with the default password 12345678.

Figure 1-2: The Omega2’s network
Graphical Setup
Now open up a browser and in the address bar type http://omega-XXXX.local, where XXXX are the same characters as from the network name. You can also use 192.168.3.1 if you have trouble reaching the .local page.
Figure 1-3 shows the Omega2 Setup Wizard page.

Figure 1-3: The Setup Wizard page
Click Start and log in with the username root and the password onioneer. You’ll then be asked to identify and connect to your wireless network, which is a necessary step to continue. Find your network, enter your information, and click Configure Wi-Fi. The O2 will attempt to connect to your network, which may take a few minutes.
Once your board is done configuring itself, you’ll be asked if you want to register it on the cloud. This is up to you, but if you like you can skip that step and do it later. Registering your O2 on Omega’s cloud not only lets you access your O2 from anywhere, but also allows you to install apps, create API keys, and even compile and load projects from a web browser. If you choose to do it later, waiting won’t affect the setup steps here.
Finally, click the Upgrade Firmware And Install Console button. This will update your O2 to the latest firmware and install it, as well as installing the console application. When it’s finished, you should see a Success! screen, and your board should reboot. (If it doesn’t come back online, switch it off and on again or disconnect/reconnect the power, and it should power up successfully.) You are now all set up!
Trouble Connecting?
It may happen that the Setup wizard fails; try as I might, I could not get my O2+ to connect to my home network via the wizard—it either rejected the password (which I knew was correct) or simply hung on the Configuring step. If your board simply won’t connect, and you know the password is correct, first make sure that your home network IP addresses aren’t colliding with the Onion. In other words, if your home IP is on a network with the same address prefix (192.168.3.0/24), your board will be confused and won’t know what data to send where. If that’s the case, you can change the O2’s network prefix and solve the problem. If you need to do that, follow the directions in the following section to use Secure Shell (SSH) to connect to your Omega2, and then we’ll use the uci command to edit its IP address.
Once you’re logged in, enter the following in your terminal application:
uci set network.wlan.ipaddr=<IP ADDRESS>where IP ADDRESS should be 192.168.5.1 or something similar—just something different from your home network’s prefix. Once you’ve set it, you’ll need to save your changes with
uci commit networkand then restart your Omega2’s network with
/etc/init.d/network restartNow you can try connecting again via your browser. If you still have problems, read on.
Connecting via the Command Line
If the GUI setup has failed for you, fear not! This is what the command-line setup is for! To connect via the command line, you’ll need to SSH into your board. Follow the previous steps to connect your computer to the O2’s wireless network, but then open a terminal (Mac/Linux) or your SSH client, such as PuTTy (Windows). In your terminal, type
ssh root@omega-XXXX.localwhere again the XXXX is your O2’s ID. The password is onioneer, and you should almost immediately see something like Figure 1-4.

Figure 1-4: SSH login to the Omega2
You may get a warning about connecting to the Omega2 for the first time; you can accept the warning and connect.
Once you’re logged in, you can connect to your network using the wifisetup command. Enter that in your terminal and you’ll be greeted with the screen you see in Figure 1-5.
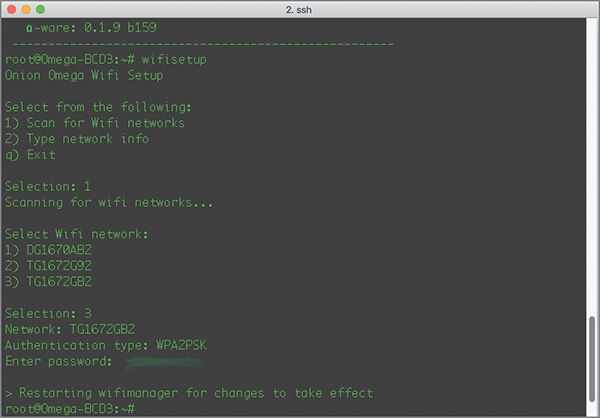
Figure 1-5: The wifisetup command sequence
When you see this screen, choose 1 to scan for networks. Choose your home WiFi network from the resulting list and enter the password. (A nice feature of this particular tool is that you can see the password you’re typing, so you can make sure it’s correct.)
Once you press Enter, the Onion will restart its network adapter and connect to your network.
Upgrading Firmware and Installing the Console
Now that you’re connected, you’ll need to upgrade the firmware and install the console to make working with the O2 a bit easier. In your terminal, type
oupgradeThe Onion will compare your firmware and operating system version against what’s available online and download and install the newer version if necessary. This can take a few minutes, so don’t be too impatient. Per the Onion website: Do NOT disconnect your board from power or WiFi during the upgrade process, as it may corrupt the OS! When the upgrade is finished, your board will reboot and the blinking LED will again stop blinking.
When it has rebooted, SSH into your O2 again, using the same username and password, and install the console by typing the following commands into your terminal:
uci set onion.console.setup=1
uci set onion.console.install=2
uci commit onion
The console will then be installed the next time you boot your board. You can enter
reboot nowin your terminal to reboot your board immediately. To make sure everything worked the way it should, open your browser again and enter http://omega-XXXX.local/ into the address bar, substituting your O2’s name for XXXX. You should be greeted with the console login page (Figure 1-6).

Figure 1-6: The console login page
The username is root and the password is onioneer. Enter those credentials and you should now see the console (Figure 1-7).

Figure 1-7: The Omega2 console
Congratulations! You’ve now set up and connected to your Omega2 board. In the next chapter we’ll go through the different console areas and write a small introductory application.