Chapter 2
Getting to Know the Console
Now that we’ve got your Omega2 set up, let’s walk through the different parts of the console application and see what each one does before we play around with programming the board itself.
Once you’ve logged into your console, you should see a screen like the one in Figure 2-1.
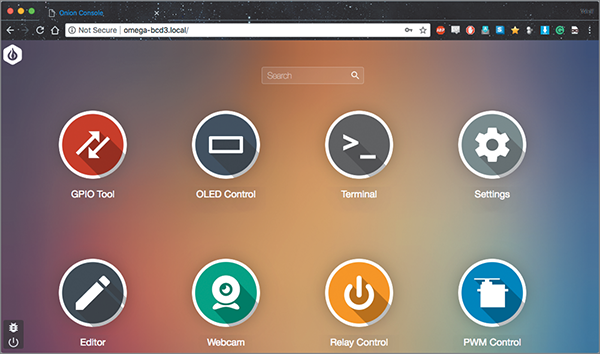
Figure 2-1: The Omega2 console
GPIO Tool
Starting at the upper left, you see the first item on the screen is the GPIO tool, which lets you play around with the general-purpose input/output (GPIO) pins on the O2 in real time, turning them off and on with no programming involved. To try it out, grab an LED from your toolkit and plug it into the headers on your dock, with the longer (positive) leg in the header for pin 1 and the shorter anode in the GND position (Figure 2-2).

Figure 2-2: An LED connected to pin 0 and GND
Now click the GPIO Tool icon on your console and you’ll see a sketch of the Onion’s dock (Figure 2-3). Leave the default GPIO 0 selected, and choose Output from the Direction dropdown menu and 0 from the Value dropdown menu. The LED you plugged in should light up. Choose 0 from the Value dropdown menu to turn it off again.

Figure 2-3: The GPIO tool
As you can see, you can play with input and output values for several of the GPIO pins with this tool. For instance, connect a jumper wire between the 3.3V pin (not the 5V—the Omega’s pins can’t handle more than 3.3V inputs) and pin 6. Click pin 6 on the GPIO sketch, select Input from the Direction dropdown, and click the Sync button. The entry in the Value box should switch to 1. If you then move the jumper wire to the GND header and click Sync again, the value will switch to 0. I think it’s a good way of making sure that your GPIO pins are acting the way you expect them to.
OLED Control
Next, let’s look at the organic light-emitting diode (OLED) tool (I’m assuming you purchased an OLED expansion to go with your Onion). Choosing this tool from the home console screen takes you to the OLED Expansion Control screen (Figure 2-4).

Figure 2-4: The OLED Expansion Control screen
There are a few handy tools here, but before any of them will work on your screen, you’ll need to initialize the screen from the command line. SSH into your O2 again if you’ve disconnected, and at the prompt, type
oled-exp -iThis “turns on” the board and allows it to respond to commands.
Back in your OLED control console, in the Text tab (the default), type some words on the display by clicking in the text box and then click the Display On OLED button. Your text should appear on the screen. If you choose a setting from the Scroll dropdown menu at the top right of the screen, the words should move smoothly in the direction you chose. The Toggle Invert and Toggle Dim buttons are self-explanatory, and when you’re done playing with the text, click Clear Screen to move on.
The Image tab allows you to upload an image to the O2’s internal memory that can then be displayed on the screen. The screen has a resolution of 128×4, so it’s surprisingly good at displaying rather detailed images (Figure 2-5).

Figure 2-5: The OLED tool displaying a car
Settings
The Settings application is pretty comprehensive; it allows you to do everything from setting up your O2 as a WiFi access point to setting your time zone to changing your security settings. A handy tool on this page is the Firmware Upgrade tab, which will check the Onion servers and see whether your board needs an upgrade. The Factory Restore tool may come in handy if you manage to brick your board (somehow I’ve managed to avoid that so far).
The Cloud Settings tab allows you to register your O2 on the Omega Cloud, which allows you to remotely interact with it and even compile code online. If you skipped this step during your board setup process, here’s where you can remedy that, should you choose to. Clicking the Register button walks you through the process of registering on Onion’s servers and then registering your device. Once successful, you’ll receive a device ID, which you might want to jot down for future reference.
The Terminal App
In order to save space on the device, the folks at Onion decided to leave the Terminal, Editor, and Webcam tools out of the default console installation. If you would like to play with them, you’ll need to install each one. Luckily, it’s a simple click. There doesn’t seem to be much to the Terminal app (it’s the same interface as an SSH interface), so if you don’t want to bother installing it, you won’t be missing much.
The Editor
Next up in the available applications is the Editor, possibly the most useful of them all. The Editor allows you to write and save shell scripts to your board (think of it as a sort of text editor like vim or nano that goes with the Omega2’s Linux distro). You can also upload files and scripts from your local machine.
After installing the Editor, you’ll see the screen in Figure 2-6.

Figure 2-6: The Editor application
Along the left side of the screen is your board’s directory structure, and along the top are tools to interact with files and folders. Let’s write a simple shell script that will change the O2’s solid LED to a heartbeat pattern. In your editor, navigate to the /root folder by clicking it, and then click New File. Name the file heartbeat.sh.
When it’s been created and saved, click the name of the file on the left, and then enter the following lines into your file:
#!/bin/sh
# Get the name of the board
# Either omega2 or omega2p
. /lib/ramips.sh
board=$(ramips_board_name)
# Define the function
_Heartbeat () {
    echo heartbeat > /sys/class/leds/$board:amber:system/trigger
}
## Main program ##
_Heartbeat $*
exit
If you’re familiar with shell scripts in Linux, this should be pretty easy to understand. We’re simply getting the name of the board from the /lib/ramips.sh script, and then using that name in the filename/directory structure that we echo heartbeat into.
Save the file (the button at the very top right) and then open your SSH connection (or your Terminal app—either one will work) and enter the following at the prompt:
sh /root/heartbeat.shThe LED on your Onion should start beating like a heartbeat, showing that you created and saved the script correctly.
The Webcam Application
The next app in the list that may be worth trying out is the Webcam app, which does need to be installed. After installing it, you should see the screen in Figure 2-7.

Figure 2-7: The Webcam app
If you have an expansion dock with a USB port, plug a standard USB webcam into the port and click Start Stream at the top of the screen. If all is working, your camera should show up in the middle of the screen, as shown in Figure 2-8.

Figure 2-8: The working webcam
Try playing with the resolution and FPS settings in the Webcam tool. It’s worth noting here that not all USB webcams will work with the Omega2, because not all webcams can work with the Onion’s ARM chipset, and some require more power than the O2 can provide. Also note that you may have to restart your board after plugging in the webcam in order for it to be recognized.
Relay and PWM Control
The last two sections of the console deal with expansion boards that you may or may not have purchased: the relay board and the PWM (pulse-width modulation) board. The first of these (which we’ll use in Chapter 4) allows you to control two other external, independent circuits, such as motors, that are isolated from your O2 and use a separate power source. You can use some pretty beefy power supplies here; the relays are rated for 220VDC or 250VAC switching voltage, with up to 2A current and 60W of power. That’s enough to easily handle turning on a lamp, a thermostat, or even your garage door.
If you have the board, plug it into your expansion dock—you don’t even have to hook anything up to it to experiment with it.
When it’s connected and your board is powered on again, log into your console and click the Relay Control icon. You’ll see a screen like the one in Figure 2-9.

Figure 2-9: Relay Control screen
There are five clickable objects on this screen: the two relays, R1 and R2, and the three toggle switches. The switches control the I2C address of the board (which is useful for when you have more than one relay expansion board connected), and R1 and R2 actually control the relays. To test the board, move all of the toggle switch icons to the right by clicking them so that the Relay I2C Address shown is 0x27. Now click the R1 relay, and you should hear the physical relay on your expansion board click. R2 should do the same when you click on its representation. You can stack up to 8 relay expansion boards, which means you can control up to 16 external devices with these boards!
Finally, the PWM control tool allows you to send pulse-width modulated signals to up to 16 different devices such as servos, DC motors, and LEDs. Those devices can be powered either through your dock or with the attached DC barrel jack, which allows you to source up to 6V to power your external devices. The Onion will source only enough power for one or two servos, so you’re going to want to use an external source for anything more than that. Also, unlike the relay expansion board, you can attach only one PWM expansion board to your O2 at any given time. However, that still allows you to control up to 16 devices.
The board’s 16 channels come with male headers preattached, with the pins in order, from top to bottom:
- Ground
- 5V
- Signal
(The white/yellow pin is the signal pin.) If you have the board and a servo sitting around, plug it into the board and open the PWM control tool from your console. You’ll be greeted by the screen shown in Figure 2-10.

Figure 2-10: PWM Control screen
All 16 of the PWM channels are clickable; if none are selected, all are active. If you want to choose one channel in particular, simply click it. Unfortunately, you can’t simultaneously select two channels, or three, or four—you can select only one channel or all of them.
At the right you can choose the frequency, duty cycle, and delay. With your servo channel selected, play around with these values and see what effects they have on your servo’s motion.
OPKG and Python
That concludes our tour of the Omega2 console. The last thing I’d like to discuss before we move on to our projects is the Onion’s package manager and using it to install packages—Python in particular.
If you’re familiar with Linux, you know that most distributions have a package manager that handles software installation for you, from determining what package is necessary to finding and installing dependencies. The Onion’s WRT distro is no different, and it uses the opkg package manager.
I tend to use Python for most of my programming, and with the O2 it’s no different. We will, however, need to use the package manager to install Python, because it doesn’t come preinstalled on your board. To save space, we’re going to install the light version.
SSH into your Onion (or use the Terminal application in your console) and at the prompt, enter
opkg updateto update opkg’s list of packages. Now, install python-light with
opkg install python-lightIf you would like to use Python3, you can install it as well with
opkg install python3-lightFinally, we may need to install additional Python packages, and to do that we can use pip, Python’s package manager. We can install it with
opkg install python-pipWe will, however, need to update the default setuptools module that comes with pip, and that can be done by entering
pip install --upgrade setuptoolsat the terminal prompt.
Now, if we need to use the module urllib3 (for example), we can install it by typing
pip install urllib3and it will be available in our Python scripts.
That should do it for our setup and first scripts! In the next chapter, we’ll get started with our first project with the Omega2.