Chapter 5. MVPs and Experiments
With the parts of your hypothesis now defined, you’re ready to determine which product ideas are valid and which ones you should discard. In this chapter, we discuss the Minimum Viable Product (MVP) and what it means in Lean UX. In addition, we’ll cover:
Determining product focus (delivering value or increasing learning?) using MVP
Using prototypes and prototyping tools
Running experiments without prototypes
About MVPs and Experiments
Lean UX makes heavy use of the notion of MVP. MVPs help test our assumptions—will this tactic achieve the desired outcome?—while minimizing the work we put into unproven ideas. The sooner we can find which features are worth investing in, the sooner we can focus our limited resources on the best solutions to our business problems. This concept is an important part of how Lean UX minimizes waste.
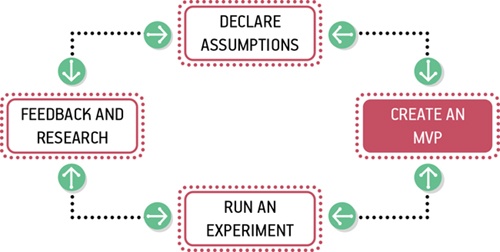
Your prioritized list of hypotheses has given you several paths to explore. To do this exploration, you are going to want to create the smallest thing you can to determine the validity of each of these hypothesis statements. That is your MVP. You will use your MVP to run experiments. The outcome of the experiments will tell you whether your hypothesis was correct and thus whether the direction you are exploring should be pursued, refined, or abandoned.
The Focus of an MVP
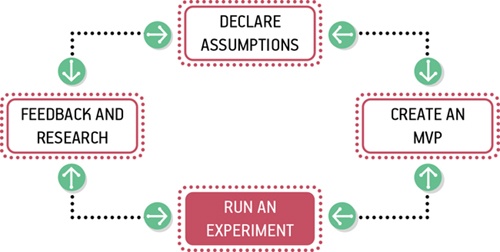
The phrase MVP has caused a lot of confusion in its short life. The problem is that it gets used in two different ways. Sometimes teams create an MVP primarily to learn something. They’re not concerned with delivering value to the market; they’re just trying to figure out what the market wants. In other cases, teams create a small version of a product or a feature because they want to start delivering value to the market as quickly as possible. In this second case, if you design and deploy the MVP correctly, you should also be able to learn from it, even if that’s not the primary focus. See Figure 5-1.
Let’s take as an example a medium-sized company with which I consulted recently. They were exploring new marketing tactics and wanted to launch a monthly newsletter. Newsletter creation is no small task. You need to prepare a content strategy, editorial calendar, layout and design, as well as an ongoing marketing strategy. You need writers and editors to work on it. All in all, it’s a big expenditure for the company to undertake. The team decided to treat this newsletter idea as a hypothesis.
The first question they had to answer was whether there enough customer demand for a newsletter to justify the effort. The MVP they used to test the idea was a signup form on their current website. The signup form promoted the newsletter and asked for a customer’s email address. This approach wouldn’t deliver any value to the customer—yet. Instead, the focus was on helping the team learn enough to make a good decision about whether to proceed.
They spent half a day designing and coding the form and were able to launch it that same afternoon. The team knew that their site received a significant amount of traffic each day: they would be able to learn very quickly if there was interest in their newsletter.
At this point, the team made no effort to design or build the actual newsletter. That would come later, after the team had gathered enough data to make a GO/NO-GO decision. After the team had gathered enough data, and if the data showed that their customers wanted the newsletter, the team would move on to their next MVP, one that would begin to deliver value and learning. They planned to experiment with MVP versions of the newsletter itself that would let them test content strategy, design, and other newsletter features.
Creating an MVP
When you start planning your MVP, the first thing you have to do is consider what you’re trying to learn. It’s useful to think about these three basic questions:
Is there a need for the solution I’m designing?
Is there value in the solution and features I’m offering?
Is my solution usable?
Although you can build an MVP to help you answer any of these questions, the first question is probably best answered with traditional design research methods. (In the next chapter, we discuss Lean approaches to this research.) But for the second and third questions, using an MVP adds a lot of value.
If you’re trying to answer question two, you will likely find yourself creating an MVP that is optimized for learning. If your question is about the usability of your solution, you will want to emphasize value delivery in your product. This step will allow you to “release” a product into the market and “observe” users interacting with it in realistic contexts.
Here are some guidelines to follow if you’re trying to maximize your learning:
- Be clear and concise
Spend your time distilling your idea to its core value proposition and present that to your customers
- Prioritize ruthlessly
Ideas, like artifacts, are transient. Let the best ones prove themselves.
- Stay agile
Information will come in quickly, so make sure that you’re working in a medium that allows you to make updates easily.
- Measure behavior
Build MVPs that allow you to observe and measure what people actually do, not just what people say. In digital product design, behavior trumps opinion.
- Use a call-to-action
You will know people value your solution when they demonstrate that they are using it. A call-to-action is a clear phrase, sometimes complemented by an image, that asks the user to take a specific action: “sign up” or “buy now.” Giving people a way to opt in to or sign up for a service is a great way to know if they’re interested.
Here are some guidelines to follow if you’re trying to deliver value to your customers:
- Be functional
Some level of integration with the rest of your application must be in place to create a realistic usage scenario.
- Integrate with existing analytics
Measuring the performance of your MVP must be done within the context of existing product workflows.
- Be consistent with the rest of the application
To minimize any biases toward the new functionality, design your MVP to fit with your current style guide and brand.
Of course, you’ll find that you’re trying to learn and deliver value at the same time. Keeping these guidelines in mind as you plan your MVPs will help you navigate the trade-offs and compromises you’re going to have to make.
Regardless of your desired outcome, build the smallest MVP possible. Remember that it is a tool for learning. You will be iterating. You will be modifying it. You may very well be throwing it away entirely.
And keep one last thing in mind: in many cases, your MVP won’t involve any code at all. Instead, you will rely on many of the UX designer’s existing tools: sketching, prototyping, copywriting, and visual design.
Prototyping
One of the most effective ways to create MVP’s is by prototyping the experience. A prototype is an approximation of an experience that allows you to simulate what it is like to use the product or service in question. It needs to be clickable (or tappable). At the same time, your goal should be to expend as little effort as possible in order to create the prototype, which makes your choice of prototyping tool important.
Choosing which tool to use for your prototype depends on:
Who will be interacting with it
What you hope to learn
How much time you have to create it
It’s critical to specify the intended audience for your prototype. Knowing your audience allows you to create the smallest possible prototype that will generate meaningful feedback from this audience. For example, if you’re using the prototype primarily to demo ideas to software engineers on your team, the prototype can largely overlook primary areas of the product that aren’t being affected by the prototype, such as the global navigation. Your developers know those items are there and that they’re not changing, so you don’t need to illustrate those items for them.
Stakeholders, often less familiar with their own product than they’ll ever admit, will likely need a greater level of fidelity in the prototype in order to truly grasp the concept. To meet the various needs of these disparate audiences, your prototyping toolkit should be fairly broad. You’ll want a broad range of methods to communicate your ideas. Let’s take a look at some ways to create prototypes and the pros and cons of each.
Low-Fidelity Prototypes: Paper
Made of the most accessible components—paper, pens, and tape—paper prototypes (Figure 5-2) allow you to simulate experiences in a quick, crafty, fun manner. No digital investment is necessary. Using tactics such as flaps to show and hide different states on a page or even creating a “window” for a slideshow of images to move through gives the team a sense of how the product should function. You’ll be able to get an immediate sense of what is available in the experience and what is missing. Paper prototyping can give you a sense of how the workflow is starting to coalesce around the interface elements you’ve assembled. Paper prototyping is especially helpful with touch interfaces that require the user to manipulate elements on a screen.
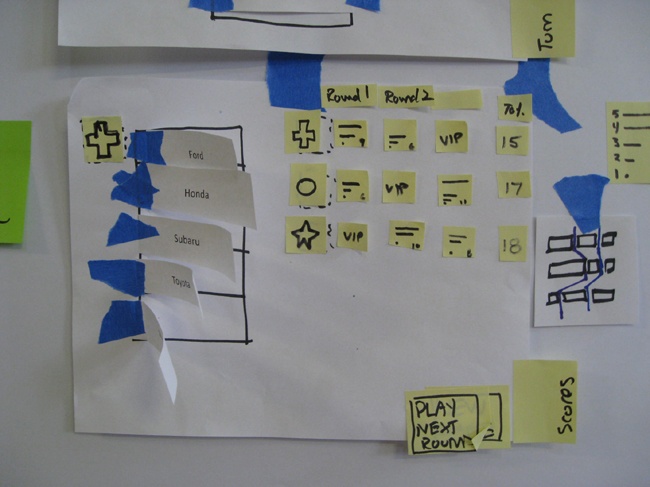
Pros
Can be created in an hour
Easily arranged and rearranged
Cheap
Can be assembled with materials already found in the office
Fun activity that many people enjoy
Cons
Rapid iteration and duplication of the prototype can become time-consuming and tedious
The simulation is very artificial, because you’re not using the actual input mechanisms (mouse, trackpad, keyboard, touch screen, etc.)
Feedback is limited to the high-level structure and flow of the product
Low-Fidelity Prototypes: Clickable Wireframes
Creating an experience with clickable wireframes (Figure 5-3) lets you take a prototype to the next level of fidelity. Your investment in pixels provides a bit more realistic feel to the workflow. Test participants and team members use digital input mechanisms to interact with the prototype, which offers better insight and feedback about the way they will interact with the product at the level of the click, tap, or gesture.
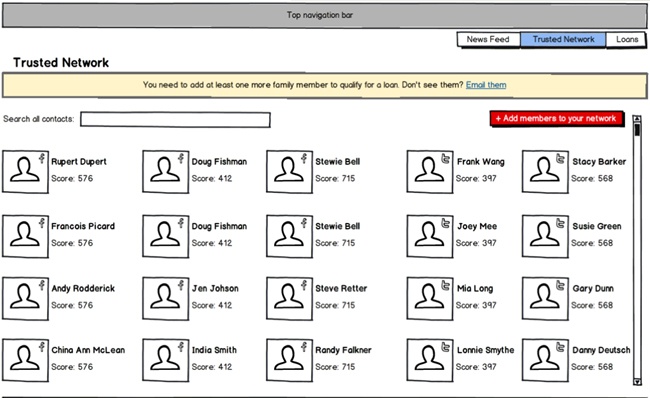
Pros
Provides a good sense of the length of workflow
Reveals major obstacles to primary task completion
Allows assessment of findability of core elements
Can be used to quickly create “something clickable” to get your team learning from your existing assets instead of forcing the creation of new ones
Cons
Most people who will interact with these assets are savvy enough to recognize an unfinished product
More attention than normal is paid to labeling and copy
Tools for creating low-fidelity clickable wireframes
Here are some of the tools that work well for this type of prototyping:
- Balsamiq
An inexpensive wireframing tool that provides “sketchy”-looking output. It’s the closest thing to digital sketching of interfaces and has a robust community of support. Its limitations are what make it powerful; you can’t spend your time tweaking the finer points of the interface, so you spend more time churning through revisions. The ability to link pages together easily makes it a great early prototyping tool.
- Microsoft Visio
This program, the granddaddy of wireframing tools, can still be used to link its screens together to create something clickable. It’s hard to work quickly with Visio, though: the general challenges of using this product make it less and less attractive as more modern products, both desktop and web-based, enter the market.
- OmniGraffle (Mac only)
In many ways, this is the Mac equivalent of Visio, though it is easier to use, has more robust features, and provides better-looking artifacts. You can use images in your drawings, so you can create good-looking artifacts. Still, its core power is in diagramming, not in simulating workflows and interaction.
- Microsoft PowerPoint
In a pinch, PowerPoint can still be relied on to fake some level of interactivity. You can use the native drawing tools to draw wireframes and link them together, or you can import mockups, wireframes, or screenshots that you’ve created in another tool. By clicking sequentially through your slides or by using linked hotspots, you can provide a bare minimum level of fake interactivity. On the Mac, Keynote can be used in the same way. You can also buy libraries of images from Keynotopia that let you assemble realistic-looking mockups. Maintaining these prototypes can end up being very time-consuming.
- Fluid Designer/Pop Prototype on Paper
These mobile prototypting tools (and others like them, which are emerging very rapidly) allow you to quickly build prototypes that run on a smartphone. You import images (or photograph sketches) and link them quickly using hotspots. You can simulate simple workflows very quickly.
Note
I am aware that there are many options on the market for creating wireframes and prototypes. The list of tools I mention in this section is in no way meant to be comprehensive. In fact, it is highly recommended that you try out as many of these tools as you can. See how well they fit the way you and your team work together. Most products have a free trial so you can give the product a field test before committing.
Mid- and High Fidelity Prototypes
Mid- and high-fidelity prototypes (see Figure 5-4) have significantly more detail than wireframe-based prototypes. You’ll use these to demonstrate and test designs that are fleshed out with a level of interaction, visual, and/or content design that is similar to (or indistinguishable from) the final product experience. The level of interactivity that you can create at this level varies from tool to tool; however, most tools in this category allow you to represent pixel-perfect simulations of the final experience. You will be able to create interface elements such as forms, fields, drop-down menus that work, and form buttons that simulate submit actions. Some tools allow logical branching and basic data operations. Many allow some types of minor animations, transitions, and state changes. Additionally, the cost of creating this level of fidelity is significantly reduced with the use of these tools.
Pros
Cons
Interactivity is still more limited than fully native prototypes
Users typically can’t interact with real data, so there is a limit to the types of product interactions you can simulate
Depending on the tool, it can be time-consuming to create and maintain these prototypes; maintaining a high-fidelity prototype and keeping it in sync with the actual product often involves duplicate effort
Tools for creating mid- and high-fidelity clickable wireframes
Here are some of the tools that work well for this type of prototyping (again, this is only a very partial list):
- Axure RP
This increasingly popular prototyping tool allows you to create realistic web pages with screens and forms, and to submit workflows. Axure mockups run in any browser and do an excellent job of simulating web pages. Because it imports images well and supports native HTML user interface elements, it is a very effective mid-fidelity prototyping tool (though you can use it for both low- and high-fidelity prototypes as well). It has good conditional logic, so you can mock up a good range of interactions. A growing community of support is sprouting up around Axure, and many interaction designers have begun using it as their primary tool. Its ability to generate specifications from the prototype is an added bonus for organizations that still make those demands of their teams.
- Adobe Fireworks
An old Macromedia acquisition, Fireworks tries to blend the best of Adobe Illustrator with the best of Photoshop and mashes it up in a stew of pseudo-interactivity that makes it a powerful prototyping tool when visual fidelity is important. You can create screens and manage varying states of specific elements. You can add working form components. You can link elements via simple hotspots. You can create custom asset libraries that make the reuse of interface elements efficient and encourage use of the tool.
Coded Prototypes
Coded prototypes offer the highest level of fidelity for simulated experiences. For all intents and purposes, people interacting with this type of prototype should not be able to distinguish it from the final product unless they bump up against the limits of its scope (i.e., they click on a link to a page that was not prototyped). Coded prototypes exist in the native environment (the browser, the OS, on the device, etc.) and make use of all of the expected interactive elements. Buttons, drop-down menus, and form fields all function as the user would expect them to. These prototypes take input from the mouse, keyboard, and screen. They create as natural an interaction pattern as possible for the prototype’s evaluators.
Hand-coded and live-data prototypes
There are two levels of fidelity for coded prototypes: hand-coded and live data. The hand-coded prototypes look and function like the end product, but don’t account for any kind of real-time data input, processing, or output. They are still just simulations. The live-data prototypes will connect with real-time data and process user input. These are often deployed to real customers and offer a level of analytical insight into customers’ usage of the prototype that is not available from hand-coded prototypes. They can also be used when A/B testing certain features or changes to the current workflow.
Pros
Potential to reuse code for production
The most realistic simulation to create
Can be generated from existing code assets
Cons
Team can get bogged down in debating the finer points of the prototype
Time-consuming to create working code that delivers the desired experience
Tempting to perfect the code before releasing to customers
Updating and iterating can take a lot of time
What Should Go Into My Prototype?
You’ve picked the tool to create your MVP and are ready to get started. There is no need to prototype the entire product experience. Instead, simulate the most important part of the experience for your customer and your business. Focus on the core workflows that illustrate your MVP.
Focusing on the primary workflows of your MVP gives the team a sense of temporary tunnel vision (in a good way!), allowing them to focus on a specific portion of the experience and assess its validity and efficacy.
Demos and Previews
Test your prototyped MVP with your teammates, stakeholders, and members of other teams. Take it to the lunch area and share it with colleagues who work on different projects. Ensure that people within the company are providing the team with insights into how well it works, how they’ll use it, and whether it’s worth additional investment. Let stakeholders click through it and give you their insights and thoughts.
Prototypes help show the project’s stakeholders that progress is being made. If your team has a demo day (and if it doesn’t, it should), bring the prototype there to show progress on the project. The more exposure the MVP gets, the more insight you’ll have as to its validity. Next, take your prototype to customers and potential customers. Let them click through the experience and collect their feedback.
Putting It All Together: Using a Prototype MVP
Here’s how one team I worked with recently used a prototype MVP. In this case study, the team was considering making a significant change to their offering. We used a prototype MVP to support the research and decision-making process.
This established startup was struggling with their current product—an exclusive subscription-based community for group collaboration. It had been in market for a few years and had gained traction, but adoption had reached a plateau—new users were not signing up. Realizing that a radical change was in order, especially in light of growing competition, they were considering revamping their business model and opening up the product to a significantly broader market segment. Their concern was twofold:
Would current users accept this change, given that it would alter the exclusive nature of the community?
Would the new market segment even be interested in this type of product?
The team was worried that they could take a double hit. They feared that existing users would abandon the product and that there wouldn’t be enough new users coming on board to make up for the shortfall.
I worked with the team to define our plan as a hypothesis. We laid out the new market segment and defined the core set of functionality we wanted to provide to that segment. It was only a subset of the ultimate vision, but it could be articulated in five wireframes.
We spent a week creating the wireframes using Balsamiq to ensure that our developers, marketers, and executives were on board with the new direction. We showed the wireframes to current customers (twice!) over the course of these five days and ended up with a clickable prototype—our MVP.
The timing for our experiment was fortuitous: there was a conference full of potential customers scheduled for the following week in Texas. The team flew down to the conference and walked the halls of the convention center with the prototype on our iPads.
The mockups worked great on the iPads: customers tapped, swiped, and chatted with us about the new offering. Three days later, we returned to NYC with feedback written on every sticky note and scrap of paper available.
We gathered the notes into groups, and some clear themes emerged. Customer feedback made us realize that although there was merit to this new business plan, we would need further differentiation from existing products in the marketplace if we were going to succeed.
All told, we spent eight business days developing our hypotheses, creating our MVP, and getting market feedback. This work put us in a great position to refine the product to fit our market segment more effectively.
Non-prototype MVPs
For many teams, the default approach to creating an MVP is to create a prototype—to immediately begin designing and writing code. It’s easy to understand this approach: we are trained to test our designs and our code, so when we think about validation, we naturally think about creating a product mockup to test. There are many occasions when this step isn’t necessary and can even be harmful, though. As valuable as prototyping is, it isn’t the only way forward.
Sometimes it makes sense to create an MVP that doesn’t simulate your product and instead lets you test something related to your product. For example, when your team is trying to determine the value of a new feature or product, it often makes sense to use a non-prototype MVP to learn whether you’re on the right path.
The mantra to keep in mind when creating non-prototype MVPs is this: you can always go leaner. To plan your MVP, ask yourself the following questions:
What am I trying to learn?
What are the main signals I need from the market to validate my hypothesis?
Are there any other signals I can test for that will serve as indicators for my main signal?
What’s the fastest way for me to find this information?
As an example, let’s answer these questions for a solution that an ecommerce company wants to test:
What am I trying to learn? We are trying to learn whether this new ecommerce solution will increase purchases.
What are the main signals I need from the market to validate my hypothesis? The main signal we’re seeking from the market is an increase in completed purchases.
Are there any signals I can test for that will serve as indicators for my main signal? Instead of completed purchases, can we test for customer intent and use that as a proxy for purchases?
What’s the fastest way for me to find this information? Let’s send out an email to a subset of our users offering a few items for sale and count click-throughs for that call-to-action. This will help us determine interest and intent to purchase.
Types of Non-Prototype MVPs
Let’s take a quick look at some techniques for creating non-protoype MVPs.
Email is a very powerful tool when it comes to learning about your customers. Open rates, click-throughs, and task completion rates for recipients all provide insight into whether your idea has value.
- Google Ad Words
A very inexpensive experiment to run is to purchase Google Ad Words advertisements that target searches relevant to your business. By monitoring what people are searching for, you’ll start to get feedback on what kind of language resonates with your audience. By measuring click-throughs, you can see how much interest there is in the words and messages you propose.
- Landing Page
A landing page for click-through traffic from Google ads can further validate your thinking. A landing page is the online equivalent of a Wild West movie studio set. It’s just a facade of your service, built with a very specific and obvious call-to-action on it. Whether it’s Sign-up, Buy Now, or Share-With-A-Friend, every user who completes the task on your landing page counts as validation of your product idea.
- The button to nowhere
A feature can be tested on your site by adding a button to the interface that touts the new functionality. That button does nothing more than measure the number of times it’s clicked. Each click indicates a customer’s desire for that feature. With enough measurable interest, further development of the feature can continue. Of course, you should give the user some explanation of why the feature isn’t working. You can use this further interaction as a chance to capture an email address or another bit of feedback.
Hybrids and Creativity
When I talk to teams and entrepreneurs, I’m often impressed by how creative they can be in their approach to creating MVPs. Designing tests is a creative process, and you should use the methods listed in this chapter as inspiration for your creativity. The best approach for you will often be a mashup of many approaches.
Here’s an example of how Cheryl Yeoh launched CityPockets using a hybrid approach called a Concierge MVP to find out whether her idea solved a real problem and if there was enough demand to justify building it for real.
Cheryl Yeoh started CityPockets from the hypothesis that people had trouble managing, keeping track of, and redeeming all the daily deals and coupons they purchased online. She interviewed customers to validate that indeed there was a need, but she wasn’t sure if her solution—an online wallet for all of these coupons—would bring the kind of value these customers needed. To validate her hypothesis, she launched an MVP version of CityPockets.com that featured only a front end. Building the back-end processing and integration she would need was going to be costly; she didn’t want to spend her money unless she was sure her customers would find her service valuable.
Instead of building a back end, Cheryl assigned a unique email address to each customer who signed up for the service. She instructed her customers to forward all of their coupon emails to that address. Behind the scenes, Cheryl was manually entering every coupon into a database. She set an arbitrary target outcome for herself: 500 emails a day. If customers were sending her 500 emails a day, she felt confident concluding there would be enough demand for the service to merit further investment. She would be ready at that point to build a back end to take over the processing.
This approach—though it involved some design and coding—left out the heavy lifting. Instead, it let Cheryl focus her investment on the smallest possible set of features she needed to support her learning. At the end of the day, this is the essence of the Lean UX approach. Design only what you need. Deliver it quickly. Create enough customer contact to get meaningful feedback fast.
Conclusion
In this chapter, we defined the Minimum Viable Product as the smallest thing you can make to learn whether your hypothesis is valid. In addition, we discussed the various forms an MVP can take, took a closer look at prototyping, and discussed tactics for learning that don’t require building prototypes.
In Chapter 6, we take a look at various types of research you can use to make sure that your designs are hitting the mark. We also take a look at how your team can make sense of all the feedback your research will generate.