R’s success lies in its community. While the R Core Team does a fantastic job, it’s important to realize that most R code is written by users. In this chapter, you’re going to learn how to create your own packages to share your code with your colleagues, friends, and the wider world. Even if you’re a lone-working hermit who doesn’t like sharing, packages are a great way to organize code for your own use.
After reading this chapter, you should:
- Be able to create a package
- Know how to document its functions and datasets
- Be able to release the package to CRAN
The natural way to share R code and make it reusable by others (or even just yourself) is to package it up. In my experience, a lot of R users delay learning about how to create their own packages, perceiving it to be an advanced topic. In reality, it’s a simple task—as long as you follow the prescribed rules. These rules are laid out in the “Writing R Extensions” manual that ships with R. If things go wrong, the answer is invariably buried within that document.
Building packages requires a bunch of tools that are standard under Linux and other Unix derivatives, but not on Windows. All the tools have been collected together in a single download, available at http://cran.r-project.org/bin/windows/Rtools (or the bin/windows/Rtools directory of your nearest CRAN mirror). For even easier installation, use install.Rtools in the installr package.
While you’re installing things, you’ll want the devtools and roxygen2 packages as well:
install.packages(c("devtools","roxygen2"))
Creating a package is mostly just a case of putting the right files in the right places. Inside your package directory, there are two compulsory files:
Three other files are optionally allowed:
Before you start panicking at the thought of having to write five whole administrative files, take a deep breath. NAMESPACE and INDEX are completely autogenerated, DESCRIPTION is partially autogenerated, and you don’t need a license file if you use one of several common, standard, licenses.[67]
At the top level, there are two directories that must be included:
- R contains your R code.
- man contains help files.
There are also some optional directories:
- src contains C, C++, or Fortran source code.
-
demo contains R code demos to be run by the
demofunction. -
vignettes contains longer documents explaining how to use the package, as found via
browseVignettes. - doc contains help documents in other formats.
- data contains data files.
- inst contains anything else.
The first optional directories are beyond the scope of this quick introduction to package creation. Of the three compiled languages, C++ is easiest to use with R, thanks to the Rcpp package (see Dirk Eddelbuettel’s Seamless R and C++ Integration with Rcpp). Creating vignettes isn’t hard, especially if you use the knitr package (read Yihui Xie’s Dynamic Documents with R and knitr).
Data files are things that will be made available via the data function (as we saw in Built-in Datasets in Chapter 12). The preferred format is for them to be .RData files—the result of a call to save—though other formats are possible.
Although inst is the free-range folder that can contain anything, there are some standard contents that may be included:
-
inst/tests contains your
RUnitortestthattests. - inst/python, inst/matlab, and inst/someotherscriptinglanguage contain code from other scripting languages. (The three compiled languages that are supported go in src, as discussed above.)
- CITATION describes how you would like the package to be cited, although this information is usually autogenerated from the description file.
OK, enough theory—let’s make a package already. First, we need some contents: the hypotenuse function from the last chapter will do nicely. To demonstrate including data in a package, we can use some Pythagorean triples:
hypotenuse<-function(x,y){sqrt(x^2+y^2)}pythagorean_triples<-data.frame(x=c(3,5,8,7,9,11,12,13,15,16,17,19),y=c(4,12,15,24,40,60,35,84,112,63,144,180),z=c(5,13,17,25,41,61,37,85,113,65,145,181))
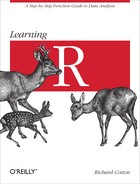
So now we need to create a load of directories to try and remember where to put things, right? Actually, it’s easier than that. The package.skeleton function creates (almost) everything we need. It needs a name for the package (“pythagorus” will do nicely), and a character vector naming the variables to add to it:
package.skeleton("pythagorus",c("hypotenuse","pythagorean_triples"))
Running package.skeleton creates the R, man, and data directories and the DESCRIPTION and NAMESPACE files, as well as a file named Read-and-delete-me that contains further instructions. Its output can be seen in Figure 17-1.
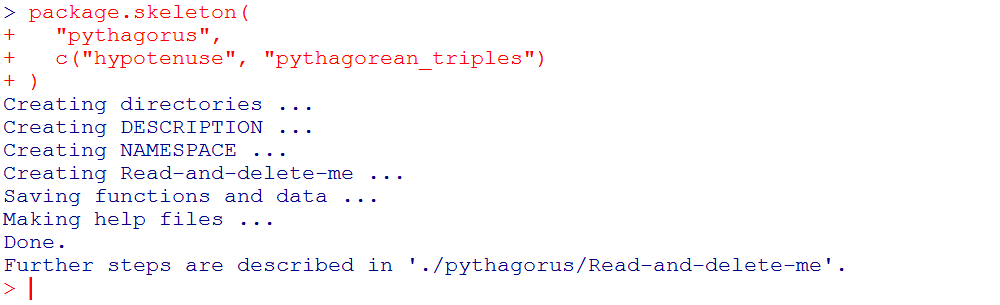
The DESCRIPTION file has a strict structure of Name: value pairs. All we need to do is to update the Title, Author, Maintainer, Description, and License fields to something appropriate. The basic file format, created by package.skeleton, is shown in Figure 17-2.
The License field must be one of “file” (in which case a LICENCE or LICENSE file must be included), “Unlimited” (no restriction), or one of these standard licenses: “GPL-2,” “GPL-3,” “LGPL-2,” “LGPL-2.1,” “LGPL-3,” “AGPL-3,” “Artistic-2.0,” “BSD_2_clause,” “BSD_3_clause,” or “MIT.”
The NAMESPACE file contains the text exportPattern("^[[:alpha:]]+"). This means “make any variable whose name begins with a letter available to the users.” Modern best practice is to write an export statement for each variable that you want to make available, rather than specifying a pattern.
We’ll see how to automate creation of NAMESPACE in the next section, but for now, replace the text with export(hypotenuse).
The man directory contains some automatically generated .Rd files: one for each function, one for each dataset, and another named pythagorus-package.Rd. These .Rd files contain LaTeX markup that will be used to create the help pages once the package is built. pythagorus-package.Rd contains a general help page for the whole package, where you can introduce the rest of the package. An example of an autogenerated .Rd file is given in Figure 17-3.

While the basic format is automatically created for you, R does not know what the function is for, so you need to manually fill in some of the details. There is a hard way to do this and an easy way, the latter of which is described next.
The big problem with having the help page for a function stuck in a different directory than the actual content is that it is very easy for the content to get out of sync. A typical example of this is when you add, remove, or rename the arguments that go into a function. R is not able to automatically change the corresponding help file to match the function, and you have to flit backward and forward between the two files to make sure that everything stays up to date.
The roxygen2 package solves this problem by letting you write help text in comments next to the R code that you are trying to document. As a bonus, it uses a simple markup that reduces the amount of LaTeX that you need to know. roxygen2 is derived from Doxygen, which provides a similar documentation generation facility for C++, C, Java, Fortran, Python, and other languages. This makes it worthwhile learning the syntax, since you can then document code in many languages.
Each line of roxygen2 markup starts with #'. Some sections, like the title and description, are marked by their position at the start of the block. Other sections are denoted with a keyword. For example, the section describing the return values begins with @return. A full help block for a function would look like this:
#' Help page title#'#' A couple of lines of description about the function(s).#' If you want to include code, use code{my_code()}.#' @param x Description of the first argument.#' @param y Description of the second argument.#' @return Description of the return value from a function.#' If it returns a list, use#' itemize{#' item{item1}{A description of item1.}#' item{item2}{A description of item2.}#' }#' @note Describe how the algorithm works, or if the function has#' any quirks here.#' @author Your name here!#' @references Journal papers, algorithms, or other inspiration here.#' You can include web links like this#' url{http://www.thewebsiteyouarelinkingto.com}#' @seealso Link to functions in the same package with#' code{link{a_function_or_dataset}}#' and functions in other packages with#' code{link[another_package]{a_function_or_dataset}}#' @examples#' #R code run by the example function#' dontrun{#' #R code that isn't run by example or when the package is built#' }#' @keywords misc#' @exportf<-function(x,y){#Function content goes here, as usual}
In the preceding example, there are a few things to pay special attention to.
The arguments are announced with the @param keyword. (The term “param” is standard throughout the Doxygen variants, so changing it to “arg” for R would cause more confusion than it would remove.) After @param comes a space, the name of the argument, and another space before the description of that argument.
Anything in the examples should be legal R code, since it is automatically run when you build the package. If you want to add commentary, use an extra hash (on top of the existing #' for roxygen2) to create R comments. If you want to add examples that may fail (demonstrating errors or creating files, for example), then wrap them in a dontrun{} block.
Help files can contain keywords, but not just anything. To see the list of possible values, install the R.oo package, and run this snippet:
library(R.oo)Rdoc$getKeywords()
(Alternatively, open the KEYWORDS file in the directory returned by R.home("doc").)
Adding the @export keyword lists the function in the NAMESPACE file, which in turn means that users should be able to call that function from the package, rather than it being an internal helper function.
The documentation for the whole package belongs in a file named packagename-package.R. It is similar to function documentation, but possibly even easier to write since there is less of it:
#' Help page title. Probably the package name and tagline.#'#' A description of what the package does, why you might want to use it,#' which functions to look at first, and anything else that the user#' really, absolutely, must look at because you've created it and it is#' astonishing.#'#' @author You again!#' @docType package#' @name packagename#' @aliases packagename packagename-package#' @keywords packageNULL
The two really important bits of function documentation are the @docType package line, which tells roxygen2 that this is whole-package documentation, and the NULL value afterward. This is needed for technical reasons—errors will result if you omit it.
Documenting datasets is almost the same as documenting the whole package. There is no standard place for this documentation; you can either append it to the package documentation file, or create a separate packagename-data.R file:
#' Help page title#'#' Explain the contents of each column here in the description.#' itemize{#' item{column1}{Description of column1.}#' item{column2}{Description of column2.}#' }#'#' @references Where you found the data.#' @docType data#' @keywords datasets#' @name datasetname#' @usage data(datasetname)#' @format A data frame with m rows of n variablesNULL
As with packages, the two important bits are the @docType data line, which tells roxygen2 that this is function documentation, and the NULL value afterward.
Once you’ve written documentation for each function, each dataset, and the whole package, call the roxygenize function to generate your help files and update the NAMESPACE and DESCRIPTION files (roxygenise is an identical alternative to roxygenize provided for those who prefer British spellings):
roxygenize("path/to/root/of/package")
Now you’ve created all the required directories, added R code and datasets, and documented them. You’re nearly ready to build your package—the last task is to check that everything works.[68]
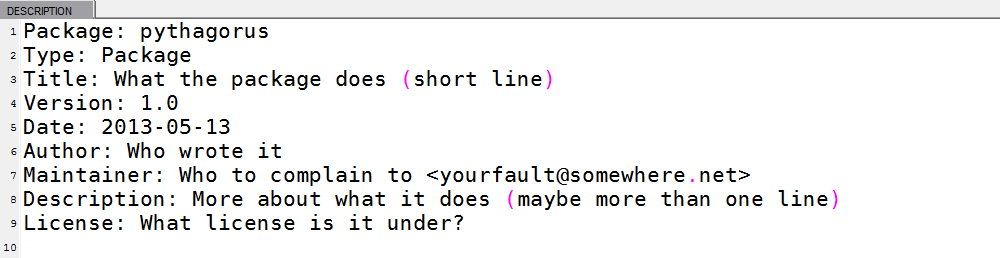
R has a built-in check tool, R CMD check, available from your OS command line. It’s incredibly thorough and is the main reason that most packages you download from CRAN actually work. Of course, using a DOS or bash command line is so 20th century—a better alternative is to use the check function in the devtools package, the output of which is shown in Figure 17-4:
library(devtools)check("path/to/root/of/package")
This provides several pages of output and will warn on a variety of things, like documentation not matching the corresponding function, names not being portable across OSs, examples not running correctly, and whether it thought your coding style was a bit old-fashioned. (OK, the last one is made up, but there are lots of checks.)
Read the output, fix the errors and warnings, and repeat. Once you are satisfied that your package files are mistake-free, you can finally build it! As with check, there is a command-line version of build built into R, but it is much easier to use the function in the devtools package. You get a choice of building to source (portable across OSs; the standard format for Linux) or binary (specific to your current OS):
build("path/to/root/of/package")
That’s it—you now have your own package! Although, wouldn’t it be great if other people had your package too? To release your package to CRAN, use the devtools release function:
release("path/to/root/of/package")
This asks you lots of questions to make sure that you’re really, really, really sure you’ve done everything you need to before you send your package.
Warning
When you upload a package to CRAN, R Core members will check that your package builds without warnings. Their time is precious, so it’s important that you run the check function and that you fix all the errors and warnings before uploading to CRAN.
Functions act like a black box to users. They pass in some arguments and a value gets returned, without the user needing to be aware of what happens inside the function (at least in theory). This means that the signature of a function (the names and order of the function’s arguments) should not be changed without warning the user. R provides several functions to help notify users of changes to signatures.
If you are planning to add a new feature but haven’t had the chance to implement it, or you want to give your users advance notice that this feature is coming, use the .NotYetUsed function. This causes an error or a warning that the argument is not yet in use, which will be thrown if a user tries to use it prematurely. In this next example, we’re going to extend the hypotenuse to work as a two-dimensional p-norm. Before we add the new functionality, we’re just going to change the signature, and throw an error if the user tries to use the p argument:
hypotenuse<-function(x,y,p=2){if(!missing(p)){.NotYetUsed("p")}sqrt(x^2+y^2)}hypotenuse(5,12)#behavior as before
## [1] 13
hypotenuse(5,12,1)
## Error: argument 'p' is not used (yet)
Once we add the new functionality, we can remove the call to .NotYetUsed:
hypotenuse<-function(x,y,p=2){(x^p+y^p)^(1/p)}
If you want to add a whole new function (rather than just an argument), the equivalent function is .NotYetImplemented. This is brilliant when you are first creating a package, or adding a large block of functionality. Writing a single function can be time-consuming, so by the time you’ve written a few you may have forgotten which others you were going to add. Sometimes it’s better to work at a high level and fill in the details later. Simply create a placeholder for each function, making the body a call to .NotYetImplemented. One day the function in the next example will calculate triangular numbers, but for now it just throws an error:
triangular<-function(n){.NotYetImplemented()}triangular()
## Error: 'triangular' is not implemented yet
If you want to remove a function, it is polite to do it in stages. The first step is to add a call to .Deprecated, with the name of an alternative function to call instead. The rest of the function should remain unchanged, so that the existing behavior is preserved:
hypotenuse<-function(x,y,p=2){.Deprecated("p_norm")(x^p+y^p)^(1/p)}hypotenuse(5,12)
## Warning: 'hypotenuse' is deprecated. Use 'p_norm' instead. See
## help("Deprecated")
## [1] 13
After a suitable length of time—long enough for your users to have noticed the messages about deprecation—you can change the contents of the function to a call to .Defunct, which throws an error:
hypotenuse<-function(x,y,p=2){.Defunct("p_norm")}hypotenuse(5,12)
## Error: 'hypotenuse' is defunct. Use 'p_norm' instead. See help("Defunct")- Making packages mostly involves organizing your files into a specific structure.
-
package.skeletoncreates much of this structure for you. -
The
roxygen2package makes documenting packages easy. -
The
devtoolspackage makes checking and building packages easy. -
NotYetImplemented,Deprecated, andDefuncthelp you maintain your packages.
- Question 17-1
- Which of the five files in the top-level directory of an R package are compulsory? The files are DESCRIPTION, INDEX, LICENSE, NAMESPACE, and NEWS.
- Question 17-2
- Which of the eight directories in an R package are compulsory? The directories are data, demo, doc, inst, man, R, src, and vignettes.
- Question 17-3
- Why might you include a CITATION file in your package?
- Question 17-4
-
Which function must you call to generate help files from
roxygen2markup? - Question 17-5
- What’s the recommended way to politely remove a function from a package?
- Exercise 17-1
-
Write a function,
sum_of_squares, that calculates the sum of the firstnsquare numbers. (Hint: the formula isn* (n+ 1) * (2 *n+ 1) / 6.) [5] -
Create a data frame,
squares_data, with two columns. Thexcolumn should contain the numbers 1 to 10. Theycolumn should contain the sum of the square numbers up to the correspondingxvalue—that is, the result ofsum_of_squares(1:10). [5] -
Use
package.skeletonto create thesquarespackage, containing thesum_of_squaresfunction and thesquares_datadata frame. [5]
-
Write a function,
- Exercise 17-2
-
Document the
sum_of_squaresfunction, thesquares_datadata frame, and the wholesquarespackage usingroxygen2markup, and generate the help files. - Exercise 17-3
-
Use the
devtoolspackage to check and build thesquarespackage.