Many customers around the world rely heavily on Oracle Real Application Clusters (RAC) for high availability, scalability, and system uptime. In the database world, Oracle RAC has no competition in this space. IBM UDB DB2 and Microsoft SQL Server are slowly catching up to Oracle, but Oracle is still the only vendor that truly provides an active/active real-time configuration between multiple nodes. Oracle dominates in the database cluster technologies.
Different DBAs have different schools of thought about implementing RAC. Some believe that just about every application can be converted to RAC. Some believe that RAC poses too many technological challenges and difficulties for their organization to introduce. Experienced DBAs will accept the challenge but will not embrace the technology until implementations can be a repeatable process and thoroughly tested with their application.
Contrary to what some vendors may state, Oracle RAC can scale horizontally. With Oracle Database 10g Release 2, RAC can scale up to 100 nodes. Given that the majority of Oracle's customers are in the range of 2- to 16-node RAC implementations, few companies have dared to stretch Oracle RAC to beyond 16 nodes.
In today's downturn economy, companies are slowly migrating away from large IBM, HP, or Sun servers and migrating to commodity hardware running Linux. Also, with the readily available quad-core Intel and AMD CPUs at affordable prices, companies can run eight CPU Linux servers at a fraction of the cost of enterprise Unix servers on IBM, Sun, and HP. More important, flavors of Linux such as SUSE, Red Hat, and Oracle Enterprise Linux have proven to be rock-solid operating systems that provide utmost reliability similar to their counterpart Unix operating systems such as Sun Solaris, HP/UX, and IBM AIX.
If your company has a new implementation of Oracle applications deployed on Oracle's Unbreakable Linux Network and has requirements for high availability or scalability, you should consider RAC. This chapter will focus on installing and configuring RAC on Linux. Obviously, we cannot cover all facets of RAC deployment on Linux in a single chapter. We will concentrate on the topics we consider to be the most relevant surrounding RAC deployments on a Linux operating system.
You are new to RAC and want to architect a RAC solution according to industry best practices. You want to make sure that hardware requirements are met and all the vested parties are on the same page as to how RAC is architected from the engineering side.
A typical RAC configuration with Automatic Storage Management (ASM) looks like Figure 13-1.
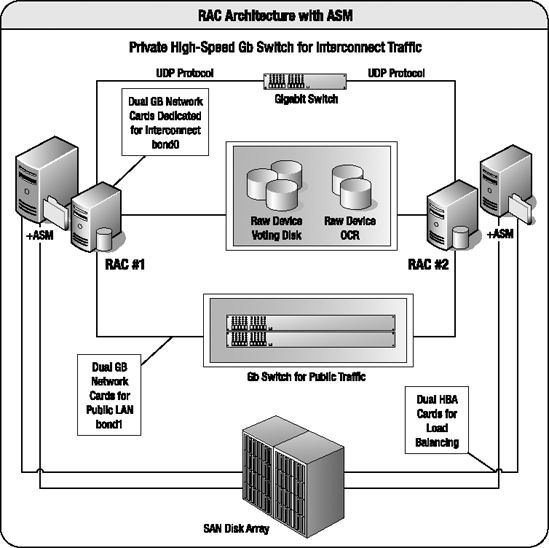
A RAC configuration must have at least two network interface cards (NICs)—one dedicated to the private interconnect traffic and another NIC card dedicated to the public network. Oracle RAC architected for performance and reliability will incorporate at least four network cards per RAC node. Two of the NICs will be bonded or paired into a single interface (for example, bond0) for interconnect traffic. The other two network cards will be bonded to service the public network (for example, bond1).
RAC implementations with ASM will also have host bus adapters (HBAs). Again, a well-designed RAC architecture will require two HBAs for load balancing and failover. In addition, HBAs can also be aggregated for performance too. If you are implementing RAC on ASM, you will typically have HBAs and Fibre Channel on the storage area network.
Oracle RAC configurations require gigabit switches in the architecture. Because of the bonding requirements of the NICs for interconnect and public network, you will have to invest in switches that support NIC bonding. Again, your architecture should include two switches for load balancing and failover.
Oracle RAC can be implemented on numerous storage arrays and on multiple filesystem types. Depending on your company requirements, you may be leveraging one of the following file storage types; all support a clustered database:
Oracle Clustered File System (OCFS) v1 for Linux 2.4 kernels or OCFS v2 for Linux 2.6 kernels
Network File System (NFS)
Third-party clustered filesystem such as Veritas Clustered FS
ASM
Raw devices
RAC implementations on NFS or OCFS tend to be easier for DBAs to configure than on ASM with raw devices for voting disks and Oracle Cluster Registry (OCR). Please keep in mind this comes at a cost of performance, as NFS and OCFS do not perform as well as ASM. The reason is simply because system administrators (SAs) will have presented the shared storage to all the RAC nodes, formatted the disks, and created a clustered/networked filesystem before presenting the storage to the DBAs. The SAs will have done the preliminary testing of the clustered filesystem prior to releasing the filesystems. DBAs at this point do not have to struggle from raw devices not being formatted with fdisk, clearing the disks with dd, or dealing with permission issues of the raw device.
Oracle RAC implementations on Linux require the installation of Oracle Clusterware software. Oracle Clusterware, formerly called Cluster Ready Services (CRS), provides the cluster management software for nodes to communicate with each other and establish a cluster.
Note
As mentioned, as of Oracle Database 10g Releasexs 2 (10.2), CRS is now Oracle Clusterware.
Oracle Clusterware, at a high level, is a product that manages high availability resources in a RAC configuration such as databases, instances, services, and listeners. In a typical RAC implementation, Oracle Clusterware should be installed and configured before the ASM/database software. Oracle Clusterware must be installed on a separate ORACLE_HOME. The Oracle Clusterware software home directory is also known as $ORA_CRS_HOME.
The OCR houses all the RAC configuration details and must be accessible by all the nodes in the cluster. The OCR contains information such as database names, status of the database, instances associated with the database, services, node applications, and services. In Linux, the location of the OCR is housed in the /etc/ocr.loc file.
The voting disk, formerly known as the quorum disk, stores the heartbeat of the RAC nodes and must be available to all the nodes in the cluster. The voting disks determine which nodes are available in the RAC cluster. The voting can be a single point of failure in a RAC configuration; thus, we strongly recommend you follow Oracle's best practices to have at least three voting disks in your RAC environment.
Before installing and configuring RAC on Red Hat or Oracle Enterprise Linux (OEL), you want to properly set the appropriate kernel parameters for database implementations.
The following kernel parameters in the /etc/sysctl.conf file are applicable for Red Hat and OEL distributions:
kernel.shmall                = 2097152
kernel.shmmax                = 2147483648
kernel.shmmni                = 4096
kernel.sem                   = 250 32000 100 128
fs.file-max                  = 65536
net.ipv4.ip_local_port_range = 1024 65000
net.core.rmem_default        = 262144
net.core.rmem_max            = 262144
net.core.wmem_default        = 262144
net.core.wmem_max            = 262144
For the previously mentioned Linux distributions, you can modify the /etc/sysctl.conf file and reload the kernel parameters without incurring a server reboot by executing the sysctl -p command as root. To view the relevant parameters for Oracle databases, you can execute the /sbin/sysctl command provided here:
sysctl -a |egrep "shmmax|shmall|shmmni|sem|file-max|ip_local_port_range|rmem|wmem"
The majority of the kernel parameters for stand-alone databases and RAC databases will be similar. You probably will not notice net.core.* parameters in the stand-alone database implementations. The net.core.* parameters are important to RAC since these parameters establish the UDP buffers required by Oracle Global Cache Services (GCS) for cache fusion traffic. Oracle interconnect utilizes UDP to transfer messages and data blocks between the instances. The Oracle recommended setting of 256KB should be sufficient to support the majority of database applications. The default value for net.core.rmem_default and net.core.wmem_default is 64KB. The default value for net.core.rmem_max and net.core.wmem_max is 128KB. Not setting appropriate values for the net.core.* parameters will generate errors while installing Oracle software.
Often, the net.core.*max parameters have to be adjusted to 1MB or greater to support a high number of concurrent blocks.
The cvuqdisk package discovers and checks the accessibility of shared storage for SCSI disks. The cvuqdisk package is located in the installation media. You can change your directory to the clusterware/rpm directory after you unzip the Clusterware software and install the cvuqdisk package with the rpm -ihv command:
$ sudo rpm -ihv cvuqdisk-1.0.1-1.rpm
Preparing...                ########################################### [100%]
   1:cvuqdisk               ########################################### [100%]
If the cvuqdisk package is not installed, you will receive an error as part of the runcluvfy.sh output indicating that the cluster verify utility could not determine the "sharedness" of a disk during the shared storage accessibility (SSA) component check:
Unable to determine the sharedness of /dev/sda on nodes:
        rac3,rac4
If you have a previous version of the cvuqdisk package, you should remove the previous version using the rpm -e command before installing the latest version. We recommend that Cluster Verification Utility (CVU) be run before and after CRS install as well as database install. CVU can be downloaded from OTN under the Clusterware page.
You want to modify the /etc/hosts file for RAC. For example, you want to add the public, private, and virtual IP addresses of your RAC nodes.
The /etc/hosts file must be modified to reflect the interconnect private network IP addresses, public IP addresses, and virtual IP addresses (VIPs). A sample /etc/hosts file will have entries that resemble what you see here for a two-node RAC system:
172.16.201.132       rac3.dbaexpert.com           rac3
172.16.201.134       rac4.dbaexpert.com           rac4
172.16.201.232       rac3-vip.dbaexpert.com       rac3-vip
172.16.201.234       rac4-vip.dbaexpert.com       rac4-vip
192.168.2.3          rac3-priv.dbaexpert.com      rac3-priv
192.168.2.4          rac4-priv.dbaexpert.com      rac4-priv
The DNS server should also hold entries for the hostname and the virtual hostnames.
In the sample /etc/hosts file entries, you will notice that a separate entry exists for the hostname, the virtual hostname, and the private hostname. For each RAC node, three entries must exist in the /etc/hosts file. In addition, the entries must be in the following format:
IP Address hostname.domain_name hostname
The /etc/hosts format in the previous example is Oracle's standard across the majority of its product line including Oracle Database, Grid Control, E-Business Suite, and Collaboration Suite. System administrators often have their own standard of making entries to the /etc/hosts file that do not coincide with Oracle's mandated format.
The virtual hostnames play an important role in the RAC world. The virtual hostnames are what DBAs in the RAC world refer to as VIPs. VIPs are leveraged for client side connectivity as well for fast client side failover. VIPs are leveraged to configure the database's listener.ora and tnsnames.ora files. You can also take advantage of VIPs to configure local and remote listeners.
Warning
A common mistake that DBAs and SAs make when configuring RAC for the first time is to set up the network interface for the VIP. Oracle VIP Configuration Assistant (VIPCA) is responsible for configuring the VIP network interfaces. Prior to the Clusterware installation, you must not be able to ping the VIPs. In addition, the output of the ifconfig -a command should not list an entry for the VIP.
Furthermore, a separate IP address for interconnect traffic is required on each host. Interconnect IP addresses often start with 192.xx or 10.xx octals. Interconnect hostnames should not be listed in the DNS servers.
You want to configure ssh so that the oracle Unix account can log on to the other RAC nodes without being prompted for a password.
To set up user equivalence, you must first generate the secure token key using the ssh-keygen Unix command. The ssh-keygen command accepts prompts for several input options. In this solution, you will specify the command to generate an RSA key and accept all default options. The output of the ssh-keygen command will look like this:
$ ssh-keygen -t rsa
Generating public/private rsa key pair.
Enter file in which to save the key (/home/oracle/.ssh/id_rsa):
Enter passphrase (empty for no passphrase):
Enter same passphrase again:
Your identification has been saved in /home/oracle/.ssh/id_rsa.
Your public key has been saved in /home/oracle/.ssh/id_rsa.pub.
The key fingerprint is:
21:bf:46:5a:a8:19:91:ea:6d:d1:e2:7c:18:57:e8:79 [email protected]
The public key (id_rsa.pub file) is created in the $HOME/.ssh directory of the user. You can use the cat command to view the contents of this file from the /home/oracle/.ssh directory, as shown here:
$ cat id_rsa.pub
ssh-rsa AAAAB3NzaC1yc2EAAAABIwAAAIEAuvyW56fX0U+3Qm1LOcD+iE+QReloBVOK72sGuPVvH33WOiY9
H7ueJkrHErDqK2V2U9zAMkNysDX+pTIziiwbP9cFC94TYeWbwMz8a7tiWhNIANT8D6TAX1ZVncxjMSRoqYb8
XgpuokCgyUhAu3yo9LZc6mhAM2llq/A+jMnr/Us= [email protected]
You can copy this file to the remote server and during the file transfer rename the file to something like id_rsa.pub.[hostname], or you can copy the contents of the id_rsa.pub file to your operating system buffer. Either way, you must copy the contents of the id_rsa.pub file to the $HOME/.ssh/authorized_keys file on the other RAC nodes. In this case, the authorized_keys file will be /home/oracle/.ssh/authorized_keys.
Once the entry to the other RAC node's authorized_keys file is made, you can secure shell to the RAC node without a password prompt.
Note
However, if you supplied a passphrase when running the command ssh-keygen -t rsa to create the public key, then you will be prompted for that passphrase when connecting to the other RAC nodes. Please review recipe 14-6 for details on how to configure a promptless login.
The first time you secure shell to a remote node, you will be prompted to confirm the authenticity of the server to which you are attempting to connect. The following example establishes a connection to rac4 for the first time:
$ ssh rac4
The authenticity of host 'rac4 (172.16.201.134)' can't be established.
RSA key fingerprint is 78:c6:41:47:3c:39:27:71:68:34:76:6e:86:d6:67:c2.
Are you sure you want to continue connecting (yes/no)? yes
Warning: Permanently added 'rac4,172.16.201.134' (RSA) to the list of known hosts.
Last login: Sun Jun 22 09:12:12 2008 from rac3.dbaexpert.com

ORACLE_BASE: /apps/oracle
BIN Directory: /apps/oracle/general/sh
[...]
$
You can see that we were able to connect directly to the rac4 server. You must repeat the connectivity to the host and also to the fully qualified hostname. In addition, you must also set up user equivalence to the local host by hostname and the local host with the fully qualified domain name. Here's a simple script that can be enhanced in your environment to check for proper user equivalence setup:
ssh rac3 date
ssh rac4 date
ssh rac3.dbaexpert.com date
ssh rac4.dbaexpert.com date
ssh rac3-priv date
ssh rac4-priv date
ssh rac3-priv.dbaexpert.com date
ssh rac4-priv.dbaexpert.com date
You should run this script on every RAC node. Notice that the ssh user equivalence connectivity test is even set up for the interconnect hostnames. Again, you will not be able to secure shell to the virtual hostnames yet. The VIPs will be enabled when root.sh is executed after Clusterware is installed on the last node.
Setting up user equivalence is an important component to a successful RAC installation. During the installation, the Oracle Universal Installer (OUI) must copy files and execute programs on the RAC nodes. Setting up user equivalence allows the OUI to copy files and execute programs without being prompted for a password.
For some reason or another, user equivalence poses some problems for DBAs. One common issue DBAs run into is directory permissions for the oracle user account. Often, the home directory for oracle has write privileges granted to the world or even to the oinstall or dba group. ssh2 protocol considers this a security violation and will not allow a promptless login.
Note
If you execute the ssh-keygen executable, you will destroy user equivalence. For this reason, you should consider making a copy of the id_rsa.pub file and the id_rsa file as id_rsa.HOSTNAME and id_rsa.pub.HOSTNAME. In the event that anothers DBA executes the ssh-keygen executable, you can revert to the original versions, instead of having to copy the id_rsa.pub entry to all the authorized_keys files.
The SAs, SAN engineers, and network administrators prepared the RAC environment. Before you install Oracle Clusterware, you want to perform preliminary validations to check whether the OS and hardware configuration are adequately configured.
Using the Cluster Verification Utility (cluvfy), you can check your Linux hardware configuration before actually starting to install Oracle Clusterware:
./runcluvfy.sh stage -post hwos -n rac3,rac4 -s /NFS -verbose
Executing cluvfy will yield output similar to the following. If the output from the hardware/OS cluster verify is acceptable, you can proceed with the next check, which is to perform the pre-Clusterware installation checks.
Performing post-checks for hardware and operating system setup

Checking node reachability...

Check: Node reachability from node "rac3"
  Destination Node                      Reachable?
  ------------------------------------  ------------------------
  rac3                                  yes
  rac4                                  yes
Result: Node reachability check passed from node "rac3".

Checking user equivalence...

Check: User equivalence for user "oracle"
  Node Name                             Comment
  ------------------------------------  ------------------------
  rac4                                  passed
  rac3                                  passed
Result: User equivalence check passed for user "oracle".

Checking node connectivity...
Interface information for node "rac4"
  Interface Name    IP Address    Subnet        Subnet Gateway  Default Gateway
Hardware Address
  ----------------  ------------  ------------  ------------  ------------
------------
  eth0              172.16.201.134  172.16.201.0  0.0.0.0       172.16.201.2
00:0C:29:E7:A6:A7
  eth1              192.168.2.4   192.168.2.0   0.0.0.0       172.16.201.2
00:0C:29:E7:A6:B1


Interface information for node "rac3"
  Interface Name    IP Address    Subnet        Subnet Gateway  Default Gateway
Hardware Address
  ----------------  ------------  ------------  ------------  ------------
------------
  eth0              172.16.201.132  172.16.201.0  0.0.0.0       172.16.201.2
00:0C:29:AB:66:8E
  eth1              192.168.2.3   192.168.2.0   0.0.0.0       172.16.201.2
00:0C:29:AB:66:98


Check: Node connectivity of subnet "172.16.201.0"
  Source                          Destination                     Connected?
  ------------------------------  ------------------------------  ----------------
  rac4:eth0                       rac3:eth0                       yes
Result: Node connectivity check passed for subnet "172.16.201.0" with node(s)
rac4,rac3.

Check: Node connectivity of subnet "192.168.2.0"
  Source                          Destination                     Connected?
  ------------------------------  ------------------------------  ----------------
  rac4:eth1                       rac3:eth1                       yes
Result: Node connectivity check passed for subnet "192.168.2.0" with node(s)
rac4,rac3.

Interfaces found on subnet "172.16.201.0" that are likely candidates for VIP:
rac4 eth0:172.16.201.134
rac3 eth0:172.16.201.132

Interfaces found on subnet "192.168.2.0" that are likely candidates for a private
interconnect:
rac4 eth1:192.168.2.4
rac3 eth1:192.168.2.3
Result: Node connectivity check passed.

Checking shared storage accessibility...

"/NFS" is shared.

Shared storage check was successful on nodes "rac4,rac3".

Post-check for hardware and operating system setup was successful.
You can take advantage of the runcluvfy.sh shell script prior to installing Oracle Clusterware to check your hardware components. The runcluvfy.sh shell script resides in the installation media and is accessible once you unzip the downloaded Clusterware software from Oracle Technology Network (OTN) using the URL http://otn.oracle.com.
Oracle started to ship the cluvfy utility as part of the software stack as of Oracle Database 10g Release 2. DBAs should master the cluvfy utility. The cluvfy utility can be leveraged to check the successful completion of each stage of the RAC implementation and can save RAC implementers an enormous amount of time and headaches by diagnosing potential issues in the RAC topology. The cluvfy utility is designed to be executed at each stage of the RAC installation. The valid stages of RAC installations are as follows:
-post hwos    :  post-check for hardware and operating system
-pre  cfs     :  pre-check for CFS setup
-post cfs     :  post-check for CFS setup
-pre  crsinst :  pre-check for CRS installation
-post crsinst :  post-check for CRS installation
-pre  dbinst  :  pre-check for database installation
-pre  dbcfg   :  pre-check for database configuration
After the Oracle Clusterware installation, you can run the cluvfy command with the post crsinst option to verify a successful installation:
/apps/oracle/product/CRS/bin/cluvfy stage -post crsinst -n rac3,rac4
Another important stage to execute the cluvfy utility is before the database installation. You can execute the cluvfy utility with the -pre dbinst option, as shown here:
crs > cluvfy stage -pre dbinst -n rac3,rac4
In addition to checking the RAC environment at each stage of a RAC implementation, you can also check the components of the RAC environment such as clustered file system integrity, OCR integrity, cluster integrity, cluster manager integrity, node connectivity, reachability between nodes, space availability, minimum space requirements, and so on. You can execute the cluvfy comp -list command to review all the options.
Your company decided to implement Oracle RAC. The DBA team is responsible for installing and setting up Oracle RAC. You want to start by installing Oracle Clusterware.
Let's install and configure Oracle Clusterware. First, you must download the Oracle Clusterware software from the OTN web site. Just like you invoke the runInstaller executable for database installations, you execute the same runInstaller executable from the unzipped clusterware directory. When you launch the OUI, you will be presented with the Welcome screen. You can click the Next button to be directed to the Specify Home Details screen. On this screen, specify a name for the Clusterware home directory and the destination directory where you want to install Oracle Clusterware.
Note
Please do not install Oracle Clusterware in the same subdirectory level as your Oracle Home for the database binaries. Oracle Clusterware is an in-place patch maintenance and upgrade. If your Oracle Clusterware directory happens to be /apps/oracle/product/10.2.0/CRS and and you upgrade to Oracle Clusterware 11g, you will be running the 11.1 software release from a 10.2 directory name structure.
Click the Next button to be routed to the Product-Specific Prerequisite Checks screen. Make sure that all components pass the prerequisite checks and that you see the message "Check complete. The overall result of this check is: Passed" at the bottom of the screen.
After you confirm that all the prerequisites are met, click the Next button. You will be directed to the Specify Cluster Configuration screen, as displayed in Figure 13-2.
Check the public node name, the private node name, and the virtual hostname, and then confirm that the entry made by the OUI is correct. If the entry is inaccurate, click the Edit button, and correct the entry. If the entry is correct, proceed by clicking the Add button to be directed to the Add a New Node to the Existing Cluster pop-up window, as displayed in Figure 13-3.
On this screen, enter the public node, the private node, and the virtual hostname, and click the OK button. You will notice the standard implemented: the virtual hostname has -vip appended to the hostname, and the private hostname has -priv appended to the hostname. Your company should create a standard naming convention and be consistent across other RAC implementations.
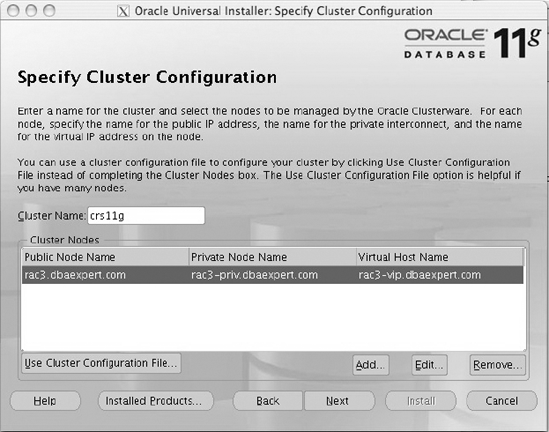

Now the Specify Cluster Configuration screen will reflect the new RAC node. Next, enter additional RAC nodes as necessary by clicking the Add button. Once you have added all the RAC nodes, you can proceed to the next screen by clicking the Next button; you'll be routed to the Specify Network Interface Usage screen, as displayed in Figure 13-4.

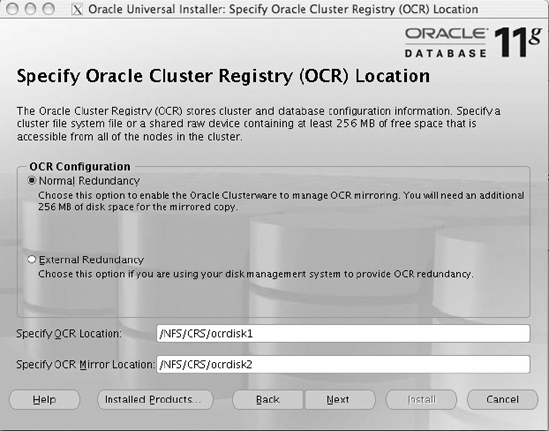
Please select one network interface to be the public network and one network interface to be the private network. In our example, we changed eth0 to be the public network. You can proceed with the Oracle Clusterware configuration by clicking the Next button to be directed to the Specify Oracle Cluster Registry (OCR) Location screen, as displayed in Figure 13-5.
On this screen, choose the Normal Redundancy option, and specify a mirrored location for the OCR disk. Unlike this example, you should place the OCR on separate disks, NFS, or clustered filesystems. As of Oracle Database 10g Release 2, Oracle provides the support for a mirrored OCR disk. Even if you are mirroring at the hardware level, you should mirror the OCR disk for additional redundancy.
In Oracle Database 10g Release 2, OUI does not support block devices, so you have to provide raw devices for both OCR and Voting Disk. In Oracle Database 11g, Oracle extends support for block devices in the OUI.
Note
Please notice the disk space requirements for the OCR disk. In Oracle Database 10g Release 2, the amount of space required for the OCR disk was 100MB. As of Oracle Database 11g, the disk requirement for the OCR disk is 256MB of disk space.
For simplicity, we recommend that when sizing the OCR or voting disk, you ask for 512MB or 1GB to be consistent and ask the SAs to carve out five 512MB or 1GB LUNs for the OCR and voting disk.
After you specify the OCR disk, you can proceed to the next screen by clicking the Next button. You will be directed to the Specify Voting Disk Location screen, as displayed in Figure 13-6.
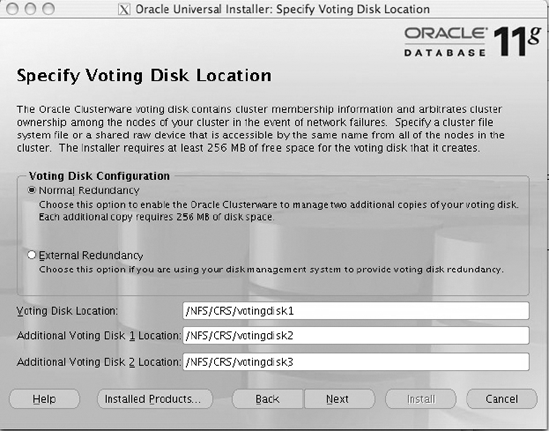
Again, select the Normal Redundancy option for the voting disks. The voting disk is a single point of failure for RAC, and you should choose at least three voting disks on separate disks or filesystems for a RAC implementation. You must have more than 50 percent of the voting disks online for RAC availability. You may have up to 32 voting disks. The option to specify multiple voting disk was a new feature introduced in Oracle Database 10g Release 2. Similar to the OCR disk, the size requirements for the voting disk is increased to 256MB as of Oracle Database 11g. The requirement for the voting disk in Oracle Database 10g was 20MB. Again, unlike this example, you should place the voting disk on separate disks, NFS, or clustered filesystems.
Note
You can specify block devices for the voting disk starting in Oracle Database 11g.
Once multiple voting disks are specified, proceed by clicking the Next button to go to the Summary screen. On the Summary screen, you have the option to review the options you chose. Once you are satisfied, you can click the Install button to initiate the software install.
Once the software is installed on both the primary RAC node and the remote RAC node(s), several configuration assistants will be launched in silent mode. Upon successful execution of the configuration assistants, you will be presented with the Execute Configuration Scripts screen to run the root.sh script from the $ORA_CRS_HOME directory.
Warning
An important lesson to share is that you must execute root.sh serially and at one node at a time. Attempting to execute root.sh in parallel will cause your RAC installation to fail.
Running root.sh will yield output similar to what you see here:
WARNING: directory '/apps/oracle/product' is not owned by root
WARNING: directory '/apps/oracle' is not owned by root
WARNING: directory '/apps' is not owned by root
Checking to see if Oracle CRS stack is already configured

Setting the permissions on OCR backup directory
Setting up Network socket directories
Oracle Cluster Registry configuration upgraded successfully
The directory '/apps/oracle/product' is not owned by root. Changing owner to root
The directory '/apps/oracle' is not owned by root. Changing owner to root
The directory '/apps' is not owned by root. Changing owner to root
clscfg: EXISTING configuration version 4 detected.
clscfg: version 4 is 11 Release 1.
Successfully accumulated necessary OCR keys.
Using ports: CSS=49895 CRS=49896 EVMC=49898 and EVMR=49897.
node <nodenumber>: <nodename> <private interconnect name> <hostname>
node 1: rac3 rac3-priv rac3
node 2: rac4 rac4-priv rac4
clscfg: Arguments check out successfully.

NO KEYS WERE WRITTEN. Supply -force parameter to override.
-force is destructive and will destroy any previous cluster
configuration.
Oracle Cluster Registry for cluster has already been initialized
Startup will be queued to init within 30 seconds.
Adding daemons to inittab
Expecting the CRS daemons to be up within 600 seconds.
Cluster Synchronization Services is active on these nodes.
        rac3
        rac4
Cluster Synchronization Services is active on all the nodes.
Waiting for the Oracle CRSD and EVMD to start
Oracle CRS stack installed and running under init(1M)
Running vipca(silent) for configuring nodeapps

Creating VIP application resource on (2) nodes...
Creating GSD application resource on (2) nodes...
Creating ONS application resource on (2) nodes...
Starting VIP application resource on (2) nodes...
Starting GSD application resource on (2) nodes...
Starting ONS application resource on (2) nodes...


Done.
This particular output happens to be the root.sh output from the last node in the RAC environment. Notice the line in the output that is in bold and reads "Running vipca(silent) for configuring nodeapps." The VIPCA is invoked in silent mode to set up the VIP, GSD, and ONS services.
Note
If the VIPCA raises an error, you can correct the error by executing the vipca manually. To execute vipca, set your DISPLAY environment variable to a valid X server, and execute vipca from the CRS $ORACLE_HOME. You will be directed to another GUI tool to set up the VIPs for the RAC instances. The VIPCA will add the virtual IP addresses and another network interface, something like bond1:1 or eth1:1 depending on the NIC associated with the public network.
You just performed an Oracle Database 11g Release 1 Clusterware installation. If you are running Oracle Database 10g Release 2, you must install the base Oracle Database 10g Release 2 Clusterware software (10.2.0.1) and then install the patchset to upgrade to the 10.2.0.3 or 10.2.0.4 release.
Oracle introduced the CRS bundle patch for Oracle Clusterware for enhanced reliability of Oracle Clusterware 10.2.0.2 and newer releases. We strongly recommend you download the CRS bundle patch for your version of Clusterware and apply the patches using opatch. You can download the CRS bundle patch for your specific version of Oracle Clusterware. Each CRS bundle patch is inclusive and contains all the patches from the previous bundle patch. Please review MetaLink Note 405820.1 for additional details.
You run into numerous errors during the Clusterware installation. You tried to debug the issues but realize that you have to restart from the beginning. You want to completely remove any remnants of the installation and start again.
The following script example is an excerpt from MetaLink Note 239998.1 and can be executed to completely remove the existence of Oracle Clusterware:
rm /etc/oracle/*
rm -f /etc/init.d/init.cssd
rm -f /etc/init.d/init.crs
rm -f /etc/init.d/init.crsd
rm -f /etc/init.d/init.evmd
rm -f /etc/rc2.d/K96init.crs
rm -f /etc/rc2.d/S96init.crs
rm -f /etc/rc3.d/K96init.crs
rm -f /etc/rc3.d/S96init.crs
rm -f /etc/rc5.d/K96init.crs
rm -f /etc/rc5.d/S96init.crs
rm -Rf /etc/oracle/scls_scr
rm -f /etc/inittab.crs
cp /etc/inittab.orig /etc/inittab
Once you remove all the remnants of Oracle Clusterware from the /etc directory, you want to make sure there are no traces of the executables in memory. You can check for background processes running with the following ps -ef command:
ps -ef |egrep -i "crs|css|evm|d.bin"
If the output results in any processes running, you should terminate all the processes with the kill −9 command. Next, you should clear out the OCR and voting disk(s) with the dd command, similar to what is provided here:
# dd if=/dev/zero of=/dev/raw/raw11 bs=8192 count=12000
Lastly, as root, remove the CRS install directory with the rm -rf command. An example of such a command is shown here:
rm -rf /apps/oracle/product/CRS
When you install Oracle Clusterware, numerous scripts are scattered in the /etc directories. Not only do you have to remove the Clusterware HOME directory, but you also need to purge all the Clusterware scripts in the /etc directory. This solution is derived from Oracle MetaLink Note 239998.1 that explains all the files that need to be deleted to completely remove Oracle Clusterware for all operating systems.
In addition to removing all the installation files, you also need to delete the voting disk and OCR disk. If your voting and OCR disks happen to be on raw devices, you can use the dd command to clear out the contents of the files.
Note
Starting in Oracle Database 11g, voting and OCR disks can be on block devices. Raw device support continues to be phased out with each release.
You want to register RAC resources such as ASM, the database, and other RAC components with the OCR.
srvctl accepts an add argument to register a configuration information to the OCR. To register an ASM instance into the OCR, you can use the syntax provided here:
srvctl add asm -n rac3 -i +ASM1 -o /apps/oracle/product/10.2.0/ASM
The -n option specifies the node name. The -i option specifies the ASM instance name. Lastly, the -o option specifies the location of the Oracle ASM HOME directory. You must repeat the srvctl add asm command for each of the ASM instances. You can execute the srvctl command from one node.
The srvctl syntax to add the database is slightly different. You must first enter the configuration information for the database and then provide configuration information for each RAC instance. To add the configuration information for the database, you can use the add database option like you see here:
srvctl add database -d VISK -o /apps/oracle/product/10.2.0/RACDB
Next, you must add RAC instance configuration information using the add instance option:
srvctl add instance -d VISK -i VISK1 -n rac1
You need to repeat the add instance command for each RAC instance.
The srvctl executable is the interface to interact with the CRS and the OCR. Oracle recommends the database and instance registration with the srvctl executable. You can add other resources including service, nodeapps, and listener with the add option.
Once you have successfully added a resource, you can check on the status of the resource with the status option of the srvctl command. An example to display the status of the RACQA database would look like this:
$ srvctl status database -d RACQA
Instance RACQA1 is running on node rac3
Instance RACQA2 is running on node rac4
Once the ASM instance and the database information are captured within the OCR, you can use the start/stop command to shut down the database or ASM at the RAC level. To start a database, you can use the start database option like this:
srvctl start database -d VISK
To start an individual instance, you must specify the instance name with the -i option like this:
srvctl start instance -d VISK -i VISK1
To stop a database, you can use the stop database option similar to what you see here:
srvctl stop database -d VISK
Note
You may not realize the significance of the start and stop commands at the database level if you are running a two- or three-node RAC. DBAs who run RAC environments that are four nodes or more will probably appreciate the start database and stop database options. If you happen to be running a ten-node RAC, you can shut down all ten RAC instances with a single command.
The stop database option also accepts an -o option to specify abort mode. The stop database option will stop all the services and instances associated with the database across all the nodes. If you want to abort the RAC instances, you can use the -o option like this:
srvctl stop database -d VISK -o abort
You can stop a single instance of the RAC environment using the -i option:
srvctl stop instance -d VISK -i VISK1
Just like you can shut down the database with the stop option, you can start up the database with the start option. Similarly, you can start up an instance with the start instance option. The stop instance option also accepts an -o option to specify abort mode.
We recommend that DBAs exclusively use srvctl to set up a service for the database and to start/stop the database using the srvctl tool. Not only can you manage the database, but the database listener and services such as SERVICE_NAMES can also be managed. Table 13-1 lists additional start/stop srvctl commands that are frequently utilized to manage services.
Oracle provides syntax help for the srvctl executable. By simply typing srvctl -h without any arguments, detailed usage for all the argument options display on the screen. If you want to obtain detailed usage information for a specific option, you can pass arguments to srvctl with the -h option.
To get help about how to add a database service, you can type srvctl add service -h. Requesting help for this command yields this output:
$ srvctl add service -h
Usage: srvctl add service -d <name> -s <service_name> -r "<preferred_list>" [-a
"<available_list>"] [-P <TAF_policy>]
    -d <name>           Unique name for the database
    -s <service>        Service name
    -r "<pref_list>"    List of preferred instances
    -a "<avail_list>"   List of available instances
As another example, say you want to print the usage to remove a database from OCR since this command is rarely executed:
$ srvctl remove database -h
Usage: srvctl remove database -d <name> [-f]
    -d <name>           Unique name for the database
    -f                  Force remove
-h Print usageYou can get help for just about all the available options to srvctl.srvctl accepts the following arguments for the help parameter:
srvctl <command> <target> -h
Table 13-2 lists possible command and target options to receive help for.
Table 13.2. Command and Target of the Command
Command | Target of the Command |
|---|---|
|
|
|
|
|
|
|
|
|
|
|
|
| |
| |
| |
| |
| |
| |
|
You can specify valid combinations from the command and target columns for help.
You can view CRS status information using the crs_stat executable. The -t option shows the output in tabular format, as shown here:
$ crs_stat -t
Name           Type           Target    State     Host
------------------------------------------------------------
ora....A1.inst application    ONLINE    ONLINE    rac3
ora....A2.inst application    ONLINE    ONLINE    rac4
ora.RACQA.db   application    ONLINE    ONLINE    rac4
ora....C3.lsnr application    ONLINE    ONLINE    rac3
ora.rac3.gsd   application    ONLINE    ONLINE    rac3
ora.rac3.ons   application    ONLINE    ONLINE    rac3
ora.rac3.vip   application    ONLINE    ONLINE    rac3
ora....C4.lsnr application    ONLINE    ONLINE    rac4
ora.rac4.gsd   application    ONLINE    ONLINE    rac4
ora.rac4.ons   application    ONLINE    ONLINE    rac4
ora.rac4.vip   application    ONLINE    ONLINE    rac4
crs_stat also has a -v option for verbose output. Let's look at the ora.RACQA.RACQA1.inst resource with the -v option:
$ crs_stat -v ora.RACQA.RACQA1.inst
NAME=ora.RACQA.RACQA1.inst
TYPE=application
RESTART_ATTEMPTS=5
RESTART_COUNT=0
FAILURE_THRESHOLD=0
FAILURE_COUNT=0
TARGET=ONLINE
STATE=ONLINE on rac3
With the verbose output, additional information such as restart attempts, restart count, failure threshold, and failure count are exposed for each of the resources. You can also execute the -v option with the -t option. Executing the command yields this output:
$ crs_stat -t -v
Name           Type           R/RA   F/FT   Target    State     Host
----------------------------------------------------------------------
ora....A1.inst application    0/5    0/0    ONLINE    ONLINE    rac3
ora....A2.inst application    0/5    0/0    ONLINE    ONLINE    rac4
ora.RACQA.db   application    0/0    0/1    ONLINE    ONLINE    rac4
ora....C3.lsnr application    0/5    0/0    ONLINE    ONLINE    rac3
ora.rac3.gsd   application    0/5    0/0    ONLINE    ONLINE    rac3
ora.rac3.ons   application    0/3    0/0    ONLINE    ONLINE    rac3
ora.rac3.vip   application    0/0    0/0    ONLINE    ONLINE    rac3
ora....C4.lsnr application    0/5    0/0    ONLINE    ONLINE    rac4
ora.rac4.gsd   application    0/5    0/0    ONLINE    ONLINE    rac4
ora.rac4.ons   application    0/3    0/0    ONLINE    ONLINE    rac4
ora.rac4.vip   application    0/0    0/0    ONLINE    ONLINE    rac4
You will notice the R/RA columns for restart count and restart attempts. Similarly, you will notice the F/FT columns for failure count and failure thresholds.
Executing the crs_stat command with the -p option will provide even more detailed information about the resource.
The crs_stat command displays the status of the cluster services and reads directly from the OCR. Unfortunately, the output is not very readable. With the -t option, the output is significantly better except the resource column is abbreviated and often hard to read.
Oracle support provides an elaborate awk script in MetaLink Note 259301.1 that provides the crs_stat output in readable format to view the resource name column in entirety. Here we incorporated Oracle's awk script in a shell script called dba_crs. Executing dba_crs, you can see the complete resource name:
$ ./dba_crs
HA Resource                                   Target     State
-----------                                   ------     -----
ora.RACQA.RACQA1.inst                         ONLINE     ONLINE on rac3
ora.RACQA.RACQA2.inst                         ONLINE     ONLINE on rac4
ora.RACQA.db                                  ONLINE     ONLINE on rac4
ora.rac3.RACQA_RAC3.lsnr                      ONLINE     ONLINE on rac3
ora.rac3.gsd                                  ONLINE     ONLINE on rac3
ora.rac3.ons                                  ONLINE     ONLINE on rac3
ora.rac3.vip                                  ONLINE     ONLINE on rac3
ora.rac4.RACQA_RAC4.lsnr                      ONLINE     ONLINE on rac4
ora.rac4.gsd                                  ONLINE     ONLINE on rac4
ora.rac4.ons                                  ONLINE     ONLINE on rac4
ora.rac4.vip                                  ONLINE     ONLINE on rac4
You want to determine why a certain srvctl command is failing. You want to see srvctl in verbose mode.
The easiest way to enable debugging is to set the Unix environment variable called SRVM_TRACE to TRUE:
export SRVM_TRACE=true
Once you set the SRVM_TRACE environment variable, you can execute the srvctl command, and your output will be displayed in debug mode. Here's an example of an srvctl output with SRVM_TRACE set to TRUE:
[...]
m[ain] [19:51:59:385] [HAOperationResult.getOutputAll:115]  errLine is [CRS-0215:
Could not start resource 'ora.RACQA.RACQA2.inst'.]
[main] [19:51:59:385] [ParallelServerHA.startInstance:1419]  Failed to start RACQA2
 on rac4 error=CRS-0215: Could not start resource 'ora.RACQA.RACQA2.inst'.
[main] [19:51:59:386] [RemoteResponseEvent.<init>:62]  Creating Rmi Data Event
[main] [19:51:59:388] [HAOperationResult.getOutputAll:114]  outLine is []
[main] [19:51:59:388] [HAOperationResult.getOutputAll:115]  errLine is [CRS-0215:
Could not start resource 'ora.RACQA.RACQA2.inst'.]
PRKP-1001 : Error starting instance RACQA1 on node rac3
rac3:ora.RACQA.RACQA1.inst:
rac3:ora.RACQA.RACQA1.inst:SQL*Plus: Release 11.1.0.6.0 - Production on Tue Jun 24
19:51:33 2008
rac3:ora.RACQA.RACQA1.inst:
rac3:ora.RACQA.RACQA1.inst:Copyright (c) 1982, 2007, Oracle.  All rights reserved.
rac3:ora.RACQA.RACQA1.inst:
rac3:ora.RACQA.RACQA1.inst:Enter user-name: Connected to an idle instance.
rac3:ora.RACQA.RACQA1.inst:
rac3:ora.RACQA.RACQA1.inst:SQL> ORA-00119: invalid specification for system
parameter LOCAL_LISTENER
rac3:ora.RACQA.RACQA1.inst:ORA-00132: syntax error or unresolved network name
'LISTENER_RACQA1'
rac3:ora.RACQA.RACQA1.inst:ORA-01078: failure in processing system parameters
rac3:ora.RACQA.RACQA1.inst:SQL> Disconnected
rac3:ora.RACQA.RACQA1.inst:
CRS-0215: Could not start resource 'ora.RACQA.RACQA1.inst'.
PRKP-1001 : Error starting instance RACQA2 on node rac4
CRS-0215: Could not start resource 'ora.RACQA.RACQA2.inst'.
The output of the srvctl command in debug mode is quite lengthy; the output that is provided here is just a snippet of the entire output. In this particular example, the output provides some relevant information about the local listener as the starting point to diagnose the problem.
You want to load the hangcheck-timer to ensure that the RAC node is evicted from the cluster under unstable conditions in order to prevent database corruptions.
To manually load the hangcheck-timer, you can execute the insmod command. First, locate the hangcheck-timer by executing the find command in the /lib/modules directory path:
# find /lib/modules -name 'hangcheck*'
/lib/modules/2.6.9-42.0.0.0.1.EL/kernel/drivers/char/hangcheck-timer.ko
/lib/modules/2.6.9-42.0.0.0.1.ELsmp/kernel/drivers/char/hangcheck-timer.ko
Change your directory to the location of the hangcheck-timer kernel module. As the root user, load the hangcheck-timer into the kernel using the insmod command, as you see here:
# cd  /lib/modules/2.6.9-42.0.0.0.1.ELsmp/kernel/drivers/char/
# insmod hangcheck-timer.ko hangcheck_tick=30 hangcheck_margin=180
Once the hangcheck-timer kernel module is loaded into the kernel, you can confirm the existence of the module in the kernel using the lsmod command, as you see here:
# lsmod |grep -i hangcheck
hangcheck_timer         7897  0
As the root user, you can view the log entries in the /var/log/messages file to confirm that the hangcheck-timer started successfully. Here's a snippet of the /var/log/messages file:
# tail /var/log/messages
[...]
Jun 21 17:10:30 rac3 kernel: Hangcheck: starting hangcheck timer 0.9.0 (tick is 30
seconds, margin is 180 seconds).
Jun 21 17:10:30 rac3 kernel: Hangcheck: Using monotonic_clock().
To survive node reboots, the /etc/modprobe.conf file must have the following line added:
options hangcheck-timer hangcheck_tick=30 hangcheck_margin=180
Linux has a kernel module named hangcheck-timer to monitor the health of the RAC environment and to restart a RAC node in the event of availability and reliability problems. Starting in Oracle 9i Release 2 (9.2.0.2), Oracle supports the hangcheck-timer loaded into the Linux kernel to monitor and detect various system hangs and pauses. The hangcheck-timer module simply sets a timer and checks the timer after a configurable amount of time. If a delay is detected and if that delay exceeds a given margin of time, the server is rebooted.
The hangcheck-timer module leverages the Time Stamp Counter (TSC) CPU register of the CPU and is incremented with each clock signal. Utilizing the CPU, the kernel module provides precise and accurate time measurements under normal conditions. When a delay is detected, the delay can be an indication of a system hang. If the delay is longer than the specified threshold, the RAC node is evicted.
The hangcheck-timer module has two parameters: hangcheck-tick and hangcheck-margin. The hangcheck-tick specifies the time between system health checks. The hangcheck-tick parameter has a default value of 60 seconds. The recommended value for this parameter by Oracle is 30 seconds. The hangcheck-margin parameter specifies the allowable hang delay in seconds that will be tolerated before hangcheck-timer evicts the RAC node. The default value is 180 seconds and happens to be the recommended setting by Oracle.
A RAC node will be evicted when the system hang time is greater than the result of the following calculation:
hangcheck_tick + hangcheck_margin
Starting in Oracle Database 11g, the hangcheck-timer module is accompanied by the Process Monitor Daemon (oprocd), which monitors the system state of cluster nodes. The oprocd can detect hang conditions that the hangcheck-timer misses. hangcheck-timer is good for detecting driver failures (which would require reboots), whereas, oprocd is used to detect node stalls.
To start Oracle Clusterware, you can execute the crsctl command and pass the correct arguments, start crs, to initiate a startup of the CRS:
$ sudo -u root -s $ORACLE_HOME/bin/crsctl start crs
Attempting to start Oracle Clusterware stack
The CRS stack will be started shortly
To stop Oracle Clusterware, you can also execute the crsctl command with the argument stop crs to initiate the shutdown of CRS:
$ sudo -u root -s $ORACLE_HOME/bin/crsctl stop crs
Stopping resources. This could take several minutes.
Successfully stopped CRS resources.
Stopping CSSD.
Shutting down CSS daemon.
Shutdown request successfully issued.
Root privileges are required to start or shut down Oracle Clusterware. In Oracle Database 10g Release 1, the /etc/init.d/init.crs script was the preferred script to start and shut down Clusterware. As of Oracle Database 10g Release 2, the $ORA_CRS_HOME/bin/crsctl script became the supported script to start and shut down Oracle Clusterware. Starting and stopping Oracle Clusterware involves starting/shutting down all the RAC-related background processes such as CRSD, OPROCD, OCSSD, EVMD, and ONS.
To disable Oracle Clusterware from automatically starting when the server reboots, you can specify the disable crs option to the crsctl command:
crs > sudo -u root -s $ORACLE_HOME/bin/crsctl disable crs
Oracle Clusterware is disabled for start-up after a reboot.
Likewise, to start Oracle Clusterware with a server reboot, you can execute the crsctl command with the argument enable crs:
sudo -u root -s $ORACLE_HOME/bin/crsctl enable crs
Oracle Clusterware is enabled for start-up after a reboot.
You may have some issues with your hardware and want to stop CRS from automatically starting or stopping. One such reason can be because your device names do not survive reboots. For example, with each reboot, the device names for OCR and voting disks may change. You can then disable Oracle Clusterware from automatically starting. Upon a server boot, the SA can map the correct block or raw devices for the OCR and voting disk, and then you or the SA can manually start Clusterware. Once the SA has some available time, the SA can write scripts with udev and effectively implement device-naming persistency.
You can check the state of Oracle Clusterware with the crsctl command and the check crs option, as shown here:
crs > crsctl check crs
Cluster Synchronization Services appears healthy
Cluster Ready Services appears healthy
Event Manager appears healthy
Alternatively, you can check each of the daemons including CSSD, CRSD, and EVMD:
crs > crsctl check cssd
Cluster Synchronization Services appears healthy
rac4.dbaexpert.com:/apps/oracle/general/sh
crs > crsctl check crsd
Cluster Ready Services appears healthy
rac4.dbaexpert.com:/apps/oracle/general/sh
crs > crsctl check evmd
Event Manager appears healthy
Assuming that all the hardware requirements are satisfied and all the preliminary tasks are complete including a successful installation of Oracle Clusterware, the conversion from a stand-alone database to a RAC database is relatively straightforward. In this solution, we will provide the detailed steps required to convert a stand-alone database to a RAC database.
First, you must add a separate redo log thread for each instance. If the database has four redo log groups for thread 1, you must add four redo groups to thread 2 (your second RAC instance). Here's the syntax to add four redo groups for thread 2:
1  alter database add logfile thread 2 group 11
2  ('/u04/oradata/DBAPROD/DBAPROD2_redo_01a.rdo',
    '/u03/oradata/DBAPROD/DBAPROD2_redo_01b.rdo') size 200m
10:13:40 SQL> /
Database altered.

1  alter database add logfile thread 2 group 12
2* ('/u05/oradata/DBAPROD/DBAPROD2_redo_02a.rdo',
    '/u02/oradata/DBAPROD/DBAPROD2_redo_02b.rdo') size 200m
10:15:44 SQL> /
Database altered.
1 alter database add logfile thread 2 group 13
2* ('/u04/oradata/DBAPROD/DBAPROD2_redo_03a.rdo',
'/u03/oradata/DBAPROD/DBAPROD2_redo_03b.rdo') size 200m
10:16:44 SQL> /
Database altered.
1 alter database add logfile thread 2 group 14
2* ('/u05/oradata/DBAPROD/DBAPROD2_redo_14a.rdo',
'/u02/oradata/DBAPROD/DBAPROD2_redo_14b.rdo') size 200m
10:18:03 SQL> /
Database altered.For RAC databases on ASM, the syntax would resemble the example here, assuming that the db_create_file_dest and db_create_online_log_dest_1 parameters have the value of '+data':
alter database add logfile thread 2 group 21 size 100m;
alter database add logfile thread 2 group 22 size 100m;
alter database add logfile thread 2 group 23 size 100m;
alter database add logfile thread 2 group 24 size 100m;
After you add the redo groups, you must enable the thread using the alter database enable command:
alter database enable thread 2;
Note
You must add groups for each of the RAC instances. For example, if you have a four-node RAC, you will have to repeat the steps outlined previously two more times.
In addition to adding redo groups for each thread, you must also add an undo tablespace for each of the RAC instances. The syntax to create another undo tablespace looks like this:
1* create undo tablespace undo_rbs2
   datafile '/u02/oradata/DBATOOLS/undo_rbs2_01.dbf' size 4000m
SQL> /
Again, you must create an undo tablespace for each of your RAC instances. Next, you must create the RAC views by executing catclust.sql from $ORACLE_HOME/rdbms/admin as sysdba. RAC views enable you to obtain information about all the RAC nodes at once instead of having to log on to each of the RAC nodes. For example, if you want to view active sessions across all the RAC nodes, you can query the GV$SESSION view instead of the V$SESSION view. Likewise, if you are interested in blocking locks at the entire RAC level, you can query the GV$LOCK view instead of the V$LOCK view.
You are almost done. You must now modify the initialization parameters or spfile to recognize the database as a RAC database:
# ------- RAC Specifics ---
*.cluster_database_instances=2
*.cluster_database=true
DBAPROD1.thread=1
DBAPROD1.instance_number=1
DBAPROD1.undo_tablespace='UNDO_RBS1'
#
DBAPROD2.thread=2
DBAPROD2.instance_number=2
DBAPROD2.undo_tablespace='UNDO_RBS2'
*.remote_login_passwordfile='exclusive'

# 10g parameters
*.db_create_file_dest='+data'
*.db_create_online_log_dest_1='+data'
You can execute the srvctl command to register the database in the OCR. To register the database as a RAC database, you can execute these commands:
srvctl add database -d DBAPROD -o /apps/oracle/product/10.2.0/RACDB
srvctl add instance -d DBAPROD -i DBAPROD1 -n rac3
srvctl add instance -d DBAPROD -i DBAPROD2 -n rac4
As the final step, you must restart the database.
We provided the steps to convert a stand-alone database to a RAC-enabled database to demonstrate that the conversion to a RAC database is not a black box—you can see from the solution that RAC conversion is not rocket science. The following are the steps to convert a stand-alone non-RAC database to a RAC database:
Create redo groups for each RAC instance.
Create an undo tablespace for each RAC instance.
Enable threads for each RAC instance.
Execute
catclust.sqlfrom$ORACLE_HOME/rdbms/admin.Register the database and instance using the
srvctlcommand.Make appropriate changes to the spfile or initialization file.
Bounce the database.
Note
You can also migrate to RAC with the rconfig tool introduced in Oracle Database 10g Release 2. rconfig provides another method to convert a single-instance non-RAC database to RAC. For additional information, please review Oracle's MetaLink Note 387046.1.
Bonding a network card is relatively straightforward. First, you have to configure the Linux bond drivers. For example, in Red Hat 4, you must modify the /etc/modprobe.conf file to enable the bonding driver. You must add entries for each of the logical interfaces in the modprobe.conf file that resemble this:
alias bond0 bonding
alias bond1 bonding
options bonding miimon=100 mode=1
In this particular solution, you are adding two bonded interfaces, one for the private interconnect and the other for the public network. You also have four network interfaces, eth0, eth1, eth2, and eth3.
If you have not bonded network interfaces before, most likely the bonding module is not loaded into the kernel. As root, execute the insmod bonding.ko command from the /lib/modules/`uname -r`/kernel/drivers/net/bonding directory to insert the module into the kernel. To confirm that the bonding module is loaded, you can leverage the lsmod command piped to the grep command, as shown here, to provide the status of the modules in the kernel:
# lsmod |grep -i bonding
bonding                65128  0
Once you confirmed that the bonding module is loaded into the kernel, you can proceed by configuring the logical interfaces by creating or modifying two configuration files in the /etc/sysconfig/network-scripts directory called ifcfg-bond0 and ifcfg-bond1. The entries for ifcfg-bond0 look like this for the private network:
DEVICE=bond0
IPADDR=192.168.1.20
NETWORK=192.168.1.0
NETMASK=255.255.255.0
USERCTL=no
BOOTPROTO=none
ONBOOT=yes
You must modify the ifcfg-eth0 and ifcfg-eth1 files, which are the interface cards for ifcfg-bond0. Let's start by modifying the ifcfg-eth0 file with the settings you see here:
DEVICE=eth0
USERCTL=no
ONBOOT=yes
MASTER=bond0
SLAVE=yes
BOOTPROTO=none
Similarly, let's modify the ifcfg-eth1 file so it looks like what is shown here:
DEVICE=eth1
USERCTL=no
ONBOOT=yes
MASTER=bond0
SLAVE=yes
BOOTPROTO=none
Now, you need to repeat the procedures described earlier to configure the ifcfg-bond1 interface for the public network interface. The ifcfg-bond1 interface file needs to resemble this:
DEVICE=bond1
IPADDR=72.99.67.100
NETWORK=72.99.67.0
NETMASK=255.255.255.0
USERCTL=no
BOOTPROTO=none
ONBOOT=yes
The key difference between ifcfg-bond0 and ifcfg-bond1 are the IPADDR, NETWORK, and NETMASK lines. After the ifcfg-bond1 file is created, you can proceed to modify the ifcfg-eth3 and ifcfg-eth4 files. You can create these two files to look like ifcfg-eth0 and ifcfg-eth1 and modify the DEVICE and MASTER names accordingly.
To enable the newly configured bonded network, you need to bounce the networking services. You can shut down all the interfaces with the service network stop command. As the final step, you need to start the bonded network interfaces by executing the service network start command.
The Linux kernel comes with a bonding module that provides NIC teaming capabilities. The kernel bonding module teams multiple physical interfaces to a single logical interface.
Bonding or pairing a network is an important concept for RAC. Network interfaces that are not bonded are a single point of failure. Just as every other component of the RAC is built for redundancy, so must the network infrastructure be.
In the /etc/modprobe.conf file, we specified options bonding miimon=100 mode=1. The miimon parameter stands for Media Independent Interface Monitor and represents the frequency for link monitoring. The value for miimon is specified in milliseconds (ms), is set to zero by default, and is disabled. The mode parameter specifies the type of configuration to be deployed. A value of 0, which is the default, indicates that a round-robin policy will be implemented, and each of the interfaces will take turns servicing requests. You can use a round-robin policy for load balancing. A value of 1 indicates that an active backup policy will be deployed. In an active backup policy, only one slave in the bond is active. One and only one device will transmit at any given moment. A value of 6 indicates adaptive load balancing.
In the ifcfg-eth[x] files, the MASTER parameter indicates the logical interface to which the particular NIC belongs. The SLAVE parameter indicates that the participating NIC is a member of bond interface. A SLAVE can belong to only one master.
You want to implement RAC on NFS filesystems. You want to take advantage of Oracle Database 11g Direct NFS.
To implement Oracle Direct NFS, you must have an existing NFS mount point that is presented to all the RAC nodes. The mount options for NFS are irrelevant since Oracle Direct NFS will override and configure settings optimally. Oracle Direct NFS setup involves manipulating the oranfstab file. The oranfstab file can reside in several locations. Oracle will always check the $ORACLE_HOME/dbs directory first. If the oranfstab file does not exist, it will search in the /etc directory. If an oranfstab file does not exist, Oracle will utilize the operating system /etc/mtab file. Oracle's Direct NFS client looks for mount point settings in the following order:
$ORACLE_HOME/dbs/oranfstab/etc/oranfstab/etc/mtab
To enable Direct NFS, you must replace the standard Oracle Disk Manager (ODM) driver with the ODM NFS library. For the client to work, you need to shut down the database and create a symbolic link from the standard ODM library to point to the NFS ODM library. Before you create the symbolic link, you should rename the original file libodm11.so to libodm11.so.ORIG for backup purposes. Next, you will create the symbolic link libodm11.so to point to libnfsodm11.so. Here are the steps to set up the NFS ODM library file:
cd $ORACLE_HOME/libmv libodm11.so libodm11.so.ORIGln -s libnfsodm11.so libodm11.so
Next, create the oranfstab file in the $ORACLE_HOME/dbs directory. The oranfstab file is not a requirement to implement Direct NFS. The oranfstab file is a special file to list additional options specific for Oracle Database to Direct NFS. The oranfstab file has the following attributes for each NFS server to be accessed using Direct NFS:
- Server:
NFS server name
- Path:
IP or hostname of up to four network paths to the NFS server
- Export:
Exported path from the NFS server
- Mount:
Local mount point for the NFS server
For this simple demonstration, you will just have one entry in the oranfstab file. The contents of the oranfstab file look like this:
server: nas150
path: 192.168.1.150
export: /apps/oracle/share mount: /oradata
An example of an oranfstab with multiple paths looks like this:
server: nas150
path: 192.168.1.1
path: 192.168.1.2
path: 192.168.1.3
path: 192.168.1.4

export: /oradata/share1 mount: /oradata1
In this example, four paths are specified in the oranfstab file. You may specify up to four paths by IP address or name as displayed by the ifconfig command. The Direct NFS client will perform load balancing across all four paths to the NAS server. If an I/O request to a specific path fails, Direct NFS will reissue the I/O request over the remaining paths.
Oracle Database 11g delivers the highly anticipated new feature called Direct NFS. RAC and non-RAC customers who leverage NFS today on filers can take advantage of Oracle's new Direct NFS. Direct NFS provides simplicity and performance for database implementations on network-attached storage (NAS). Customers have opted for NFS solutions over block devices for simplicity and lower cost, and Direct NFS makes NFS implementations even simpler and faster.
Oracle Direct NFS is an NFS client built directly into the database kernel. With Oracle Direct NFS, the database kernel performs all the tuning processes automatically. DBAs and system administrators are no longer responsible for being intimate with all the tuning parameters associated with NFS.
Note
Implementation of RAC on NFS is common with customers who utilize NAS storage. If you are not on Oracle Database 11g, you must use the following NFS mount options for RAC:
netapp1:/nasvol/u03  /u03  nfs  rw,rsize=32768,wsize=32768,tcp,hard,nointr,
nfsvers=3,bg,actimeo=0,timeo=600,suid,async
You have only one voting disk, and you want to follow Oracle best practices and create two additional voting disks.
Oracle Clusterware should be shut down while adding voting disks. With Clusterware offline, you should also back up the voting disk. If your voting disks are on raw devices, as the oracle user, execute the dd command and back up the voting disk as you see here:
$ dd if=raw1 of=/apps/oracle/vote.bkup
103680+0 records in.
103680+0 records out.
Before you start adding raw devices for voting disk, you should clear out the contents of the raw devices using the dd command in conjunction with the /dev/zero device. Here we will clear out the contents of the /dev/raw/raw2 and /dev/raw/raw3 devices:
$ dd if=/dev/zero of=/dev/raw/raw2 bs=1024000 count=50
50+0 records in.
50+0 records out.
$ dd if=/dev/zero of=/dev/raw/raw3 bs=1024000 count=50
50+0 records in.
50+0 records out.
The crsctl command with the -force option must be used to add the voting disk since the CRS stack is down. Here we will add the /dev/raw/raw2 and /dev/raw/raw3 devices to the voting disk configuration with the CRS stack down:
$ crsctl add css votedisk /dev/raw/raw2 -force
Now formatting voting disk: /dev/raw/raw2.
Successful addition of voting disk /dev/raw/raw2.

$ crsctl add css votedisk /dev/raw/raw3 -force
Now formatting voting disk: /dev/raw/raw3.
Successful addition of voting disk /dev/raw/raw3.
Once the voting disks are successfully added, you can restart CRS by executing the crsctl start crs command from the $ORA_CRS_HOME/bin directory.
The RAC configuration supports up to 32 voting disks. The voting disk is the heartbeat of RAC. The RAC environment must have at least 50 percent of the voting disk online to remain available. Once you have successfully added the voting disks, you can execute the crsctl command with the query option to view voting disk information, as shown here:
$ crsctl query css votedisk
 0.     0    /dev/raw/raw1
 1.     0    /dev/raw/raw2
 2.     0    /dev/raw/raw3
For additional information regarding how to add/remove/move/replace voting or OCR disks, please review Metalink Note 428681.1.
You can simply remove a voting disk with the crsctl command as root since root owns the voting disk. To remove a voting disk, you would simply issue the delete option, as shown here:
# crsctl delete css votedisk /NFS/CRS/votingdisk3
Successful deletion of voting disk /NFS/CRS/votingdisk3.
To move a voting disk, you would proceed by adding a voting disk as shown in recipe 13-21.
Moving a voting disk implies that you will delete the existing one and create a new voting disk on an alternate location. But if you have only one voting disk, you need to create a new one first before you can delete the original. If you have just one voting disk, this is a great opportunity you triple mirror your voting disks with Oracle. Once again, we recommend to triple mirror your voting disk to avoid a single point of failure.
You must first install the OCFS2 RPMs. If you are registered with Oracle's Unbreakable Linux Network (ULN), you can take advantage of the up2date command. In this solution, we will show how to execute the up2date command to install the ocfs2-tools, ocfs2console, and ocfs2 RPMs. In the example here, we will install the ocfs2 driver module using the $(uname -r) syntax to derive the kernel release:
# up2date --install ocfs2-$(uname -r)
Installing the ocsf2 RPM will automatically download the ocfs2-tools RPM based on dependency requirements. The ocfs2-tools RPM provides the command-line interface to the OCFS2 tool. Although ocfs2console RPM is not required, we recommend that you install the ocfs2console RPM by executing the up2date command with the ocfs2console RPM as the argument, as displayed here:
# up2date --install ocfs2console
The ocfs2console RPM provides the GUI front end for OCFS2. If you do not have a license for Oracle's ULN, you can download the RPMs from http://oss.oracle.com and install them with the rpm -ihv {RPM_NAME} syntax. You must install the OCFS2 RPMs on each of the RAC nodes.
You can confirm that OCFS2 RPMs are installed on the RAC nodes by executing an rpm query on the OCFS2 modules:
# rpm -qa |grep -i ocfs2
ocfs2-tools-1.2.2-2
ocfs2-2.6.9-42.0.0.0.1.ELsmp-1.2.3-2
ocfs2console-1.2.2-2
ocfs2-2.6.9-42.0.0.0.1.EL-1.2.3-2
Once you verified that OCFS2 RPMs are installed on each of the RAC nodes, you are ready to start configuring OCFS2. OCFS2 comes with a cluster stack called O2CB. The O2CB cluster stack handles the communication between the nodes and the cluster filesystem and includes services such as a node manager, a distributed lock manager, and a heartbeat service. You will need to start the O2CB cluster stack before you can proceed to format and mount the filesystem. The ocfs2console GUI tool provides the easiest and recommended method to configure the O2CB cluster stack. The ocfs2console provides the capability to manage OCFS2 volumes providing the mechanism to format, tune, mount, and unmount OCFS2 volumes.
To configure OCFS2 with the GUI tool, as root, launch the ocfs2console from the /usr/sbin directory. If your Linux server does not have X server software installed, set DISPLAY to another server, to a VNC server, or to your desktop that has Hummingbird or other third-party X server software installed.
Note
For X server configuration information, please review Chapter 15.
Launching the ocfs2console tool displays the screen shown in Figure 13-7.
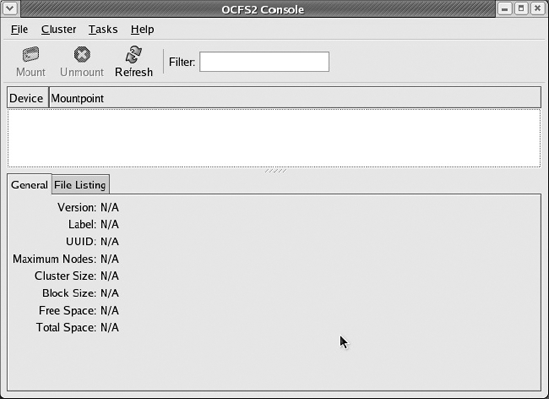
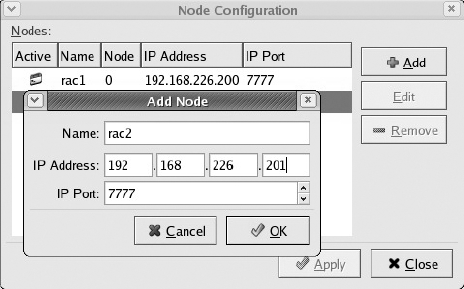
On the OCFS2 Console screen, click the Cluster menu, and select the Configure Nodes option to start the cluster stack. An informational window will be displayed to show that the cluster stack has been started. The cluster.conf configuration file will be created in the /etc/ocfs2 directory if it does not already exist. The message on the window will indicate that the cluster stack needs to be running for any clustering functionality to work and that you will need to run the command /etc/init.d/o2cb enable to have the cluster stack started upon reboot. Click the Close button, and the Node Configuration screen will be displayed. On the Node Configuration screen, click the Add button to add a node to the OCFS2 cluster. Figure 13-8 shows both the Node Configuration and Add Node screens.
On the Add Node screen, enter the hostname, IP address, and IP port of the OCFS2 cluster. Click the OK button once the host information is entered. Repeat the steps outlined to add the remaining node that will participate in the OCFS2 cluster.
After all the other RAC nodes are added, you will need to propagate the configuration to the other nodes by selecting the Propagate Configuration option from the Cluster menu item. The Propagate Configuration option assumes that ssh user equivalence is already set up. This screen pushes the configuration file to the remote RAC nodes. Please review the Propagate Configuration screen as displayed in Figure 13-9.

Once the propagate cluster configuration process is complete, you can quit the application from the File menu item. You can review the /etc/ocfs2/cluster.conf file to view the members of the OCFS2 cluster:
# cat cluster.conf
node:
    ip_port = 7777
    ip_address = 192.168.226.200
    number = 0
    name = rac1
    cluster = ocfs2

node:
    ip_port = 7777
    ip_address = 192.168.226.201
    number = 1
    name = rac2
    cluster = ocfs2

cluster:
    node_count = 2
    name = ocfs2
In addition to storing all the information that was entered from the ocfs2console tool, the cluster.conf file contains information about how many nodes are part of the cluster and the name of the cluster. ocfs2 is the default name of the cluster.
Now, let's configure the o2cb driver to automatically load after a reboot on each of the Linux servers. Before you can configure o2cb, you must unload the modules since ocfs2consolsole loaded the drivers earlier. In the next example, you will pass the configure argument to the /etc/init.d/o2cb command to load the drivers on reboot of the server.
Configuring the O2CB driver.

This will configure the on-boot properties of the O2CB driver.
The following questions will determine whether the driver is loaded on
boot.  The current values will be shown in brackets ('[]').  Hitting
<ENTER> without typing an answer will keep that current value.  Ctrl-C
will abort.

Load O2CB driver on boot (y/n) [y]:
Cluster to start on boot (Enter "none" to clear) [ocfs2]:
Specify heartbeat dead threshold (>=7) [7]: 61
Writing O2CB configuration: OK
Loading module "configfs": OK
Mounting configfs filesystem at /config: OK
Loading module "ocfs2_nodemanager": OK
Loading module "ocfs2_dlm": OK
Loading module "ocfs2_dlmfs": OK
Mounting ocfs2_dlmfs filesystem at /dlm: OK
Starting O2CB cluster ocfs2: OK
You can verify that the cluster stack is loaded by executing the o2cb status command on each RAC node, as shown in this example:
[root@rac2 ocfs2]# /etc/init.d/o2cb status
Module "configfs": Loaded
Filesystem "configfs": Mounted
Module "ocfs2_nodemanager": Loaded
Module "ocfs2_dlm": Loaded
Module "ocfs2_dlmfs": Loaded
Filesystem "ocfs2_dlmfs": Mounted
Checking O2CB cluster ocfs2: Online
Checking O2CB heartbeat: Not active
Note
For all o2cb command options, you can execute the o2cb command with a help argument from the /etc/init.d directory:
# ./o2cb help
Usage: ./o2cb {start|stop|restart|force-reload|enable|disable|configure|load|
unload|online|offline|force-offline|status}
When the disks are presented to each of the RAC nodes, you can proceed to the next step, which is to format the disks. There are two ways to format an OCFS2 disk, the ocfs2console GUI tool or interactively with the mkfs.ocfs2 command-line utility. The simplest and recommended way to format a disk is with the ocfs2console tool. Again, launch the ocfs2console tool, click the Tasks menu item, and select the Format option. Formatting a disk occurs on only one node. You should see a Format window similar to what is displayed in Figure 13-10.

Select an option from the Available Devices drop-down menu, and select the cluster size. By default, the cluster size is set to Auto, but you can select 4K, 8K, 16K, 32K, 64K, 128K, 256K, 512K, or 1M. For database files, Oracle recommends cluster sizes of 128KB or larger. The block size can be from 512 bytes to 4KB. Oracle recommends 4KB block sizes for most disk sizes. Both the cluster size or block size are not modifiable after the disk is initialized.
Click the OK button once you've chosen all the options. You will be prompted to make sure you really want to format the device.
The volume label is changeable after the disk is formatted. The number of node slots can be increased after the disk is formatted but cannot be decreased.
Once you have the disk(s) formatted, you can proceed to mounting the filesystem. ocfs2console supports mounting the OCFS2 filesystem. To mount a filesystem, select the formatted device, and click the Mount button at the left-top corner of the screen. A small window will appear with the mount point and options fields, as displayed in Figure 13-11.

One option that is worth noting is the _netdev option. This option specifies that network availability is required before mounting the filesystem after a reboot of the server.
Click the OK button after you enter the mount point and OCFS2 option(s). Your main ocfs2console window should look similar to Figure 13-12.

Now your /ocfs001 filesystem is ready for RAC-related files. To mount the filesystem on reboot, you can add the following line in the /etc/fstab file of all the RAC nodes:
/dev/sdb1 /ocfs001 ocfs2 _netdev,datavolume,nointr 0 0
Oracle Corporation introduced OCFS version 1.0 in December 2002 as open source software to the RAC community to support Linux 2.4 kernels. The design of the initial OCFS version was to provide an alternative solution for raw devices for database files.
For Linux 2.6 kernels, Oracle Corporation released OCFS version 2.0 (OCFS2) in September 2005 to support database files, Oracle binaries, and configuration files. OCFS2 is an extent-based, open source, POSIX-compliant shared disk filesystem. This recipe focuses only on OCFS2 since most Linux customers are running Linux 2.6 kernels.
Because the OCFS2 filesystem is a general-purpose clustered filesystem, Oracle customers also leverage this technology to provide highly available web servers, application servers, and file servers.
Note
Despite all the laborious efforts we went through to create the OCFS2 filesystem and present it to the RAC nodes, with the incredible advancement of ASM we do not recommend you use OCFS2 for RAC. You may consider storing the voting disk and OCR in the OCFS2 filesystem.