![]()
Managing X Window
Many DBAs argue that most Linux/Solaris servers don’t need an X Window System, even when hosting an Oracle database. In fact, previous chapters of this book show that you can manage your Oracle database on a Linux/Solaris server using a text console; you really don’t need a graphical console. In recipes 10-11 and 10-12, you learned how to install the Oracle RDBMS software and how to create an Oracle database without running the Oracle Universal Installer (OUI) that requires a graphical display.
However, for DBAs planning to migrate from a Windows environment and wanting to explore Oracle Database on a Linux/Solaris environment, typing (and remembering exactly) the OS, SQL, and RMAN commands via a command line can be intimidating. If you prefer to run GUI-based programs, such as using the DBCA to create an Oracle database, this chapter is definitely for you.
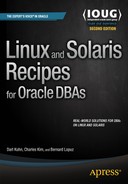
To understand the concept of the X Window System in a Linux/Solaris environment, review the analogy of a client and a server in a networked environment. An X client and an X server can both be hosted on a single computer (which is an uncommon feature in a typical client/server environment) or two disparate computers on a network, as illustrated in Figure 15-1. But the terminology is backward from what many expect. An X server, for example, is what you run on your client PC to interact with your application. So the application you run on some remote machine is actually the client. The application you run locally (X Window) is actually the server.

Figure 15-1. X clients on local or remote Linux/Solaris servers
This chapter shows you how to configure, start, and stop an X server; and how to redirect and secure an X display to a remote computer. You also learn how to change the look and feel when running an X terminal. If you use Windows as your client computer, you can explore OpenSSH for Windows or perhaps use Virtual Network Computing (VNC), which is discussed in detail in Chapter 16.
Problem
You want to configure an X Window server on a Linux/Solaris server to run GUI-based applications such as the DBCA to create an Oracle database.
Solution
To set up an X Window server (often called just an X server) on a Linux/Solaris server, you have to edit the xorg.conf X Window configuration file, which is usually found in the /etc/X11 directory. There are two ways to edit the /etc/X11/xorg.conf file:
- Directly modify the /etc/X11/xorg.conf file
- Run the Xorg application
To configure the /etc/X11/xorg.conf file, run Xorg with the configure option, which creates a temporary configuration file called /root/xorg.conf.new. The following is the snippet of the results after running the Xorg -configure command:
# /usr/bin/Xorg -configure

X.Org X Server 1.14.5
Release Date: 2013-12-12
X Protocol Version 11, Revision 0
Build Operating System: SunOS 5.11 i86pc
Current Operating System: SunOS BLSOL01 5.11 11.2 i86pc
Solaris ABI: 64-bit
Current version of pixman: 0.29.2
        Before reporting problems, check http://support.oracle.com/
        to make sure that you have the latest version.
Markers: (--) probed, (**) from config file, (==) default setting,
        (++) from command line, (!!) notice, (II) informational,
        (WW) warning, (EE) error, (NI) not implemented, (??) unknown.
(==) Log file: "/var/log/Xorg.0.log", Time: Fri Nov 13 00:38:29 2015
List of video drivers:
        intel
        openchrome
        r128
        vmware
        mga
        vboxvideo
        radeon
        cirrus
        ast
        mach64
        ati
        vesa
(++) Using config file: "/root/xorg.conf.new"
(==) Using config directory: "/etc/X11/xorg.conf.d"
(==) Using system config directory "/usr/share/X11/xorg.conf.d"
Number of created screens does not match number of detected devices.
  Configuration failed.
(EE) Server terminated with error (2). Closing log file.
![]() Note When running Xorg -configure, you might see this error message: “Fatal server error: Server is already active for display 0. If this server is no longer running, remove /tmp/.X0-lock and start again.” To avoid this error, delete the file described in the error message.
Note When running Xorg -configure, you might see this error message: “Fatal server error: Server is already active for display 0. If this server is no longer running, remove /tmp/.X0-lock and start again.” To avoid this error, delete the file described in the error message.
You can then test the /root/xorg.conf.new configuration by executing the command X -config /root/xorg.conf.new. If the X server runs fine using the newly created /root/xorg.conf.new configuration file, copy that file to /etc/X11/xorg.conf.
How It Works
When you start the X server, it reads the xorg.conf file that is located by default in the /etc/X11 directory. The /etc/X11/xorg.conf file contains configurations of the system resources, video card, keyboard, mouse, and monitor for a Linux/Solaris server running the X Window System.
You have to put in the sections that have changed into the xorg.conf file. Otherwise, the unspecified sections will use the default settings. Additional contents are also read from the files that are in the /etc/X11/xorg.conf.d directory.
In the “Solution” section, two methods were described to create and update the /etc/X11/xorg.conf file. One of the methods is to manually modify the file, which we don’t recommend except when you are sure of the changes. Regardless of the method you want to pursue, make sure to back up or create another copy of the /etc/X11/xorg.conf file before you attempt to modify it. That way, you can always revert to the original settings in case the new changes don’t work.
![]() Note When troubleshooting X server, always check the log file /var/log/Xorg.0.log, as well as /var/log/messages for Linux and /var/adm/messages for Solaris.
Note When troubleshooting X server, always check the log file /var/log/Xorg.0.log, as well as /var/log/messages for Linux and /var/adm/messages for Solaris.
15-2. Starting an X Server
Problem
You want to start an X server on the Linux/Solaris server to run GUI-based software applications.
Solution
For Solaris server, perform the following steps:
- Run the svcs command to verify the status of the GDM service.
# svcs gdm
STATE          STIME    FMRI
disabled 1:25:37 svc:/application/graphical-login/gdm:default - If the state of GDM service is disabled, run the following command:
# svcadm enable gdm
For Linux server, there are three ways to start the X server:
- Manually run the X command.
- Run init 5 or telinit 5.
- Modify /etc/inittab and reboot the server.
The first method happens to be the most involved and requires manually starting the X server on the console of your Linux server. Follow these steps:
- If you are prompted to log on, do so as the OS user from which you want to run the X server.
- Run the X server by typing the X command followed by an ampersand (&), as shown in the following line of code. Make sure you add an & at the end so the X server will run in the background. That way, you can still type other OS commands in the same console session.
$ X & - Press Ctrl+Alt+F7 to change to the graphical console. An x will appear in the center of a blank screen, which represents the cursor of your mouse.
- Press Ctrl+Alt+F1 to return to the text console session.
The second method for starting an X server is to run the init 5 or telinit 5 command as root on the OS prompt. A GUI-based logon screen may appear.
The third method is to change the value of the initdefault variable to 5 in the /etc/inittab file, as shown here. But you must reboot the Linux server to effect the changes made in the /etc/inittab file.
id:5:initdefault:
![]() Note To show the details of the X server, run the OS command xdpyinfo.
Note To show the details of the X server, run the OS command xdpyinfo.
How It Works
For Solaris server, you can run the command svcadm enable gdm to start the GDM service. If you made changes to the X Window configuration file xorg.conf, you can run the command svcadm restart gdm. To verify the status of the GDM service, issue the command svcs gdm. The following results indicate that the GDM service is online (i.e., enabled):
# svcs gdm
STATE          STIME    FMRI
online         11:23:58 svc:/application/graphical-login/gdm:default
For Linux server, if the run level is set to 5, the X server is automatically started when the Linux server is rebooted. However, if the Linux server starts with a run level 3, in which the default screen display is a text console, and you want to run some GUI-based applications such as dbca to create an Oracle Database, you have to manually start the X server on the Linux server.
You can start the X server in three ways. First, you can manually start the X server by running the X command, as demonstrated in the “Solution” section. Another method is to run either the init or telinit command and pass 5 as a parameter, but you must be root or have sudo access to run those commands. Finally, if you want X server to automatically run every time a Linux server is rebooted, you have to change the id directive in /etc/inittab to run level 5.
Because the majority of DBAs don’t work in front of a server console, starting the X server is not necessary when the Linux server is booted. But if you have enough physical memory on your Linux server, we recommend that you use the third method. If the current level is 3, use either the first or second method to start the X server. We recommend the second method because it is easier and requires fewer steps than the X command.
![]() Note Running an X server on your Linux database server can pose security issues because another client can access and observe your keystrokes. For security measures, we recommend that you employ access control using xhost or tunnel X over SSH, as discussed in recipes 15-4 and 15-5.
Note Running an X server on your Linux database server can pose security issues because another client can access and observe your keystrokes. For security measures, we recommend that you employ access control using xhost or tunnel X over SSH, as discussed in recipes 15-4 and 15-5.
The X command actually calls Xorg, as shown here:
# which X
/usr/bin/X
# ls -l /usr/bin/X
lrwxrwxrwx. 1 root root 4 Jan 13  2014 /usr/bin/X -> Xorg
# which Xorg
/usr/bin/Xorg
# ls -l /usr/bin/Xorg
-rwsr-xr-x. 1 root root 2274240 Nov 21  2013 /usr/bin/Xorg
![]() Note The X command may be in a different directory from other Linux distributions, so run the command which X to determine the exact directory.
Note The X command may be in a different directory from other Linux distributions, so run the command which X to determine the exact directory.
Instead of running the X command to start the X server, you can run the startx command, which then invokes the X command on your behalf and also launches a graphical display manager. The default display manager of most Linux distributions is GNOME. If you prefer another graphical display manager, see recipe 15-6 on how to switch from GNOME to KDE, and vice versa.
Once an X server is already running, you can press Ctrl+Alt+F1 to change to a text console or press Alt+F7 to change to the graphical console. You can repeat these steps to go back and forth between the text and graphical consoles.
Problem
You want to stop the X server running on your Linux server. For example, you might want to save on resources such as the memory consumed by GUI-based software applications.
Solution
For Solaris server, issue the following command:
# svcadm disable gdm
For Linux server, there are three ways to stop an X server:
- Run init 3 or telinit 3.
- Press Ctrl+Alt+Backspace.
- Modify /etc/inittab and reboot the server.
For the first method, perform the following steps to manually stop the X server on your Linux server:
- If the X Window system is already running, press Ctrl+Alt+F1 to change to a text console.
- If you are prompted to log on, do so as root.
- Issue either init 3 or telinit 3 to stop the X server:
# init 3
For the second method, perform the following steps:
- Press Alt+F7 to change to the graphical console. If you are already on the graphical console, you can skip this step.
- Press Ctrl+Alt+Backspace to stop the X server.
For the third method, change the value of the initdefault variable to 3 in the /etc/inittab file, as shown here:
id:3:initdefault:
You must then reboot the Linux server to effect the changes.
How It Works
To stop the X server in Solaris, you can issue the command svcadm disable gdm. Afterward, issue the command svcs gdm. The following results indicate that the GDM service is disabled:
# svcs gdm
STATE          STIME    FMRI
disabled       11:18:03 svc:/application/graphical-login/gdm:default
For Linux, you can stop the X server in three ways. You can manually stop the X server by running either init 3 or telinit 3 on the text console to change the current run level to 3. But you must be root or have sudo access to run these commands. If the current run level is already 3, you can press Ctrl+Alt+Backspace when you are on the graphical console. If you don’t want the X server to automatically run every time the Linux server is rebooted, change the id directive to run level 3 in /etc/inittab.
The first and second methods are dependent on the current run level. If the current run level is 5 and you perform the second method, it will always return to the graphical login screen. So perform the first method if the current level is 5; otherwise, use the second method.
Issue the runlevel command to display the previous and current run levels. In the following example, the first character is N, which means that the run level is not changed yet; the second character indicates that the current run level is 5:
# runlevel
N 5
15-4. Displaying an X Client on a Remote Server
Problem
You want to run an X client or a GUI-based software application on your local Linux server, but X server is not running. Instead, you want to redirect the graphical display to a remote Linux/Solaris server in which an X server is running.
Solution
In the following example, the OS user oracle is currently logged on to the local Linux server RAC1, where you want to run an X client or a GUI-based software application, but an X server is not running. Meanwhile, the Solaris server BLSOL01 is a remote Linux server where an X server is running.
Perform the following steps to redirect the graphical display to the Solaris server BLSOL01 when running an X client or a GUI-based software application such as dbca to create an Oracle database on Linux server RAC1:
- On the Linux server RAC1, set the OS environment variable DISPLAY to point to the Solaris server BLSOL01.
[oracle@RAC1 ~]$ export DISPLAY=BLSOL01:0.0 - Run dbca on the Linux server RAC1.
[oracle@RAC1 ~]$ dbca Note If the OS environment variable DISPLAY is not set, you might see this error message: “DISPLAY not set. Set DISPLAY environment variable, then re-run.” To resolve this error, make sure you set the OS environment variable DISPLAY to point to a server in which the X server is running.
 - Next, the Database Configuration Assistant screen will appear, as shown in Figure 15-2. Behind the screen, notice that the output of the OS command uname -a, executed on the terminal window, confirms that the Solaris server is BLSOL01.

Figure 15-2. Database Configuration Assistant screen
How It Works
You usually run an X client or GUI-based software application and have the graphical display on the local Linux/Solaris server in which you are currently logged on. But what if the X server is not running on the local Linux/Solaris server? Your option is to redirect the graphical display to another remote Linux server in which an X server is running.
However, you may experience the following error because the local Linux/Solaris server, which is the Linux server RAC1 in the example illustrated in the “Solution” section, is probably not granted access control on the remote Solaris server, which is server BLSOL01:
[oracle@RAC1 ~]$ dbca
No protocol specified
Error: Can’t open display: BLSOL01:0.0
To confirm whether access has been granted, run the OS command xhost without any parameter on the Solaris server BLSOL01. If the message says "access control enabled", only authorized clients can connect. If Linux server RAC1 is not in the list, that explains why you are getting the earlier error message when running the dbca. Here’s an example:
bslopuz@BLSOL01:~$ xhost
access control enabled, only authorized clients can connect
INET: BLSOL02
INET: RAC1
You can resolve this problem in two ways: run the command xhost +RAC1 from the Solaris server BLSOL01 or run the command xhost + on the Solaris server BLSOL01. Using the first approach allows only clients from the host RAC1 to connect. Here’s an example:
bslopuz@BLSOL01:~$ xhost +RAC1
RAC1 being added to access control list
bslopuz@BLSOL01:~$ xhost
access control enabled, only authorized clients can connect
INET: RAC1
On the other hand, the OS command xhost + will grant access control to all servers that have direct access to BLSOL01. We don’t recommend that you grant that much access because you are basically allowing access from any server. Here’s an example:
bslopuz@BLSOL01:~$ xhost +
access control disabled, clients can connect from any host
To revoke access control, run the OS command xhost -RAC1 to revoke the privilege from the specific server RAC1, as shown in the following example. Notice that in the results of the first OS command, xhost without any parameters, server RAC1 is on the list. Meanwhile, after you run the OS command xhost -RAC1, server RAC1 is no longer on the list during the second time you run the OS command xhost without any parameters.
bslopuz@BLSOL01:~$ xhost
access control enabled, only authorized clients can connect
INET:BLSOL02
INET:RAC1
bslopuz@BLSOL01:~$ xhost -RAC1
RAC1 being removed from access control list
bslopuz@BLSOL01:~$ xhost
access control enabled, only authorized clients can connect
INET:BLSOL02
However, if you earlier issued the OS command, and the message says "access control disabled", clients can connect from any host when you issue the OS command xhost without any parameter. Any server, such as the Linux server RAC1, can still access the Solaris server BLSOL01, even though you have already revoked the privilege from the specific Linux server RAC1. To revoke access control from all servers, you can issue xhost -, as shown here:
bslopuz@BLSOL01:~$ xhost -
access control enabled, only authorized clients can connect
bslopuz@BLSOL01:~$ xhost
access control enabled, only authorized clients can connect
Problem
You want to run an X client or a GUI-based software application on a remote Linux/Solaris server. However, you want to log on to that remote Linux server through a secured connection and have the data encrypted that is traversing between servers.
Solution
In the following example, the OS user oracle is currently logged on to the local Linux server BLSOL01; server BLSOL02 is the remote Solaris server. Perform the following steps to connect to server BLSOL02 from server BLSOL01 through SSH and execute an X software application on server BLLNX2:
- On the local Solaris server BLSOL01, run ssh with the -X (uppercase X) option, as shown here. You may be prompted to provide a password of the OS user on BLSOL02.
bslopuz@BLSOL01:~$ ssh -X BLSOL02
Password:
Last login: Mon Nov 16 02:17:46 2015
Oracle Corporation SunOS 5.11 11.2 June 2014 - If X11Forwarding is properly set up, the DISPLAY variable is automatically set up once you are successfully connected to the remote Linux/Solaris server, as shown here:
bslopuz@BLSOL02:~$ echo $DISPLAY
localhost:10.0 - Once you are successfully connected to server BLSOL02, you can now run an X client or GUI-based software application on server BLSOL02. To test this, we recommend that you run a simple X client, such as xeyes, as shown in Figure 15-3.

Figure 15-3. xeyes display
![]() Note The default port for X server is 6000. If this port is blocked, a workaround is to run ssh with the -X option to display th.plication, such as xclock or Oracle’s dbca.
Note The default port for X server is 6000. If this port is blocked, a workaround is to run ssh with the -X option to display th.plication, such as xclock or Oracle’s dbca.
How It Works
Recipe 15-4 allows you to redirect a graphical display to a remote Linux/Solaris server. However, the data traversing between the servers is not secured because it is not encrypted. For security reasons, we recommend that you forward or tunnel the graphical display through SSH, as shown in this recipe.
![]() Note To learn how to configure SSH tunneling using PuTTY, refer to recipe 1-1.
Note To learn how to configure SSH tunneling using PuTTY, refer to recipe 1-1.
To forward the display of an X client or GUI-based software application on a remote Linux/Solaris server, run ssh with the -X (uppercase X) option. The -x (lowercase X) option disables X forwarding. However, before you can start to connect using ssh, make sure that the Secure Shell daemon, or sshd, is already running on the remote Linux/Solaris server. Otherwise, review Chapter 14, particularly recipe 14-1, which discusses in detail how to set up ssh.
When running an X client or GUI-based software application on a remote Linux/Solaris server, you may receive this message: “Warning: Remote host denied X11 forwarding.” Also, if you run an X client or GUI-based software, you will receive the message “Error: Can’t open display.” To resolve these errors, make sure X11Forwarding is set to yes in the /etc/ssh/sshd_config file on the remote Linux/Solaris server.
![]() Note To troubleshoot your SSH connection, run the ssh command with the -v option to display debugging messages. For more debugging messages, run with the -vvv option instead. We also recommend that you review the /var/log/secure and /var/log/messages files.
Note To troubleshoot your SSH connection, run the ssh command with the -v option to display debugging messages. For more debugging messages, run with the -vvv option instead. We also recommend that you review the /var/log/secure and /var/log/messages files.
15-6. Manipulating the Terminal Emulator for X Windows
Problem
You want to launch the default X terminal and change the look and feel to support different database environments: development, quality assurance, and production database environments.
Solution
To launch an X Window terminal, you can execute the xterm command. If your OS environment variable DISPLAY is set up correctly to a Hummingbird X Server, Reflection X Server, or Cygwin X Server (or if you are running X server locally), a small white terminal will appear. This small window will probably not be adequate to support the day-to-day activities of today’s DBA who supports many database environments. More than likely, you will have a larger window, a title to specify the name of the window, different colors to easily identify the environment, and a larger scroll buffer area. Here are several xterm examples you can execute in your environment to support multiple database environments:
xterm -sl 32000 -sb -title "Production" -geometry 128x40 -bg red -fg white &
xterm -sl 32000 -sb -title "QA" -geometry 128x40 -bg yellow -fg black &
xterm -sl 32000 -sb -title "Development" -geometry 128x40 -bg blue -fg white &
Each of the xterm windows is designed with different background colors with the -bg parameter to differentiate database environments. In our example, the blue window represents the development environment, the yellow window represents the QA environment, and, of course, the red window represents the production environment. DBAs should be aware of the color scheme and exercise extra caution by remembering that while in the red background, they are logged on to the production database server.
In addition to the background colors, we defined the scroll length buffer as 32,000 lines. The default scroll buffer is 64 lines above the top of the window. The scroll buffer of 32,000 lines, designated by the -sl parameter, will consume more memory on the server, but will prove to be well worth it, especially when diagnosing problems.
The title of the windows can also be defined with the -title parameter, which should be enclosed with double quotes so that you can customize titles to suit your requirements.
The dimensions of the xterm window can be managed with the -geometry parameter, which defines the window size and position. You can define a specific font, font size, and other attributes with the -font parameter. The easiest way to designate font and size attributes is to execute the xfontsel command. Executing the xfontsel command will open another X window similar to the one displayed in Figure 15-4.

Figure 15-4. xfontsel window
When you decide on the font type and size attributes, you can click the select button and paste in another terminal with the xterm command, which will look like the following command:
xterm -font -adobe-courier-bold-*-*-*-12-*-*-*-*-*-*-*
Once you are satisfied with the font look and feel, you can go back to the xfontsel window and click the quit button.
Another popular parameter for xterm is the -e parameter. With the -e option, you can specify the program and arguments to run in the xterm window. Here’s an example of how the -e option can be manipulated:
xterm -e "ssh rac3 -l root"
How It Works
xterm is the standard terminal emulator that runs in X Windows. Other terminal emulators in Linux include Konsole (the default KDE terminal), GNOME Terminal (the default GNOME terminal), rxvt (a slimmed-down replacement for xterm), and Eterm. xterm is the standard de facto for terminals in all UNIX OSs. No matter whether you are running Linux, Sun Solaris, IBM AIX, or HP/UX, xterm will look and behave the same. One behavior includes the ability to copy and paste. Within an xterm window, if you highlight a word or a sentence, the highlighted portion will automatically be copied to the memory buffer. To copy the memory buffer, you simply press the middle mouse button; for a two-button mouse, the middle button is most often the trackball. You can press on the track ball to paste the contents of the memory buffer. If you have the old traditional two-button mouse, pressing both the left and right buttons at the same time will paste the memory buffer.
Similarly, if you hold the Ctrl key and simultaneously press the left, middle, or right button, you will see the following menu options:
- Press Ctrl and the left mouse button for Main Options.
- Press Ctrl and the right mouse button for VT Fonts.
- Press Ctrl and the middle mouse button for VT Options.
For example, with the VT Fonts menu, you can change the size of the font to unreadable, tiny, small, medium, large, and huge. As you change the size of the font, the window diameter will change accordingly. With the VT Options menu, you can modify simple things such as enabling or disabling scrollbars or enabling reverse video.
For assistance with the myriad of xterm arguments, you can execute the xterm -help command.