
Most problems I’ve ever had when using log4j are related to bad configuration, usually stemming from a basic lack of understanding of how the various components of log4j work together. The core concepts of log4j are not well understood by the average user, or there wouldn’t be as many configuration problems as there are. In this section, we will take a look at the core concepts of the log4j architecture, along with an example for each, taken from the Example Application used with the Short Cut.
Each concept will be presented with an example so the reader can see how it works right out of the gate. Simple usage patterns are presented here for Appender usage and where to place the configuration file and how to name it.
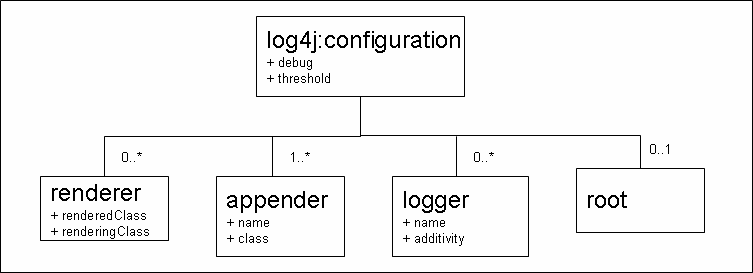
Let’s spend a minute looking at how the most basic components of log4j fit together. Figure 3 illustrates this.

Below is a short description of each component in Figure 3. We will look at each of these in more detail in later sections.
- logger
This is a named entity—where you control the name—with which you interact directly from your Java code to do logging.
- Appender
This represents a destination for logging output such as a file, the console, or even a database. Log4j comes packaged with a number of appenders that represent the most common log destinations you will need, but extensible so that if we have a need for an appender that log4j doesn’t provide we can write one.
- Layout
This tells log4j how to format its output, or put another way, what the formatted output is to look like. Log4j comes packaged with a few useful layouts, and we will look at a few of them as we move through this Short Cut.
To do logging, your Java code, the logger, its Appender(s) and the Appender Layout(s) work in concert. The Configuration tells log4j how to coordinate everything.
The sections that follow will refer to specific values of the Log Level, so they are presented here as a warm up. As noted earlier, the level of a log event is representative of its importance from your perspective as the developer. Log4j has 5 different levels you can specify from your Java code, shown below from least important (most granular) to most important (least granular).
TRACE
DEBUG
INFO
WARN
ERROR
FATAL
Note
The case of a Log Level’s name is unimportant to log4j. So,
DEBUG is the same as debug (or DeBuG, or DEbug, for that matter). However, for
readability you should use uppercase level names, as this seems to be
a de facto industry standard. Uppercase Level
names are used throughout this Short Cut.
At the least important—or if you prefer, the finest-grained—is TRACE, where programmer-level information such as method trace information is logged. At the other end is FATAL (or course grained), where the system (or some system function) cannot continue and will imminently fail. When trying to decide the level of a particular message, it might be helpful for you to ask, “Under what conditions would this message need to be seen in production?”
Note
In speaking of one level being “more” important, it is in terms of its value in conveying the system’s health in a production environment. For example, an INFO level message is less vital in that regard than, say, an ERROR level message.
Configuration is where you tell log4j how to choreograph the
activities it should perform to do logging on behalf of your
application. When it comes to configuration, I have good news and bad
news. The good news is that configuring log4j is really easy. The bad
news is that configuring it incorrectly is even easier. So in this
section we will talk a little about some of the most common ways to
configure log4j, the simplest of which—covering probably 80% of the
ways you will ever use it—is through the use of a Properties file
called log4j.properties, which must be placed
somewhere on the CLASSPATH.
Warning
Unless you are using advanced features of log4j like Filters and Error Handlers (which we will see in the second half of this Short Cut), put your configuration in a file called log4j.properties and make sure this file ends up somewhere on the CLASSPATH.
In the configuration, you tell log4j how the various components in Figure 2 work together to do logging.
Consider a simple—but working—example:
Example 1. Simple log4j.properties configuration file
log4j.rootlogger=WARN, Console
log4j.appender.Console=org.apache.log4j.ConsoleAppender
log4j.appender.Console.layout=org.apache.log4j.PatternLayout
log4j.appender.Console.layout.ConversionPattern=
%c {%l}:%n    [%t] %-5p - %m%n
log4j.logger.com.makoto=INFO
log4j.logger.com.makoto.example.log4j.Controller=DEBUG
Note
The character “” in the example above is a continuation character, and is used for lines that are longer than will fit on the width of a page in this Short Cut. This notation will be used throughout. By the way, log4j respects the backslash as a line continuation character, too.
There are several things to notice about this example, summarized below.
log4j.rootlogger=…This is how you configure the Root logger, which is always present in the system and is at the top of the hierarchy. All loggers defined by your program are descendents of the Root logger. In this example, the Root logger’s threshold—the level below which log messages are filtered—is set to
WARN, so no messages whose level isTRACE.DEBUGorINFOwill be seen.log4j.appender.Console=…This is how you configure an appender, one in this case whose configuration name in this case is
Console. As I said earlier, an appender is a special class that represents a particular destination for log output, and log4j comes packaged with several, one of which writes messages to the console, and whose fully qualified class name isorg.apache.log4j.ConsoleAppender. The appenderConsolecould just as easily have been calledfunkyappender,A1orstdout. The name is entirely up to you, and for this example I pickedConsolefor hopefully obvious reasons. As a rule of thumb, the name you choose for an appender should be a string representative of what it does (in this case, log to the console). I’ll use this naming pattern throughout this Short Cut.log4j.appender.console.layout=…This is how you configure a layout, and must match up to an appender’s configuration name, in this case
Console. A Layout is a special class that tells the appender how to format the String representation of log messages. In this example I’ve chosen to usePatternLayout, which usesprintf-style formatting strings.log4j.appender.Console.layout.ConversionPattern=…This is how you configure the specifics (the
printf-style formatting stings mentioned above) of thePatternLayout, which gives you great control over how the log messages appear. A plethora of information on how to usePatternLayoutis available in the log4j javadoc (which comes packaged with log4j), so I won’t repeat all of it here. We will, however, look at it in more detail later.log4j.logger.com.makoto=…This is how you explicitly set the Level of a logger. In this example, the logger named
com.makotois set toINFO. All other loggers in the application that are not descendents ofcom.makotohave the level ofWARN, because they inherit that level from the root logger (see above).log4j.logger.com.makoto.example.log4j.Controller=…This logger is a descendent of
com.makoto, and its level is set toDEBUG. Since its level is set explicitly in the configuration, it overrides the level of its ancestor, which would be INFO because it is specified in the configuration (see above). This behavior holds true for all loggers. We will look more at inheritance of Level in sections that follow.
Once again, loggers are named entities, and the names are entirely up to you. Log4j is designed so that loggers work together in hierarchies. As such, I recommend that you give your loggers names that are (a) legal Java names and (b) use Java package-style - hierarchical - notation. The hierarchy originates on the left and descends as names are added to the right, followed by dots, just like the way Java packages are named.
Furthermore, befitting log4j’s built-in respect for hierarchical
naming, a logger named com.makoto.example is a
parent of com.makoto.example.log4j, which is a parent
of com.makoto.example.log4j.Controller, and so
on. By the same token, a logger (other than the root logger) is a
descendent of its parent logger, so the logger
com.makoto.example is a descendent
of the logger com.makoto.
When it comes to naming your loggers, however, you may name them as you wish. The examples below are all valid logger names:
com
com.makoto.example.log4j
org.whatever.dude
this.is.also.a.valid.logger.name.but.not.recommended
thisisavalidloggernametoo
hosd0897092834n…*&^()!@#$%,-+
The rules for naming loggers are pretty loose (as you can see with that last example). The only character that seems to cause the log4j configuration any difficulty is the equals sign (=), which makes sense because the equals sign separates the property name from its value. You should stick to names that make sense and are readable, even though the rules are flexible, which is true of log4j in general. In fact, here’s a handy rule of thumb for naming loggers, which is practically a de facto standard:
Loggers are never instantiated directly. Rather, a logger should
always be created by calling logger.getlogger(…) from your Java code.
Below is Java code from Controller
class of the example application.
package com.makoto.example.log4j;

import apache.log4j.logger;

public class Controller {
...
  private static final logger log =
    logger.getlogger(Controller.class);
...
    public static void main(String[] args) {
      log.trace("Application Starting...");
      log.trace("Checking arguments...");
      if (log.isDebugEnabled()) {
        log.debug("Arguments:");
        int aa = 0;
        for (String arg : args) {
          log.debug("	arg[" + aa++ + "] -> '" + arg + "'");
        }
      }
      if (args.length < 1) {
        log.info("Usage: " + Controller.class.getName() +
                 " mbean_definition_file target_name");
        } else {
          log.trace("Inspecting argument[0] +
            (supposed to be the MBean definition file)...");
            String appMbeanDef = args[0];
          log.debug("Application definition mbean file is '" +
                    appMbeanDef + "'");
          log.trace("Inspecting argument[1] +
                    (supposed to be the target name)...");
          String targetName = args[1];
          log.debug("Target name is '" + targetName + "'");
          new Controller(appMbeanDef, targetName);
          log.info("APPLICATION STARTING AT ==> " +
             new DateTime().toString("MM/dd/yyyy HH:mm:ss.SSS") +
             " <==");
          try {
            log.trace("Waiting for current thread to die...");
            log.debug("Current thread is '" +
                      Thread.currentThread().getName() + "'...");
            Thread.currentThread().join();
            log.trace("Thread dead...");
          } catch (InterruptedException e) {
            log.warn("Caught InterruptedException! What gives?", e);
          }
      }
      log.trace("Application Terminated.");
  }
}
Log4j’s API has methods on it whose names match the Level of the
event you want to log. For example, if you want to log a DEBUG message, call the debug() method on the logger to which you’re
writing the message. It appears from the example above that you always
pass a String to the particular log4j API method you are calling.
Strictly speaking, the logger methods take an Object (which in the example above just so
happens to be a String). This may seem a bit strange, but is actually
an architectural feature of log4j that allows it to separate the
message to be logged from how it is eventually rendered as a String.
Rendering a log message as a String is referred to as Object
Rendering, and we will talk more about it later on in this Short
Cut.
You may have noticed from this example that the logger is not
retrieved by name, but rather by using its Class object. The One logger Per
Class pattern is such a common usage pattern that log4j has
incorporated a convenience method into its API to facilitate its use.
You can either pass the name of the class as a String, or the Class object. For example, the following two
lines of code resolve to the same logger instance:
logger l = logger.getlogger("com.makoto.example.log4j.Controller");
logger m = logger.getlogger(com.makoto.example.log4j.Controller.class);
if (l == m) {
  // Success!
} else {
  // Code never executed (or log4j is broken)
}
Log4j creates an instance of the requested logger if it does not already exist. In fact, each time you ask for a logger of the same name, you get the same instance of that logger. For example, the following two statements return the same instance of the logger:
logger l = logger.getlogger("some.logger");
logger m = logger.getlogger("some.logger");
if (l == m) {
  // Success!
} else {
  // Code never executed (or log4j is broken)
}
Whereas, these two do not:
logger l = logger.getlogger("some.logger");
logger n = logger.getlogger("some.other.logger");
if (l == n) {
  // Code never executed (or log4j is broken)
} else {
  // Success!
}The configuration is used to control which messages are seen.
To configure a logger, use the following syntax:
log4j.logger.logger_name=[threshold_value][,appender_1[,appender N]]
Where logger_name is the name of the
logger, threshold_value (optional) is the
level below which log output is dropped,
appender_1 (also optional) is an appender
name (which must match the name of an appender somewhere else in the
configuration), and may be followed by N other appender names. Recall
from Figure 2 how
multiple appenders can be configured for a logger. Additional
appenders are separated by commas and, again, refer to appenders
specified elsewhere in the configuration script.
The Root logger is special. It is always present, has no
ancestor logger and thus does not inherit its level from any other
logger. You configure the Root logger like any other logger, except
that the word rootlogger is used to
designate it in the configuration. We saw in Example 1 how to configure
the Root logger, but below is the formal definition of the
configuration syntax. With the exception of the designation rootlogger, it is identical in explanation
to loggers in general (see above).
log4j.rootlogger=[threshold_value][,appender_1[,appender N]]
Note
If you do not explicitly assign a Level to the Root logger,
its Level value will default to DEBUG.
Log4j does not require you to configure the root logger. However, it is always a good idea to configure the root logger with:
An explicit level setting
At least one appender
Following this simple piece of advice as a matter of course will save you untold grief.
Warning
Failure to configure the root logger can lead to strange results such as the dreaded message:
log4j:WARN No appenders could be found for logger
(logger.name.with.no.appender.configured)
log4j:WARN Please configure the log4j system
properly.
If you always configure the root logger with at least one appender (and we will see how to do that in the next section), you can avoid this confusing message.
Every other logger in the application inherits its Level (among
other things, as we’ll see later) from the root logger. In fact, as a
more general statement (call it the Inheritance
Rule): if any logger’s Level is not explicitly set in the
configuration, its effective level is set by
inheriting the Level of its nearest ancestor. For example, if logger
com.makoto has its Level set to
INFO in the configuration and
com.makoto.example does not, then
com.makoto.example.log4j.Controller
will inherit the INFO Level from
its ancestor com.makoto. When your
code issues a log statement, log4j will walk the hierarchy of
loggers—starting with the one you used to issue the log
statement—until it figures out the effective level of the issuing
logger, walking all the way to the root logger if necessary (which is
why it’s a good idea to always configure the root logger).
An appender represents a destination for log output and log4j comes packaged with a set of Appenders that will satisfy most of the destinations you’ll probably ever need. There is no limit to the number of appenders a logger can have, though if you associate more than two appenders to a logger (other than the Root logger), you should really have a compelling reason for doing so. The examples in this section focus on two appenders:
org.apache.log4j.ConsoleAppenderorg.apache.log4j.RollingFileAppender
The job of the RollingFileAppender is to write log
statements to a file whose size is controlled via the configuration.
Once that file reaches the maximum size, it “rolls” over by copying
the contents of the current log file to a numbered “rollover” file
(and the number of “rollover” files is configurable too) so that the
current log file is never larger than the limit you set. As we saw in
Example 1
configuring an appender is fairly straight-forward and follows this
simple set of rules:
An appender is given a name (which is up to you) in the configuration, and that name must be unique among all other appenders in the same configuration file.
An appender may have properties, and if so you will need to configure those properties.
An appender’s properties are exposed via the Java Beans pattern, and these are the names you will use when configuring the values of those properties.
An appender must always be associated with a logger via the configuration for it to be able to do anything.
Example 2 shows how
to configure the Root logger to use a RollingFileAppender.
Example 2. Configuring a
RollingFileAppender
log4j.rootlogger=, RollingFilelog4j.appender.RollingFile.File=log4j.loglog4j.appender.RollingFile.MaxFileSize=1000000log4j.appender.RollingFile=org.apache.log4j.RollingFileAppenderlog4j.appender.RollingFile.layout=org.apache.log4j.PatternLayoutlog4j.appender.RollingFile.layout.ConversionPattern=%c {%l}:%n    [%t] %-5p - %m%n
log4j.logger.com.makoto=INFO
log4j.logger.com.makoto.example.log4j.Constroller=DEBUG
Notice that the threshold level value of the root logger is not
explicitly set. As I said earlier, if not set it will default to
DEBUG.
To configure an appender, use the following syntax:
log4j.appender.appender_name=appender_class
Where appender_name is the appender’s
configuration name (which must be unique, i.e., no other appenders in
the same configuration can have that name) and the
appender_class is the fully qualified name
of the appender class to use. The configuration name of an appender is
entirely up to you, and can contain any character but the equals sign.
While the naming of appenders is flexible from log4j’s perspective, be
sure to adopt a convention (such as the one used in this Short Cut),
and be consistent in its use.
To configure the appender’s properties, use similar syntax:
log4j.appender.appender_name.property_name=property_value
Where property_name is the name of
the appender’s property, and property_value
is the value to assign to it. Depending on the appender you use, the
properties will vary. The javadoc for the appenders that come packaged
with log4j will tell you which properties you need to set.
If you try to set a property that doesn’t exist:
log4j.appender.RollingFile=org.apache.log4j.RollingFileAppender
log4j.appender.RollingFile.nonExistentProperty=whatever
Log4j will complain:
log4j:WARN No such property [nonExistentProperty] in
org.apache.log4j.RollingFileAppender.
Notice when you run Example 2 (you did run the
example, didn’t you?) there is no output on the console. This is
because no ConsoleAppender is
configured. To add the ConsoleAppender to the root logger, the
following lines are modified and/or added to the configuration:
Example 3. Adding the ConsoleAppender to the
Root logger
log4j.rootlogger=WARN, RollingFile, Console
log4j.appender.RollingFile.File=log4j.log
log4j.appender.RollingFile.MaxFileSize=1000000
log4j.appender.RollingFile=org.apache.log4j.RollingFileAppender
log4j.appender.RollingFile.layout=org.apache.log4j.PatternLayout
log4j.appender.RollingFile.layout.ConversionPattern=
%c.%M():%n    [%t] %p: - %m%n
log4j.appender.Console=org.apache.log4j.ConsoleAppender
log4j.appender.Console.layout=org.apache.log4j.PatternLayout
log4j.appender.Console.layout.ConversionPattern=%c {%l}:%n    [%t] %-5p - %m%n
log4j.logger.com.makoto=INFO
log4j.logger.com.makoto.example.log4j.Constroller=DEBUG
If you run Example 3 you’ll see that output now shows up on the console.
The third commonly used component in log4j is the Layout, which tells the appender how to format the String representation of the message to be logged. Remember, the appender only represents a destination. An appender is only concerned with getting a message to its destination and thus treats log messages as opaque. The appearance of the message is the concern of the Layout.
Strictly speaking, the Layout always asks for the rendered
message (by rendered, log4j means “the message object in String
format”) before formatting it further, which gives the object
rendering mechanism a chance to work on the log event. However, unless
you explicitly configure an ObjectRenderer for a particular class, the
layout formats the String representation of the log message by calling
toString() on the object passed to
whichever log method was called from your code.
To configure a layout, you specify it for an appender as if it
were a specially named property called layout:
log4j.appender.appender_name.layout=layout_classname
Where appender_name is the
configuration name of the appender to which this layout belongs, and
layout_classname is the fully qualified
class name of the Layout class to use. Log4j comes packaged with
several useful layouts that we’ll talk about in this section.
Warning
The layout property passed
to the appender must begin with a lowercase l or log4j will give you an error message
like:
log4j:ERROR Could not find value for key
log4j.appender.FileAppender.layout
log4j:WARN Failed to set property [layout] to value
"org.apache.log4j.HTMLLayout".
log4j:ERROR No layout set for the appender named
[FileAppender].
Log4j is somewhat forgiving on how you name attributes for various constructs, but is not always consistent. I will make sure and point these exceptions out as we run across them.
The simplest layout to use is named, aptly, SimpleLayout, and does nothing more than
format the message as the message level, followed by a dash, followed
by the rendered message. For example output from SimpleLayout might look like:
DEBUG - This is a debug message.
INFO - Some information you might want.
FATAL - The sky is falling!
The most commonly used layout is the PatternLayout, perhaps because it offers a
great deal of control over how the log message will appear. All of the
early examples in this Short Cut used PatternLayout, which if you recall from
Example 2 also configures
the ConversionPattern property of
PatternLayout as:
log4j.appender.Console.layout=org.apache.log4j.PatternLayout
log4j.appender.Console.layout.ConversionPattern=
%c {%l}:%n    [%t] %-5p - %m%n
PatternLayout will work fine
without configuring its ConversionPattern property, but all you will
see is the rendered message, which is less helpful than SimpleLayout. No other information (such as
the logger, thread, time stamp, level, etc.) is included, so make sure
to configure the ConversionPattern
property whenever you use PatternLayout, or you might as well use
SimpleLayout.
There are many options available for the ConversionPattern property when using
PatternLayout, and only the most
commonly used are shown here. Please see the javadoc for PatternLayout that ships with log4j if you
need a comprehensive reference. The value of the ConversionPattern property is a
format string, and respects white space and
certain control characters (again, the javadoc will provide more info
in that regard). Characters in the format string will be present in
the relative positions in which they appear in the format string, just
like printf-style format
strings.
Notice in the configuration snippet above that a colon (:), space, left ([) and right bracket (]) and left ({) and right (}) brace are used literally. Meaning, these
characters are included in the final formatted message just as they
are specified (and in the same position) in the format string, and
have no special meaning to PatternLayout.
The characters that are preceded by a percent sign (%) indicate
that they have special meaning to PatternLayout. These are some of the most
commonly used ones I’ve seen, and are summarized below.
%cThe name of the logger (historically this was called Category, which may explain the choice of the letter
c) that was called to log the event.%lThe character
lis used for “location” which is the class, method and line number in your code where the log statement was issued.%mThe rendered message itself.
%pThis is the level of the logging event (
DEBUG,INFO, and so on). Historically, log4j called this Priority (which may explain the characterp). The “-5” tells the Layout to left justify the level, up to five characters, padding with spaces on the right if the level is less than 5 characters long. See the javadoc for more details.%nThe platform-dependent line separator.
%tThe name of the thread in which your code was running when it issued the log statement.
Some other commonly used conversion characters are:
%d{format_specifier}This conversion character formats the date and time according to
format_specifier, using the same format specifiers as JDKSimpleDateFormatuses. Below are some commonly used format specifiers:- MM/dd/yyyy
Formats the month, day, and four-digit year.
- HH:mm:ss,SSS
Formats the Hour (24 hour format, use hh for 12 hour format), minute and second, plus the milliseconds separated by a literal comma.
- MM/dd/yyyy HH:mm:ss,SSS
The two specifiers above combined.
%rThe number of milliseconds that has elapsed since the creation of the Layout (usually at initialization time) to the time the log statement was issued (strictly, the upper bound is set when log4j decided the log event would not be filtered).
When it comes to configuring log4j, you have two main options, and we will look at these in detail in this section. These options are:
Properties file
XML file
Log4j’s configuration mechanism is very flexible, which unfortunately that means it’s easy to make mistakes (configuration mistakes are a common source of frustration for developers, myself included). Let’s start with log4j’s configuration sequence.
Log4j uses the LogManager
class to do its initialization in what it terms a default
initialization procedure, which consists of the following
steps:
Check the
log4j.defaultInitOverridesystem property. If it is set tofalse, then default initialization is skipped. Otherwise, proceed to step 2.Check the
log4j.configurationsystem property to see if its value is set. This is how you would, for example, specify the name of your configuration file (more on this later) if you don’t like log4j.properties or log4j.xml as configuration file names.Check the
log4j.configuratorClasssystem property to see if it is set. This is a way for you to programmatically configure log4j yourself. This is advanced stuff, and not recommended unless you really know what you’re doing. The space allotted in this Short Cut precludes looking at how to write aConfigurator, which requires a deep understanding of the inner workings of log4j.If you don’t set the log4j.configuration system property, then log4j looks for a file named log4j.xml somewhere on the CLASSPATH. If it doesn’t find that file, it looks for a file named log4j.properties on the CLASSPATH.
At this point, log4j passes control to
OptionHandlerto complete initialization. If a configuration file is found, it is read and processed. Or if a custom configuration (via thelog4j.configuratorClasssystem property) is used, it is executed here.If log4j cannot find any type of configuration, there is no warning or anything, and you get this message:
log4j:WARN No appenders could be found for logger
(name.of.some.logger).
log4j:WARN Please initialize the log4j system properly.
Where
name.of.some.loggeris the first logger that issued a log statement, at which point log4j complains that it is not configured correctly.
If you see a message telling you “No appenders could be found…” the real problem just may be that log4j cannot find its configuration file, which must be located somewhere on the CLASSPATH.
Note
If you want to see what log4j is doing under the hood, you can. Log4j writes output using its own mechanism, and you can see what it is doing by setting the property log4j.debug in your configuration file. Just add the following line anywhere in your log4j.properties file:
log4j.debug
No value is necessary. The presence of the above string in the
configuration file is sufficient to turn on log4j’s internal
DEBUG logging. Several of the
examples have this property, so I refer you there to investigate
further.
Now that you’ve seen a little about how log4j goes about initializing itself, in the sections that follow you will see how log4j does each type of configuration.
Properties-style configuration is limited to the elements listed below. If you plan to use properties-style configuration in your application, it may be a good idea to adopt an idiom for the location of these elements in your configuration to make it more readable. Below is a suggested order:
Debug Flag
Global Threshold
Root logger
Layout
Appender
Logger(s)
Renderer(s)
In the list above we see Global Threshold for the first time. This is like the main breaker switch to electrical system in your home (well, if the breaker switch had threshold levels) and acts as a way to control the Level below which log messages are dropped regardless of how appenders, loggers or any other constructs are configured. For example, if the Global Threshold is set to WARN, then no messages from any loggers in your application below WARN will be seen, regardless of how you’ve specified appender or logger thresholds (except log4j’s internal logging, which is unaffected by the Global Threshold).
The Renderer is also new, and refers to an Object Renderer, which is responsible for producing (or rendering) the String representation of a particular log message object. For each such class, you will need to specify its Object Renderer, and we’ll see how to do that later on. There are also numerous examples throughout this Short Cut that use object rendering.
The other constructs above should be familiar to you by now.
Below is a summary of the syntax for configuring each element you may put in a properties file.
- Debug Flag
log4j.debug, where the presence of this literal (it needs no value) alone turns on log4j’s internal debugging. This logging is not subject to the global threshold check (see below).- Global Threshold
log4j.threshold=[threshold_value], wherethreshold_valueis the level value below which no messages will be seen, regardless of how any other constructs are configured.- Root logger
See Configuring a logger for the syntax to configure the Root logger.
- Layout
See Layouts for the syntax to configure a Layout.
- Appender
See Appenders for the syntax to configure an appender.
- Logger
See Configuring a logger for the syntax to configure a logger.
- Renderer
log4j.renderer.rendered_classname=[renderer_classname], whererendered_classnameis the fully qualified class name of the message class that is to be rendered, andrenderer_classnameis the fully qualified class name of the class that is to do the rendering. These can be the same class, but log4j will create an instance of therenderer_classname, so it must have a no argument constructor.
Example 4
shows all of these elements in an example. Notice that the global
threshold value is INFO, so even
though the com.makoto logger is set
to DEBUG, no DEBUG output appears. This is also the first
time we’ve seen a renderer in the configuration, and in this case an
inner class of Queue called
QueueRenderer is used to do the
rendering. See the example application for more details.
Example 4. A simple but complete properties configuration example
log4j.debug
log4j.threshold=INFO
log4j.rootlogger=WARN, Console
log4j.appender.Console=org.apache.log4j.ConsoleAppender
log4j.appender.Console.layout=org.apache.log4j.PatternLayout
log4j.appender.Console.layout.ConversionPattern=
%c {%l}:%n    [%t] %-5p - %m%n
log4j.logger.com.makoto=DEBUG
log4j.renderer.com.makoto.example.log4j.Queue=
com.makoto.example.log4j.Queue$QueueRenderer
It is possible to tell log4j through the log4j.configuration system property that its
configuration is to be found elsewhere than in log4j.properties.
Note
None of the Properties file examples in this section are from the example application. These examples are for illustration purposes only. However, you should be able to modify (at your own risk, of course) the example code to make these examples work. Only Windows examples are shown, since the germane portion (in bold) of the example will not differ from Windows to Linux (except where noted).
If you need to configure log4j through a file with a name other than log4j.properties, you can specify the name of that file in a number of ways, but the most common are:
Through a file:/// URL
Through the name of a file on the CLASSPATH
To specify a configuration file called, say, mylog4jconfig.properties, located in the folder C:home, your command line script on Windows might look like:
@rem Assume CLASSPATH is set
@rem Assume java is on the PATH
java -classpath %CLASSPATH%
 -Dlog4j.configuration=file:///C:homemylog4jconfig.properties
 com.makoto.example.log4j.Controller myapp.xml
Or on Linux (since this is slightly different from Windows), if the file is located in the directory /home/steve:
# Assume CLASSPATH is set
# Assume java is on the PATH
java -classpath ${CLASSPATH}
 -Dlog4j.configuration=file:///home/steve/mylog4jconfig.properties
 com.makoto.example.log4j.Controller myapp.xml
To specify a file called, say myconfig.properties, located on the CLASSPATH, your Windows command line script might look like:
@rem Assume CLASSPATH is set
@rem Assume java is on the PATH
java -classpath %CLASSPATH%
 -Dlog4j.configuration=myconfig.properties
 com.makoto.example.log4j.Controller myapp.xml
Note
The extension .properties is not required. Log4j will detect that the file is a properties file and process it accordingly.
The value of the log4j.configuration property can also be a
URL. Suppose the configuration for your application resides at http://my.whatever.com/log4j.properties. When invoking
the JVM, the command line script on Windows might look like:
@rem Assume CLASSPATH is set
@rem Assume java is on the PATH
java -classpath %CLASSPATH%
 -Dlog4j.configuration=http://my.whatever.com/log4j.properties
 com.makoto.example.log4j.Controller myapp.xml
Log4j will detect the URL, and fetch the configuration from it. For the purposes of example, the URL is representative here (and at the time of this writing does not exist). If you have access to a web server, copy the log4j configuration file to an HTTP-reachable location and see for yourself that this works right out of the box.
This section describes how to configure log4j via an XML file.
Note
If you are going to use an XML file, placing your configuration in a file called log4j.xml and then placing that file on the CLASSPATH is by far the easiest way to configure your application, since log4j’s default initialization procedure is already wired to look for a file with this name.
The syntax of the XML file follows a Document Type Definition (DTD) that ships with log4j called log4j.dtd. You should always specify log4j.dtd in your XML configuration script so that log4j can validate your XML and report any problems with the structure of your configuration to you while your application is still in development.
You are not required to specify the DTD definition in your XML configuration file. But note that if you do not specify the DTD in your configuration, the XML parser has nothing to validate against, and you will see messages like the following:
log4j:WARN Continuable parsing error 7 and column 50
log4j:WARN Document root element "log4j:configuration",
 must match DOCTYPE root "null".
log4j:WARN Continuable parsing error 7 and column 50
log4j:WARN Document is invalid: no grammar found.
To be safe, always specify the following in your XML configuration file:
<!DOCTYPE log4j:configuration SYSTEM "log4j.dtd">
Log4j will make sure and pull the DTD from the log4j JAR file, so including the above line in your configuration file is all you need to do.
Before getting too far into the required syntax of your log4j XML configuration file, it may be helpful to see an example .properties configuration from earlier, “translated” into XML.
Example 5. XML Configuration File
<?xml version="1.0" encoding="UTF-8" ?>
<!DOCTYPE log4j:configuration SYSTEM "log4j.dtd">
<log4j:configuration xmlns:log4j='http://jakarta.apache.org/log4j/'>
  <appender name="Console"
            class="org.apache.log4j.ConsoleAppender">
    <layout class="org.apache.log4j.PatternLayout">
      <param name="ConversionPattern"
             value="%c {%l}:%n    [%t] %-5p - %m%n"/>
    </layout>
  </appender>
  <logger name="com.makotogroup">
    <level value="INFO"/>
  </logger>
  <logger name="com.makotogroup.log4j.Controller">
    <level value="DEBUG"/>
  </logger>
  <root>
    <level value="WARN"/>
    <appender-ref ref="Console"/>
  </root>
</log4j:configuration>
The structure of the configuration in XML is basically the same as it is in a Properties file (but ordered a little differently because of the way the DTD is defined):
Debug Flag
Global Threshold
Object Renderer(s)
Configure Appender(s)
Configure logger(s)
Configure the root logger
By now, the basic structure of this document should be somewhat intuitive. The order is a little different and that has to do with the way the various constructs are defined in the DTD. I have noticed that the XML parser will parse the document, even if it violates the DTD, so if you must, restructure your configuration as you like (so long as it contains all of the required elements). Just be aware that the XML parser will complain. That said, the structure above follows the structure defined in log4j.dtd, and is the one I will use in this section.
Here is a simple rule of thumb to determine whether or not you need to use XML to configure log4j (some of these concepts we will see later). If one or more of the following apply, you must use XML to configure log4j:
You need to attach an appender to another appender (such as configuring a backup appender)
You need to use filter chains (we will look at Filters later)
You need to use error handlers (we will look at Error Handlers later) for your appenders
We’ll start with a diagram (Figure 4) showing the top-level of the elements you can include in your XML configuration.
<log4j:configuration>
This is the one and only root element in the XML configuration and it contains two attributes:
debug=valueThis attribute is optional and controls whether or not log4j will output its own debug information, and can be handy if you ever want to know a little about what log4j is doing under the hood. If present
valuemust be one of the following:truefalsenull
Setting this attribute to
truewill turn on log4j’s internal logging. For example:<log4j:configuration xmlns:log4j='http://jakarta.apache.org/log4j/' debug="true" threshold="ALL"> . . . </log4j:configuration>threshold=valueThis attribute is optional and sets the Global Threshold level value, and any log event with a level below the value specified will be dropped. This attribute defaults to
all, but if presentvaluemust of one of the following:alltracedebuginfowarnerrorfataloffnull
These values should look familiar because they are the lower-case values of the Log Level to which to set the global threshold. If you specify the uppercase values, log4j will complain, but will work fine. For example, to set the global threshold level to
WARN(remember the values are lower-case):<log4j:configuration xmlns:log4j='http://jakarta.apache.org/log4j/' debug="true" threshold="warn"> <!-- More Config Here --> </log4j:configuration>
Following the <log4j:configuration> element are the
top level elements, which are described in the order they must appear
to be valid (according to the DTD). Where appropriate a figure is
provided.
<renderer>
This element is used to specify zero or more ObjectRenderer implementations for your
message objects. The <renderer> element itself is optional,
but if specified, has two attributes:
renderedClass=classNameThis attribute is required, and is the class that, if passed to a log4j API method as the message, will be rendered as a String.
classNameis the fully qualified name of this class. In the example application, an instance of theQueueclass can be passed to log4j and result in a meaningful message because it has an object renderer defined for it:<renderer renderedClass="com.makoto.example.log4j.Queue" renderingClass="com.makoto.example.log4j.Queue$QueueRenderer"/>renderingClass=classNameThis attribute is required and is the fully qualified name of the class that is to render
renderedClassas a String. In the example application, if an instance of theQueueclass it passed to a log4j method it will be rendered by a custom renderer calledQueueRenderer, which happens to be an inner class ofQueue. The specified renderer will be invoked, rather than callingtoString()on theQueueobject.The
Queueconstructor in the example application:public Queue(int capacity) { super(capacity); log.info(this);// Queue renders itself as a message }The configuration:
<renderer
  renderedClass="com.makoto.example.log4j.Queue"
  renderingClass="com.makoto.example.log4j.Queue$QueueRenderer"/>
A <renderer> element
has no contained elements.
If you run Example 4 from the Example application, you can see object rendering in action.
<appender>
This element is used to configure an appender. You should always configure at least one appender and attach it to the root logger, even though an appender is not technically required according to the DTD. Technically Figure 3 is not correct according to the DTD, but log4j will not work without configuring at least one appender, so I would argue that the DTD does not match log4j’s functional requirements (though I suppose you could omit any appenders from the configuration, then programmatically add an appender, but I’ve never been able to get that to work). When you define an appender it has two attributes:
name=appender_nameThis attribute is required and is how you specify the name of the appender, whose value is
appender_nameand must be unique. The value of this attribute is also how the appender will be referenced elsewhere in the configuration via the<appender-ref>element, which we will see later. For example, to create an appender calledConsole:<appender name="Console" class="org.apache.log4j.ConsoleAppender"> <!-- More appender config --> </appender>Now elsewhere in the configuration you can use the name
Consoleto refer to this appender.class=appender_classThis attribute is required, and is the fully qualified name of the appender class. For example, to use the
ConsoleAppenderclass that comes packaged with log4j:
<appender
   name="Console"
   class="org.apache.log4j.ConsoleAppender">
   <!-- More appender config -->
</appender>Figure 5
illustrates the <appender>
element and its subordinate elements. The order of the elements should
be as they appear in the figure, from left to right.
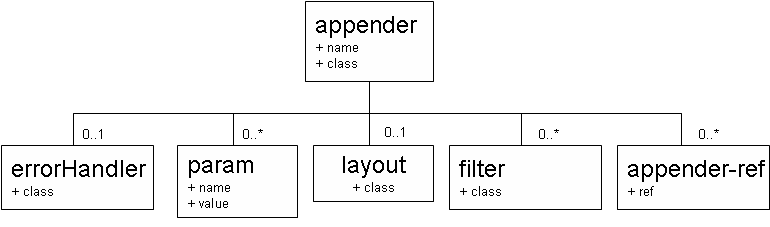
An <appender> may
contain the following elements (configuration for which we will see
later in this section):
<errorHandler>This element is optional, but if present an appender may have at most one Error Handler defined for it. We will see later how to work with Error Handlers.
<param>This element is optional, but if present, there will be many of these as the appender requires (and will therefore vary from appender to appender).
<layout>This element is optional, and is used to define the layout for the appender, and there may be at most one of these. If present, a
<layout>element has a single required attribute,class, which is the fully qualified name of the Layout class. A<layout>may also have zero or more nested<param>values, depending upon the particular Layout class used.<filter>This element is optional, but an appender may have as many filters as you want. If present, a
<filter>element has a single required property, class, which is the fully qualified name of the Filter class to be used. Depending on the particular Filter class in use, a<filter>element may have zero or more nested<param>elements.<appender-ref>This element is optional, and is used to attach other appenders to this appender, so long as this appender implements the
AppenderAttachableinterface, such as theAsyncAppenderdoes.
Below is a—somewhat contrived—example of an appender named
FileForErrors, that uses the log4j
FileAppender class to output
messages to a file called errors.log, has an
Error Handler (we will see more about using Error Handlers later) that
uses the log4j FallbackErrorHandler, uses the PatternLayout class, and has a StringMatcher Filter (we will see more about
using filters later) that matches any message with the word “error” in
it.
Example 6. Appender configuration example - some of the example has been omitted for brevity.
<appender name="FileForErrors"
   class="com.makoto.example.log4j.FileAppender">
  <errorHandler class="org.apache.log4j.varia.FallbackErrorHandler">
    <appender-ref ref="FallbackFileForErrors"/>
  </errorHandler>
  <param name="File" value="errors.log"/>
  <layout class="org.apache.log4j.PatternLayout">
    <param name="ConversionPattern"
           value="%c {%l}:%n    [%t] %-5p - %m%n"/>
  </layout>
  <filter class="org.apache.log4j.varia.StringMatchFilter">
    <param name="StringToMatch" value="error"/>
  </filter>
</appender>
<appender name="FallbackFileForErrors"
          class="org.apache.log4j.FileAppender">
  <param name="File" value="fallback.log"/>
  <layout class="org.apache.log4j.SimpleLayout">
  </layout>
</appender>
This example is probably not very practical, and is only
intended to show you a complete configuration example (see
PROJECT_ROOT/conf/example1-6.xml
for the complete configuration). We will see more about appenders
containing other appenders (and the AppenderAttachable interface) in the section
Working with Appenders later on.
Appenders also have a special parameter (that you specify with a
<param> element) called
Threshold, that serves as the
appender’s Threshold Level. Any log event of a level below the
specified value is dropped. For example, to set the Threshold of the
Console appender to INFO, whereby
any DEBUG and TRACE events are dropped (regardless of how
any loggers are configured):
<appender name="FileForErrors"
          class="org.apache.log4j.FileAppender">
<param name="Threshold" value="INFO"/>
<!-- Other config for this appender goes here -->
</appender>
<logger>
This element is optional, and is used to configure a logger. If specified, it has two attributes:
name=logger_nameThis attribute is required and is the name of the logger you want to configure.
additivity=(true|false)This attribute is optional and sets the appender additivity flag for this logger. This attribute defaults to
true, but must be eithertrueorfalseif specified. We will discuss appender additivity in the section Working with Loggers.
A <logger> may contain
the following nested elements:
<level>This element is optional, and is used to indicate the logger’s threshold level. There may be at most one
<level>element within a<logger>element.<appender-ref>This element is optional, and is used to attach as many appenders to this logger as you want. The
refattribute of the<appender-ref>element specifies the appender name, which must be defined elsewhere in your configuration.
Below is an example of configuring a <logger> element for the logger whose
name is com.makoto, whose threshold
level is WARN and has an appender
named RollingFile attached to
it:
<appender name="RollingFile"
          class="org.apache.log4j.RollingFileAppender">
  <param name="File" value="log4j.log"/>
 . . .
</appender>
<logger name="com.makoto">
  <level value="WARN"/>
  <appender-ref ref="RollingFile"/>
</logger>
<root>
This is the element that represents the Root logger. It is
optional, but you should always configure the root logger with at
least one appender as a matter of good practice (are you tired of me
saying that yet?). That way every logger in your application will have
access to at least one appender. The <root> element has no attributes and
two nested elements:
<level>This element is optional, but if present is used to specify the Threshold level of the root logger.
<appender-ref>This element is optional, but if present is used to attach an appender to the root logger.
That’s all of the top level elements. Below is a listing of the remaining elements that may appear in log4j’s XML configuration.
<appender-ref>
This element is used to refer to an <appender> element defined somewhere
else in the configuration, and if present has a single required
attribute:
ref=appender_nameThe
appender_namevalue must refer to the name property of an<appender>element defined elsewhere in the configuration.
<errorHandler>
This element is used to specify an Error Handler for an appender, and if this element is present has a single required attribute:
class=class_nameThis is the fully qualified name of the error handler class.
The <errorHandler>
element is used to configure an Error Handler for an appender, in case
the appender should fail. You may configure at most one error handler
for an appender. An <errorHandler> may also have the
following nested elements:
<param>Used to specify any parameters the Error Handler may need
<root-ref>This element is used to tell log4j that this Error Handler is to be associated with the Root logger in case the appender to which this
<errorHandler>is associated fails, in which case the backup appender can be used instead for messages belonging to the Root logger. This is the only place<root-ref>can appear in the configuration, is always an empty element and has no attributes.<logger-ref>This element is used to tell log4j that this Error Handler is to be associated with the specified logger in case the appender to which this
<errorHandler>is associated should fail, in which case the backup appender can be used instead for messages belonging to the logger. This is the only place<logger-ref>can appear in the configuration, is always an empty element with a single attribute,ref, which must refer to the name of the specified logger.<appender-ref>This is how you specify a backup appender. Although not required, it is a good idea to specify a backup appender since the whole purpose of the Error Handler is to handle the case when an appender fails.
<level>
This element is used to specify the Threshold level for an appender or logger (including the root logger). If present, it has two attributes:
class=level_classnameThis attribute is only required if the level you’re specifying is a custom level (i.e., one that does not come packaged with log4j). If you are using one of the standard Level values (
DEBUG,INFO, etc) you can ignore this attribute.value=level_valueThis attribute is required and is the level value, such as
WARN,DEBUGand so on.
<param>
This is used to provide parameter values for configuration elements, and if present has two required attributes:
name=parameter_nameThis attribute is required and is the name of the parameter, which must be unique within the scope of the containing element. For example, if the
<param>element is nested inside a<layout>element, the name must be unique within the<layout>element only; a<param>of the same name may appear elsewhere outside the scope of the<layout>element.value=parameter_valueThis attribute is required and is the value of the parameter.
For a complete working XML example showing the elements described above, see Example 6 from the Example application.
The focus of log4j is logging, and Logger is the central class in that regard,
and the one that you use in your Java code to do logging. Ironically,
using the log4j API through the logger class is very simple; it is when you
bring all of the other features of log4j in the mix—appenders, layouts,
and the like—that things get complicated. But, you still need to know
what the API looks like, and how to obtain and use a logger from your
Java code, and that is the focus of this section.
The Logger class is actually a
subclass of Category (which has historical significance to log4j), but
for the purposes of an API, think of the logger as being defined
as:
public class logger {
  // To gain access to a logger instance
  public static logger getlogger(Class owningClass);
  public static logger getlogger(String nameOfOwningClass);
  // The API
  public boolean isTraceEnabled();
  public void trace(Object message);
  public void trace(Object message, Throwable t);

  public boolean isDebugEnabled();
  public void debug(Object message);
  public void debug(Object message, Throwable t);

  public boolean isInfoEnabled();
  public void info (Object message);
  public void info (Object message, Throwable t);

  public void warn (Object message);
  public void warn (Object message, Throwable t);

  public void error(Object message);
  public void error(Object message, Throwable t);

  public void fatal(Object message);
  public void fatal(Object message, Throwable t);
}
Note
To be clear: log4j does not define the Logger class as above. However, you use an
instance of Logger as if it were
defined as above.
Using a logger is very simple:
Call
Logger.getlogger()and pass it the name of the class in which you are making the call.Call the method that corresponds to the Level of the message you want to log.
Notice the logger class is its own factory. The only way you
should ever ask log4j for an instance of Logger is through one of the getlogger() methods.
You may be wondering what about the “is enabled” methods. Remember
that TRACE and DEBUG (and possibly INFO too for that matter) logging is very
granular, and there may be lots of your code devoted to calling these
methods. Every now and then, some of this granular code will be in a
high traffic code path, and will have performance implications. For
logging code in loops, or other high traffic code paths, before the call
to log your message, always call the appropriate isXxxEnabled() method, where Xxx is Trace,
Debug or Info as an optimization. For example:
logger l = logger.getlogger(com.makoto.example.log4j.Queue.class);
if (l.isDebugEnabled()) {
  l.debug("This " + "would " + "be " + "inefficient " + "in " +
          "a " + "loop");
}
In this example, if the effective Level of the logger is higher
than DEBUG, the message will be
dropped. Unfortunately, the Java runtime will still perform all of the
String concatenation anyway before invoking the debug() method. This is wasteful. If this code
were in a high traffic code path there would be a significant
performance hit for no real reason. Calling the isDebugEnabled() method saves the runtime from
doing this type of costly processing (like String concatenation).
Often, it is helpful to see an exception message and stack trace. Fortunately, log4j is equipped to handle this. When you catch an exception, simply call the appropriate version of the method you want to call, passing it the exception, and the message and stack trace will passed along to the appender(s) configured for the logger you’re using. Here is some code from the Example application:
public class Controller extends Basic ... {
 ...
  private static final logger log =
    logger.getlogger(Controller.class);
 ...
  private void createHtmlAdapter() {
    log.trace("Entering createHtmlAdapter...");
    int portNumber = 8090;
    try {
      HtmlAdaptorServer html = new HtmlAdaptorServer(portNumber);
      ObjectName html_name = null;
      html_name =
        new ObjectName("Adaptor:name=html,port=" + portNumber);
      log.debug("	Registered MBean: OBJECT NAME = " + html_name);
      server.registerMBean(html, html_name);
      html.start();
    } catch (Exception e) {
      log.error("Could not create the HTML adaptor!", e);
    }
    log.trace("Leaving createHtmlAdapter...");
  }
 ...
}
In this example we see that in the event of an exception, the exception is caught and logged passing the exception as the second parameter.
An appender represents a destination for log output. Here’s how a message gets to an appender: You call one of the logger API methods to issue a log statement in your application and log4j decides the message should be seen. Now what? Now the appender takes over, whose job is to format the object that accompanies the event (using a Layout, which we will look at in the next section), and append it to the destination it represents.
First, an Appender must implement the Appender interface, shown below.
package org.apache.log4j;

import org.apache.log4j.spi.Filter;
import org.apache.log4j.spi.ErrorHandler;
import org.apache.log4j.spi.LoggingEvent;

public interface Appender {

  void addFilter(Filter newFilter);
  public Filter getFilter();
  public void clearFilters();
  public void close();
  public void doAppend(LoggingEvent event);
  public String getName();
  public void setErrorHandler(ErrorHandler errorHandler);
  public ErrorHandler getErrorHandler();
  public void setLayout(Layout layout);
  public Layout getLayout();
  public void setName(String name);
  public boolean requiresLayout();
}
The method of most significance is the doAppend() method, which takes a LoggingEvent object, which is a very
significant class in the log4j architecture. LoggingEvent is created once log4j decides
not to drop a log event, and contains just about everything you might
want to know about a log event, including:
The fully qualified name of the class issuing the log statement that resulted in the log event,
The timestamp when the event was generated,
The Level of the event, and
The name of the thread that the logger class was running on when the log statement was issued.
There are several other properties, but unless you plan to write
your own appender, all you need to know is that LoggingEvent contains a plethora of
information log4j makes available to the appender that receives it as
a parameter to its doAppend()
method.
Next, an appender is a configuration-only construct, and you should never need to interact directly with an appender from your code. To use appenders directly from your application code subverts the purpose of separating loggers from appenders in the first place.
Finally, appenders are attached to loggers—as we’ve seen—through the configuration. Because of the hierarchical nature of loggers, this has a very significant ramification when you are configuring log4j for your application. Recall that loggers can inherit their Level from their ancestors. Well, as it turns out, loggers inherit appenders too, sort of.
Consider the following complete configuration snippet
log4j.rootlogger=WARN, Console
log4j.appender.Console=org.apache.log4j.ConsoleAppender
log4j.appender.Console.layout=org.apache.log4j.SimpleLayout
log4j.logger.com.makoto=INFO
The root logger is configured with a single appender called
Console. The logger com.makoto overrides the Level it normally
would inherit from the root logger, but notice it has no appenders
attached to it. Where do messages from com.makoto go? Where do messages from
com.makoto’s descendents go? If you
guessed the output would go to the Console appender, you are correct.
In fact, this is a rule of log4j. A logger to which no appender is
attached will inherit the appender(s) of its nearest ancestor. So, for
com.makoto and its descendents that
is Console. If the root logger had
multiple appenders attached to it, output from com.makoto would go to all of those
appenders.
So what? Well, this “appender inheritance” behavior has
ramifications. Suppose that we want to segregate output from a
particularly verbose (from a log output standpoint) part of our
application from the rest. Sure, we could throttle down the verbosity
of the “noisy” logger(s) by setting the logger’s Level up from
DEBUG to, say, INFO or WARN, but suppose we really need to see that
output for some reason; we just want to route it somewhere else. What
do we do?
If you’ve been running the examples, you’ve noticed that Controller has some seriously verbose log output if you set it to DEBUG or TRACE (run Example 1 and you’ll see what I mean). So, what if we could send all of the output for Controller to its own appender?
Example 7. Configuring an appender to handle noisy parts of the application
log4j.rootlogger=WARN, Console
log4j.appender.Console=org.apache.log4j.ConsoleAppender
log4j.appender.Console.layout=org.apache.log4j.SimpleLayout
log4j.appender.FileAppender=org.apache.log4j.FileAppender
log4j.appender.FileAppender.File=makoto.log
log4j.appender.FileAppender.layout=org.apache.log4j.PatternLayout
log4j.appender.FileAppender.layout.ConversionPattern=
 %c {%l}:%n    [%t] %-5p - %m%n
log4j.logger.com.makoto=INFO,FileAppender
log4j.appender.NoisyAppender=org.apache.log4j.FileAppender
log4j.appender.NoisyAppender.File=noisy.log
log4j.appender.NoisyAppender.layout=org.apache.log4j.PatternLayout
log4j.appender.NoisyAppender.layout.ConversionPattern=
 %c {%l}:%n    [%t] %-5p - %m%n
log4j.logger.com.makoto.example.log4j.Controller=DEBUG,NoisyAppender
If we run Example 7 we see all the
Controller class log output in
noisy.log. Super! We have successfully isolated
the log output of the Controller
class’ logger. But hold on, we also see all of that output on the
console and in makoto.log too. What’s going
on?
Well, what we’re seeing is what log4j calls Appender
Additivity. That means a message bound for a logger down
the hierarchy will be sent to its appender(s) as well as all of the
appenders of its ancestors (remember appender inheritance?). So the
log output from Controller goes to
NoisyAppender like we wanted, but
because of appender additivity, the messages also get sent to all of
Controller’s ancestral appenders
(Console and FileAppender) as well. Remember how loggers
inherit appenders from their ancestors? Well, in this case, this is
exactly what we DO NOT want! Is there a way to turn this behavior
off?
Yes, there is! Appender additivity is set to true by default, but any logger can have its
additivity flag set to false, which
tells log4j not to send messages to appenders further up the
hierarchy. What would that configuration look like? Take a look at
Example 8.
Example 8. Configuring an appender to handle noisy parts of the application, but segregating its output through judicious use of appender additivity
log4j.rootlogger=WARN, Console
log4j.appender.Console=org.apache.log4j.ConsoleAppender
log4j.appender.Console.layout=org.apache.log4j.SimpleLayout
log4j.appender.FileAppender=org.apache.log4j.FileAppender
log4j.appender.FileAppender.File=makoto.log
log4j.appender.FileAppender.layout=org.apache.log4j.PatternLayout
log4j.appender.FileAppender.layout.ConversionPattern=
 %c {%l}:%n    [%t] %-5p - %m%n
log4j.logger.com.makoto=INFO,FileAppender
log4j.appender.NoisyAppender=org.apache.log4j.FileAppender
log4j.appender.NoisyAppender.File=noisy.log
log4j.appender.NoisyAppender.Append=false
log4j.appender.NoisyAppender.layout=org.apache.log4j.PatternLayout
log4j.appender.NoisyAppender.layout.ConversionPattern=
 %c {%l}:%n    [%t] %-5p - %m%n
log4j.additivity.com.makoto.example.log4j.Controller=false
log4j.logger.com.makoto.example.log4j.Controller=DEBUG,NoisyAppender
By setting the additivity flag to false for the logger com.makoto.example.log4j.Controller, the
output from that logger goes no further up the hierarchy and the
verbose output from the Controller
logger is limited to noisy.log, which is what we
wanted.
Consider Figure 6 which is a graphical representation of the configuration shown in Example 8.
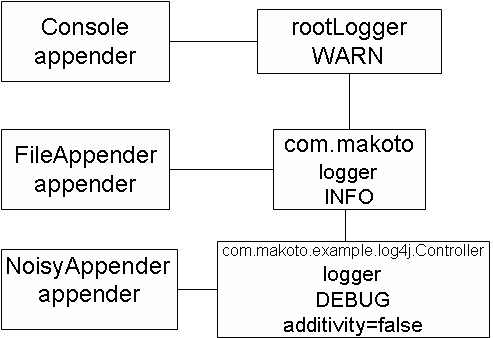
Let’s walk through a few scenarios.
INFOlevel message originates fromcom.makoto.example.log4j.Controller. It is handled byNoisyAppender. Appender additivity is set to false for this logger, so the message goes no further.INFOlevel message originates fromcom.makoto.example.log4j.Queue(not pictured, but it is a descendent ofcom.makoto). It is handled byFileAppenderand byConsoleAppenderbecause of appender additivity (which is defaulted totrue—by default—forcom.makoto).DEBUGlevel message originates fromcom.makoto.example.log4j.Queue. Message is below the threshold ofINFOset for its parent loggercom.makoto, so the message is dropped.WARNlevel message originates fromcom.acme(not pictured). Message is handled byConsolevia the Root logger.
The threshold level of a logger does not affect whether or not
messages are handled by an appender attached to it. For example, an
INFO message from com.makoto.example.log4j.Queue will still be
handled by Console, even though the
root logger’s level is set to WARN
because (1) the logger com.makoto
explicitly sets its and all its descendents’ thresholds to INFO, and
(2) all of the root logger’s descendents inherit that appender from
it, unless the particular descendent logger’s additivity flag is set
to false. The point is that appender inheritance is orthogonal to the
threshold level of an appender attached to it. It is the effective
threshold level of the originating logger (i.e., the logger that was
called from your code to create the log event) that determines whether
a message is filtered out or not.
However, there is a way for an appender to have the final say in
whether a log message is seen. Appenders have a property called
Threshold that can be set to
whatever level value you want, and any messages below that
level—regardless of the level of the originating logger—will be
dropped. To set the threshold of an appender in log4j.properties:
log4j.appender.FileAppender=org.apache.log4j.FileAppender
log4j.appender.FileAppender.threshold=WARN
log4j.appender.FileAppender.File=makoto.log
log4j.appender.FileAppender.layout=org.apache.log4j.PatternLayout
log4j.appender.FileAppender.layout.ConversionPattern=
 %c {%l}:%n    [%t] %-5p - %m%n
And in log4j.xml:
<appender name="FileAppender"
          class="org.apache.log4j.FileAppender">
  <param name="Threshold" value="WARN"/>
  <param name="File" value="makoto.log"/>
  <layout class="org.apache.log4j.PatternLayout">
    <param name="ConversionPattern"
           value="%c {%l}:%n    [%t] %-5p - %m%n"/>
  </layout>
</appender>To wrap up this section, let’s look at a few of the appenders that come packaged with log4j and how to configure them. Some of these we have already seen. This is by no means an exhaustive reference for these appenders, but merely shows the properties I’ve found to be the most helpful.
The following properties are common to all of the appenders in this section:
LayoutThe fully qualified name of the class that will format the log messages handled by this appender
ThresholdThe threshold Level below which messages will be dropped by this appender (regardless of the level of the originating logger), and must be one of the well known Level values (
TRACE,DEBUG,INFO, and so on).
For each appender, a complete properties-style configuration is shown, along with the corresponding configuration in XML. The XML configuration is a snippet, but all it is missing is the surrounding XML, shown below:
<?xml version="1.0" encoding="UTF-8" ?>
<!DOCTYPE log4j:configuration SYSTEM "log4j.dtd">
<log4j:configuration
  xmlns:log4j='http://jakarta.apache.org/log4j/'>

<!-- PASTE IN XML CONFIGURATION SNIPPET HERE -->

</log4j:configuration>
To use the XML snippets that follow, copy the snippet
“container” above into a file, and then paste the XML snippet below,
replacing the line “PASTE IN XML CONFIGURATION SNIPPET HERE” and you
should have a working configuration. To use the Example Application’s
build script to run it, make sure the configuration file is named
ad-hoc.xml, place it in the
PROJECT_ROOT/conf
directory and run the ad-hoc-xml
target.
You can run the properties examples below in the same way. Just
call the file ad-hoc.properties and run the
ad-hoc target.
ConsoleAppender
Represents the console and has the following properties:
TargetRepresents the output target and must be either
System.out, orSystem.err.
Example - Configure an appender named STDERR whose output goes to System.err, that will drop all messages
below WARN and uses PatternLayout to format its messages.
Properties configuration:
log4j.rootLogger=WARN,STDERR
log4j.appender.STDERR=org.apache.log4j.ConsoleAppender
log4j.appender.STDERR.layout=org.apache.log4j.PatternLayout
log4j.appender.STDERR.layout.ConversionPattern=
 %c {%l}:%n    [%t] %-5p - %m%n
log4j.appender.STDERR.Target=System.err
log4j.appender.STDERR.Threshold=WARN
XML configuration snippet:
<appender name="STDERR"
          class="org.apache.log4j.ConsoleAppender">
  <param name="Target" value="System.err"/>
  <param name="Threshold" value="WARN"/>
  <layout class="org.apache.log4j.PatternLayout">
    <param name="ConversionPattern"
           value="%c {%l}:%n    [%t] %-5p - %m%n"/>
  </layout>
</appender>
<root>
  <level value="WARN"/>
  <appender-ref ref="STDERR"/>
</root>
FileAppender
Represents a file and has the following properties:
AppendIf
true(default) output is appended to the specified file, and isfalsethe specified file is truncated before writing output. This occurs when the appender is created, and is a handy way to “reset” a file for testing code with loggers that have verbose output (see Example 8).FileThis is the name of the file to which log output will be written. If the file does not exist log4j creates it.
Example - Configure an appender named FileAppender whose output goes to
/tmp/output.log—truncated each time the appender
is created—that will drop all messages below INFO and uses PatternLayout to format its messages.
Properties configuration:
log4j.rootLogger=WARN,FileAppender
log4j.appender.FileAppender=org.apache.log4j.FileAppender
log4j.appender.FileAppender.layout=org.apache.log4j.PatternLayout
log4j.appender.FileAppender.layout.ConversionPattern=
 %c {%l}:%n    [%t] %-5p - %m%n
log4j.appender.FileAppender.File=/tmp/output.log
log4j.appender.FileAppender.Threshold=INFO
log4j.appender.FileAppender.Append=false
XML configuration snippet:
<appender name="FileAppender"
          class="org.apache.log4j.FileAppender">
  <param name="File" value="/tmp/output.log"/>
  <param name="Threshold" value="INFO"/>
  <param name="Append" value="false"/>
  <layout class="org.apache.log4j.PatternLayout">
    <param name="ConversionPattern"
           value="%c {%l}:%n    [%t] %-5p - %m%n"/>
  </layout>
</appender>
<root>
  <level value="WARN"/>
  <appender-ref ref="FileAppender"/>
</root>
RollingFileAppender
Represents a file that will grow to a certain (configurable) size and then roll so that the “current” file is never greater than the specified size, and has the following properties:
MaxFileSizeThis is the maximum size of the file—in bytes—before it is rolled over. The last log event causing the rollover to occur is written before rollover, so that the rolled file is always slightly larger than
MaxFileSize. This parameter is optional and defaults to10MBif not specified. Log4j is smart about the value you provide. For example for 1 Megabyte you can specify1048576,1MBor1024KB. You can also use2GBto specify 2 Gigabytes.MaxBackupIndexThis is the number of rollover (backup) files to keep, and should be a number from 1-10 (log4j will support > 10 rollover files, but the mechanics of rollover get increasingly cumbersome). If you set the
MaxBackupIndexto zero, whenMaxFileSizeis reached the file is truncated (probably not what you want). This parameter is optional and defaults to 1 if not specified.
Example - Configure an appender named RFA whose output goes to
/tmp/output.log, will roll every 30 Kilobytes,
keep up to 5 rollover (backup) files, will drop all messages below
INFO and uses PatternLayout to format its messages.
Properties configuration snippet:
log4j.rootLogger=WARN,RFA
log4j.appender.RFA=org.apache.log4j.RollingFileAppender
log4j.appender.RFA.layout=org.apache.log4j.PatternLayout
log4j.appender.RFA.layout.ConversionPattern=
 %c {%l}:%n    [%t] %-5p - %m%n
log4j.appender.RFA.File=/tmp/output.log
log4j.appender.RFA.Threshold=INFO
log4j.appender.RFA.MaxFileSize=30KB
log4j.appender.RFA.MaxBackupIndex=5
XML configuration snippet:
<appender name="RFA"
          class="org.apache.log4j.RollingFileAppender">
  <param name="File" value="/tmp/output.log"/>
  <param name="Threshold" value="INFO"/>
  <param name="MaxFileSize" value="30KB"/>
  <param name="MaxBackupIndex" value="5"/>
  <layout class="org.apache.log4j.PatternLayout">
    <param name="ConversionPattern"
           value="%c {%l}:%n    [%t] %-5p - %m%n"/>
  </layout>
</appender>
<root>
  <level value="WARN"/>
  <appender-ref ref="RFA"/>
</root>
Here is the way the file rolling works, using the parameter
values in this example: when output.log rolls
over the first time, it will be renamed to
output.log.1. When
output.log rolls over a second time,
output.log.1 will be renamed to
output.log.2, output.log
will be renamed to output.log.1, and so on. Once
MaxBackupIndex is reached,
output.log.5 (remember, 5 is the MaxBackupIndex in this example) will be
discarded.
DailyRollingFileAppender
Represents a file that rolls on specified date-specific
boundaries; the “Daily” part of the name is a little misleading;
perhaps TemporalRollingFileAppender
would have been a better choice of name.
Note
This class does not extend RollingFileAppender, meaning it does not
roll on size as well as temporal boundaries, as its name might
imply. DailyRollingFileAppender
and RollingFileAppender both
extend FileAppender, and that is
the extent of their relationship.
DailyRollingFileAppender has
the following properties (in addition to those of FileAppender):
DatePatternThis parameter is used to specify the exact temporal boundary on which the log file will be rolled and can be every month, week, day, half-day, hour or minute. The boundary can take any one of the values below.
.yyyy-MMRoll the file at the beginning of each month.
.yyyy-wwRoll the file on the first day of each week, which will vary by Locale.
.yyyy-MM-ddRoll the file at midnight each day.
.yyyy-MM-dd-aRoll the file twice each day: at noon and at midnight (i.e., on each half-day boundary).
.yyyy-MM-dd-HHRoll the file at the top of each hour.
.yyyy-MM-dd-HH-mmRoll the file at the beginning of each minute.
For each boundary specified, the rollover file will be named
according to the DatePattern
specification you provide. For example, if you specify .yyyy-MM-dd as the temporal rollover
boundary, and the current log file (whose name is, say,
log4j.log) is for March 3, 2010, the first
message logged on March 4, 2010 will cause the current log file to be
renamed to log4j.log.2010-03-03.
Note
Note that log4j will not actually roll the file until a log
message comes in that crosses the specified temporal boundary. At
that time the file will be rolled. For example, if you set up your
DailyRollingFileAppender to roll
every hour, and a the first message to cross an hour boundary comes
in at, say, 10:02am, the file will be rolled at that time and the
10:02am message will then become the first message in the current
log file. In other words, there will be no empty log files for the
hours where there was no log output.
The particular values of the DatePattern property should look familiar.
They are the same values you might pass to the JDK SimpleDateFormat class. So you can use other
characters (except the colon (:),
the backslash () and the forward
slash (/)), which will be treated
as literal characters and included as part of the rollover file
name.
I thought it might be fun to see if log4j just passes the
DatePattern value opaquely to do
the file name formatting. So, I substituted an underscore character
(_) for the dash in the values
above, and it worked. However, there’s no guarantee that this behavior
will work in future versions, I just thought that was
interesting.
Example - Configure an appender named TRFA whose output goes to
C:homeoutput.log, will roll every hour, will
drop all messages below INFO and
uses PatternLayout to format its
messages.
Properties configuration snippet:
log4j.rootLogger=WARN,TRFA
log4j.appender.TRFA=org.apache.log4j.DailyRollingFileAppender
log4j.appender.TRFA.layout=org.apache.log4j.PatternLayout
log4j.appender.TRFA.layout.ConversionPattern=
 %c {%l}:%n    [%t] %-5p - %m%n
log4j.appender.TRFA.File=C:\home\output.log
log4j.appender.TRFA.Threshold=INFO
log4j.appender.TRFA.DatePattern=.yyyy-MM-dd-HH
XML configuration snippet:
<appender name="TRFA"
          class="org.apache.log4j.DailyRollingFileAppender">
  <param name="File" value="C:\home\output.log"/>
  <param name="Threshold" value="INFO"/>
  <param name="DatePattern" value=".yyyy-MM-dd-HH"/>
  <layout class="org.apache.log4j.PatternLayout">
    <param name="ConversionPattern"
           value="%c {%l}:%n    [%t] %-5p - %m%n"/>
  </layout>
</appender>
<root>
  <level value="WARN"/>
  <appender-ref ref="TRFA"/>
</root>The Layout is used to format a LoggingEvent instance as a String. A Layout is
a subclass of the log4j Layout class,
which has several methods that control aspects of a message’s
appearance, the most important of which is format(). This separates the concern of
delivering the message from how it looks when it gets there. We’ve
already seen PatternLayout throughout
this Short Cut, so you should be pretty familiar with how to use it. In
this section we will look at two of the other Layouts that come packaged
with log4j and how to configure them.
HTMLLayoutXMLLayout
These layouts don’t give us the precise control over what gets
logged that PatternLayout does, but
they can still be quite useful.
HTMLLayout
As its name suggests this Layout takes the LoggingEvent object and formats it as an HTML
table element. This Layout relies on two methods of Layout to wrap the
messages that are formatted by it in the necessary HTML
semantics:
getHeader()
getFooter()
These two methods always return null for the other common log4j
Layout subclasses, but for HTMLLayout
these methods return the HTML header (such as the <html> and <body> tags) and footer (such as
</body> and </html>) markup. Since each log message
is atomic, these methods ensure that the log output produced from this
layout is well formed enough to read. Example 9 shows the configuration for using this
Layout, which is extremely simple.
Example 9. Using the HTMLLayout
log4j.rootLogger=WARN, Console
log4j.appender.Console=org.apache.log4j.ConsoleAppender
log4j.appender.Console.layout=org.apache.log4j.SimpleLayout
log4j.appender.FileAppender=org.apache.log4j.FileAppender
log4j.appender.FileAppender.File=makoto.log.html
log4j.appender.FileAppender.layout=org.apache.log4j.HTMLLayout
log4j.appender.FileAppender.layout.LocationInfo=true
log4j.appender.FileAppender.layout.Title=Log output from the
 com.makotogroup logger
log4j.appender.FileAppender.Append=false
log4j.logger.com.makotogroup=INFO,FileAppender
log4j.renderer.com.makotogroup.log4j.Queue=
  com.makotogroup.log4j.Queue$QueueRenderer
And in XML:
<?xml version="1.0" encoding="UTF-8" ?>
<!DOCTYPE log4j:configuration SYSTEM "log4j.dtd">
<log4j:configuration xmlns:log4j='http://jakarta.apache.org/log4j/'
  debug="true">
  <renderer renderedClass="com.makotogroup.log4j.Queue"
       renderingClass="com.makotogroup.log4j.Queue$QueueRenderer"/>
  <appender name="Console"
            class="org.apache.log4j.ConsoleAppender">
    <layout class="org.apache.log4j.SimpleLayout"/>
  </appender>
  <appender name="FileAppender"
            class="org.apache.log4j.FileAppender">
    <param name="File" value="makoto.log.html"/>
    <param name="Append" value="false"/>
    <layout class="org.apache.log4j.HTMLLayout">
      <param name="LocationInfo" value="true"/>
      <param name="Title"
             value="Log output from the com.makotogroup logger"/>
    </layout>
  </appender>
  <logger name="com.makotogroup">
    <level value="INFO"/>
    <appender-ref ref="FileAppender"/>
  </logger>
  <root>
    <level value="WARN"/>
    <appender-ref ref="Console"/>
  </root>
</log4j:configuration>
When you run the Example 9 target from the Example application, you’ll notice that the output from the application code goes into a file called makoto.log.html. If we open up this file in Firefox, we see something like Figure 7.
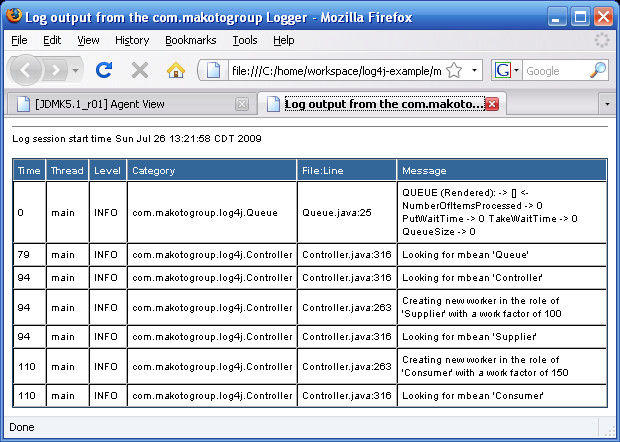
The log output itself is contained in a <table>, and each row in the table is a
<tr> element. Each <td> element shows one piece of
information from the LoggingEvent.
HTMLLayout has the following
parameters that may be set:
LocationInfoThis parameter is optional, but when set to
truethe Layout produces two extra columns:Category, which shows the name of the logger that produced that row, andFile:Line, showing the source file and line number where the call to that logger was made.TitleAlso optional, this parameter is used to specify the title of the HTML page that is generated. In this example, I set it to “Log output from the com.makotogroup logger” but can be any text string you like.
Since the FileAppender is used
(which is a subclass of WriterAppender), when the file is opened, the
getHeader() method is called. What
about getFooter()? Well, that method
gets called when the appender is closed. So when I pulled up the
makoto.log.html file to produce the
screen shot in Figure 7 the footer
information was not yet written, but Firefox was able to infer what was
going on and produce nice output. If your application is long running
(like a web application, for example), the footer information will not
be included until the appender is closed, (or if you use a rolling
appender until the file rolls). So be aware of this behavior if you plan
to use HTMLLayout.
XMLLayout
Unlike HTMLLayout, which
produces a header and footer to wrap the log output in well formed HTML
markup, this Layout assumes that some other component in the system will
take care of that. XML that is generated for each LoggingEvent is atomic, but since it is
missing the enclosing XML markup, is not well formed. This means that
you can create log output, for example, in one file, and include it as
an external entity in another. Example 10 shows the configuration for
using XMLLayout:
Example 10. The configuration for using XMLLayout
log4j.rootLogger=WARN, Console
log4j.appender.Console=org.apache.log4j.ConsoleAppender
log4j.appender.Console.layout=org.apache.log4j.SimpleLayout
log4j.appender.FileAppender=org.apache.log4j.FileAppender
log4j.appender.FileAppender.File=makoto.log
log4j.appender.FileAppender.layout=org.apache.log4j.xml.XMLLayout
log4j.appender.FileAppender.layout.LocationInfo=true
log4j.appender.FileAppender.Append=false
log4j.logger.com.makotogroup=INFO,FileAppender
log4j.renderer.com.makotogroup.log4j.Queue=
  com.makotogroup.log4j.Queue$QueueRenderer
And in XML:
<?xml version="1.0" encoding="UTF-8" ?>
<!DOCTYPE log4j:configuration SYSTEM "log4j.dtd">
<log4j:configuration xmlns:log4j='http://jakarta.apache.org/log4j/'
  debug="true">
  <renderer renderedClass="com.makotogroup.log4j.Queue"
renderingClass="com.makotogroup.log4j.Queue$QueueRenderer"/>
  <appender name="Console"
            class="org.apache.log4j.ConsoleAppender">
    <layout class="org.apache.log4j.SimpleLayout"/>
  </appender>
  <appender name="FileAppender"
            class="org.apache.log4j.FileAppender">
    <param name="File" value="makoto.log.html"/>
    <param name="Append" value="false"/>
    <layout class="org.apache.log4j.xml.XMLLayout">
      <param name="LocationInfo" value="true"/>
    </layout>
  </appender>
  <logger name="com.makotogroup">
    <level value="INFO"/>
    <appender-ref ref="FileAppender"/>
  </logger>
  <root>
    <level value="WARN"/>
    <appender-ref ref="Console"/>
  </root>
</log4j:configuration>
XMLLayout has the following
parameters which may be specified:
LocationInfoThis parameter is optional, but when set to
truethe Layout produces an element within the<log4j:event>element called<log4j:locationInfo>, which contains four attributes showing the source class, method, file and line number where the call to the logger was made.
Below is a snippet of a single line of the XML output using
XMLLayout:
<log4j:event logger="com.makotogroup.log4j.Controller"
  timestamp="1248635922358" level="INFO" thread="main">
<log4j:message><![CDATA[Looking for mbean 'Queue']]>
</log4j:message>
<log4j:locationInfo class="com.makotogroup.log4j.Controller"
method="createMBeanFromXMLDefinition" file="Controller.java"
line="316"/>
</log4j:event>