In the field of engineering, it is crucial to have accurate estimates of the performance of building materials. These estimates are required in order to develop safety guidelines governing the materials used in the construction of buildings, bridges, and roadways.
Estimating the strength of concrete is a challenge of particular interest. Although it is used in nearly every construction project, concrete performance varies greatly due to a wide variety of ingredients that interact in complex ways. As a result, it is difficult to accurately predict the strength of the final product. A model that could reliably predict concrete strength given a listing of the composition of the input materials could result in safer construction practices.
For this analysis, we will utilize data on the compressive strength of concrete donated to the UCI Machine Learning Repository (http://archive.ics.uci.edu/ml) by I-Cheng Yeh. As he found success using neural networks to model these data, we will attempt to replicate Yeh's work using a simple neural network model in R.
According to the website, the dataset contains 1,030 examples of concrete, with eight features describing the components used in the mixture. These features are thought to be related to the final compressive strength, and include the amount (in kilograms per cubic meter) of cement, slag, ash, water, superplasticizer, coarse aggregate, and fine aggregate used in the product, in addition to the aging time (measured in days).
As usual, we'll begin our analysis by loading the data into an R object using the read.csv() function and confirming that it matches the expected structure:
> concrete <- read.csv("concrete.csv")
> str(concrete)
'data.frame':    1030 obs. of  9 variables:
 $ cement      : num  141 169 250 266 155 ...
 $ slag        : num  212 42.2 0 114 183.4 ...
 $ ash         : num  0 124.3 95.7 0 0 ...
 $ water       : num  204 158 187 228 193 ...
 $ superplastic: num  0 10.8 5.5 0 9.1 0 0 6.4 0 9 ...
 $ coarseagg   : num  972 1081 957 932 1047 ...
 $ fineagg     : num  748 796 861 670 697 ...
 $ age         : int  28 14 28 28 28 90 7 56 28 28 ...
 $ strength    : num  29.9 23.5 29.2 45.9 18.3 ...
The nine variables in the data frame correspond to the eight features and one outcome we expected, although a problem has become apparent. Neural networks work best when the input data are scaled to a narrow range around zero, and here we see values ranging anywhere from zero to over a thousand.
Typically, the solution to this problem is to rescale the data with a normalizing or standardization function. If the data follow a bell-shaped curve (a normal distribution as described in Chapter 2, Managing and Understanding Data), then it may make sense to use standardization via R's built-in scale() function. On the other hand, if the data follow a uniform distribution or are severely non-normal, then normalization to a zero to one range may be more appropriate. In this case, we'll use the latter.
In Chapter 3, Lazy Learning – Classification Using Nearest Neighbors, we defined our own normalize() function as:
> normalize <- function(x) {
    return((x - min(x)) / (max(x) - min(x)))
  }
After executing this code, our normalize() function can be applied to every column in the concrete data frame using the lapply() function as follows:
> concrete_norm <- as.data.frame(lapply(concrete, normalize))
To confirm that the normalization worked, we can see that the minimum and maximum strength are now zero and one, respectively:
> summary(concrete_norm$strength)
   Min. 1st Qu.  Median    Mean 3rd Qu.    Max.
 0.0000  0.2664  0.4001  0.4172  0.5457  1.0000
In comparison, the original minimum and maximum values were 2.33 and 82.60:
> summary(concrete$strength)
   Min. 1st Qu.  Median    Mean 3rd Qu.    Max.
   2.33   23.71   34.44   35.82   46.14   82.60
Tip
Any transformation applied to the data prior to training the model will have to be applied in reverse later on in order to convert back to the original units of measurement. To facilitate the rescaling, it is wise to save the original data, or at least the summary statistics of the original data.
Following Yeh's precedent in the original publication, we will partition the data into a training set with 75 percent of the examples and a testing set with 25 percent. The CSV file we used was already sorted in random order, so we simply need to divide it into two portions:
> concrete_train <- concrete_norm[1:773, ]
> concrete_test <- concrete_norm[774:1030, ]
We'll use the training dataset to build the neural network and the testing dataset to evaluate how well the model generalizes to future results. As it is easy to overfit a neural network, this step is very important.
To model the relationship between the ingredients used in concrete and the strength of the finished product, we will use a multilayer feedforward neural network. The neuralnet package by Stefan Fritsch and Frauke Guenther provides a standard and easy-to-use implementation of such networks. It also offers a function to plot the network topology. For these reasons, the neuralnet implementation is a strong choice for learning more about neural networks, though that's not to say that it cannot be used to accomplish real work as well—it's quite a powerful tool, as you will soon see.
Tip
There are several other commonly used packages to train ANN models in R, each with unique strengths and weaknesses. Because it ships as part of the standard R installation, the nnet package is perhaps the most frequently cited ANN implementation. It uses a slightly more sophisticated algorithm than standard backpropagation. Another option is the RSNNS package, which offers a complete suite of neural network functionality, with the downside being that it is more difficult to learn.
As neuralnet is not included in base R, you will need to install it by typing install.packages("neuralnet") and load it with the library(neuralnet) command. The included neuralnet() function can be used for training neural networks for numeric prediction using the following syntax:

We'll begin by training the simplest multilayer feedforward network with the default settings using only a single hidden node:
> concrete_model <- neuralnet(strength ~ cement + slag
  + ash + water + superplastic + coarseagg + fineagg + age,
  data = concrete_train)
We can then visualize the network topology using the plot() function on the resulting model object:
> plot(concrete_model)

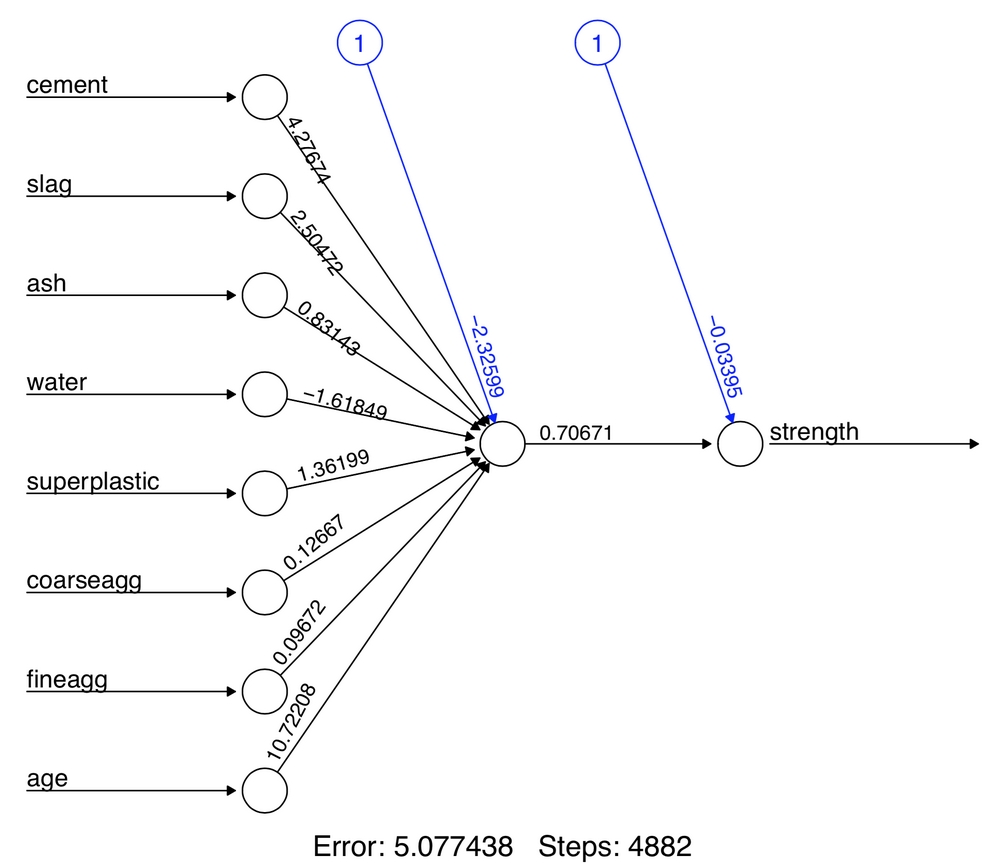
Figure 7.11: Topology visualization of our simple multilayer feedforward network
In this simple model, there is one input node for each of the eight features, followed by a single hidden node and a single output node that predicts the concrete strength. The weights for each of the connections are also depicted, as are the bias terms indicated by the nodes labeled with the number 1. The bias terms are numeric constants that allow the value at the indicated nodes to be shifted upward or downward, much like the intercept in a linear equation.
Tip
A neural network with a single hidden node can be thought of as a cousin of the linear regression models we studied in Chapter 6, Forecasting Numeric Data – Regression Methods. The weight between each input node and the hidden node is similar to the beta coefficients, and the weight for the bias term is similar to the intercept.
At the bottom of the figure, R reports the number of training steps and an error measure called the sum of squared errors (SSE), which, as you might expect, is the sum of the squared differences between the predicted and actual values. The lower the SSE, the more closely the model conforms to the training data, which tells us about performance on the training data but little about how it will perform on unseen data.
The network topology diagram gives us a peek into the black box of the ANN, but it doesn't provide much information about how well the model fits future data. To generate predictions on the test dataset, we can use the compute() function as follows:
> model_results <- compute(concrete_model, concrete_test[1:8])
The compute() function works a bit differently from the predict() functions we've used so far. It returns a list with two components: $neurons, which stores the neurons for each layer in the network, and $net.result, which stores the predicted values. We'll want the latter:
> predicted_strength <- model_results$net.result
Because this is a numeric prediction problem rather than a classification problem, we cannot use a confusion matrix to examine model accuracy. Instead, we'll measure the correlation between our predicted concrete strength and the true value. If the predicted and actual values are highly correlated, the model is likely to be a useful gauge of concrete strength.
Recall that the cor() function is used to obtain a correlation between two numeric vectors:
> cor(predicted_strength, concrete_test$strength)
             [,1]
[1,] 0.8064655576
Correlations close to one indicate strong linear relationships between two variables. Therefore, the correlation here of about 0.806 indicates a fairly strong relationship. This implies that our model is doing a fairly good job, even with only a single hidden node.
Given that we only used one hidden node, it is likely that we can improve the performance of our model. Let's try to do a bit better.
As networks with more complex topologies are capable of learning more difficult concepts, let's see what happens when we increase the number of hidden nodes to five. We use the neuralnet() function as before, but add the parameter hidden = 5:
> concrete_model2 <- neuralnet(strength ~ cement + slag +
                               ash + water + superplastic +
                               coarseagg + fineagg + age,
                               data = concrete_train, hidden = 5)
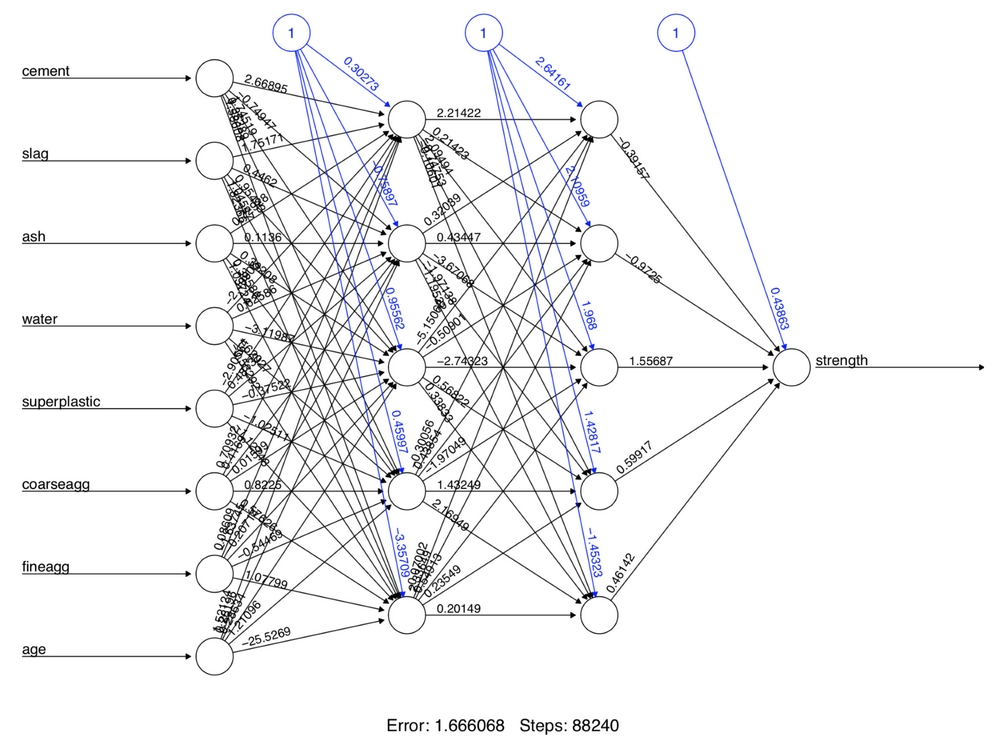
Plotting the network again, we see a drastic increase in the number of connections. How did this impact performance?
> plot(concrete_model2)

Figure 7.12: Topology visualization of an increased number of hidden nodes
Notice that the reported error (measured again by SSE) has been reduced from 5.08 in the previous model to 1.63 here. Additionally, the number of training steps rose from 4,882 to 86,849, which should come as no surprise given how much more complex the model has become. More complex networks take many more iterations to find the optimal weights.
Applying the same steps to compare the predicted values to the true values, we now obtain a correlation around 0.92, which is a considerable improvement over the previous result of 0.80 with a single hidden node:
> model_results2 <- compute(concrete_model2, concrete_test[1:8])
> predicted_strength2 <- model_results2$net.result
> cor(predicted_strength2, concrete_test$strength)
             [,1]
[1,] 0.9244533426
Despite these substantial improvements, there is still more we can do to attempt to improve the model performance. In particular, we have the ability to add additional hidden layers and to change the network's activation function. In making these changes, we create the foundations of a very simple deep neural network.
The choice of activation function is usually very important for deep learning. The best function for a particular learning task is typically identified through experimentation, then shared more widely within the machine learning research community.
Recently, an activation function known as a rectifier has become extremely popular due to its success on complex tasks such as image recognition. A node in a neural network that uses the rectifier activation function is known as a rectified linear unit (ReLU). As depicted in the following figure, the rectifier activation function is defined such that it returns x if x is at least zero, and zero otherwise. The significance of this function is due to the fact that it is nonlinear yet has simple mathematical properties that make it both computationally inexpensive and highly efficient for gradient descent. Unfortunately, its derivative is undefined at x = 0 and therefore cannot be used with the neuralnet() function.
Instead, we can use a smooth approximation of the ReLU known as softplus or SmoothReLU, an activation function defined as log(1 + ex). As shown in the following figure, the softplus function is nearly zero for x less than zero and approximately x when x is greater than zero:

Figure 7.13: The softplus activation function provides a smooth, differentiable approximation of ReLU
To define a softplus() function in R, use the following code:
> softplus <- function(x) { log(1 + exp(x)) }
This activation function can be provided to neuralnet() using the act.fct parameter. Additionally, we will add a second hidden layer of five nodes by supplying the hidden parameter the integer vector c(5, 5). This creates a two-layer network, each having five nodes, all using the softplus activation function:
> set.seed(12345)
> concrete_model3 <- neuralnet(strength ~ cement + slag +
                               ash + water + superplastic +
                               coarseagg + fineagg + age,
                               data = concrete_train,
                               hidden = c(5, 5),
                               act.fct = softplus)
As before, the network can be visualized:
> plot(concrete_model3)

Figure 7.14: Visualizing our network with two layers of hidden nodes using the softplus activation function
And the correlation between the predicted and actual concrete strength can be computed:
> model_results3 <- compute(concrete_model3, concrete_test[1:8])
> predicted_strength3 <- model_results3$net.result
> cor(predicted_strength3, concrete_test$strength)
             [,1]
[1,] 0.9348395359
The correlation between the predicted and actual strength was 0.935, which is our best performance yet. Interestingly, in the original publication, Yeh reported a correlation of 0.885. This means that with relatively little effort, we were able to match and even exceed the performance of a subject matter expert. Of course, Yeh's results were published in 1998, giving us the benefit of over 20 years of additional neural network research!
One important thing to be aware of is that, because we had normalized the data prior to training the model, the predictions are also on a normalized scale from zero to one. For example, the following code shows a data frame comparing the original dataset's concrete strength values to their corresponding predictions side-by-side:
> strengths <- data.frame(
    actual = concrete$strength[774:1030],
    pred = predicted_strength3
  )
> head(strengths, n = 3)
    actual         pred
774  30.14 0.2860639091
775  44.40 0.4777304648
776  24.50 0.2840964250
Examining the correlation, we see that the choice of normalized or unnormalized data does not affect our computed performance statistic—the correlation of 0.935 is exactly the same as before:
> cor(strengths$pred, strengths$actual)
[1] 0.9348395359
However, if we were to compute a different performance metric, such as the absolute difference between the predicted and actual values, the choice of scale would matter quite a bit.
With this in mind, we can create an unnormalize() function that reverses the min-max normalization procedure and allow us to convert the normalized predictions to the original scale:
> unnormalize <- function(x) {
    return((x * (max(concrete$strength)) -
            min(concrete$strength)) + min(concrete$strength))
  }
After applying the custom unnormalize() function to the predictions, we can see that the new predictions are on a similar scale to the original concrete strength values. This allows us to compute a meaningful absolute error value. Additionally, the correlation between the unnormalized and original strength values remains the same:
> strengths$pred_new <- unnormalize(strengths$pred)
> strengths$error <- strengths$pred_new - strengths$actual

> head(strengths, n = 3)
    actual         pred    pred_new        error
774  30.14 0.2860639091 23.62887889 -6.511121108
775  44.40 0.4777304648 39.46053639 -4.939463608
776  24.50 0.2840964250 23.46636470 -1.033635298

> cor(strengths$pred_new, strengths$actual)
[1] 0.9348395359
When applying neural networks to your own projects, you will need to perform a similar series of steps to return the data to its original scale.
You may also find that neural networks quickly become much more complicated as they are applied to more challenging learning tasks. For example, you may find that you run into the so-called vanishing gradient problem and closely-related exploding gradient problem, where the backpropagation algorithm fails to find a useful solution due to an inability to converge in a reasonable time. As a remedy to these problems, one may perhaps try varying the number of hidden nodes, applying different activation functions such as the ReLU, adjusting the learning rate, and so on. The ?neuralnet help page provides more information on the various parameters that can be adjusted. This leads to another problem, however, in which testing a large number of parameters becomes a bottleneck to building a strong-performing model. This is the tradeoff of ANNs and even more so, DNNs: harnessing their great potential requires a great investment of time and computing power.
Tip
Just as is often the case in life more generally, it is possible to trade time and money in machine learning. Using paid cloud computing resources such as Amazon Web Services (AWS) and Microsoft Azure allows one to build more complex models or test many models more quickly. More on this subject can be found in Chapter 12, Specialized Machine Learning Topics.
