
Chapter 5
Working in a Team
Most projects involve more than one person working together at any given time. It is common in design for many people to work collaboratively to meet deadlines and create a set of construction documents. Autodesk® Revit® Architecture software has tools that allow for a collaborative design and documentation process while giving multiple people simultaneous access to its single-file building model. This unique functionality is known as worksharing.
In this chapter, you’ll learn to:
- Understand key worksharing concepts
- Enable worksharing on your project
- Organize worksets in your model
- Manage workflow with worksharing
- Understand element ownership in worksets
- Collaborate in the cloud
Understanding Worksharing Basics
Worksharing refers to the use of worksets to divide a model for the purpose of sharing project work among multiple people. A workset is a customizable collection of building elements that can be used to manage project responsibilities. By associating various building elements with worksets, the design team has the ability to subdivide the model to retain additional control over element ownership. Using worksets, several people can collaborate and work within the same file without fear that their decisions will conflict directly with their teammates. By default, worksharing is not enabled when you start a project because it is assumed you are in a single-user environment.
Worksharing is commenced when worksets are enabled and a project file is saved as a central file located on a network drive. This central file becomes the repository where all the design team’s work is saved. Team members then create a local copy of the central file on their own workstation in which they will work as usual. The local copies of the model are individual versions of the file connected to the central file (Figure 5.1).

Figure 5.1 The worksharing concept
The only information that flows instantly between the local copies and the central file is permissions. Edits to model elements or settings are not transferred among the project team members because this would significantly decrease performance and would be distracting to your workflow to see the model constantly changing on the screen. In other words, the only way another team member knows you are editing something is by seeing that you own the element. Even though worksets are established to break a model into manageable chunks, permissions for a worksharing-enabled project are managed at the object level. This means that you could have a worksharing-enabled project with only one workset. Remember, a project file is essentially a database. As you are working on elements within the model, you are automatically obtaining permission to edit elements from the central database. Once permission to modify an element is granted, no one else can make changes to that element until the changes are reconciled with the central file. This occurs when you use the Synchronize With Central (SWC) command on the Collaborate tab to save changes you have made back to the central file and simultaneously update your local file with any other changes that have been published to the central file by other team members.
The actual use of worksets can vary greatly from project to project. Quite frankly, creating more worksets beyond the defaults is technically not necessary; however, you can use worksets to take advantage of other benefits:
- Use worksets to control the visibility of groupings of building components, such as building skin, core, interior walls, and so on, without the need to use temporary view settings or control visibility manually.
- Close worksets as needed to remove those parts of your project from active memory, thus improving performance.
- Use workset ownership to prevent others from editing a part of the project you are currently designing.
Enabling Worksharing on Your Project
The worksharing feature can be enabled in any Revit project file. You can begin worksharing, create and remove worksets, or move elements between worksets during any stage of the project.
To follow along with the text in this chapter, you can download the sample building project file from this book’s companion website at www.sybex.com/go/masteringrevit2017. One version of the project does not have worksets, whereas the other has retained worksets but is not configured for worksharing. Open the file c05-Sample-Building_Start.rvt and switch to the Collaborate tab in the ribbon. The worksharing tools are shown in Figure 5.2.

Figure 5.2 The Collaborate tab
You can initiate worksharing by clicking the Collaborate button. It will initially be the only active button on the Manage Collaboration panel. Selecting this tool opens the Collaborate dialog box, alerting you that you are about to enable collaboration for your project (Figure 5.3). You can choose to Collaborate within your Network or with Autodesk 360. You can only choose A360 if you have that application installed. Both options allow you to enable Worksets. To start worksets, select the Worksets button in the Manage Collaboration Panel. Two worksets are automatically created within your project: Shared Levels and Grids, to which any existing levels and grids in your project will be assigned, and Workset1, to which all other building elements will be assigned. You can rename these worksets; however, we recommend not renaming Workset1 because you can never delete that workset—even if it has been renamed. You will read about an alternative way to use Workset1 in the section “Organizing Worksets” later in this chapter.


Figure 5.3 Activating worksharing
Click OK to confirm that you want to enable worksharing. Depending on the size of your model and your processor speed, this process can take a few minutes to complete. Once it is done, the Worksets dialog box opens (Figure 5.4).
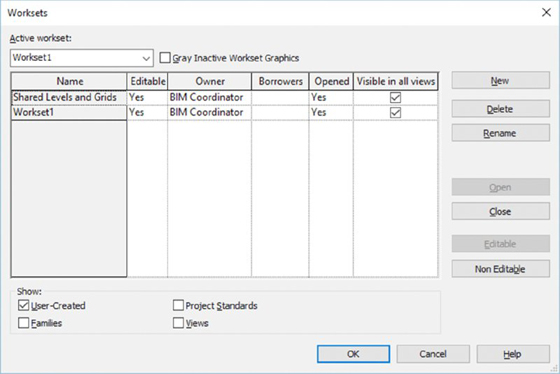
Figure 5.4 The Worksets dialog box
In the Worksets dialog box, you can create as many user-defined worksets as necessary; we offer some tips in the section “Organizing Worksets” later in this chapter. By default, when a new workset is created, it does not contain any model elements or components. You can add model elements to worksets as you build them or reassign existing elements to worksets. The Worksets dialog box also lets you take and relinquish permissions over existing worksets. First, you should understand the different types of worksets illustrated by the options in the Show area at the bottom of the Worksets dialog box, shown in Figure 5.4.
Types of Worksets
There are four types of worksets in any project: user-created, families, project standards, and views. User-created worksets such as Shared Levels and Grids and Workset1 are shown by default, and you have the option to list the others by selecting the check boxes at the bottom of the Worksets dialog box:
User-Created Worksets In addition to the two worksets automatically generated when you first enable worksharing, all of the worksets you add in the Worksets dialog box will fall under this category. All building elements, spaces, and datum objects you place in the project are assigned to user-created worksets. Only elements in user-created worksets can be moved to other user-created worksets.
Families Worksets For each family loaded in the project, a workset is automatically created. When editing the properties of a family, you will automatically take ownership over that family.
Project Standards Worksets The project standards workset type is dedicated to all the project settings, such as materials, dimension styles, annotations, tags, line styles, and so on. Any time you need to edit a project standard, such as modifying the type properties of dimensions, you will be taking ownership of the element’s workset.
Views Worksets Every view created in a project has its own workset. The views workset type controls ownership of the view properties and any view-specific elements, such as annotations, dimensions, tags, detail lines, and so on. You can take ownership of a particular view workset by selecting it from the workset list and clicking the Editable button, but this is not necessary to start working in a view. You can also take ownership of a view by right-clicking the view in the Project Browser and choosing Make Workset Editable from the context menu. This can be a helpful shortcut in construction documents when much of the effort on the project is more view specific. Regardless of ownership, any team member always has the ability to add annotation elements to any view—you just cannot change any existing view-specific elements when another user owns a view workset.
We will get back to worksets in the “Organizing Worksets” section of this chapter. For now, you should establish the workset-enabled project model as a central file.
Creating a Central File
After you enable worksets in a project model, you must save the project as a central file to enable others to collaborate on the model. This is the file that will collect all the work done by your team members and allow them to receive regular updates of changes being made to the model and documentation.
You can use one of two commands to establish a workset-enabled model as a central file: Save or Save As. If you click Save from the Application menu, you will be presented with a warning telling you that this is the first time the file will be saved since worksharing was enabled (Figure 5.5). If you select Yes, the file will become a central file with only the default settings in its current location.

Figure 5.5 The Save command will create a central file with only the default settings.
As an alternative, we recommend using the Save As ➢ Project command from the Application menu. When you click this button instead of Save, the Save As dialog box will appear. In the Save As dialog box, click the Options button to access the options shown in Figure 5.6.

Figure 5.6 Options for saving a project file
This dialog box contains some important settings. At the top, you can set the number of backups the file will keep in the folder history after saves. The default value is 20. Depending on the storage availability on your network, how often your network is backed up, and the number of people working in the model (remember, local files are also backups), you might want to increase this number. For example, if three users are using Synchronizing With Central every 30 minutes; that might be 48 saves before the next backup. Better safe than sorry. Also, the Make This A Central Model After Save check box is selected and grayed out. This is because we have activated worksharing in this file and it is assumed that we will be making a central file on the next save.
You can also specify default settings for opening the project file (shown as Open Workset Default). We will discuss opening a file in the section “Creating a Local File” later in this chapter, but we recommend setting this option to Specify for most project scenarios. This will always prompt your team members with the Worksets dialog box when a local file is opened. Click OK to exit the File Save Options dialog box.
Back in the Save As dialog box, choose a network location that everyone on the team has access to for your central file. Be sure that when you are naming your new central file, you choose a new name. Do not save over the existing Revit project file. There are two reasons for this: First, it automatically gives you a backup of your file as it existed before worksharing was enabled. Second, saving over an open Revit file can sometimes cause corruption, even if it is the same model. It is also a good idea to name the file with some clarity that helps identify it as a central file, such as MyProject-Central.rvt.
Once you have entered a new name for the file, click the Save button to save the file. Now that your file is saved to the network, close all the open view windows. As one final step, you need to make sure you don’t accidentally retain any rights over the objects and elements within the central file, thereby prohibiting anyone from editing those elements.
To do this, go to the Collaborate tab, find the Synchronize panel, and click the Synchronize With Central button. This button is a flyout button that contains two commands: Synchronize And Modify Settings and Synchronize Now. You will want to use Synchronize And Modify Settings in this case. In the Synchronize With Central dialog box, shown in Figure 5.7, make sure you select any available check boxes in the middle portion to relinquish ownership of all worksets. You can also add a comment to identify the action taken during this synchronization.

Figure 5.7 Synchronizing with central to relinquish permissions
Yes, it might seem odd to use the Synchronize With Central command when you are actually in the central file, but this method is the fastest way to relinquish all worksets and complete the setup of the central file. Click OK to complete the synchronization.
USING A REVIT SERVER ACCELERATOR
If your project team is distributed in various geographic locations, an alternative to synchronizing with the central model directly over the wide area network (WAN) is to use a Revit Server Accelerator. This technology was developed by Autodesk to support extended collaboration through the use of server technology that creates a layer of virtual central models. The Revit Server then manages changes into a single central model without burdening the WAN with full synchronization traffic.
You may learn more about A360 Collaboration for Revit, which we discuss more in the “Collaborating in the Cloud” section later in this chapter.
Selecting a Starting View
On the Manage tab of the ribbon, locate the Manage Project panel and click the Starting View command. With this command, you can select any project view to be the first view displayed when the model is opened (Figure 5.8). Because 3D views take longer to regenerate when your project opens, we recommend you select a 2D view to speed this process; you can even create a drafting view that contains the project name and image as the starting view.

Figure 5.8 Selecting the starting view
Another use for the starting view is as a project bulletin board. Simply create a drafting view for the starting view and keep it populated with project standards, modeling action items, and other notes your team might need to know.
Synchronize the central file once again, and remember to relinquish any worksets you might have obtained during the configuration of the central file. From the Application menu click Close to close the central file.
Creating a Local File
Now that you have made a central file, you will need to create a local copy of it in which you will organize worksets for team collaboration and continue your design and documentation. There are several ways to perform this action. One option is to simply open the network location of the central file and copy the file from the network to your desktop or anywhere on your local hard drive. Be careful not to move the file—only copy it. It is also a good idea to rename the file to something that identifies it as a local file, such as c05-Sample-Building-Local.rvt.
Another method of creating a local file is to use a script or macro. There are many variations of this method, so we will not discuss them in detail here. We believe the simplest example of a script is to use common Windows commands in a BAT file. You can create a BAT file in any simple text editor such as Windows Notepad, and you will find a command-line reference in Windows Help and Support on your computer (search for commands). You can also find a free tool on David Baldacchino’s blog:
http://do-u-revit.blogspot.com/2008/03/streamlining-local-file-creation.html
The last and most predictable method for creating a local file is to use the functionality integrated with the Open command. Using any common method to open a file, you will get to the Open dialog box (Figure 5.9). Navigate to the central file, and when it is selected, you will have the option to create a new local file at the bottom of the dialog box. Whenever you select a central file through the Open dialog box, this box is checked for you as a safety precaution against you opening the central file directly.

Figure 5.9 Create a new local file from the Open dialog box.
The local file is created in the location specified as the default path for user files. This setting can be found in the application options, under the File Locations settings. The default location for this setting is the My Documents folder. If you choose this method, the local file will be appended with your workset username. If you have already created a local file with this method, you will be prompted with a warning the next time you attempt to create a new local copy from the central file (Figure 5.10). You have the option to either overwrite the existing local copy or append a time stamp to the existing file.

Figure 5.10 Overwriting existing local files
Before you proceed to open the file, you can change the way you interact with worksets. If you click the small arrow to the right of the Open button, you will see a list of options, as shown in Figure 5.11.

Figure 5.11 Workset options when opening a file
The default setting for opening worksharing files is Last Viewed, but each of the available settings is helpful to your workflow. Let’s review these settings in detail:
All This setting opens all available user-created worksets.
Editable This setting opens only those worksets that you have previously made editable. If you did not retain ownership of any worksets the last time you worked on a local file, none of the user-created worksets will be opened. To retain ownership of worksets when you close a file, you will be prompted with the alert shown in Figure 5.12. Choose the option to keep ownership of elements and worksets. We do not recommend this workflow because it restricts others on your team from working on elements for which you retain ownership.

Figure 5.12 Closing a file while relinquishing ownership of worksets
Last Viewed The file will be opened with the Last Viewed worksets configuration. If you use this option when opening a new local file for the first time, all worksets will be opened.
Specify We highly recommend this option because it will give you the most flexibility when opening a local file. When Specify is selected, you will be presented with the Worksets dialog box immediately after you click the Open button. You can then choose the worksets you would like to open or close before the file is loaded into memory.
To continue your exercise, choose the Specify option and then click the Open button. The first time any local file is opened using a method other than the Create New Local option, you will see a warning message alerting you that you are opening a local file. This is simply a notification that you have made a local copy of a central file and you will be the owner of the local file. If this warning appears, click Close to dismiss the warning and continue the file-opening process.
The Worksets dialog box will be displayed if you used the Specify option to open the file. At this point in the exercise, you will still have only Shared Levels and Grids and Workset1, but in the future, you will have the ability to close any workset you may not need for editing in your work session. Click OK to close the Worksets dialog box.
Using Worksharing Usernames
Each local file is automatically associated with your worksharing username once it is opened; after it is opened, it cannot be edited by any other user. By default, your Windows login name is used as your worksharing username. When you use the Create New Local option to open a worksharing-enabled project, the username is appended to the end of the local filename—for example, c05-Sample-Building-A16-Central_YourName.rvt.
It can be a good idea to adjust the naming convention for usernames to help team communication. In a smaller office, it might not be as necessary, but in a larger office or multi-office team, clarification of element ownership is vital. One option is to change your workset username to first name, last name, and phone extension. This way, team members can quickly identify and contact you if they need you to relinquish permission of an element.
To make this modification, follow these steps:
- Close all your open projects files. You can change the username only when no workshared projects are open (you cannot change your username while it is active in open projects). After you change your workset username, you will need to create a new local file because the old local file is associated with a different username.
- From the Application menu, choose Options at the bottom.
- In the Options dialog box, select the General category.
- In the Username field, enter a new value (Figure 5.13). Click OK to exit.

Figure 5.13 Changing the default username
If you have signed in to an Autodesk® 360 (A360) services account, your username will automatically switch to your A360 username, which may not include your telephone number but will give you access to other ways of communication such as instant messaging through applications such as C4R. A360 is an online service with Autodesk accessible from the upper-right portion of your application window. If you are not signed in, you should see the button as a small figure with Sign In next to it. More information on the A360 account is provided later in this chapter.
Organizing Worksets
Now that you have enabled worksets and configured your project file for worksharing, you have the opportunity to further organize your model into more worksets. When dividing your project into worksets, it is important to think about the larger building system rather than try to isolate its individual components. In other words, worksets should not be used like layers in a CAD application. A good way to think about dividing up worksets is to consider the building elements and the number of people working on each of these elements. A basic breakdown of a project’s components might include the following:
- Exterior skin
- Core
- Interior partitions (in a larger building, by floor)
- Site
- Furniture, fixtures, and equipment (FF&E)
This breakdown mirrors some of the roles and responsibilities on the project as well. There might be a small group working on exterior skin design and detailing, another group working on interior partitions, and a third working on FF&E. And for larger projects where you have linked files (possibly from other disciplines like mechanical, electrical, and plumbing [MEP] or structure), it is helpful to associate those linked files with their own worksets.
Continuing with the Sample Building exercise file, open a local copy of the central file and click the Worksets button from the Collaborate tab or from the status bar. Click the New button and create each of the following new worksets (keep the Visible In All Views option selected each time):
- Exterior and Structure
- Furniture
- Interiors
When you have done this, you should see a total of five user-created worksets, as shown in Figure 5.14. The worksets we have set up demonstrate how a typical breakdown might occur in a project of this size, but creating, defining, and assigning worksets is by no means limited to this scheme. Depending on how you structure work in your office, the worksets might be quite different.

Figure 5.14 Creating new worksets in the project
As we stated previously, one of the biggest challenges facing teams new to Revit is understanding the difference between layers in a CAD application as compared to worksets. These teams typically want to try to manage worksets as they managed layers in CAD, which can result in worksets named Doors, Windows, Walls, and so on. Although this is effective management in a CAD environment, you do not want to create all of this structure for worksets. Not only is it time-consuming, but it does not provide any benefit.
Much like layers, the workset is a tool that the team will need to understand in order to use it successfully. Worksets should be structured by a team’s BIM coordinator or a project manager familiar with a BIM workflow. Ultimately, though, it is up to the team members to place elements in the proper worksets and ensure that project standards are being followed.
Moving Elements between Worksets
With this chapter’s exercises, you are applying worksharing to an existing model; therefore, you will need to assign the existing model elements to the worksets you have created. The easiest way to move elements between user-defined worksets is by using a customized 3D view. The following exercise will walk you through moving elements from Workset1 to the new worksets you have established, using a subtractive method to reassign the model geometry. This should be done by a single person who owns all the elements to ensure that no permissions issues occur when elements are being moved between worksets. This is also best done with only one person actively working on the file. If you have other users with local copies, ask them to not use the model while you’re moving elements.
To move the elements between worksets, follow these steps:
-
Open the default 3D view so you can see the entire model. By selecting a 3D view, you cannot accidentally select view-specific elements (like elevation or sections) or datum—you’ll be selecting only model elements that can be assigned to user-defined worksets. Now open the Visibility/Graphic Overrides dialog box and choose the Worksets tab. Choose to hide all the worksets except for Workset1 (Figure 5.15), and click OK. This will turn off any elements that are visible on those worksets and allow you to “subtract” elements from this view as you move them to the nonvisible worksets.
In a worksharing-enabled file, the default 3D view is unique to each user participating in the model. The name of the view will be appended with the team member’s username; for example, {3D – BIM Coordinator}.
- To select model elements and assign them to different worksets, you have a few options:
- For a smaller model, select a comfortable number of elements using the Filter tool and then modify the Workset parameter in the Properties palette. What constitutes a “comfortable” number of elements depends on your computer’s capabilities. As an example, if you window-select all the elements in our Sample Building model, you can click the Filter button in the ribbon and choose to keep the Furniture category active and uncheck the remaining items (Figure 5.16). Click OK. In the Properties palette, assign these elements to the Furniture workset.
- For a larger model, it might first be necessary to select some individual components and move them separately. Although the process remains the same (select elements, change the workset in the Properties palette), the selection system can vary. Another example of moving elements by selection would be to highlight an exterior wall and use the Tab key to select a chain of exterior walls. Those exterior walls can be moved to the Exterior and Structure workset.
- You can also select one or more types of elements in the model and use the Temporary Hide/Isolate tools in the view control bar. In the exercise file, try to locate a single window and select it. From the view control bar, click the Temporary Hide/Isolate icon and select Isolate Category. The boundary of the 3D view will be highlighted, indicating a temporary view setting, and you will see only windows. Window-select all the windows and then go to the Properties palette to assign them to the Exterior and Structure workset (Figure 5.17). Return to the Temporary Hide/Isolate icon in the view control bar and select Reset Temporary Hide/Isolate.
- Using the same technique, you can move the remainder of the model elements to their respective worksets. When the default 3D view is empty, you will know that all the elements have been reassigned to new worksets.

Figure 5.15 Isolating Workset1 in Visibility/Graphic Overrides

Figure 5.16 Use the Filter tool to select specific object categories.

Figure 5.17 Assign the Workset property to multiple elements.
For even easier workset management and quality control, you can create a 3D view named according to each workset. In each of these views, isolate the respective workset in the Worksets tab of the Visibility/Graphic Overrides dialog box. After these views are established in the project, you can periodically examine them to fix any workset assignment mistakes. For example, someone might have placed plumbing fixtures on the Site workset.
As you continue to assign model elements to worksets, you should be aware of some special conditions that might exist in your project. Some elements that can be selected and/or filtered are actually subcomponents of other systems, and as such their Workset property cannot be changed independently of the parent system. For example, you can select and filter curtain wall panels and mullions, but you can change only the Workset property of the curtain wall object, which is simply categorized as a wall.
Another special condition to look for is the presence of groups. Grouped objects will show up in the filter list as Groups and not in their respective categories. As an example, in Figure 5.18, the filter list shows Model Groups. Select only Model Groups in the Filter dialog box and use the Isolate Elements command in the view control bar, and you will see that the groups contain elements in the Casework and Furniture categories.

Figure 5.18 Select only Model Groups in the Filter dialog box.
At any point in this process, you can check your work by opening the Workset tab in the Visibility/Graphic Overrides dialog box and setting all but one workset to Hide. Use this method to inspect the contents of each workset.
The workflow described in the preceding exercise is necessary only if you have developed a model before enabling worksharing for collaboration. You can always start a new project enabled with worksets, and your team can develop the model simultaneously. The only important thing to remember is to ensure your team uses the appropriate active workset when working in a worksharing-enabled project. We will cover that in greater detail in the following section.
Managing Workflow with Worksets
Now that you or your BIM coordinator has established a central file and organized your project into worksets, you can get ready to work by creating a local copy of the central file. Do you need to do anything special to begin working in a project that is enabled with worksets? No. You can simply start adding or editing content in your project because permissions are being automatically managed as you work. Just remember that you cannot edit any elements (2D or 3D) that someone else is already editing.
You do not have to make any worksets editable unless you want to prevent other team members from editing certain parts of your project until you have completed some work. Remember the library analogy earlier in this chapter.
The most important thing to remember when you use worksharing is that every element in the file and added to the file belongs to a workset. To make sure you are placing elements in the proper workset while working, know there are a few tools to ensure that you select the right workset.
One such location is on the Collaborate tab, where you originated worksharing. As shown in Figure 5.19, the active workset is Exterior and Structure. This also tells you that the Exterior and Structure workset is not editable. What this means is that as a user, you have not taken ownership of this workset. However, as we mentioned previously, you do not need to own a workset to add elements to it. It just needs to be active in this window.

Figure 5.19 Setting the active workset in the ribbon
The second location is in the status bar at the bottom of the application (Figure 5.20). The drop-down menu on the left serves the same function as the Active Workset drop-down in the Collaborate tab, but it allows you to verify that the proper workset is active without the need to bounce between tabs in the ribbon and interrupt your workflow. From this location you can also change the active workset and even open the Worksets dialog box using the small button to the left of the drop-down menu.

Figure 5.20 Setting the active workset in the status bar
Another helpful tool located on the Collaborate tab is the Gray Inactive Worksets button. This dims all the elements that are not on the active workset, helping you identify what elements are in your current, active workset. This is a temporary view state and will not affect any printing or other output.
In addition, you can always view an object’s workset assignment by hovering your mouse pointer over the object and viewing its workset in the status bar (Figure 5.21). This location will also display an object’s family and category. In the example shown here, the wall is in the Exterior and Structure workset, in the Walls category, and its type is Exterior - EIFS on Mtl. Stud. There are three locations in this figure where you can see the workset: one in the Properties palette, one in the status bar, and one in the tooltip shown when you hover over an element.

Figure 5.21 Workset assignment displayed in status bar, Properties, palette, and pop-up information.
Saving Work
It will eventually become necessary to save your work and share your progress with others in the model. You have three ways to both save your work and view the work of others: Save, Synchronize And Modify Settings, and Synchronize Now.
Save The Save button saves the work you have done to your local file only; the work is not shared or published back to the central file. This can be a useful step if you are in the middle of a process and want to make sure your work is saved but are not ready to share the changes with the rest of the team. You can find the Save tool either by choosing Application ➢ Save or by clicking the Save icon on the Quick Access toolbar (QAT).
Synchronize With Central ➢ Synchronize And Modify Settings When you are ready to publish your work for the rest of your team to see, you have two command choices to synchronize with the central file. The first of two synchronizing commands is known as Synchronize And Modify Settings. You can access this command in a couple of ways. The first is on the Collaborate tab in the Synchronize panel, as shown in Figure 5.22. The Synchronize With Central flyout button is located on the left of this panel.

Figure 5.22 Synchronize With Central command on the ribbon
As an alternative, you can use the Synchronize With Central button located on the QAT. Both buttons perform the same action and will open the Synchronize With Central dialog box (Figure 5.23). This dialog box gives you some additional tools to assist your workflow:
- The Compact Central Model check box allows you to compact the model to save on disk space. It will take some additional save time, but it can temporarily decrease your file size significantly. This should not be seen as a permanent solution to managing a large file, however. Compaction will decrease the file size, but use of the file will expand the compacted elements. Tips and techniques for reducing file size are discussed in Appendix B.
- Five additional check boxes will be available (depending on what work you have done to the file) to allow you to relinquish or keep permission over the elements you have previously edited. Unchecking these boxes means that you will retain ownership over all the elements you currently own with the model. This can be useful if you are planning to continue working on the same elements and want to publish only recent changes of the model.
- You can add comments to the synchronization that can be useful for tracing potential model conflicts later in the production process.
- A final check box, Save Local File Before And After Synchronizing With Central, allows you to save your changes locally, get any new changes from the central file, and then save locally again, ensuring that your local copy is up to date. This is the save option that takes the longest, and you might choose to uncheck this periodically if you have pressed for time or have a large file that typically takes longer to save.

Figure 5.23 Synchronize With Central dialog box
Synchronize With Central ➢ Synchronize Now The second command choice to publish your changes is called Synchronize Now. Choosing this option allows you to bypass the Synchronize With Central dialog box and simply sync your file immediately. With this option, you will be relinquishing all your permissions over any elements you have borrowed; however, you will remain the owner of any worksets you have made editable in the Worksets dialog box.
Saving at Intervals
You will be prompted to save your work at regular intervals. Once worksharing is enabled, you will receive an additional reminder to synchronize with the central file as well as to save your work (Figure 5.24). You can dismiss these dialog boxes by clicking Cancel at the lower right, but remember, it is a good idea to save regularly so you do not lose any work.

Figure 5.24 Changes Not Synchronized With Central dialog box
If the Changes Not Synchronized With Central dialog box appears, you will have three options to choose from:
- Synchronize With Central, which will perform a save operation identical to that of the Synchronize Now command
- Synchronize With Central And Set Reminder Intervals, which will synchronize your file and then pull up the Options dialog box, allowing you to set the intervals in which you receive this message
- Do Not Synchronize And Set Reminder Intervals, which will cancel all future reminders for the remainder of your Revit session
You can modify the reminder time shown in the dialog box at any time by clicking the Application button, selecting Options, and then choosing the General tab.
Loading Work from Other Team Members
It is possible to update your model and load work from other team members without publishing your own work back to the central file. This process, called Reload Latest, basically downloads the latest changes from the central file to your local file. Because you are only downloading content from the central file and not uploading, this process takes only a portion of the time a full SWC does. To do this, click the Collaborate tab on the ribbon, and choose Reload Latest from the Synchronize panel. The default keyboard shortcut for this command is RL.
Using Worksharing Visualization
Sometimes it helps to have the ability to graphically display worksets and their status in the project. With worksharing visualization, you can visualize four different values: ownership status, individual ownership, updated elements, and workset assignment. You can open the settings from the view control bar.
To display any of the values, select the desired setting. When any value is selected, the temporary view condition is indicated by colored highlighting around the edges of the view window.
Select the Worksharing Display Settings menu item to customize the graphic appearance of the visualization overrides. The Checkout Status tab of the Worksharing Display Settings dialog box shows three values: what is owned by you, owned by others, or not owned at all (Figure 5.25).

Figure 5.25 Checkout Status tab
The Owners tab of the Worksharing Display Settings dialog box illustrates which elements are owned by the users in your project. If you see users listed who do not have any enabled elements or worksets, you can remove them from the list by selecting their username and clicking the Remove User icon at the lower left (Figure 5.26).

Figure 5.26 Owners tab
The Model Updates tab of the Worksharing Display Settings dialog box indicates changes to the central file that may not be apparent until you have synchronized with the central file (Figure 5.27).

Figure 5.27 Model Updates tab
The Worksets tab allows you to color-code the model based on the workset assignment of all the building elements. Color-coding is also helpful for keeping track of your active workset (Figure 5.28).

Figure 5.28 Worksets tab
Finally, how often the display settings update in your project is up to you. To modify these settings, choose Application ➢ Options to modify the Worksharing Update Frequency option (Figure 5.29). Moving the slider to the far left will set the description below the Updates slider to Manual Updates Only, and the update will occur when you use Reload Latest or Synchronize With Central. Slide just a bit to the right and you will see that the display will update every 60 seconds. Slide it all the way to the right and your display will update every 5 seconds.

Figure 5.29 Modifying the settings for Worksharing Update Frequency
Managing Workset Visibility in View Templates
As we described in the section “Moving Elements between Worksets,” worksets can be used as a different way to visualize your project using the Visibility/Graphic Overrides dialog box. Workset visibility can also be managed as part of a view template. To modify these settings, go to the View tab, locate the Graphics panel, and select View Templates ➢ Manage View Templates. In the View Templates dialog box (Figure 5.30), select V/G Overrides Worksets to modify the visibility settings in any view template. Refer to Chapter 4, “Configuring Templates and Standards,” for more information on view templates.

Figure 5.30 Workset settings in view templates
Closing Revit
Eventually, you will need to close your project and leave for lunch, attend a meeting, or go home for the day. Do not worry—the project will still be there tomorrow. But in the meantime, it is important to understand how to close the project correctly so you do not accidentally retain permission over any elements. This situation—where a team member has accidentally left the office and not closed the project file or relinquished permissions—leaves the other team members without a way to edit elements for which the team member had permission or even request permission. So that you are not the unfortunate victim of their wrath upon your return, make sure you close the application properly.
The most thorough way to close the file is to simply quit the application completely. You can do this by clicking the X at the upper right or choosing Exit Revit from the Application menu. You will be presented with a dialog box in which you can choose to Synchronize With Central, save your changes locally, or discard the changes (Figure 5.31). Obviously, the best choice is to use Synchronize With Central, allowing your changes to be published and any objects you own to be relinquished; however, you might be in the middle of a design study and not ready to share your changes. In that case, you may choose to save locally and retain ownership of certain elements. Just be aware that no one else on your team can edit elements you own until you relinquish them. Our recommendation is to always relinquish all elements at the end of your work session.

Figure 5.31 Saving options when closing a local file
What if you were only reviewing the model and making some minor changes, and you do not want to save the changes? Close the file or application with any of the methods previously mentioned and select Do Not Save The Project from the Changes Not Saved dialog box. You will then be presented with another dialog box with two choices concerning borrowed elements (Figure 5.32). In the Close Project Without Saving dialog box, you can either relinquish any borrowed elements and worksets or retain ownership of them. Clearly, the best choice is to relinquish all elements and worksets.

Figure 5.32 The Close Project Without Saving dialog box
Disabling Worksharing
In a few cases, you might decide that you have enabled worksharing too soon, or after enabling worksharing you would rather go back. Worksharing may be disabled as part of the Detach From Central functionality. This option can be found at the bottom of the Open dialog box. When you elect to detach a copy of the central file, you have the option to discard worksets, as shown in Figure 5.33.

Figure 5.33 Disabling worksharing
If you choose to preserve worksets, the worksharing functionality remains in the file. This allows you to maintain any visibility configurations you have established that depend on worksets. Although this file retains the worksharing capability, it can no longer be synchronized with the original central file because it will become a new central file as soon as you save it after detaching. This method can also create a file for review by a project manager or quality control reviewer without the fear of changing the model accidentally. If you elect to discard worksets, you will lose any visibility settings established from worksets. You will also need to create all new worksets from scratch if you decide to enable worksharing again in the future.
Understanding Element Ownership in Worksets
One of the fundamental concepts in a model enabled with worksharing is the ownership of elements. When you directly edit an element in a project, you automatically take ownership of that element—as long as no one else owns it. Determining whether you own an element is fairly easy. Simply select it. If you do not own it, you will see a worksharing icon, as shown on the selected element in Figure 5.34.

Figure 5.34 The worksharing icon on a selected element
By borrowing elements, team members can take ownership of only portions of a workset, leaving the remainder of the workset to be edited by someone else. Taking ownership of elements in this style creates a more “take what you need” approach to editing and usually results in less overlap between team members.
Besides automatically borrowing elements when they are edited, you can obtain ownership of an element or group of elements in a few other ways:
- In the Worksets dialog box, you can make any workset editable. You then become the owner of the workset instead of borrowing elements within one.
- Select any element or series of elements, and take ownership of them by clicking the worksharing icon.
- You can right-click any element in the Project Browser under the Families node. In the context menu that appears, you can take ownership of families, groups, or views.
- You can right-click any element in a view and choose Make Elements Editable from the context menu (see Figure 5.35). You also have the ability to make editable the entire workset to which the selected object is assigned.

Figure 5.35 Making an element editable using the context menu
If you use any of these options, if the selected element is already owned by another team member, Revit will alert you and you will not be able to modify the element or make it editable.
Understanding Editing Requests
When working in a worksharing project, you do not always have to take ownership of an entire workset in order to begin editing elements. As we discussed earlier in this chapter, it is possible to take ownership of individual model elements. This process is referred to as borrowing. Remember, there can be only one owner of a workset but multiple borrowers of elements within a workset.
If you need to work on elements that already belong to someone else, you will receive an alert that you cannot edit the elements until the other person relinquishes them, and you will be given the option to place an editing request.
Understanding the editing request workflow is critical for multiuser teams; it allows users to transfer permission of objects without having to constantly save all their work to the central file and relinquish all worksets. Let us look at this interchange of permissions in more detail.
Placing an Editing Request
Imagine you are happily working away on your model in a worksharing environment and you try to edit an element that someone else owns. What do you do? When that situation occurs, you will be presented with a dialog box that allows you to request permission to edit the element from the other user (Figure 5.36).

Figure 5.36 Placing a request for permission
Looking at the dialog box, you have two options:
- You can click Cancel and not take possession of the element, and then focus your efforts on another part of the design.
- You can click Place Request to ask your team member to relinquish possession over the element in question. When you click Place Request, the dialog box shown in Figure 5.37 opens.

Figure 5.37 Editing Request Placed dialog box
Once you have placed your request, you are in a bit of a holding pattern. You cannot continue to edit this element until the other user has granted you permission to edit it, and you cannot continue working on other portions of the project. This situation applies only if you are editing an element and you need to make an editing request related to that element. If you simply want to request permission to edit an element and not edit it right away, you could close the request confirmation box and continue working on other elements in your project.
The recipient of an editing request will see a pop-up notification appear at the bottom of the application, as shown in Figure 5.38. The notification gives the recipient instant information about the element in question and who made the request and provides buttons to grant or deny the request. It also provides a Show button that finds the element in a view so the recipient can determine the most appropriate response to the request.

Figure 5.38 Editing request notification
If you happen to miss or accidentally close the request notification, there is also a small visual indicator on the status bar at the bottom of your screen.

It indicates whether there are any outstanding requests (both to and from you). Clicking this icon opens the Editing Requests dialog box (Figure 5.39). Any requests indicated by an asterisk require you to Synchronize With Central before granting the editing request.

Figure 5.39 The Editing Requests dialog box
Granting an Editing Request
Let’s now observe the other side of this scenario. If you are the recipient of an editing request and you are ready to grant it, one of two things will happen. If you have not changed the element, you can simply click Grant and the permission for the element will be transferred to the requesting team member.
If you have modified the element or one that is dependent on or hosted by the element in question, you will be alerted that you will need to SWC before the request can be granted. The team member who placed the editing request will subsequently need to use the Reload Latest command or SWC to receive the recent changes, and then he or she can edit the most recent version of that element. Permission requests that require an SWC are flagged in the Editing Requests dialog box by an asterisk next to the request.
After your editing request has been granted, you will receive a notification similar to those shown in Figure 5.40. If the request did not require an SWC from the other team member (as indicated in the left image in Figure 5.40), you can continue the editing command that prompted the request. Otherwise, you will need to Reload Latest before you can continue the editing command. If you need to return to a view of the element or elements related to the editing request, you can click the Show button. Click the X to close the notification box.

Figure 5.40 (a) Notification of a granted editing request (b) Alternate notification of a granted request alerting you to Reload Latest
Relinquishing Permission
It is not always necessary to wait for a request from another team member to relinquish permission over your elements. Fortunately, there is a tool to do just that. On the Synchronize panel of the Collaborate tab is a button called Relinquish All Mine (Figure 5.41). This feature returns the permissions for any elements you have not edited back to the central file so they are available to the rest of your team.

Figure 5.41 Relinquish All Mine
Using the Worksharing Monitor
If you are an Autodesk® Subscription customer, you will have access to a useful extension application called Worksharing Monitor, shown in Figure 5.42. When you are working on a team project that is enabled for worksharing, this utility gives you real-time information about the users participating in the project file. It also has a convenient resources monitor to keep you informed of your computer’s available RAM, virtual memory, and disk space.

Figure 5.42 The Worksharing Monitor is available for Autodesk Subscription customers.
Collaborating in the Cloud
Eventually you will need to collaborate with other designers. Maybe this partnership—if it is with your structural engineer or MEP designer—will require the both of you to share models. Maybe you simply need to share your modeling work with people within your own office who are not Revit savvy enough to be able to negotiate their way through the software, and you are looking for an easy way for them to view and comment on what you have created. Fortunately, there is a way for you to not only share your model but also comment on models created by your team.
Autodesk has created a web-based resource to share and mark up Revit files. The site is A360 Drive (360.autodesk.com). The site requires an A360 account, which you can register for on the website. Once signed up, you can sign in through Revit to take advantage of online applications like daylighting or cloud rendering (see Chapter 9, “Conceptual Design and Design Analysis“) or use the site as an online collaboration portal.
The site (Figure 5.43) allows you to upload and share models with collaborators. You can make models public or you can share them with only certain individuals.

Figure 5.43 Viewing models online with A360 Drive
One of the great benefits of the site beyond just document management and sharing is the ability for non-Revit users to be able to navigate the model in a read-only format. Using the sample model we will work on throughout this book, a non-Revit user can navigate any of the views within the model (plans, elevations, 3D views, and so forth) as well as spin the model around in an interactive 3D format. Figure 5.44 shows a plan view and some of the additional model metadata that is stored on the site.

Figure 5.44 Using the A360 online viewing engine
This is an easy way to share models and allow nonusers to make comments on preset views. The site works best with Google’s Chrome web browser and works on either a Mac or a PC.
A360 Collaboration for Revit
Although the A360 Drive website allows you to upload and download files as well as view Revit models, it does not provide an alternative to true collaboration with Revit worksharing. A new service called A360 Collaboration for Revit (C4R) allows teams to synchronize changes using Autodesk’s cloud services instead of a Revit Server Accelerator on your WAN.
A360 Collaboration for Revit is a paid service that can be purchased per registered user. You can learn more about the service at www.autodesk.com/products/collaboration-for-revit.
The Bottom Line
Understand key worksharing concepts. Once the team has created local files, it is necessary to understand how to keep both the local files and the central file up to date as changes occur on the project. Doing so ensures that everyone is working from an updated and recent copy of the model at all times.
Master It Once you have begun working in your local file, how do you publish your changes to the central file? How do you download changes from the central file to your local file?
Enable worksharing on your project. Knowing how to activate and use worksharing is indispensable to working in a team environment using Revit.
Master It How do you transition a single-user Revit file to a multiuser environment using worksharing?
Organize worksets in your model. There is no single rule for organizing worksets in your project models; however, they can be used to your team’s advantage. You can use worksets to better organize larger projects and for additional visibility control.
Master It How do you assign objects to worksets? How do you change an object’s workset assignment?
Manage workflow with worksharing. Once the central file has been created, you will need to organize and structure the model into logical worksets to maintain workflow with Revit.
Master It How do worksets differ from layers in 2D CAD? What are some logical ways to create worksets within a model?
Understand element ownership in worksets. Editing elements in a central file means you have sole ownership over further changes to those elements. Understanding the permissions is critical to working in a team.
Master It How do you edit an element in the model if someone has already taken ownership of it in a worksharing environment?
Collaborate in the cloud. Not all of your team members will be Revit-savvy and know how to use the tools. In addition, not everyone on the team will have a copy of Revit, but you might still need their input and comments on the design. Learning to leverage complementary tools to Revit is critical to keeping a project moving smoothly.
Master It How do you use the cloud to get feedback from non-Revit users on a project team?