
You may choose to print your presentation for any number of reasons. Perhaps you want others to review it to help you correct or edit it before you present your slide show. You may also want to print audience handouts or a copy for yourself to refer to while presenting the show. You might want to preserve a printout of the outline of your contents for your files or to use as the basis of another document.
Whatever your reason for printing your presentation, PowerPoint provides tools to help you preview your printed document, add headers or footers, and choose various printing options such as page orientation.
When you print your slides, you can choose how many slides to fit to a page. You can print audience handouts that place several slides on a page and leave space for taking notes. You can also print one slide per page with your speaker notes included. Finally, you can print the Outline view, which includes only the outline text.
When you print slides you may want to include information such as slide number, the date and time the presentation is printed, or the name of the author of the presentation. To do so, you use the Header and Footer feature. You can insert separate headers and footers on slides and on notes and handouts. You can also choose to omit header and footer text on the title slide of the presentation.
See Also
For information about using footer placeholders using the slide master feature, see "Insert Footer Information".
Tip
In addition to using the Insert menu command, you can change header and footer settings from Print Preview by clicking Options, Header and Footer.
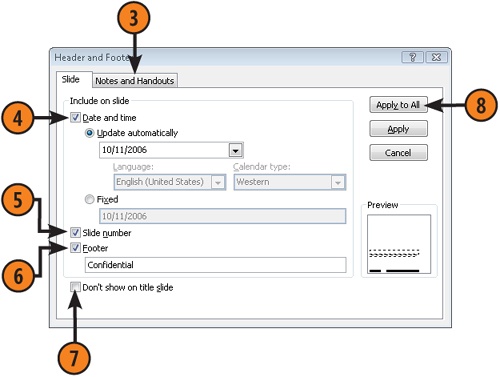
 Click either the Slide or Notes And Handouts tab, depending on where you want to set headers and footers.
 Click the Date And Time check box to include a date and/or time and choose either of these options:
Update Automatically, to include the current date and/or time. If you choose this option, use the drop down lists to select a date/time format, language, and calendar type. The date will update every time you open the slide show.
Fixed, to include a date you specify by typing it in.
 Click the Slide Number check box to include the number of each slide.
 Click the Footer check box and enter text to appear in a footer.
 If you are on the Slide tab, you can also check the Don’t Show On Title Slide check box to omit the footer information from any slide with a Title Slide layout.
 Click Apply To All to apply the settings to all slides. On the Slide tab you have the option to click Apply if you want to apply the settings only to the current slide.


Tip
Note that all items inserted using the Slide tab of the Header and Footer dialog box are inserted as footers, but you can click and drag footers to place them anywhere on an individual slide in Normal view. Notes and Handouts use both header and footer placeholders, and again, you can move those placeholders around in the Notes Page view or Handout Master.