
Chapter 17. Managing Reports, Data Sources, and Models
In this Chapter
• Deployment Options in Visual Studio
• Deployment Through Report Manager
• Deploying Reports Through SQL Server Management Studio
• Changing Report Properties
• Setting Report History and Snapshots
• My Reports
Managing Report Server content on SSRS is fairly straightforward. After developing reports, the first thing you need to do is to learn how to deploy them. After reports are deployed, a number of options and properties can be set on the Report Server. These options range from the fairly mundane, such as moving reports from one folder to another, to more complex options, such as managing report histories and snapshots.
Deployment Options in Visual Studio
Because Visual Studio is the primary report development tool, it should come as no surprise that it has the capability to deploy reports. You can actually set it up to deploy reports every time you build your projects. In addition, you can use Visual Studio to overwrite existing data sources on the server, hence setting the proper location for use in production.
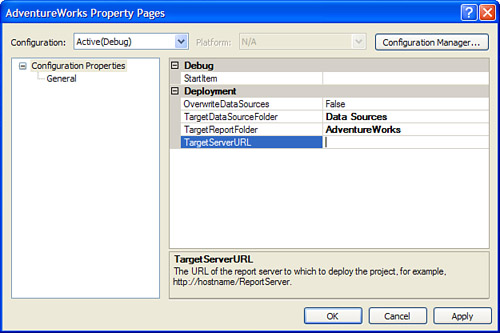
ServerName
First, you need to set the server name for deployment of your project. You can do this by setting the project properties through the IDE. This is actually much simpler than it sounds. If you have closed the AdventureWorksReports Samples reports project, open it again.
1. Open Solution Explorer (View, Solution Explorer).
2. 2. Right-click on the project and select Properties.
3. You should have a screen that looks similar to Figure 17.1.
Figure 17.1. Deployment properties for the AdventureWorks project.
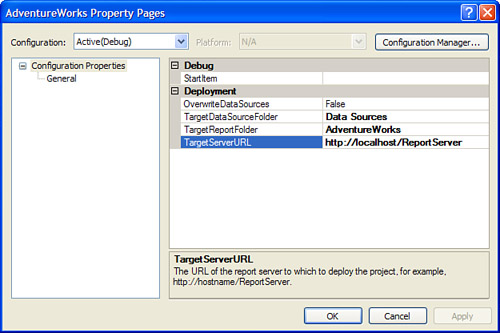
Now all you have to do is set the server name. The server name and virtual directory have to be placed in the TargetServerURL property. The format is http://{ServerName}/{VirtualDirectory}. By default, if you have installed the server locally, its property is filled in as http://localhost/ReportServer
Report Folder Location
TargetReportFolder is another major property.
By default, it sets itself to the project name. The folder name is the name of the folder created on the Report Server to house your reports. You can leave it blank and reports will deploy on the root folder.
Overwriting Data Sources
One of the most important properties is OverwriteDataSource as it will change the location of the data source on the Report Server.
By default, when Visual Studio deploys, it creates the data source for your reports. The key here is it creates the data source, but never updates it even if you have updated the data source in your project. The exception to this is when the report has an embedded data source in its data sets.
The purpose of this switch is to force the upgrade of shared data sources. If you need to overwrite the data sources, set this to true, and you will be on your way.
Target Folder for Data SourceNEW in 1005
This property (TargetDataSourceFolder) is similar to the folder for reports. This is actually new in SSRS 2005. The previous version had no such option. Remember this only applies to shared data sources.
Building and Deploying Reports
When you set all the properties, you should have a screen that looks similar to Figure 17.2.
Figure 17.2. Completed deployment properties for the AdventureWorks project.
When you are ready to deploy the reports and data sources, complete the following steps:
1. From Solution Explorer, right-click on the project.
2. Select Deploy.
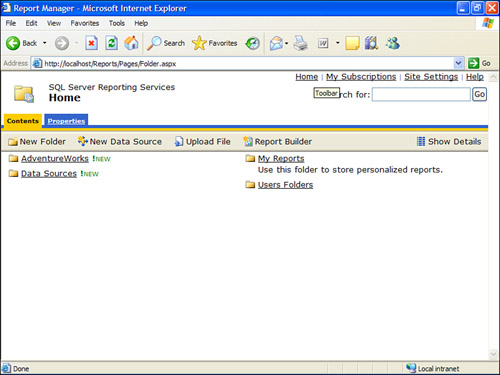
After a quick permissions check with the chosen Report Server, Visual Studio should allow you to deploy the project. At this point, you should see the folders created in Report Manager. See Figure 17.3.
Figure 17.3. Deployed AdventureWorks project.
Deployment Through Report Manager
As covered in Chapter 1, “Introduction to SQL Server Reporting Services (SSRS),” the Report Manager web application is the main user interface. All administrative functions can be called from here. It also serves as the main user interface into the Report Server. Essentially, it checks user permissions, and if you have permission to do a task, it presents you with the interface to do it. By default, administrators on the machine on which the Report Server is installed have full permissions to all functions.
Creating a New Folder
First, you need to set up a folder into which you will deploy the reports. If you want, you can deploy it onto the root of the Report Server; however, it can get difficult to manage with a large number of reports.
In the Report Manager user interface, a row of buttons displays across the top. See Figure 17.4.
Figure 17.4. Creating a new folder.
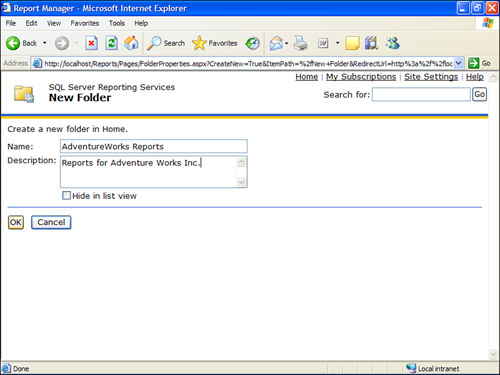
To get acquainted with Report Manager, let’s use it to publish some reports manually. The first thing to do is to create a new folder by clicking on the New Folder button. You should see a screen similar to Figure 17.4.
Complete the following steps to finish adding the new folder:
1. Change the Name field to AdventureWorks Reports.
2. Change the Description field to Reports for Adventure Works Inc.
3. Click OK.
This should return you to the main screen, and you should see your folder present. If you click on the folder, the user interface shows you its contents; however, it will be empty because it was just created and you haven’t published anything yet.
Setting Up a Data Source
It is time to set up a shared data source for the report that you will be publishing. The shared data source is beneficial because you have many reports that use the same database catalog for information. To set up a shared data source, perform the following steps:
1. If you haven’t done so already, click the AdventureWorks Reports folder.
2. Click the New Data Source button on the toolbar. The contents of the browser window should look similar to Figure 17.5.
Figure 17.5. Creating a new data source.
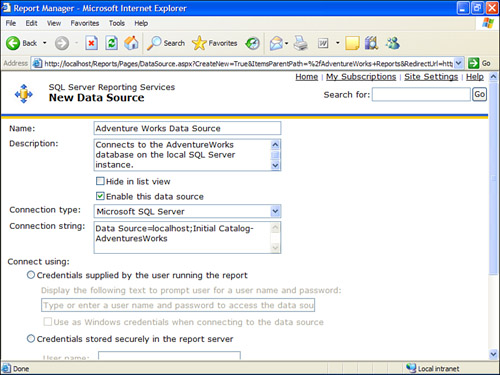
3. In the Name text box, enter Adventure Works Data Source.
4. In the Description field, enter “Connects to the AdventureWorks database on the local SQL Server instance.”
5. Select Microsoft SQL Server for the connection type.
6. Enter the following connection string: Data Source=localhost;Initial Catalog=AdventureWorks.
7. Select Windows Integrated Security.
8. Click OK.
Clicking the OK button should return you to the folder contents and your data source should be displayed.
Uploading a Report
Now it is finally time to upload your reports. This is a pretty straightforward process, but you need to know the location of the RDL files on your hard drive. If you do not remember, go back to the Visual Studio solution, click on the report inside Solution Explorer and look at the properties for the report list. Take note of the Full Path property. This is the location of the RDL file on your PC.
Let’s continue on and use the Report Manager to upload our reports. To upload reports, perform the following steps:
1. Click the Upload File button on the toolbar.
2. Click Browse and browse to the location of the RDL file.
3. Change the Name property. See Figure 17.6.
Figure 17.6. Uploading a file from the AdventureWorks project.
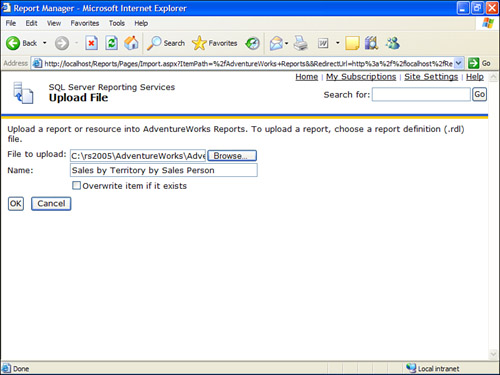
4. If you want to update an existing copy of the report, check the Overwrite Item if It Exists check box.
5. Click OK.
Report Manager should now display the folder contents with the report and data source in it.
Changing the Report ManData Source
Because you are using a shared data source, it makes sense to change the report to use the shared data source. Changing the report to use the shared data source entails the following steps:
1. Click on the report.
2. Click the Properties tab.
3. Go to Data Sources on the left menu.
4. Select the A Shared Data Source option.
5. Click Browse.
6. Drill down into the folder list until you see AdventureWorks DataSource and select it. You should now see a screen similar to Figure 17.7.
Figure 17.7. Setting the data source for a report through Report Manager.
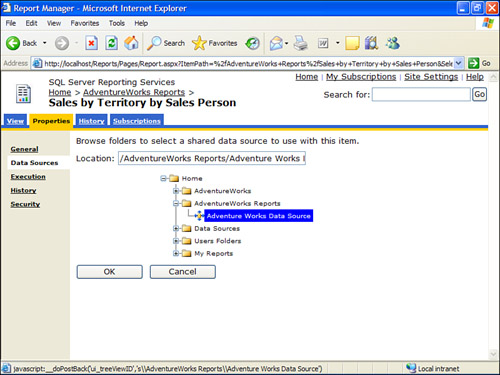
7. Click OK.
8. You should now be on the data source property window. Click Apply.
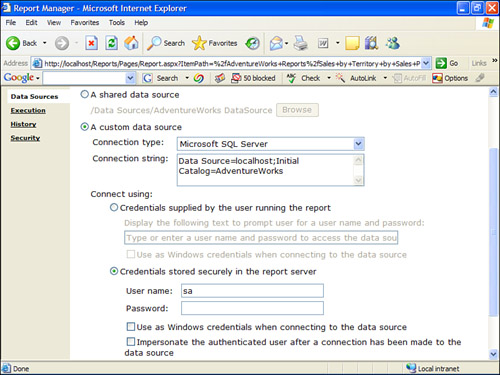
If you do not want to use the shared data source, you can choose to use a custom one.
Simply select Custom Data Source on the data source properties window and fill in the values for the data source properties just as you would have if it had been a shared data source. An example of this is shown in Figure 17.8. In place of using Windows security, it shows how to connect with a SQL Server logon and password. For simplicity’s sake, the logon is “sa”; however, in a production environment, you should use more granular permissions.
Figure 17.8. Defining a custom data source for a report through Report Manager.
Now if you click on the report, it should render inside the window.
Deploying Reports Through SQL Server Management Studio
Deploying reports through SQL Server Management Studio is not incredibly different from using Report Manager. The concepts are the same (as are the steps); the only difference is that you use a smart client tool instead of a web browser.
Creating a New Folder
Complete the following steps to create a new folder using SQL Server Management Studio:
1. Open SQL Server Management Studio.
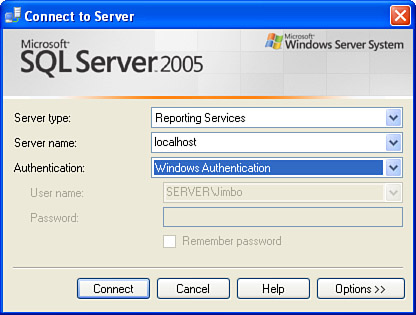
2. Change the server type to Reporting Services. See Figure 17.9.
Figure 17.9. Using SQL Server Management Studio to connect to SSRS.
3. Click the Connect button.
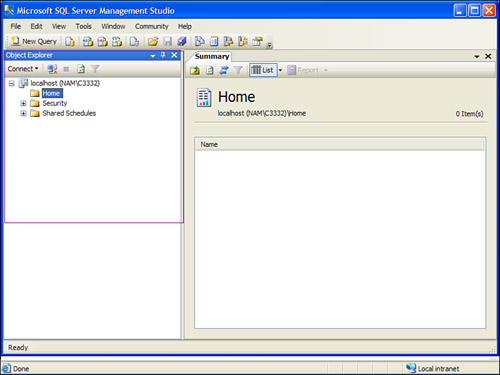
4. In Object Explorer, navigate to the Home folder, as shown in Figure 17.10.
Figure 17.10. SQL Server Management Studio’s Object Explorer.
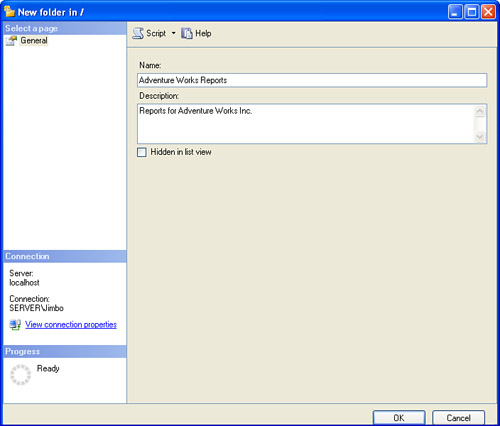
5. Right-click on the Home folder and select New Folder.
6. Change the Name field to AdventureWorks Reports.
7. Change the Description field to “Reports for Adventure Works Inc.” See Figure 17.11.
Figure 17.11. Adding a new folder in SQL Server Management Studio.
8. Click OK.
Setting Up a Data Source
SQL Server Management Studio can be used to create data sources, just like Report Manager. To set up a data source using SQL Server Management Studio, complete the following steps:
1. Right-click on the new folder and select New Data Source.
2. In the Name text box, enter AdventureWorks DataSource.
3. In the Description field, enter “Connects to the AdventureWorks database on the local SQL Server instance.”
4. On the Connection tab, select Microsoft SQL Server for the Data Source Type.
5. Enter the following connection string: Data Source=localhost;Initial Catalog=AdventureWorks.
6. Select Windows Integrated Security.
7. Your screen should look similar to Figure 17.12. Click OK.
Figure 17.12. Adding a new data source through SQL Server Management Studio.

Uploading a Report File
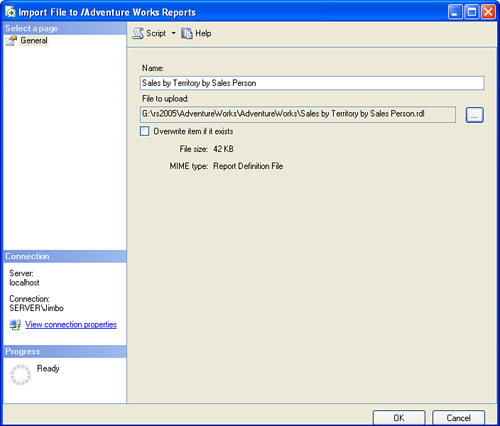
After creating the folder and adding a data source, you are now ready to upload the RDL files to the Report Server. Just like everything else so far, SQL Server Management Studio does not differ all that much in concept. Complete the following steps to upload a report:
1. Right-click on the Adventure Works folder, and select Import File.
2. Select the file to upload.
3. Your screen should look similar to Figure 17.13. Click OK.
Figure 17.13. Uploading a file through SQL Server Management Studio.
Changing Report Properties
Now that you have published the Adventure Works sample reports, let’s change some properties. Most report properties can be changed.
Basic Properties
To start modifiying properties, open any report by clicking on it. Then select the Properties tab and click the General tab (left side). See Figure 17.14.
Figure 17.14. Report properties.
You can modify the name or description of any report. Just enter the new name/description and click Apply.
Some other options include the ability to retrieve and update the RDL definition of a report. Ideally, you should store RDL files in some form of Source Control, such as Visual Source Safe or CVS. This helps not only with storage, but also with version control and history. However, because the RDL is stored in the ReportServer database, you can also choose to download it. To download the RDL file, click the Edit button and a File Download dialog box opens. If you want to update the RDL for any report, click the Update button.
Another obvious function is Delete, which deletes a report.
Many of the functions have equivalents in SQL Server Management Studio. They are all accessible through Object Explorer. First connect to the Report Server using SQL Server Management Studio. Then through Object Explorer, navigate to the reports. Most basic functions are available by right-clicking on the report, and they have similar names to that in Report Manager. Right-click on a report and select Edit to save the RDL. Right-click on a report and select Replace Report to update the RDL saved on the Report Server. Right-click a report and select Properties to change the name.
Moving Reports
The Move button allows you to move a report. To move a report, complete the following steps:
1. Click on the report to be moved and select the Properties tab.
2. Under General in the left menu, click the Move button.
3. Choose the new location from the treelist.
4. Click OK.
To move reports from the SQL Server Management Studio, do the following:
1. Open SQL Server Management Studio and connect to the Report Server.
2. In Object Explorer, select the report to be moved.
3. Right-click the report and select Move.
4. Click the “...” button.
5. Select the new location from the treelist.
6. Click OK.
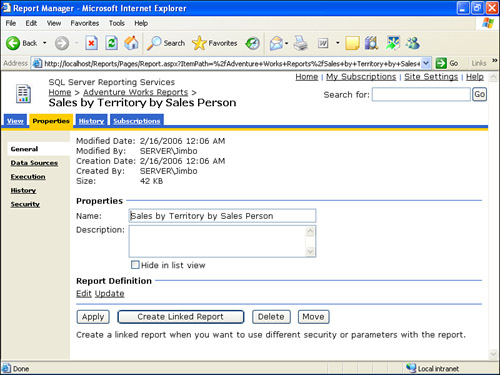
Linked Reports
A linked report is a “copy” of a report with a different set of parameter values or other properties. Linked reports share the same RDL definition with the source report, and, as such, when the parent reports’ RDL gets updated, the linked reports get updated as well. A single, nonlinked report can be the parent of any number of linked reports, but a linked report cannot be the parent of another linked report.
Linked reports may share the same RDL and data sources, but just about every other property can be modified. These include the following:
• Name and Description—Linked reports can have a completely different name and description. To the end user, it can look like a completely separate report.
• Location—Linked reports can exist anywhere in the catalog.
• Parameters—Linked reports can be used with a completely different set of parameter values from the originating report. This helps in presenting the linked report as a completely separate entity. This can also be the primary motivation for creating the linked report.
• Security—Different role assignments can be assigned to the linked report.
• Report Execution and Report History—The report execution and report history properties can vary from a linked report to the original.
• Subscriptions—Subscriptions to linked reports are completely separate than those of the parent.
After the linked report has been created, it can be treated like another item in the catalog. Linked reports can be deleted at will with no further repercussions. However, if the parent report of the linked report is deleted, all subsequent linked reports become invalid. At this point, either the linked report must be deleted or it must be pointed to a different report definition.
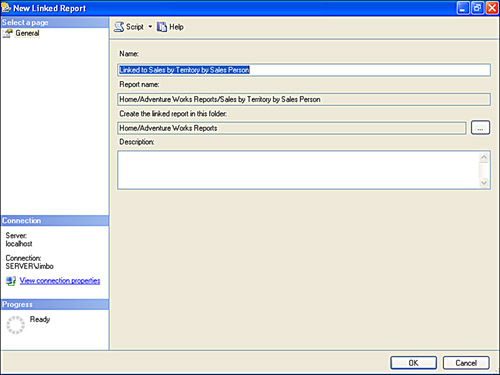
Creating a linked report is fairly straightforward, and it can be done through either Report Manager or SQL Server Management Studio. Complete the following steps to create a linked report through Report Manager:
1. Open the report and click the Properties tab.
2. Click the Create Linked Report button.
3. Enter a name and description. Just like any other report, the description is optional.
4. If you want to place the linked report in another folder, click the Change Location button and choose the new location.
5. When all the steps are complete, your screen should look similar to Figure 17.15. Click OK.
Figure 17.15. Creating a new linked report.

Creating a linked report through SQL Server Management Studio is essentially the same process. Here are the steps:
1. Open SQL Server Management Studio, and connect to the Report Server.
2. From Object Explorer, navigate to the report for which you want to create the linked report.
3. Right-click on it and select New Linked Report.
4. Enter a name for the new report, and, optionally, enter a description.
5. If you want to place the linked report in another folder, click the “...” button next to the Create Linked Report in This Folder option, and choose the new location.
6. Figure 17.16 show the completed screen. Click OK.
Figure 17.16. Creating a new linked report through SQL Server Management Studio.
Setting Report History and Snapshots
Most of the reports, including many of the samples, don’t really tax modern hardware. However, in some cases, there might be a report in production that could be hundreds of pages, or could tax the database server with expensive queries. In these cases, it would be helpful to be able to cache reports, so that the report-rendering engine and the database server don’t waste resources.
SSRS attains the preceding goals by retaining something called report history. The history is a collection of previously run reports called snapshots. A snapshot is a copy of the report at a point in time. If the report layout or data changes, the snapshot remains the same and does not reflect the update.
Report Server Settings to Affect Report History
There are two levels of settings when setting report history. The first level is Report Server-wide, and is accessible through the Site Settings link or by clicking on the server itself in Object Explorer through SQL Server Management Studio. The other settings are at the report level, and can override the sitewide settings.
The only global parameter for the Report Server as a whole is how many snapshots to keep in history. By default, the sitewide settings are set to keep an unlimited number of snapshots in history; however, most reports are set to run on the fly, and not set to render from a snapshot. If an administrator decided to change this value, the old snapshots would be deleted as the maximum number of snapshots is reached.
The rest of the settings for snapshots are set at the report level, and can be set either through the Report Server or through SQL Server Management Studio. To access the setting through the Report Manager, click the report, select the Properties tab, and select History. From SQL Server Management Studio, right-click on the report and select Properties and then select History.
The first option is Allow Report History to Be Created Manually.
This allows the New Snapshot button to appear on the History page in Report Manager. Using this button, users can then select to create a snapshot themselves.
The second option is Store All Report Execution Snapshots in History. This stores a copy of each snapshot in the report history. Users can then look back over time and see how the report has changed.
Another option allows users/administrators to generate report snapshots on a custom or shared schedule. The snapshots generated over time will help to form the history.
The last option defines how many snapshots are to be kept in history. This allows us to use the Report Server’s default setting or override it by allowing a limited number or infinite number of copies.
From a security perspective, users must have the Manage Report History task inside their roles to generate snapshots. The end users must also have the View Reports role to view the report history. Report snapshots are not meant for, and not recommended to be used on, a report that contains secure or confidential data. If a report uses a data source that prompts the user for a password, or one that requires integrated security, the snapshot cannot be created.
Creating Snapshots
Snapshots contain the following data:
• A copy of the resultset(s) brought back by the data sources of the report.
• The report definition at the time when the snapshot was created. Keep in mind that this will not take into account any recent changes.
• Parameter values that were used while processing the reports and/or query.
• Any embedded resources for a report. If the report relies on an outside resource, that resource is not saved on the RS database.
To add a snapshot using Report Manager, follow these steps:
1. Open the report for which you want to create a snapshot, and click the History tab.
2. Click the New Snapshot button, as shown in Figure 17.17.
Figure 17.17. Creating a snapshot.
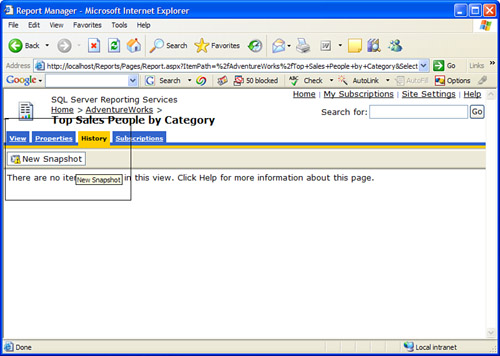
3. A new snapshot should appear, with the date it was created and the size.
To create a snapshot using SQL Server Management Studio, complete the following steps:
1. Using Object Explorer, navigate to the History folder under the report for which you want to create a snapshot.
2. Right-click the History folder, and select New Snapshot. See Figure 17.18.
Figure 17.18. Creating a snapshot through SQL Server Management Studio.
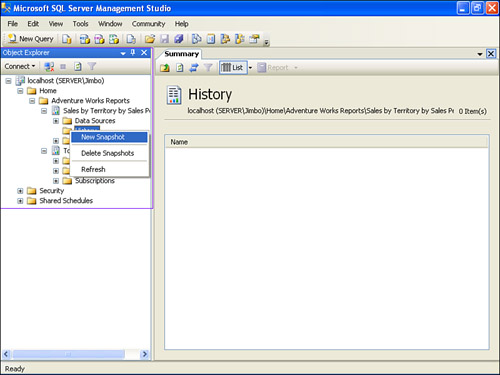
3. Right-click on the History folder again and select Refresh to make sure the snapshot appears.
Deleting Snapshots
After snapshots have been created, they can only be deleted—not modified. There are two ways to delete a snapshot.
The first way involves using either SQL Server Management Studio or Report Manager to delete individual snapshots in the report history. From Report Manager, navigate to the report and click the History tab. Then select the check boxes next to the individual snapshots and click the Delete button. From SQL Server Management Studio, use Object Explorer to navigate to the History folder under the report, right-click it, and select History.
Right-clicking on the History folder gives the user an option to Delete All Snapshots. Otherwise, right-click on an individual snapshot and select Delete.
The second way to delete snapshots is to simply lower the number of snapshots the Report Server should keep. This forces the older snapshots to be deleted as needed.
My Reports
The My Reports folder creates an individual workspace for each user in the Report Server. The individual users can use it for any number of things as they see fit. These might include storage space for reports in progress, or as a holding area for reports not yet ready to be published. There is no way for an administrator to control the size or amount of content end users choose to place in their My Reports folder.
The structure of the My Reports folder is somewhat analogous to the My Documents folder in Windows. Just like My Documents is a pointer to C:Documents and Settings..., My Reports actually points to a folder called /User Folders/<username>/My Reports. This folder doesn’t actually get created in the Report Server catalog until a user actually uses the My Reports feature.
Enabling My Reports
The My Reports feature is disabled by default in a new installation of SSRS. After being enabled, it is effective for the entire user base, meaning it cannot be enabled for some users but not others. A number of considerations must be considered before enabling it.
First, you need to consider server resources. My Reports is a powerful feature. It is effectively like giving end users access to a file share with unlimited space. In SSRS 2000, end users only had Visual Studio to create reports—a not-so-appealing option for many end users. Now with Report Builder, end users can easily create new reports to suit their needs and store them on the Report Server.
Second, you need to consider security. With the My Reports feature turned on, end users can create new security policies and publish reports for other users from the My Reports folder. This might at first seem helpful for administrators, but the propagation of security policies could prove difficult to manage later.
If an administrator chooses to enable the My Reports feature, it is a fairly straightforward process. Here are the steps to enable My Reports:
1. Using Report Manager, click the Site Settings option.
2. Check the Enable My Reports to Support User-Owned Folders for Publishing and Running Personalized Reports check box.
3. Select a default role to apply to each user’s My Reports folder. The default is a role called My Reports. See Figure 17.19.
Figure 17.19. Enabling My Reports.
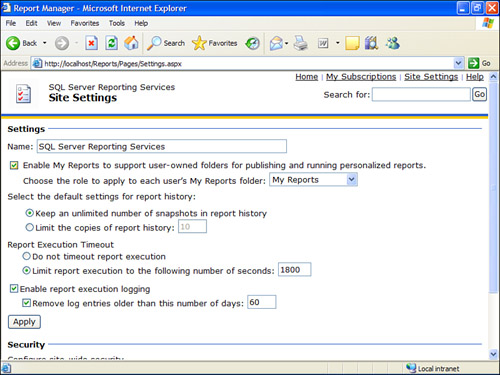
4. Click Apply.
From this point forward, a user will see the My Reports folder pop up under the root folder in the catalog. In addition, administrators will see the User Folders folder, along with their My Reports folder. Of course, a user cannot create a folder called My Reports at the root folder level. The name My Reports has been reserved.
Disabling My Reports
Should My Reports have to be disabled, simply deselect the check box under Site Settings. From this point forward, users can create a folder called My Reports; however, no special redirection occurs. Any actual folder that has been created under the User Folders folder will remain.
Summary
In this chapter, you have seen how to deploy reports through both Report Manager and Visual Studio. Report Manager allows end users the ability to set basic report properties and modify a report’s data source.
Report Manager also allows end users to link reports, move reports, and create report snapshots.
If administrators allow it, end users also can have their personal report repositories in their My Reports folders.