
Chapter 18. Securing Report Server Items
In This Chapter
• Reporting Services Security Model
• Defining Custom Roles
Because SSRS is a .NET application, many of the existing .NET security paradigms come into play when securing access to the Report Server. From the end user’s viewpoint, SSRS uses role-based authorization built on top of Windows authentication. If using a custom authentication mechanism, the underlying principals are the same. It is simply up to the authorization mechanism to define valid users and roles (called principals).
Reporting Services Security Model
Role-based authorization is not a new concept. It is a proven mechanism that is implemented in a variety of ways. One of the most common, everyday items that uses role-based authorization is the file system. If your PC’s file system is based on NTFS, you have the ability to place access control lists (ACLs) on certain folders. ACLs specify users or groups of users (generically called principals), permissions to read, write, or execute items within a folder, or the folder itself. If a folder does not have ACLs placed on it, the folder then simply inherits its permissions from the parent folder. The administrator of the computer can, of course, change access to certain folders, but is not allowed to place himself in the access pool.
Drawing from the file system’s paradigm, the SSRS security models it very similarly. Within SSRS, there are a fixed number of predefined roles, which can be assigned to users. These roles are used to give permissions to execute certain tasks on folders or other report items. Examples of some of the built-in roles include Browser, Content Manager, and System Administrator.
When SSRS installs, it sets up the local administrator pool with the System Administrator and Content Manager roles.
This is the absolute minimum security that can be applied. SSRS requires that at least one principal, a valid user or group, be assigned to the System Administrator role, and likewise to the Content Manager role. This ensures that the Report Server cannot be locked out from the outside.
There are no users added. Users cannot interact with the Report Server until someone in the local Administrators group assigns them to either one of the predefined roles, or a custom role.
When the time comes to start adding users, administrators have the choice to add users to a certain role, or to many roles. Users can even have different permissions on different report items. For example, a user might be a Content Manager, which allows the user to publish reports, in one folder, yet only be a Browser (read only) in another folder.
As mentioned in the chapter introduction, SSRS uses Windows authentication by default. The list of valid users and groups rests in the hand of the authentication services. When a user or group (referred to as a principal from this point forward) is added to a role, the principal is validated against the authenticating authority.
On a Report Server, authentication through the Windows security extension (default method) is performed by IIS. The user and group accounts that you specify in role assignments are created and managed through Active Directory.
If a customer security extension is used, it is up to the extension to validate the principal.
What Can Be Secured?
Although it might not be the most efficient approach, the reality is that just about every report item can be secured individually. Some things that don’t follow this rule are subscriptions and schedules because they are used in conjunction with a report and not as an independent part of it. Table 18.1 describes how report items and their security work.
Table 18.1. Report Items and Effects of Security

How Role Assignments Work
To continue with the file system analogy, one has to ask what are we actually putting limits on? The answer is who can read, write, and execute on objects within the file system. A cursory glance at Table 18.1 gives a similar perspective. By securing a report item, you are actually putting limits on what actions can be taken using that item. The actions are called tasks in SSRS.
SSRS comes with 25 different tasks. Tasks cannot be added to or taken away from. Table 18.1 has already mentioned the names of a few tasks, such as View Reports and Manage Reports.
Tasks themselves actually encompass a set of underlying permissions. For example, the Manage Folders task actually gives the end user the ability to create, delete, update, and modify a folder and its properties. If a user visits the Report Manager without the permissions to Manage Folders, none of the buttons or UI elements will be enabled.
The underlying permissions are nice to know about, but not very practical, as task is the lowest level of assignment. To get assigned permissions to complete an operation, the permissions have to be implemented into a task. The task or tasks have to then be placed in a role to be performed. Hence, if the View Models task is not included in a role, or the role is not included in a role assignment, users cannot view report models.
Tasks themselves come in two different categories, as follows:
• Item-level tasks—Tasks that act on an item in the Report Server catalog, such as folders, models, reports, and resources
• System-level tasks—Tasks that can be performed on objects that are not in the catalog but are global in scope, such as site settings and shared schedules
As you might have already guessed, the role is the central tenet of role-based security. Roles are collections of tasks. SSRS comes with a few predefined roles, but administrators can also create roles to suit their needs. A single role can only contain one of the two task types, that is, either item-level tasks or system-level tasks. Because of this, there are item-level roles and system-level roles. A role is only active when it is assigned to a user.
When a user tries to perform an action, the Report Server checks what permissions are required to perform that action. The required permissions are expressed in the roles required for access. It then checks to make sure that the user requesting the action has sufficient privileges to perform that action. Again, the easiest way is to check if the user is either a member of the specified role, or if the roles contain the required tasks and, hence, permissions.
Relationships Between Roles, Tasks, and Users
The relationship between items that need to be secured, roles, and users is called a policy. The policy is what is responsible for mapping out the minimum set of permissions required for securing a report item. An individual policy is a mapping of users or groups (principals) with a required role needed for access. Each item in the catalog can have multiple policies defined; however, no single item can have two policies that apply to the same principal.
For example, suppose you have a user named George and you need to grant George access to view reports in the Adventure Works folder. To do so, you specified that George can have the Browser role. After doing this, you created a policy. The policy can be modified by granting more roles to George, hence increasing George’s permissions to, for example, Content Manager; however, you cannot create a second policy with George. What you can do is create a group, for example “Adventure Works Content Managers,” and place George in that group. You can then give the group the role of Content Manager.
So, in the end, what are George’s permissions? Well, because roles are really nothing more then a collection of tasks, George can perform all the tasks that Content Managers and Browsers can perform. This is why the policies are called additive.
By this point, you are probably thinking that security is a lot of trouble. If every item can have a policy, and polices are additive, granting permissions can quickly get out of hand. The thing to remember here is that just because you can do something doesn’t mean that you should.
When you apply a policy to a folder, or some other items, you are, by default, applying the same policy to children of that folder/item. This makes it easy to change and apply policies. The recommended best practice is to secure folders within the Report Server catalog. By securing the folder, administrators are securing everything within that folder. This is the same model used in NTFS. Every child item of a folder automatically inherits the parent folder’s permissions. Whenever an item’s permissions need to change, just break the inheritance and SSRS starts a new policy with that item.
Overview of Built-In Roles
For most organizations, the built-in roles should suffice. If they do not, keep in mind that the Report Server administrators can create custom role definitions. If you need to create a custom role definition, it might be helpful to stage that role definition in a development environment.
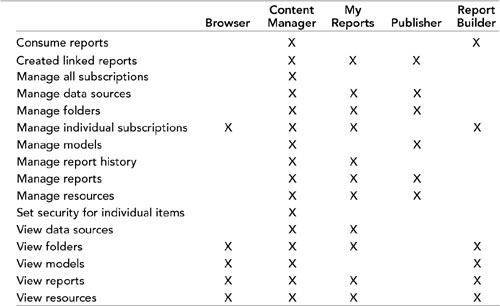
Tables 18.2 and 18.3 describe the predefined roles and their corresponding tasks. Keep in mind that when a task is called “Manage...” that it implies the ability to create, modify, and delete.
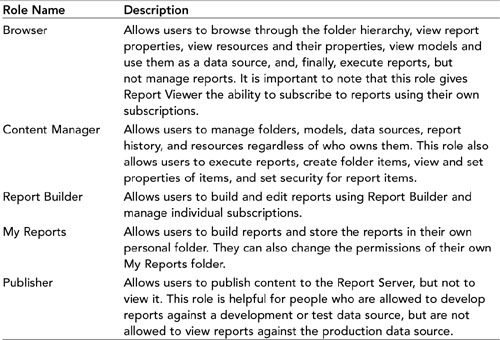
Table 18.3. Tasks Assigned to Item-Level Roles
There are two built-in, system-level roles. These roles follow the same pattern as the item-level roles in that one role allows view access to systems settings, and the other allows them to be modified. Keep in mind that you can also create new system-level roles. Tables 18.4 and 18.5 break down the system-level roles and tasks.
Table 18.4. System-Level Roles
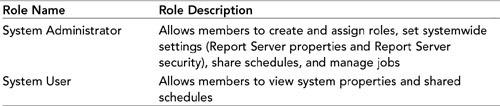
Table 18.5. Tasks Assigned to System-Level Roles

After the Report Server is installed, the local Administrators group is assigned two roles. The first role is the Content Manager, and the second is the System Administrator role. Individually, the roles limit access to certain areas. The Content Manager role can manage everything within the Report Server catalog.
System Administrators can manage the Report Server. With the combination of these two roles, local administrators are able to do anything to the Report Server.
Assigning Built-In Roles
First, to use any method of authorization, you need to create some principals. As an example, you will use some Windows Groups: AdventureWorksSalesManagers and AdventureWorksSalesPeople. Go ahead and create these Windows groups on your Report Server, and place some users in them. The examples assume that the Adventure Works sample reports have been published to the Report Server and that there are two folders. There might be three folders if you have published the sample report model.
You can assign roles to an object either through the Report Manager website or through SQL Server Management Studio. The following sections cover steps to assign roles through the Report Manager.
Assigning Roles Through Report Manager
Role assignments can be done through either Report Manager or SQL Server Management Studio. Complete the following steps to assign roles through management studio:
1. Navigate to the Adventure Works Sample Reports folder.
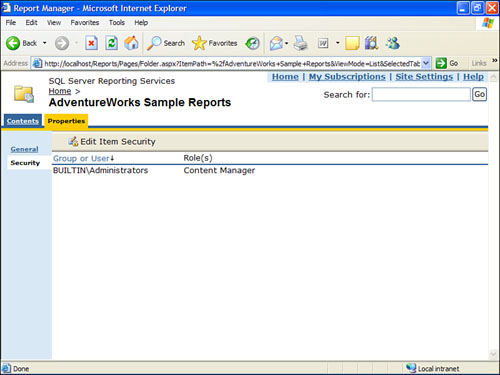
2. Click the Properties tab. Then select Security from the left menu. The screen should resemble Figure 18.1.
Figure 18.1. Item security on the Properties tab.
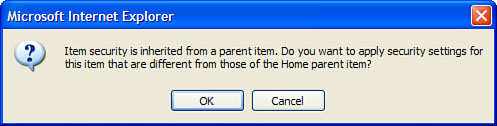
3. Click the Edit Item Security button. A dialog box opens that looks similar to Figure 18.2. Click OK in this dialog box.
Figure 18.2. Confirmation dialog box to break security inheritance.
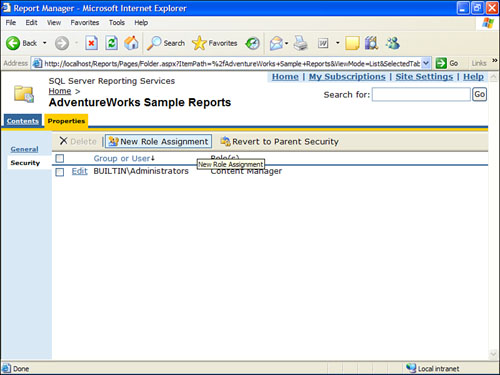
4. Click the New Role Assignment button, as shown in Figure 18.3.
Figure 18.3. New Role Assignment button.
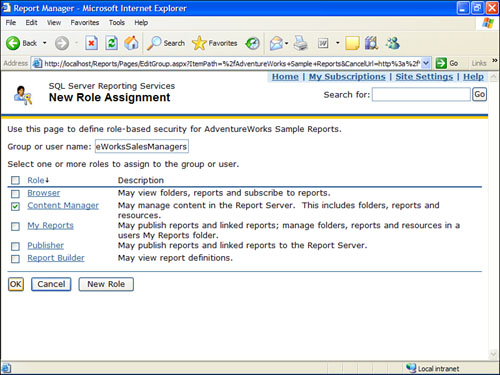
5. Enter AdventureWorksSalesManagers in the Group or User Name text box, and select the Content Manager role, as shown in Figure 18.4.
Figure 18.4. Granting AdventureWorksSalesManagers Content Manager roles.
6. Click OK.
To revert back to the parent security, click the Revert to Parent Security button, as shown in Figure 18.5.
Figure 18.5. Revert to Parent Security button.

To modify an item’s security, select a user or group by clicking the Edit check box next to the assigned principal under Security (on the left). This returns you to the role assignment screen, where roles can be added or removed.
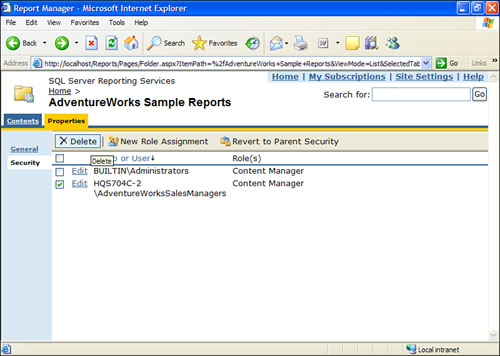
To delete a role assignment, select the check boxes next to the principals to delete, and select the Delete button. Figure 18.6 illustrates how this can be done. A confirmation box appears asking users to confirm deletion of the item(s). Click OK.
Figure 18.6. How to delete a role assignment.
To give Adventure Works’ sales managers some visibility into the inner workings of the Report Server, let’s outline the steps required to give the group the System Users role.
1. Click Site Settings.
2. Under Security, select Configure Site-wide Security. Figure 18.7 shows the resulting screen.
Figure 18.7. System Role Assignments screen.
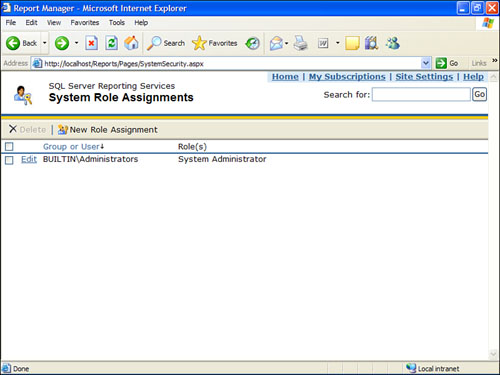
3. From here, it is very similar to setting item-level security. Select the New Role Assignment button.
4. Enter AdventureWorksSalesManagers in the Group or User Name text box, and select the System User role, as shown in Figure 18.8.
Figure 18.8. Adventure Works Sales Managers as System Users.
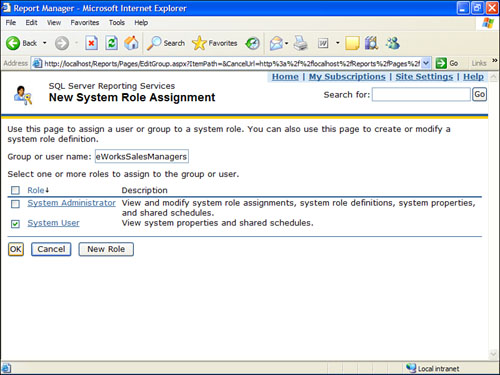
5. Click OK.
Assigning Roles Through SQL Server Management Studio
Everything we have just done could just as easily have been done through SQL Server Management Studio. Complete the following steps to add item-level security through SQL Server Management Studio:
1. Open SQL Server Management Studio.
2. Click File and then Connect Object Explorer.
3. Change the server type to Reporting Services.
4. Click the Connect button.
5. In Object Explorer, right-click on the Adventure Works Sample Reports folder under Home, and select Properties.
6. Select the Permissions page.
7. Click the Add Group or User button.
8. Enter the name of the group in the text field, and click OK.
9. Select the Content Manager role for the AdventureWorksSalesManagers group. The screen should look similar to Figure 18.9.
Figure 18.9. Assigning permissions through SQL Server Management Studio.
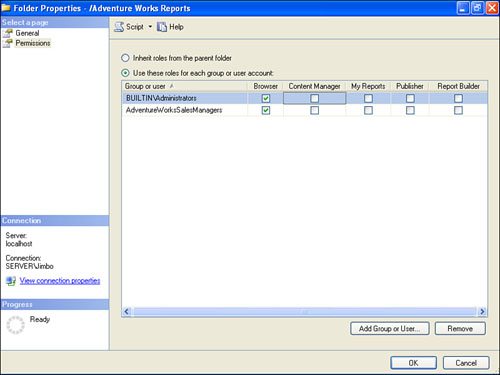
10. Click OK.
System-level roles can also be assigned with SQL Server Management Studio. The following steps grant the System User role to the AdventureWorksSalesManagers group:
1. Open SQL Server Management Studio.
2. Click File and then Connect Object Explorer.
3. Change the server type to Reporting Services.
4. Click the Connect button.
5. In Object Explorer, right-click on the server name and select Properties.
6. Select the Permissions page.
7. Click the Add Group or User button.
8. Enter the name of the group in the text field, and click OK.
9. Select the System User role for the AdventureWorksSalesManagers group.
10. Click OK.
To modify a role assignment, follow the steps to get to the appropriate property window. From the property window, select Permissions and update the lists of tasks. To delete a role assignment, select the role from the property window, and click the Remove button.
Defining Custom Roles
SSRS allows administrators to create custom-defined roles to suit individual needs. This can be a very helpful feature for organizations that desire a finer degree of granularity, or if the built-in roles simply do not suffice. Administrators can also modify any existing role.
Before jumping into creating new roles, a quick word of caution: It is very easy to get carried away with creating custom roles. There might only be 25 tasks altogether (16 item level and 9 system level), but there are many different combinations you could create. At this point, the Manager role might be just as cumbersome as managing individual tasks.
Creating/Modifying a Custom Role
One of the role SSRS lacks is a true “view only” type of role. The following steps outline how you could use Report Manager to create such a role. Later, you will use SQL Server Management Studio to do the same thing.
1. Open Report Manager, and select Site Settings from the upper-right side.
2. The process for creating an item-level role versus a system-level role is identical, so simply select Configure Item-Level Role Definitions or Configure System-Level Role Definitions. For this example, select Configure Item-Level Role Definitions.
3. Click the New Role button.
4. Enter View Only Role in the Name text box and “May View reports but not subscribe to them” in the Description field, as shown in Figure 18.10.
Figure 18.10. New View Only role.

5. Select View Folders, View Models, View Reports, and View Resources from the tasks, as shown in Figure 18.11.
Figure 18.11. Tasks to assign the View Only role.
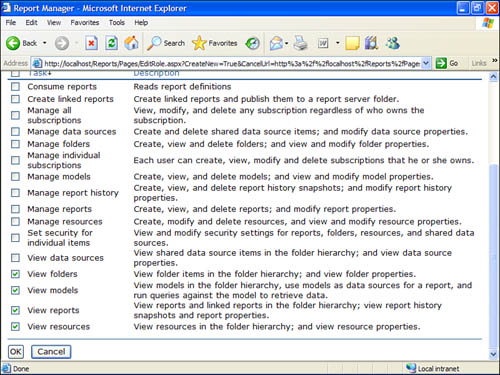
6. Click OK.
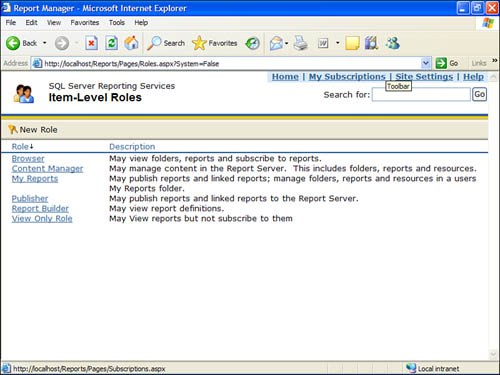
Figure 18.12 shows how the new role functions just like any of the predefined roles.
Figure 18.12. New View Only role functions just as the built-in roles.
To modify a role, simply click on the role name after selecting Configure Item-Level Role Definitions or Configure System-Level Role Definitions. Update the list of tasks, and then click OK.
To delete a role, follow the same processes as modifying the role, except click the Delete button at the bottom of the screen. Click OK when it asks you to confirm.
Managing Roles with SQL Server Management Studio
The following steps create a new View Only Role using SQL Server Management Studio:
1. Open SQL Server Management Studio.
2. Click File and then Connect Object Explorer.
3. Change the server type to Reporting Services.
4. Click the Connect button.
5. In Object Explorer, open the Security folder. At this point, if you want to create a system-level role, open the System Roles folder; otherwise, open the Roles folder.
6. Right-click the Roles folder and select New Role from the context menu.
7. Enter View Only Role in the Name text box and “May View reports but not subscribe to them” in the Description field.
8. Select View Folders, View Reports, View Models, and View Resources from the tasks.
9. Click OK.
To modify a role, right-click on any role and select Properties. The same screen appears as for adding a new role. Update the task list and/or description and select OK. To delete a role, select the role from Object Explorer, right-click the role, and select Delete from the context menu.
Summary
SSRS uses role-based security in a similar fashion as Windows itself. Roles are groups of tasks. SSRS contains two different types of tasks—system-level tasks and item-level tasks. Item-level tasks are actions that affect the catalog, such as View or Browse. System-level tasks are actions that can be taken on items outside the catalog, but are global in Report Server scope such as shared schedules.
The combination of principal, item, and role is called a policy. Every item in the catalog can either have a policy defined for it explicitly or will inherit the parent item’s policy.
If the built-in roles do not suffice, the administrator is free to make his own.