In this section:
Customizing the Ribbon
Customizing the Quick Access Toolbar
Customizing the Work Area
Creating Macros
Safeguarding a Document
Recovering Unsaved Versions of a File
Restricting Access and Changes to a Document
Digitally Signing a Document
Protecting a Document with a Password
One of the great things about Microsoft Word 2010 is that not only does it pack a lot of power into the various features and tools at your fingertips, but it also allows you to customize those tools so you have just what you want nearby when you want it. You can easily customize the ribbon by adding tabs, tab groups, and tools; you can customize the Quick Access Toolbar by changing the tools it displays and changing where in the document window it appears. What’s more, you can change other preferences, such as the way the screen looks, the way your files are saved, and much more.
Another important story in Word 2010 is the enhanced security that occurs largely without your even noticing it. Behind the scenes, Word 2010 is working to ensure that the files you receive and open have been checked—thoroughly—for any possible risk. You can set the types of files you want to be blocked in your version of Word and tell the program when you want Protected View to intervene and safeguard your files and when it’s okay to open them directly. These security features—and more—are the topic of this section.
You probably remember all the excitement around the introduction of the ribbon, which was offered for the first time with Office 2007. Some people were thrilled, others were dismayed, and most Word users simply figured out how to master the interface and gradually grew to like it. Word 2010 includes a new feature that is huge to Word users who want to have within clicking distance the tools they use most often. Now you can customize the ribbon to include tabs you create. And you can add your own groups and tools to those tabs in whatever order makes sense to you.


Tip
If you use more than one computer and want to use your customized ribbon on another machine, click the Import/Export button in the lower-right corner of the Customize Ribbon dialog box. Choose Export All Customizations to create a file you can add to other computers. When you move the file to the new computer, use Import Customization File to import your changed ribbon settings.

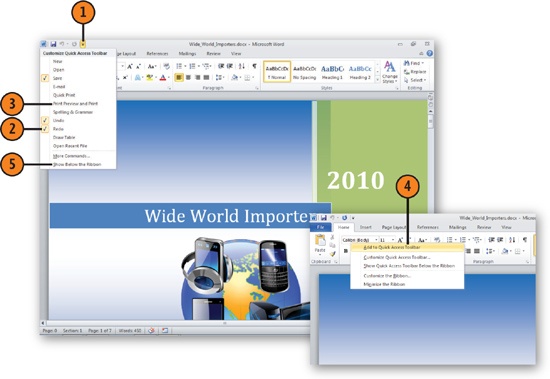
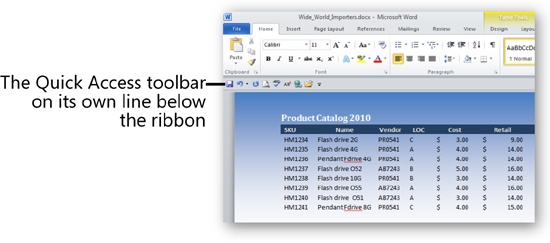
The Quick Access Toolbar makes it easy for you to have the tools you want to access quickly nearby no matter which Word tabs you may be using. If you put so many items on the Quick Access Toolbar that it becomes too big to fit on the title bar, you can move it to its own line.
Click the down arrow at the right of the Quick Access Toolbar.
On the Customize Quick Access Toolbar menu, click any checked items that you want to remove from the toolbar.
Click any unchecked items that you want to add to the toolbar.
Right-click any item anywhere on the ribbon that you want to add to the toolbar, and choose Add To Quick Access Toolbar from the shortcut menu.
If the toolbar becomes too large to fit on the title bar or if you want to change the location of the bar, click the down arrow at the right of the toolbar and click Show Below The Ribbon on the menu.
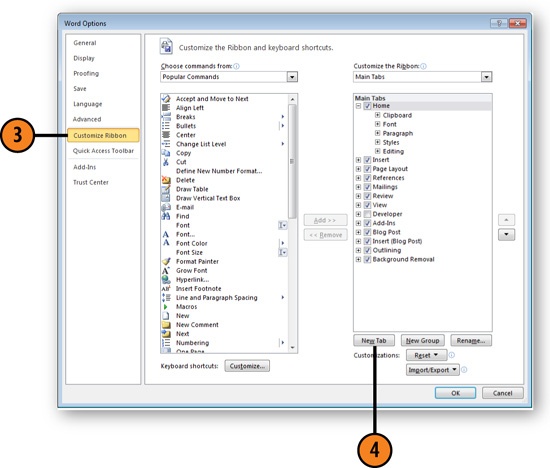
Click the Quick Access Toolbar arrow and click More Commands to display the Word Options dialog box with the Customize Ribbon category selected in the left pane.
Specify the category of commands you want to select from.
Click a command you want to add to the toolbar.
Click Add.
To remove a command you don’t use, select it and click Remove.
To change the order in which commands will appear on the toolbar, click a command and use the up or down arrow to move the command.
Repeat steps 3 through 7 to make any further customizations to the Quick Access Toolbar; click OK when you’ve finished.

Tip
You’re not limited to “standard” Word commands. You can include styles, fonts, and macros on the toolbar.
Tip
When you change the Quick Access Toolbar, the changes you make appear in the toolbar in all your documents. If you want to use that version of the toolbar in the current document only, display the Word Options dialog box, click Quick Access Toolbar, and click the Customize Quick Access Toolbar arrow and choose the name of your current document. Click OK to save your changes.
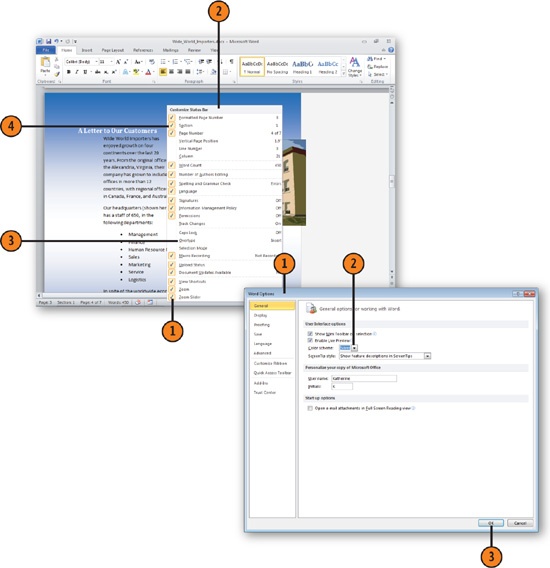
The work area is where you create, edit, format, and fine-tune the documents you create in Word 2010, so you may want to customize it to fit your own preferences. You can show or hide items on the status bar, set the ribbon to appear only when you need to use it, change the overall color scheme for the window, and so on.


Try This!
With the ribbon displayed, double-click the active tab to minimize the ribbon, and then click any tab to display the ribbon temporarily. Click in your document to minimize the ribbon again. Double-click the active tab to redisplay the ribbon. Press Ctrl+F1 to hide the ribbon, and press Ctrl+F1 again to always display the ribbon.
If you want to save your documents in specific folders, you can have Word change the places your files are saved by default. You set file locations and formats using the Word Options dialog box. What’s more, you can choose to save your Word files in a previous version if you like, in case you work with peers and friends who are using a previous version of Word. (Note, however, that if you work in a version of Word prior to 2007, many of the new features—including artistic effects, collaborative tools, and more—won’t be available in the earlier format.)
Click the File tab, click Options and click Advanced. Scroll down to the General area and click the File Locations button to display the File Locations dialog box.
Click the item whose location you want to change.
Click Modify, and, in the Modify Location dialog box, locate and select the folder that you’re designating as the new location; click OK.
Specify the location for any other file types and click OK when you’ve finished.
Click the Save category.
Select the default format in which you want to save your documents.
Click OK to close the Word Options dialog box.


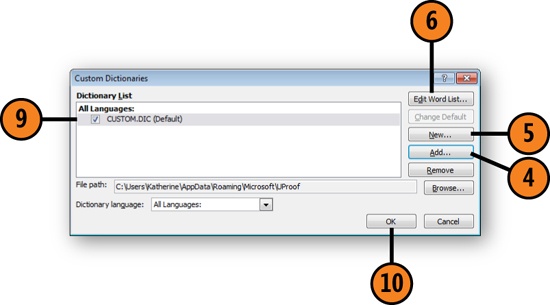
Word 2010 enables you to use one or more dictionaries to check your spelling. When there’s a word in your document that’s correct but that Word doesn’t recognize—a name, an address, or an unfamiliar technical or scientific term, for example—you can tell Word to add that word to your custom dictionary. If you already have a custom dictionary that includes many of the words you want Word to recognize as correct, you can add that dictionary to the list of dictionaries that Word is using. Now in Word 2010 you can also choose a dictionary in another language if you are translating or editing in a language other than English.
Click the File tab and click Options to display the Word Options dialog box.
Click Proofing.
Click the Custom Dictionaries button to display the Custom Dictionaries dialog box.
If you have an existing dictionary that you want to use, click Add; in the Add Custom Dictionary dialog box that appears, locate the dictionary file. Click Open.
To create a dictionary by adding entries, click New, use the Create Custom Dictionary dialog box to name the dictionary file, and click Save.
To add or delete words in a dictionary, select the dictionary, and click Edit Word List.
Click Add and type a word, or select a word you want to remove and click Delete.
Click OK.
Verify that the dictionaries you want to use are checked and those you don’t want to use aren’t checked.
Click OK.


You can automate procedures you follow often by creating a macro to record the keystrokes and menu selections and then playing them back by pressing a single key combination. For example, you could create a macro by recording the replacement of a phrase and/or a style using the Replace command. Then you can run that macro to modify other documents. Regardless of the complexity of your macro, you can run it as though it were a single Word command.
Click the View tab, click the Macros arrow in the Macros group, and choose Record Macro to display the Record Macro dialog box.
Type a name for the macro. (The name must begin with a letter and can’t contain any spaces or symbols.)
Choose whether you want to assign the macro to a button or the keyboard.
Specify where you want to store the macro and type a description.
Click OK.
Execute the series of actions you want to record as a macro, using your keyboard to select text and to move the insertion point. (Note that other than when you click a command, most mouse actions aren’t recorded.)
When you’ve completed the series of actions, click the Macros arrow again and choose Stop Recording.
Click Macros to display the Macros dialog box, select the macro you just recorded and click Run to make sure the macro performs correctly.


Today you just can’t be too careful about the files you accept and download from the Internet. Every computer user needs some sort of antivirus program that scans incoming files for potential threats and keeps your computer safe from attack. Word 2010 includes improved security features that evaluate files before you open them and then prompting you if something unrecognized is found.
One area developers found vulnerable to attack occurs when you open a file saved in a previous version of Word. To safeguard this process, Word now includes a security check that goes on behind the scenes when you open a new document. The file must pass a series of checks—called a file validation process—before it is considered a safe file. If Word 2010 finds anything suspicious, the document is displayed in Protected View.
Word 2010 shows you that a file is in Protected View by displaying a message bar across the top of the work area. If you know the sender of the file or are certain the file is safe, you can click Enable Editing to remove the protection and edit the file normally. You can change which files Word 2010 flags for protection by changing the settings in the Trust Center.

You use the Trust Center to set up your preferences for the way your files are opened, shared, and protected. You can create lists of trusted publishers, documents, and locations that don’t have to be authenticated each time you receive a document from them.
You’ll find the Trust Center by clicking the File tab and clicking Options. At the bottom of the category list, click Trust Center and then click Trust Center Settings. The Active X tab opens by default so that you can review those settings. The following table explains each of the categories in the Trust Center and explains how you can use those options to safeguard your files.

Category | Description |
|---|---|
Trusted Publishers | Enables you to create a list of publishers you trust so that any content you receive from the publisher is opened freely without restriction. |
Trusted Locations | Gives you the ability to create a list of trustworthy locations—for example, share folders and SharePoint Workspaces. |
Trusted Documents | Creates a list of documents you have specified as trusted. After a document is marked as trusted, macros and all content is enabled automatically. |
Add-Ins | Enables you to specify whether any application add-ins must be signed by a trusted publisher. |
Active X Settings | Lets you choose whether ActiveX controls will be allowed to play in regular mode or in safe mode. You also set the level of restriction for the running of the controls. |
Macro Settings | Sets whether macros are automatically disabled or enabled. |
Protected View | Enables you to choose the situations in which Protected View is used. |
Message Bar | Lets you show or hide the Message Bar. |
File Block Settings | Gives you the ability to choose whether specific file types are blocked from being open or saved. |
Privacy Options | Lets you set privacy options for the current file. |
You can tell Word 2010 which file types you want to validate before opening the files. This controls when Protected View is used to safeguard files that you are opening. You can choose that files be checked when you open a file, save a file, or both. The following table introduces the different settings you can choose for file validation.
Click the File tab and click Options to display the Word Options dialog box.
Click Trust Center.
Click the Trust Center Settings button.
Click the File Block Settings category.
Click to clear the check mark in any file type you don’t want to check.
Click to add a check mark in the Open and Save columns for those file types you do want to check.
Click OK.

Setting | Description |
|---|---|
Do Not Open Selected File Types | The selected files are blocked and will not be opened. |
Open Selected File Types In Protected View | Opens the selected file in a safe mode that is protected from other files and processes. |
Open Selected File Types In Protected View And Allow Editing | Opens the selected file type in safe mode but allows the user to edit normally. |
The Protected View message bar appears when you have tried to open a file that has either been blocked or has been determined to be in a file format flagged for blocking. If you want to see the contents of the file or know the person or company who sent it, you can open the file in Protected View. Protected View is a safe mode that enables you to view the file without it potentially affecting your other files. When you know the file is okay, you can click Enable Editing to open the file normally.
Word 2010 enables you to choose when Protected View is used for your files. You’ll find the settings for Protected View in the Protected View category in the Trust Center.

Office 2010, like its predecessors, makes it easy for you add passwords to your Word, Excel, and PowerPoint files. Now in Office 2010, you can add encryption to your password to ensure that your file is as secure as possible.
Click the File tab.
In the Info tab, click Protect Document in the Permissions area.
Click Encrypt with a Password.
Enter a password and click OK.

Tip
You can also set the password during the Save As process by clicking (in the Save As dialog box) the Tools arrow, choosing General Options, and entering the password required to open the file. If you plan to share the file with others, you can enter a separate password that you share with co-authors to enable modification and file sharing.
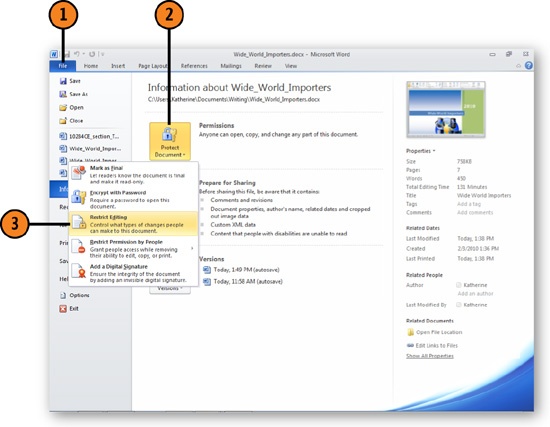
Not only do you need to make sure that the files you open are safe, but you also need to be able to protect the files you create so that people can change only what you want them to change in the file. You can set protection levels on individual files that make it possible for you to limit editing in a document, for example, or protect sections or the structure of a worksheet, so that others’ ability to change the content of the file is limited.
Click the File tab.
In the Info tab, click Protect Document.
Click Restrict Editing to control the types of editing that can be done in the file.
Click the Allow Only This Type Of Editing In The Document check box.
Click the type of change you want to allow.
Indicate who these changes apply to.
Click Yes, Start Enforcing Protection.

Tip
You can also limit the access others have to your files by restricting the permissions they have based on their role. The Restrict Permission By People option in the Protect Document settings in the Info tab (in Backstage view) enable you to choose the group of people who you want to give access to your document.
Tip
Word gives you the option of adding a digital signature to your document to verify a document’s integrity. The digital signature feature in each of these applications requires a signature service from a third-party vendor. You can begin the process by clicking Add A Digital Signature in the Protect Document selection of the Info tab, and a prompt will offer you the option of finding a signature service on Office Marketplace. Note that Protect Document is not available if you are using Compatibility Mode—you must first save the document as a Word 2010 file before Protect Document becomes available.
Have you ever made great changes to a document and then accidentally closed the file without saving? One of the great new safety-net features in Word 2010 is your file is saved for you in case you forget. Because the program stores your unsaved files automatically, you can return to a previous version if you need to find information you accidentally deleted or items you revised in error.
Click the File tab.
Click Manage Versions.
Click Recover Unsaved Versions.
Select the file you want and click Open.

