In this section:
What’s Where in Word?
Checking Out Word Views
Creating a New Document
Starting with a Template
Working with an Existing Document
Introducing Backstage View
Adding Content
Adding Hyperlinks
Printing a Document
Getting Help
So what kind of document are you in the mood to create? Microsoft Word 2010 makes it easy for you to design, print, and share professional-looking letters, reports, newsletters, postcards—almost any document you can imagine, you can produce in Word 2010. The screen is organized so that you can find everything easily; the ribbon offers just the tools you need as you work with different objects on your page.
This section gives you a whirlwind tour around the Word 2010 window and introduces you to the basic skills you’ll need as you create your content. You discover how to navigate the Word 2010 ribbon and add text, view your document, find what you’re looking for, translate phrases and sections, and print what you create.
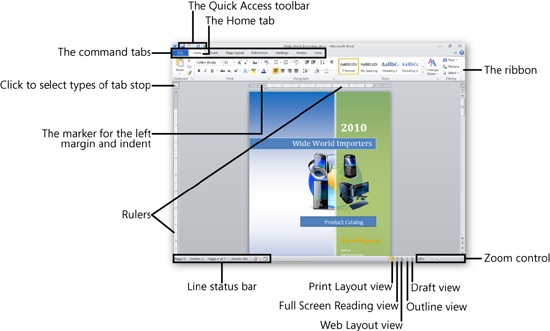
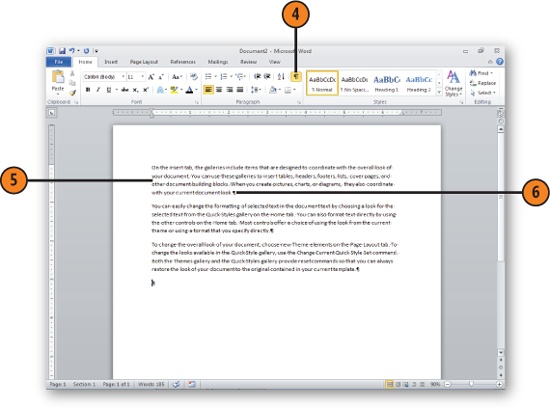
The Word 2010 window is simple to navigate and easy to use. All the tools you need are within reach, and the program offers a number of views you can use to get different perspectives on the document you’re creating. When you first start the program, your document window appears in Print Layout view. Exploring the Word window takes only a few clicks of the mouse. The following two screens give you a sense of the common elements you are likely to see often and show you the different views you can use as you work.
To help keep the screen uncluttered and the tools easy to find and use, Word brings you just the tools you need when you need them. For example, when you click a picture in your document, the Picture Tools contextual tab appears. Likewise, reviewing tools are available only when you are working with a document that includes tracked changes.

Word 2010 gives you a number of different views you can use as you work with your document in different ways. By default, Print Layout view appears when you start Word; in this view you see the page as it will appear when you print it. Other views make it easy for you to see how your content will look online, review the outline of your document, or display your document in a quick reading view that enables you to scan the text quickly.

Full Screen Reading view enables you to review a document in a maximized window so that you can do more reading and less scrolling. In Full Screen Reading view, you can add comments, highlight content, translate phrases, and more. You cannot do any editing in this view, however.
Web Layout view makes it easy for you to see how your document will look formatted as a Web page. The big difference between this view and Print Layout view is that you will not see the divisions between the individual pages in your document.
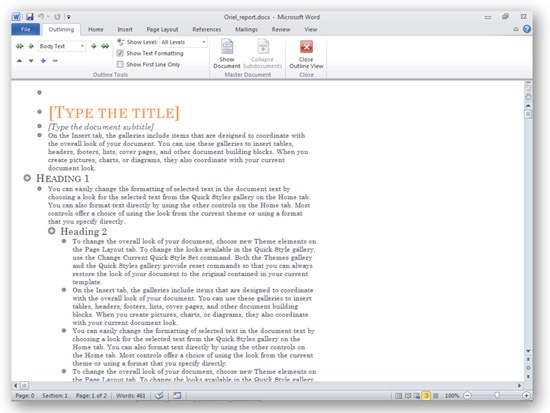
Outline view enables you to see how your document looks when it is displayed according to the various outline levels you’ve established for your text. You can choose whether to display the text formats—for example, displaying headings in the font size and style they have in the document—or choosing to display text only. You can also move text up and down levels in the outline while you work in Outline view.

Draft view removes a lot of the bells and whistles in the display in Print Layout view and enables you to focus on only your text and pictures. In Draft view you don’t see the page divisions that are present in Print Layout view, but you can see pictures, revision marks, tables, and diagrams you create.
Launching Word requires just a couple of clicks of the mouse. The Word window opens with a new blank document, ready for your content. If you’ve been experimenting and Word is already running, you can open a new blank document with a few mouse clicks.
Click the Start button and click All Programs.
Click Microsoft Office, and click Microsoft Word 2010.
If you are already working in Word, start a new document by clicking the File tab and clicking New. Click Blank Document and click Create.
In the blank document, click the Show/Hide tool in the Paragraph group of the Home tab. This shows paragraph marks, spaces, and tabs in your text as you type.
Type your text. When you reach the end of a line, keep typing. Word automatically moves, or wraps, the text to the next line.
Press Enter to begin a new paragraph.


See Also
Correcting Your Spelling and Grammar for information about working with the spelling and grammar checkers.
Choose a folder where you want to store the file, or if you want to save the file to your default location, click Hide Folders.
Type a name for the document in the File Name box. File names can be as long as 250 characters and can include spaces, but you can’t use the / * ? <>or | characters.
Click Save.
Continue working on the document, saving your work frequently by clicking the Save button or pressing the keyboard shortcut Ctrl+S.

Tip
After you’ve saved your document for the first time, the Save As dialog box won’t appear for subsequent saves. To save the document using a different location, name, or file format, click the File tab and click the Save As button.
See Also
Word’s File Formats for information about using a different file format to save your document.
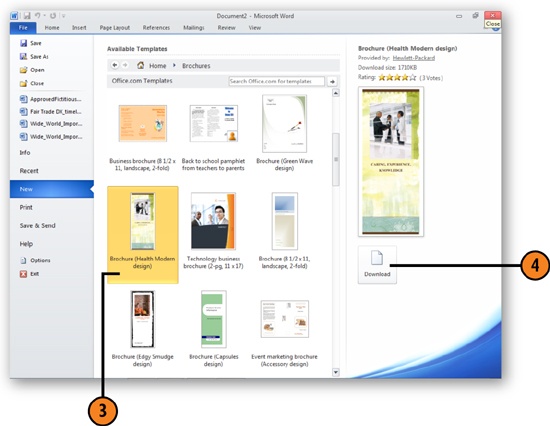
But there’s no reason that you have to begin every new document as a blank page. Word 2010 comes with literally dozens of templates you can use to create brochures, letters, newsletters, postcards, flyers, and more. And because the templates that appear in Word come from Office.com, you’ve got an almost inexhaustible supply of new looks and styles always available for exploring.
Click File to display Backstage view and choose New.
Click the category of the templates you want to view by performing one of the following actions:
Click Recent Templates to see the templates that you’ve used recently and double-click the one you want to use.
Click Sample Templates to view templates Word 2010 offers as samples, showing examples of letters, reports, resumes, and more. Double-click one to open a new file based on the template.
Click My Templates to display the New dialog box and your custom templates. Double-click a template to create a document.
In the Office.com area, click an icon to display the templates in that category that are available for download and double-click the one you want to use.
Click New From Existing to display the Open dialog box so that you can open an existing document as a template.
In the template category, click the template you want to view.
Click the Create button or the Download button to open the new document.

Of course, not every document you work on will be a document you create from scratch. A friend asks you to proofread her newsletter. The president of the garden club asks you to add some text to the brochure. You decide to update your resume. Working with an existing document is as easy as opening the file, making your changes and additions, saving the document, and closing it until the next time you need it.
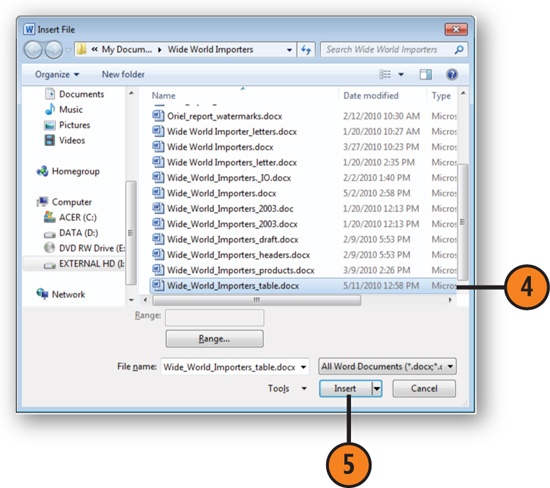
Click the File tab and click Open.
Click the folder in which the file is stored.
Click the file you want to open.
Click Open.

Tip
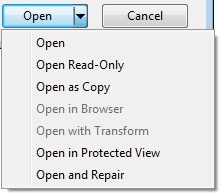
To open a document as a copy or as a read-only file, click the File tab and click Open; then choose the folder you need and click the file you want to open. Click the down arrow at the right of the Open button, and choose the option you want from the menu. Read-only lets you open the document but doesn’t allow you to save it to the same folder using the same file name.
See Also
Chapter 3 for information about selecting, deleting, replacing, and moving text.
Word 2010 offers all the tools you need to create, save, share, and choose options for your Word operations in Backstage view, which appears when you click the File tab. This convenient view gives you an easy way to create, open, and save files; get information about your document; find files you’ve used recently; and save and send the files you create.
When you click the File tab, Backstage view opens, and the Info tab is displayed. This tab displays the file’s properties and authors, and gives you access to the commands you need to set permissions, prepare to save the file, and work with file versions. Other tabs in Backstage view—such as Recent, New, Print, and Save & Send—give you access to existing and new files and help you print and share the files you create. Additionally, you set program options and get Help in Backstage view.
Click File to display Backstage view.
Click Recent.
Click the file you want to open.
You can also click a folder to display the Open dialog box and navigate to the file you want to open.

Tip
To “pin” a specific file or folder to the displayed list in the Recent tab, click the small push pin icon to the right of the file name. This saves the item with the list so that each time you want to locate that file or folder you can see it in the Recent tab list. To “unpin” the item, simply click the icon a second time.

One of the great things about Word 2010 is its flexibility. You can add content by typing your text, copying and pasting, inserting existing text files, or even dragging and dropping information to your open document page. What’s more, you can use Word 2010’s improved inking tools to write or sketch on your Word page.


Tip
In addition to these methods of adding text to your blossoming document, you can also create and insert building blocks of text you use often in the documents you prepare. For more about working with building blocks, see Inserting Building Blocks.
See Also
For the specifics on copying and pasting or moving text in a document, see Moving and Copying Text.
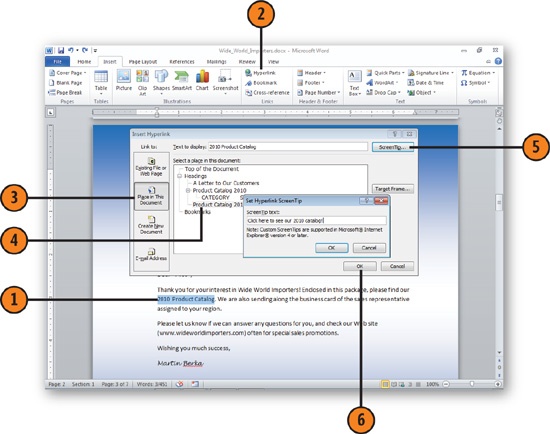
You can add links in your document to make it easy for your readers to move from one document, file, or Web page to the next. You can create links, also called hyperlinks, to different parts of your document, to other Word documents, or to other types of files in an online document.
Select the text you want to use as a hyperlink.
On the Insert tab, click the Hyperlink tool in the Links group to display the Insert Hyperlink dialog box.
Click Place In This Document to see the headings and bookmarks that are contained in the document.
Click the heading or bookmark you want to link to.
Click the ScreenTip button, type a short description of the link that will appear when someone points to the hyperlink, and then click OK.
Click OK.
Tip
In many instances, Word can automatically insert hyperlinks—for example, when you create a table of contents, a table of figures, a table of equations, or a table of tables; or when you create cross-references, footnotes, and a master document. Take a look through this book to find examples of these automatically inserted hyperlinks.
On the Insert tab, click the Hyperlink tool in the Links group.
In the Insert Hyperlink dialog box, click Existing File Or Web Page.
Click a category to locate the file you want to link to:
Current Folder for a file in your default document folder or to locate a file in another folder on your computer or network
Browsed Pages for Web pages you’ve visited or files you’ve opened
Recent Files for files you’ve used recently
Use the Browse tools to locate a Web page or to move to the correct folder if the file is in a different folder.
Enter the Web address or click the file or the Web page you’re linking to.
Click ScreenTip, type a short description of the link, and click OK.
Click OK.

Tip
Unless you enter some descriptive text in the ScreenTip dialog box, the ScreenTip will display the entire path and file name of the document, which usually isn’t useful and doesn’t describe the content.
Tip
By default, you must hold down the Ctrl key and click a hyperlink to use the link. Requiring the use of the Ctrl key to follow a hyperlink prevents unintended jumps and simplifies selecting a hyperlink for editing. If you prefer to follow a hyperlink without using the Ctrl key, click the Office button; click the Word Options button; and in the Advanced category of the Word Options dialog box, clear the Use CTRL+Click To Follow Hyperlink check box.
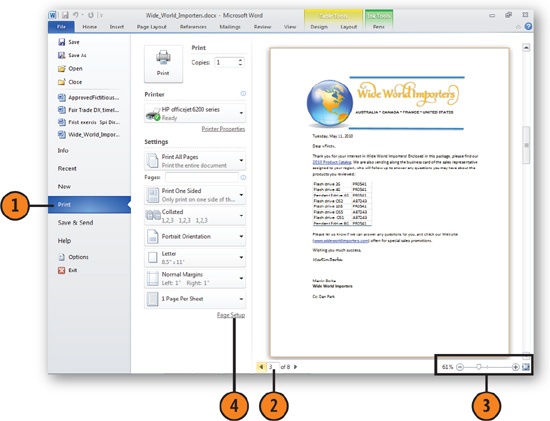
The print process in Word 2010 is much easier, thanks to Backstage view. Now you can preview your document as it will look when printed, set your print options, and print the file, all in a single view. You can also print your file directly to a OneNote notebook, if you use one to gather notes.
Click the File tab to display Backstage view and click Print.
Scroll through the document, using the page controls or the vertical scroll bar.
Use the Zoom slider to change your view of the document. Choose a specific zoom setting by clicking the Zoom tool and choosing the zoom percentage you want in the Zoom dialog box. Click OK.
If you’re not happy with the way the document looks, click the Page Setup link to display the Page Setup dialog box and make the changes you want in the layout. Click OK.
Choose the printer you want to use.
Specify whether you want to print the entire document, a single page, some selected text, or a range of pages.
Specify the number of copies you want.
If you’re printing multiple copies, specify whether the pages are to be printed in order (collated) or whether all copies of the same page are to be printed at one time.
Specify a scaling size if you want to print on paper that’s a different size from the paper the document was originally set up for.
Choose the number of pages you want to print on a single page.
Click Print to print the document.

All the Word help you need is also within clicking distance in Backstage view. The Help tab provides you with information about your version of Word (which you’ll need if you contact tech support at any point), as well as a link to get program updates and tools to display searchable help.
Click the File tab to display Backstage view and click Help.
Click Check For Updates to make sure you have the most recent program updates.
Click Microsoft Office Help to display the Word Help dialog box.
Type a word or phrase and click Search to find help on a selected topic.
Click a link to display an article with help information.
If the font size is too small or too large, click the Change Font Size button, and choose a font size from the menu.
To print the topic, click the Print button.
To return to either the list or the articles, click the Back button. To return to the list of categories, click the Back button again.
