In this section:
Composing Different Types of Documents
Word’s File Formats
Creating an Online Document
Including a File Within a File
Writing and Publishing a Blog
Printing Envelopes and Mailing Labels
Mail Merge: The Power and the Pain
Creating and Personalizing Form Letters
Whether you’ve been working with computers for a long time or you’re relatively new to the game, you are no doubt aware that today we’re using Word to create much more than documents you print on the printer and share with co-workers and friends. Whether you want to create a blog post, prepare a Web page, complete a mass mailing, print envelopes, or send notes to your OneNote notebook, Microsoft Word 2010 includes the features to help you produce the end result you’re imagining.
This section is all about using Word to complete tasks outside those more traditional write-edit-print documents you may create. Along the way, you’ll find out about the variety of file formats you will work with as you create your Word projects and learn the ins and outs of creating a form letter and customizing it so the recipient feels you’re writing to him or her personally (which, of course, you are).
Word 2010 includes dozens of templates that offer all kinds of different documents you can create. Click the New tab in Backstage view and you’ll see a large collection of document categories from which you can choose. Reports? Sure. Invitations? You bet. Whether you want newsletters or agendas or any kind of document you’ll share in paper or electronically, you can find it in Word’s templates.

See Also
Designing a Template for information about creating your own templates.
What are the main differences you should be concerned with when you plan to create a document that you’ll share electronically instead of in print? The biggest difference is that you don’t need to worry about some of the traditional page setup issues:
Page margins
Columns
Headers and footers
Page numbers
Orientation
See Also
Create a Template from Scratch for more information about selecting the template you want to use to create your document.
Tip
If you want to create a document that will be viewed electronically but also may be printed, you do want to set up the page as though it will be sent to the printer. This means you can include page margins, columns, headers and footers, page numbers, and more. Then the reader can view the document on the screen but also print it if desired. For some documents, it’s nice to have the choice.
Other issues you do need to think about as you plan a nontraditional document are these:
How are your readers likely to view the file?
Do you want readers to be able to edit or modify the electronic version?
Will you include hyperlinks so readers can move from page to page and document to document?
In what format should you save it?

See Also
Customizing a Template for information about modifying a template.

When you plan to share files with others, thinking through the format you use to save the file is very important. Word 2010 uses some different file formats from those of versions of Word prior to Word 2007, but with a few simple steps you can make sure that’s not a problem for others who work in different file formats. If you decide not to use the new formats, however, be aware that you won’t be able to use some of Word’s very cool new features. Review the descriptions of the formats to see which work best for you. To see the list of available formats, choose Save As from the File menu, and, in the Save As dialog box, scroll through the Save As Type list.

Word Document: This is the new format that enables all of Word’s new features. Documents in this format can’t be opened in earlier versions of Word unless you’ve downloaded and installed a special translating filter program. The Word Document format has the file extension .docx and saves files in the eXtensible Markup Language (XML) format. A single Word document has multiple XML files, but Word places them in a single container.
Word Macro-Enabled Document: This is the same format as the Word Document format, except that it contains macros. This special file type is a security enhancement, and it allows system managers and others to restrict the use of macros that could carry viruses and other evil things.
Word XML Document: This is a plain text file that includes all the text and the XML coding. This format is used primarily in a corporate setting in which transforms are created to extract and/or reformat information that will be stored for reuse.
Word Template: This new form of template also enables the new features of Word and, as in the Word Document format, stores multiple XML files in a single containing file with the .dotx file extension.
Word Macro-Enabled Template: This is the same format as the Word Template format, except that it can contain macros.
Word 97–2003 Document: This is the binary file format used in previous versions of Word. It provides compatibility with earlier versions of Word, but saving in this format disables some of the advanced features of Word 2007.
Word 97–2003 Template: This is the binary file format used in previous versions of Word. Macros, AutoText, custom toolbars, and styles are stored in this file.
Single File Web Page: This format creates a Web page and stores all the graphics in the same file.
Web Page: This format creates a standard HTML–format Web page whose graphics are stored in a separate folder.
Web Page, Filtered: This format creates a standard HTML–format Web page, which deletes Word-specific information that isn’t needed to display the Web page. Any graphics in the document are stored in a separate folder.
Rich Text Format: This is a binary file that contains the text and formatting information but little else. It provides compatibility with many programs, including WordPad and earlier versions of Word.
Plain Text: This text file contains only the text of the document and no formatting.
Word 2003 XML Document: This format saves a document in the XML format compatible with Word 2003 XML schemas.
Works 6.0–9.0: This format provides compatibility with people who use the Microsoft Works word processor.
See Also
Ensure that colleagues and friends can read your documents. See the section Work in Compatibility Mode to make sure others can view what’s most important in your Word 2010 document.
Creating a document that will be posted for others to read online is a snap in Word 2010. An effective online Word document includes hyperlinks that enable readers to easily navigate to other parts of the current document or to other documents or Web pages. The document may also include e-mail links and also include other documents or files as icons in the current file so that readers can quickly move to relevant information that is related to the document you’ve posted. When you’re finished with the file, you can easily save it as a Web page, give it a title, and post it to your server space.
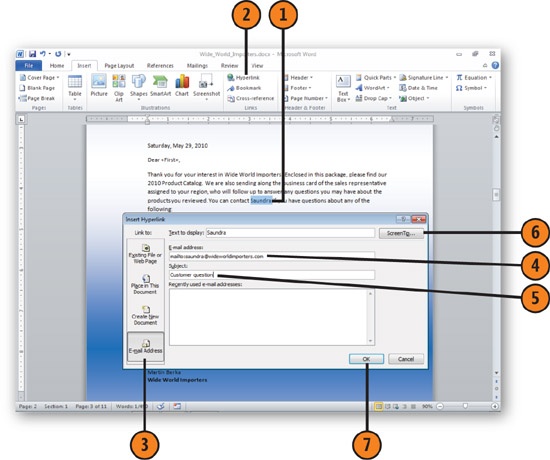
Highlight the text in the document where you want to add the e-mail link.
Click the Insert tab and click Hyperlink in the Links group (or press Ctrl+K).
Click E-mail Address.
Type the e-mail address.
Type the text you want to include in the subject line of the e-mail message.
Click to add a ScreenTip providing prompt text when the user hovers the mouse over the address.
Click OK.


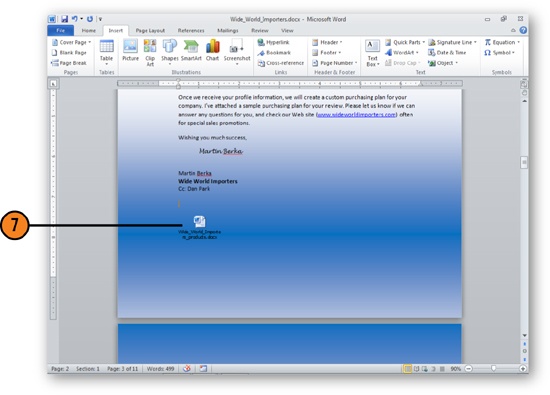
In some cases, you may want to share additional resource files within the online document you are preparing for colleagues or team members. You might, for example, insert the letter you want to send to new customers and ask your peers to review it along with the newest sales brochure. You can easily include a file as a simple icon so readers can click the icon to display the file if they choose. If they’d rather not view the file, it doesn’t take up much room in the document or interrupt the flow of your text.
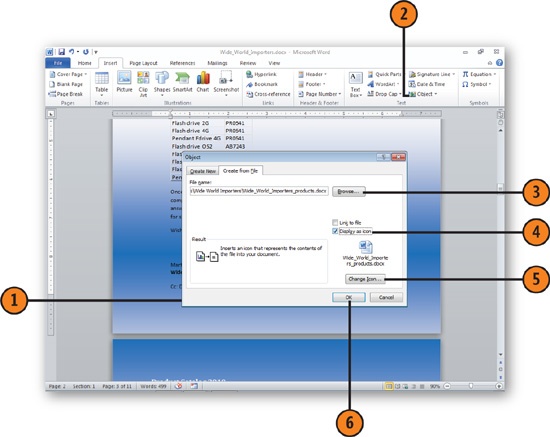
Click in the document where you want to add the file.
To insert an entire file as an icon, click the Object tool in the Text group of the Insert tab.
Click the Create From File tab, click Browse, locate the file, and click Insert.
Select this check box.
If you want to use a different icon, click Change Icon, select a different icon or type a new caption, and click OK.
Click OK in the Object dialog box.
See Also
Adding Hyperlinks to learn how to add hyperlinks in your document.
Move the file icon to the place you want it to appear. Set the text wrapping for the icon, if desired. Set any document protection you want, and then save and distribute the document.
Well, who doesn’t know about the blogosphere? Blogs are a popular way for individuals and companies to share information—free and continuously—with the Web-browsing public. Not everyone wants or needs a blog, of course, but a blog does provide a simple—and sometimes fun—way to share bits of information about a topic you care about. A Web log, blog, is a Web-based site where you can add your entries, called posts, which you can create in Word. The great thing about creating blog entries in Word is that you can use all Word’s tools for checking the spelling and grammar, translating words and phrases, and formatting as you’d like; then you can publish the post directly to your blog.
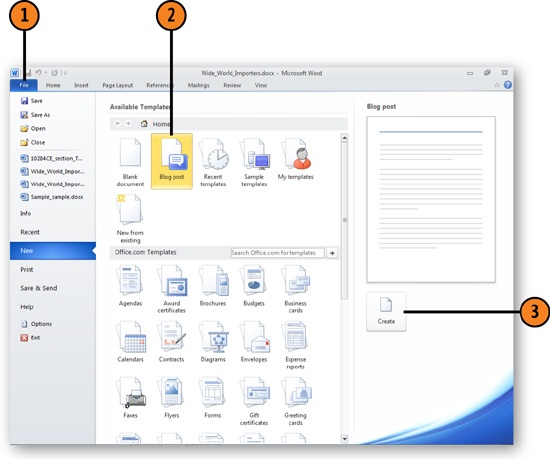
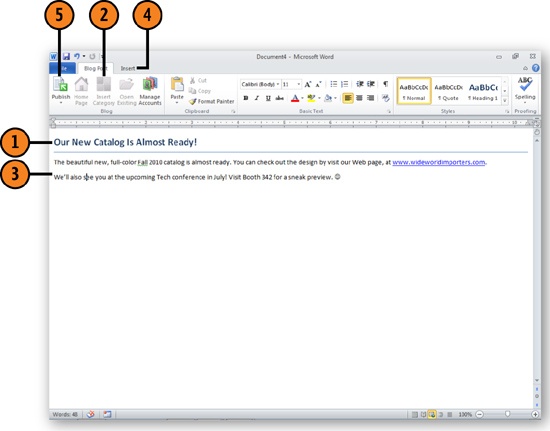
Click the File tab and click New.
Click Blog Post.
Choose Create.
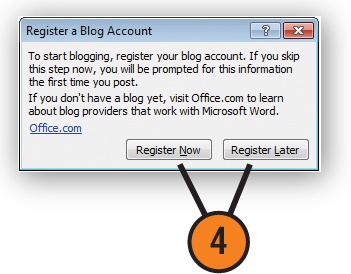
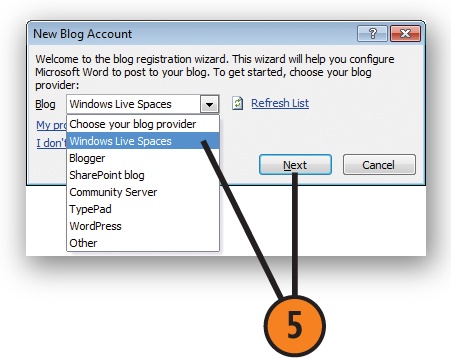
If this is the first time you’re using Word to post to your blog, click Register Now in the Register A Blog Account dialog box. In the New Blog Account Wizard that appears, select the service you’re using and click Next.
Choose the blogging service you use and click Next.
Complete your account information. The details you’re asked to provide will vary depending on the service you’re using, but will likely require your user name and password, the URL (Web address) of your blog, and possibly the type of blog interface you’re using.
Click the Picture Options button to display the Picture Options dialog box and choose how you want pictures to be added.
Click OK in each of the dialog boxes.

On the Blog Post tab, click the Post Title content control and type the title for this blog entry. Use any of the formatting tools to format the title the way you want it.
If you want to include a category for the entry, click the Insert Category button, enter the name and password for your account, if necessary, and then choose a category from the drop-down list that appears.
Click in the body of the document and enter your text, using styles or direct formatting.
Use the items on the Insert tab to insert special content, including tables, pictures, shapes, and hyperlinks.
Click Publish to publish the entry on your blog. If you want to send the entry to your blog as a draft so that you can view it there before you publish it, click the down arrow at the bottom of the Publish button, and choose Publish As Draft from the drop-down menu.
In some cases, adding a handwritten envelope may be just the touch you’re looking for, but in other cases—especially when you’re sending business correspondence—a printed envelope makes your document look more professional.
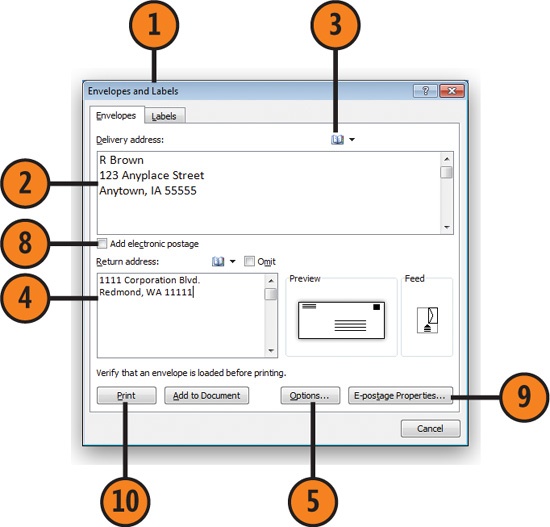
Word makes it easy for you to create crisp, businesslike printed envelopes. You can easily include your return address, and in the United States you can add electronic postage so you can avoid stamps altogether. If you already have the delivery address in your letter, Word usually detects it and copies it to the Envelopes And Labels dialog box. You can also type the address directly in the dialog box.
Click the Mailings tab and click Envelopes in the Create group to display the Envelopes and Labels dialog box.
If a delivery address is displayed on the Envelopes tab, verify that it’s correct.
If no delivery address is shown or if you want to use a different address, type the address. If the address is in your Microsoft Outlook Contacts list, click the Insert Address button.
Verify that the return address is correct. If you’re using an envelope with a preprinted return address, select the Omit check box so that the return address won’t be printed.
Click Options.
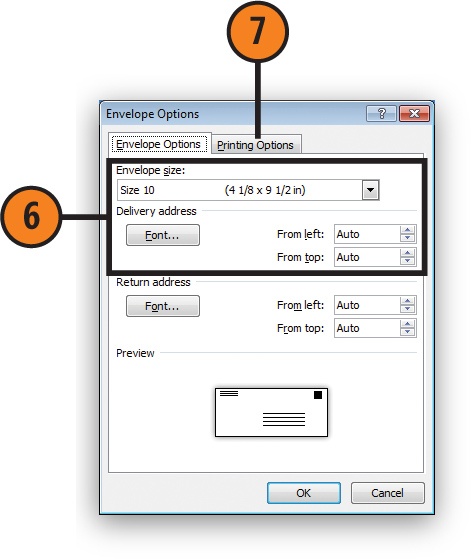
On the Envelope Options tab, specify the envelope size and the fonts and positions for the addresses.
On the Printing Options tab, specify how the envelope is to be loaded and printed. Click OK.
If you have Electronic Postage (E-Postage) software installed, select this check box to use electronic postage.
If you need to make changes to your E-Postage setup, click the E-Postage Properties button.
Click Print to print the envelope.
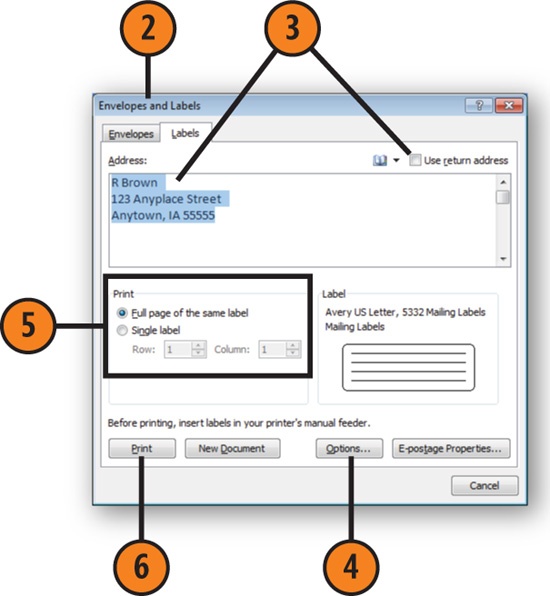
Printing mailing labels can be a real time-saver when you need to send many copies of a document—letter, newsletter, brochure, or report—to people at different addresses. In the past, mailing labels could be a bit of a headache, but Word 2010 makes the whole process simple for you. All you need to do is specify the type of label you’re using, the address, and the way you want the label to be printed. That’s it! Word does the rest. You can also use this method to print other types of labels, from business card labels to CD labels.
Note the manufacturer and the number of the labels you have (for example, Avery 5332). If you’re planning to print only one label, figure out which label on the sheet of labels is the one you’re going to use. Later in the process, you’ll need to specify the label by row (the horizontal line of labels) and by column (the vertical line of labels). Insert the sheet of labels into your printer (usually into the manual feed tray if your printer has one).
Click the Mailings tab and click Labels to display the Envelopes And Labels dialog box.
Click the Labels tab and use the proposed address, type a new one, or click the Insert Address button to insert an address from your Outlook Contacts list. To insert your return address, select the Use Return Address check box.
If the type of label shown isn’t the one you’re using, click here to display the Label Options dialog box, specify the label you’re using and click OK.
Click the appropriate option to print a whole page of identical labels or only one label on the sheet of labels. If you want to print only one label, specify the label by row and column.
Click Print to print your label or labels.
Tip
If you need to print a large number of different mailing labels, consider using the mail merge feature.
See Also
Mail Merge: The Power and the Pain, and Creating a Form Letter, for the ins and outs of running a successful mail merge.
If you’ve ever had to send the same letter or catalog to more than one person, you know what a time-saver mail merge can be. Mail merge saves you the trouble of typing numerous names and addresses by merging your contacts list with the document you’re creating. In Word 2010, mail merge uses a master document and a data source to accomplish the task. The master document is the template (although not a template in the Word document sense) that lays out your document and contains text or other items that never change. This might be the sales letter, for example, that you want to send out to all your customers. The master document also contains instructions for inserting data from a data source into each document. The data source is your contact list, Excel spreadsheet data, or other file containing the name and address information you want to merge with the document.
The goal of mail merge is simple: to produce many different documents that are personalized to go to many different individuals—without a lot of extra work from you. The process of putting together a mail merge document may seem a bit complicated at first, but it’s really just a matter of telling Word where to substitute the different data items. (For example, the name goes here and the address goes there.) Once you use the mail merge feature a time or two, it will seem fairly intuitive. After you master the basic mail merge process, you can get a little fancier by adding conditional expressions, which enable you to create a mail merge letter for a customer if a certain condition is true.
Tip
There’s one change for Microsoft Works users who plan to use their Works database as the data source for Word 2010 mail merge. Now you need to export your data and then create a new data source before importing the information into Word. Word 2010 no longer directly imports Works databases.
The mail merge feature can do more than create form letters and address envelopes. You can save the merged documents as a file so that you can edit them or send them by e-mail. You can create almost any type of document by using a specific template or designing the document from scratch. All Word needs is a data document with some data fields in it. You can create mailing labels and address books, awards, parts lists, different versions of exams, and catalogs designed for specific geographical areas or demographic populations. The uses for mail merge are limited only by your creativity, your willingness to experiment with different data fields and Word fields, and your decision as to whether mail merge would be faster than manually creating individual documents.
Mail merge offers you a flexible way to produce content based on what your customers want to see. You can easily tailor the content according to the data stored in your mailing list. For example, you might offer one promotion to individuals who live in the West Coast region, but offer a different promotion to those who live in the southern United States. If you have an entry in your data file that tracks the region in which the customer lives, you can use that data to control the content of your document. To add this kind of conditional content, you use the IF field, available in the Rules tool in the Mailings tab. You can tell Word to insert one set of content IF the contact lives in the western region or insert a different set of content IF the contact lives in the southern region.
If the idea of creating a form letter sends a shudder of apprehension down your spine, relax; it’s no more difficult than writing a simple note to a co-worker. Once you create the letter, you can customize it by adding the mail merge fields you want—and then it’s just a few short steps to the final merge process.
Create your letter as you would any other letter, leaving blank any parts that you want to be completed with data from your mailing list. Save the letter.
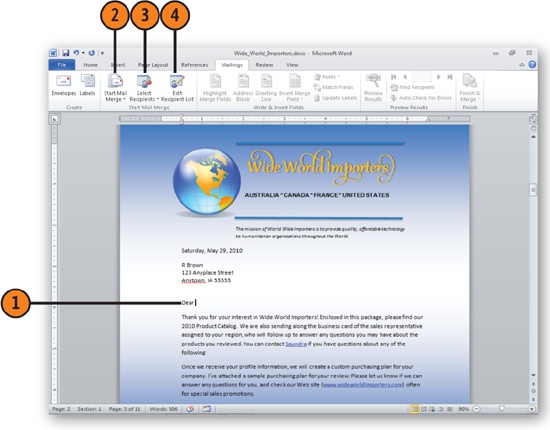
On the Mailings tab, click Start Mail Merge in the Start Mail Merge group, and choose Letters from the drop-down menu.
Click the Select Recipients button, and specify the type of data you want to use for your mailing list:
Type New List to enter your data in the New Address List dialog box.
Use Existing List to use data that exists in a file Word can read. To see which type of data sources you can use, open the Files Of Type list in the Select Data Source dialog box, and review the list.
Select From Outlook Contacts to use data from your Outlook Contacts list.
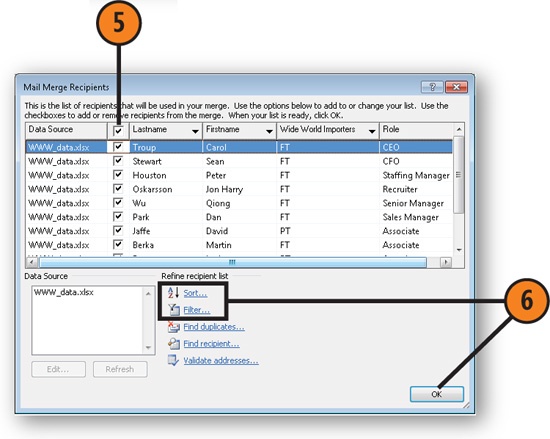
Click Edit Recipient List to display the Mail Merge Recipients dialog box.
Select or clear check boxes to designate whom you want to include in the mail merge.
Choose the options you want to apply to the information. Click OK when you’ve finished.
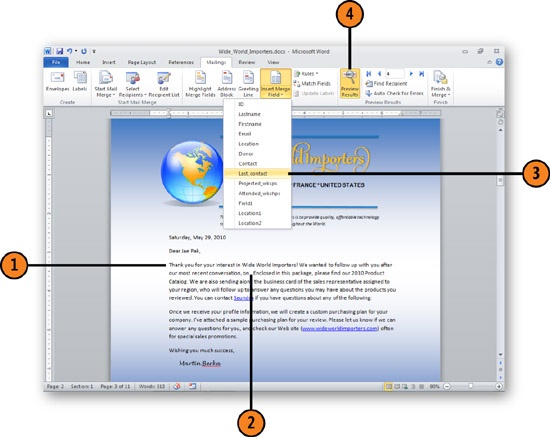
In your document, click where you want to add information from your data source.
In the Write & Insert Fields group, click the type of information you want to insert.
In the dialog box that appears, specify the options you want and then click OK. Continue adding items to the letter.
Click the Preview Results button to display your data in the document.
Use the buttons to see how your form letters will look when they’re merged with the different data records.
Click Edit Recipient List if you see that the form letter you’re previewing is addressed to someone you don’t want to include in this mailing. In the Mail Merge Recipients dialog box, clear the check box for that individual and click OK.
Click Auto Check For Errors and choose to do a simulated merge to check the document for errors. Correct any errors.
Click Finish & Merge and specify how you want your letters to be completed.


When you use Word’s mail merge feature, you aren’t limited to simply adding names and addresses. Word includes a number of different fields that enable you to merge the data you need to add in your specific documents. You can also create merge operations that include conditional information so that data is merged only if specific criteria are met.
Create your form letter and add your recipient data and a greeting, if necessary.
Click where you want to add the personalized information.
Click the down arrow on the Insert Merge Field button in the Write & Insert Fields group and select the field you want to insert.
Click the Preview Results button and step through some of the records to make sure the field is working correctly.
Repeat steps 2 through 4 to insert any other merge fields you want.
Click Rules and choose If ... Then ... Else ... from the drop-down list.
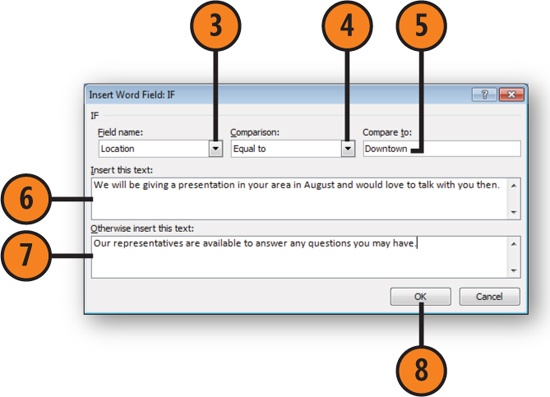
In the Insert Word Field: IF dialog box, select the field that contains the condition you want to use.
Specify how you want to evaluate the condition.
Enter the value to be used to evaluate the condition.
Enter the text to be inserted if the condition is evaluated as true.
Enter the text to be inserted if the condition is evaluated as not true.
Click OK.
Click Preview Results and step through some of the records to make sure that the field is working correctly. When you’re ready, print the merged letters.