2 Introduction to SharePoint Online
SharePoint Online is part of the Microsoft 365 ecosystem that facilitates collaboration and productivity in organizations by empowering its users with tools to create and share content. At its core, SharePoint is a content management system that gives its users places, such as sites, lists, and libraries, where they can create and store documents and data. It also lets its users collaborate on this content by allowing it to be securely shared with others within or outside the organization. Users are also able to securely find this content through the powerful Microsoft Search capability. Additionally, SharePoint enables an organization to effectively communicate through rich pages, engaging tools, and web parts. We will go over these areas in more detail throughout the book, first introducing them in Chapter 3, Working with Modern Sites in SharePoint Online.SharePoint integrates well with a lot of other tools within and outside of the Microsoft 365 ecosystem, such as Microsoft Teams, OneDrive, and the Microsoft Office suite, to name a few. SharePoint can be accessed through a variety of desktop and mobile browsers, such as Edge, Chrome, Firefox, and Safari. It can also be accessed through native iOS and Android mobile apps.We briefly discussed in Chapter 1, Overview of Microsoft 365, that SharePoint is available both as a standalone e-installation (on-premises) and as a cloud offering through Microsoft 365. The recipes in our book are written with the cloud version in mind, called SharePoint Online. While the recipes and related commentary are written for and tested with the cloud version, the key concepts equally apply to both versions of SharePoint. All references to SharePoint in these chapters and in general throughout the book refer to SharePoint Online unless mentioned otherwise.The following recipes in this introductory chapter will show you how to carry out some of the more common tasks in SharePoint Online:
- Getting to the SharePoint start page
- Creating a modern site
- Viewing site contents
- Creating a list
- Adding an item to a list
- Creating a document library
- Uploading documents to a library
- Deleting and restoring a file
- Sharing a document
- Searching content
While this chapter covers the more commonly used scenarios, dedicated chapters later in this book will dive into many of the different areas of SharePoint in more detail. You will find references to these chapters in the See also sections of each recipe in this chapter. By the end of this chapter, you will be able to carry out basic yet common tasks in SharePoint.
Getting to the SharePoint start page
The SharePoint start page is the central location that shows you relevant content from all the SharePoint sites that you have access to in your organization. From here, you can easily get to the sites that you are following, frequently visit, or have recently visited. This page also lets you search for content across all the SharePoint sites that you may have access to.This recipe shows you how to log in to Microsoft 365 and then browse to the SharePoint Online home page from there.
Getting ready
To be able to browse to the SharePoint start page, your organization should have purchased one of the Microsoft 365 products that contain SharePoint. In addition, they should have assigned you a license to use SharePoint Online.
How to do it...
You can follow these steps to access the SharePoint Online home page:
Browse to
www.office.comand click the Sign in button, as shown in the following image:
- Log in using your email ID and password, as described in the Signing in to Microsoft 365 topic in Chapter 1, Overview of Microsoft 365.
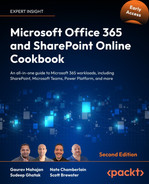
You will be directed to the Office 365 home page upon a successful sign-in. Click the app launcher in the top-left corner, as shown in the following image:
Doing so will expand the app launcher to reveal the suggested and frequently used apps. Then click the SharePoint icon, as shown below:

- Doing so will take you to the SharePoint start page, which we will look at in the How it works… section of this recipe.
That's it! You just learned how to log on to Microsoft 365 and browse to your organization’s SharePoint start page. The content that you see on this page is personalized to you based on various factors, such as, but not limited to, content you’ve modified or interacted with, news promoted by your organization, your past searches, sites or people you follow, etc.
How it works...
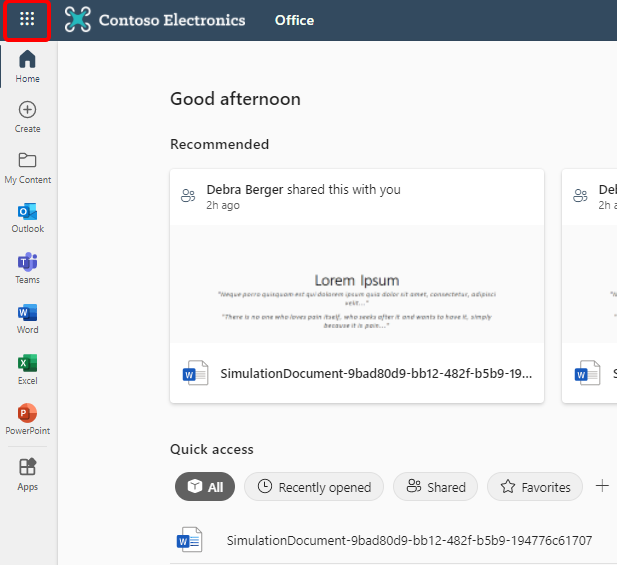
The SharePoint start page shows your interactions across all SharePoint sites that you have access to. In short, this page lets you get to what's most relevant to you, without you having to search for the content. All pages in SharePoint, including the start page, as shown below, are comprised of three sections:
- The navigation bar: We discussed the navigation bar as part of Chapter 1, Overview of Microsoft 365. One additional detail about the navigation bar for the SharePoint start page is that the search box in the center of this bar allows you to centrally search all your SharePoint and OneDrive content right from within this page. You will get to know more about searching content in SharePoint later in this chapter. There’s also a dedicated chapter later in the book (Chapter 7, Search in Microsoft 365) that covers Microsoft 365 Search in greater detail.
- The app bar: The app bar is your gateway to the most relevant content in SharePoint. It allows you to navigate to the sites, news, and files deemed most relevant to you through your interactions with SharePoint and Office 365 in general. It also allows your organization to define a global navigation:

The following are the different features you can access through the app bar:
Home: The home icon takes you to the SharePoint start page by default. However, as a SharePoint administrator or an owner of the SharePoint home site (see Types of modern sites later in this chapter), you can modify the home icon to show cross-site navigation instead.
Such cross-site navigation in SharePoint is also called global navigation. We will read more about global navigation in the Modifying the top navigation recipe of Chapter 3, Working with Modern Sites in SharePoint Online.
You can also read more about implementing global navigation through the app bar here: https://m365book.page.link/home-icon.
- My sites: Clicking this icon shows you a list of your frequently visited and recently followed sites.
- My news: Clicking this link shows you the recommended news from across all sites.
- My files: This shows you a list of your recently visited documents.
- My lists: This shows you the lists that you have recently worked with or that you have marked as a favorite.
The main content area: The navigation bar and the app bar remain stationary as you navigate between various SharePoint sites and pages. What changes, however, is the content that you see within the main area outside of these bars. For the SharePoint home page, this content area contains the following sections, which we will go through point by point:

- Bookmarks section: This section allows you to quickly get to content that you have bookmarked or that you have recently interacted with. This section contains the following subsections:
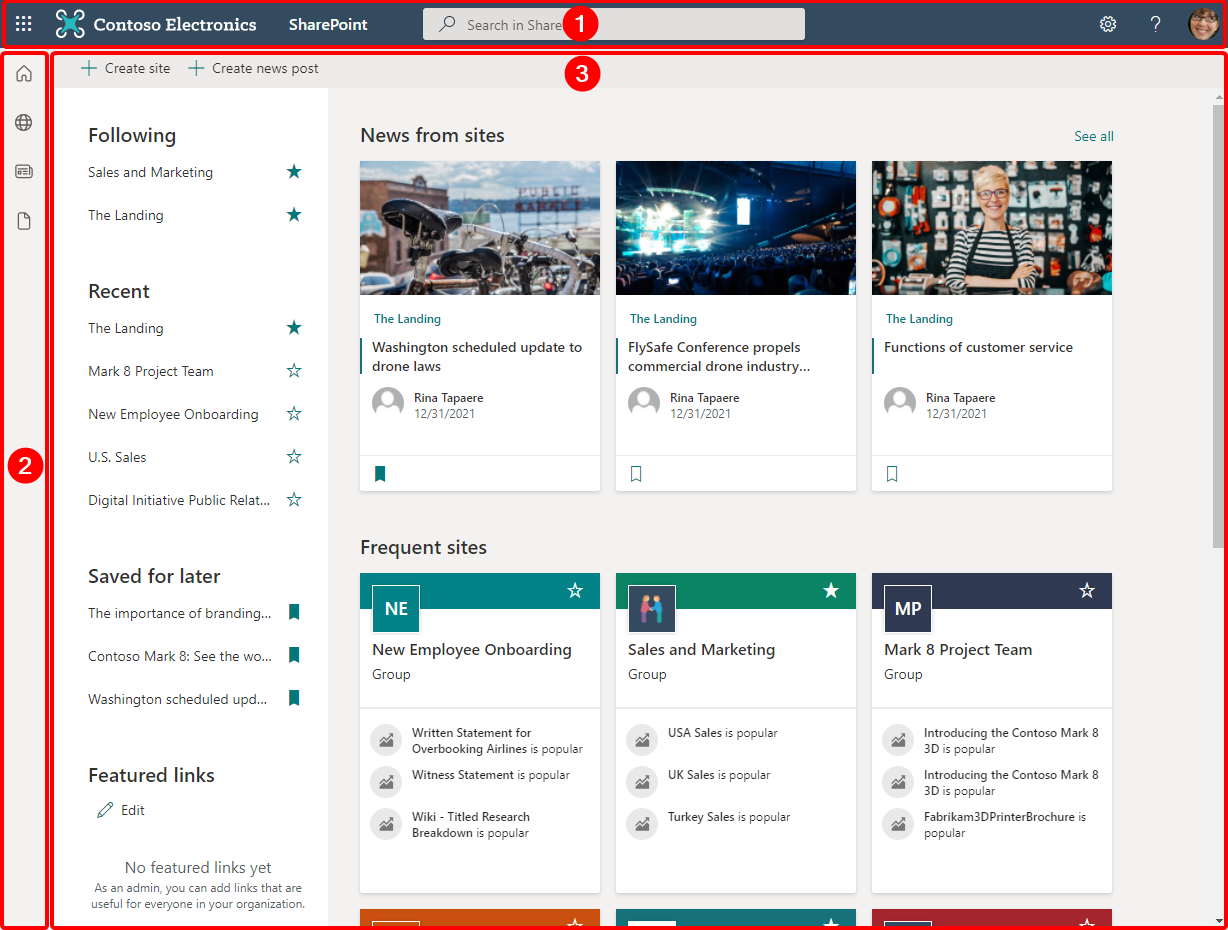
Following: Here, you can view a list of the sites that you are following. You can then click the site name to directly go to the home page of that site. When you create a site, SharePoint automatically adds it to the list of sites that you are following. To follow an existing site, you can click the Not following text toward the top right of any page on that site, as shown in the following image:
- Recent: This section shows a list of sites that you recently visited. You can click on the site name to quickly get to that site. You can also click the star (
 ) image next to the site name to add it to the followed sites list.
 Saved for later: As you browse pages within various SharePoint sites, you can bookmark them by clicking the bookmark (
 ) icon or the Save for later link toward the bottom of any news item or a SharePoint page, as shown below:
- These bookmarked pages then show up in this section. Clicking the page name takes you to the respective page.
- Featured links: Your organization admins can add links that are useful for everyone in this section. The links they add are then visible to everyone in the entire organization. These could be links to your organization’s website, timesheet system, payroll, or any other resource that would prove useful for everyone. Only certain admins can create or edit these links.
Create site and Create news post:
- Clicking Create site starts the new SharePoint site creation wizard. We'll discuss this in more detail as part of the Creating a modern site recipe later in this chapter.
- Clicking Create news post takes you to the Create news post page within a site of your choice.
These options only show up if your organization has turned them on. We'll discuss this in more detail as part of the Adding a page recipe in Chapter 3, Working with Modern Sites in SharePoint Online.
- News from sites: As the title suggests, this section brings together news from all your sites in one single place. From here, you can simply click the news item to go to the details page. You can also bookmark (save for later reading) a news item so that it shows up in your list of Saved items on this page.
- Frequent sites: As the title suggests, this section shows you tiles containing information about your most visited sites. In addition to the name of the site and a link to it, each tile shows a quick glimpse of what's latest and popular on the site.
- Bookmarks section: This section allows you to quickly get to content that you have bookmarked or that you have recently interacted with. This section contains the following subsections:
See also
- Chapter 1, Overview of Microsoft 365
- The Creating a modern site recipe in this chapter
- The Adding a page recipe in Chapter 3, Working with Modern Sites in SharePoint Online
Creating a modern site
SharePoint provides various templates or site types so that you can create sites. These templates use similar building blocks but create slightly different sites in the end that help target different collaboration and communication goals. These templates differ from each other in various ways, such as how they store information, how they present it, and even the features that they offer.This recipe shows you how to create a site using the Team site template, which is the most commonly used site template for team collaboration.
Getting ready
Your organization should do the following before you can create sites from the SharePoint start page:
- Grant you access to SharePoint as part of the Microsoft 365 suite
- Enable the creation of sites from the SharePoint start page
- Enable the creation of modern sites in your Microsoft 365 environment
How to do it...
To create a new site from the SharePoint start page, follow these steps:
- Browse to the SharePoint start page, as described in the previous recipe.
Click on the Create site (1) option and then Team site (2), as shown in the following screenshot:

What we're creating on this page is called a site collection. In the There's more... section later in this recipe we will see the difference between a site and a site collection. If you can't see the Create site option, your organization has likely disabled the creation of site collections for you. Please refer to Chapter 3, Working with Modern Sites in SharePoint Online, for steps on creating a (sub) site if that's the case.
Fill in the Site name and Site description and confirm or change the pre-selected Group email address, Privacy settings, and Select a language (more about these settings later in this recipe). Then, click the Next button, as shown in the following screenshot:

The group email address that you can see in the previous screenshot is used for the corresponding Microsoft 365 group that gets created along with the team site. You can read more about groups in Chapter 3, Microsoft 365 Groups (online supplement).
Furthermore, you should carefully choose the Privacy settings on this screen. Choosing Private for this setting means only selected members that you allow on the next screen will have access to view and modify content within the site. Selecting Public would mean that everyone in your organization will be able to view and modify content within this site. You can always change the site's permissions after it has been created.
- At this point, SharePoint will start creating the site in the background.
Even as it does that, SharePoint will prompt you to optionally invite other users to your site. These users are typically people from your organization who you'd like to grant owner or member access to this site. Coworkers you add from here are added as Members by default. You can change their access level on the site by selecting the word Member against their name and then changing the role to Owner. This can be seen in the following screenshot:

Owners and members who are added through this screen are granted two different levels of permissions in SharePoint.
Members can add, update, or delete content (documents, pages, and/or list items) on your site. They can also view all the content within your site that others may have authored.
Site owners can do everything that members can do. In addition they are able to alter site permissions, add and customize pages, and change other key elements of the site. This access is usually only granted to a select few users from the team.
There is a third permission setting that isn't shown here, and that is visitor access. Visitors to your site can view the content within your site. This content can be presented through informational lists, documents, or pages within your site.
Who you grant member and owner permissions should be carefully considered, but know that these permissions can easily be changed after the site has been created.
- Clicking Finish will then redirect you to the home page of this newly created site. You may also be prompted to apply a custom template to your site but we will talk about that in the next section.
Congratulations! You just created a new site in SharePoint Online.
How it works...
At its core, a SharePoint site is a website that lets us store information and then present it in different ways. Information can be stored as data in lists and in the form of documents and/or files in libraries within the site. SharePoint uses pages and, optionally, web parts in these pages to show this information in a variety of formats. When you create a new site in SharePoint, it automatically creates one or more of these artifacts for you within that site. Finally, every site that gets created comes with search capabilities built into it. Microsoft Search in SharePoint is a quick way to find information relevant to you, not only from within your site but also other sites and workloads that your organization may have enabled in Microsoft 365. We will learn more about Search as part of the Searching content recipe in this chapter and then go through it in more detail as part of Chapter 8, Search in Microsoft 365.
Types of modern sites
At the time of writing this book, Microsoft has made a variety of templates available for modern sites. Let's go over them now.
Team site
This type of site is primarily used for collaboration within a team or a department that is actively working on a shared project or goal. As mentioned earlier, this is by far the most common type of site template used for creating SharePoint sites. SharePoint team sites are also connected to Microsoft 365 groups, which, in turn, are connected to other Office 365 workloads such as Microsoft Teams, Planner, and Outlook. Examples of team sites include sites created for individual project teams to collaborate on, sites created to work with external partners or vendors, and sites created for departments within the organization (such as the Human Resource department or Finance department) for their team collaboration. This means your organization would typically have a lot of team sites.
While this recipe described creating a group-associated team site, you can also have your designated SharePoint admin(s) create modern team sites for you without an underlying group. They can create such team sites through the SharePoint admin center.
Communication site
This type of site is used to broadcast a message or simply tell a story to your organization. Communication sites can be used to share news, reports, strategies, and other information in a visually compelling way. The content in a typical communications site will be shared with a large audience (potentially the entire organization). Examples of communication sites include your intranet landing site, a training site, a site where members in your organization would view key business metrics, and a site that's created to gather information for an organizational merger. This means your organization would typically have very few communication sites.
Hub site
SharePoint hub sites are a way to bring together (roll up) information such as news and activity from a family of related sites. As a site owner, you can either register your site as a hub site or associate it with an existing hub. If you choose to associate your site with an existing hub, your site will inherit the look and feel of the hub site.Your site will also inherit other properties of the hub site, such as the navigation bar, additional navigation links, applications, or custom lists with specific columns.Additionally, users who have been granted access to the hub site will start seeing content, news, and activity being rolled up from your site, along with any other sites that are associated with that hub site. This makes it easier for users to discover related content from across all these sites. An example of a hub site could be an enterprise Sales portal providing shared resources for the organization-wide Sales teams and connecting multiple regional Sales team sites and communication sites.
Hub sites need special permissions to be created and cannot be created by end users through the SharePoint start page. They can only be created by special users designated as SharePoint admins by your organization. You can read more about the SharePoint admin role here: https://m365book.page.link/SP-Admin.
Home site
A home site is your organization's designated intranet landing site. Behind the scenes, a home site is just another communication site, but with the following differences:
- It aggregates content from your entire organization through news, events, videos, conversations, and other resources.
- The search experience in the home site defaults to the entire organization. This means that if you perform a search from the home site, it will bring back results from the entire organization.
- You can only designate one site from your entire organization as the organization's home site.
It is highly recommended that you create a home site as a place to aggregate content that is of utmost importance to your organization.You can read more about the home site and the best practices surrounding its setup here: https://m365book.page.link/Home-Site.
Site creation next steps
After you create a site, you are provided with a menu to carry out additional actions for it:

The actions discussed here are advanced topics. It may be beneficial to revisit them after you review the more advanced SharePoint chapters in the book.
We review these options below:
Apply a site template: When you create a site, it comes with a standard set of libraries, lists, and pages. The lists, libraries, and pages that get created as part of the standard team and communication site templates are very minimal. SharePoint offers additional templates that you can apply on top of these standard sites. These templates contain pre-populated pages, page templates, web parts, and other artifacts that may be better suited to the specific needs of the site being created. The following image shows the different templates that are currently available in SharePoint:
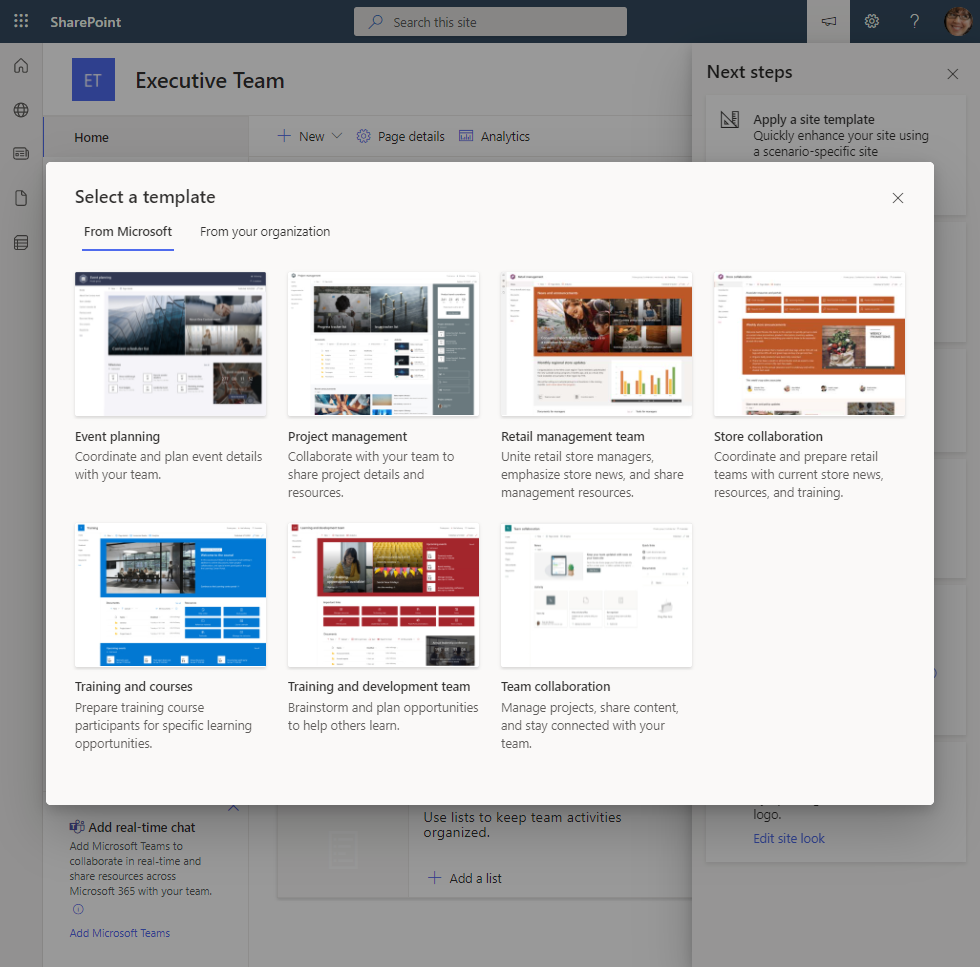
- As you can see from the image, your organization can also create templates that you can apply when creating your sites. Like the templates provided by Microsoft, these templates can have pre-baked content that can be specific to your custom needs built into them.
As we hinted at before delving into the different types of modern sites, these templates are subject to change. It is worth checking this Microsoft article for a list of the built-in site templates currently available that might suit your purpose: https://m365book.page.link/site-templates.This Microsoft article provides a walkthrough of the steps you can use to create your own templates: https://m365book.page.link/create-site-template.Please note that these steps assume some development knowledge.
Invite team members: You can use this action to grant access to others to your site. Please note that this option is called Share this site with others for communication sites:

- We will discuss permissions and access in more detail in the Determining and revoking permissions in a site recipe of Chapter 3, Working with Modern Sites in SharePoint Online.
- Upload files: Clicking Upload a document simply takes you to the default document library for the site so you can upload the relevant document(s) to it. You will learn about document libraries and uploading documents to them through subsequent recipes in this chapter.
- Post news: Clicking Create a news post creates a draft News post page, and takes you to it. You will learn more about creating news posts in the News post and news link topic of the Adding a page recipe in Chapter 3, Working with Modern Sites in SharePoint Online.
- Add real-time chat: Clicking Add Microsoft Teams creates a new team and links this site to it. You will learn all about Teams in Chapter 8, Microsoft Teams.
- Change the look: Clicking Edit site look allows you to apply a theme to your site, as well as changing its header, footer, and navigation settings. You will learn more about these topics through multiple recipes in Chapter 3, Working with Modern Sites in SharePoint Online.
There's more...
In this section, we will briefly review the concept of site collections. We will then look at the difference between the deprecated classic user interface versus the more modern experience.
Site versus site collection
As noted earlier, what we created through this recipe is actually called a site collection. Fundamentally, as the name suggests, this is a collection of one or more sites that are under the same URL. More often than not, all sites within a site collection will share identical navigation, branding, audience type, and sometimes even similar security.When you first create a site collection, SharePoint will create a top-level site, or what is known as the root site, for you. You can then create as many subsites as you'd like to under this root site.Microsoft no longer recommends creating subsites. Everything in the modern SharePoint experience is based on top-level sites (or site collections, as they are called). In fact they have altogether eliminated the words site collections and subsites from their terminology and just use the word site instead. You can read more about this change as part of the How it works… section of the Creating a subsite recipe in Chapter 3, Working with Modern Sites in SharePoint Online
Modern versus classic experience
SharePoint supports two different user interface (UI) experiences:
- The more modern, fluid, and mobile-friendly experience
- The classic experience, which is now being phased out
The modern experience makes it easy for you to create dynamic sites and pages that automatically adjust to the resolution of the device that they are being viewed on and are, hence, mobile-friendly. The modern site experience also includes a newer, modern way of working with lists and libraries. Since the classic experience is being deprecated and no longer recommended for creating new content, we will only be discussing the modern experience in this book. For those of you with an inquisitive mind, here is a great article on the SharePoint community blog explaining the modern experience and why you should use it for creating new content: https://m365book.page.link/Why-Modern.
See also
- Chapter 3, Working with Modern Sites in SharePoint Online
Viewing site contents
The Site contents page in SharePoint provides a one-stop view of all the lists, libraries, and other apps within the site. Any subsites within that site will also appear here. Provided you have appropriate access, you can also add new lists, libraries, pages, apps, and subsites to the site from this page.
Getting ready
You should have at least Read or View access to a site in order to be able to view the contents within that site.
How to do it...
To view the contents of your site, follow these steps:
- Browse to your site in SharePoint
Click on the settings icon (1) in the top-right corner of any page on the site and then click Site contents (2), as shown in the following screenshot:

- You will be directed to the Site contents page, as shown in the following screenshot:

That's it! You can now view the various assets of your site from here.
How it works...
The Site contents page lets you view a list of all the lists and libraries within your site. The view shows various information for each list and/or library, including its name, type, number of items in that list or library, and when anything was last modified in it.If the site has subsites, you can also view a list of such sites through this page. The view shows the following details for each subsite: its name, description, number of user views, when the site was created, and when anything was last modified in it.In addition to this, you can also perform multiple actions from this page as shown in the image below:

Let's go over these actions here:
- New: you can use this menu to create or add a Lists, Page, Document library, App, and Subsite. We will discuss these items through various recipes in this chapter and as well as in Chapter 3, Working with Modern Sites in SharePoint Online.
- Site usage: You can view these reports to understand how users interact with your site and what content is popular among the users of your site. Assuming you have the required access, this is also where you can generate and view reports about the content permissions within your site. You can read more about site usage reports here: https://m365book.page.link/Usage-Data.
Site workflows: SharePoint workflows are now deprecated. We will also briefly discuss them as part of the SharePoint workflows topic in the Appendix. However, if you are still using SharePoint workflows and have appropriate access in SharePoint, you can click this link to view the site workflows.
The modern way to implement process automation and workflows is to use Power Automate in Microsoft 365. We will discuss Power Automate in great detail in Chapter 9, Power Automate (Microsoft Flow).
- Site settings: You can view and change the site’s settings through this link. We'll discuss site settings in detail in the Viewing and changing site settings recipe in Chapter 3, Working with Modern Sites in SharePoint Online.
- Recycle bin: The SharePoint recycle bin is just like the recycle bin on your computer; it lets you view the items that have been deleted from your site. We will return to the recycle bin in the How it works… section of the Deleting and restoring a file recipe, later in this chapter. Please refer to the See also section for other recipes in this chapter where we have covered artifact deletion and the recycle bin in greater detail.
See also
- The Deleting a list topic in the Creating a list recipe, later in this chapter
- The Deleting an item topic in the Adding an item to a list recipe, later in this chapter
- The Deleting and restoring a file recipe, later in this chapter
- The Viewing and changing site settings recipe in Chapter 3, Working with Modern Sites in SharePoint Online
- SharePoint workflows in the Appendix
Creating a list
A SharePoint list is a table-like container that stores information similar to an Excel spreadsheet or a database table. A key difference between Excel files or database tables and lists is that the information in lists is automatically shared with and available to other users that have access to those lists. This recipe shows you how to create a new list from scratch. For illustrative purposes, we will use this list to store details of the products from our company's product line. This list will contain the following columns to store the product information:
- Title
- Code Name
- Product Line
- Date Released
- Notes
Getting ready
You will need either Edit, Design, or Full Control permission on the site where you'd like to create the list.
How to do it...
You can follow these steps to create a new SharePoint list:
- Browse to any page within the site where you'd like to create the list.
Click the New menu, click List, and then click Blank list:
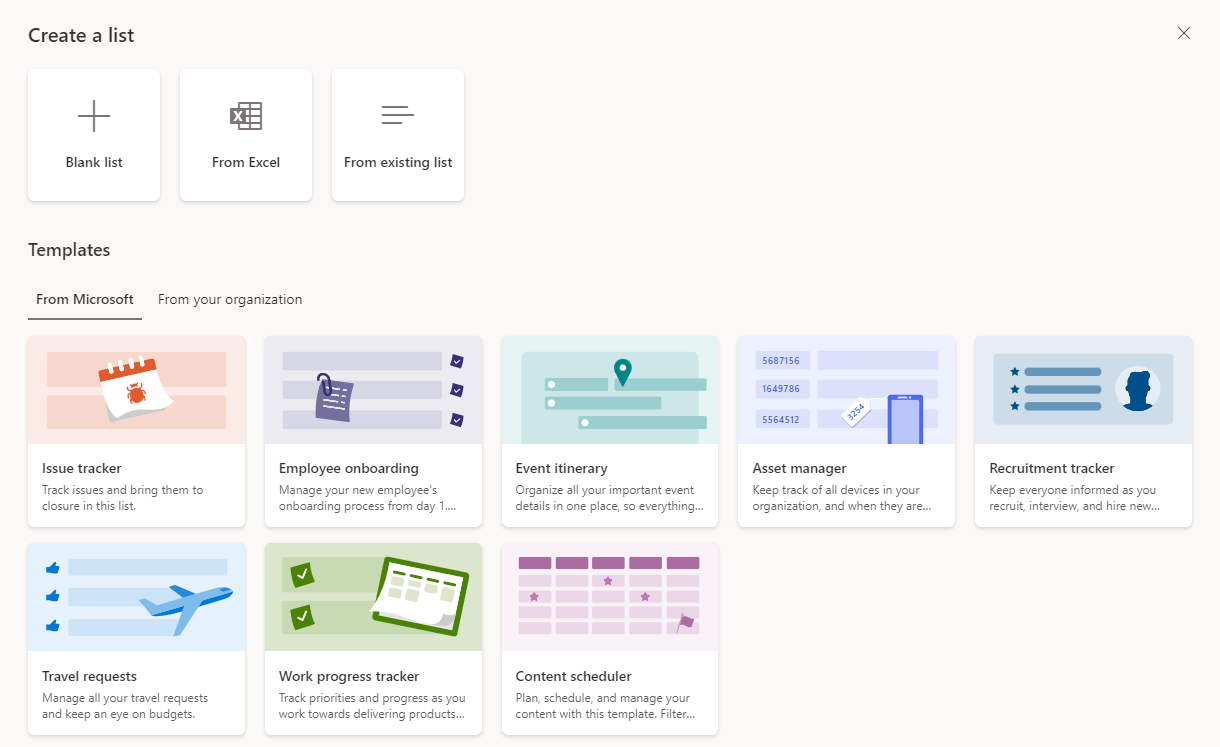
Instead of creating a new list from scratch, you can also choose to start from an existing list, create a list based on an Excel file, or use a pre-defined template to create the list. Doing so creates a list with pre-defined columns and settings. We will further explore these options in Chapter 4, Working with Lists and Libraries in SharePoint Online.
- Provide a descriptive name for the list so that others can identify the nature of the information that it stores. We are going to use Products as the name for our list.
Enter a description for the list and leave the Show in site navigation box checked. This will result in the list being shown in the site’s quick launch navigation area toward the left. Then click the Create button:

- This will create the new list and take us to it in the browser.
- You will notice that the list already has a Title column created for us. We can now add the remaining columns to our list.
- To add the Code Name column, click the Add column option and select Single line of text. Then, enter Code Name as the column name, optionally provide an appropriate description for the column, and click the Save button.
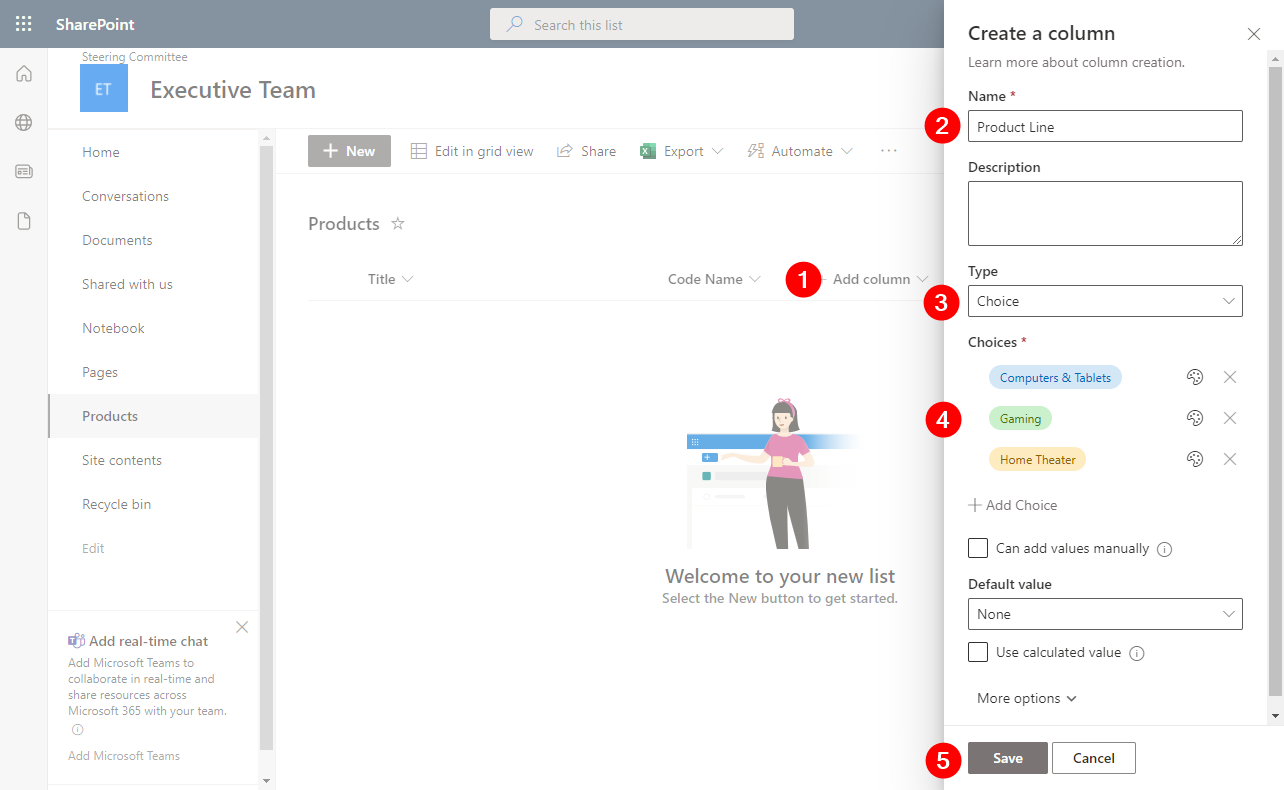
To add the Product Line column, click on the Add column (1) option and enter Product Line in Name (2). Then select Choice (3) as the column type and enter Computers & Tablets, Gaming, and Home Theater on three separate lines in the Choices (4) field. Then, click the Save (5) button, as shown in the following screenshot:
- To add the Date Released column, click the Add column option and select Date as the column type. Then, enter Date Released as the column name and click the Save button.
To add the Notes column, click on the Add column option and select Multiple lines of text as the column type. Then, enter Notes as the column name, optionally enter a description, and click the Save button.
When a new list is created in SharePoint, it creates a few additional columns that are not shown to the users by default. The Modified and Modified By columns are two such columns that get created with the list. We are going to add them back to the view of the list so that we can track who added the items to the list and when.
Click on Add column (1) and then Show/hide columns (2). As shown in the following screenshot, then select the Modified and Modified By columns (3):

- This is what your list would look like in the end if you followed the preceding steps:

Congratulations! You just learned how to create a custom list and added new columns to it.
How it works...
SharePoint uses lists as the primary way to store information that users create. Almost all information in SharePoint is stored in some type of a list. A list in SharePoint helps you to store data in a way that enables you and your co-workers to organize and share information flexibly. Just like a spreadsheet or a database table, it lets you add and manage columns so that you can store and display various types of information such as text, number, date, and currency. For each column, you can also specify properties, such as making the column required or optional, setting a default or calculated value for the column, etc. The properties you can specify for each column type vary based on the type of column. The Adding a column recipe in Chapter 4, Working with Lists and Libraries in SharePoint Online, discusses list columns in greater detail.In addition to the ability to define columns, SharePoint lists also let you create multiple views, which allow you to organize and show the underlying list data in various forms. List views enable you to filter, sort, group, and format the data in a list so you can easily present and highlight information that's most important to your audience.Content in lists exists in the form of list items. Items in a list can include file attachments, people, and links. Furthermore, SharePoint provides pre-created forms that you can use to add or update the information in lists. You can also create your own customized forms to add or edit information in lists. You can use tools such as Microsoft Power Apps to create mobile-friendly forms and apps around this data. Additionally, you can configure email alerts for when list items are added, updated, or deleted. We will look at alerts as part of the Adding alerts recipe in Chapter 4, Working with Lists and Libraries in SharePoint Online.
Deleting a list
You can delete a list by browsing to the List settings page. Please refer to the How it works... section of the Viewing and changing list settings recipe in Chapter 4, Working with Lists and Libraries in SharePoint Online, for more information about browsing to the List settings page and deleting a list.
See also
- The Deleting an item topic in the Adding an item to a list recipe, later in this chapter
- The Deleting and restoring a file recipe, later in this chapter
- Chapter 4, Working with Lists and Libraries in SharePoint Online
Adding an item to a list
You can add items to lists in various ways. This recipe will show the most used method to add items to the representative list we created as part of the previous recipe. The other methods to add list items will be covered in greater detail in Chapter 4, Working with Lists and Libraries in SharePoint Online. Even though this recipe uses the Products list as an example, the steps provided here can be used to add items to any list.
Getting ready
You will need Contribute permissions or higher for the list you would like to add the new item to.
How to do it...
To add a new item to a list, follow these steps:
Browse to the list where you'd like to add the new item.
You can browse to the lists and libraries on your site using the Quick Launch (left navigation) and the Global (top) navigation. The introduction in Chapter 3, Working with Modern Sites in SharePoint Online, shows how to access these navigation menus.
You can also access the lists and libraries through the Site contents page. The Viewing site contents recipe earlier in this chapter shows you how to navigate to this page.
- Click the New (1) button above the section that shows the title of the list.
- Enter information for the required fields (highlighted by a red *) and, optionally, the non-required fields (2).
- You can also optionally add file attachments for this item by clicking the Add attachments hyperlink toward the bottom of the form. File attachments include a variety of file types – images and documents, to name a few.
- Click the Save (3) button, as shown below, to add the item to the list:

Congratulations! You just added a new item to a SharePoint list.
How it works...
You can imagine a list item as a single row in an Excel spreadsheet, except that this row can hold a variety of rich information. Each list comes with a set of forms to add, edit, and view these items. Each list item can optionally also contain one or more attachments. Furthermore, the forms to add, edit, and view list items can be customized to meet specific user needs. Every time an item is added or edited in a list, SharePoint also stores additional information (or metadata) for that item. This metadata includes information such as who created or edited the item and when was it created or edited. Further, you can use Power Automate to set up automated actions when certain things happen in the list. For example, you can set up an automated approval and notification workflow that kicks in when a new item is added to a list or when an existing item is updated. We will discuss Power Automate in depth in Chapter 9, Power Automate (Microsoft Flow).
There's more...
Provided you have appropriate access, you can also delete one or more list items from a list and documents from a library.
Deleting an item
To delete a list item, simply browse to your list, select the file you would like to delete (1), and then click the Delete (2) option from the list's menu bar, as shown in the following screenshot:

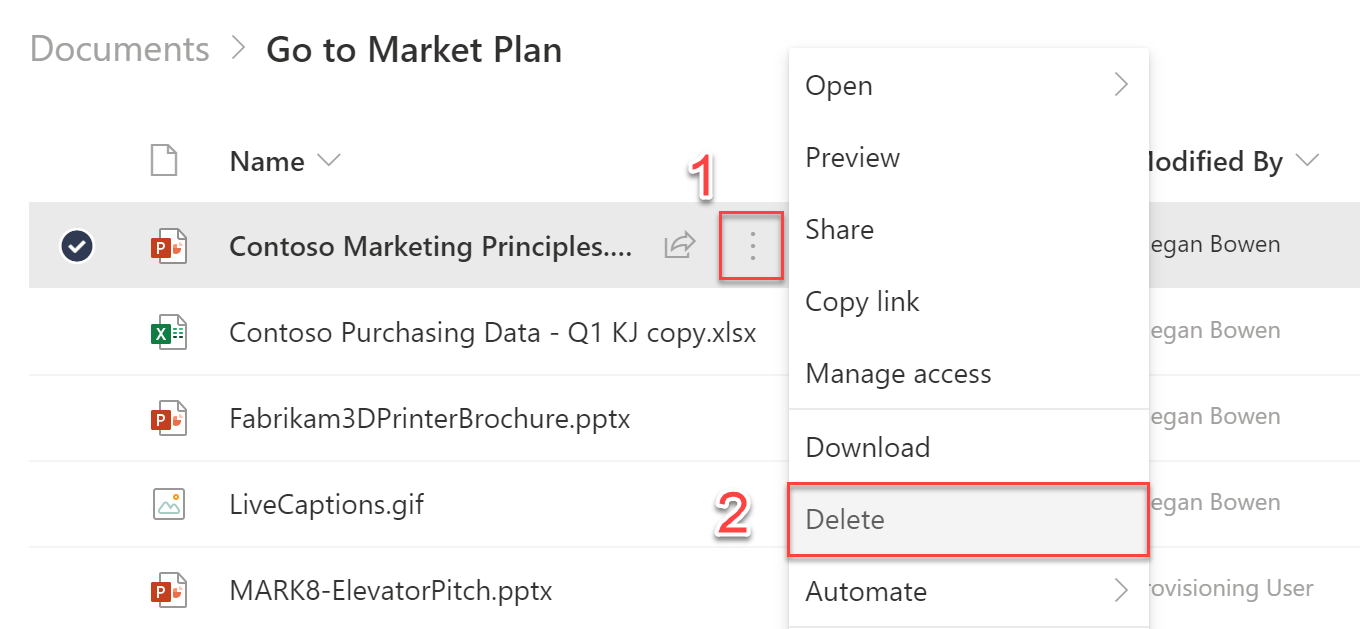
Alternatively, you can also right-click the list item or click the three dots to the right of the title field (1) to open the context menu and then click Delete (2) to delete the item. This is shown in the following screenshot:
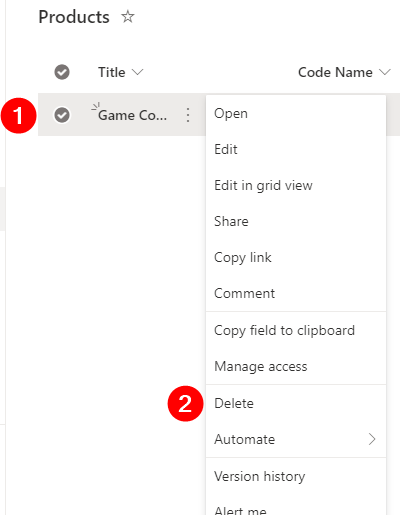
The steps provided here for deleting list items are also true for deleting files from SharePoint libraries. Deleting an item from a list or library sends it to the recycle bin, where it stays for a couple of days until it gets moved to the second-stage recycle bin or gets permanently deleted. You can restore deleted items if they are still in the recycle bin and have not been permanently deleted. Please refer to the Deleting and restoring a file recipe, later in this chapter, to read more about the site recycle bin.
See also
- The Deleting a list topic in the Creating a list recipe, earlier in this chapter
- The Deleting and restoring a file recipe, later in this chapter
- Chapter 4, Working with Lists and Libraries in SharePoint Online
- The Adding alerts recipe in Chapter 4, Working with Lists and Libraries in SharePoint Online
Creating a document library
A library is a secure place in SharePoint where you can upload, create, edit, and manage files for online sharing and collaboration with your team. Just like lists, each library comes with key built-in columns that automatically store default information about each file, such as who created the file and when, and who last modified it and when. You can always add your own columns to the library, just as you would for a list. Each SharePoint site ships with one or more libraries to enable you to store files within the site. Libraries can be of different types. A document library is the most used type of library and, as the name suggests, is used to store, manage, and share documents. The site pages library is used to store and manage pages and news items. The Inbuilt list and library templates topic of the Creating a list using a built-in list template recipe in Chapter 4, Working with Lists and Libraries in SharePoint Online, provides a list of all the inbuilt templates.For this recipe, we will create a document library from scratch. We will use this library to store marketing documents. This library will also enable you to classify each document using the Document Type and Document Classification columns.
Getting ready
You will need either Edit, Design, or Full Control permission on the site where you'd like to create the library.
How to do it...
You can follow these steps to create a new document library:
- Browse to any page within the site where you'd like to create the library.
- Click the New menu and then click the Document library option.
- Provide a name and description for the library so that others can identify the nature of the documents that it stores. We are going to use Marketing Collateral as the library name and This library contains collateral for use of the Marketing team as its description.
- We will leave the Show in site navigation box checked. This will result in the library being shown on the left-hand side navigation menu for the site.
- We will then click the Create button to create the new document library. This will create the new library and redirect us to it in the browser.
- You will notice that the library comes with the following columns already created for us: Name, Modified, and Modified By. We can now add the remaining columns to our library.
- To add the Document Type column, click on the Add column option and select Choice as the column type. Then, enter Document Type as the column name. Enter Campaign, Case Study, Product Overview, and Product Pitching in four separate lines in the Choices field (1).
Then, click More options, set Require that this column contains information to Yes (2), and click the Save (3) button, as shown in the following screenshot:

- Similarly, to add the Document Classification column, click the Add column option again and select Choice as the column type. Then, enter Document Classification as the column name. Enter Confidential, Restricted, Internal use, and Public in four separate lines in the Choices field.
- Then, click More options, set Require that this column contains information to Yes, and click the Save button
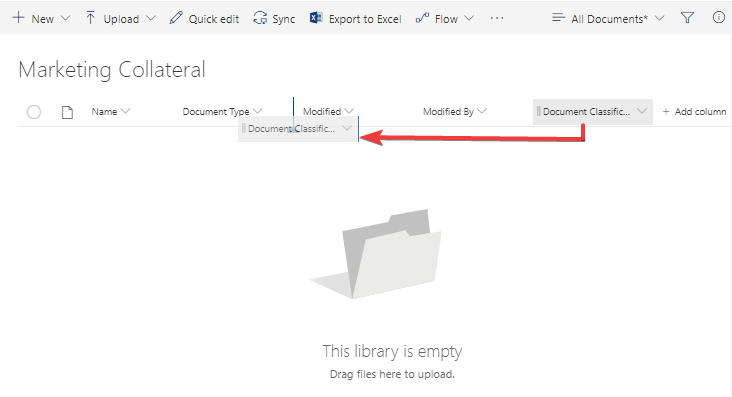
- We will also change the position of the two newly created columns so that they show up next to the Name column (before the Modified and Modified By columns). To do so, simply click on the Document Type column name and drag it to the left, before the Modified column. Do the same for the Document Classification column, as shown in the following screenshot:
That's it – congratulations! You just created and configured your first SharePoint document library.
How it works...
We discussed lists in the two previous recipes. A document library is a special type of list that is centered around documents. Just like a list, it lets you add, edit, view, and delete documents, and metadata related to those documents. One of the more popular and widely used features that document libraries enable is the ability for multiple users to concurrently view and edit documents that it stores. Users can not only concurrently edit documents but can also view each other's edits in real time. SharePoint also lets you create complex approval workflows surrounding these documents. Like regular lists, you can set email alerts so you are notified when relevant documents in a library are added, updated, or deleted.Just like lists, SharePoint comes with a number of pre-built libraries. Some notable examples of such libraries are the picture library, form library, and site pages library.
See also
- Chapter 4, Working with Lists and Libraries in SharePoint Online
- Chapter 5, Document Management in SharePoint Online
Uploading documents to a library
SharePoint lets you create new documents directly within a library through the New menu. It also lets you upload documents that have been authored offline.In this recipe, we are going to learn how to upload an existing document to a document library and then associate metadata to it. Even though this recipe uses the Marketing Collateral library, which we previously created as an example, the steps here work for any SharePoint library.
Getting ready
You will need Contribute permissions or higher to the library where you would like to upload the document.
How to do it...
Here’s how to upload a document to your document library:
- Browse to the library where you'd like to upload the document.
Click Upload and then choose the Files option to open the file selection dialog, as shown in the following screenshot:

Browse to the file that you'd like to upload and click the Open button.
You can upload multiple files or entire folders to a library using this method if you so desire.
SharePoint also supports drag-and-drop capabilities, which work with a wide variety of browsers. Simply drag and drop the files or folders anywhere in the browser window when viewing the library. This will result in SharePoint uploading the folders, subfolders, and any files within them to the library, resulting in the same outcome as that of steps 2-3 here.
This will initiate the file upload process. SharePoint will show the newly uploaded file in the library, as shown in the following screenshot:
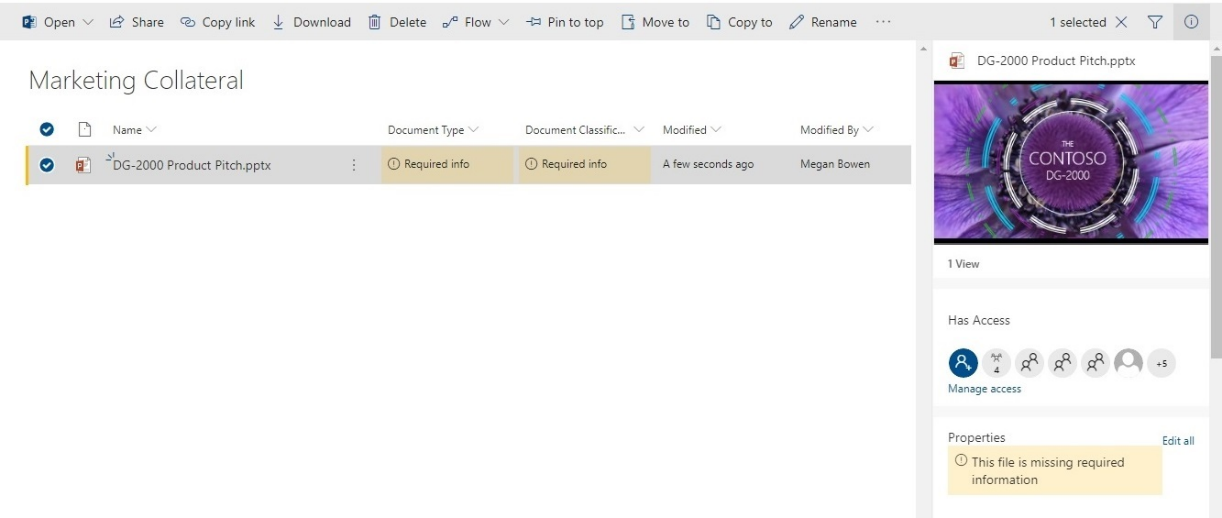
You will notice that SharePoint shows information about the file as well as a preview.
Clicking the preview in the right-hand side pane activates the file and lets you view the entire contents of the file right from within that pane.
- You will need to enter information in the required fields for this document before it becomes visible to anyone else in your site or your organization (depending on how the site’s security has been configured). You will also want to give your file a friendly title at this point. Click the Edit all link in the details pane toward the right. Make sure the document is selected if you can't see the details pane.
- Enter or select the required information for the document and click the Save button, as shown in the following screenshot:

After you've uploaded the document, SharePoint will maintain a history of all edits that have been made to that document. You can view the previous versions of the document, when and who modified it, and even roll back the document to a previous version. This is particularly useful when a document is being updated by multiple users and you need to "undo" a small set of changes because they were inaccurate or incorrect.
That's it! You have now uploaded your first document to a SharePoint document library. We will learn how to view and modify these documents in the Viewing and editing documents in the browser recipe in Chapter 5, Document Management in SharePoint Online.
How it works...
Documents are stored in libraries one document at a time. SharePoint also lets you upload or delete multiple documents at a time. If your documents have associated metadata, SharePoint lets you edit the metadata of multiple documents at once. The metadata that you associate with the documents will also show up in the information panel in regular desktop Office apps such as Microsoft Word, Excel, or PowerPoint, as shown in the following screenshot:

In addition to custom metadata, SharePoint will also store and show you additional information about who created or last modified the document and when. SharePoint also lets you create follow-up actions when documents are added, modified, or deleted. You can do this by using Microsoft Power Automate. For example, if a user uploads an expense report, you can send it through an automated approval process in your organization. Please refer to Chapter 9, Power Automate (Microsoft Flow), for more details.Finally, SharePoint enforces some restrictions on file sizes and paths. You can view those restrictions here: https://m365book.page.link/File-Size-Path-Restrictions.
Uploading a folder
You can upload an entire folder along with any subfolders and their contents to a SharePoint document library. To do so, simply browse to your library, click Upload, and choose the Folder option. You will then be prompted to select a folder from your computer. Selecting the folder will create a copy of that folder in the document library and copy all the contents of that local folder to the newly created folder in SharePoint online. Note, as mentioned earlier in this recipe, that you can also simply drag and drop folders into your document library view. Doing so will recreate the folders and their contents within the document library.
See also
- Chapter 5, Document Management in SharePoint Online
- The Adding alerts recipe in Chapter 4, Working with Lists and Libraries in SharePoint Online
Deleting and restoring a file
In this recipe, you will learn how to delete a SharePoint document and then restore it from your site’s recycle bin.
Getting ready
You will need to be able to access a document library in a SharePoint site for which you have at least Contribute or Member/Edit permissions. You will not be able to delete a file without these permissions. To complete these steps, the document library must also have at least one document you can delete.If the document library is empty, you can create a new document quickly by using the New button and selecting Word, Excel, PowerPoint, etc. as the document type.If you have difficulty locating a document library on a site, navigate to Settings > Site Contents and look for a document library there.
How to do it...
Select the ellipsis (…) next to a file, then Delete.
Confirm the deletion on the pop-up dialog by selecting Delete.

Watch for the status notification in the upper-right corner letting you know the file was successfully deleted.

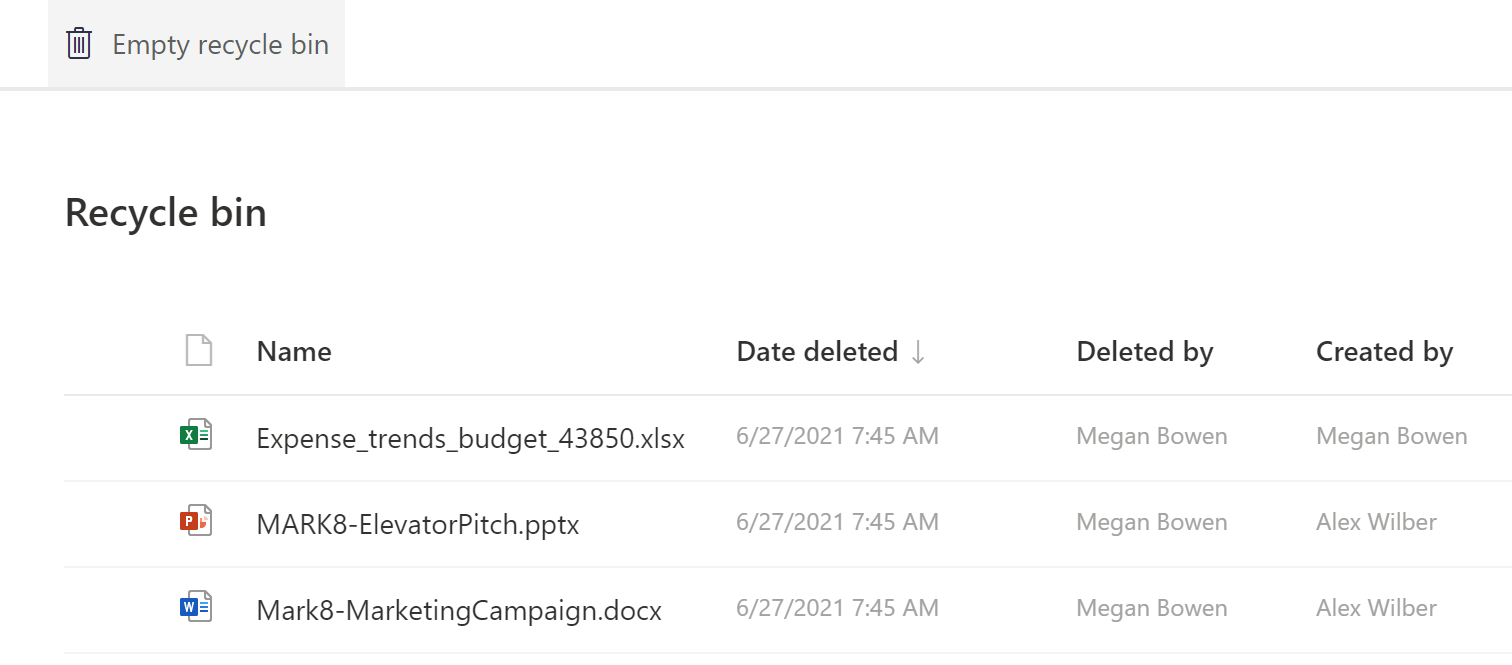
- Select Recycle Bin from the left-hand navigation menu (team site templates only) OR Settings > Site Contents > Recycle Bin.
- Select the file you wish to restore by clicking the circle that appears to its left when hovering your mouse over the file. Then choose Restore:

How it works...
Steps 1-3 move a file from its original location to the site’s recycle bin shared by all site members. At this point, a countdown of 93 days begins, after which the file will automatically be permanently deleted.If, during those 93 days, you choose (or a fellow site member chooses) to restore a deleted file, you can follow steps 4-5 to move the file back to its original library.Just like the recycle bin on your computer, you can either restore deleted items or permanently delete them from here. However, there are several key differences between the recycle bin on your computer and the site recycle bin as follows:
- Types of deleted items: The site recycle bin not only contains deleted files and folders but also deleted items of other types, such as list items, calendar items, contacts from the contact lists, entire lists or libraries, and even subsites. In that sense, it is a catch-all for anything that gets deleted from your site.
- Permission-dependent: You can only view content that you have access to depending on your permissions within a site. So, unless you had permission to specific content before it was deleted from the site in the first place, you will not see it in the site recycle bin. An exception to this rule is for the site admins – since site admins have access to all content on the site, they also can view and restore any and all content that was deleted from the site.
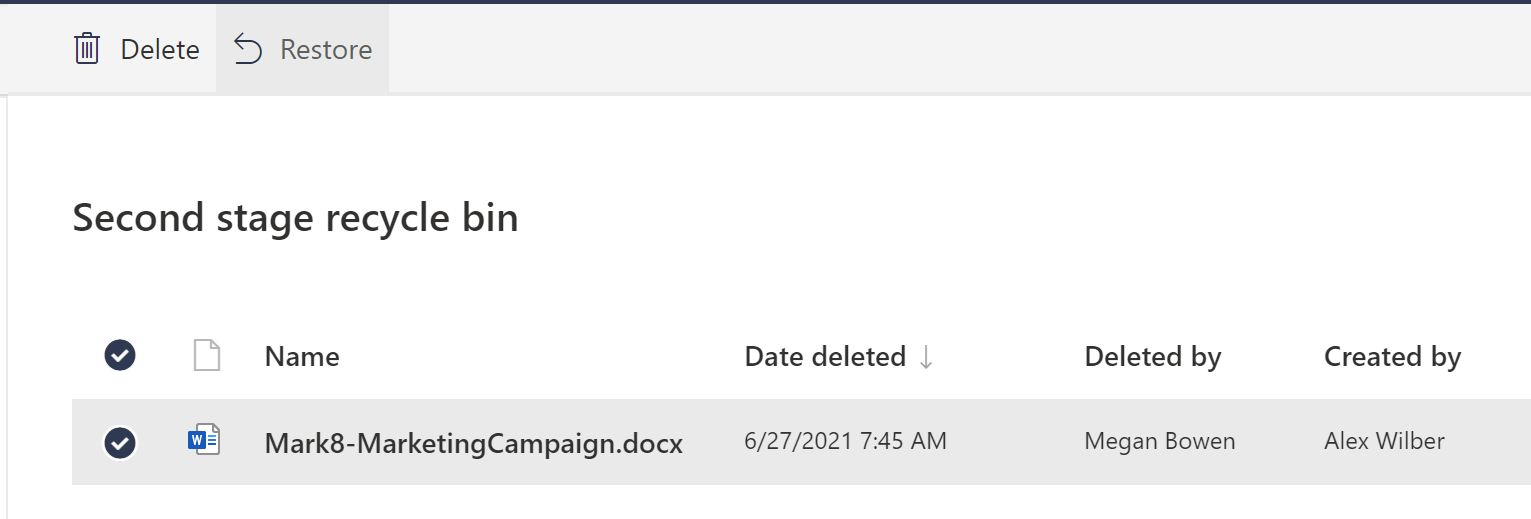
Second-stage recycle bin: In addition to the primary recycle bin that you can see within a site, site admins also have access to a second-stage recycle bin (or the site collection recycle bin). This is where items go once they've been deleted from your recycle bin. Just as in the primary recycle bin, admins can restore or permanently delete items from the second-stage recycle bin.
Deleted subsites are stored in the second-stage recycle bin and can only be restored from there by the site owner.
You can learn more about restoring items from the site collection recycle bin here: https://m365book.page.link/2nd-stage-bin.
We also read about site collections as part of the Creating a modern site recipe earlier in this chapter. Deleted site collections will need to be restored by a designated SharePoint admin from your organization.
- Retention period: The total retention period for items in the recycle bin is 93 days. You can restore content or have your site admins restore content within the site for 93 days. After that, the content is permanently deleted.
- Auto-purge on quota: Files in the site recycle bin still count against site storage quotas, and the recycle bin can only hold 200% of that quota before it will begin to auto-purge the oldest items. The second-stage recycle bin (when the recycle bin is empty, or deleted files are deleted from the recycle bin) does not count against site storage quotas and is only accessible to site owners.
You can read more about managing site storage limits here: https://m365book.page.link/site-storage-limits.
- Back-up data: In addition to the above, Microsoft retains back-ups of your site data for 14 days beyond the actual deletion. Such data is only available via a request to Microsoft Support by your organization’s administrators.
There's more...
As with most things in SharePoint, you can accomplish the outcome of this recipe in multiple ways. For example, instead of selecting a document’s ellipsis (…) and then Delete, you can instead simply right-click the document and choose Delete. You can also select the file (clicking the circle to the left of the file) and choose Delete from the top ribbon menu.You can also multi-select to delete several files at once and restore them through the same method.Keep in mind that the recycle bin is shared by all site members, so another member may choose to restore a file you deleted (and you can restore files others deleted). All these actions are always dependent on having appropriate edit permissions to involved content and locations.
Emptying the recycle bin
If you know you won’t need any deleted items in your recycle bin you can choose to Empty Recycle Bin, which is effectively the same as deleting a file a second time, but from your recycle bin. This moves all content in your site’s recycle bin to the site’s second-stage recycle bin only accessible to site owners.
Files can still be restored from here by a site owner unless a file has been in either recycle bin for a total of 93 days after which it’s permanently deleted.
Files restored from the second-stage recycle bin still return to the original location (not the first recycle bin).
File deletion in OneDrive
Deleting files in OneDrive is very similar to this process. In fact, the deletion and restoring process is nearly identical.For those closely monitoring their storage space in OneDrive, second-stage recycle bin files will not count toward the storage being used. However, this should not be used as a permanent storage solution to bypass a storage limit. After 93 days, files in either recycle bin (first or second-stage) are permanently deleted.
Restoring a library
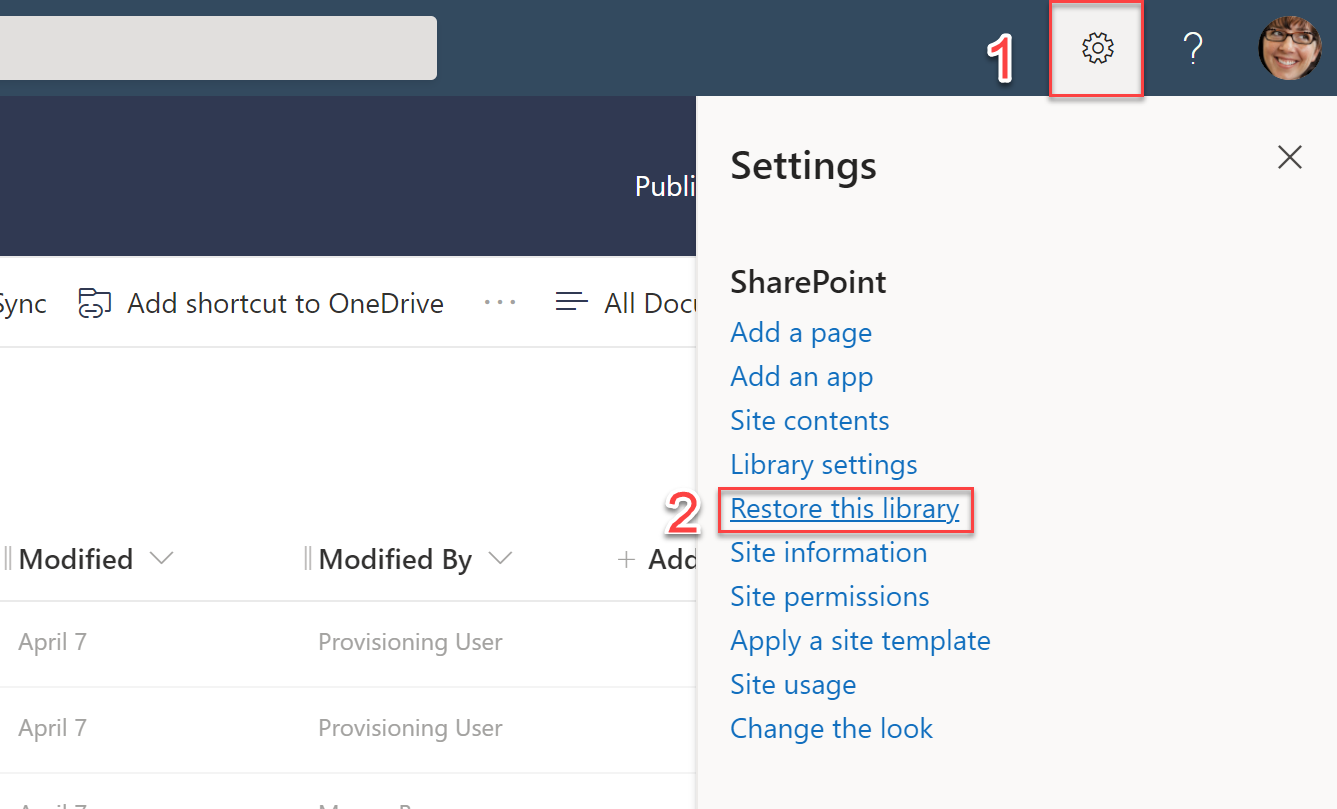
Rather than restoring one file, you may wish to “undo” many changes made over a period of time. In SharePoint document libraries (and your OneDrive) you can choose Settings > Restore this library. This allows you to specify a point in time to which you’d like to revert the entirety of the library (or your OneDrive).
When restoring a library, you choose a point in time to which you’d like to return. You can restore to:
- Yesterday
- One week ago
- Three weeks ago
- Custom date and time
Once you’ve made a selection for the point in time, you’ll see all individual changes (file modified, file deleted, etc.) that will be undone before you proceed with the restoration as seen at the bottom of the following screenshot.
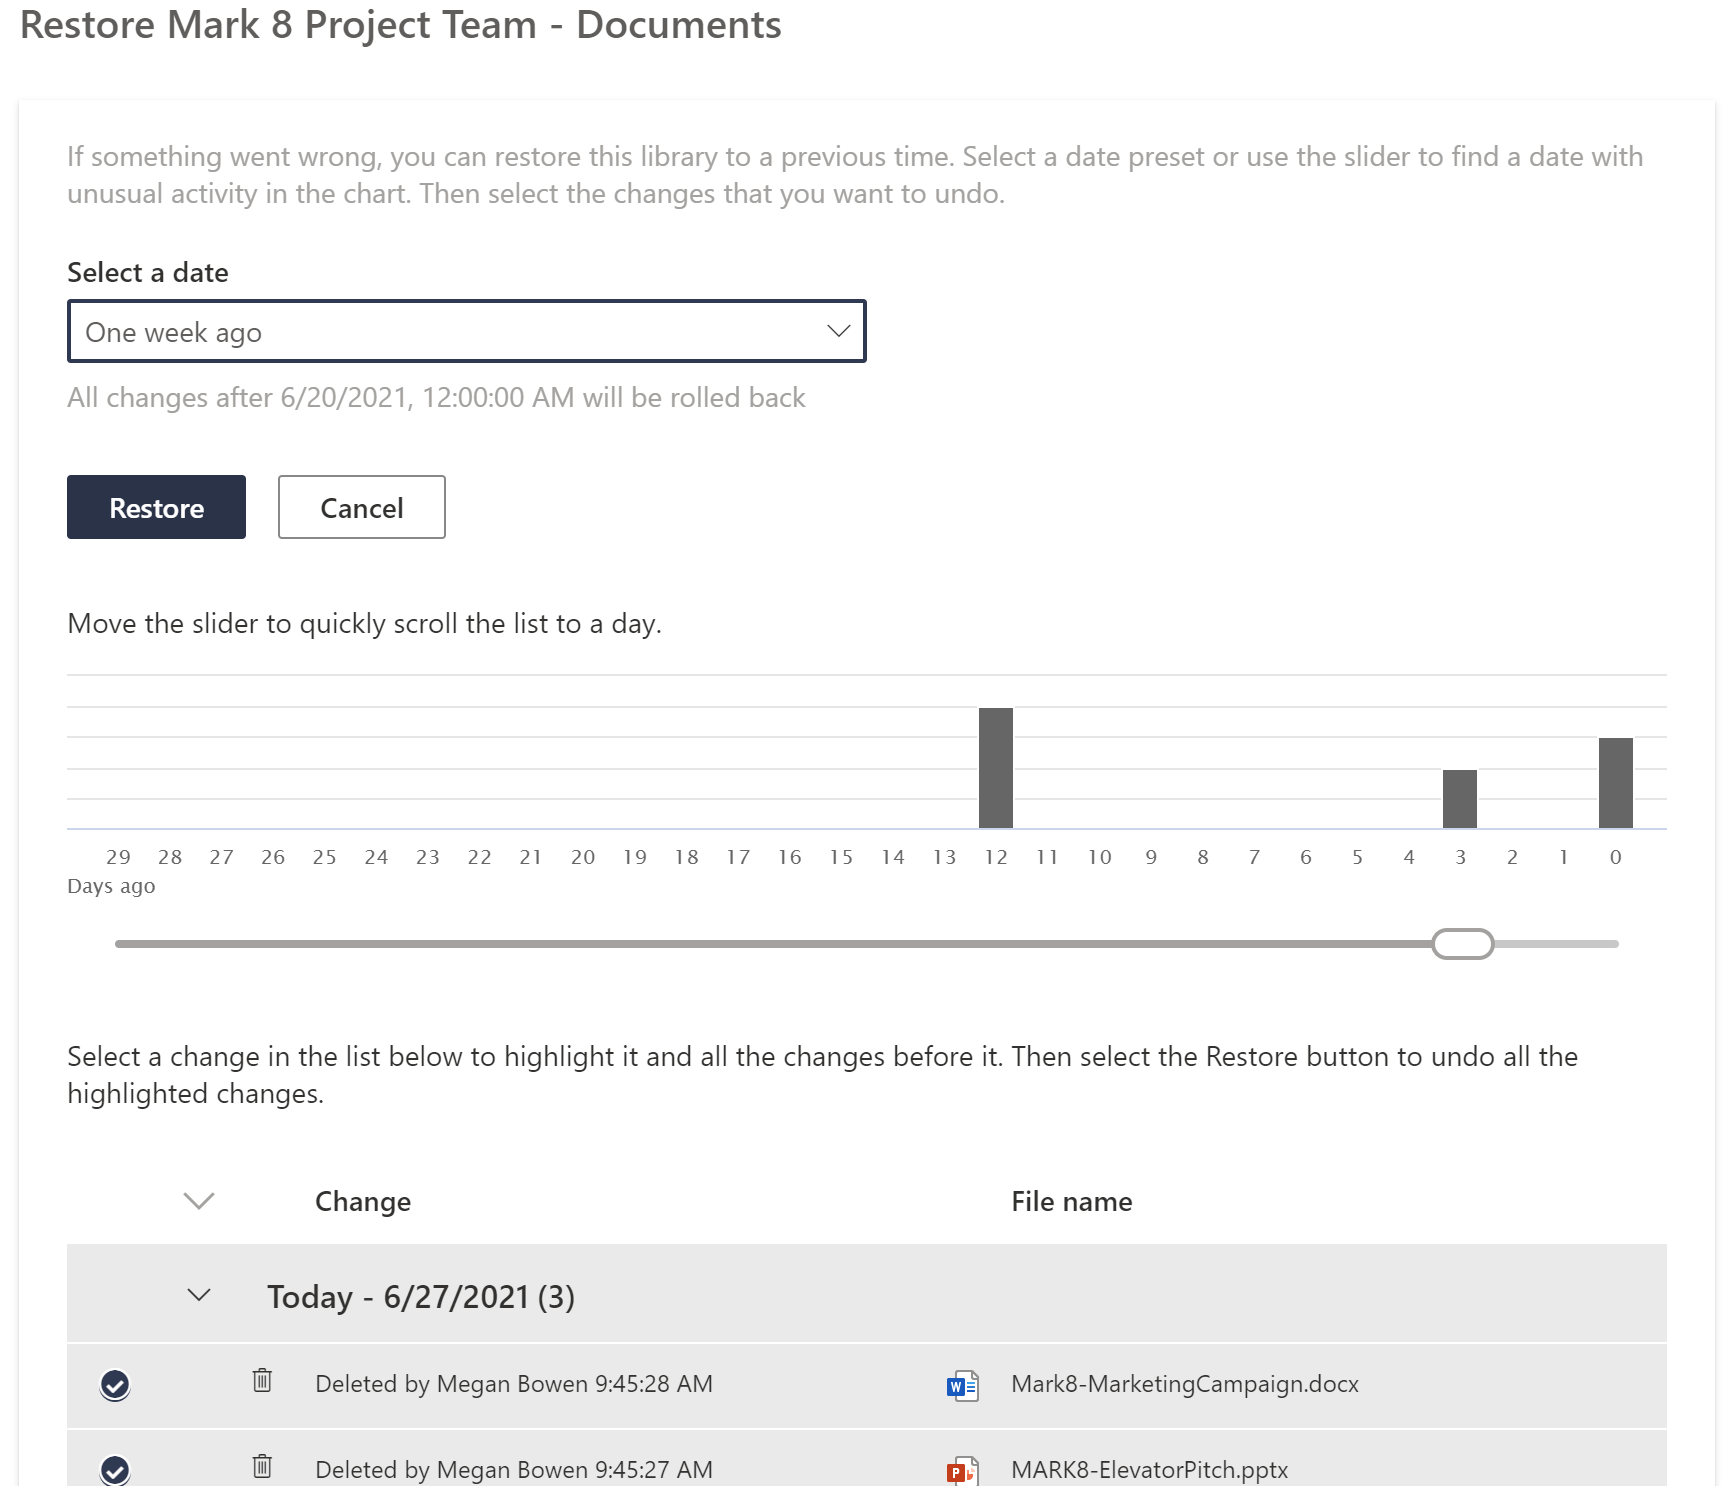
Once you click Restore, it may take some time to complete depending on the size and complexity of all involved changes.
Deleting library columns
It’s worth noting that if you should ever delete a column of metadata from a library (such as Category, Due Date, etc. that may have been used for organization), that column is not retrievable or restorable. Once deleted, it is permanently gone.

One idea to consider is just hiding the column so the metadata is retrievable in version histories or for auditing. You can even rename these unneeded columns with a prefix like ARCHV-Category to keep them sorted together and available if needed.
Deleting previous file versions
If you delete a specific version of a file (for example version 2, when the current version is 6), that version goes through the recycle bin independently in the same process as a normal file and can be restored. You’ll see it noted with the original filename, but appended with the version number in parentheses as shown in the following screenshot:
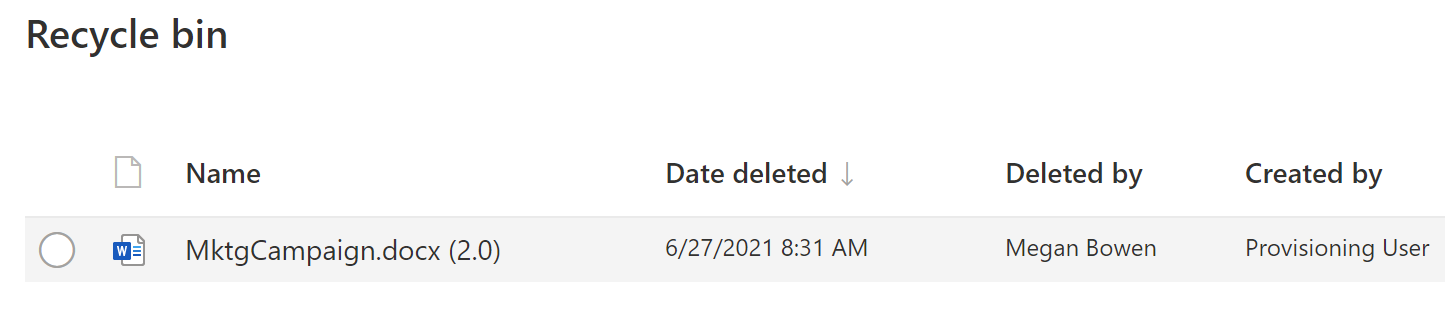
And after 93 days (or if manually deleted sooner) that version will be permanently deleted and non-restorable just as with a normal file.
See also
- The Deleting a list topic in the Creating a list recipe, earlier in this chapter
- The Deleting an item topic in the Adding an item to a list recipe, earlier in this chapter
Sharing a document
Once you've uploaded your document to SharePoint Online, you can simply use Share or Copy link to easily share it with your colleagues. This recipe shows you how to share a link to a document using the Share feature.
Getting ready
You should have at least Read access to the document you'd like to share.
How to do it...
To share a document with a member of your team, follow these steps:
- Browse to the document you'd like to share.
Click on the Share (
 ) icon next to the document. Alternatively, select the document and then click the Share option on the top menu bar, as shown in the following screenshot:
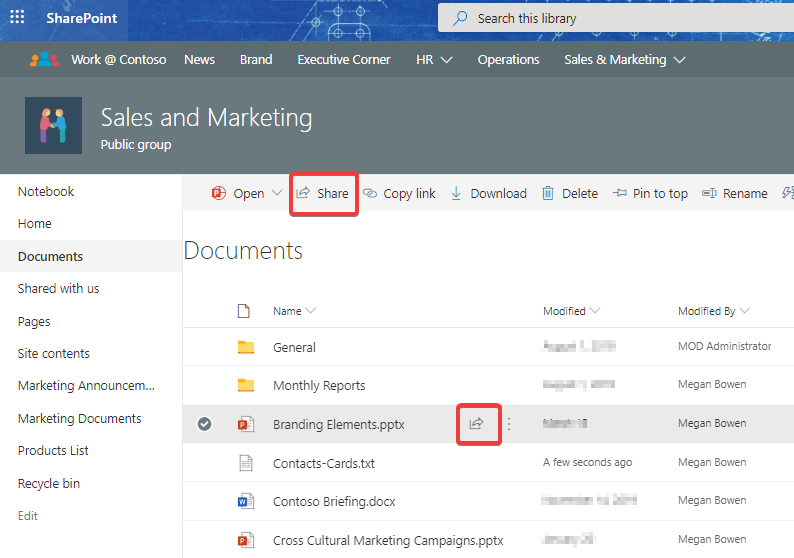
On the pop-up box that appears, click the dropdown right below the filename to select who you would like to share the link with:

- This will open the Link settings dialog, which allows you to select one of the following options:
- Anyone with the link: This option is for anonymous link sharing and is enabled only if your organization allows this
- People in <your organization’s name> with the link: This option creates a link that allows the entire organization to view or edit your document
- People with existing access: This option simply creates a link for people who already have access to the document
- Specific people: This option allows you to specify names of people with whom you’d like to share the document
We will cover these options in more detail in the How it works… section of this recipe. For now, select the last option to generate a link for specific people.
Select whether the person you are sharing this document with should be able to edit it and whether they should be able to download the document (or be able to view it only online). For our example, we will deselect the Allow editing option and select Block download so the generated link grants view-only access to the document through the browser:

Your organization can control the options that are enabled and selected by default in the Link settings box, as shown in the preceding screenshot. Most organizations have the Allow editing option not selected by default. This means that the people who you are sharing the document with will be able to view it but will not be able to edit it.
You can additionally select the Block download option to prevent users from being able to download the documents. When this option is selected, they can only view the documents in the browser. This is useful when you do not want users to maintain a local copy of the document. Note that the Block download option is only available when you are sharing the document with a view-only link.
- Click the Apply button and then enter the names of the people you would like to share the document with.
Enter a message to be sent with the sharing invitation email and click the Send button, as shown in the following screenshot:
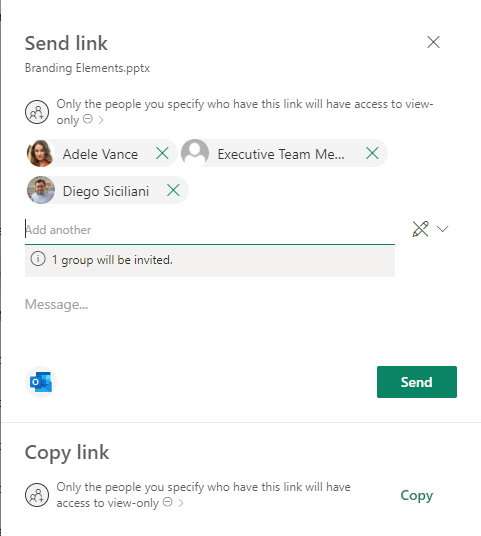
Depending on how your organization has been set up, in addition to sharing documents with individuals, you may be able to share them with entire groups or teams (see figure).
Also note that you can copy the link from this dialog and send it to members via a tool of your choice (such as an email or Microsoft Teams message). The copied link is only valid for the members selected on this screen.
- SharePoint then sends the recipients an email with your message and a link to the document, as shown in the following screenshot:
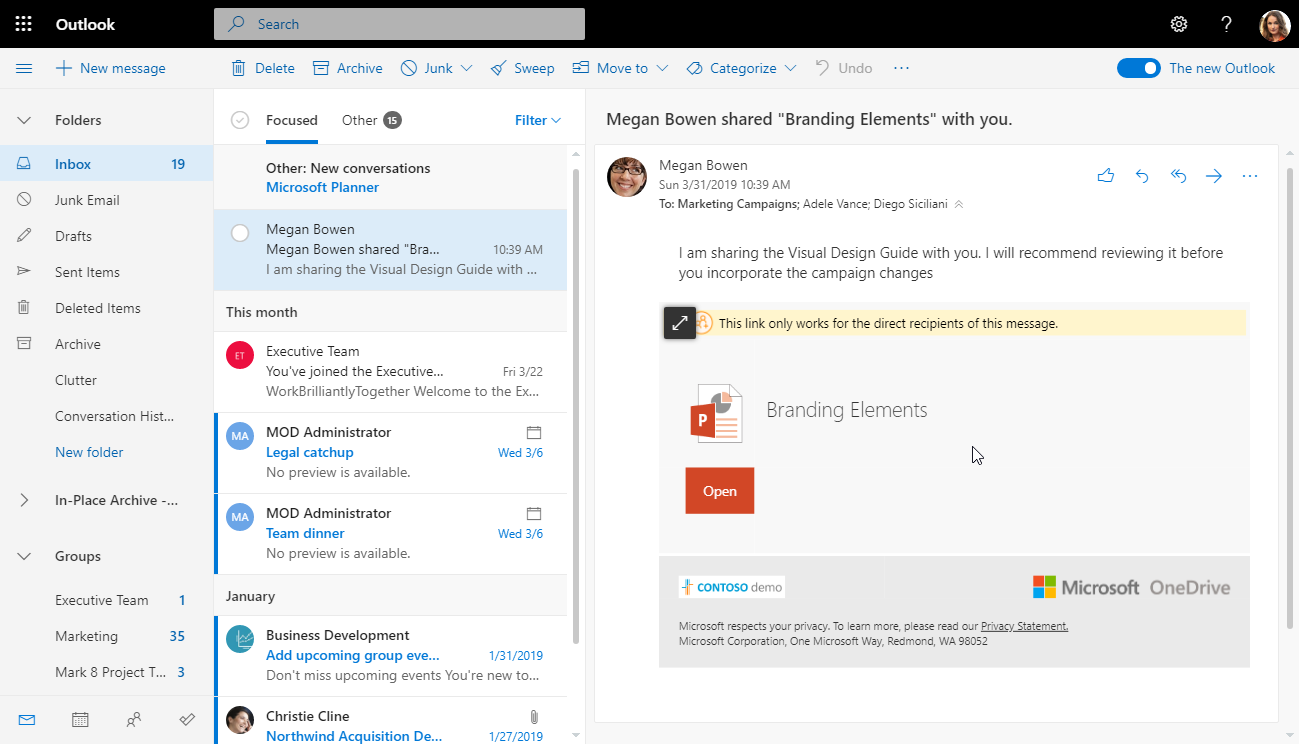
Congratulations! You just learned how to share a document with other members within your organization. The recipients of your sharing invitation can now view or edit this document, depending on the permission that was granted to them.
How it works...
There are a couple of things that happen when a document is shared:
SharePoint checks to see if the person that the document is being shared with already has the required permissions. If not, SharePoint alters the permissions for the document so that the appropriate rights (Read or Contribute) are granted to the person that the document is being shared with. You can read more about managing document permissions in the Viewing and changing document permissions recipe in Chapter 5, Document Management in SharePoint Online.
SharePoint also checks your permissions during the sharing process. If you do not have permission to edit the document and try to share it with the Allow editing box checked, SharePoint will send an approval request email to the site owners. An email with a link to the document will then only be sent to the requested users after the sharing request gets approved. The request reviewer will also be able to change the level of access that will be granted to the requested user(s). They can restrict permissions and inversely grant greater access than what you had originally requested.
- It generates a link specific to the people with which the document is being shared.
- It sends an email with the generated link, along with a message, if you specified one.
Types of links
This recipe showed you how to share a document with specific people. Three other sharing options that you will see in the Link settings dialog are as follows:
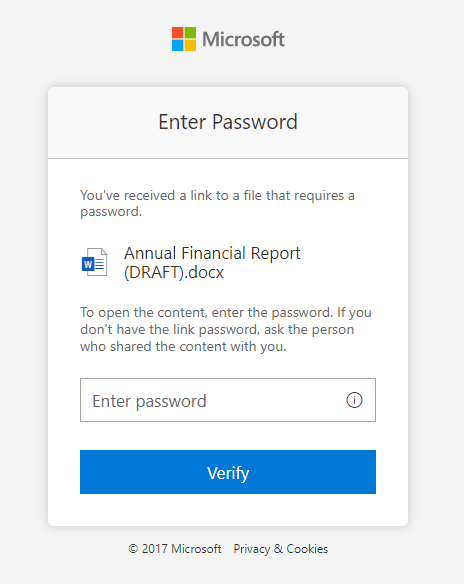
- Anyone with the link: Use this option to share the document with anonymous users that are outside your organization. People with this link can view or edit the document without having to sign into Microsoft 365. Since this option enables you to share your organization's content with anonymous external users, there's a good chance that it may have been disabled by your SharePoint site or organization administrators. When sharing a link through this option, it is recommended to set an expiration date, along with a password, for added security:

If you do decide to password-protect your file, remember to share the password with people who will use the link. They will be prompted to enter the password before accessing the file, as shown in the following screenshot:
- People in <your organization’s name> with a link: This option generates a link that anyone in your organization can use to view or edit the document. Note that unlike the previous option, users of the link will be required to sign into the site.
- People with existing access: This option enables you to simply get a link to the document without changing its permissions. This should be your first choice if you know that people who will view the link already have access to the document.
There's more...
As we just saw, the Share option sends an email message with a link to the intended recipients. You may, however, need to just copy the link so that you can then share it through different means (such as a Teams channel or even an existing email chain). The Copy link menu option, which is right next to the Share option, enables you to do just that.
Copy link
You can access the Copy link option from either the top navigation bar or the context menu for a list or library item:
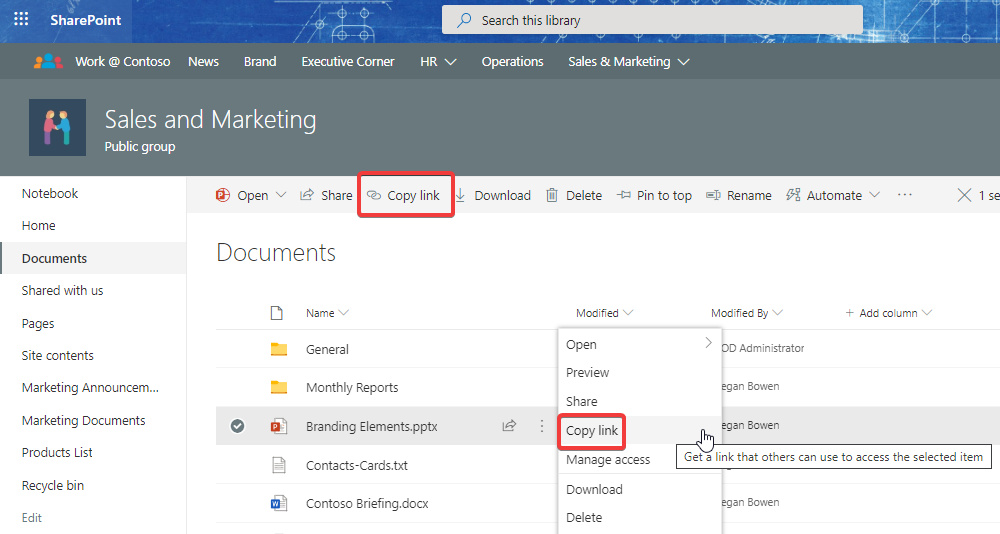
Once you select this option, you can optionally go through steps similar to the Share option described in this recipe, to adjust the permissions of the generated link.
See also
- The Creating a new document recipe in Chapter 5, Document Management in SharePoint Online
- The Determining and revoking permissions in a site recipe in Chapter 3, Working with Modern Sites in SharePoint Online
- The Sharing a file recipe in Chapter 7, OneDrive for Business (online supplement)
Searching content
Search is a core part of the SharePoint user experience. It enables users to find relevant business information and documents more quickly and easily than ever before.For this recipe, I am going to act as a marketing manager who would like to search for our visual design guide, which I remember is called "Branding Elements."
Getting ready
All you need is Read access to the site where you will be performing your search. The results that SharePoint returns are security trimmed, which means you will only see content that you have access to through direct or indirect permissions.
How to do it...
To perform a search within a site, follow these steps:
- Browse to any page on the site where you'd like to perform the search. In our example, I will browse to my Sales and Marketing site.
Start typing your search keywords to see the relevant results. In this case, we will start typing Branding Elements. We'll notice that we immediately start seeing the results after entering the first two letters, as shown in the following screenshot:

- At this point, we can click the appropriate result if we've found what we're looking for.
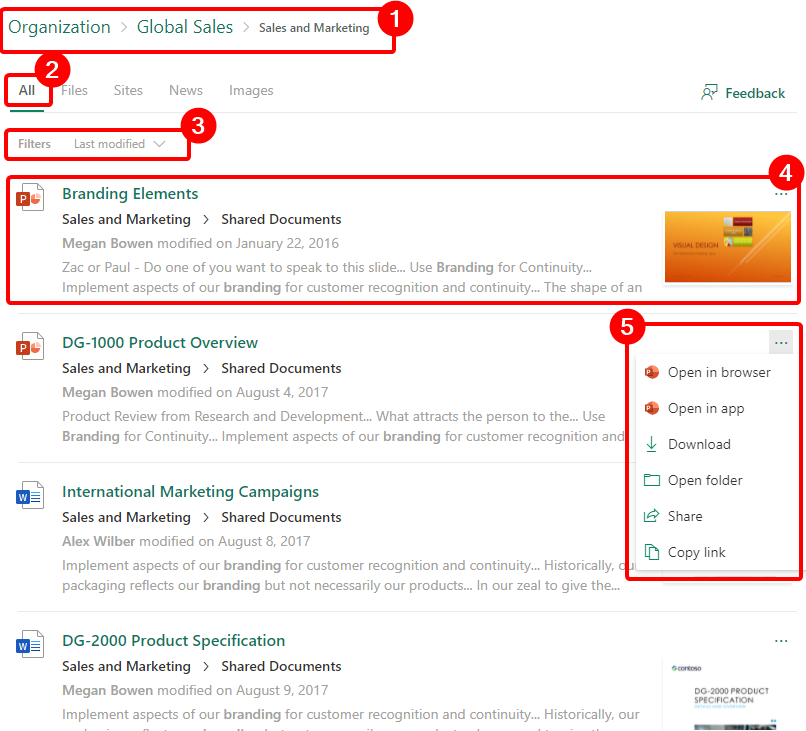
- Otherwise, we can finish entering the search keyword(s) and then click the Show more results link, toward the bottom, to be taken to the search results page to see the matching results from the current site. Note that these results are sorted in order of their predicted relevance to you.
As shown in the image below, we have the following options on this page:
- The ability to change the scope of the search results to show results from the hub or entire organization, instead of just from within this site.
- By default, this page shows you all result types. You can however select one of the tabs on the top to further narrow down the results to Files, Sites, News, or Images.
- Depending on the selected tab, you can apply additional filters such as the modified date.
- Each result shows you a preview of where your search keyword occurred and also an image of the relevant file or site result.
- Finally, the three dots toward the top right of the result row allow you to perform certain actions on the result. These actions vary depending on the type of search result. The options that you see in the screenshot below are relevant to the file result type.
The whole SharePoint search experience is highly customizable by your organization. For example, your organization can define additional filters that you can utilize. Another search customization that's widely used is to define Best Bets, which are results that would show up at the top, depending on your search keywords.
- Finally, the results you will initially see are those from within the site where you performed the original search. Clicking the Global Sales link at the top, however, brings back results from the hub that this site is part of.
You learned about hub sites in the Creating a modern site recipe earlier in this chapter
Furthermore, clicking the Organization link at the top will expand the scope to show results from all sites in the entire organization. Bear in mind that the results you see are always security-trimmed, which means that you will only see documents and content that you have access to in the first place.
How it works...
Microsoft Search is the component of Microsoft 365 that helps you find information that you already have access to but do not know where to look for. This information could be a document that you had previously created, or it could be information that was shared by your colleagues.In addition to lists and libraries, SharePoint search indexes content in pages and the profiles of the employees in your organization. It then lets you search this indexed content using advanced filter criteria. Finally, it lets you view the results through a user-friendly presentation experience.Some of the salient features of the search results page shown in the preceding screenshot are as follows:
- Search scopes: Earlier, we discussed the ability to expand the scope of the search results from the current site to the current hub, and then to the entire organization. Searching from within the Microsoft 365 home page or the SharePoint start page automatically defaults the search scope to the organization level. Similarly, performing a search from the hub site defaults the scope to the entire hub, meaning that it will show you results from all the sites within that hub.
- Search result verticals: The various tabs shown in the preceding screenshot are also commonly known as search verticals. Verticals are a way to group content of different types. The preceding screenshot shows verticals for Files (which only shows file and folder results), Sites (which only shows matching sites), and News (which only shows matching news posts). The All vertical shows combined results from all the verticals. In addition to these, you may also be able to see a People vertical, which, as the name suggests, will show you matching people results. The People vertical is only shown when you expand your search scope to the organization level. We'll discuss People search in more detail in the Finding experts and people recipe in Chapter 7, Search in Microsoft 365.
- Unified experience: Microsoft provides a unified search experience through all the Microsoft 365 workloads. This means that no matter which workload or app you search from, you will find the identical experience everywhere, regardless of whether you perform the search from SharePoint, Outlook, Teams, Word, or other workloads and apps in Microsoft 365.
Microsoft has been investing heavily in Search, resulting in numerous improvements being made to it. These improvements include things such as showing results based on their relevance to you. This relevance score could be based on the things you work on the most, the people you interact with the most, and the freshness of the content, to name a few. Recent enhancements to the platform have resulted in users being able to get the results back instantly, even as you click in the search box and start typing your keywords, and even before you click the search button to perform an actual search.
See also
- Chapter 7, Search in Microsoft 365
- Chapter 9, Office Delve (online supplement)
Feedback
We are constantly looking at improving our content, so what could be better than listening to what you as a reader have to say? Your feedback is important to us and we will do our best to incorporate it. Could you take two mins to fill out the feedback form for this book and let us know what your thoughts are about it? Here's the link: https://forms.office.com/r/SqsgJVkbJ1.Thank you in advance.