
6 Planner
Planner is a visual tool that helps you organize your team tasks. It helps you stay on track, thereby making it easier to manage an ongoing project.Planner is not a comprehensive project-management solution like Microsoft Project, but it provides lightweight task-management capabilities, such as creating tasks and assigning them to team members, specifying due dates, sharing files, having conversations, and more.Planner lets you visualize your tasks by allowing you to sort your project tasks by team member, task status, or task bucket, all from the same screen. It does this by laying all your task items on a planner board, which is like a dashboard that displays all of the tasks in a given plan.Diving deeper into it, you might want to group tasks together based on an attribute, such as the task status or project phase. As we will learn in this chapter you can achieve this by creating buckets within a board, which let you add cards representing individual tasks. You can move cards from one bucket to another by dragging them or simply by updating the bucket within the card. We will explain this with screenshots throughout the chapter, where it will be easy to visualize how this works.You can manage all your plans via the Planner Hub page. The Planner Hub also provides a visual chart of the completed and ongoing tasks. Team members can have task-specific conversations within each card. They receive notifications when a new task gets assigned. Planner integrates with other Microsoft 365 apps, such as Teams and Microsoft 365 Groups. Together, they offer a rich user experience. Planner is available to customers with Microsoft 365 Enterprise E1–E5, Business Essentials, Business Premium, and Education subscription plans. So, let's get into it.We will cover the following recipes in this chapter:
- Creating a plan
- Creating tasks
- Assigning tasks
- Adding items to the checklist
- Managing a plan
- Deleting a plan
By the end of this chapter, you will be able to perform the basic functionality available on Planner, understanding how it works and how you can apply it in your organization for smoothly managing projects.
Creating a plan
Planner can be used to manage an event, research new ideas, track a project, prepare for a customer visit, or just organize your team more effectively.You begin by creating a plan. There are several ways in which you can create a plan. One obvious way is to create the plan through the Planner homepage. Plans also get created indirectly if you create a team in Microsoft Teams or a group within Microsoft 365 Groups.
Getting ready
In order to create plans, you should have permission to provision a Microsoft 365 group. Administrators can disable this feature in some organizations; however, Microsoft 365 does allow you to selectively grant Microsoft 365 group creation rights to individuals or groups.
How to do it...
To create a plan from the Planner app:
- Log in to https://office.com using your Microsoft 365 account.
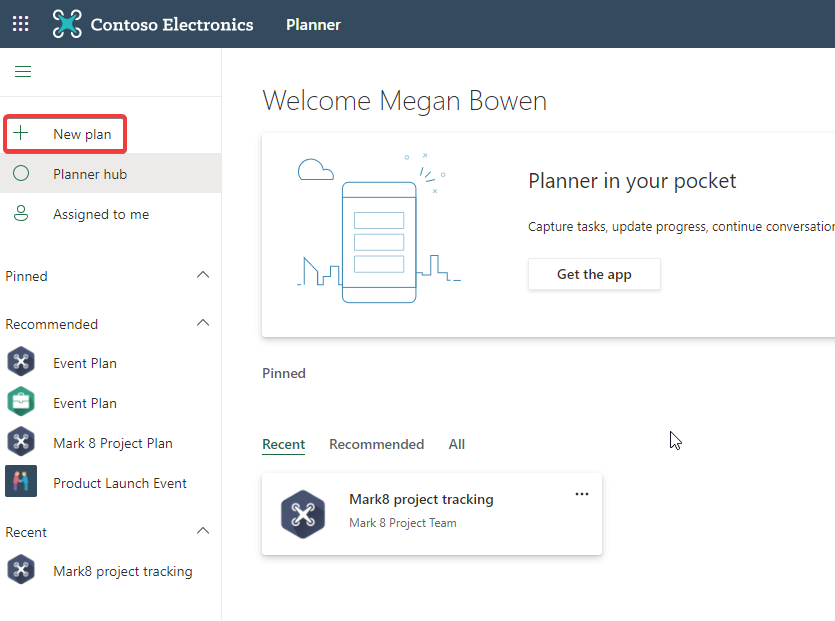
- Click on Planner.
Click on New plan:
- Give your plan a name and click Create plan:
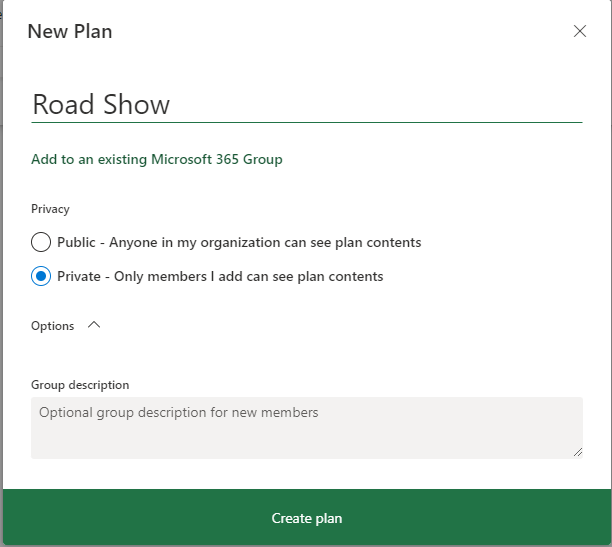
It’s as easy as that – you have successfully created a plan. Now we will look at the Public and Private options presented in the above screenshot.
How it works...
While creating a plan, you can specify whether the plan is public or private:
- Public plans will be visible to everyone in your organization.
- Private plans will only be accessible to members that you add to the plan.
Creating a plan triggers actions in several other apps. You get a Microsoft 365 group to collaborate on your plan, a notebook is created for the group in OneNote, and your group gets a mailbox in Outlook, a calendar, and a SharePoint site.If you already have a Microsoft 365 group and want to create another plan, then this can be done by associating the new plan with your group using the Add to an existing Microsoft 365 Group option.After the plan is created, you will be taken to the Board view (landing page) of the plan.The board displays all the cards grouped together in columns (known as buckets). Buckets can be project phases, task categories, or any other type that you would like to categorize the tasks by, as shown in the following screenshot:

The Charts view shows how your plan is progressing. It provides some basic visuals to show what's done, in progress, not started, and late. It also displays the task count in a bucket. You can also create tasks in this view:

The Schedule view displays team tasks and also lets you create tasks within a calendar, as shown in the following screenshot:

If you click the ellipsis (...) icon, it reveals several options in the context menu, as shown in the following screenshot:

The list below explains the options in the context menu, with numbers corresponding to those in Figure 6.6 respectively:
- Conversation: This takes you to the mailbox for the Microsoft 365 group that sits behind the plan.
- Members: By clicking on this you can share a plan with your colleagues. It takes you to the Microsoft 365 Groups page where you can add new members using the Add member option.
- Files: Takes you to a SharePoint document library where all the group documents are stored.
- Notebook: Allows you to access the group's OneNote document.
- Sites: Takes you to the SharePoint site sitting behind the plan.
- Pin: Lets you mark the plan as a favorite so that you can easily find it.
- Copy plan: Lets you clone the plan as a public or private plan. The copy option copies the tasks (along with the task artifacts) associated with the plan.
- Export plan to Excel: Lets you export the Planner task into Excel in case you want to share these tasks with an external member or someone outside your organization.
- Copy link to plan: Copies the link to the plan, which you can bookmark (if you want to). Note that this is not the preferred way of saving links for future reference. Instead, you should mark a plan as a favorite.
- Plan settings: Lets you change the plan name and privacy settings or delete the plan.
- Add plan to Outlook: Lets you add your Planner tasks to your Outlook calendar by adding a subscription.
See also
- Creating tasks, in this chapter
- Adding items to the checklist, in this chapter
- Managing a plan, in this chapter
- Deleting a plan, in this chapter
Creating tasks
A plan is no good if it doesn't have any actions. The individual action items in a plan are created as tasks. The tasks in a plan appear as cards. Every card represents a unique activity with an optional due date and an assignee. Tracking the individual cards on the board lets you track the progress of your plan holistically.
Getting ready
Individual tasks can be created by the members of the Microsoft 365 group associated with the plan.
How to do it...
The following are the steps to create a new task in Planner:
- Log in to https://office.com using your Microsoft 365 account.
- Click on Planner and choose the plan you are working on.
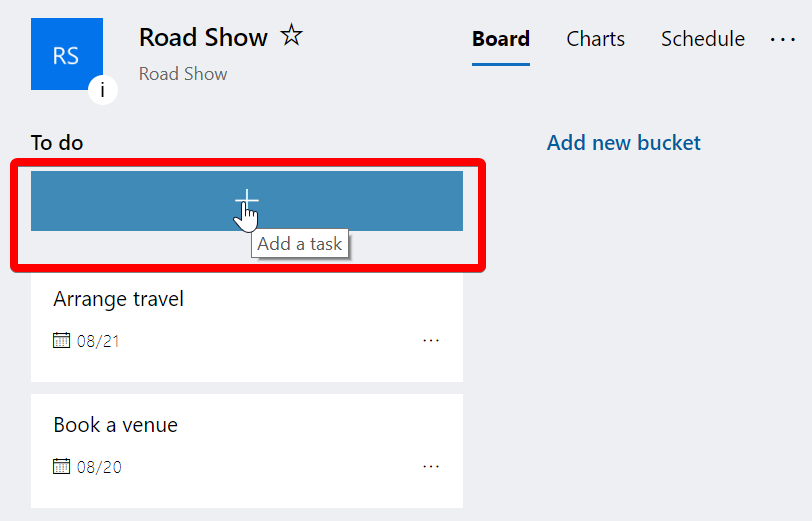
Click on the + symbol on the board below the bucket name:
Give your task a name and provide a due date (optional) and assignee (optional):
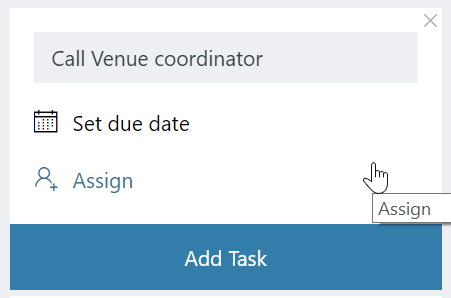
- Click Add task.
- The task appears on the board. Click to open it.
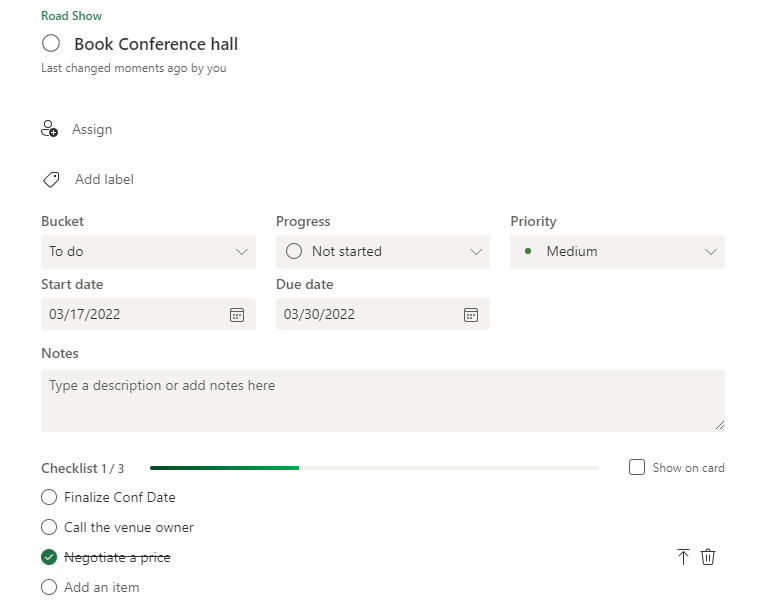
You can now set a start date for the task as well as update the due date, as shown in the following screenshot:
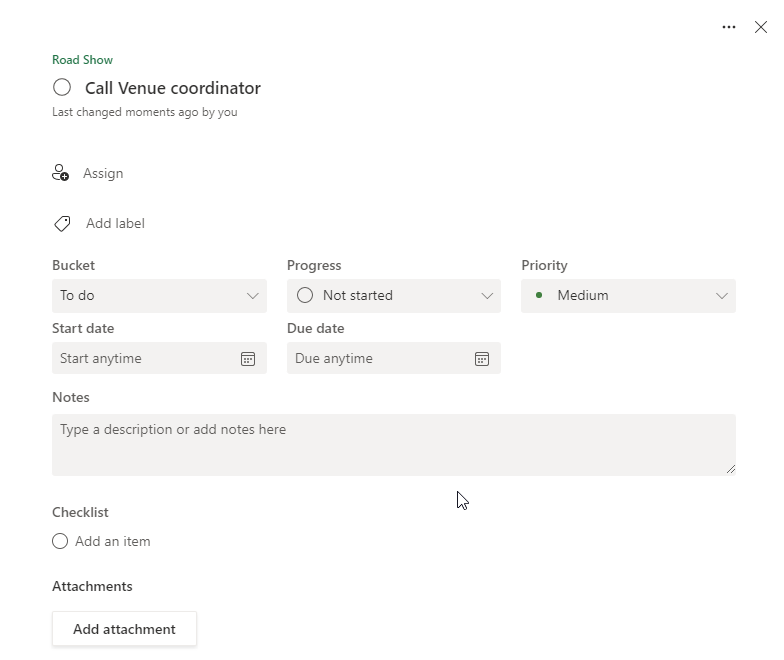
- Enter the task description. Planner autosaves your task properties.
How it works...
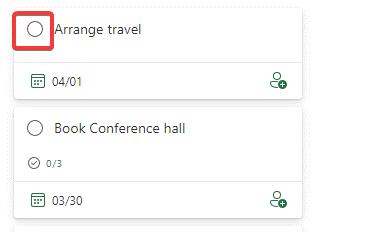
A Planner task offers several features that let you manage your task in an efficient manner. You can add a due date to the task, which lets you manage the overall plan. Planner lets you specify a task start date so that the project manager can determine which tasks are in progress and which ones are yet to be started. You can mark the task as complete by clicking on the checkbox next to the task name, as shown in the following screenshot:
The card also lets you clone a task. This can be done either from the Board view or from within the Task view:

See also
- Creating a plan, in this chapter
- Adding items to the checklist, in this chapter
- Managing a plan, in this chapter
- Deleting a plan, in this chapter
Assigning tasks
Tasks let you keep a digital reminder of work activities you need to complete by a given due date. Planner lets you create tasks from the Board view without having to assign an owner. If you simply specify a task name and press Enter, a task gets created without an assignee. You can see the tasks that don't have an assignee by grouping the tasks by Assigned to.
Getting ready
All members of the Microsoft 365 group that is associated with the plan can add task assignees.
How to do it...
You can assign a group member by doing one of the following:
- Update the task.
- Drag the card in the Assigned to view.
Both methods are explained in the following sections.
Updating the task
The following are the steps to update a task:
- Log in to https://office.com using your Microsoft 365 account.
- Click on Planner and choose the plan you are working on.
- Click on the task name.
- Click Assign.
A text box appears with the list of group members below it:

- Click on one or more group members to assign a task to them.
- Close the task by clicking the X icon.
Dragging the card
You can also update a card by dragging it across to a bucket, as follows:
- Log in to https://office.com using your Microsoft 365 account.
- Click on Planner and choose the plan you are working on.
Switch the Group by option to Assigned to, as shown in the following screenshot:
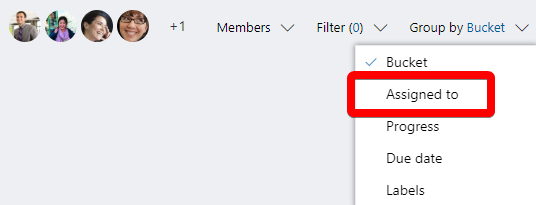
- Drag a task from one person’s bucket to another. The task assignee gets updated.
How it works...
Planner notifies assignees of the task when they have been added. Planner tasks can be assigned to one or more group members. You can also assign people who are not part of your group by specifying their email addresses.
Remember, you cannot assign tasks to people outside your organization.
See also
- Creating tasks, in this chapter
- Adding items to the checklist, in this chapter
Adding items to the checklist
Adding tasks on the board meets just one objective. After the tasks get created, they need to be monitored and managed. This is done by organizing the tasks in categories known as boards and tracking the progress of a task by creating checklists within them. For instance, booking a conference room task might involve finalizing the conference date, calling the owner, negotiating a price, and so on. These can be treated as subtasks and can be tracked via a checklist.
Getting ready
Checklists can be added by the members of the Microsoft 365 group associated with the plan.
How to do it...
You can add the checklist items by going through the following steps:
- Log in to https://office.com using your Microsoft 365 account.
- Click on Planner and choose the plan you are working on.
- Click on a task.
- Go to the section that says Checklist.
- Add a checklist item where it says Add an item.
- Type in a checklist item and simply press Enter.
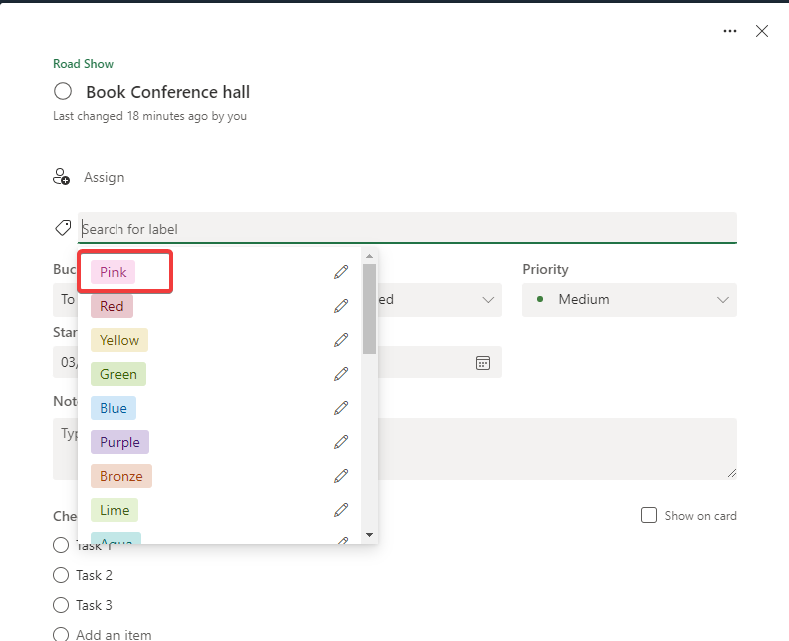
Check the Show on card option, as shown in the following screenshot:

- The tasks can be labeled with a color that lets you easily identify a task—for instance, all tasks related to a conference venue, such as arranging food, organizing a projector, and so on can be labeled with a pink color:
How it works...
While adding items to a checklist, if you check the box that says Show on card, then the incomplete checklist items roll up to the Task view. A tiny graphic appears below the rollup section that displays how many of the checklist subtasks have been completed:

As we can see, the completed checklist items don't appear in the rollup section. If we look at the Task view, however, they appear with a strikethrough:
See also
- Creating a plan, in this chapter
- Creating tasks, in this chapter
- Managing a plan, in this chapter
- Deleting a plan, in this chapter
Managing a plan
Planner has various features to track and manage your plan. This includes using charts and dashboards. You can view the plans and tasks by bucket, progress, due date, and labels. Planner also lets you visualize statistics related to completed and unfinished tasks.
Getting ready
Plans can be managed by the members of the Microsoft 365 group associated with the plan.
How to do it...
To manage a plan, go through the following steps:
- Log in to https://office.com using your Microsoft 365 account.
- Click on Planner and choose the plan you are working on.
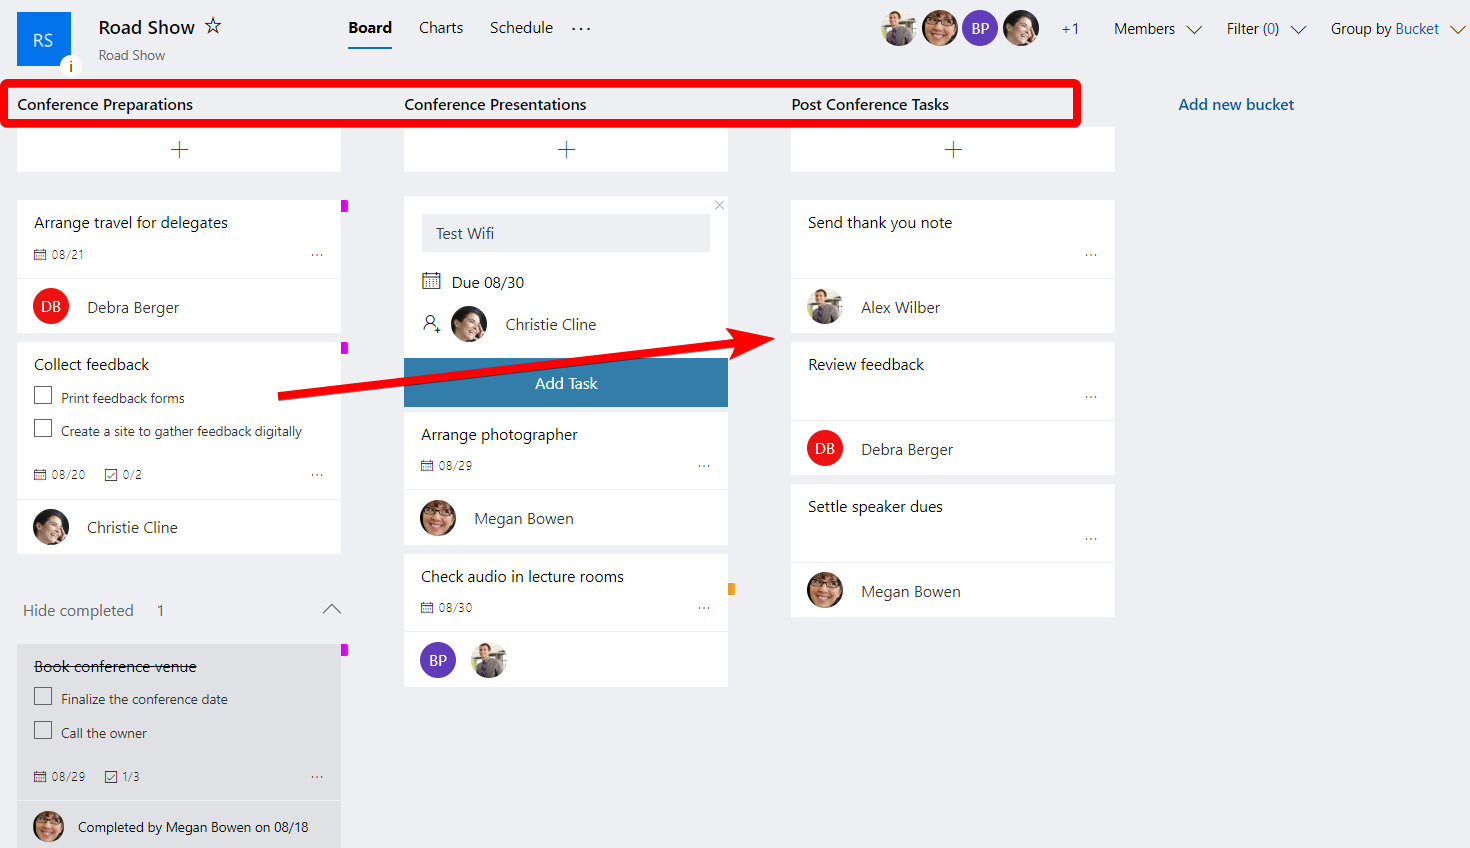
- Click on the Board view to see the tasks oragnized by bucket.
Drag the Collect feedback card to the Post Conference Tasks bucket:
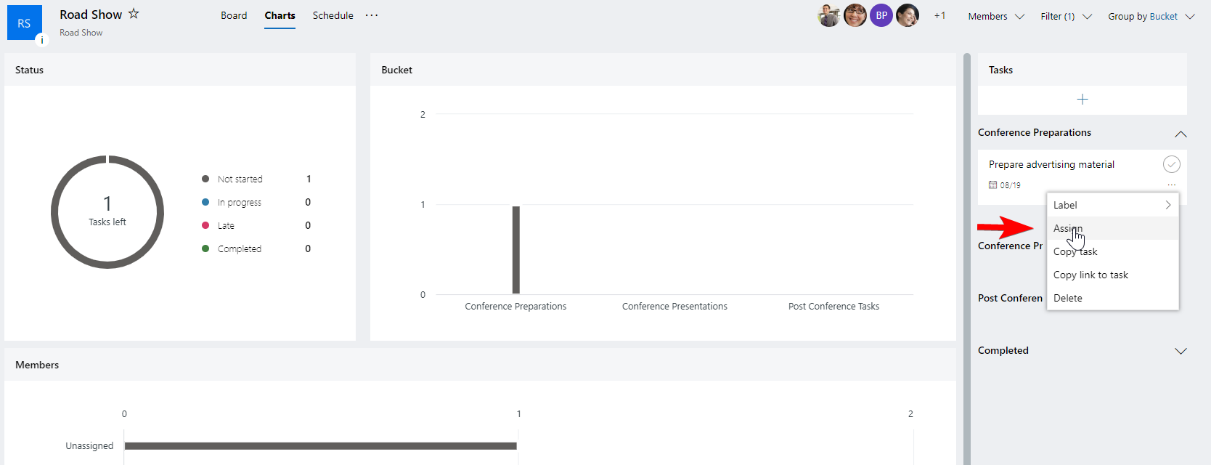
Click on the Chart view to see the tasks by status. We can see that we have an unassigned task. Let's assign it to someone:

Click on the Unassigned section. This will filter all the tasks that do not have an assignee:

Assign a member to the unassigned task by clicking on the context menu:
- Click on the Schedule view to see the tasks in a calendar.
To add a task on a certain date, just roll the mouse over the date and click on the + symbol:
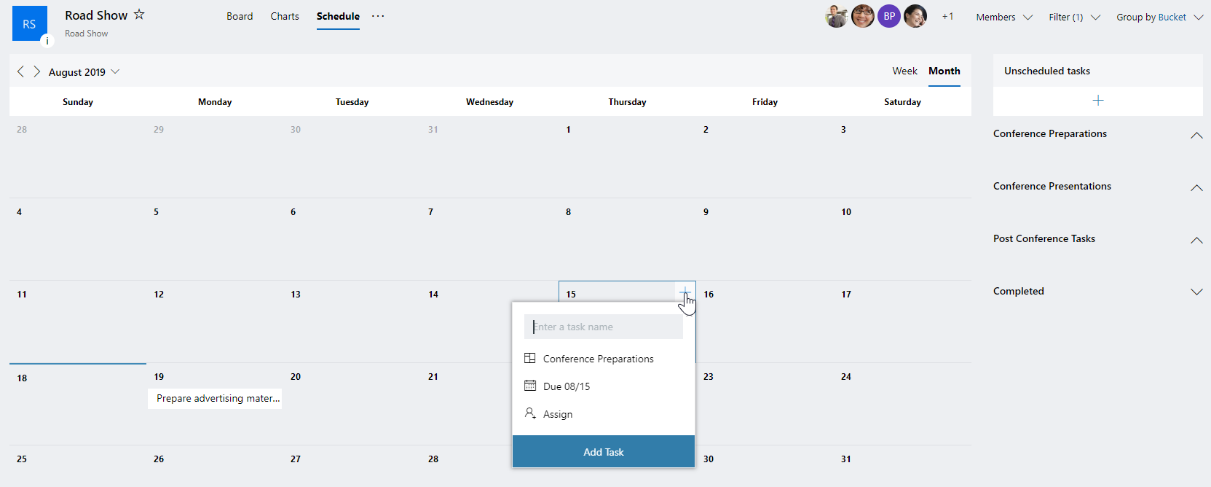
- Specify the task name and press Enter.
There's more...
Besides the three views we have gone over so far (Board, Chart, and Schedule), you can also visualize the tasks by five categories: Bucket, Assigned to, Progress, Due date, and Labels. Let’s go over each in turn:
- Bucket: This is the default view where tasks appear under buckets. In our case, the buckets are Conference Preparations, Conference Presentations, and Post Conference Tasks.
- Assigned to: In this view, the tasks are laid out by the resource assigned to the task. You can change the assignee by simply dragging the task under another person:

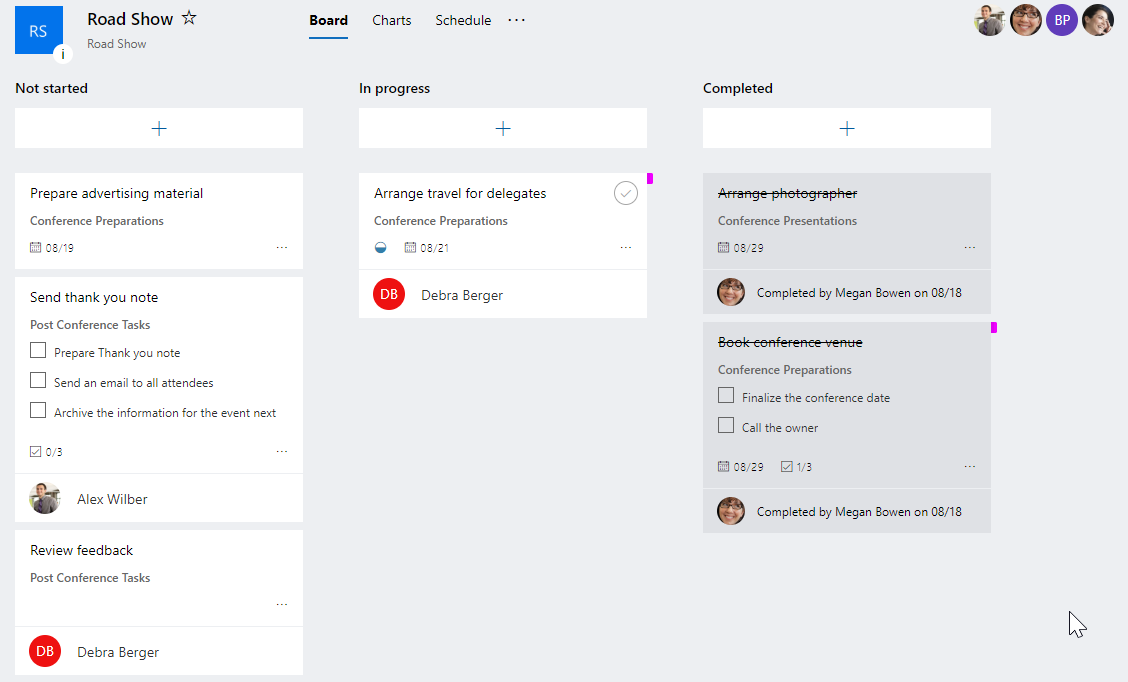
- Progress: This view lists tasks by their progress metadata. Tasks are listed as Not started, In progress, and Completed. To complete a task, simply drag the task to the Completed section:

Figure 6.24: Visualising tasks with the Progress category
Due date: This view lays out the tasks according to the delivery date. There are five standard categories that a task can fall under:
- Tomorrow
- This week
- Next week
- Future
- No date
The tasks move under the appropriate heading if the due date field is modified. This view is good to use to filter tasks that don't have a due date assigned:
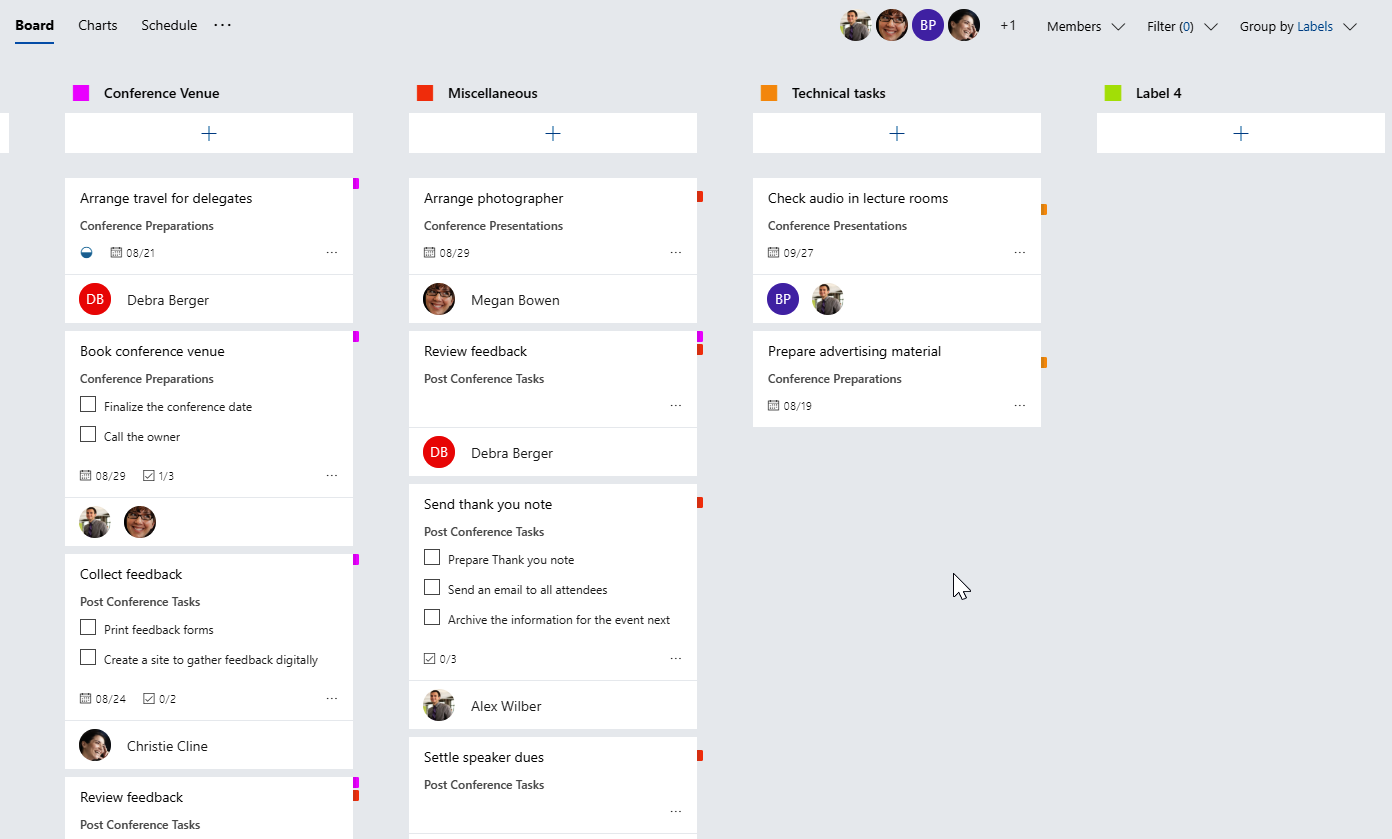
- Labels: Labels are useful in identifying the tasks visually. You can use labels to group tasks by an attribute relevant to the plan. You can add more than one label to a task:

See also
- Creating a plan, in this chapter
- Creating tasks, in this chapter
- Adding items to the checklist, in this chapter
- Deleting a plan, in this chapter
Deleting a plan
Sometimes the plan falls through and is no longer relevant to the group or the team—for example, if a conference gets canceled because the product that was meant to be launched at the event has been discontinued. In such cases, you might want to delete the plan.
Getting ready
You need to be an administrator or group owner to delete a plan.
How to do it...
- Log in to https://office.com using your Microsoft 365 account.
- Click on Planner and select the plan you are working on.
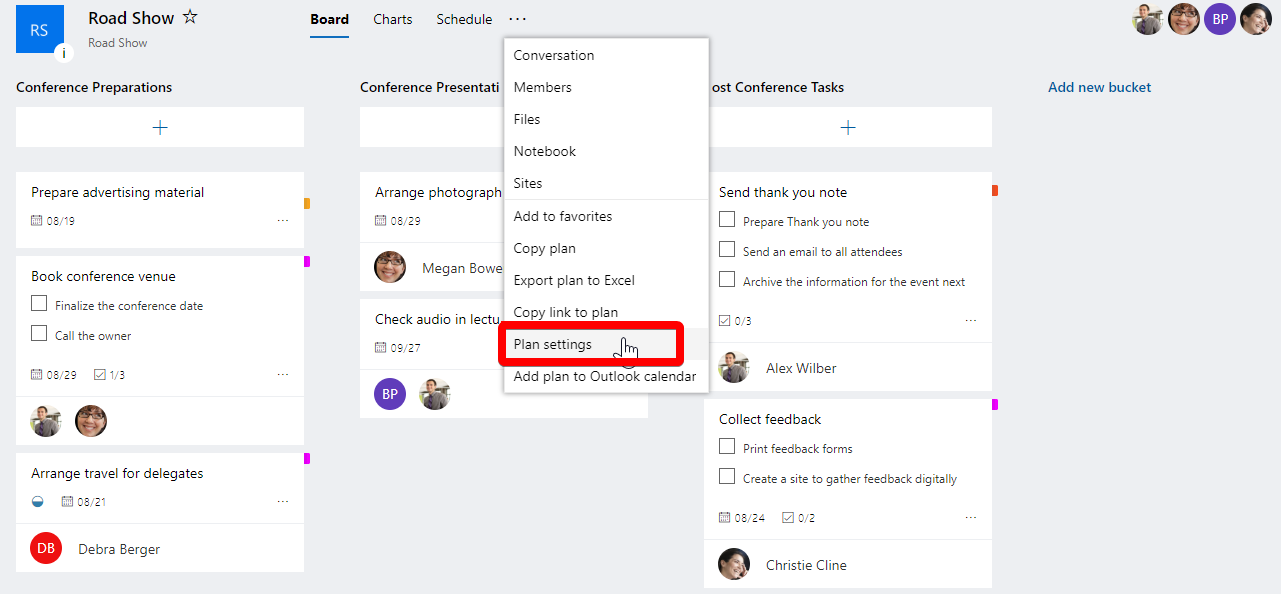
Go to Plan settings by clicking on the ... icon:
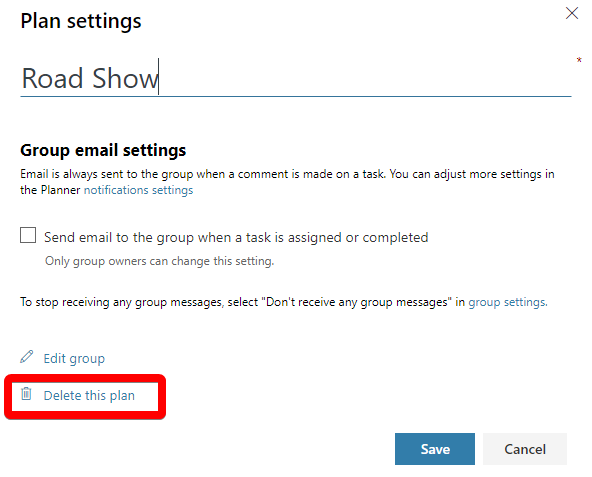
On the Plan settings page, click on Delete this plan:
You will be presented with a confirmation window. Check the box and click Delete:
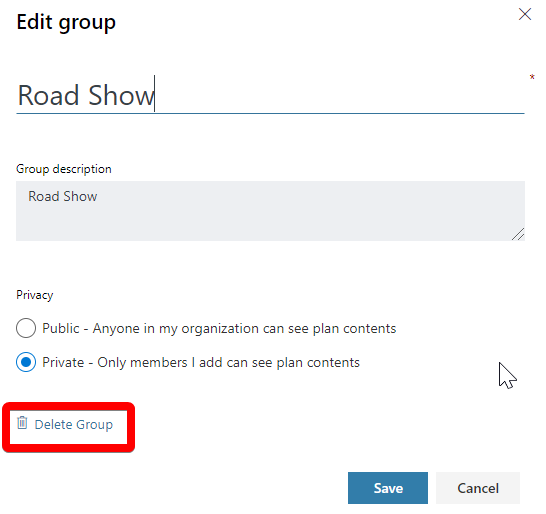
- If you want to delete the group associated with the plan, click on the Edit group button from step 4.
On the Group settings page, click on Delete Group:

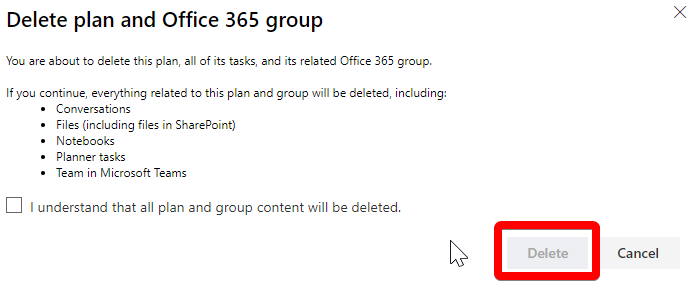
- You will be presented with the following message. Check the box and click Delete:
The group and all plans associated with it will be deleted.
There’s more...
A deleted plan cannot be recovered, so you should consult with other members of the group before taking action. If you are deleting the group attached to the plan, then you will also lose all the conversations and group files. If your concern is that too many plans appear on your Planner Hub, then you could instead leave the plans you don't want to be involved in.This can be done via the Plan context menu, as shown in the following screenshot:
This option is available to you if you are not an administrator. Administrators will not see the Leave plan link.
If you are deleting the plan or group permanently, it is recommended that you back up or move your files and conversations.
See also
- Creating a plan, in this chapter
- Creating tasks, in this chapter
- Managing a plan, in this chapter
Feedback
We are constantly looking at improving our content, so what could be better than listening to what you as a reader have to say? Your feedback is important to us and we will do our best to incorporate it. Could you take two mins to fill out the feedback form for this book and let us know what your thoughts are about it? Here's the link: https://forms.office.com/r/SqsgJVkbJ1.Thank you in advance.