In this chapter we start by going over some general best practices to follow when building runbooks. Then we will delve into the best practices for using Windows PowerShell inside your runbooks to handle scenarios where the integration packs (IPs) for Orchestrator cannot be used. Lastly, we describe some patterns for runbook design that will increase reusability of your runbooks as well as patterns for handling state in long-running processes.
This section describes best practices in the following areas of runbook design:
Flow control
Publishing data
Logging execution data
Looping
Sequential vs. parallel activity execution
Setting job concurrency
When designing runbooks, you should strive to increase readability of the overall flow. In many instances it is a good idea to label links between activities to further explain execution flow without having to look at the link details. To be able to see the link labels, navigate to Runbook Designer | Options | Configure and select Show Link Labels as shown in Figure 5-1.

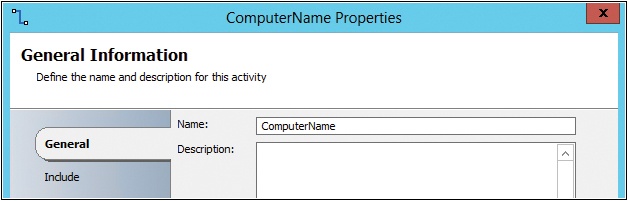
To edit a link label, double-click the link to open its property window and then click the General tab and edit the Name field as shown in Figure 5-2.
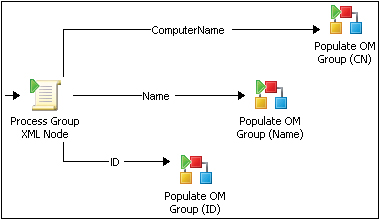
When the link label has been edited, it then provides a better understanding of execution flow as shown in Figure 5-3, where execution branches are based on a value on the data bus which has the option of being ComputerName, Name, or ID.
The color and/or thickness of the link can also be edited, which can help to visually track success or error paths. To change the color of a link, double-click the link to open the properties window, then select the Options tab and edit the Color property as shown in Figure 5-4.

The resulting link looks like what is shown in Figure 5-5:

As a design best practice, all error paths should be colored red as shown above and all branching logic should be labeled to indicate what the branch is for.
In situations where you have one runbook that is going to be initiated by another runbook, it is often necessary to return execution state information as well as potentially returning business data to the calling runbook’s data bus. To accomplish this, the runbook must be set up to return data. To set, right-click the runbook name, select Properties and click the Returned Data tab. Next, click Add to open the Add Returned Data Definition dialog box. Fill in the Name, Type, and optionally the Description fields, then click OK to save as shown in in Figure 5-6. Repeat this process for all required data and click Finish to save and close the Properties window.

With this set, a runbook can now use the Return Data activity (under Runbook Control) to publish data. Simply drop the activity onto the design surface, linking it to the defined process. Next, double-click the Return Data activity to open its properties window. From the Details tab, all defined return data variables are shown and can be set manually or via Published Data as shown in Figure 5-7.

One technique to troubleshoot execution errors is to have Orchestrator log execution data to the Orchestrator database. By default, this is turned off for every runbook but it can be turned on as needed. To set this up, right-click the runbook name, select Properties and click the Logging tab. Then select the Store Activity-specific Published Data check box to have Orchestrator save this data to the database. To save additional general data to the database, check the Store Common Published Data check box. These options are shown in Figure 5-8.

Please note that storing execution data will cause more database activity on the Orchestrator database and will increase the size of the database if there are no log-purging settings set up. To set up log purging, from the Runbook Designer, right-click the server name in the leftmost window and choose Log Purge. The Log Purge Configuration dialog box, as shown in Figure 5-9, will open and from there you can set how often you want the logs purged and how much data to retain.

Looping allows a runbook activity or a complete runbook to run multiple times until a condition is met to end the loop. This condition can be a successful condition (that is, able to connect to a server) or limiting condition (that is, run only a maximum of five times before exiting). To setup looping on an activity, right-click the activity and select Looping from the context menu. This will open up the looping dialog box as shown in Figure 5-10.
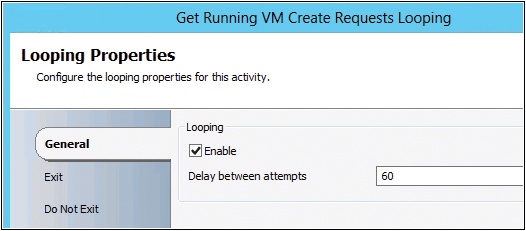
On the General tab, make sure to check the Enable checkbox and set the Delay between attempts to the number of seconds between loop runs. On the Exit tab, set the exit conditions. These may both be successful and unsuccessful conditions. Always limit the number of runs using the Loop: Number of attempts property to make sure the loop will end at some point. An example is show in Figure 5-11.

The Do Not Exit tab can be used to further limit the exit criteria. Be careful using the Do Not Exit rules and make sure any criteria set here does not cause an infinite loop.
There is a lot of confusion as to whether multiple activations of an activity happen sequentially or in parallel. The bottom line is inside of a single runbook, all activities run sequentially with one exception. The Invoke Runbook activity, when the Wait For Completion check box is cleared, as shown in Figure 5-12, and the child runbook’s job concurrency is set greater than one, allows the child runbook to run in near-parallel for multiple activations. The downside to this though is the inability to capture the result output from these executions.

More info
For more information on the mechanics of sequential and parallel activity execution, read the blog article at http://blogs.technet.com/b/orchestrator/archive/2012/05/11/sequential-vs-parallel-processing-of-runbook-activities.aspx.
Job concurrency allows a single runbook to have multiple simultaneous executions when the value is greater than 1. To set this up, right-click the runbook name, select Properties, and click the Job Concurrency tab. Then enter a value greater than 1 in the Maximum number of simultaneous jobs textbox to allow multiple concurrent executions, or set to 1 to disable multiple concurrent executions. This is shown in Figure 5-13. The default setting is 1.

This is an important and impactful setting, so choose wisely. Unfortunately there is no right or wrong answer for this setting as it will truly depend on the runbook in question. There are examples where you don’t want to have multiple instances at the same time such as:
working with external data that cannot be locked to a single process
working with Orchestrator counters as the counter values can become unreliable if changed by multiple runbooks at the same time
Conversely, there are also instances where it is perfectly okay to set the number of simultaneous jobs to a value greater than one:
checking that a list of servers are on and able to accept connections
working with transactional data or data that can be locked to a single process
Using Windows PowerShell in Orchestrator script activities vastly expands what can be automated as compared to the functionality available in the various IPs. For example, Virtual Machine Manager (VMM) ships with over 520 cmdlets compared to the 23 IP activities found in the VMM Integration Pack. Windows PowerShell also has the ability to interact with managed code application programming interfaces (APIs), such as the ones that ship with System Center Operations Manager, so even if the product doesn’t have cmdlets, scripts can still be created against their managed API.
The one drawback currently is that Orchestrator runs in a 32-bit process and most Windows PowerShell modules today are written for 64-bit only. To get around this, opening a remote session using Windows PowerShell remoting will allow scripts to run in a 64-bit process.
The following pattern should be followed when using Windows PowerShell remoting in the .Net Script activity. The script outline can be broken down into the following sections, each detailed below:
Subscribe to Published Data
Set Trace and status variables to defaults
Validate inputs
Establish the Windows PowerShell remote session
Execute script in the remote session
Use try/catch/finally
Append useful data to the trace variable
Add required Windows PowerShell modules
Use throw for common errors
Perform core task logic
Set ErrorState and ErrorMessage
Return results
Prep data for Orchestrator Publishing
Close the remote session
Note
All of the scripts and scriptlets in this chapter are available as a zipped archive from http://aka.ms/SCrunbook/files.
The first step is to create variables to hold any required Published Data from the Orchestrator data bus. All Published Data should be captured at the top of the script and not embedded further into the script to aid readability.
$SCOMServerFQDN = "{OM Server from "Initialize Data"}"
$MPName = "{Management Pack Name from "Initialize Data"}"
$MPNamespace = "{Management Pack Namespace from "Initialize Data"}"
$GroupName = "{Group Name from "Initialize Data"}"There are three standard variables that are published from all scripts, which are the ErrorState, ErrorMessage, and Trace variables. ErrorState is an integer that represents success (0), warning (1), error (2), or critical error (3). ErrorMessage holds the error text when a problem occurs. Trace is a variable where you can append information to help with troubleshooting should an error occur. At the beginning of the script we set these variables to their default values as well as clear the built-in Error variable.
$ErrorState = 0
$ErrorMessage = ""
$Trace = ""
$Error.Clear()
All inputs sent to the remote script should be validated to the extent possible, as shown here.
        if (($SCOMServerFQDN.length -lt 1) -or ($MPName.length -lt 1) -or
($MPNamespace.length -lt 1)
            -or ($GroupName.length -lt 1))
        {
            Throw "Error: One or more required parameters is Null."
}Since this script will be making a remote call, establish the remote session with error checking as shown here.
$Session = New-PSSession -ComputerName $SCOMServerFQDN
if ($Session -eq $null)
{
    $ErrorMessage = $Error[0]
    $Trace += "Could not create PSSession on $SCOMServerFQDN"
    $ErrorState = 2
}With a valid session, use the Invoke-Command cmdlet to execute the remote script, passing in any input parameters.
else
{
   $ReturnArray = Invoke-Command -Session $Session
   -Argumentlist $SCOMServerFQDN, $MPName, $MPNamespace, $GroupName -ScriptBlock {
Param ( $SCOMServerFQDN, $MPName, $MPNamespace, $GroupName )The remote script should be wrapped in a try...catch...finally block to handle any exceptions that occur and to properly close out the Trace variable. A useful variable to create is the Action variable which holds a string explaining what the script is supposed to be doing. This variable then can easily be referenced as needed when appending information about the execution in Trace. Both examples are shown below.
Try
{
    $Action = 'Create OM Group';
    # More Code Here
}
Catch
{
    $Trace += "Exception caught in remote action '$Action'... 'r'n"
    $ErrorState = 2
    $ErrorMessage = $error[0].Exception.tostring()
}
Finally
{
    $Trace += "Exiting remote action '$Action' 'r'n"
    $Trace += "ErrorState: $ErrorState'r'n"
    $Trace += "ErrorMessage: $ErrorMessage'r'n"
}As the remote script runs, append information to the Trace variable that will help in debugging issues in the case of failure. At the beginning of the remote script, write out the input variables for easy reference.
$Trace = "Beginning remote action '$Action' 'r'n"
$Trace += "Parameters: 'r'n"
$Trace += " SCOMServerFQDN: $SCOMServerFQDN 'r'n"
$Trace += " MPName: $MPName 'r'n"
The next step is to import any Windows PowerShell modules on the remote server that are necessary to accomplish the desired task.
      $Trace += "Importing Operations Manager module 'r'n"
      try
      {
       Import-Module OperationsManager
      }
      catch
      {
         $Trace += "Importing of the OpsMgr module failed as the module was already
present 'r'n"
}If the script encounters something unexpected that does not throw an error by itself (like getting back a null value from a cmdlet), use the throw keyword to raise exceptions as shown here.
$PrimaryMgmtServer = Get-SCOMManagementServer -Name $SCOMServerFQDN

   $Trace += "Checking if primary management server is null or not...`r`n"
   if($PrimaryMgmtServer -eq $null)
   {
      Throw "Can't get the Primary Management Server"
}Write the script to perform the desired task, incorporating Trace best practices as needed.
        $group = Get-SCOMGroup -DisplayName $GroupName

        if ($group -eq $null)
        {
            $Trace += "Group '$GroupName' not found. Creating... 'r'n"
            $group = New-Object
Microsoft.EnterpriseManagement.Monitoring.CustomMonitoringObjectGroup($MPNamespace,
                        $GroupName,$GroupName,$formula)
            $mp = Get-SCOMManagementPack -name $MPName
            $mp.InsertCustomMonitoringObjectGroup($group)
}At the end of the remote script, if no problems have occurred, set the ErrorState variable to 0. In the case of an exception, inside the catch statement, set the ErrorState to the appropriate value, and then populate the ErrorMessage variable with the exception caught.
    $ErrorState = 0 #Return Success
    $Trace += "Completed remote action '$Action'... 'r'n"
}
Catch
{
    $Trace += "Exception caught in remote action '$Action'... 'r'n"
    $ErrorState = 2
    $ErrorMessage = $error[0].Exception.tostring()
}The last step in the remote script is to package up the results into the Results variable as an array and return the Results variable to the calling script.
    $Results = @($ErrorState, $ErrorMessage, $Trace)
    Return $Results
}In the local script context, unpackage the results for inclusion on the data bus. If one of the values was an array itself, follow the guidance on handling arrays document in the Returning arrays section later in this chapter.
$ErrorState = $ReturnArray[0]
$ErrorMessage = $ReturnArray[1]
$Trace = $ReturnArray[2]
The script contained below is the entire script showing the various design elements.
$SCOMServerFQDN = "{OM Server from "Initialize Data"}"
$MPName = "{Management Pack Name from "Initialize Data"}"
$MPNamespace = "{Management Pack Namespace from "Initialize Data"}"
$GroupName = "{Group Name from "Initialize Data"}"

$ErrorState = 0
$ErrorMessage = ""
$Trace = ""
$Error.Clear()

if (($SCOMServerFQDN.length -lt 1) -or ($MPName.length -lt 1) -or ($MPNamespace.length -
lt 1)
            -or ($GroupName.length -lt 1))
{
      Throw "Error: One or more required parameters is Null."
}


$Session = New-PSSession -ComputerName $SCOMServerFQDN
if ($Session -eq $null)
{
    $ErrorMessage = $Error[0]
    $Trace += "Could not create PSSession on $SCOMServerFQDN"
    $ErrorState = 2
}
else
{
   $ReturnArray = Invoke-Command -Session $Session
   -Argumentlist $SCOMServerFQDN, $MPName, $MPNamespace, $GroupName -ScriptBlock {
        Param ( $SCOMServerFQDN, $MPName, $MPNamespace, $GroupName )
   Try
   {
        $Action = 'Create OM Group';
        $Trace = "Beginning remote action '$Action' 'r'n"
        $Trace += "Parameters:'r'n"
        $Trace += " SCOMServerFQDN: $SCOMServerFQDN 'r'n"
        $Trace += " MPName: $MPName 'r'n"
        $Trace += " GroupName: $GroupName 'r'n"
        $Trace += "'r'n"

           $Trace += "Importing Operations Manager module 'r'n"
           try
           {
           $Path = Get-ItemProperty "HKLM:SOFTWAREMicrosoftSystem Center Operations
Manager12Setup"
               $FinalPath = $Path.InstallDirectory +
"PowershellOperationsManageroperationsmanager.psd1"
           Import-Module $FinalPath
           }
           catch
           {
                $Trace += "Importing of the OpsMgr module failed as the module was
already present 'r'n"
           }
        $PrimaryMgmtServer = Get-SCOMManagementServer -Name $SCOMServerFQDN

            $Trace += "Checking if primary management server is null or not... 'r'n"
           if($PrimaryMgmtServer -eq $null)
           {
               Throw "Can't get the Primary Management Server"
           }

        $group = Get-SCOMGroup -DisplayName $GroupName
        if ($group -eq $null)
        {
            $Trace += "Group '$GroupName' not found. Creating... 'r'n"
            $group = New-Object

Microsoft.EnterpriseManagement.Monitoring.CustomMonitoringObjectGroup($MPNamespace,
                        $GroupName,$GroupName,$formula)
            $mp = Get-SCOMManagementPack -name $MPName
            $mp.InsertCustomMonitoringObjectGroup($group)
        }

        $ErrorState = 0 #Return Success
        $Trace += "Completed remote action '$Action'... 'r'n"
    }
    Catch
    {
        $Trace += "Exception caught in remote action '$Action'... 'r'n"
        $ErrorState = 2
        $ErrorMessage = $error[0].Exception.tostring()
    }
    Finally
    {
        $Trace += "Exiting remote action '$Action' 'r'n"
        $Trace += "ErrorState: $ErrorState'r'n"
        $Trace += "ErrorMessage: $ErrorMessage'r'n"
    }
    $Results = @($ErrorState, $ErrorMessage, $Trace)
    Return $Results
  }
  $ErrorState = $ReturnArray[0]
  $ErrorMessage = $ReturnArray[1]
  $Trace = $ReturnArray[2]

  Remove-PSSession -Session $Session
}There is a little known fact that you can indeed return more than single-valued variables from a .Net Script activity whose type has been set to Windows PowerShell. The Published Data section of the activity is setup as normal as shown in Figure 5-14, where the variables are defined as needed and there is no option to mark the variable as a collection.

By packaging up the return data into an array, as shown in the following script example, every future activity will be called “n” times, where “n” is the length of the array.
[xml]$node = $groupNode

$MPs = @()
$ClassNames = @()
$FilterProperty = @()
$FilterWith = @()

foreach ($classNode in $node.Group.Class)
{
    $MPs += $classNode.MP
    $ClassNames += $classNode.Name
    $FilterProperty += $classNode.FilterProperty
    $FilterWith += $classNode.FilterWith
}
In the previous example, four Windows PowerShell arrays were created ($MPs, $ClassNames, $FilterProperty, $FilterWith). These arrays were then populated for each loop using the += operator to add items to each array.

If the Process Group XML Node activity shown in Figure 5-15 processed four items in the loop, then the subsequent activity Populate OM Group (Name) would execute four times. If the Windows PowerShell array was generated inside of a remote call, then the array must be repackaged in the local execution context for Orchestrator to correctly handle the array processing, as shown in the following example:
$ReturnArray = Invoke-Command -Session $Session -Argumentlist $VMMServerFQDN
-ScriptBlock {
    Param ( $VMMServerFQDN )

    Import-Module VirtualMachineManager

         $VMMServer = Get-SCVMMServer -ComputerName $VMMServerFQDN

    $roleNames = @()
    $roles = Get-SCUserRole
    foreach ($role in $roles)
    {
        $roleNames += $role.Name
    }

    $Results = @($ErrorState, $ErrorMessage, $Trace, $roleNames)
    Return $Results

} #End remote execution

$ErrorState = $ReturnArray[0]
$ErrorMessage = $ReturnArray[1]
$Trace = $ReturnArray[2]
$Names = $ReturnArray[3]

#Reprocessing the array locally for Orchestrator
$RoleNames = @()

foreach ($name in $Names)
{
   $RoleNames += $name
}In this section we will discuss three runbook structure patterns, namely component, control, and initiation, as well as design patterns to deal with file-based variables and file-based state for long running processes.
Component runbooks are low-level runbooks that perform a single task without any Orchestrator dependencies other than possibly an IP. In most cases, a component runbook will consist of the following activities:
Initialize Data activity that sets up all required input parameters.
.NET Script activity or IP activity that does the task work.
Two Return Data activities that return the error information or completion information. For more information on setting up runbook data publishing, see the Publishing data section in this chapter. For information on what data to return, see the Error handling section in this chapter.
The structure for component runbooks is shown in Figure 5-16.

The following rules are in place to guide the design.
The runbook performs a simple task without complex business logic. Business logic is the domain for control runbooks.
The runbook will declare all inputs with the Initialize Data activity.
If Windows PowerShell scripts are used, the scripts should follow the Windows PowerShell guidelines on making remote calls, error handling, and error / trace reporting defined in the Using Windows PowerShell in Orchestrator section.
The runbook should publish success / failure by publishing at a minimum, ErrorState, ErrorMessage, Trace Runbook Name, and Activity Name. More information on publishing data can be found in the Publishing data section:
The runbook should have the Log Common Published Data setting active. More information can be found in the Logging execution data section.
The runbook should have Job Concurrency set greater than 1. When it is not possible, it should be noted in documentation for future reference as to the reasons Job Concurrency must be set to 1. More information on job concurrency can be found in the Setting job concurrency section.
The runbook will have no dependencies on Orchestrator global variables. All inputs will be defined on the Initialize Data activity.
The runbook will have no dependencies on other Orchestrator runbooks.
The runbook will have no dependencies on additional software being installed on the Runbook server outside of IPs.

Error handling in component runbooks consists of publishing data back to the calling runbook using the Return Data activity. The error information returned should consist of, at a minimum, the information listed in Table 5-1.
Table 5-1. Summary of Error Handling for Component Runbooks
Name | Description |
|---|---|
Error State | A numeric value indicating success (0), warning (1), error (2), or critical error (3). |
Error Message | A string containing the error or warning message, or blank if the execution was successful. |
Trace | A string containing the execution flow for a Windows PowerShell script, or any other additional data for other types of activities that can help narrow down the problem. |
Runbook Name | A string containing the name of the runbook (common published data). |
Activity Name | A string containing the name of the activity that had the problem or blank if successful (common published data). |
Activity Start Time | The start time of the activity (common published data). Can be left blank if successful. |
All scripts should validate that the required parameters are not null and that the values are valid. Within component runbooks, the validation takes place within the same activity that hosts the main script.
For each script, add the following code snippet and use the variables according to your script requirements:
if (($Variable1.length -lt 1) -or ($Variable2.length -lt 1)
     -or ($Variable3.length -lt 1))
{
     Throw "Error: One or more required parameters is Null."
}
For value validations, the following sample scripts can be used.
if (!($variable1 -match "^[A-Z0-9._%+-]+@[A-Z0-9.-]+.[A-Z]{2,4}$"))
{
    Throw "Error: parameter is not a valid email address."
}The control runbook pattern encapsulates the business logic needed and the overall workflow required to perform a complex task. Control runbooks are composed of:
An Initialize Data activity
Optionally, one or more component runbooks
Optionally, one or more control runbooks since control runbooks can be nested
Error routine runbooks in case of error
Other Orchestrator activities
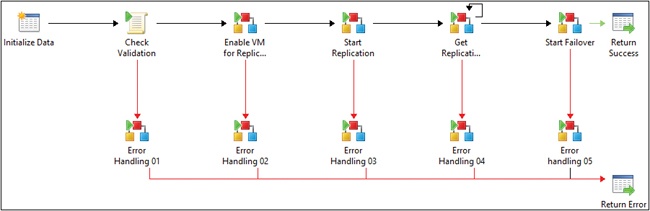
In the example shown in Figure 5-17, in addition to calling multiple component runbooks, there are script activities that read business logic for the process from an XML file. Because these scripts are directly tied to the business logic for the control runbook, it doesn’t make sense to encapsulate them into component runbooks.

Component runbooks are executed using the Invoke Runbook activity where the Wait For Completion property is checked, as shown in Figure 5-18. This allows the control runbook to process the output of the child runbook, including handling exceptions.

The following rules are in place to guide the design.
The control runbook stitches one or more component runbooks together to perform a complex task.
The runbook can have dependencies on variables. For more information on variables, refer to the File-based runbook variables section.
The runbook should have dependencies on component runbooks.
The runbook will perform error handling by utilizing a component error handling runbook.
The runbook will publish an overall ErrorState of success / failure.
The runbook should have no dependencies on additional software being installed on the Runbook server outside of IPs.
If Windows PowerShell scripts are used, the scripts should follow the Windows PowerShell guidelines on making remote calls, error handling, and error / trace reporting defined in the “Using Windows PowerShell in Orchestrator” section.
The runbook should start with an Initialize Data activity to handle any required inputs. Runbooks that start via a Monitor activity are handled as Initiation runbooks.
Error handling in control runbooks consists of calling an error routine runbook, as shown in Figure 5-19.

Optionally, the runbook can publish data back to a calling runbook using the Return Data activity as shown in Figure 5-20.

The error information returned, when published, should consist of, at a minimum, the information listed in Table 5-2.
Table 5-2. Summary of Error Handling for Control Runbooks
Name | Description |
|---|---|
Error State | A numeric value indicating success (0), warning (1), error (2), or critical error (3). |
Runbook Name | A string containing the name of the runbook (common published data). |
Activity Name | A string containing the name of the activity that had the problem or blank if successful (common published data). |
Activity Start Time | The start time of the activity (common published data). Can be left blank if successful. |
At the control runbook level, it is important to check if all required parameters are passed into the runbook are valid and that any process prerequisites are checked. An example is shown in Figure 5-21.
The second activity in each control runbook should be a validation script activity that will check if all required parameters are passed in and that the values are not null. Additionally, a range check can be used where appropriate.
The next activity is a “Check Prerequisites” component runbook or script. This is optional, and is required only if prerequisites are defined. Depending on the logic behind the prerequisites check, it might be a component runbook (if complex) or be part of the main control runbook. This depends on the complexity of the validation and if it can be reused in other scenarios as well.
It’s also important to check whether all hosts that are required for a specific scenario are reachable and able to be connected to. For example, when creating a cluster it’s important to be able to connect to all hosts that will form the cluster. For instance, it would be wasteful to run the entire process for creating the cluster and installing features only to discover that one or more of the required nodes couldn’t be reached.
This form of validation is only required when modeling scenarios (control runbooks) that involve interacting with more than one host; therefore, control runbooks involving only a single host do not require this type of validation. For each script, a connectivity check will be implemented and therefore a check on control runbook level is not required.
The implementation is a component runbook that takes a single parameter (list of hosts or a single host) which will be evaluated. The script will publish a couple of variables that help to define what to do depending on the output.
The variables used in the script are:
$isReachable. A Boolean that is set to True if all hosts are reachable. If a single host is not available this variable is set to False
$serverResultList. An array of servers with a boolean set to True if available, otherwise set to False. (Output is server1,true;server2,false;server3,true)
$unreachableServerCount. The number of servers unreachable (so if you pass in five servers to the component runbook, and one out of five is not reachable, then the value is set to 1)
$reachableServerCount. The same as for $unreachable (using the same example this value would be set to 4).
The script itself is as follows:
#Inputs from published data
$Hosts= vmm01;sco01;sco02"

$HostList = @()
$HostList = $Hosts.split(",",[stringsplitoptions]::RemoveEmptyEntries)

$ErrorState = 2
$ErrorMessage = ""
$Trace = ""
$Error.Clear()

# -----------------------------------------------------------
Function TestPSRemoting {
         Param ( [string]$HostName )

         $ErrorState = 0
         $ErrorMessage = ""
         $Trace = ""
         $Error.Clear()

         Try
         {
            $IPAddressFromDNS = [System.Net.Dns]::GetHostAddresses($HostName)
            $Trace += $IPAddressFromDNS + " 'r'n"
            $Trace += "Attempting Invoke-Command -ComputerName $HostName `r`n"
            $ErrorActionPreference = "Stop"
            $Result = Invoke-Command -ComputerName $HostName { 0 }
            If ($Result -eq 0) {
                $Trace += "Successfully connected to $HostName 'r'n"
                $ErrorState = 0
            }
        }
        Catch
        {
            $ErrorState = 2
            $ErrorMessage = $error[0].Exception.ToString()
        }
        Finally
        {
            $Trace += "ErrorState:     $ErrorState 'r'n"
            $Trace += "ErrorMessage:   $ErrorMessage 'r'n"
               #write-host $ErrorState
        }
        $ResultArray = @($ErrorState, $ErrorMessage, $Trace)
        Return $ResultArray
}
#---------------------------------------------------------------

$Trace = "Beginning BatchTest-PSRemoting... 'r'n"
$Trace += "'r'n"
$Trace += "Host(s):   $Hosts'r'n"
$Trace += "'r'n"

$serverResultList = @()
$ResultList = @{}
$unreachableServerCount=0
$reachableServerCount=0
$isReachable = $true

foreach($x in $HostList)
{
    $ResultList = TestPSRemoting($x)
    if($ResultList[0] -ne '0')
    {
        $isReachable = $false
        $unreachableServerCount++
        $serverResultList+="$x,false"
    }
    else
    {
        $reachableServerCount++
        $serverResultList += "$x,true"
    }
}The sole purpose of initiation runbooks is to call control runbooks based on a trigger condition that is initiated by one of the various Orchestrator monitor activities. The execution of the control runbook should not wait for completion and therefore should not provide any error handling except for reporting errors with the Monitor activity itself if required.
The example shown in Figure 5-22 consists of a Monitor Date/Time activity that when triggered (once per hour in this case), calls the Get VMM Roles control runbook, not waiting for completion.

The following rules are in place to guide the design.
The runbook should start with one of the monitor activities followed by a call to a control runbook. The exception to this rule is when the initiation is controlled by System Center Service Manager service requests. This is detailed in the Service requests initiation runbooks section later in this chapter.
The runbook should execute the control runbook without waiting for completion.
The runbook should only provide error handling if the Monitor activity needs to report on errors.

The only time error handling should be added to an initiation runbook is when the Monitor activity is not based on date/time and itself could throw an exception. An example would be the Monitor Object activity from the System Center Service Manager IP.
To properly implement service requests in Service Manager, the request needs to publish the runbook activity ID to a property on the runbook’s Initialize Data activity. This way, if an error occurs, the runbook can set the runbook automation activity to a failed status so that the default error handling will not break the success / failure logic inherent in Service Manager. Figure 5-23 shows an example of this.

The example in Figure 5-23 is broken down into the following parts:
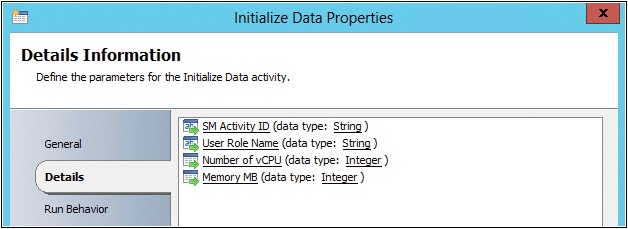
The first activity is the Initialize Data activity, where we have defined the SM Activity ID property as well as any other required inputs.
The second activity retrieves the Service Manager runbook automation activity that initiated this call using the passed in SM Activity ID.
The next two activities in this case are getting any associated configuration items that have been added to the Service Manager runbook automation activity. In the previous example, we are getting an associated virtual machine configuration item by first getting relationships of type virtual machine and then getting the actual virtual machine item.
Finally, we are calling our control runbook which in the previous example, resizes the virtual machine. In this case we set our Wait For Completion checkbox to checked.
If any of the activities fail, we are calling our component error runbook and then we are setting the Service Manager runbook automation activity to a failed status.


Orchestrator global variables present a number of challenges, especially when dealing with a runbook library concept as opposed to a one-off development implementation. These challenges include:
Lack of visibility into runbook dependencies. There is no way to know if a variable value is changed, what runbooks are affected by that change.
Runbook exports always export all global variables, used or not for the scope of the export. There are CodePlex solutions to strip the unused variables out of export files but this is not supported by Microsoft.
Multivalued variables are not available. CSV values can be created but are not user-friendly to read or edit.
In practice, most “global” variables truly only apply to one or a select few runbooks.
Your runbook automation library (Automation Library) should define a root path for all files in the Orchestrator global variable Runbook Root File Path. For single server deployments, this variable can be set to a local directory. In multiserver deployments, this variable should be set to a network file share that is accessible to all runbook servers. A suggested location would be placing a share on the Orchestrator database server but is by no means a hard requirement. The Automation Library should also define the URL to the Orchestrator REST API in the Orchestrator global variable Orchestrator Web Service URL. These two values are Orchestrator global variables because they will be used by all runbooks that need access to their file-based runbook variables, as well as any runbook that implements the file-based state pattern later in this chapter.
The Automaton Library will also contain two component runbooks that are used in the patterns. Details of how to build these runbooks is included in the Appendix. The first is the Get Runbook Folder runbook which determines the file path for a runbook based on its location in the Orchestrator folder hierarchy. The second runbook created is called Get Relative Folder and it takes in a starting directory and, with the use of some additional parameters, can return a relative path as needed. The suggested locations of these items are listed in Table 5-3.
Table 5-3. Suggested Folder Locations
Item | Type | Location |
|---|---|---|
Runbook Root File Path | Variable | Global SettingsVariablesAutomation Library |
Orchestrator Web Service URL | Variable | Global SettingsVariablesAutomation Library |
Get Runbook Folder | Runbook | RunbooksAutomation LibraryComponent RunbooksCore |
Get Relative Folder | Runbook | RunbooksAutomation LibraryComponent RunbooksCore |
In an attempt to address these issues, the Automation Library can use a pattern of file-based, runbook local variables. To share variables for a complex task across multiple runbooks, see the Shared runbook variables section. If the variable in question is truly global in nature, you can utilize Orchestrator global variables.
To use the pattern, create a text file to hold your control runbook settings, preferably in the XML format. Place the file in the logical place on the file system as follows:
Start with a root path, that is, C:Runbooks
Create the folder structure using the Automation Library Control Runbooks tree. The leaf folders of the folder structure will be the runbooks themselves.
Only runbooks that need to read from file-based global variables, or perform file-based state operations need to have a folder on the file system.
Create your XML file in the proper runbook file folder.
In the control runbook, after the initialize data activity, place an Invoke Runbook activity on the design surface and use the Get Runbook Folder runbook as shown in Figure 5-24.

This runbook has three inputs, as shown in Figure 5-25 and described in Table 5-4.

Table 5-4. Inputs for the Get Runbook Path Runbook Activity
Input | Value |
|---|---|
Orchestrator Web Service URL | Global SettingsVariablesAutomation Library Orchestrator Web Service URL |
Runbook Activity ID | Published Data: Activity ID from Initialize Data |
Root Path | Global SettingsVariablesAutomation Library Runbook Root File Path |
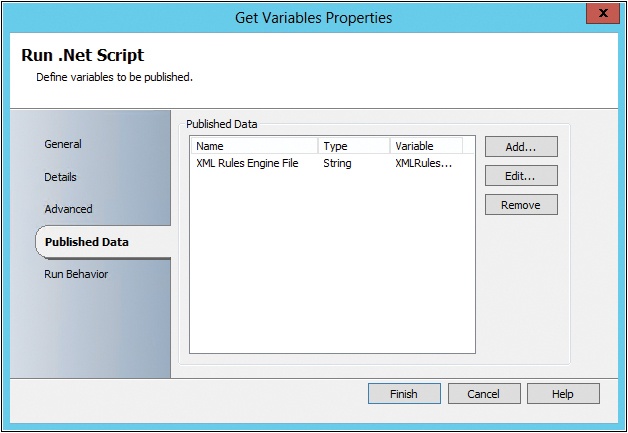
This runbook will use the inputs to retrieve the logical file location for a runbook, publishing the data to the Runbook Path data bus variable. Next, add a Run .Net Script activity to read in a file at the Runbook Path location and publish the results. In the following example, the script activity reads from a Runbook Variables.XML file and outputs the values to the data bus. The XML file was set up as follows:
<xml>
   <XMLRulesEngine>myEngine.xml</XMLRulesEngine>
</xml>
The Run .Net Script activity is set up as shown in Figure 5-26 and Figure 5-27.

Now subsequent activities can use these values as needed.
The simplest way to share variables for a complex task is to create an outer control runbook that reads in all the variables from its file and then passes in those variables to all the child control runbooks. Use the Local runbook variables pattern above and have the outer parent runbook contain all the shared variables in its local variable file.
There are also times where a group of runbooks needs to share variables where it may not be convenient for a parent runbook to read them in and pass them on to the child runbooks. In this case, shared file-based variables can be used. This pattern extends the local file-based variables pattern by introducing a second core component runbook that will allow relative-position directory navigation so that a shared location can be found and accessed.
To use the pattern, create a text file to hold your control runbook settings, preferably in the XML format. Place the file in the logical place on the file system as follows:
Start with a root path, that is, C:Runbooks
Create the folder structure using the Automation Library Control Runbooks tree. The leaf folders of the folder structure will be the runbooks themselves.
Only runbooks that need to read from file-based global variables, or perform file-based state operations, need to have a folder on the file system.
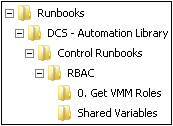
Create a directory to hold your shared variable file. The directory should be created within the scope of the control runbook theme, that is, Shared Variables under RBAC.
Create your XML file in the folder.
In the control runbook, after the Initialize Data activity, place an Invoke Runbook activity on the design surface and use the Get Runbook Folder runbook setup as in the previous section. Next, add another Invoke Runbook activity and point it to the Get Relative Folder runbook, as shown in Figure 5-28.

This runbook has three inputs, as shown in Figure 5-29 and described in Table 5-5.
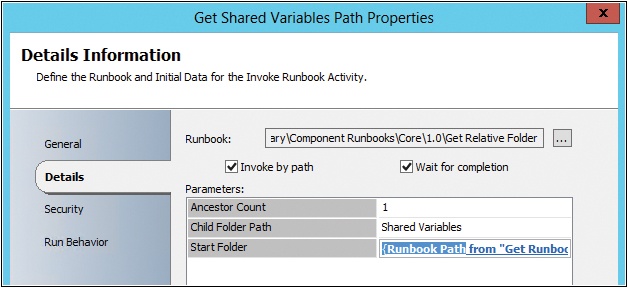
Table 5-5. Parameters for the Get Relative Folder Runbook
Input | Value |
|---|---|
Start Path | The runbook path as returned by Get Runbook Path |
Ancestor Count | The number of parent directories to traverse |
Child Path | The path to navigate down to after traversing the parent directories |
This runbook will uses the inputs to retrieve the shared file location for a runbook, publishing the data to the Directory Path dat abus variable. Next, add a Run .Net Script activity to read in a file at the Directory Path location and publish the results as in the preceding section.
The state patterns are very similar to the file-based variables patterns as there are two patterns to consider. The first pattern deals with local state, meaning state that is tracked within a single runbook. The other state pattern deals with shared state, where multiple runbooks share the state information to complete a complex task. Both patterns use the same core components that are described in the File-based runbook variables section. The Get Runbook Folder component runbook will return the path that should be used for the local state pattern and the combination of that runbook plus the Get Relative Folder component runbook will allow the state to be saved in a shared location relative to where the control runbook is located.
File-based state relies on being able to create, read, and update information in a file. While any file schema can be used for state, this guide will focus on using XML files as described in the Working with XML in Windows PowerShell section that follows.
Windows PowerShell makes scripting with XML simple and straightforward. This section will review some simple patterns for working with XML including creating an XML file, both exclusive and non-exclusive reading and writing, how to wait for a locked file and how to delete an XML file.
The following script example shows how to create an XML file using Windows PowerShell by creating a string template, loading in as XML, and then setting the values.
$path = "{Directory Path from "Get Shared State Path"}"
$filePath = $path + "SharedState.xml"
$template = "<xml><Request ID='' Status='' StatusText=''/></xml>"
[xml]$xml = $template
$xml.xml.Request.ID = 'SR12345'
$xml.xml.Request.Status = '0'
$xml.xml.Request.StatusText = 'Submitted'
$xml.Save($filePath)In situations where file read/writes happen sequentially or are limited to a single process, the following script example can be followed.
$path = "{Directory Path from "Get Shared State Path"}"
$filePath = $path + "SharedState.xml"
[xml]$xml = Get-Content '$filePath'
$xml.xml.Request.Status = '1'
$xml.xml.Request.StatusText = 'Approved'
$xml.Save('$filePath')In situations where there is the possibility for concurrent file writes, all write operations should be done with the file locked for exclusive access. The following script uses the .NET System.IO classes to accomplish this.
$path = "{Directory Path from "Get Shared State Path"}"
$filePath = $path + "SharedState.xml"
[System.IO.FileStream]$file = [System.io.File]::Open($filepath, 'Open', 'ReadWrite', 'None')
[xml]$xml3 = New-Object System.Xml.XmlDocument
$xml3.Load($file)
$xml3.xml.Request.Status = '6'
Read-Host
#rewind the stream the beginning to overwrite
$file.Position = 0
$xml3.Save($file)
$file.Close()In situations where exclusive write access to a file is needed, reading the XML and handling possible lock issues is a bit more complicated. The following example shows how this can be accomplished with looping and a try/catch block.
$path = "{Directory Path from "Get Shared State Path"}"
$filePath = $path + "SharedState.xml"
$accessed = $false
$tries = 0
while (!$accessed -and $tries -lt 10)
{
  try
  {
    [System.IO.FileStream]$file = [System.io.File]::Open($filePath, 'Open', 'ReadWrite', 'ReadWrite')
    [xml]$xml3 = New-Object System.Xml.XmlDocument
    $xml3.Load($file)
    $accessed = $true
    #Do Work Here
    $file.Close()
  }
  catch
  {
    $tries++
    sleep(5)
  }
}In situations where exclusive write access to a file is needed, deleting the XML and handling possible lock issues is a bit more complicated. The following example shows how this can be accomplished with looping and a try/catch block.
$path = "{Directory Path from "Get Shared State Path"}"
$filePath = $path + "SharedState.xml"
$accessed = $false
$tries = 0
while (!$accessed -and $tries -lt 10)
{
  try
  {
    [System.IO.FileStream]$file = [System.io.File]::Open($filePath, 'Open', 'Read', 'None')
    [xml]$xml3 = New-Object System.Xml.XmlDocument
    $xml3.Load($file)
    $accessed = $true
    #Do Work Here
    $file.Close()
    [System.io.File]::Delete($filePath)
  }
  catch
  {
    $tries++
    sleep(5)
  }
}In the local state pattern, all interaction with the state file(s) happens within a single control runbook execution. An example would be a process where the control runbook asynchronously starts a series of child runbooks and then waits for notification (via state files) that the process has completed. This is shown in Figure 5-30. Although there are multiple runbooks, the calling runbook can share the state file location with the child runbooks.

In the shared state pattern, multiple disconnected runbooks need to access the state of a long-running process that does not have an overarching control runbook that executes for the entire duration of the process. This pattern is important when the design requires easy restart ability from a state which is not a rerun from the beginning scenario. An example would be a series of runbooks to handle virtual machine provisioning workflows where the following occur:
A process creates the request (state).
Another process monitors for requests that are in particular states and hands them off to the scheduling engine.
The scheduling engine looks at the current state and hands off the request to the proper child process. Example child processes include create virtual machine, install SCOM agent, add local administrators, and so on.
The child process updates the state during execution.
The process monitor then repeats until the request is in the finished or failed state.
The routing / engine pattern uses the shared state pattern to work on a long-running process and make it easier for the process to be restarted at the point of failure instead of having to restart at the beginning of the process. Virtual machine (VM) provisioning is a good example of where this pattern can be applied since there may be many steps involved beyond the interaction with VMM to kick off the VM provisioning for activities such as Active Directory computer account set up, System Center agent installs, etc.
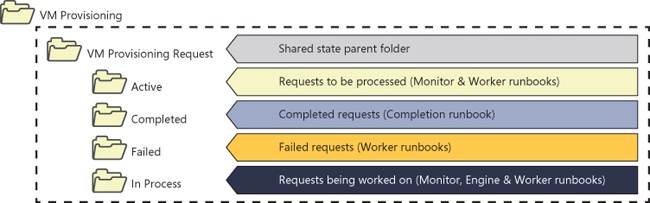
In the diagram in Figure 5-31, there are five folders that make up the folder structure for the routing/engine pattern. The VM Provisioning Request folder is the parent shared state folder in this example and contains four other folders that will house the request XML files as they are processed. The Active folder is for requests that need to be processed through the engine. The Completed folder is for requests that have completed the overall process. The Failed folder is for requests that could not be completed and the In Process folder is for requests that are actively being worked on by a runbook.
In this pattern there are four types of runbooks, namely a monitor runbook, an engine runbook, multiple worker runbooks, and lastly a completion runbook. The monitor runbook looks for requests from the Active folder, moves the request to the In Process folder, and hands off each request to the engine runbook. This is shown in Figure 5-32.

The engine runbook examines the status in the file, updates the status to Pending for the next scheduled task, and hands the request off to the worker runbook to process. This is shown in Figure 5-33.
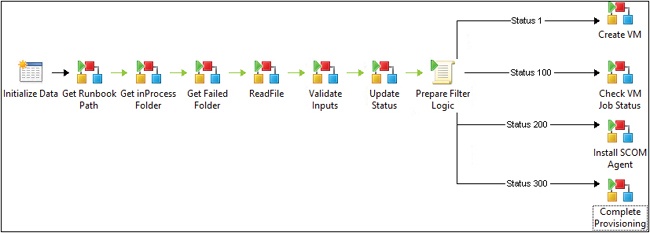
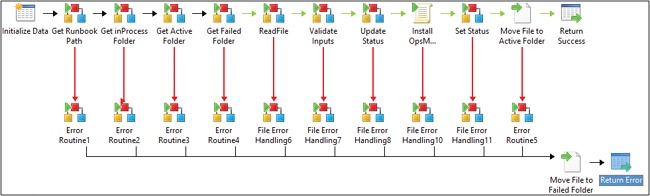
The worker runbook processes the request and updates the status to either Step Completed or Step Failed. If the step completed, the worker process moves the request back to the Active folder to start the process again. If the worker runbook failed the request, it moves the request to the Failed folder for operator triage. This is shown in Figure 5-34
If the problem can be fixed, the operator edits the request to reset the status to the last known good status and moves the file back into the Active folder for further processing. When all work has been completed, the engine runbook hands the request off to the completion runbook which in turn updates the status to the final completion status and moves the request to the Completed folder. This is shown in Figure 5-35.

When the monitor runbook hands requests off to the engine runbook, the runbook activity is setup with the wait for completion flag off so that multiple requests can be serviced simultaneously. Likewise, when the engine runbook hands off the request to a worker runbook, the runbook activity is setup with the same setting, that is, fire and forget so that multiple requests can be worked on in parallel. In both cases, the degree of parallelism is controlled by the job concurrency setting for each runbook. Once the concurrency limit has been reached, subsequent executions will be queued until a run slot opens up. For more information on setting the job concurrency, see the “Setting job concurrency: section.