CHAPTER 4
Customizing SSRS reports for Configuration Manager 2012
The previous chapter describes the process of setting up SSRS and integrating it with Microsoft System Center 2012 Configuration Manager. This chapter discusses customizing Configuration Manager reports using SSRS.
The following procedure demonstrates how to create a custom SSRS report for Configuration Manager 2012 using Microsoft SQL Server 2008 and Microsoft Visual Studio 2008.
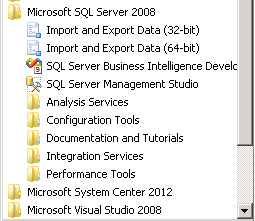
1. Click Start, All Programs, SQL Server 2008, and then select SQL Server Business Intelligence Development Studio. This opens Microsoft Visual Studio 2008.
IMPORTANT If SQL Server Business Intelligence Development Studio is not installed, you can install it using the SQL Server CD. Run the setup and select Business Intelligence Development Studio listed under Features on the Feature Selection page.
2. Click File, New, Project, and under Visual Studio Installed Templates choose Report Server Project.
3. Specify the name, location, and solution name (such as, ConfigMgr Custom Reports) and click OK.
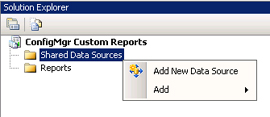
4. On the menu bar, click View, Solution Explorer.
5. In Solution Explorer, under ConfigMgr Custom Reports, right-click Shared Data Sources and select Add New Data Source.
6. On the Shared Data Source Properties page, enter the following information:
![]() For Name, specify the name of the Configuration Manager database (such as, CM_CAS).
For Name, specify the name of the Configuration Manager database (such as, CM_CAS).
![]() For Type, specify Microsoft SQL Server.
For Type, specify Microsoft SQL Server.
![]() For Connection String, click Edit.
For Connection String, click Edit.

7. Under Connection Properties specify the name of the SQL server (i.e., CM12CASRTM).
8. Select Use Windows Authentication for logging on to the server.
9. Select or enter a Configuration Manager database name (i.e., CM_CAS).
10. Click Test Connection to make sure the connection works.
11. Click OK twice to complete the wizard. This creates an .rds file (i.e., CM_CAS.rds) under Shared Data Sources.
12. In Solution Explorer, right-click Reports and select Add New Report.
13. On the Welcome page click Next.
14. On the Select The Data Source page, select the Configuration Manager database (i.e., CM_CAS) and click Next.
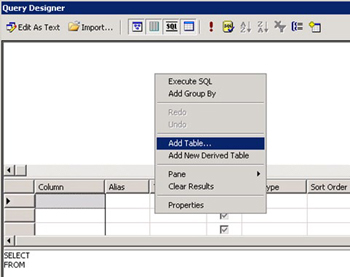
15. On the Design The Query page, click Query Builder to open the Query Designer page.
16. Right-click anywhere on blank portion at the top of the page and select Add Table.
17. Click the View tab and choose the following views:
![]() v_UpdateComplianceStatus
v_UpdateComplianceStatus
![]() v_UpdateInfo
v_UpdateInfo
![]() v_GS_Computer_System
v_GS_Computer_System
![]() v_StateNames
v_StateNames
![]() v_CICategories_All
v_CICategories_All
18. Next, to join the appropriate columns with the different views, highlight CI_ID on the v_UpdateComplianceStatus list and drag it onto CI_ID on the v_UpdateInfo view.
19. Create a join between the following pairs by repeating the procedure from step 18:
![]() v_UpdateComplianceStatus.CI_ID and v_CICategories_All.CI_ID
v_UpdateComplianceStatus.CI_ID and v_CICategories_All.CI_ID
![]() v_UpdateComplianceStatus.ResourceID and v_GS_COMPUTER_SYSTEM.ResourceID
v_UpdateComplianceStatus.ResourceID and v_GS_COMPUTER_SYSTEM.ResourceID
![]() v_UpdateComplianceStatus.Status and v_StateName.StateID
v_UpdateComplianceStatus.Status and v_StateName.StateID
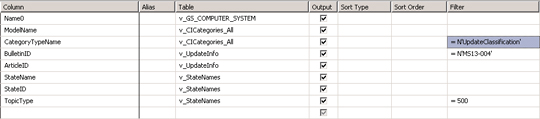
The result now looks like the following screenshot.

20. On the Query Designer page, under the middle tier box, specify the following filters for the corresponding column names:
![]() CategoryTypeName = ‘UpdateClassification’
CategoryTypeName = ‘UpdateClassification’
![]() BulletinID = ‘MS13-004’
BulletinID = ‘MS13-004’
![]() TopicType = 500
TopicType = 500
You can also copy and paste the following SQL query to generate the above joins and filter automatically:
   SELECT v_UpdateComplianceStatus.ResourceID, v_UpdateComplianceStatus.Status,
   v_GS_COMPUTER_SYSTEM.Name0, v_CICategories_All.ModelName, v_CICategories_All.
   CategoryTypeName, v_UpdateInfo.BulletinID, v_UpdateInfo.ArticleID, v_StateNames.
   StateName, v_StateNames.StateID, v_StateNames.TopicType

   FROM v_UpdateComplianceStatus INNER JOIN v_GS_COMPUTER_SYSTEM ON v_
   UpdateComplianceStatus.ResourceID = v_GS_COMPUTER_SYSTEM.ResourceID INNER JOIN
   v_CICategories_All ON v_UpdateComplianceStatus.CI_ID = v_CICategories_All.CI_ID
   INNER JOIN v_UpdateInfo ON v_UpdateComplianceStatus.CI_ID = v_UpdateInfo.CI_ID
   INNER JOIN v_StateNames ON v_UpdateComplianceStatus.Status = v_StateNames.StateID

   WHERE (v_CICategories_All.CategoryTypeName = N'UpdateClassification') AND (v_
   StateNames.TopicType = 500) AND (v_UpdateInfo.BulletinID = N'MS13-004')
21. Click the exclamation mark symbol at the top of the Query Designer page to execute the query and review the results.
22. Click OK to accept the query. This will return you to the Design The Query window.
23. On the Select The Report Type page, select Tabular and click Next
24. On the Design The Table page, select all of the fields under available Fields, click Details to add them to Displayed Fields on the right, and then click Next.

25. On the Choose The Table Style page, select Corporate and click Next.
26. On the Completing The Wizard page, provide a report name, select the Preview Report option at the bottom of the page, and click Finish.
27. This process will create .RDL file, which can be used to upload the report into SSRS.

In the next chapter we’ll examine how to customize function-based built-in reports.