
Chapter 10. Developing with Mondrian
This chapter is recommended for
| Business analysts | |
| Data architects | |
| Enterprise architects | |
| Application developers |
All of the previous chapters dealt with creating Mondrian content and using Mondrian from existing tools. You learned the steps necessary to create a data warehouse and populate it for Mondrian. You learned how to create a schema and optimize performance. You also learned how to apply security to Mondrian, including dynamic security. Finally, you learned about a variety of tools that can use Mondrian.
In this chapter you take the next step and learn how to use Mondrian from your own applications. This chapter is mainly written for software developers. It’s expected that you have the ability to read HTML, JavaScript, and Java code to fully understand the examples.
Adventure Works management has decided that they want to add analytical information to their existing web and desktop applications. This functionality would allow them to let analysts and managers see reports and trends against their data while using their existing applications rather than needing multiple tools. They want to use Mondrian to do so because of its rich feature set, built-in security, and existing user base.
They discover that there are two main ways to use Mondrian from within their applications (figure 10.1). If they have a thin-client application, they can use XML for Analysis (XMLA) and JavaScript to make calls to Mondrian. In this case Mondrian would run on a web server configured as an XMLA source. In section 10.1 we’ll show how to use Mondrian using jQuery with Ajax as well as the xmla4js JavaScript libraries.
Figure 10.1. Mondrian can be used from web and desktop clients via XMLA, and it can be embedded in Java applications.

If they’re writing an application using Java or some other JVM language, they can use olap4j to talk to Mondrian. olap4j works both with Mondrian configured as a web service or directly embedded within your application. Using olap4j you can also access additional functionality, such as access to the cache control service provider interface (SPI), that isn’t available when making XMLA calls from a thin client. In section 10.2 we’ll show how to use olap4j to make both types of connections.
Code snippets in this chapter
Note that we only show the parts of the code that are relevant to Mondrian and XMLA. We’ve also generally kept error detection to a minimum to make the code clearer as well. Please see the book’s web-site (http://www.manning.com/back) to download the complete code examples.
10.1. Calling Mondrian from a thin client
As we described, Mondrian can be invoked from both a thin client and desktop application. The techniques are similar but take different approaches. We’ll first introduce XMLA to provide some background. Next, we’ll describe how to invoke Mondrian as an XMLA service using JavaScript and Ajax. Finally we’ll describe how to use an open source library, xmla4js, that makes working with XMLA easier. Though the xmla4js approach is simpler, it’s worth understanding the more complex approach with straight XMLA since xmla4js assumes you understand the messages being passed.
10.1.1. XML for Analysis (XMLA)
XML for Analysis (XMLA) is a standard that allows systems to interact with OLAP servers via SOAP messages. XMLA was first proposed by Microsoft in 2000, and the XMLA council was formed in 2001. Since that time, most OLAP providers, including Mondrian, have added support for XMLA.
SOAP, which originally stood for Simple Object Access Protocol, is a message passing protocol designed for system-to-system communications. SOAP exchanges can be thought of as two friends sending letters back and forth. SOAP messages have an envelope that contains a header and a body. The content of the message is put into the body and is an XML document (listing 10.1). In our case, the message body will be our XMLA messages. The receiver of the message typically responds back with another SOAP message. SOAP message exchange is often implemented as an asynchronous communication using a JavaScript library such as jQuery. The sender won’t wait for a response, but rather listens for one to show up. When the SOAP message is received, a function is called to handle the message and do something with it.
Listing 10.1. Basic SOAP message
<SOAP-ENV:Envelope
    xmlns:SOAP-ENV="http://schemas.xmlsoap.org/soap/envelope/"
    SOAP-ENV:encodingStyle="http://schemas.xmlsoap.org/soap/encoding/">
  <SOAP-ENV:Header />
  <SOAP-ENV:Body>
    XML message here
  </SOAP-ENV:Body>
</SOAP-ENV:Envelope>
XMLA consists of two types of messages: discover messages that allow the calling system to retrieve information about the data sources and cubes and execute messages that let the calling system execute remote MDX queries (figure 10.2). By using a series of messages, you can create applications that can interact with an XMLA server for analysis without writing your own analysis code. This allows you to support a variety of applications using the same back end. And since XMLA is a standard, you could potentially switch between vendors.
Figure 10.2. Exchanging XMLA messages via SOAP

10.1.2. Configuring Mondrian as an XMLA web service
Before Mondrian can be used as an XMLA service, it has to be properly configured. When Mondrian is deployed with Pentaho, it’s already configured to be used as an XMLA service. If you examine the pentaho-solutions/system/olap/datasources.xml file, you’ll see the configuration information for the data source. Listing 10.2 shows some of the key values. The URL is the one you’ll want to use when making connections to the XMLA server. Note that you should pass the username and password for a valid user.
Listing 10.2. Mondrian configuration in datasources.xml

If you’re deploying Mondrian as part of your own web application, the steps are similar to what the BI server does. You create a datasources.xml file in your web application WEB-INF directory. The format of the file is the same as the Pentaho one shown in the preceding listing. You also configure the XMLA servlet in your web.xml configuration file, as shown in listing 10.3. Full details with an example can be found on the Mondrian configuration page at http://mondrian.pentaho.com/documentation/installation.php#5_How_to_configure_Mondrian_as_an_XMLA_provider.
Listing 10.3. Mondrian configuration in web.xml
<servlet>
  <servlet-name>MondrianXmlaServlet</servlet-name>
  <servlet-class>mondrian.xmla.impl.DefaultXmlaServlet</servlet-class>
</servlet>
Now that Mondrian is configured to provide XMLA services, the next step is to use the service. Using the service can be done using either JavaScript or olap4j. The next section will describe how to access the service using direct Ajax SOAP calls. After that we’ll look at a library that makes it a lot simpler.
10.1.3. Calling XMLA services with Ajax
To learn how to use XMLA services in the thin clients, we’ll first build a simple web page that will allow us to discover the available data sources from the Mondrian XMLA server and make analytical queries. We can use this knowledge to interface from a variety of clients. We’ll base the interface on jQuery and Ajax, since that will allow us to create the type of dynamic interfaces that users have come to expect.
This is the hard way
This section provides you with the low-level details of how to use the XMLA service. If you prefer to use libraries and simplify your work, you can skip ahead to section 10.1.4.
Creating the thin-client application
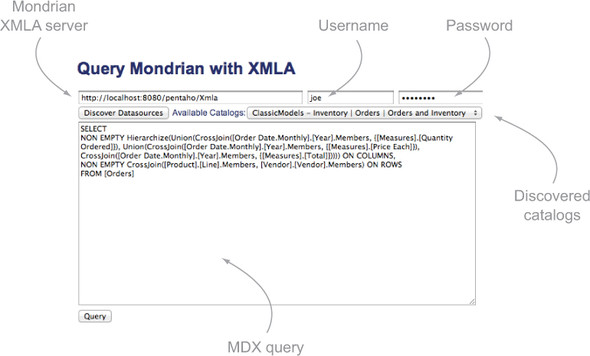
The first thing to do is create an HTML page to define the layout of this application. Figure 10.3 shows the client proof of concept to be built. With this client, we’ll be able to enter the URL for the Mondrian server along with a user-name and password and discover the available data sources and cubes. Once a data source is selected, we can enter an MDX query and get the results as a table of data. Although simple, this example shows how you can easily embed access to Mondrian in any thin client.
Figure 10.3. Simple thin client for XMLA queries
The solution consists of four files:
- QueryXMLA.html —An HTML document that defines the layout of the page
- QueryXMLA.js —A JavaScript file that uses jQuery and does the bulk of the work
- XMLAResponse.js —A JavaScript class that will aid in parsing responses from XMLA
- QueryXMLA.css —A cascading stylesheet to make the page look nice
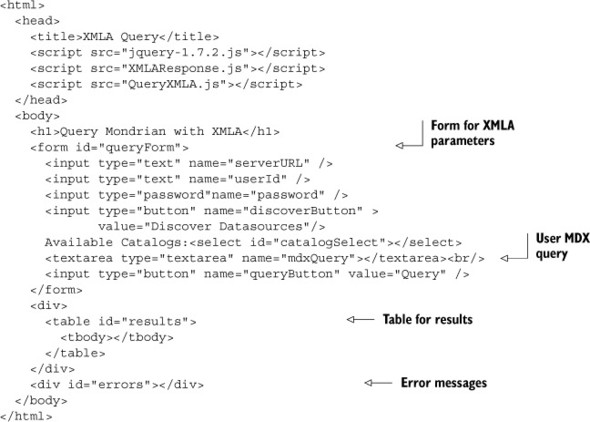
Listing 10.4 shows the simplified HTML we use to lay out the page. JavaScript will populate the page as the user enters data and makes selections. The user first enters and selects values, then enters an MDX query, and then views the results of the query.
Listing 10.4. HTML layout
XMLA discovery
Once the layout has been defined, the JavaScript that performs the work in the thin-client application needs to be written. Retrieving information about the data sources and cubes is done by sending a series of XMLA Discover messages. The end goal is to have enough information to be able to make MDX queries. To make MDX queries, we need the data source and the schema, also called a catalog in XMLA. To get this information, we send a series of three discover messages: DISCOVER_DATASOURCES, DBSCHEMA_CATALOGS, and MDSCHEMA_CUBES. Figure 10.4 shows the exchange of messages used to discover the data sources, catalogs, and cubes.
Figure 10.4. SOAP message exchange for discovery

Each of the discover messages is sent as a SOAP message. The message is embedded into the SOAP body, as shown earlier in listing 10.1. Listing 10.5 shows the messages sent to discover all of the cube information needed to make queries.
Listing 10.5. Discover data sources query

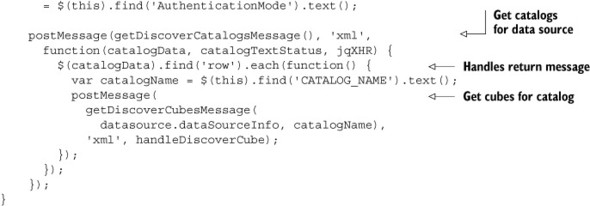
To make the call, the user will enter a URL and username and password and then click the Discover Datasources button. When the button is clicked, the application will retrieve the discover message defined here and will post the message to the XMLA server using a jQuery Ajax function.
To handle posting messages to the XMLA server, you can define a general purpose JavaScript function to be used each time you need to send a message. Listing 10.8 shows the function that will post messages using the jQuery Ajax call. This function takes three parameters. The first is the message to send to the XMLA server. The message must be a valid XMLA SOAP message. The second parameter is the type of content to send to the callback handler. The valid options are text or xml. Text is convenient for debugging or getting back generic content. Since the XMLA server returns SOAP messages, we’ll generally specify XML. The third parameter is the function to call when the response is received from the XMLA server. We’ll describe the format of this function in a bit.
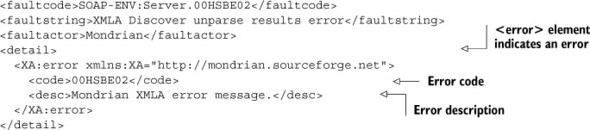
Since XMLA is based on message passing, a few types of errors can occur. The first is general Ajax errors that can be handled with standard Ajax calls. The second is XMLA errors. If the message passed to the XMLA server isn’t correct, then an error message will be returned. Listing 10.6 shows the general form of an error message. The main element to look for is the <error> element. If it exists, then this is an error message and the code and description elements will tell you what the error is.
Listing 10.6. Example XMLA error
To support error handling, we’ll create a function to check for XMLA errors and let us know if one occurred. Listing 10.7 shows the code to check for an error (without the SOAP header information). If an error is found, an alert will be shown with the error, and the function will return true. The return value can then be used by callback functions to know if there was an error or if it has valid content to process.
Listing 10.7. Function to check for XMLA errors

In order to post a message to the server, it’s necessary that the URL be set. The postMessage function will verify that a URL has been entered, as shown in the following listing. It’s up to the user to make sure that the URL is correct. Mondrian also allows you to pass a user ID and password when making XMLA calls, so the postMessage function will add those if they’re provided.
Listing 10.8. Function to post XMLA SOAP messages via Ajax

Once the message has been successfully sent, the results need to be handled in the callback function. jQuery Ajax callback functions take three parameters: the data returned from the call (either text or an XML DOM object), a text status indicating whether the Ajax call succeeded, and a jQuery object that contains information about the query. For our program we’re only going to use the data. Note that the success text will indicate success if the Ajax query was successful even if the XMLA query wasn’t.
The data source information callback will provide the data source information. Theoretically, multiple data sources can be returned, but in the case of Mondrian embedded inside of Pentaho, only a single data source is returned so a single object is sufficient to hold the data.
Listing 10.9 shows a partial example of the content of the SOAP message returned. The data source information is listed inside of a row element. The data source info is the primary data that we’ll need, but we’ll go ahead and save all of the information returned in case we want to display or use it later.
Listing 10.9. Content of a discover response message

Listing 10.10 shows the callback function that’s called when the response to DISCOVER_DATASOURCES is received. It parses the response and saves the information to the data source object. It also clears the catalogs object in case there were earlier queries. Finally it calls to get the catalog information.
Listing 10.10. Callback function for handling discover data source messages

The calls to discover the catalogs (Mondrian schemas) and cubes for each catalog provide the data needed to select the schema for the query. Listing 10.11 shows the message used to retrieve the catalogs. The response to this query is a set of catalogs available for requests. Each of the catalogs can then be used to find the cubes for the query.
Listing 10.11. XMLA query to discover catalogs

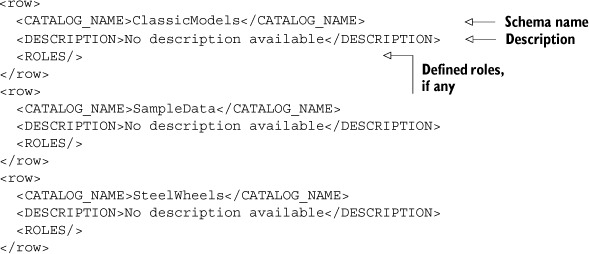
Listing 10.12 shows the body of the response back from the XMLA server. Several additional properties are returned, but these are the main ones we’re interested in for now. They allow us to provide the name and description for the interface and make MDX query calls. Each row contains information about a different catalog that can contain cubes.
Listing 10.12. XMLA response for discover DBSCHEMA_CATALOGS query
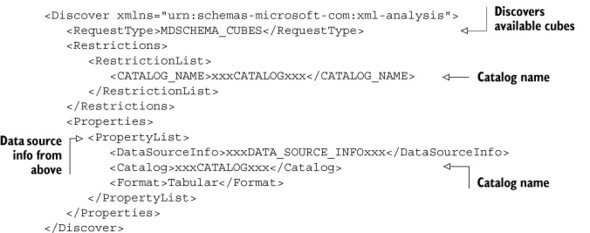
Listing 10.13 shows the calls to get the cubes for a given catalog. Note that the data source information and the catalog must be included in the message. This message is sent for each catalog.
Listing 10.13. XMLA query to discover cubes for a given catalog

A response like that shown in listing 10.14 is returned for the discover message. Each row is a cube for the given catalog (schema). Each cube can be used for analysis queries.
Listing 10.14. XMLA response for discover MDSCHEMA_CUBES query

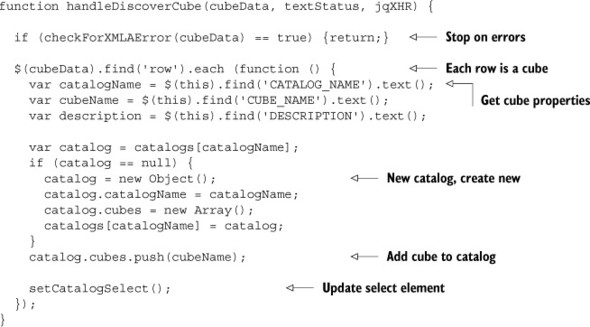
As each response to the MDSCHEMA_CUBES message is received, the handle-DiscoverCube function (listing 10.15) is called with the results. This will check each row and store the properties of the catalog and cube. This information will be needed for the user to execute queries later.
Listing 10.15. Function to handle MDSCHEMA_CUBES response
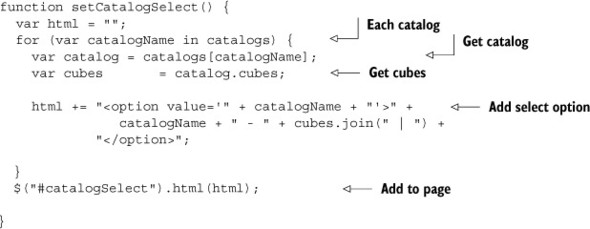
Once the cubes have been processed and added to the list of catalogs, the select input is updated with the list of catalogs and cubes as shown in listing 10.16. A complete update needs to be made each time, because the user could’ve pointed to a different XMLA server. At this point the user has a populated list of cubes to use for querying. In the next section we’ll see how to create and send the queries.
Listing 10.16. Function to set the catalogs and cubes to select
Executing XMLA queries
Now that we have all the information needed to execute a query, the application user can enter straight MDX queries and run them. Listing 10.17 shows the message that’s sent to the XMLA server and the JavaScript function used to get the message. The xxxMDX_STATEMENTxxx will be replaced with the actual MDX query entered by the user. The data source info and catalog information are set from values retrieved and chosen earlier.
Listing 10.17. Execute MDX query message

When the user clicks the Query button, the code checks that a query of some sort has been entered. If not, the user gets an error message and no query is made. Assuming a query has been entered, an Ajax call is made to the XMLA server as shown in listing 10.18.
Listing 10.18. Execute MDX query

Displaying the results
After studying the return results from the query, it should be apparent that parsing the results is going to be complex. So we’ll put the code for parsing the query results into its own class to make it easier to understand, and we can potentially reuse it in future projects. Two major steps are involved: parse the column and row headers, and parse the data. We’ll create a new JavaScript class called XMLAResponse to parse the response and provide access to the headers and the data. Listing 10.19 shows the new class with a constructor.
Listing 10.19. Class to parse XMLA response

When the class is created, the XML content is passed to the class. The class has three arrays to hold the row and column headers and the data returned. The class then calls to parse the headers and the data so they’re available to the user of the class. The headers and data arrays hold an array of values for each row so that they can be easily processed as shown in figure 10.5.
Figure 10.5. Table of query results
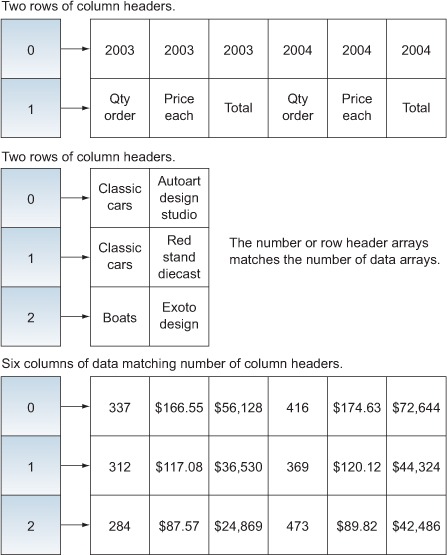
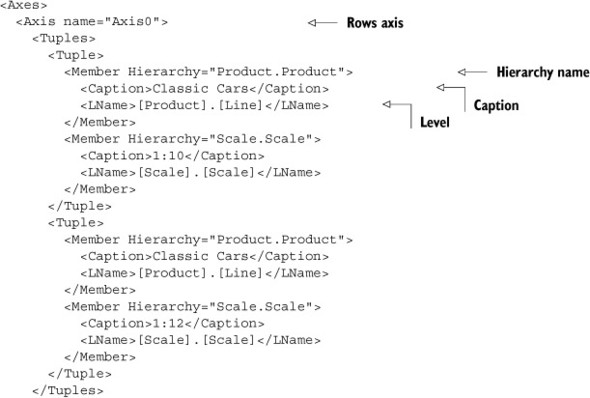
Listing 10.20 shows the format of the axes returned. Of interest to us are the level and the caption. In this example, the levels are lined neatly, but that isn’t always the case. Sometimes the levels have a single value followed by multiple values for lower levels. The solution is to check the level and make sure captions are at the proper level for all of the columns and rows.
Listing 10.20. XMLA response axis headers

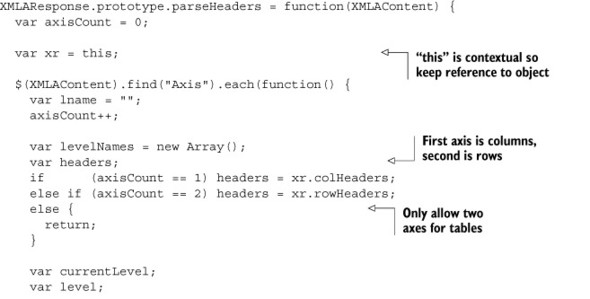
Listing 10.21 shows the parsing of the headers. The code reads the tuples from each axis to get the level and caption. It then finds the correct level in the header and gets the caption for that level. By definition in MDX, columns are axis 0 and rows are axis 1. You can theoretically have more than two axes, but that’s difficult to display in two dimensions, so the typical approach when presenting the data is to only handle two axes and put them into a table. For this reason any axis above two will be ignored. Since the values for the headers are returned the same way for all axes, we can rotates the headers for the row to convert from column form to row form as shown in listing 10.22.
Listing 10.21. Parse the row and column headers

Listing 10.22. Rotate the row headers

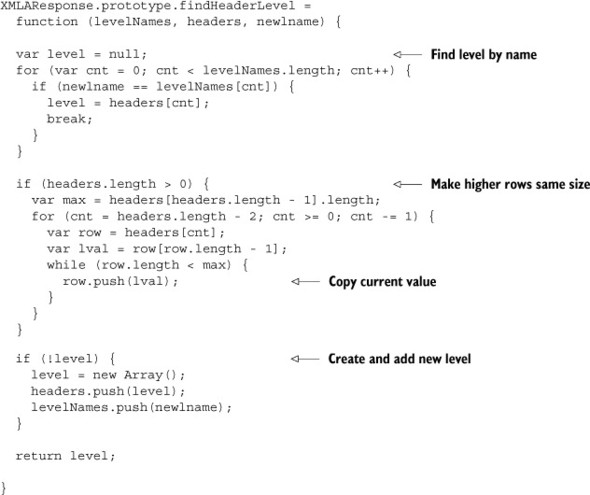
Finding the correct level in the data has to account for both new levels and jagged headers, as shown in listing 10.23. First the code checks through the levels to see if this is one of the existing levels. Once the level is found, all of the levels are made to be the same length. This is done by populating any shorter rows with the same value. Finally, if this is a new level, it’s created and added to the levels to be used for future values. The current level is returned to let the value be added.
Listing 10.23. Find the right level
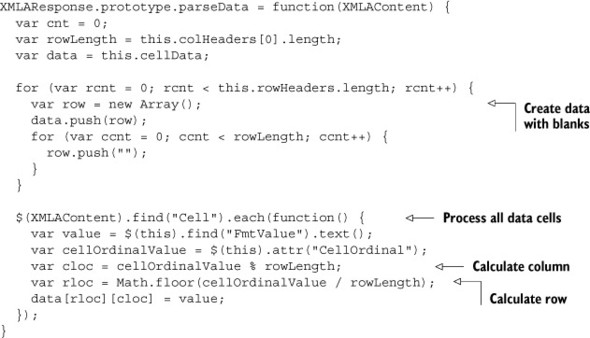
Now that the headers have been properly handled, the cell values need to be read and put into the right location. The data’s complexity comes from the fact that it’s all in one, flat list. It’s up to the receiver to figure out how to handle the data. Also, only the cells that have values are returned—empty cells aren’t. Rather, a CellOrdinal value is returned that tells where the data belongs.
There are two ways that the data can be populated. One alternative is to parse through the data and fill the arrays as data is read. This approach would mean that each cell is populated once. But it makes the code fairly complex and difficult to maintain. An easier if less computationally efficient approach as shown in listing 10.24. First create the arrays for the data and prepopulate them with blanks. Then use the Cell-Ordinal value to put the cell into the correct row and column, since a value now exists for each cell.
Listing 10.24. Parse the data
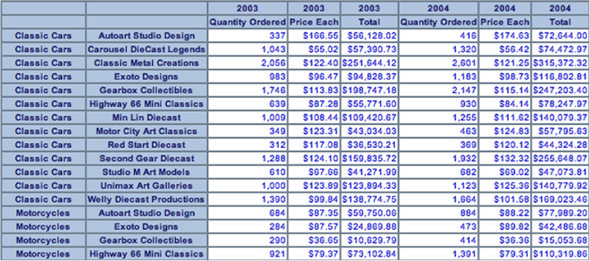
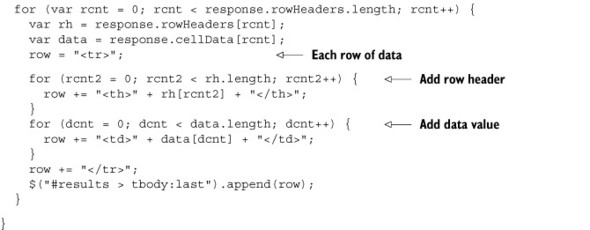
The final step is to display the results to the user, as shown in listing 10.25. First the columns headers are added, leaving spaces for each of the row headers. Then the row headers followed by data are added. The final result is a table of all the data returned from the query. Figure 10.6 shows the final results for the user.
Figure 10.6. Table of query results
Listing 10.25. Show query results

Now we’re satisfied with our prototype and understand what needs to be done for thin clients. A large part of the work was creating and sending standard SOAP messages. This seems to be a common requirement for many developers. When there’s a common technical problem, there’s often a common technical solution. The next section will describe just such a solution for XMLA.
10.1.4. XMLA for JavaScript (xmla4js)
If you do research into XMLA for reusable libraries, you’ll find xmla4js. Xmla4js is a JavaScript library that wraps the effort of interacting with XMLA. Although you need to understand the messages to call and the properties to set, you no longer need to create and parse SOAP messages. Since this approach sounds good, we can head to http://code.google.com/p/xmla4js/ and download the library and documentation. Now we can rework the original prototype, but using xmla4js. Though you could write your own library, having one that has been tested and is community supported makes a lot of sense and can save you a lot of development and testing efforts.
Since we’re replacing the original prototype, we can reuse the same HTML and CSS. We’ll also use jQuery as we did in the previous example. But we can replace the XMLAResponse class by using xmla4js.
The first step is to replace the code that gets the cubes to populate the selection for the user. After a user enters the URL, username, and password as before, they can click the Discover Datasources button. Before using xmla4js, this process involved formatting SOAP messages, sending the messages, handling the callbacks, and parsing XML documents. As you can see from listing 10.26, the code is now much simpler.
Listing 10.26. Get catalogs and cubes


Xmla4js makes the discover process straightforward. Each discovery is basically one line of code. Though Xmla4js supports both synchronous and asynchronous calls, it makes the code cleaner to use synchronous calls. This is especially nice since we need the data for future calls. We can reuse the same selection code as the previous prototype to set the select options.
Now the user can select the cube to use and enter a query. Listing 10.27 shows the code that gets executed when the user clicks the Query button. First the values set by the user are retrieved. Then a single call is made to execute the query and return the value as tabular results. Tabular results are easy to put into a table, which is our goal.
Listing 10.27. Execute the MDX query

Among the various data returned as part of the results are the field names that specify the columns and rows. Handling the field names is probably the most difficult part of the effort, whereas handling the data is straightforward. Listing 10.28 shows the code that retrieves the field names and adds them to the results. First it calls to get the fields from the results and calls a function that parses the header data. Finally, the headers are dynamically added to the HTML document.
Listing 10.28. Execute the MDX query

Parsing the headers is the most difficult part of this effort. This is because the headers are returned as a single array with the full path to indicate which column they apply to. For example, a member caption has the form [dimension].[level] .[MEMBER_CAPTION] and a column header has the form [level].[member] .[level].[member].... Headers in OLAP are generally more complex than dealing with headers in a JDBC result set because OLAP is multidimensional, whereas JDBC is tabular (two dimensional). Listing 10.29 shows the code to parse the field names and put them into a set of arrays where each array is a row of headers that can be displayed.
Listing 10.29. Parse field names


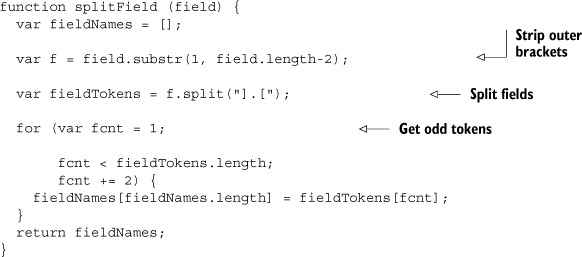
In the previous example there was a call to split the fields. This is because the format needs to be broken up to create multiple header cells based on the number of levels. Listing 10.30 shows the JavaScript to parse the field. First the outside brackets are removed, then the fields are split on the ].[ separator. This results in a set of fields. Only the odd-numbered fields are needed for display, so they’re added to the output and returned.
Listing 10.30. Parse individual field
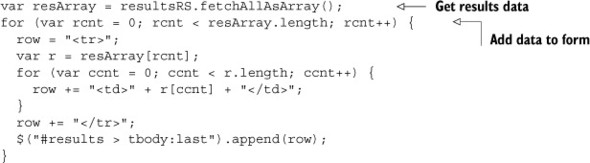
The last step is to add the results to the form. The results can be returned as an array of rows, making it simple to add them. The following listing shows how to add the results after fetching them as an array.
Listing 10.31. Add results data
And that’s it! Using xmla4js dramatically simplified the effort of retrieving data from XMLA. Figure 10.7 shows the results. As you can see, they look basically the same as the longer effort that we previously performed.
Figure 10.7. xmla4js query results

Although many other things can be done with XMLA and xmla4js, we’ve seen the basics of how to integrate with XMLA via a thin client. Though xmla4js was much simpler, the lessons learned from writing SOAP messages were useful for understanding the process better. Now we’re ready to tackle integrating with Mondrian from a desktop application, which we’ll cover in the next section. Though you’d probably want to start with xmla4js, hopefully you have a better understanding of what xmla4js is doing when you make calls.
10.2. Calling Mondrian from a Java application
Now that we’ve seen how to connect to Mondrian via XMLA using thin-client applications, we’ll look at how to connect to Mondrian from Java applications. Though you could create an application that exchanges XMLA SOAP messages with Mondrian, there’s a much easier way: use olap4j.
Olap4j is a standard API and driver for connecting to OLAP systems. It allows users to generically connect to XMLA servers as well as embed Mondrian directly into an application. The API is written in Java, so it can easily be embedded into any Java or JVM application, including desktop applications or web service applications. The libraries and documentation can be found at the project site: http://olap4j.org.
JDBC and olap4j
If you’re familiar with JDBC, much of olap4j will look similar. olap4j was inspired by JDBC and uses a number of JDBC classes and techniques.
Java OLAP interface (JOLAP)
In addition to olap4j, there was a Java Specification Request (JSR-69) called JOLAP that would’ve created a pure Java interface for OLAP systems. JSR-69 has since been withdrawn by the specification lead.
10.2.1. Creating connections via olap4j
Currently two drivers are available for olap4j. The first is the XmlaOlap4jDriver that provides connections to XMLA systems. You create an instance of the driver and then a connection to the XMLA server. The server can be based on Mondrian, but it also works with Microsoft Analysis Services (MSAS) and other OLAP servers that support XMLA. Listing 10.32 shows creating the class and connecting to a remote server.
Listing 10.32. Create XMLA connection

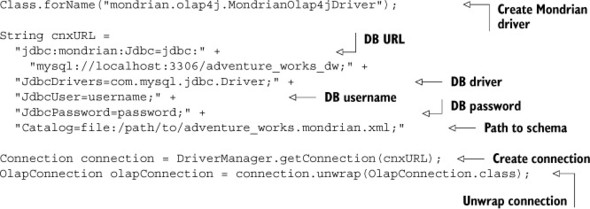
To embed Mondrian directly, you create a different driver and create a connection. Listing 10.33 shows the code needed to create the Mondrian driver and connect to the database. Note that we need to unwrap the connection to an OlapConnection before it’s ready for use. No matter which driver you choose to use, the rest of the API is now the same.
Listing 10.33. Create Mondrian connection
Unsupported methods
Many of the methods in the driver specification aren’t required to be implemented. So even though you may see a method in the JavaDoc, you should verify that it’s supported.
Now that you have a connection, you can start making queries to the server from your application. If you’re using the XMLA driver, SOAP messages will be sent between the application and the server. If you’re using Mondrian, then direct API calls are made. After you’re finished working with the data, make sure you call the close() method to close the connection.
10.2.2. Querying data
The first thing we might want to do is find out which cubes are available to query. Getting the list of cubes is one simple line of code: NamedList<Cube> cubes =connection .getOlapSchema().getCubes();. The cubes can now be used to allow the user to specify which one to use.
Querying data can be done one of two ways. The first is to create a query model (org.olap4j.query.Query) that represents the equivalent MDX query. The benefit is that it’s all code and you don’t really have to understand MDX. The drawback is that the query model isn’t as rich as MDX, so you may need to create MDX query strings. Since MDX query strings will always work, that’s the approach we’ll use here.
The following listing shows the code needed to create the MDX query. All you need is a string value and then call to execute the query. You will get the results back as a CellSet.
Listing 10.34. Execute MDX query
String mdx =
  "select {Measures.[Qty Ordered], " +
          "Measures.[Unit Price]} on columns, " +
          "Customer.Gender.Members on rows " +
  "from [Internet Sales]";

CellSet cellSet =
  this.connection.createStatement().executeOlapQuery(mdx);
The last step in the example code will loop through the results and print them out. Listing 10.35 shows how this is done. First you get a list of all of the positions for the columns and rows. Then you get a list of the member values for the particular position. Finally you get the cell and show its value.
Listing 10.35. Show the results of the query

The results will look like listing 10.36. Each set of data shows the value for one aggregate of the given members. Note that you got the aggregate for [All Gender] as well as the values for each gender.
Listing 10.36. Output of query results
[Customer].[Gender].[All Gender]
[Measures].[Qty Ordered]

60,398

[Customer].[Gender].[All Gender]
[Measures].[Unit Price]
$29,358,677.22

[Customer].[Gender].[Female]
[Measures].[Qty Ordered]
30,017

[Customer].[Gender].[Female]
[Measures].[Unit Price]
$14,813,618.68

[Customer].[Gender].[Male]
[Measures].[Qty Ordered]
30,381

[Customer].[Gender].[Male]
[Measures].[Unit Price]
$14,545,058.55
The last feature we’ll explore is performing drillthrough. Drillthrough returns the underlying data that was used to create the contents of a cell. There are two approaches to use. One is to make an MDX DRILLTHROUGH query. This approach differs from the previous query in that you’d call this.connection.createStatement() .executeOlapQuery(mdx); rather than executeOlapQuery. This is because you’re making a relational and not a multidimensional query. An advantage of the MDX approach is that you can specify the maximum number of rows to return. The disadvantage is that you have to determine the right query to create.
The second option is to call the drillThrough() method on a Cell as shown in the following listing. You can then iterate through the ResultSet and display the source data.
Listing 10.37. Drilling through a cell

Listing 10.38 shows the source of data from a slightly more complex query. In this case it’s a single row, but in some cases there can be very many rows of data.
Listing 10.38. Cell drillthrough results
Promotion Name    Product Name    Qty Ordered
No Discount    AWC Logo Cap        2190
This section showed how to connect to Mondrian or an XMLA server, execute an MDX query, and get the results. Adventure Works can now integrate Mondrian into their company’s applications to provide rich analytics capabilities without a lot of work. And since both Mondrian and olap4j are open source projects, they’ll get the benefits of any improvements that are made to either.
10.3. Summary
This chapter introduced integrating with Mondrian in four ways:
1. Integrating from a thin client by exchanging SOAP messages
2. Integrating from a thin client using xmla4js
3. Integrating from a desktop client using olap4j and the XMLA driver
4. Integrating from a desktop client using olap4j and embedded Mondrian
If you want to create a completely thin client, then you should consider either XMLA and SOAP or xmla4js, the latter being much easier. If you’re creating a Java application, then you should consider using olap4j and either integrating Mondrian directly or calling Mondrian via XMLA. In both cases, the driver is the main difference.
All of the APIs discussed in this chapter have many more classes and methods available for exploration. Each also has dedicated sites with documentation and examples that you can draw on as you explore them and integrate with Mondrian. Finally, the code is available for you to experiment with and use to truly understand the APIs. Now we’ll turn to some advanced topics related to Mondrian and analytics in the next chapter.