02. Getting Started with Your GoPro HERO5 Black

In this chapter, you’ll learn specifically about the GoPro HERO5 Black camera. Topics include the following:
![]() What’s included with the HERO5 Black camera
What’s included with the HERO5 Black camera
![]() An overview of the camera’s built-in buttons, ports, status screen, and touchscreen display
An overview of the camera’s built-in buttons, ports, status screen, and touchscreen display
![]() Details about the ways to control the camera remotely
Details about the ways to control the camera remotely
![]() How to get started using the HERO5 Black camera
How to get started using the HERO5 Black camera
If you opted to invest in the GoPro HERO5 Black camera, you now have in your hands GoPro’s most advanced camera (as of mid 2017). It’s packed with the most features and functions of the models, and it’s the model that showcases the most significant design advancements compared to previous GoPro camera models.
Ten Improvements to the HERO5 Black
Some of the improvements made to this HERO5 Black model include the following:
1. It is waterproof (up to 33 feet), temperature/weather-resistant, shock-proof, durable, and portable without needing to be in an optional housing.
2. The HERO5 Black comes with the Frame housing, which allows the camera to easily attach to a wide range of mounts and accessories. This housing also helps to protect the camera’s body yet it leaves the front and back of the camera, along with the Mode button, readily accessible. If you manually remove the side door, the camera’s ports are also accessible, even when the camera is within the Frame housing.
3. It has a built-in, full-color touchscreen on the back of the camera. From this screen, you can adjust the camera’s shooting mode and related settings, use the screen as a live viewfinder when shooting, and then preview or play back what you’ve shot.
4. The broadest range of shooting modes, resolutions, frames per second (FPS), and field of view (FOV) settings are offered, compared to all other GoPro camera models.
5. You can control the camera using the built-in touchscreen, GoPro’s new voice command functionality, or the optional wireless Smart Remote, or you can link the camera wirelessly to your smartphone, tablet, or smartwatch.
6. The built-in GPS records exactly where your photos and videos are shot and embeds this information within the digital files for your content. Location information can then be utilized in a variety of ways, as described throughout this book.
7. When shooting video with the built-in video stabilization feature, the content is smoother than with other models, even when it’s taken during extreme activities that involve motion. The stability can be dramatically improved when you use the camera with the optional Karma Grip accessory, which is described in Chapter 5, “Must-Have GoPro Camera Accessories.”
8. Content shot using the HERO5 Black can automatically and wirelessly be uploaded to the subscription-based GoPro Plus online service, which makes the content available to all of your computers and mobile devices without requiring that you do a manual transfer of the content.
9. The operating system (Camera Software) that allows the HERO5 Black to function has been redesigned to be more intuitive, easier to navigate, and simpler to update.
10. A greater selection of optional and specialized mounts and accessories are available, which enables photographers and videographers alike to capture the best possible photos and videos in a broader range of shooting situations—on land (indoors or outdoors), in the air, around water, or underwater.
What Comes with the HERO5 Black
The HERO5 Black camera is virtually ready to use straight out of the box. With the exception of a microSD memory card and optional mounts and accessories, everything you need to get started shooting photos or video content with the GoPro HERO5 Black comes with the camera. The following things are included with the camera:
• The GoPro HERO5 Black camera
• One compatible, rechargeable battery
• A USB cable used for connecting the camera to a computer and/or charger
• The Frame housing
• A mounting buckle that works with some of the optional mounts
• Several mounts that connect to the Frame or Super Suit housing
Depending on what and where you’ll be shooting, you might find it advantageous to use a variety of different mounts and accessories. For example, you might find it necessary to use some type of mount, an external microphone, and/or optional lighting to achieve the professional results you desire in your video. How and when to use optional mounts and accessories is covered in later chapters.
What and where you’ll be shooting can affect the best way to control the camera. Your options for controlling the camera include using
• The camera’s built-in touchscreen and buttons
• Voice commands (with or without the optional Remo accessory, which extends the distance you can be from your camera when issuing voice commands to up to 33 feet)
• The optional GoPro Smart Remote
• The Capture mobile app running on your smartphone, tablet, or smartwatch (after establishing a wireless connection between the camera and the mobile device)
Choosing an FOV
All of the GoPro cameras allow you to choose between several field of view (FOV) options, based on which shooting mode you’ve selected. More information on which shooting resolution, FOV, and FPS (for video) option to choose is covered later, but for now you should understand the types of shots you can capture using the fixed lens that’s built into your GoPro camera.
The following sections provide a summary of each FOV option and an explanation of what each can be used for when shooting still images or video.
Narrow
This is the smallest FOV option. It offers virtually no “fish-eye” distortion, and places more emphasis on what’s in the center of the frame as you’re shooting.
Linear
The Linear FOV offers a more traditional shooting perspective that displays less content on the right and left sides of the frame, compared to the Wide or SuperView FOV options. Regular point-and-shoot digital cameras and the cameras that are built into smartphones typically offer a linear FOV by default.
This is a new FOV option added to the latest GoPro cameras. It offers a mid-range field of view that eliminates the “fish-eye” distortion that appears when using a wider FOV option for shooting content that’s relatively close to the camera.
Medium
Depending on what you’re shooting, you might want to include more content on the extreme right and left sides of the frame, but not as much content as would appear when using the Wide or SuperView FOV option. Depending on how close the camera is to what you’re shooting, some “fish-eye” effect might be present with this FOV, and the viewer’s eyes will be drawn to the center of the frame.
Wide
This field of view option displays a lot more content on the extreme right and left edges of the frame, and there’s often an obvious fish-eye effect if the camera is close to what’s being shot. If you’re shooting action from a first- or third-person perspective, a Wide FOV looks immersive, and helps draw the viewer into what they’re watching.
SuperView
Available when shooting HD video, SuperView is the most immersive and visually exciting FOV option available to you. This is truly what the GoPro cameras are known for. This FOV option is ideal for shooting action, from a first- or third-person perspective, when the camera is attached to your body or gear while you’re engaged in a high-action or intense (motion-oriented) activity. This FOV option is also great for showcasing vast cityscapes or landscapes. It provides for attention-grabbing 16:9 widescreen playback on an HD television or monitor.
Overview of the HERO5 Black’s Body
Like the older (and discontinued) GoPro HERO4 Black camera, the HERO5 Black has a compact, handheld, rectangular design. The HERO5 Black, however, also has a built-in, full-color touchscreen and an LCD status screen, which means it’s much easier to set and quickly adjust the camera’s shooting mode and related settings directly from the camera. This section helps you quickly get acquainted with the layout of the camera and explains where all of the various buttons, ports, and features are located and what they’re used for.
The Front of the Camera
The front of the HERO5 Black contains three important features: the camera’s lens, the status screen, and one camera status Light.

All of the GoPro cameras are equipped with a fixed, ultra-wide lens that’s designed to capture photos and videos with an extremely wide FOV. A fixed lens means that there is no built-in zoom feature, and it’s not possible to swap between multiple lenses (like you can do when shooting with a digital SLR camera, for example).
It is possible, however, to use photo- or video-editing software to crop content after it’s been shot, which can replicate a traditional zoom feature. What you can do with your GoPro, thanks to new options, is easily switch between a Narrow, Linear, Medium, Wide, or SuperView FOV, depending on which shooting mode you’re using.
As with any camera, everything you want to capture within your photos or video must be seen through the front-facing lens. Thus, it’s essential that when you’re holding the camera in your hands and shooting, or you place the camera within a housing and use an optional mount, that nothing blocks any part of the lens and that the camera is positioned at the ideal angle to capture your desired subject.
Of course, you always want to make sure the camera lens is clean (void of dirt, dust, sands, fingerprints, smudges, water drops, and so on) before you start shooting. Use a microfiber lens-cleaning cloth to wipe the lens, as needed.
The LCD status screen uses text, numbers, and tiny graphic symbols to display information related to what your camera is currently doing. This information includes which shooting mode and shooting options are selected, the available storage capacity of the memory card that’s installed within the camera, and current battery life for the battery that’s installed within the camera.
When using older GoPro camera models, the status screen served a very important function, and it was used often. However, because the HERO5 Black has so many other ways to interact with the camera (via the touchscreen, voice commands, or remotely from a mobile device, for example), you probably won’t need to rely on this status screen too heavily.
The three status lights built into the camera are tiny, colored LEDs that flash or display a solid color to indicate the camera is currently shooting or the battery is charging. The lights flash if you’re using the camera and its memory card reaches its storage capacity or if the camera needs to alert you of something.
One of the status lights is located on the front of the camera (near the top-left corner). Another is on the bottom of the camera (near the speaker), and a third is on the back of the camera (in the top-left corner).
The Back of the Camera
The back of the camera includes one of the three tiny status lights . Otherwise, almost the entire back of the HERO5 Black camera is taken up by the full-color, touchscreen display. This screen serves three main purposes:
1. Provides access to menus and enables you to select the camera’s shooting mode and adjust related settings
2. Acts as a live viewfinder (shown) for framing your shots and seeing exactly what you’re shooting
3. Offers a preview of photos or playback of videos that have been shot and that are stored within the microSD memory card

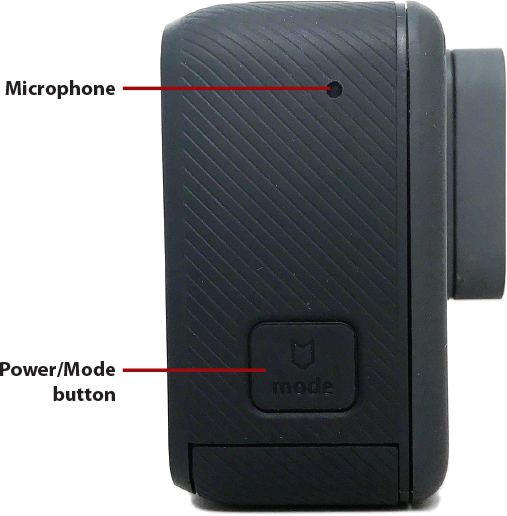
The Right Side of the Camera
The right side of the camera (when the camera’s touchscreen is facing you) has the Power/Mode button and one of the camera’s built-in microphones.
Use the Power/Mode button to turn on or off the camera, and then to access on-screen menus that enable you to switch between shooting modes and menu options.
The Left Side of the Camera
The left side of the camera (when the back of the camera is facing you) has the side door and another of the camera’s built-in microphones.

Open and Close the Side Door
To open and close the side door, follow these steps:
![]() Remove the HERO5 Black from whatever housing it’s in by placing one or two fingers at the top latch of the housing and lifting it upward. (Shown here is the Frame housing that comes with the camera.)
Remove the HERO5 Black from whatever housing it’s in by placing one or two fingers at the top latch of the housing and lifting it upward. (Shown here is the Frame housing that comes with the camera.)

![]() With your fingers at the top of the housing door, pull the back of the door to open it.
With your fingers at the top of the housing door, pull the back of the door to open it.

![]() Gently press the front of the camera, and slide the HERO5 Black out the back of the housing.
Gently press the front of the camera, and slide the HERO5 Black out the back of the housing.

![]() Use your finger to gently press the small latch release button located on the side door.
Use your finger to gently press the small latch release button located on the side door.

![]() Use the same finger to slide the side door down, toward the bottom of the camera. The door should hang over the bottom of the camera by less than a quarter inch.
Use the same finger to slide the side door down, toward the bottom of the camera. The door should hang over the bottom of the camera by less than a quarter inch.

![]() From the bottom of the door, lift the side door up.
From the bottom of the door, lift the side door up.

Be Careful!
Make sure you don’t accidently break the door off the hinge. It’s fragile! If necessary, you can purchase a replacement side door from the GoPro website (http://shop.gopro.com/accessories-2/replacement-side-door-hero5-black/AAIOD-001.html) for $19.99.
![]() Close the side door by reversing the preceding steps and sliding the door back into the camera. When the door is back in place, you hear a slight click. (Not shown.)
Close the side door by reversing the preceding steps and sliding the door back into the camera. When the door is back in place, you hear a slight click. (Not shown.)
Removing and Reattaching the Port Compartment Door
Removing the door allows you to place your GoPro camera within the Frame housing while still having full access to the camera’s ports. For example, you can plug the Pro 3.5mm Mic Adapter into the camera and then connect an external microphone to record better sound quality while recording video. When the door is removed, you can also connect an external battery pack to your camera to extend the battery life (or recharge the camera’s internal battery) while shooting.
When the latch is open, position it at a 90-degree angle from the side of the camera.
![]() Using your thumb and index finger pull the door straight out. The door snaps out with minimal force. Always pull the side door off (or push it back into position) from a 90-degree angle from the camera.
Using your thumb and index finger pull the door straight out. The door snaps out with minimal force. Always pull the side door off (or push it back into position) from a 90-degree angle from the camera.

![]() Place the loose door somewhere it will not get lost. (See the earlier note if you lose the door and need to order a replacement.)
Place the loose door somewhere it will not get lost. (See the earlier note if you lose the door and need to order a replacement.)

![]() Reattach the door by holding it at a 90-degree angle to the camera. Line up the door hinge with the hinge built into the camera, and push the door gently in until it clicks into place. You can then close the door.
Reattach the door by holding it at a 90-degree angle to the camera. Line up the door hinge with the hinge built into the camera, and push the door gently in until it clicks into place. You can then close the door.

The Top of the Camera
On the top of the HERO5 Black camera is another built-in microphone, as well as the Shutter button.
When the camera is in Photo mode, each time you press and release the Shutter button, you capture one still digital image. When the camera is in Video mode, you press the Shutter button once to begin the recording process and then press it again to end the recording process.

The Bottom of the Camera
On the bottom of the HERO5 Black camera is a built in speaker. It allows you to hear alert beeps generated by the camera and the audio of recorded video that you’re playing back.
Also located on the bottom of the camera is another LED status light and the battery compartment door. Within the compartment is a slot for the camera’s rechargeable battery and a separate slot for the microSD memory card.
To open and close the battery door, use the same steps that were outlined earlier in this chapter for the side door. Begin by removing the HERO5 Black camera from its housing, if applicable, and then press the latch release button for the battery door. Using your finger, slide the door outward slightly until it pops open.

Exploring the LCD Status Screen
Anytime the HERO5 Black camera is turned on, the status screen automatically displays information about how the camera is set up and what it’s currently doing. Using text, numbers, and tiny graphic icons, the following five pieces of information are simultaneously displayed:
• Camera shooting mode
• Selected and active settings
• Available storage space on the microSD memory card
• Battery status

Exploring the Camera’s Full-Color Touchscreen
As you use the HERO5 Black camera, when the touchscreen is being used as a live viewfinder you see the following information on this screen in addition to what you’re shooting (your subject):
• Wireless status—A wireless icon that indicates your HERO5 Black is wirelessly linked with your smartphone, tablet, smartwatch, or the optional GoPro Smart Remote accessory.
• GPS—Turn on this feature on your HERO5 Black so the camera can track and record the exact location and other information pertaining to where content is shot. When editing action videos using the QUIK Desktop software, it’s possible to display information like the subject’s exact location, travel speed, GPS path, G-force, acceleration, and altitude on the screen, overlaid over the video content.
• Memory card info—Information about how much video you can film (based on available memory card storage capacity) or how many photos you’ve taken.
• Battery status—An icon and a numeric percentage that indicate available battery life as you’re using the camera.
• Shooting mode—An icon that indicates which shooting mode is currently selected—for example, a movie camera-shaped icon indicates video mode is active or a camera-shaped icon indicates the camera is set up to take still shots.
• Resolution, FOV, and FPS settings—The shooting resolution, FOV, and FPS for video.
• Advanced settings selected (not shown)—Icons for features such as video stabilization or auto low light display along the right margin of the screen.

Interact with the Touchscreen
In addition to simply displaying information, the touchscreen responds to finger presses and swipes. For example, select a displayed menu option by using your finger to press on the screen over the desired option or icon to select or activate it. Often, when you press a menu option or icon you see a submenu, which displays additional options.

The touchscreen also responds to finger swipes, which you use to switch between menus or cycle through menu options. Depending on the menu that’s displayed, you might need to swipe upward, downward, to the left, or to the right. Press on the desired menu option or icon to activate or select a specific feature or function.
Setting Up the Camera for the First Time
Each time you begin using your HERO5 Black camera, regardless of the shooting situation, you need to properly prepare the camera. However, the first time you turn on the camera to begin using it, a few extra steps are required to properly set it up.
To begin, remove the camera from its packaging, and then remove the camera itself from the Frame housing. Next, open the battery door on the bottom of the camera and insert a microSD memory card (sold separately) into the camera.
The rechargeable battery that came with the camera is already installed. This battery might be partially charged, but you should fully charge it before using the camera for the first time. See Chapter 7 for more information on ways to charge the camera’s battery.
Customizing Your HERO5 Black
The first time you turn on the HERO5 Black, follow the instructions on the touchscreen to walk through a series of setup steps.
At any time you can update or change these and other customizable settings:
• Date and Time—Set the date and time within the camera. This allows the camera to keep track of exactly when photos are taken and videos are shot. This metadata gets stored with each digital content file so you can access it while you’re editing and viewing the files.
• Beep Volume—When the camera needs your attention, it generates an audible beep. This option allows you to adjust the volume of the beeps. Choose between High (the default option), Med, Low, or Off. When the volume is turned off, the camera operates silently. All information still appears on the status screen and touchscreen, however.
• LED—This option allows you to turn on or off the LED status lights. Options include All On, All Off, or Front Off, which deactivates only the status light on the front of the camera.
• Default mode—Chances are, you’ll wind up using one of your HERO5 Black’s shooting modes more than others. Thus, you want to change the Default Mode to the shooting mode you use most often so you can turn on the camera and quickly start shooting using the mode and related settings that you’ve preselected. You can set the Default Mode to Video, Time Lapse Video, Video+Photo, Looping, Photo, Night, Burst, Time Lapse Photo, or Night Time Lapse Photo.
• Auto Off—To conserve the camera’s battery life, adjust this Auto Off setting so that the camera automatically turns itself off when it hasn’t been used for 5, 15, or 30 minutes. If you want the camera to remain on until you manually turn it off (or the battery goes dead), choose the Never option.
• Screensaver—While the camera is shooting, set the Screensaver option so that the touchscreen turns itself off automatically (while the camera is still operational) and conserve battery life. Options include 1 minute, 2 minutes, 3 minutes, or Never.
• Brightness—Adjust the brightness of the touchscreen display. Choose between 10 percent and 100 percent brightness. The higher the brightness, the more battery power is needed.
• Auto-Rotation—Regardless of whether you hold the camera in landscape or portrait mode, upside down, or right side up while shooting, turn on this option to automatically rotate the image or content so you can view it properly on the screen. When Auto mode is set, you always see content in the correct orientation. Choose the Up option to always capture in right-side-up orientation, regardless of whether you’re holding the camera upright or upside down when shooting. Choose the Down option to capture content upside down, regardless of how the camera is positioned when shooting.
• GPS—When turned on, this feature automatically captures and records the exact location where you’ve shot photos and videos. This metadata becomes part of the digital image files associated with your photos and video content. You can later access this information when viewing or editing your content.
• Language—Choose the default language that all text-based messages are displayed in when using your camera.
• Video format—Choose between the NTSC and PAL video formats. If you’re within the United States or anywhere in North America, select the NTSC format; otherwise, choose the PAL format.
Customize Your Camera’s Settings
Edit or customize any of the previously listed settings by following these steps:
![]() Turn on the camera. (Not shown.)
Turn on the camera. (Not shown.)
![]() Place your finger near the top of the touchscreen (on the back of the camera) and swipe downward with your finger.
Place your finger near the top of the touchscreen (on the back of the camera) and swipe downward with your finger.

![]() Tap Preferences.
Tap Preferences.

![]() Scroll down within the Preference menu and tap the option or setting you want to adjust.
Scroll down within the Preference menu and tap the option or setting you want to adjust.

![]() Follow the on-screen prompts to adjust that setting or option. (Not shown.)
Follow the on-screen prompts to adjust that setting or option. (Not shown.)
Using Voice Commands
You can set up your HERO5 Black camera to listen for voice commands, which enables you to speak directly to your camera and have it respond to the command you’ve issued. For this to work, you can’t be in an overly noisy or windy environment, and you must be within close proximity to the camera.
However, if you purchase the optional and waterproof Remo accessory ($79.99), which you can clip onto your clothing or wear like a watch (using the supplied wristband), you can issue voice commands to your camera when you’re within 33 feet of your camera.
Turn on the Voice Control feature by turning on the camera, placing your finger near the top of the touchscreen, and then swiping down. Tap the Voice Command icon (which looks like a human’s head) to toggle the option on. When you see an X to the right of the icon’s mouth, the feature is turned off. (Repeat these steps to turn the feature off.)

Alternatively, from the HERO5 Black’s Preferences menu, scroll down to the Voice Control heading, and then tap on the On Camera Voice Control option to toggle it between on and off. Tap the Language option to choose the language the feature understands, and tap the List of Commands option to see a list of verbal commands you can issue to your camera. (Table 2.1 summarizes commands the camera understands.)
Using this feature, the camera can be in any shooting mode. It’s possible to issue either an Action command or a Mode command.

Table 2.1 Commands for Voice Control
Updating Your Camera’s Operating System
When you purchase a new GoPro camera, the operating system (Camera Software) that controls the camera and its operation comes preinstalled (within the camera). As of early 2017, the latest version of the operating system for the HERO5 Black was v01.57. However, GoPro periodically updates this operating system to fine-tune the features and functions your camera offers, so it eventually becomes necessary to upgrade the camera’s operating system.
GoPro refers to this operating system software as the Camera Software. It should not be confused with the GoPro QUIK Desktop or GoPro Studio software for the PC or Mac, nor the GoPro Capture or QUIK mobile apps that you install on your smartphone or tablet. (The GoPro QUIK Desktop and GoPro Studio software, as well as the GoPro mobile apps, also require periodic updating.)
Updating your camera’s operating system software can be done using one of the following three methods.
Update Using the GoPro Capture Mobile App
For demonstration purposes, the steps are shown here on an Apple iPhone. If you’re using an iPad or any Android mobile device, the steps are similar.
To establish a wireless link between the camera and the iPhone for the first time, follow these steps:
![]() Turn on the camera. (Not shown.)
Turn on the camera. (Not shown.)
![]() Place your finger near the top of the touchscreen and swipe down.
Place your finger near the top of the touchscreen and swipe down.


![]() Select the Connect New Device option.
Select the Connect New Device option.

![]() Tap Capture App.
Tap Capture App.

![]() Turn on your iPhone and launch Settings. (Not shown.)
Turn on your iPhone and launch Settings. (Not shown.)

![]() Tap the Wi-Fi hotspot being generated by your GoPro camera. The name of this network is the camera name that’s displayed on the camera’s touchscreen. It starts with GP and is followed by a number.
Tap the Wi-Fi hotspot being generated by your GoPro camera. The name of this network is the camera name that’s displayed on the camera’s touchscreen. It starts with GP and is followed by a number.
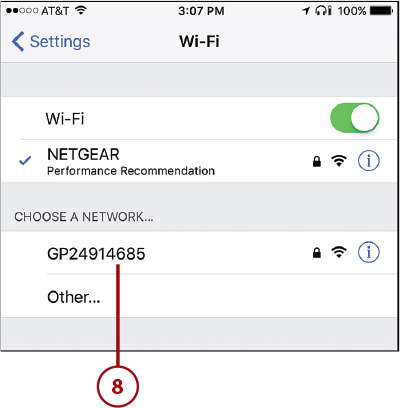
![]() Check your camera’s touchscreen for the password and then enter the password on your iPhone or iPad. Tap the Join button.
Check your camera’s touchscreen for the password and then enter the password on your iPhone or iPad. Tap the Join button.

![]() When the GoPro Wi-Fi hotspot is selected, exit out of Settings on your iPhone and launch the Capture app from the Home screen. Note that your mobile device isn’t able to access the Internet via a Wi-Fi connection while it’s linked with the camera. If applicable, the mobile device’s cellular data connection continues to work. (Not shown.)
When the GoPro Wi-Fi hotspot is selected, exit out of Settings on your iPhone and launch the Capture app from the Home screen. Note that your mobile device isn’t able to access the Internet via a Wi-Fi connection while it’s linked with the camera. If applicable, the mobile device’s cellular data connection continues to work. (Not shown.)
![]() Tap Get Started to create a free GoPro account, or tap Sign In to sign in using your existing account information.
Tap Get Started to create a free GoPro account, or tap Sign In to sign in using your existing account information.

![]() If an operating system update is available, the Capture app prompts you to download and install it. Follow the on-screen prompts after tapping the Update button. (Not shown.)
If an operating system update is available, the Capture app prompts you to download and install it. Follow the on-screen prompts after tapping the Update button. (Not shown.)
Update Using the QUIK Desktop Software
Download the QUIK Desktop software. To do this, visit https://shop.gopro.com/softwareandapp, scroll down to the QUIK Desktop section of the page, click the Learn More button, and then click the Download Now button.
After you’ve installed the software, launch it on your PC or Mac computer and then physically connect your GoPro camera to the computer using the supplied USB cable. Follow these steps to install a Camera Software update:
![]() As soon as the connection is established, you’ll be notified if an update for your camera is available. Accept the Terms of Use by adding a check mark to the check box, and then click the Update button.
As soon as the connection is established, you’ll be notified if an update for your camera is available. Accept the Terms of Use by adding a check mark to the check box, and then click the Update button.

Discover New Features
Any new features added to your camera by the Camera Software update are described within the release notes.
![]() The Camera Software update downloads to your computer. During this process, a progress meter is displayed on the computer screen.
The Camera Software update downloads to your computer. During this process, a progress meter is displayed on the computer screen.

![]() Next, the Camera Software automatically transfers to your camera and installs itself. The process takes several minutes, during which you see a progress meter. During this time, don’t touch the camera.
Next, the Camera Software automatically transfers to your camera and installs itself. The process takes several minutes, during which you see a progress meter. During this time, don’t touch the camera.

![]() Click the Got It! button in the Success! message box and then continue using the QUIK Desktop software and/or camera as you normally would.
Click the Got It! button in the Success! message box and then continue using the QUIK Desktop software and/or camera as you normally would.

Update the Camera Manually
To manually update the HERO5 Black’s Camera Software from your computer, go to this page of the GoPro website: https://gopro.com/support/product-update/register-camera.
Enter your camera’s 14-digit serial number, as well as your first name, last name, and email address within the appropriate fields. Select your home country from the pull-down menu and then click the Next Step button.
Finding Your Camera’s Serial Number
To find your camera’s serial number, turn off the camera, open the battery compartment door, and remove the camera’s battery. Printed within the battery compartment, in very small type, is your camera’s unique, 14-digit serial number, which starts with the letter C. The same serial number is also printed on the camera’s original packaging near the UPC barcode.
Follow the directions provided on your computer screen. To complete this process, you need to connect a microSD memory card reader (sold separately) to your computer and then insert your camera’s memory card (sold separately) into this reader.
The operating system software downloads to your computer and should be transferred to the memory card. Eject the memory card from the reader, and reinsert it into your camera while it’s turned off.
When you once again turn on your camera, it accesses the Camera Software update from the memory card and automatically installs it. For more information, visit https://gopro.com/update/hero5.