5. Reading Books

In this chapter, find out how to purchase books from the iBooks store and how to read them on your iPad.
As an ebook reader, your iPad gives you access to novels, textbooks, and more, storing hundreds inside. Plus, you can purchase more books right from the iPad.
A single app, the iBooks app, allows you to both read and purchase new books. You can also download and add books from other sources, including the Kindle app.
Buying a Book from Apple
The first thing to do with the iBooks app is to get some books! You can buy books using the store in the app. You can also find some free books there.
1. Tap the iBooks app icon to launch iBooks.
2. If you have previously purchased and downloaded books, you see those when iBooks opens.
3. Tap one of the buttons such as Featured, NYTimes, Top Charts, or Top Authors to switch to the iBooks store.

Don’t Want to Purchase from Apple?
You don’t necessarily need to buy books from Apple. You can buy from any seller that sends you an ePub or PDF formatted file with no copy protection. If you receive the file on a computer, just drag and drop it into iTunes. It shows up in your books collection there, ready to be synced to your iPad.
You can also add PDFs you find on the web or receive in email to your iBooks library. While viewing a PDF on your iPad in Safari, tap once in the middle of the screen, and an Open in iBooks option appears at the top. While viewing a PDF attached to an email message, you can use the Share button to open it in iBooks. Many other third-party apps also allow sharing PDFs to iBooks this way. Text and ePub-formatted documents often work as well. When you open a document in iBooks, a copy is placed in your iBooks library.
4. Swipe left and right to browse more featured books.
5. Tap Categories to go to a list of book categories.
6. Tap Top Charts to see a list of bestsellers.
7. Swipe up to see more featured categories.
8. Use the search field to search for book titles and authors.
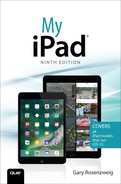
9. Tap any book cover to view more information about the book.

10. Tap the Sample button to download a sample of the book.
11. Tap the price next to a book to purchase it. The price button changes to Buy Book. Tap it again to continue with the purchase.
Reading a Book
Reading books is a simple process. Following are the basics of reading your downloaded books.
1. Tap the iBooks app icon to launch iBooks.
2. If you are still in the store section of the app, tap My Books at the bottom to go to your iBooks library. Then, tap a book to open it.

Can’t Find Your Book?
Did you download a book only to discover that you can’t see it in your Library? Try tapping the Collections button at the top of the screen and switching to a different collection. For instance, by default, PDF documents are put in the PDF collection, not in the Books collection.
3. To turn a page, tap and hold anywhere along the right side of the page, and then drag to the left. A virtual page turns. You can also tap the right side of the page.
4. Tap and drag from the left to the right or simply tap the left side of the page to turn the page back.
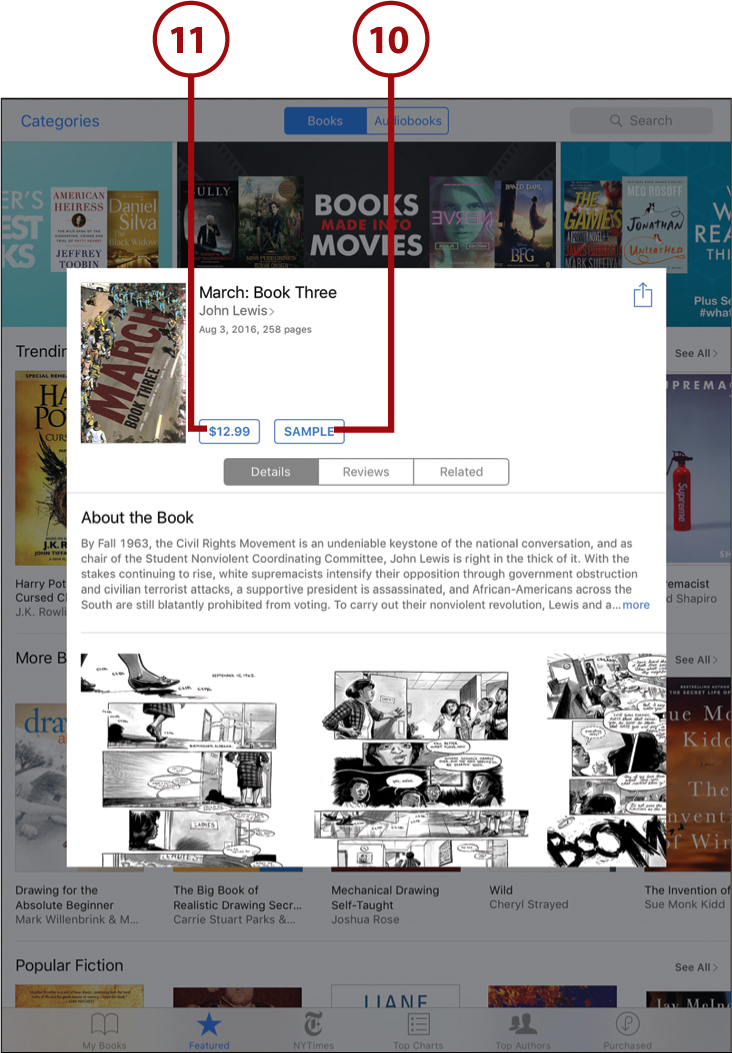
5. Move quickly through pages by tapping and dragging the small marker at the bottom of the page along the dotted line. Release to jump to a page.
6. Tap the Table of Contents button at the top to view a table of contents.
7. Tap anywhere in the table of contents to jump to that part of the book.
8. Tap the Resume button to return to the page you were previously viewing.
9. Tap the arrow to return to your books. If you return to the book later, you return to the last page you viewed. No need to stick a bookmark or piece of scrap paper into your iPad.

Using Reading Aids
iBooks has a variety of ways you can customize your reading experience. You can change the font size or the font itself, and you can even turn your iPad on its side to see two pages at one time.
1. While viewing a page in iBooks, tap the display adjustment controls at the top of the screen. If you don’t see the controls, tap once in the middle of the screen to bring them up.
2. Drag the brightness control left or right. Dragging to the left makes the screen dim, which you might use if you’re reading in a dark room. Dragging to the right makes it bright, which could make reading easier while outdoors.

3. Tap the smaller A button to reduce the size of the text.
4. Tap the larger A button to increase the size of the text.
5. Tap Fonts to choose from a few font options.
6. Tap to select one of four color themes.
7. The Auto-Night Theme switch monitors the light around your iPad and switches to Night mode when it’s dark.
8. Turn on Scrolling View to read your book as one long scrolling page.

9. Turn your iPad on its side to change to a two-page view. (Make sure your orientation lock is not on.)

Where Did the Buttons Go?
If you tap in the middle of the screen, the buttons at the top and the dotted line at the bottom disappear. You can still turn the pages; you just don’t have access to these buttons. To see the buttons again, tap in the middle of the screen.
Adding Notes and Highlights
Each time you launch iBooks, your iPad returns you to the page you were last reading. However, you might want to mark a favorite passage or a bit of key information.
1. Go to a page in a book in iBooks. (See the previous tasks in this chapter to find out how to access a book.)
2. Tap a word and hold your finger there for about a second.
3. Release your finger and you see six choices: Copy, Look Up, Highlight, Note, Search, and Share.

Look Up, Search, and Share
Tapping Look Up brings up a definition of the word. Tapping Search brings up a list of the locations of the word throughout the text. When you tap Share, you can send the excerpt you have selected to someone else using email, a text message, Twitter, or Facebook.
4. Drag the blue dots to enlarge the section of text that is highlighted.
5. Tap Highlight. Alternatively, you can tap a word and hold for a second and then immediately start dragging to highlight text.

7. Tap the first button to change the type of highlighting. You can choose from various colors or a simple red underline.
8. Tap the second button to remove the highlight completely.
9. Tap Note instead of Highlight to bring up a yellow pad of paper and add a note.

10. Tap in the note to bring up the keyboard and start typing.
11. Tap outside the yellow paper to finish the note. It appears as a small sticky note to the right side of the page. Tap it any time you want to view or edit the note. You can delete a note by removing all text in the note.

1. Tap the Bookmark button at the top of a page to bookmark the page. You can bookmark as many pages as you want in a book. If you don’t see the Bookmark button, tap once in the center of the screen to bring up the controls.

2. Tap the Bookmark button again to remove the bookmark from the page.
3. Tap the Table of Contents button to go to the table of contents.

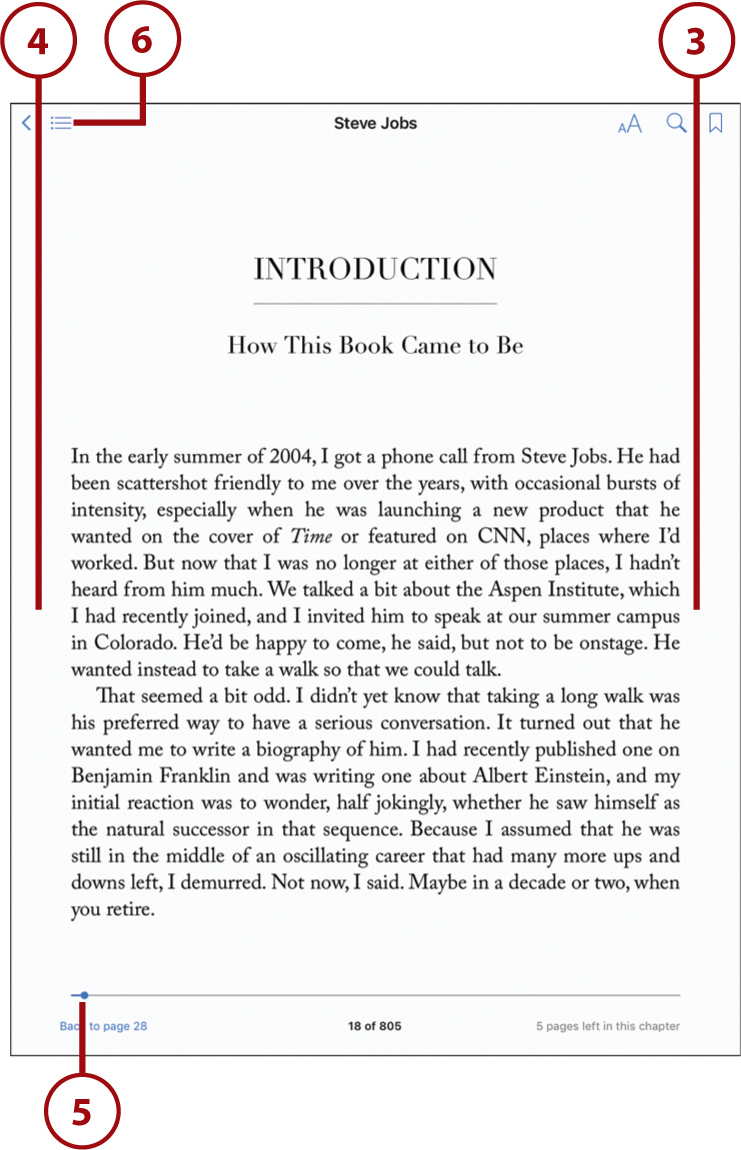
4. Tap Bookmarks at the top of the table of contents to see a list of all the bookmarks, highlights, and notes you have added to the book.
5. Tap any bookmark, note, or highlight to jump to it.
Organizing Your Books
Like to read a lot? You aren’t alone. Many people gather massive collections of ebooks on their iPads. Fortunately, iBooks includes a few great ways to organize your ebooks.
1. If you are on the iBook store screen, tap My Books to view your library. If you are viewing a book, tap Library in the upper-left corner to return to the book library.
2. The heading at the top of the screen shows which collection you are viewing. Tap it to see a list of collections.
3. Tap a Collection name to jump to that collection. You can think of collections as different bookcases filled with books.
4. Tap New Collection to create a new collection.

5. The New Collection option changes to an editable text field, and the keyboard appears. Type the name of the new collection. The Collections list now features your new collection.
6. Tap Done. If you ever want to delete or rearrange collections, the Edit button at the top of this list allows you to do that.

Books in the Cloud
When you view your Purchased Books collection, you see all the books you have bought in the past, even if that book is no longer on your iPad because you removed it. Books not currently on your iPad have a little iCloud icon in the upper-right corner; tap the icon to download the book. If you later delete the book, you can always re-download it by tapping the Purchased button at the bottom of the Collections screens, selecting Not on This iPad from the top, and tapping the download button next to that book.
7. The new collection doesn’t have any books in it yet, so selecting it now only brings up a blank list. Instead, tap All or Books to return to your list of books.
8. After you have returned to your list of books, tap Select to start selecting books to move to the new collection.

9. Tap several books to select them. A check mark in the bottom-right corner indicates selected books.
10. Tap Move. (While in this mode, you can instead tap Delete to remove the books from your iPad.)

11. Tap the name of your new collection to move your books there.

12. Bring up the Collections list again and switch to your new collection.
13. The books you selected to move now appear here.

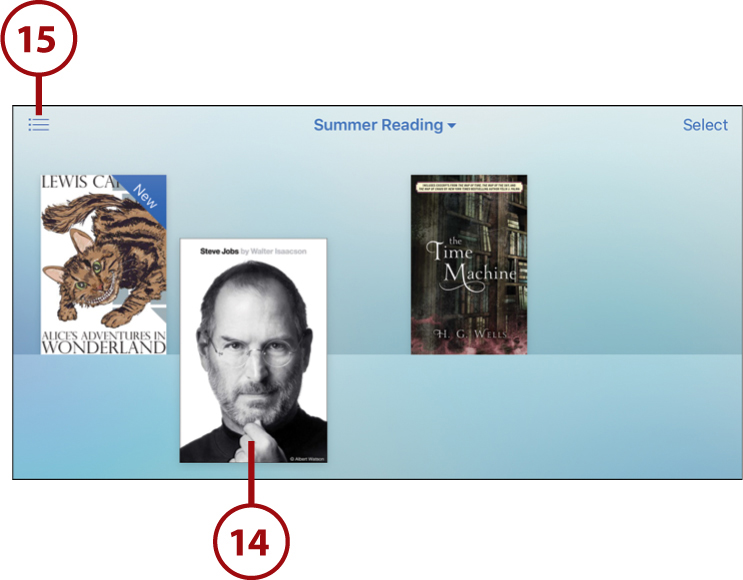
14. Rearrange your books inside a collection by tapping and holding any book. The book’s picture gets a little larger and follows your finger. Drag it around on the screen and release to place it before or after another book.
15. Tap the button at the top left to switch to list view.
16. The list view allows you to sort your books by author or category.
17. Tap the button at the top left to return to the bookshelf view.

Another Way to Delete
You can also delete books in list view by swiping from left to right across the title of a book. A Delete button appears to the right. Tap it to delete the book.
Using iBooks Alternatives
You can purchase and read books from other sources in addition to Apple. The Kindle app allows you to buy books from Amazon.com, or read books you have already purchased on a previous device. You can also find many small independent publishers and authors in Amazon’s catalog that aren’t available in iBooks.
You can use the App Store app to search for and install the free Kindle app. See “Purchasing an App” in Chapter 15 to learn how to get third-party apps.
1. Tap the Kindle icon to launch the Kindle app (not shown). You see a screen that displays your library. There are two modes: Cloud and Device. Cloud shows all ebooks you have purchased from Amazon. Device shows the books you have already downloaded onto your device.
2. Tap a book to open it.

3. Tap the middle of the page to bring up controls at the top and bottom.
4. Tap the Font button to change the font size, brightness, and background.
5. Tap the right side to flip to the next page.
6. Use the slider at the bottom to quickly move to other pages in the book.
7. The button at the top left allows you to jump to chapters or sections.
8. You can add your own bookmarks just like in iBooks.
9. Tap the Search button to search text in the book.

Cloud Versus Device
The Kindle app has a Cloud/Device control at the bottom of the screen. You can tap on a book on the Cloud screen to download it to your device. You can tap on it again, after it has been downloaded, to read it.
If you like to buy your books from Barnes & Noble, you can also get the Nook app. This lets you read books that have been purchased in the Nook store. If you own a Nook and have already bought books, you can access those books and load them onto your iPad.
Another app you can get is the Google Play Books app. This works with books purchased in the Google Play Store, which is similar to the Amazon Kindle store or the iBooks store. You can choose whether you want to buy from Apple, Amazon, Barnes & Noble, or Google.