Chapter 1. UI Controllers
User interface (UI) controllers serve as a connection between your UI and any business logic in your application that controls, or is instructed by, that UI.
If your application were a Shakespearean play put on in some elaborate, Old World theater, the UI controller would play the part of stage manager. It would be ushering actors out to the stage, taking commands from the director, and helping transition between scenes.
Any time you want to display an image, list, or piece of text in an app, you’ll need a UI. The presentation of the UI—how it’s rendered on the screen—is usually controlled by layout instructions (often markup, like XML or HTML); the UI Controller acts as the bridge between input commands, database queries, IPC requests, messages, and much more. In a sense, it’s the heart of any app.
All of this juggling requires an incredibly complex series of events with one technology built on top of another, operating in concert. Fortunately, both Android and iOS have provided some common tools and abstractions to handle the heavy lifting of this process. Let’s learn about some core tasks in this area that are central to both platforms.
Android
Less than a year prior to the time of this writing, Google announced that its recommended style of navigation was for an application to use a single Activity instance, and Fragment class instances within that single Activity to represent operations and manage views. The new Navigation component released in the Jetpack suite should be used to manage interactions between fragments and display history.
Note that this goes against recommended practices that have been provided since Android was launched over a decade ago, where an Activity was recommended for any “activity” (roughly approximate to a “screen” or a single web page), and nesting Fragments was intermittently (!) discouraged. In fact, even today the Android dev-docs start the chapter on Activity with this:
An activity is a single, focused thing that the user can do.
There are valid arguments for both sides, but since Google is the maintainer of Android, we believe we need to accede to its recommendation going forward. That said, we know there are a lot of legacy apps out in the wild that do not use the pattern and don’t plan on re-architecting several years of work to conform to it. We won’t take a side, so we will show the basics of both approaches. When in doubt, we’ll defer to the prevalent, existing patterns—launching new Activity instances, passing data as Bundle instances of primitive information, and managing modular content with Fragment instances and Activity controller methods, rather than the newer Navigation architecture component and its siblings.
How to Create Your App’s Starting UI Controller
Let’s jump right in. When your app launches, it will perform some initialization logic, during which time you’ll see the “window background” (usually just a solid color, depending on your screen, but this can be set to any valid Drawable instance). This work occurs on the main thread and cannot be preempted or interrupted—it’s just going to happen. Note that if you provide a custom Application class for your app, anything in the onCreate method will happen at this time. Again, it’s extremely important to remember that this is happening on the main (UI) thread, so this will block anything else from happening. However, you’re free to perform asynchronous work on your own background threads at this time.
Once application initialization is complete, the application will launch a single instance of the Activity class that you defined in your application manifest with the android.intent.category.LAUNCHER value for its category node. This Activity entry should also include an action name equal to android.intent.action.MAIN, which should be present for any of your app’s entry points (e.g., launcher icon, deep link, system-wide broadcast, etc.).
Tip
Remember that you just provide the class’s canonical name, and instantiation, references, and setup are performed in the background automagically (meaning the process is entirely opaque to us as developers or users).
<intent-filter><actionandroid:name="android.intent.action.MAIN"/><categoryandroid:name="android.intent.category.LAUNCHER"/></intent-filter>
In a complete manifest, the preceding might look like this:
<?xml version="1.0" encoding="utf-8"?><manifestpackage="org.oreilly.nmd"xmlns:android="http://schemas.android.com/apk/res/android"><applicationandroid:allowBackup="false"android:icon="@mipmap/ic_launcher"android:label="@string/app_name"android:roundIcon="@mipmap/ic_launcher_round"android:supportsRtl="true"android:theme="@style/AppTheme"><activityandroid:name=".MainActivity"><intent-filter><actionandroid:name="android.intent.action.MAIN"/><actionandroid:name="android.intent.action.VIEW"/><categoryandroid:name="android.intent.category.LAUNCHER"/></intent-filter></activity><activityandroid:name=".BrowseContentActivity"/><activityandroid:name=".BookDetailActivity"/><activityandroid:name=".SearchResultsActivity"/></application></manifest>
Note
Note that any Activity you intend to use in your application must be registered in your ApplicationManifest.xml as a child of the application node (manifest → application → all activity nodes). Check the code block immediately following this note.
<activityandroid:name=".MyActivity"/>
While you’re interacting with an Android app, you are always considered to be within an Activity (unless you’re dealing with remote operations like status bar interactions with a Service, but that’s a little too in the weeds for this chapter). You will never have a usable piece of UI that is not within an Activity (the one exception to this is the RemoteViews class—a small, simple subset of View classes—which is available in notification windows).
Note that you cannot nest Activity instances. Generally speaking, a single Activity occupies the entire screen at any one time (or at least, the portion of the screen delegated to your app).
As referenced, remember that we’re not creating a new instance of an Activity; we’re simply supplying the Activity class we want to start. Behind the scenes, the Android framework will generate the instance and perform infrastructure tasks before displaying it to the user. Furthermore, this is an asynchronous operation, and the system will decide exactly when the new Activity starts.
This is also important because of various launch modes that are assigned to Activity classes in your manifest file. A particular launch mode might allow any number of a particular Activity class to exist at any time. For example, you may want to allow the user to have any number of ComposeEmailActivity instances in a single task stack. However, you may wish to impose limits on other kinds of Activity classes, like only allowing a single instance of a LoginActivity, which might either bring the last used LoginActivity to the top of the task stack or possibly destroy everything between the current Activity and the last used LoginActivity, depending on the launch mode. We won’t do a deep dive on launch modes here, but definitely check out the developer docs on this subject if you’re curious.
So we’ve successfully started an Activity—why is nothing showing up on the screen? Because an Activity is a controller-level class and is not a view itself. In order to render elements on the screen, it needs at least a single View instance, and probably several (as children of the single View used as the Activity root). This is generally done with the setContentView method and passing in an XML layout resource. See Chapter 2, where we discuss views.
How to Change the Active UI Controller
Once your initial (“launch”) Activity is presented to the user, you can start any other Activity by calling the startActivity(Intent intent) method from any Context instance (the Activity class inherits from Context, so it has a “is-a” relationship with Context—an Activity instance is a Context instance). The Intent requires a Context instance as well, as the first parameter, and a reference to the Activity class to launch:
Warning
It’s critical to understand that the system will handle instantiation, initialization, and configuration of Activity classes you’ll show to your user, and they cannot be instantiated with the new keyword or configured or otherwise modified when being started. We send an Intent to the system that indicates what Activity we want to present to the user, and the system does the rest. For this reason, Activity instances cannot be assigned variables or have methods called directly as they are being started (with standard library methods).
So if we can’t modify variables on an Activity instance or call methods directly on the Activity as we launch it, how do we pass information to it? In many UI frameworks, you can create a new view controller class instance, assign it some data, and allow it to render that data.
In the Android framework, your options are much more limited. The classic approach is to attach primitive values to the Intent object, like so:
The Intent instance that started the Activity is available via the getIntent method:
This is perfectly fine for passing small, primitive data like an identifier or URL but is not appropriate for large data (like serialized Java classes or even large Strings like JSON representing complex class instances). That data is contained within a particular system-level data store that is capped at 1 MB and can be shared among any process on the device. From the documentation for the Bundle API:
The Binder transaction buffer has a limited fixed size, currently 1MB, which is shared by all transactions in progress for the process. Since this limit is at the process level rather than at the per activity level, these transactions include all binder transactions in the app such as onSaveInstanceState, startActivity and any interaction with the system.
To pass complex information to a newly created Activity requires either saving that information to disk before starting the new Activity, to be read back out once that Activity has been created, or passing a reference to a “globally reachable” data structure. This is often simple a class-level variable (static), but there are drawbacks to using static variables in this case. Android engineers have previously endorsed a Map of WeakReferences as a static member on a utility class, or you might find the Application instance (which is always accessible from any Context instance via Context.getApplicationContext) to be a little cleaner. It’s important to note that as long as your application is running, the Application instance will be reachable, which some would argue means it could never meet the traditional definition of a memory leak. In Kotlin, global contextuality is handled a little differently, but generally speaking, the warnings about passing information still apply.
Fragments
A Fragment, in Android framework parlance, is kind of a lightweight Activity; it can be thought of as a controller for a view, rather than a view itself, but it must have a root view delegation (in Android, the role of the “view” pattern implementer from Model-View-Presenter [MVP], Model-View-Controller [MVC], Model-View-ViewModel [MVVM], etc., is filled by the View class, which is usually an atomic visual element, like a piece of text, an image, or a container of other View instances; see Chapter 2 where views are discussed in more detail).
The nice thing about Fragments, compared to Activities, is that we can instantiate them directly with custom constructor signatures, configurations, member and method access, etc. We create Fragment instances like we would any other class instance in Java. In addition, Fragments, unlike Activities, can be nested—however, there has historically been some unreliability around that, and more specifically around life-cycle callbacks, but that too is really out of scope for this chapter. Google “android fragment controversy” and you’ll find plenty of material on the topic. Again, this book chooses to remain neutral in this senseless, bloody feud.
So you create a Fragment like anything else:
Ideally, you can add your Fragment to your layout XML like you would any View:
<?xml version="1.0" encoding="utf-8"?><LinearLayoutxmlns:android="http://schemas.android.com/apk/res/android"android:layout_width="match_parent"android:layout_height="match_parent"><fragmentandroid:name=".ListFragment"android:layout_width="200dp"android:layout_height="match_parent"/><fragmentandroid:name=".DetailFragment"android:layout_weight="1"android:layout_width="0dp"android:layout_height="match_parent"/></LinearLayout>
However, we are faced again with system-level, opaque instantiation. In order to configure a custom Fragment class programmatically, you’ll need to instantiate it with the new keyword and use a FragmentManager and a FragmentTransaction to add it to the existing view hierarchy.
Note you could have a custom constructor with configuration parameters here if you so choose, although when the Fragment is reconstructed, it will lose constructor arguments, so Android suggests developers use no-arg constructors and assume Fragment instances may be created with the Class.newInstance method.
From this point, since a Fragment is not a View itself, but rather a view or UI controller, it must be instructed to render using a specific View or View tree. It’s common to use a single, empty container ViewGroup like a FrameLayout to hold the View instances that represent Fragment instances.
The FragmentTransaction is able to perform a variety of update tasks for any Fragment instances you have references to. Generally, open a transaction, make all the atomic changes you want, and then commit the transaction:
Unlike Activity, the Fragment class does not extend Context and so loses direct access to many APIs; however, Fragment instances do have both a getContext and a getActivity method, so in most cases you’re just one lookup away.
Warning
As of this writing, while the Navigation component is stable, some associated features (like the Navigation Editor UI) are not. There is some controversy about including UI code generation tools as future-proof Android tools. That said, the Navigation component is capable of handling Fragment actions like the preceding without traditional FragmentTransactions or FragmentManagers.
Understanding the UI Controller Life Cycle
As UI controllers travel through various states from inception through termination, a number of life-cycle callbacks are called and can be a great place to hook into application events. Both Activity and Fragment classes have life-cycle events (in fact, so do View instances, but those are rather limited and outside the scope of this chapter).
There’s a well-known diagram describing the Activity life cycle that has a tremendously detailed write-up, but we’ll go over the critical points now.
Figure 1-1 presents a copy of that diagram as a baseline.
When an Activity is first created, the onCreate method is called.
It is critical to understand that onCreate is also called when an Activity is re-created. Occasionally, an app’s resources will be reclaimed by the system for other use; in this case, your app is completely destroyed behind the scenes, with some primitive values about the current state saved on the local disk.
When an Activity is first created, the single method parameter—a Bundle—will be null. If it is being re-created after resource reclamation (as happens during a “configuration change,” like rotating the device or plugging in a new display), the value passed to the onCreate method will be a nonnull Bundle instance.
onStart is called when the Activity becomes visible to the user, after being not visible (for example, when behind another Activity). onStart will always follow onCreate, but not all onStart events are preceded by an onCreate event.
onResume is called any time an Activity regains focus. An Activity can lose focus if the containing app is minimized, or anything else takes the foreground, whether that’s another app, a phone call, or even a Dialog overlaying the Activity’s content, despite much of that content still being visible. When that focus is regained—by closing the other app, hanging up the phone call, or dismissing the Dialog—onResume will fire. onResume will always follow an onStart, but not all onResume events are preceded by onStart events.

Figure 1-1. Activity life cycle
Now let’s start down the other trail, to destruction.
onPause is called any time the Activity loses focus (see onResume).
onStop is a tricky one, and one that’s often misrepresented in casual conversation. onStop is effectively called when an Activity is destroyed but can be re-created—for example, if the system reclaims your app’s resources. An onStop will be followed by either an onDestroy event (see the following) or an onRestart event, which means the Activity is being rebuilt from saved “hints” after it has been stopped. All onStop events are preceded by onPause, but not all onPause events are followed by an onStop. See the documentation on this particular event if you’re interested. Here’s a relevant piece directly from that source:
When your activity is no longer visible to the user, it has entered the Stopped state, and the system invokes the
onStop()callback. This may occur, for example, when a newly launched activity covers the entire screen. The system may also callonStop()when the activity has finished running, and is about to be terminated.
onDestroy fires when the Activity is about to be terminated (gracefully) and cannot be re-created. If you tap back out of an Activity, it will call onDestroy. This is a great opportunity for cleanup. All onDestroy events are preceded by onStop, but not all onStop events are followed by onDestroy.
The documentation clearly states that you cannot count on onDestroy to fire to clean up large objects or asynchronous operations. This is true, but it’s often interpreted to mean that you can count on onStop or onPause, which is no more true. Imagine that your device gets run over by a truck (or, more likely, the battery dies). Your app is going to shut down immediately, without any chance to fire callbacks or perform cleanup operations. You’re no safer doing this kind of work in onPause than you are in onDestroy. That said, since onDestroy generally means that the Activity is going to become unreachable and eligible for garbage collection, it often doesn’t matter—you don’t need to worry about cleaning up something that’s about to be nuked.
The Fragment life cycle is very similar but includes callbacks for onCreateView (which is critical—the return of this method must return a View instance in order for the Fragment to have a visible UI) and onDestroyView. There’s also a callback for onActivityCreated, and callbacks that fire when a Fragment is added (onAttached) to, or removed from (onDetached), the UI using FragmentTransaction methods.
Note that the Fragment, FragmentManager, and FragmentTransaction classes have changed between OS releases. For consistency, and to make sure you’re always dealing with the latest release, we recommend using the support library classes. For most uses, they are interchangeable—just import android.support.v4.app.Fragment rather than android.app.Fragment; when you call new Fragment();, you’ll get a Fragment from the support library package. Similarly, use android.support.v7.app.AppCompatActivity rather than android.app.Activity, which will have a getSupportFragmentManager method, which will provide updated APIs to use with support library Fragments.
In addition, the AndroidX version of identical classes (and some new ones) is available as well, but in reality even after a year is not entirely stable (although it does have multiple released marked “stable”). The Jetpack libraries can serve a lot of these same functions, and in new projects Google encourages their use where possible, but let’s keep in mind that greenfield development is much rarer than maintenance. Feel free to explore these alternatives and see what works best for you and your team; we (the authors) have opted to use the libraries and toolsets we have simply because that’s what currently powers the majority of these features. That’s sure to change in time, and as with any technology, it’s almost a full-time job keeping up to date with best and recommended practices.
iOS
UIKit, the UI framework that almost all iOS apps rely on, is rooted in an MVC architecture. In iOS, the UI controller, or “C,” part of this framework refers, more specifically, to UIViewController. Within a typical app, there are a number of UIViewController instances and subclasses linked together to manage the behavior and hierarchy of the objects they control: views.
How to Create Your App’s Starting UI Controller
Before we get into the details of actually creating the app’s initial UI controller, we need to discuss views, windows, controllers, and how they relate to the functionality we’re about to cover.
Views and UI Controllers
Views and UIViewControllers are inextricably linked in iOS, such that discussing one necessitates some discussion of the other. Now, views are covered in greater depth in Chapter 2, but they’re important to note here because the root of an app’s view controller hierarchy starts on a single property of a specialized view: the app’s window, an instance of UIWindow. Every iOS application has a single UIWindow instance that the UIApplication presents. The property where the root view controller lives is the aptly named rootViewController. Setting the rootViewController of a UIWindow to a defined view controller can be done in one line:
window.rootViewController=viewController
When the root view controller is set this way, it is almost always done during an application’s launch, usually within application(_:didFinishLaunchingWithOptions:). However, going into Xcode and creating a new Single View Application project will create an application delegate that has the following code within the same method:
funcapplication(_application:UIApplication,didFinishLaunchingWithOptionslaunchOptions:[UIApplication.LaunchOptionsKey:Any]?)->Bool{// Override point for customization after application launchreturntrue}
Notice that nowhere in that method body is the rootViewController property set. In fact, there isn’t even a mention of a UIWindow—only a true return value. And yet, the application launches and displays a view controller created within a storyboard and seemingly never linked to or set anywhere. How very mysterious.
Xcode isn’t magic, so what’s going on here? Well, if you look closer at some other important files within this sample Xcode project, the mystery reveals itself fairly quickly.
The hunt begins
First, let’s start our detective work in a file within the project named Info.plist. This is a special file that is set within the Xcode project settings. It provides configuration values for our app via known XML keys. Within this file, there is a value for a property defined like so:
<key>UIMainStoryboardFile</key><string>Main</string>
The key for this property, UIMainStoryboardFile, indicates the storyboard filename the application should use when it’s starting up. The value given to this property is Main, which just happens to map to a file within this sample project named Main.storyboard. Let’s continue our hunt for clues with that file.
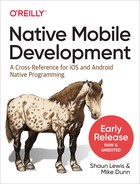
If we open up Main.storyboard in the visual editor within Xcode, we’ll see a single scene with a large arrow pointing toward it. Each scene in a storyboard is mapped to a UIViewController that is set within the Identity inspector on the righthand side of the screen. This is, by default, just a standard UIViewController instance, but by using the inspector it can be set to a custom subclass by typing the name of the subclass into the Class field. Our sample project has its custom class set to “ViewController,” which is a subclass defined in the project inside of ViewController.swift (Figure 1-2).
Now, about the large arrow on the left of the view controller scene: this just happens to be the “smoking gun” in our root view controller search. In the Attributes inspector within Xcode, there is a checkbox labeled “Is Initial View Controller” that is currently checked on our view controller scene. Unchecking this box makes the large arrow disappear. Build and run the app with the checkbox unchecked and you’ll get some warnings and the following error in Xcode’s console:
Failed to instantiate the default view controller
    for UIMainStoryboardFile 'Main' - perhaps the designated entry point is not
    set?
Success! We’ve found the source of our root view controller. But, how does this all string together to add our root view controller to the app’s window?
Well, on startup, the app looks for the UIMainStoryboardFile key within its Info.plist file. Inside the main storyboard file, the view controller scene that’s been set via our checkbox as our initial view controller is instantiated for the subclass given. Because it’s the initial view controller in the main storyboard, the application adds this view controller to the app window’s rootViewController property and voila! The app now has a root view controller that is displayed and active.

Figure 1-2. Storyboard editor in Xcode
You could, if you desired, achieve the same result with the following code inside the application delegate:
funcapplication(_application:UIApplication,didFinishLaunchingWithOptionslaunchOptions:[UIApplication.LaunchOptionsKey:Any]?)->Bool{window=UIWindow(frame:UIScreen.main.bounds)window?.rootViewController=UIStoryboard(name:"Main",bundle:nil).instantiateInitialViewController()window?.makeKeyAndVisible()returntrue}
Let’s walk through this.
First, we set the window variable that’s defined as part of the UIApplicationDelegate protocol to a UIWindow instance that is the same size as the device’s main, and most likely only, screen via UIScreen.main.bounds. Next, the root view controller on our window object is set to a view controller. This could be any view controller we have, but in our example, we’re using the initial view controller defined in the Main.storyboard file; this is done by calling the instantiateInitialViewController() method on our UIStoryboard object.
Finally, we show this window by calling makeKeyAndVisible(). This method takes the window object and makes it the primary window of the application, displacing any other windows currently displayed.
Note
Generally speaking, iOS apps display only one window at a time, but this is not always the case. Apps that need to output video to another screen might need need more than one window; a Keynote-like app is a good example of when this might necessary. However, consider this the exception to the rule, not the default.
Code versus storyboard
Now, the recommended approach for any simple app is to stick with configuration via Info.plist and the main storyboard detailed earlier. However, as an app gets more and more complex, it could become necessary, or convenient, to dive directly into the code. It’s also possible that you might prefer the codebase over storyboard configuration. There isn’t really a truly “right” way to set up your application’s starting UI controller; it’ll come down to personal preference and the requirements of the project.
Quickly, however, an application with a only single UI controller is going to become pretty limiting or incredibly complex. Let’s look at how UI controllers switch out which view is currently displayed and provide a richer experience for the app.
How to Change the Active UI Controller
There are a number of different ways to switch active UI controllers in iOS, some directly in code and some code-free transitions wired up through “segues” in the storyboard editor. More than likely, you’ll encounter both approaches in the wild, often within the same codebase. Let’s start with the code first, because it’ll help understand what’s happening under the scenes and provide better context for understanding the magic of segues.
It’s showtime!
Let’s say we have two view controllers: one named primaryViewController and another named secondaryViewController. In this example, our currently active view controller is primaryViewController. To present secondaryViewController to the user, the simplest method would be an inherited method on UIViewController named show(_:sender:). Let’s do this in the code that follows:
// Create the view controllersletprimaryViewController=...letsecondaryViewController=...// Present the secondary view controller as the active view controllerprimaryViewController.show(secondaryViewController,sender:nil)
In this simple example, invoking the show(_:sender:) method would probably cause secondaryViewController to be presented modally from the bottom of the screen in front of primaryViewController. However, a key word in that previous sentence was “probably.” We don’t know with 100% certainty without more context—show(_:sender:) decouples the process of presenting the view controller from the view controller that is calling for the presentation. This is powerful and leads to simpler logic most of the time. For example, consider the following code that doesn’t use show(_:sender:):
letprimaryViewController=UIViewController(nibName:nil,bundle:nil)letsecondaryViewController=UIViewController(nibName:nil,bundle:nil)// Add the primary view controller to a navigation controllerlet_=UINavigationController(rootViewController:primaryViewController)...// Check if the view controller is part of a navigation controllerifletnavigationController=primaryViewController.navigationController{// Push the view controller onto the navigation stacknavigationController.pushViewController(secondaryViewController,animated:true)}else{// Present the view controller modally because no navigation stack existsprimaryViewController.present(secondaryViewController,animated:true,completion:nil)}
The first thing you might notice is that we’ve introduced a new class: UINavigationController. This is a common class in iOS that helps manage a stack of view controllers; usually pushing onto or popping off a navigation controller’s stack is demonstrated in the app with a sideways transition from the right or left of the application. This is arguably the most common type of active view controller transition in iOS, possibly only behind a tab bar controller. In our preceding example, primaryViewController is added at the root of the navigation stack on the UINavigationController at instantiation.
As shown in our show-less example let’s say we wanted to add a new view controller to the stack of view controllers and make it the active view controller. First, we’d have to check if the navigationController property on primaryViewController is nil. If it’s not, the view controller is part of a navigation controller’s hierarchy, so we can then proceed to push the new view controller, secondaryViewController in this example, onto the stack by capturing the navigationController property’s value and calling the method push(_:animated:completion:) on it. If, however, the view controller doing the presenting is not on a navigation controller’s stack, we need to present this view controller in another way. In the example, we use a more direct, and older, style of presenting by calling present(_:animated:completion:).
There is more control in the code just shown, but it’s considerably more complex—and this is a simple example! What’s more, show(_:sender:) allows for some customization in how a view controller is presented as shown:
letprimaryViewController=UIViewController(nibName:nil,bundle:nil)letsecondaryViewController=UIViewController(nibName:nil,bundle:nil)// Change the presentation style and the transition stylesecondaryViewController.modalPresentationStyle=.formSheetsecondaryViewController.modalTransitionStyle=.flipHorizontal// Change the active UI controllerprimaryViewController.show(secondaryViewController,sender:nil)
Here modalPresentationStyle changes the state in which the view controller is displayed, and modalTransitionStyle changes the transition that happens to get that view controller to that state. In this example, the presentation style is a Form Sheet, a specially formatted display mode for the iPad that takes up only part of the screen. The transition style is a horizontal flip that flips the view around to reveal itself.
Note
On iPhones, or other .compact size classes, the presentation style .formSheet is ignored and UIKit adapts the style to a full-screen view. On larger iPhones, like iPhone XS Max or iPhone 8 Plus, the Form Sheet in landscape is displayed the same as it is on a tablet because these devices have a .regular size class in landscape; in a portrait orientation, these devices have a .compact size class, and the Form Sheet is displayed as a full-screen view just like on smaller phones. We point this out because there are always exceptions and edge cases. It’s important to test on a wide variety of simulators or devices.
We’ve only scratched the surface of switching out active view controllers in the app programmatically. Before we go much further, we should discuss a (somewhat) code-free option in iOS called segues.
Segues
Everything that’s been shown in code can be done in some form inside of a storyboard using segues. Segues are transitions between two view controllers; they are used to present view controllers within an app. They are most easily created within the storyboard editor in Xcode.
To create a new segue, you must first have two view controller scenes to transition between. Control-click on the source view controller scene and drag the mouse to the destination view controller within the storyboard editor. This will highlight the whole scene in blue to indicate the scene you are targeting with the mouse. Releasing the mouse will cause a pop-up to display that allows you to select the kind of segue. The options presented correspond with the options shown so far: using show(_:sender:) under the hood and letting UIKit figure out the best segue or explicitly using a modal segue, among other options.
After you create the segue, if it’s from a view controller to a view controller, you’ll need a way to programmatically call the segue. Click on the segue itself (e.g., the line connecting the scenes in the storyboard of the segue listed out as part of the scene itself like an object), open up the attributes inspector, and add a unique identifier. For our example, let’s use the name ExampleSegue.
Tip
The identifier you use for segues needs to be unique to the storyboard in which the view controller resides.
Calling the segue is done like so:
primaryViewController.performSegue(withIdentifier:"ExampleSegue",sender:nil)
The performSegue(withIdentifier:sender:) method takes a string (ExampleSegue from earlier) and a sender, which could be any object. It’s common to pass a reference to a button if the segue was triggered via a button press, but it’s acceptable to pass in nil as we’re doing in the example.
It’s also possible to wire up a button, or other control, to trigger a segue explicitly. This is done through the same Control-click mechanism in the storyboard editor, but instead of clicking and dragging on a whole scene, click and drag on a specific button within the source view controller. This makes it easy because the segue doesn’t need to be called programmatically like before using performSegue(withIdentifier:sender:) to make the transition between view controllers occur.
Sometimes additional data needs to be provided between view controllers during a segue. There are methods called between the source and destination view controllers whenever a segue is performed allowing you to pass data or state to help set up a destination view controller or perform an action. Here is an example of a view controller presenting another view controller with the ExampleSegue, defined previously:
classViewController:UIViewController{funcbuttonPressed(button:UIButton){// Code to trigger the segue. This could also be done directly// on the button itself within the storyboard editorperformSegue(withIdentifier:"ExampleSegue",sender:button)}overridefuncshouldPerformSegue(withIdentifieridentifier:String,sender:Any?)->Bool{// This is an optional method that returns true by default// Returing false would cancel the seguereturntrue}overridefuncprepare(forsegue:UIStoryboardSegue,sender:Any?){// This is the destination view controller in the segueletdestinationViewController=segue.destination// Let's pass some data to the destination segue...}}
Within this example UIViewController subclass, there is a method named buttonPressed(_:) that is triggered whenever a button is pressed. This code uses performSegue(withIdentifier:sender:) to trigger the segue. (This could also be accomplished by directly linking the button within the storyboard editor, but is shown to demonstrate what is happening within this class.)
Now, before the segue starts, the method shouldPerformSegue(withIdentifier:sender:) is called. This is an optional method within a view controller that can be overridden to provide some customization around the decision about whether or not a segue should be performed. The default value returned is true. The destination view controller has not been created before this method is called. Returning false will cause the segue to be cancelled, and nothing further will occur. It’s not all that common to use shouldPerformSegue(withIdentifier:sender:) to cancel segues; however, it is a useful integration point at times.
Finally, in the chain of events, prepare(for:sender:) is the last to occur. At this point, the destination view controller has now been instantiated and is one step away from being presented. This is the last chance for the source view controller to pass some state or contextual information to help the destination view controller during or after the segue.
We know how to create and set up the initial view controller in an app, and we know how to transition between active view controllers. Let’s take a step back and make sure understand the life of a view controller in iOS.
Understanding the Controller Life Cycle
In order to create a UI controller in iOS, you have a number of methods at your disposal, but the most common method is to use storyboards to design and define your app’s UI controllers.
Creating UI controllers from storyboards
In order to create a view controller from a storyboard, first you must create a view controller scene in the storyboard. You can do this in Xcode by adding a view controller to the editing stage. After this has been done, make sure to open up the Identity inspector and add any custom subclass used in the Class field. Additionally, give the view controller a specific Storyboard ID. This identifier is used to identify the specific view controller scene to use when creating the view controller programmatically from a storyboard. Usually the identifier is just the name of the class, like this:
letviewController=UIStoryboard(name:"Main",bundle:nil).instantiateViewController(withIdentifier:"ExampleViewController")
Tip
While the strings are easy to use, things can get out of control fast. It’s best to store storyboard identifiers separately in a constants struct, an enum, or through some other abstraction for compile-time safety and to prevent future maintenance woes.
When view controllers are created through storyboards, UIKit uses a special method that can be overridden in the class to help with initialization. This method, init(coder:), is a great place to perform any setup or customization that needs doing before the view is loaded into the class and before it’s placed in the hierarchy of view controllers. Overriding this method is done like so:
classViewController:UIViewController{requiredinit?(coderaDecoder:NSCoder){super.init(coder:aDecoder)// Perform some customization}}
Warning
While init(coder:) is easy to override, you cannot use custom parameters in the method itself. Injecting properties into view controllers at initialization via the object’s constructor is easier in Android than in iOS with the use of storyboards. Often, injection of values is done by setting properties directly or calling a setup method after the view controller has already been instantiated. Each has its own set of trade-offs, and often both patterns will be used throughout a project.
The life cycle of the UI controller is tied to the life cycle of the view it controls. There is a set of events besides the initializer the view controller receives from the view and other objects that control it to help make managing the view, and other dependent objects, easier. Let’s talk about a few of these.
viewDidLoad
This method is called after the UI controller’s view has loaded. It’s called only once during the life cycle of a view controller, and it’s the place where any view setup occurs. All outlets and actions set up inside a storyboard are wired up and ready for use at this point. Typically, things like setting a view’s background color, fonts on labels, and other stylistic operations are done within this method. Occasionally, notifications are set up here (see Chapter 11). If that is the case, make sure to unsubscribe from notification in deinit or another method to prevent crashes or memory leaks.
viewWillAppear and viewDidAppear
This set of methods is called before and after a view is presented on the tree of views that form the view hierarchy. At this point, the view often has a known size (but not always—modals do not have a view size determined until viewDidAppear) and that can be used for some last-minute size adjustments. This is also a good place to turn on memory- or CPU-intensive things like GPS tracking or accelerometer events.
viewWillDisappear and viewDidDisappear
These methods are similar to viewWillAppear and viewDidAppear, but they are triggered whenever a view is about to be, or has been, removed from the view hierarchy and is no longer visible. This is a great place to disable the things enabled in the previous set of methods.
Tip
Interactive swipe back gestures that are used by the user do not call viewDidDisappear. Be sure to test by tapping on the OS-provided back button and by swiping to pop a view off the screen.
didReceiveMemoryWarning
It’s important to handle memory warnings in iOS because memory is sometimes very constrained on mobile devices. Clear up unnecessary resource caching, clear outlets created from storyboards, etc. If the app doesn’t recover from this, it will eventually shut down and the application will be terminated.
Here’s an example of a class that handles all these methods:
classViewController:UIViewController{varhugeDataFile:Any?requiredinit?(coderaDecoder:NSCoder){super.init(coder:aDecoder)// Set up operations not dependent on a view// For example, setting up that hugeDataFile object in the background}overridefuncviewDidLoad(){super.viewDidLoad()// The view has been loaded from the storyboardtitle="Awesome View Controller Example"}overridefuncviewWillAppear(_animated:Bool){super.viewWillAppear(animated)// The view is about to be displayed on the screen}overridefuncviewDidAppear(_animated:Bool){super.viewDidAppear(animated)// The view has been displayed on the screen}overridefuncviewWillDisappear(_animated:Bool){super.viewWillDisappear(animated)// The view is about to disappear from the screen}overridefuncviewDidDisappear(_animated:Bool){super.viewDidDisappear(animated)// The view has disappeared from the screen}overridefuncdidReceiveMemoryWarning(){super.didReceiveMemoryWarning()// Uh-oh! Better clear out that huge data file we were holding on tohugeDataFile=nil}}
Notice that all the methods are override methods that call their super equivalents in the method body. It’s important to do this, otherwise subsequent view controllers in the view controller hierarchy won’t receive calls for any missing calls. Why this isn’t a compiler addition handled just like retain and release calls is beyond the scope of this book. Just don’t forget to include these method calls in your overrides!
Warning
Both Android and iOS support the use of an MVC architecture. This architecture is sometimes given pejoratively as “Massive View Controller” because without discipline, it lends itself to dumping all controlling logic for views into classes that are thousands of lines long. It’s important to be diligent in maintaining single-use responsibility of a class as much as possible and using container views appropriately.
Navigation controllers, tab bars, and split view controllers
There are special classes in iOS that have special behavior specifically for managing view controllers. The three you’ll most likely encounter are navigation controllers (UINavigationController), tab bar controllers (UITabBarController), and split view controllers (UISplitViewController).
Navigation controllers are used to handle stacks of view controllers and make transitioning between them consistent and easier to spatially navigate and reason about versus a series of modal view controllers stacked visually on top of each other.
Tab bar controllers are a special class that handle managing active view controllers with an anchored tab bar at the bottom of the screen. This is a common method of segmenting distinct sections within an app (e.g., a tab for Search, Checkout, and Orders in a shopping app).
Split view controllers originated from the iPad but have since migrated to the iPhone. They are used to display a master set of data, typically in list form, and then provide a detail view of that data whenever an item is selected.
showDetail(_:sender:)
If you’re using a UISplitController, you can use showDetail(_:sender:) to present a detail view controller in lieu of show(_:sender:). This will adapt to a full-screen modal view when a UISplitController isn’t available for a device (as on .compact size class devices like the smaller-sized iPhones).
What We’ve Learned
Within this chapter we’ve covered a lot of information about UI controllers:
-
We talked about the different architectures present within Android and iOS and showed how an
Activitystacks up to aUIViewController. -
The startup logic for an app to display a view on the screen at the direction of a UI controller was demonstrated in both platforms. In Android, there was more configuration versus the more convention-based approach of iOS.
-
We covered scene transitions and changing the active view, along with some tools in Android like
Fragmentobjects to make controlling those views a bit simpler. -
We discussed the various methods that are called as part of a UI controller for Android and iOS.
-
We introduced storyboards in iOS and their role in connecting different scenes.
It’s surprising that even with this broad knowledge base there is a huge amount of information that wasn’t covered. We talk more about some of the details of views outside of the context of UI controllers in Chapter 2. There is also additional information in Part II where we walk through building a sample application for both platforms.
If you’re ready to learn about views now, though, head to the next chapter for a great comparison!