
Chapter 4
Controlling Focus and Depth of Field
IN THIS CHAPTER
![]() Understanding autofocusing options
Understanding autofocusing options
![]() Choosing a specific autofocusing point
Choosing a specific autofocusing point
![]() Tracking focus when shooting moving subjects
Tracking focus when shooting moving subjects
![]() Taking advantage of manual-focusing aids
Taking advantage of manual-focusing aids
![]() Manipulating depth of field
Manipulating depth of field
To many people, the word focus has just one interpretation when applied to a photograph: Either the subject is in focus or it's blurry. But an artful photographer knows that there's more to focus than simply capturing a sharp image of a subject. You also need to consider depth of field, or the distance over which other objects in the scene appear sharply focused. This chapter explains how to manipulate both aspects of an image.
Some focusing options discussed in this chapter are specific to still photography; I cover video-related focusing settings in Chapter 7. Depth of field information, however, applies to both photos and videos.
 Also review the Chapter 1 section that explains how to use the Zoom In and Zoom Out buttons to magnify the display, a useful trick for making sure that your subject is in focus.
Reviewing Touchscreen Focus Options
Your camera offers a feature Nikon calls the Touch Shutter. At the default Touch Shutter setting, Touch Shutter/Touch AF, you can focus and take a picture with a single tap on the touchscreen. I detail the Touch Shutter in Chapter 1, and if you’ve already skimmed that information, you know that I recommend not using the default setting because it’s easy to take a picture with an errant tap on the monitor. However, being able to tap the screen to set focus comes in handy when you use the monitor to compose your shot.
The Touch Shutter offers two settings geared to focusing:
Touch AF: Tapping the monitor displays a focus frame over the spot you tap and focuses on that area.
At the default autofocus settings, your tap also initiates Subject-tracking AF, a feature designed to automatically keep the focus frame positioned on moving subjects. You can read more about this issue in the section “Using Auto-area AF modes,” later in this chapter.Position Focus Point: Tapping the monitor places a focus frame over the area you tap but doesn’t initiate autofocusing. Instead, the camera waits to focus until you press the shutter button halfway. Again, your tap also initiates Subject-tracking AF when you use the default autofocus settings.
For manual focusing, the camera automatically uses the Position Focus Point setting. The focus frame that you position by tapping your subject becomes the camera’s reference point for providing feedback to help you set focus correctly. See “Focusing Manually,” later in this chapter, for specifics. Subject-tracking isn’t available when you focus manually, so you don’t have to worry about that part of the equation as you do when autofocusing.
To change the Touch Shutter setting, tap the Touch Shutter symbol, shown in Figure 4-1. Each time you tap, the setting changes, with a label appearing to tell you which option is selected. For example, in the figure, the label shows that Touch AF is in force. To disable the Touch Shutter altogether, tap the symbol until the label Off appears.

FIGURE 4-1: When this option is active, you can tap the touchscreen to start autofocusing.
Controlling the Autofocus System
Taking best advantage of the Z fc autofocus system starts with understanding the following settings:
- Focus mode: Through this option, you set the camera to focus manually or use autofocusing. If you opt for autofocusing, you can choose from three Focus mode settings that determine when the camera sets the final focusing distance.
- AF-area mode: Your camera offers a total of 209 autofocus points. The AF-area mode determines the number and location of the points the camera considers when choosing a focusing target.
Symbols representing the Focus mode and AF-area mode appear side-by-side in the default monitor display, the Information display, and the viewfinder, as shown in Figure 4-2. From this point forward, I save some trees by showing just the default monitor display unless the symbols appear dramatically different in the other displays. Note, however, that if you stick with the Information display, you need to rely on the viewfinder to see critical focusing cues, such as symbols that let you know when focus is achieved.

FIGURE 4-2: These symbols represent the default Focus mode and AF-area mode settings.
For still photography, adjust the Focus mode and AF-area mode via the i menu, as shown in Figure 4-3, or the Photo Shooting menu, as shown in Figure 4-4. When you’re shooting video, the Focus mode and AF-area mode options appear in the same place on the i menu, but if you want to use the regular menus, choose your settings from the Video Recording menu instead of the Photo Shooting menu. You’re presented with different options for both settings in video mode; Chapter 7 has details.

FIGURE 4-3: Use the i menu to adjust Focus mode (left) or AF-area mode (right).
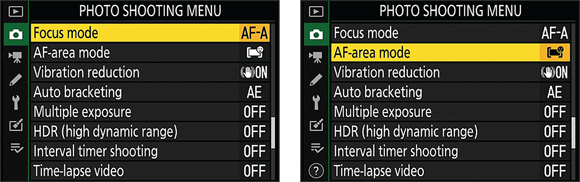
FIGURE 4-4: You also can change both settings for still photography from the Photo Shooting menu.
If you’re not ready to explore all the ins and outs of the autofocus system, you can find out how to focus using the default Focus mode and AF-area mode settings in Chapter 1. Look in the section related to shooting your first picture, near the end of that chapter. Otherwise, keep reading for help with choosing the best Focus mode and AF-area mode for your subject.
Choosing a Focus mode
When you use autofocus, the Focus mode determines when the final focusing distance is locked and whether you or the camera controls the decision. You have three choices, all beginning with AF, for autofocus.
The following list describes how things work in each mode when you use the traditional method of initiating autofocusing: pressing the shutter button halfway. Using the Touch Shutter complicates things a little, so I save that discussion for the end of this section.
AF-S (Single AF): Designed for shooting stationary subjects, this mode locks focus when you press the shutter button halfway. (Think S for still, stationary.) Focus remains locked as long as you keep the shutter button pressed halfway.
In AF-S mode, the camera insists on achieving focus before it releases the shutter. If this behavior annoys you, open the Custom Settings menu, choose Autofocus, and then change the AF-S Priority Selection option to Release. The camera then takes the picture even if focus isn't achieved.AF-C (Continuous AF): Geared to capturing moving targets, AF-C mode adjusts focus as needed as long as the shutter button is pressed halfway. (Think C for continuous.)
In AF-C mode, the camera is set by default to take the picture when you press the shutter button all the way, regardless of whether focus is set. To tell the camera to wait until focus is achieved, open the Custom Settings menu, choose Autofocus, and set AF-C Priority Selection to Focus.
 To decide which shutter-release option is right for you, consider whether you’d rather have any shot, even if it’s out of focus, or capture only those that are in focus. I prefer the latter, so I set both AF-S and AF-C modes to Focus. Why waste battery power, memory card space, and inevitable time deleting out-of-focus pictures? Yes, if you’re shooting rapid action, you may miss a few shots waiting for the camera to achieve focus — but if they’re going to be lousy shots, who cares? Sports shooters who fire off hundreds of shots while covering an event, though, may want to unlock shutter release for both AF-C and AF-S modes. Again, you may wind up with lots of wasted shots, but you increase the odds that you’ll capture that split-second when the highlight-reel moment occurs.
AF-A (AF mode auto-switch): This mode lets the camera decide whether to use AF-S or AF-C autofocusing. If the camera detects motion, it goes with AF-C; otherwise, it uses AF-S.
 When the Photo/Video switch on top of the camera is set to the still-photography position, AF-A is the default Focus mode setting because it’s easiest to use — you don’t have to decide on the focus-lock issue before you shoot. The problem is that AF-A mode doesn’t always make the right call. If your subject is stationary but people or objects are moving nearby, the camera may see that surrounding movement and mistakenly switch to continuous autofocus. By the same token, if the subject is moving only slightly, the camera may not select continuous autofocusing. So my advice is to choose AF-S or AF-C rather than let the camera take control.
A few other important points about the Focus mode:
- If your lens has an auto/manual focus switch, set the switch to the autofocus position. Usually, the autofocus setting is labeled A or AF. Some lenses sport a switch with a dual setting, such as AF/M, which enables you to use autofocusing initially and then fine-tune focus by turning the manual focusing ring.
- Not all lenses support autofocusing with the Z fc. If the only Focus mode option available is MF — for manual focus — you can’t autofocus with the attached lens. If any of the other Focus mode settings is unavailable, your lens doesn’t support that function, either.
- The camera displays different focus cues, depending on the Focus mode, as follows:
- AF-S mode: When focus is locked, one or more focus frames turns green, as illustrated in the two examples in Figure 4-5. The number and size of the focus frames depends on the AF-area mode setting, explained in the next section. But the green frames always indicate where the camera set focus.
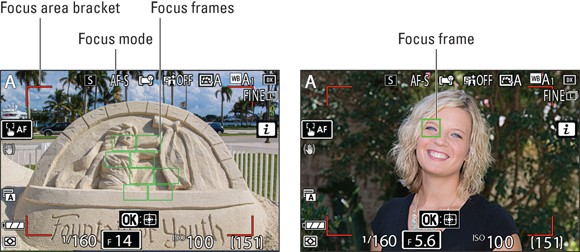
FIGURE 4-5: In AF-S mode, the green frame(s) indicate where focus is locked.
- AF-C mode: Because focus isn’t locked until you take the picture, you don’t see the green focus frames that appear in AF-S mode when you press the shutter button halfway and focus is set. Instead, you see red frames that may jump across the display as the subject moves. You just have to trust that the object under the frame(s) will be in focus when you press the shutter button all the way down.
- AF-A mode: If the camera chooses to use AF-S, the green focus frame(s) appear; if it uses AF-C, they don’t.
- AF-S mode: When focus is locked, one or more focus frames turns green, as illustrated in the two examples in Figure 4-5. The number and size of the focus frames depends on the AF-area mode setting, explained in the next section. But the green frames always indicate where the camera set focus.
- In AF-S mode, you can ask the camera to beep when focus is achieved. Enable the feature via the Beep Options setting, found on the Setup menu and detailed in Chapter 1. Regardless of this setting, you don’t hear the beep if you enable Silent Photography from the Photo Shooting menu, a feature I detail in Chapter 2.
- If you use the Touch Shutter autofocus features described at the start of the chapter, the various Focus modes may produce different results than just described. What happens after you tap the screen depends on the AF-area mode, described in the next section. For example, at the default AF-area mode setting, your tap doesn’t lock focus in AF-S mode as you might expect. Instead, it initiates Subject-tracking autofocus. Keep reading for details on how the Touch Shutter affects autofocusing for each combination of Focus mode and AF-area mode.
Picking the right AF-area mode
The partner to the Focus mode setting, the AF-area mode determines which focus point(s) the camera uses to establish the focusing distance. The Z fc offers a slew of AF-area modes — so many, in fact, that’s it’s challenging to sort them all out. I find it helpful to lump them into two categories: Auto AF-area modes, which give the camera most of the control; and advanced modes, which put control in your hands. The sections discuss both groups.
Using Auto-area AF modes
Here’s how the three Auto AF-area modes work:
 Auto-area AF: The camera can focus anywhere in the area bounded by the red focus-area brackets, one of which I labeled in Figure 4-6. Typically, the object closest to the camera is used as the focus target.
 Auto-area AF (people): This setting is the default. As with Auto-area AF, the camera may set focus anywhere within the boundaries of the red focus brackets. But before it picks a target, it scans the scene for human faces and eyes. If it finds a face or an eye, it places a yellow focus frame over that face or eye. Figure 4-7 shows the eye-detection focus frame.
FIGURE 4-6: The red brackets mark the boundary of the area containing focus points.
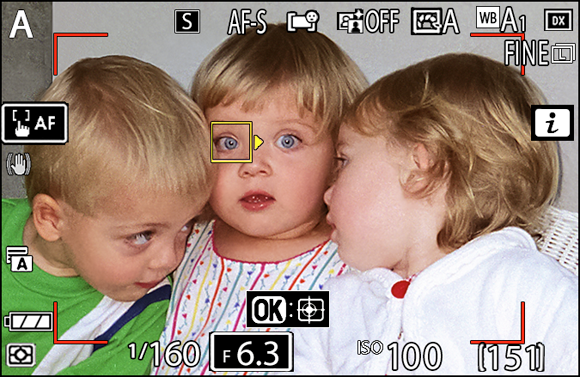
FIGURE 4-7: In Auto-area AF (people) mode, the camera uses eye-detection autofocusing.
A triangle hanging off the side of the focus frame means that you can use the Multi Selector to choose a different face or eye. Press the Multi Selector in the direction you want to move the frame.Notice that in the scene shown in Figure 4-7, the box has just one triangle, indicating that the only other eye to choose is the eye to the right of the one that’s selected. Why only one option? Because eye detection works only when the eyes are facing the camera. If your subjects are looking down or to the side, eye detection fails. In a group portrait where everyone is facing the camera, you should be able to choose from a larger selection of eyes. The same restriction applies to the camera’s ability to detect faces – don’t be surprised if it doesn’t recognize the face of a subject you’re shooting in profile view.
 Auto-area AF (animals): This mode works just like the human face/eye detection mode, but it’s designed to detect animal faces and eyes. However, it usually works best on cats and dogs; it’s not equipped to recognize what constitutes a face or eye in all of nature’s creatures. (The detection algorithm is based on certain eye and face shapes.) Again, the feature is mostly likely to succeed when the animal is facing the camera.
Now that you have a general idea of how the Auto AF-area modes work, you need to know some additional details that apply to all three:
- When face and eye detection fails, autofocusing works as it does in regular Auto-area AF mode. Again, that typically results in focus being based on whatever is closest to the camera.
Subject-tracking AF is available in all three Auto-area modes. This feature, designed for focusing on moving subjects, tells the camera to reposition the focus frame as necessary to keep it over your subject until you initiate autofocusing.
You can engage this feature in two ways:
- If you see an OK symbol like the one in 4-7, tap it or press the OK button. You see a white frame like the one shown on the left in Figure 4-8. Use the Multi Selector to position the frame over your subject and then press OK again. The frame turns yellow, as shown on the right in Figure 4-8, and the frame starts following the subject.

FIGURE 4-8: These focus frames appear when you use subject tracking.
If you set the Touch Shutter to Touch AF or Position Focus Frame, tap the monitor to position the focus frame and start subject tracking. With this method, you completely bypass the white focus frame shown on the left in Figure 4-8; the yellow tracking frame and other symbols shown on the right in the figure appear right away. (See the first part of this chapter for more details about selecting the Touch Shutter setting.)
It’s important to note that if you use Touch AF, focus is set on the area you first tap. But if the focus frame moves during subject tracking, focus isn’t adjusted to match the new frame position even if the Focus mode is set to AF-C (continuous autofocusing).
Whichever approach you use, press the shutter button halfway to set focus on the object under the tracking frame. In AF-S Focus mode, the frame turns green when focus is locked. In AF-C mode, focus is adjusted to accommodate the frame movement as long as you keep the shutter button pressed halfway. Press the button the rest of the way to take the picture. To disengage subject tracking before taking the shot, tap the Exit box (next to the OK box) or press the Zoom Out button.
- If you see an OK symbol like the one in 4-7, tap it or press the OK button. You see a white frame like the one shown on the left in Figure 4-8. Use the Multi Selector to position the frame over your subject and then press OK again. The frame turns yellow, as shown on the right in Figure 4-8, and the frame starts following the subject.
I have mixed feelings about subject tracking being tied to the Auto AF-area modes feature. Yes, it makes these modes more useful for focusing on moving subjects. But if you’re using automatic anything, you shouldn’t have to figure out what a huge OK symbol in the display means. Okay what? Okay to shoot? Okay to set focus? Okay to ask your know-it-all neighbor (no, definitely not that). Also, in other AF-area modes, described in the next section, pressing the OK button doesn’t initiate subject tracking. Instead, it moves the focus target to the center of the frame, a technique that long-time Nikon shooters have been using for years. Even if you’re not familiar with other Nikon cameras, it’s easy to forget what AF-area mode you’re in and start subject tracking when you think you’re about to position the focus frame. So my recommendation is that if you want to photograph moving subjects and need the camera to track the subject, move on to the next section and discover Dynamic-area AF mode, which offers an easier way to get the job done.
Gaining more control with other AF-area modes
In addition to the three Auto AF-area modes, you get seven advanced modes that enable you to control where the camera establishes focus. For all the advanced modes, the following rules apply:
- The first step is to position a focus frame over your subject. When you use any advanced AF-area mode, the red corner brackets that appear in the Auto AF-area modes disappear. Instead, you select the focusing area by positioning a focus frame over your subject. The frame design varies depending on the AF-area mode, but in all cases, use these techniques to position the frame:
- Press the Multi Selector in the direction you want to move the frame.
- Press the OK button to move the frame to the center of the display.
If you set the Touch Shutter to Touch AF or Position Focus Point, tap your subject on the monitor. With Touch AF, the camera places the frame and sets the initial focusing distance based on that frame. With Position Focus Point, the camera simply places the focus frame. See the section “Reviewing Touchscreen Focus Options,” at the start of this chapter, to find out how to set the Touch Shutter mode.
In the advanced AF-area modes, tapping your subject on the monitor does not start subject tracking as it does in the Auto-area modes. That form of subject tracking isn’t available in the advanced AF-area modes; again, check out Dynamic-area AF mode, covered a few paragraphs from here, for a simpler way to track focus on a moving subject.
- Which AF-area modes are available depends on the Focus mode. One AF-area mode works only when the Focus mode is set to AF-C or AF-A; others require the Focus mode to be set to AF-S. I spell out these requirements as I go through the AF-area mode descriptions.
- Not all lenses support all AF-area modes. If the Focus mode is compatible with the AF-area mode you want to use but appears dimmed in the menus, your lens doesn’t support that mode.
Now for the details about each advanced AF-area mode:
 Pinpoint AF: Available only when you set the Focus mode to AF-S, Pinpoint AF is designed for shooting stationary subjects that require precise focusing on a small detail. The first screen in Figure 4-9 shows you the itty-bitty focus frame that appears when you use this mode.
I show the focus frames against a blue background to make them easier to see. In real life, locating the smaller frames can be difficult if your subject is the same color as the frame. If you can’t find the frame, press the OK button to shift it to the center of the display, making the frame easier to spot. Then use the Multi Selector to move it over your subject.
 Single-point AF: This mode, available no matter what Focus mode you use, presents the slightly larger focus frame shown in the second example in Figure 4-9. It’s my go-to choice for shooting stationary subjects that don’t require Pinpoint AF.
 Wide-area AF (S): Displaying the focus frame shown in the third example in Figure 4-9, this mode is useful when you’re photographing a subject that doesn’t require the precision offered by Pinpoint or Single-point modes. For example, you might use it to focus on a statue that occupies a good portion of the scene. The larger the focus frame, the less time you have to spend pressing the Multi Selector or tapping the screen to move the frame into place.
The S in the name refers to the fact that this wide-area focus frame is smaller than the one described next, Wide-area AF (L) — L, for large.
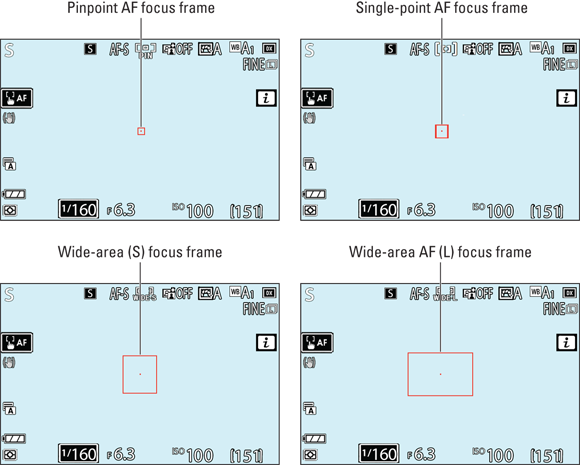
FIGURE 4-9: Pinpoint AF produces the smallest focus frame; Wide-area AF (L), the largest.
 Wide-area AF (L): Want the largest possible focus frame? Use this setting to display the frame shown on the fourth screen in the figure. It’s a good option for quickly setting focus on a large structure, such as a building. Again, because the frame is larger, you need less time to properly position it. If you use either of the wide-area options, keep in mind that the camera can select any focus points within the frame, so be careful that the frame doesn’t include objects in front of or behind your subject. If it does, the camera may choose to focus on those objects instead of on your subject.
Wide-area AF (L) plus face/eye detection: You also get two modes that add the face- and eye-detection feature explained in the preceding section to the Wide-area AF (L) autofocusing scheme.
You can choose from two Wide-Area AF (L) options:
 Wide-area AF (L-people): You see the normal Wide-area AF focus frame, but if the camera detects human eyes within the frame, it displays a small, yellow box over one of those eyes. If the camera notices a face but can’t detect eyes, the focus box appears over the face.
 Wide-area AF (L-animals): This mode works just like the one just described but is designed to find animal faces and eyes. As with the animal-eye detection available for the Auto-area modes, this one is geared to dogs and cats.
A triangle on the edge of the yellow focus frame is your cue that you can move the frame over a different face or eye. Just press the Multi Selector in the direction you want to move the frame. If no faces or eyes are detected, focusing works as it does with the normal Wide-area AF (L) setting.
 Dynamic-area AF: Available only when you set the Focus mode to AF-C or AF-A, this mode is my go-to setting for photographing action. When you enable this mode, you see a focus frame that consists of nine points, as shown in Figure 4-10. Position the frame so that the center point is over your subject. The camera uses that point to set the initial focusing distance when you press the shutter button halfway. But if your subject moves away from that focus point, the camera looks to the surrounding points for focusing information and adjusts focus as needed.
FIGURE 4-10: In Dynamic-area mode, you see a cluster of nine autofocus points.
For continuous focus adjustment to occur, you must keep the shutter button pressed halfway. You also may need to pan (move) the camera to keep your subject under the cluster of focus points.
Although you also can use Dynamic-area autofocusing when the Focus mode is set to AF-A, I suggest using AF-C instead. In the AF-A (auto-switch autofocusing), the camera may not detect enough motion in the frame to automatically switch from AF-S to AF-C mode.
Choosing the right focus combos
Because the Focus mode and AF-area mode work together to determine how the autofocus system behaves, it’s important to consider them as a duo when choosing focus settings. As you experiment with the different settings, you’ll no doubt discover which Focus mode and AF-area mode do the best job for the subjects you shoot most often. In the meantime, the next two sections offer my recommendations for shooting stationary and moving subjects.
Focusing on stationary subjects
When photographing nonmoving subjects, I usually pair AF-S Focus mode with Single-point AF-area mode. Follow these steps to try this combo:
Position the red Single-point focus frame over your subject.
For example, I placed the frame over the dragon’s eye on the first screen in Figure 4-11. You can move the frame by using the Multi Selector or tapping your subject on the touchscreen.
Press the shutter button halfway to set focus.
When focus is achieved, the focus frame turns green, as shown on the second screen in Figure 4-11. Focus remains locked as long as you keep the shutter button pressed halfway.
- Press the shutter button the rest of the way to take the picture.

FIGURE 4-11: I used AF-S Focus mode and Single-point AF-area mode for this subject.
Here are a few variations on the theme, all using the AF-S Focus mode but using different AF-area modes:
- When shooting close-ups that require precise focus positioning, switch the AF-area mode to Pinpoint AF. As an example, in Figure 4-12, I wanted focus to be set on the front part of the orchid. With the larger, Single-point frame, the camera sometimes focused on parts of the flower behind that spot. With Pinpoint AF mode, I nailed down focus with ease.
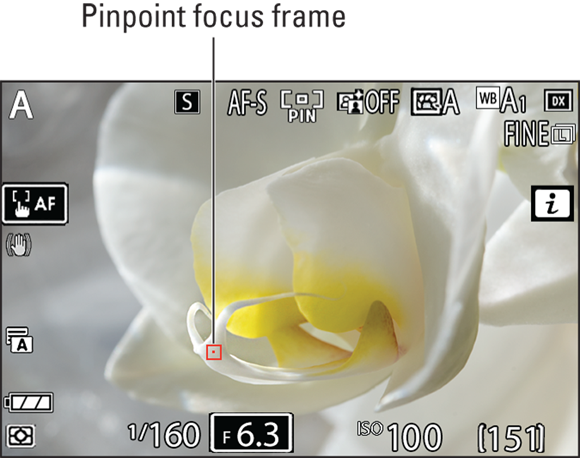
FIGURE 4-12: Use AF-S plus Pinpoint AF-area mode to focus on a detail in a close-up.
For large objects, such as the statue in Figure 4-13, using Wide-area AF (S) or Wide-area AF (L) can save time. Positioning the larger frame is faster because you don’t have to nudge it so many times with the Multi Selector or find just the right spot on the touchscreen to tap. For my sample photo, I used Wide-area AF (S) to focus on the statue.
When using either Wide-area frame, make sure nothing is inside the frame that might draw the camera’s focusing attention away from your subject. For example, had I used Wide-area AF (L) mode, the larger frame would have included some of the background monument in the focusing target, which could have confused the autofocus system.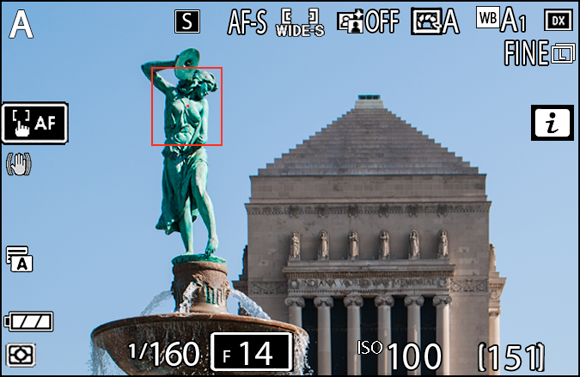
FIGURE 4-13: I used Wide-area AF (S) to focus on the statue.
For portraits of people or pets, try the Wide-area plus eye/face detection modes. Again, the face- and eye-detection feature provided by these settings works great if your subject is looking at the camera. But if you’re shooting a subject in profile or taking a candid shot of someone not looking directly at the lens, the face/eye detection usually doesn’t get the job done. If no faces or eyes are found, the camera operates in the normal Wide-area frame mode, which, again, can result in focus miscues if background or foreground objects are within the frame.
Additionally, in a group portrait, the camera may not initially target the person who’s most important to the moment, and then you have to take the time to reposition the face- or eye-detection frame. Think of a group wedding photo, for example: Obviously, the most important person in the frame is usually the mother of the bride because — let’s face it — if mama ain’t happy with those photos, nobody’s happy. But the camera may lock onto the eyes of the groom instead, and there go all your hoped-for wedding album sales. (Tip: Put all the primary players in the front row of the group, and then everyone will be about the same distance from the camera and in clear-eyed focus.)
When eye detection isn’t likely to work or the Wide-area focus frame incorporates too much of the background or foreground, use Single-point AF-area mode and position the focus frame on the preferred subject’s face or eye yourself.
Want to skip the whole task of moving the focus frame into place? When you use AF-S Focus mode, try this trick instead. First press OK to move the frame to the center of the scene. Then compose your shot initially so that the subject is under that center point. Press and hold the shutter button halfway to lock the focusing distance and then reframe to your desired composition. I use this approach most of the time when I’m handholding the camera and using AF-S Focus mode. Perhaps this is just a long-time habit, formed in the days when the only focus point available was in the center of the frame. But I find this technique faster than continually moving the focus frame when I change subjects or composition.
![]() You may want to lock focus and exposure together before you reframe. Just press and hold the AE-L/AF-L button. Otherwise, exposure is adjusted to match the new framing, which may not work well for your subject. See Chapter 3 for more details about autoexposure lock (AE Lock).
You may want to lock focus and exposure together before you reframe. Just press and hold the AE-L/AF-L button. Otherwise, exposure is adjusted to match the new framing, which may not work well for your subject. See Chapter 3 for more details about autoexposure lock (AE Lock).
Focusing on moving subjects
When shooting moving subjects, I usually select AF-C for the Focus mode and choose Dynamic-area for the AF-area mode, as shown in Figure 4-14.
When you enable Dynamic-area AF, you see a cluster of nine focus points. The camera refers to the center point to set the initial focusing distance, so start by positioning that point over your subject by using the Multi Selector or by tapping your subject on the monitor. Then press and hold the shutter button halfway. As long as you keep the button halfway down, the camera adjusts focus as needed if your subject moves before you press the button all the way to take the shot. If it can’t set focus based on the center point, it checks the eight surrounding points for focus information.
Spend some time practicing with this setup so that you can get a better feel for how it works before you need to take important action shots. Don’t be alarmed if you feel slight camera vibration or hear subtle sounds when you use AF-C with any AF-area mode, by the way — that’s just the autofocus motor doing its thing.
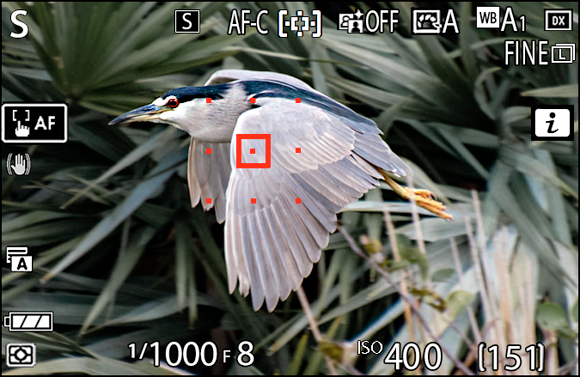
FIGURE 4-14: For moving subjects, I combine AF-C with Dynamic-area AF.
Here are some additional tips on using this autofocusing combo:
- Try to keep the subject under the center focus point to increase the odds of good focus. If the subject moves away from that point, it should still find the focus target as long as it falls under one of the other eight active points. But reframing to keep the subject under the center point gives the camera a focusing assist.
Prevent focusing miscues with tracking lock-on. You’re shooting your girlfriend's volleyball game, practicing your action-autofocusing skills. You set the initial focus on your friend, and the camera is doing its part by adjusting focus to accommodate her pre-serve moves. Then all of a sudden some clueless interloper walks in front of the camera. Okay, it was the referee, who probably did have a right to be there, but still.
The good news is that as long as the ref gets out of the way before the action happens, you’re probably okay. A feature called Focus Tracking with Lock-On tells the camera to ignore objects that appear temporarily in the scene after you begin focusing. Rather than reset focus on the newcomer, the camera continues focusing on the original subject.
You can vary the length of time the camera waits before starting to refocus by way of the Focus Tracking with Lock-On option, found in the Autofocus section of the Custom Settings menu. You can choose a delay time ranging from 1 to 5 seconds; 3 seconds is the default. At the 1 second setting, called Quick on the settings screen, the camera will probably shift focus to any person or object that moves in front of your subject. I suppose it’s a good option for a nicely focused shot of a photo bomb, but those pictures are usually only funny if it’s a squirrel or some other cute animal coming into the frame.
 You can interrupt continuous autofocusing and lock focus by pressing the AE-L/AF-L button. Focus remains locked as long as you hold down the AE-L/AF-L button. Don't forget, though, that by default, pressing the AE-L/AF-L button also locks autoexposure. You can change this setup so that the button locks just one or the other; Chapter 10 explains how.
- On occasion, you may want to switch to Single-point AF-area mode when using continuous autofocusing. For example, if you're photographing a tuba player in a marching band, you want to be sure that the camera tracks focus on just that musician. With Dynamic-area AF, it’s possible that the focus may drift to another nearby band member. The difficulty with the Single-point/AF-C pairing is that you must reframe to keep your subject under the point you selected.
- For people or pets on the move, also try using AF-C with the face/eye detection versions of the Wide-area AF (L) mode, assuming that the subjects are facing the camera. For example, think of a 2-year-old child in a highchair, about to blow out the candles on a birthday cake. Using face/eye detection with continuous autofocusing makes it easier to maintain focus on the toddler’s face (or eye) instead of the cake, even as the child wriggles in the chair. You can set focus in advance by holding the shutter button halfway down and then wait until the child starts trying to blow out the candle to take the picture.
Don’t forget that any moving subject requires a fast shutter speed to capture a blur-free shot. See Chapter 3 for details on shutter speed, and check out Chapter 6 for additional action photography tips.
Exploring a few other autofocus tweaks
Dig in to the Autofocus section of the Custom Settings menu, shown in Figure 4-15, for more settings that customize the autofocus system.

FIGURE 4-15: The Autofocus section of the Custom Settings menu contains a variety of ways to further customize autofocusing behavior.
I cover the first two options, AF-C Priority Selection and AF-S Priority Selection, in the earlier section “Choosing a Focus mode.” For help with Focus Tracking with Lock-On, see the preceding section. The remaining options work as follows:
Focus Points Used: If you change the option from the default, All Points, to Alternating Points, the camera pays attention only to every other focus point in an area when autofocusing. To put it another way, only one-quarter of the potential focus points are available. The benefit is that you can more quickly select a focus point: With fewer points, each press of the Multi Selector moves the focus frame a greater distance.
I leave this option set to All Points because I don’t find the benefit worth the price. Additionally, it has no effect in Pinpoint AF mode or any of the Wide-area AF modes — all focus points are always available in those modes.
- Store Points by Orientation: Suppose that you're shooting a landscape, framing the shot in a horizontal orientation, and select the upper right focus point. When this menu option is set to Off, as it is by default, that upper right focus point remains selected when you rotate the camera to a vertical orientation. But if you change the setting to On, the camera instead activates the focus point that was on duty the last time you shot a vertically oriented photo. Rotate the camera back to horizontal orientation, and the last point you selected when the camera was in that position becomes active again.
- AF Activation: By default, pressing the shutter button halfway initiates autofocusing as well as exposure metering. If you want to use the shutter button to trigger exposure metering only, set this option to AF-ON Only. I know, the option name insinuates that the shutter button will set focus only, but the reverse is true. Some cameras have an AF-ON button that you use to set focus, and the menu option means that you want to use that button for focusing. But because the Z fc has no dedicated AF-ON button, you have to use the customization tools that I cover in Chapter 10 to assign the autofocus duty to another button.
- Limit AF-area Mode Selection: When you change the AF-area mode via the i menu, you have the option to rotate the Main command dial to scroll the available settings. Through the Limit AF-area Mode Selection menu option, you can ask the camera to display just certain AF-area modes instead of all of them. Just deselect the check boxes for the modes you don’t want to see; remember to press OK to finalize everything. Note that all AF-area modes still appear on the Photo Shooting menu. All modes also appear if you highlight the AF-area mode in the i menu and then press the OK button, which displays the settings on a separate screen. Also, you can’t hide Single-point AF mode.
- Focus Point Wrap-Around: When you press the Multi Selector to move a focus frame, you normally hit a “wall” when you reach the edge of the focusing area. When the leftmost point is selected, for example, pressing left again does nothing. If you change this menu option to Wrap, pressing the Multi Selector left moves the focus frame to the rightmost point.
- Focus Point Options: Selecting this menu item gives you access to two settings:
- Manual Focus Mode: This option controls whether the active focus point is displayed when you use manual focusing. By default, the option is set to On, and the focus point appears. Set the option to Off if you want the point to appear only when you’re selecting a focus point. (See the section related to manual focusing, later in this chapter, to find out why you’d even want to see a focus point when focusing manually.)
- Dynamic-area AF Assist: When you stick with the default setting, On, you see a cluster of nine focus points when you use the Dynamic-area AF mode. (Refer to Figure 4-14). Choose Off if you only want to see the center point. Taking that step can make it easier to see your subject because it’s no longer covered by nine points; just don’t forget that those hidden points remain active even though you can’t see them.
Low-light AF: Because the camera can have trouble autofocusing when there’s not enough light, the Z fc can call on some focus-assist tools when this menu option is enabled. If you set the Shooting mode to Auto, the option is always on. In other Shooting modes (P, S, A, and M), you have control over whether Low-light AF is enabled. It sounds like an obvious “yes,” but keep the following points in mind as you decide:
- The feature works only when you set the Focus mode to AF-S or if you use AF-A and the camera chooses AF-S for you.
- Focusing may be slower when you enable the feature. The rate at which the displays update may also be reduced.
- Low-light AF is available only for still photography and is disabled when you use the Interval Timer Shooting or Time-lapse Video features.
When the camera feels the need to enable the low-light tools, a text label saying Low-light appears in the displays.
Built-In AF-Assist Illuminator: This is another of the camera’s dim-lighting focusing tools. When it’s enabled, the AF-assist lamp on the front of the camera shoots out a beam of light to help the focusing system find its target. If the light is distracting, you can disable it by setting this menu option to Off.
The AF-assist Illuminator has a maximum range of about ten feet. So don’t expect it to work miracles if you’re far from your subject.- Manual Focus Ring in AF Mode: This option appears on the menu only if your lens supports it. The option name pretty much says it all: If the camera is set to any of the three autofocusing Focus modes — AF-A, AF-S, or AF-C — you can use autofocusing to set the initial focusing distance and then refine as necessary by rotating the manual focusing ring on the lens. In other words, this setting provides autofocusing with manual-focus override, which, on some lenses, you enable by way of a switch on the lens itself. To make the feature work using this menu option, you must keep the shutter button pressed halfway while you turn the manual focus ring.
Additionally, the Setup menu offers an AF Fine-Tuning Options item, which enables you to create custom focus adjustments for specific lenses. This feature is one for the experts, though; even Nikon doesn't recommend that you use this tool unless it’s unavoidable. If you consistently have focusing trouble with a lens, have your local camera tech inspect the lens and camera to be sure that one or both doesn't need repair.
While you’re using this book to learn all the ins and outs of focusing, I suggest that you hold off on adjusting any of the aforementioned customization settings. Otherwise, things may not work as I describe elsewhere in the text.
Focusing Manually
Some subjects confuse even the most sophisticated autofocusing systems, causing the autofocus motor to spend a long time hunting for a focus point. Animals behind fences, reflective objects, water, and low-contrast subjects are just some of the autofocus troublemakers. When you encounter situations that cause an autofocus hang-up, you can try adjusting the autofocus options discussed earlier in this chapter. But often, it's faster to use manual focusing.
Here’s how to take a picture using manual focusing:
Set the Focus mode the the MF setting.
If your lens has an auto/manual focus switch, moving the switch to the manual-focus position should automatically change the Focus mode to MF, but it never hurts to check. You can view the current Focus mode in the area labeled in Figure 4-16; change the Focus mode via the i menu or Photo Shooting menu. When you choose MF, the symbol that normally appears next door, representing the AF-area mode, disappears. Also notice that Touch Shutter, if enabled, automatically switches to the Position Focus Point setting, detailed at the start of this chapter.

FIGURE 4-16: The displays contain several manual-focus guides.
Position the red focus frame, labeled on the left in Figure 4-16, over your subject.
Technically you don’t have to worry about the focusing frame for manual focusing: The camera adjusts focus according to the direction and degree that you rotate the lens focus ring, regardless of the position of the focus frame. But you have two reasons to put the focus frame over your subject. First, the camera displays onscreen indicators that tell you whether the object under the focus frame is in focus (see Step 4.) Second, if you use Spot metering, an exposure option covered in Chapter 3, focus is based on your selected focus point.
Position the focus frame just like you do for autofocusing: Use the Multi Selector to nudge the frame in the direction you want it to move; press OK to put the frame smack-dab in the center of the display; or tap your subject on the touchscreen.
To adjust focus, rotate the focus ring on your camera lens.
The location of the focus ring varies from lens to lens; if you’re not sure where yours is positioned, check the lens manual.
Check the focus indicators labeled in Figure 4-16.
When you switch to manual focusing, a focus-achieved (or not) indicator appears immediately near the battery symbol. A right-pointing triangle like the one shown on the left screen in Figure 4-16 indicates that focus is set in front of your subject. A left-pointing triangle indicates that focus is set behind your subject. Two blinking triangles mean that the camera can’t focus at all (usually, that means you’re too close to the subject).
As soon as you rotate the lens focus ring, you also see a focus-distance scale, as shown on the right in the figure. Don’t pay this scale too much attention — it just tells you whether you’re focusing on an object close to or far from the camera. The right end of the scale, marked by the infinity symbol, indicates the maximum focusing distance.
When focus is achieved, you see a white dot instead of the triangles next to the battery symbol, and the focus frame turns green, as shown on the right side of Figure 4-16.
When focus is set to your liking, press and hold the shutter button halfway to initiate autoexposure, if you’re using that exposure option.
Remember: Unless you press the AE-L/AF-L button to lock autoexposure, exposure is adjusted until you take the picture. During manual focusing, the AE-L/AF-L button has no impact on focusing.
- Press the shutter button the rest of the way to take the picture.
In addition to the focus guides shown in Figure 4-16, you can turn on focus peaking, which places colored outlines around the parts of the scene that are in focus. Enable this option via the Autofocus section of the Custom Settings menu, as shown on the left in Figure 4-17. You can change the color via the menu option, and you can also tell the camera how sensitive to be when locating “in focus” areas. If you want only those objects that are in sharpest focus to be covered by the highlights, use a low sensitivity value. To include objects that are slightly less sharp, raise the sensitivity value.
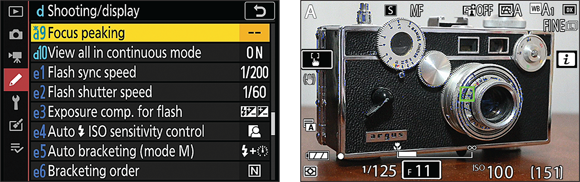
FIGURE 4-17: The Focus Peaking option displays colored outlines around areas that are in sharpest focus.
For the right example in Figure 4-17, I used a Focus Peaking setting of 2 (standard sensitivity) and set the color to blue. You can see the blue outlines around the camera lens and a few other areas. Note, though, that focus peaking works by detecting areas of sharp contrast. So, if areas don’t contain much contrast, such as the black textured surface of the camera, you don’t see the blue outlines. That doesn’t mean those areas aren’t in focus — just that they don’t offer the contrast required to be detected by focus peaking.
Even with the assistance of the manual-focus indicators, it’s important to adjust the viewfinder to your eyesight, as instructed in Chapter 1. Otherwise, you can’t accurately gauge focus with your peepers.
You also can magnify the display to check focus, as discussed in Chapter 1. Press the Zoom In button to magnify the display; press the Zoom Out button to reduce the magnification level. Focus peaking outlines disappear when the display is magnified.
Manipulating Depth of Field
Becoming familiar with the concept of depth of field is one of the biggest steps you can take to becoming a better photographer. I introduce you to depth of field in Chapter 3, but here’s a quick recap:
- Depth of field refers to the distance over which objects in a photograph appear acceptably sharp.
- With a shallow depth of field, your subject is sharply focused, but objects behind and in front of it appear blurry.
- With a large depth of field, the zone of sharp focus extends to include objects in front of and behind your subject.
Which arrangement works best depends on your creative goals. In portraits, for example, a classic technique is to use a short depth of field, as I did for the photo on the left in Figure 4-18. This approach draws the eye to the subject while diminishing the impact of the background. But for the photo shown on the right, I wanted to emphasize that the foreground figures were in St. Peter’s Square. So I used a large depth of field, which kept the background buildings sharply focused, giving them equal visual weight to the people in the foreground.

FIGURE 4-18: A shallow depth of field blurs the background (left); a large depth of field keeps both foreground and background in focus (right).
Depth of field depends on the aperture setting, lens focal length, and distance from the subject, as follows:
- Aperture setting (f-stop): The aperture is one of three main exposure settings explained in Chapter 3. Depth of field increases as you stop down the aperture (by choosing a higher f-stop number). For shallow depth of field, open the aperture (by choosing a lower f-stop number). Figure 4-19 offers an example: In the f/22 version on the left, focus is sharp all the way through the frame; in the f/2.8 version on the right, focus softens as the distance from the flag increases. I snapped both images using the same focal length and camera-to-subject distance, setting focus on the flag.

FIGURE 4-19: A lower f-stop number (wider aperture) decreases depth of field.
- Lens focal length: In lay terms, focal length determines what the lens “sees.” As you increase focal length, measured in millimeters, the angle of view narrows, objects appear larger in the frame, and depth of field decreases. As an example, Figure 4-20 compares the same scene shot at a focal length of 127mm and 183mm. I used the same aperture and camera-to-subject distance for each shot, setting focus on the parrot. For more details about focal length, flip to Chapter 1 and explore the section that discusses lens features.
- Camera-to-subject distance: As you move the lens closer to your subject, depth of field decreases.

FIGURE 4-20: Zooming to a longer focal length also reduces depth of field.
Together, these three factors determine the maximum and minimum depth of field that you can achieve:
- To produce the shallowest depth of field: Open the aperture as wide as possible (the lowest f-stop number), zoom in to the maximum focal length of your lens (if you have a zoom lens), and get as close as possible to your subject.
- To produce maximum depth of field: Stop down the aperture to the highest f-stop number, zoom out to the shortest focal length your lens offers, and move farther from your subject.
Feast on a couple of final tips related to depth of field:
- For greater background blurring, move the subject farther from the background. The portrait in Figure 4-18 offers an example: Notice that the wicker chair in which my model is sitting appears just slightly blurrier than she does, but the vines in the distance blur almost into a solid color.
Depth of field doesn't change in the live previews as you change the f-stop setting. The camera can't display the effect of aperture on depth of field because the aperture doesn't actually open or close until you take the photo.
However, you can set the red Record button that is used to start and stop video recording to display a depth-of-field preview when you’re shooting photos. If you take that step, pressing the Record button updates the display to give you an approximation of the exposure, color, and depth of field that you can expect in your final picture. The problem with this setup is that you can no longer use the button to hide and redisplay onscreen data, which is its default function during photo shooting. Chapter 10 explains how to customize buttons.