Chapter 2
Using Apple Mail
In This Chapter
![]() Adding and configuring Mail accounts
Adding and configuring Mail accounts
![]() Receiving, reading, and sending email
Receiving, reading, and sending email
![]() Filtering junk mail
Filtering junk mail
![]() Opening attachments
Opening attachments
![]() Configuring and automating Apple Mail
Configuring and automating Apple Mail
Okay, how many of you can function without email? Raise your hands. Anyone? Anyone at all?
I suppose that I can function without my Internet email, but why should I? OS X includes a very capable and reliable email client, Apple Mail (affectionately called Mail by everyone but Windows users).
In this chapter, I discuss the features of Apple Mail and show you how everything hums at a perfect C pitch. However, you have to sing out, “You’ve got mail!” yourself. Personally, I think that’s a plus, but I show you how you can add any sound you like.
Know Thy Mail Window
To begin our epic email journey, click the Mail icon on the Dock. Don’t worry if your display doesn’t look just like Figure 2-1, which illustrates the Mail window after I’ve added an account — which I demonstrate in a page or two. What you’ll see depends on whether you’re using a new Mac with a fresh copy of Yosemite or upgrading from an earlier version of OS X, and also whether you provided email account information in Setup Assistant.
Within the confines of the Mail application window, you find the following:
- Title bar: This heading at the top of the Mail window displays information about the current inbox — typically, how many messages it contains, but other data can be included as well.

Figure 2-1: The Apple Mail window.
 Like many other OS X Yosemite applications, you can switch Mail to a full-screen display (which hides the title bar, window controls, and menu bar). To switch to full screen, choose View⇒Enter Full Screen, or click the Zoom/Full-Screen button at the top-left corner of the Mail window. If you need to use a menu command, move your pointer to the top of the screen, and the menu bar temporarily reappears. To return Mail to a windowed display, display the menu bar and choose View⇒Exit Full Screen (or press Esc).
 - Toolbar: Yep, Mail has a high-powered, convenient-as-all-get-out toolbar of its own, and you can customize the Mail toolbar just like a Finder window toolbar! (Book II, Chapter 1, describes that process.) Choose View⇒Customize Toolbar and sit back in awe of the range of menu items and features you can activate with just one click.
If you don’t use the toolbar and you’d like to reclaim the space it takes in your Mail window, choose View⇒Hide Toolbar, or right-click the toolbar and choose Hide Toolbar from the menu that appears. For a “lite” version of the toolbar that takes less space, right-click the toolbar and choose Text Only.
- Message list: This resizable scrolling list box contains all the messages for the inbox or folder you choose. To resize the list larger or smaller, click the divider at the right side of the list. Your pointer turns to a line with double arrows, and you can drag it in the desired direction.
You can sort the messages in the Message list from the View menu; by default, messages are sorted by Date Received. (Alternatively, use Lazy Mark’s method: Just click the Sort By drop-down list at the top of the Message list.)
- Mailboxes: The Sidebar at the left of the main Mail window is the Mailbox list. You can click any inbox or folder there to switch the display in the Message list. The Mailbox list can be hidden or shown from the View menu by clicking the Show Mailboxes List item, or you can press the
 +Shift+M keyboard shortcut to hide or show it. There’s even a Hide/Show button at the top-left corner of the Mailbox list. Like the Message list, you can widen or narrow the Mailboxes list by clicking the divider at the right side of the list and dragging it to the desired spot.
 - Preview pane: This resizable scrolling pane displays the contents of the selected message, including both text and any graphics or attachments that Mail recognizes.
Mail uses the following folders (some of which appear only at certain times):
- Inbox: This holds mail you’ve received.
- Outbox: These are messages that Mail is waiting to send.
- Drafts: Draft messages waiting to be completed are stored here.
- Sent: Mail you’ve sent appears here.
- Trash: Deleted mail is stashed here. Like with the Trash icon on the Dock, you can open this folder and retrieve items that you realize you still need. Alternatively, you can empty the contents of the Trash at any time by pressing the +K shortcut or by choosing Mailbox⇒Erase Deleted Messages.
If you’re using Google’s Gmail, you’ll see an Archive mailbox as well, which displays the messages you’ve archived within the account. (Archiving removes the messages from the Gmail inbox, but allows them to be retrieved later.)
- Junk: Junk mail resides here. You can review these messages and mark them as Not Junk or retrieve anything you want to keep by choosing Message⇒Move To. After you’re sure nothing of value is left, you can delete the remaining messages straight to the Trash. (Junk mail filtering must be enabled from the Junk Mail settings in the Mail Preferences dialog before you see this box.)
- Notes: This folder displays notes you’ve made, like those all-important reminders about washing the car, paying taxes, and picking up dog food on the way home. I discuss how to create a new note later in this chapter.
You can add new personal folders to the Mailbox list to further organize your messages. Choose Mailbox⇒New Mailbox, or click the Add button (a plus sign) at the bottom of the Mailboxes list. Choose a location where the mailbox will appear in the list (for example, within the On My Mac section), and type the name for your new folder in the Name box. Click OK to create the new personal folder.
Messages can be dragged from the Message list and dropped into the desired folder in the Mailbox list to transfer them. Alternately, you can right-click the message and choose Move To from the contextual menu. To move multiple messages at once, use the Mail menu bar: Select the messages that you want to move, choose Message⇒Move To, and click the desired destination folder. (You can also automate the transfer of messages from folder to folder using rules, which I cover later in the chapter.)
Also note that Spotlight has staked its claim with the Search box at the upper right in the Mail toolbar. You can use the Search box to locate text from subject lines, display messages from specific people, or even search for an attachment by name.
Setting Up Your Account
By default, Mail includes one (or more) of these accounts when you first run it:
- The account that you entered when you first installed OS X: Go to the beginning — literally, Book I, Chapter 1 — to read about Setup Assistant. If you entered the information for an email account, it’s available.
- Your iCloud account: If you registered for an iCloud service account, it’s included.
- Upgraded accounts: If you upgraded an existing OS X system, your existing Mail accounts are added to the Accounts list in Mail.
Speaking of the Accounts list, choose Mail⇒Preferences and click the Accounts button to display the Accounts pane that you see in Figure 2-2. From here, you can add an account, edit an existing account, or remove an account from Mail. Note that the Mail accounts shown here are also available from the Internet Accounts pane in System Preferences. When you add, edit, or delete a Mail account from the Mail Accounts pane, Yosemite automatically performs the same operation in the Internet Accounts pane, and vice versa.

Figure 2-2: The Accounts list, where all is made clear (about your email accounts).
Although some folks still have only one email account, you can use a passel of them. For example, you might use one account for your personal email and one account for your business communications (plus that all-important account reserved for junk email and spam). To switch accounts, just click the account you want to use from this list to make it the active account.
Add an account
To add a new account within Mail, choose Mail⇒Add Account to open an Accounts assistant that leads you through the process. ’Nuff said.
However, I’m a manual kind of guy — at least, that’s what I’m told — so I should describe the process. For our demonstration, I’ll add a typical Post Office Protocol (POP) account from the Mail Preferences dialog, which displays the same Add Account assistant.
Open the Preferences dialog by clicking Mail and choosing Preferences; click the Accounts button on the Preferences toolbar. Follow these steps:
- Click the Add (plus sign) button at the bottom-left corner of the window.
The Add Account assistant appears.
- Click the desired email provider (if your provider is not listed, click Add Other Mail Account), and click Continue.
- In the Name field, type your full name — or, if this will be an anonymous account, enter whatever you like as your identity — and press Tab.
Messages you send appear with this name in the From field in the recipient’s email application.
- Type the email address assigned to you by your ISP, and press Tab.
- In the Password field, type the password supplied by your ISP for login to your email account.
- Click Continue.
Here’s a big reason to celebrate OS X: If Mail recognizes the type of account you’re using, the assistant may offer to automatically complete all the required settings for you! (If the account is recognized, Mail displays the assistant’s Account Summary screen with the configuration data it automatically entered. Smile proudly, and click Create; you’re finished. Sit back and watch as Mail downloads the existing messages.) If your account isn’t recognized by Mail, it’s no big deal — just click Next, and continue with Step 7.
- From the Account Type pop-up menu, choose the protocol type to use for the account.
You can select a POP account or an Internet Message Access Protocol (IMAP) account. If you’re adding an account from an Internet service provider (ISP), refer to the setup information you received to determine which account to use. Most ISP accounts are POP accounts.
When you select an Account Type, the fields may change on the Add Account assistant, but they still follow the same general order I give in this POP account demonstration. (In fact, IMAP accounts have fewer fields to fill out!) Keep the account information provided by your ISP handy because that data should include everything covered in the assistant. - In the Incoming Mail Server text box, type the incoming mail server address supplied by your ISP.
If your ISP requires a login for security, you need to enter your server username and password.
- Click Next.
- On the Incoming Mail Server Info sheet, click the Authentication pop-up menu and choose the authentication scheme used by your incoming mail server.
Unless you’re told differently by your ISP, the default choice — Password — is very likely correct already. Don’t enable the Use Secure Sockets Layer (SSL) check box unless specifically instructed to do so by your ISP.
- Click Next.
- In the Outgoing Mail Server text box, type the outgoing mail server address supplied by your ISP.
- If your ISP requires your email application to authenticate the connection, type the username and password supplied by your ISP into the corresponding fields.
- Click Create.
You’re finished! The new account appears in the Accounts list.
You can specify advanced settings for an account. I cover those in the section “Fine-Tuning Your Post Office,” later in this chapter.
 When you add a new account in Mail — either automatically or manually — that account will appear also in the Mail, Contacts & Calendars pane in the System Preferences window.
Edit an existing account
Need to make changes to an existing account? Choose Mail⇒Preferences and click the account that you want to change. Mail displays the same settings that I explain in the preceding section.
Delete an account
If you change ISPs or you decide to drop an email account, you can remove it from your Accounts list. Otherwise, Mail can annoy you with error messages when it can no longer connect to the server for that account. Display the Mail Preferences dialog, select the account that you want to delete, and click the Remove button (which is a minus sign).
Naturally, Mail requests confirmation before deleting the folders associated with that account. Click Remove Account to verify the deletion, or click the Cancel button to prevent accidental catastrophe.
Receiving and Reading Email Wisdom
The heart and soul of Mail — well, at least the heart, anyway — is receiving and reading stuff from your friends and family. (Later in this chapter, I show you how to avoid the stuff you get promising free prizes, low mortgage rates, and improved … um, performance. This is a family-oriented book, so that’s enough of that.)
After you set up an account (or select an account from the Accounts list), it’s time to check for mail. Use any of these methods to check for new mail:
- On the toolbar, click the Get Mail button, which bears a snazzy envelope icon.
- If the Mail icon appears on the Dock, right-click it and choose Get New Mail from the menu that appears.
- Choose Mailbox⇒Get All New Mail, or press +Shift+N.
- Choose Mailbox⇒Get New Mail, and then choose the specific account to check from the submenu.
This last method is a great way to check for new mail in another account without going through the trouble of making it active in the Preferences window.
Mail can also check for new messages automatically; you can find more on this topic in the “Check Mail automatically” section, later in this chapter.
You can receive a notification when you receive a new message — and Yosemite even allows you to conveniently read or delete the new message from the notification! For more information on notifications and how to set them for Apple Mail, visit the inviting shores of Book I, Chapter 6.
If you do have new mail in the active account, it appears in the Message list. As you can see in Figure 2-3, new unread messages appear marked with a snazzy blue dot in the first column. The number of unread messages is displayed next to the Inbox folder icon in the Mailboxes list.
Mail also displays the number of new messages you’ve received on its Dock icon. If you’ve hidden the Mail window or sent it to the Dock, you can perform a quick visual check for new mail just by glancing at the Dock.

Figure 2-3: A new message to read. Oh, joy, and no spam!
Reading and deleting messages
To read any message in the message list, you can either click the desired entry (which displays the contents of the message in the preview pane), or you can double-click the entry to open the message in a separate message window, complete with its own toolbar controls.
To quickly scan your mail, click the first message that you want to view in the message list and press the down-arrow key when you’re ready to move to the next message. Mail displays the content of each message in the preview pane. To display the previous message in the list, press the up-arrow key.
Mail also allows you to read your messages grouped within conversations (typically called threads within other email applications). A conversation contains an original message and all related replies, which makes it easy to follow the flow of an email discussion (without bouncing around in your Inbox, searching for the next message in the conversation). Conversations are indicated in the Message list by numbers at the right side of the original message, indicating how many messages are included. Choose View⇒Organize by Conversation, and the replies in the current folder are all grouped under the original messages and sorted by date. To expand a thread, click the original message to select it; then press the right-arrow key (or choose View⇒Expand All Conversations). To collapse a thread, select the original message and press the left-arrow key (or choose View⇒Collapse All Conversations).
Hey, why not let Mail read you your mail? (That is, if you can drive and listen to your MacBook speak at the same time!) Simply select one message or a group of messages, and choose Edit⇒Speech⇒Start Speaking. Wowsers!
To delete a message from the Message list, select the desired entry (or entries, by holding down the ![]() key) to select them and click the Delete button on the toolbar (or press the Delete key). To delete a message from within a message window, click the Delete button on the message window toolbar.
key) to select them and click the Delete button on the toolbar (or press the Delete key). To delete a message from within a message window, click the Delete button on the message window toolbar.
Replying
What? Aunt Harriet sent you a message because she’s forgotten where she parked her car last night? If you happen to know where her priceless ’78 Pinto is, you can reply to her and save her the trouble of retracing her steps.
If Aunt Harriet isn’t in your Contacts application yet, this is a good time to add her. With the message entry selected in the list, choose Message⇒Add Sender to Contacts. The person’s name and email address are added automatically to your Contacts database. To add more information in the new Contacts card, however, you must open that application separately. (Read through Book I, Chapter 7, for the skinny on the Contacts application.)
But I digress. To reply to a message in Mail, follow these steps:
- Click the desired message entry in the Message list, and then click the Reply button (a single left arrow) on the toolbar.
To respond to a message you’ve opened in a message window, click the Reply button on the toolbar for the message window. (Or move your pointer on top of the dividing line between the header information and the body of the message, and click the Reply button that magically appears.)
If a message was addressed not just to you but also to a number of different people, you can send your reply to all of them. Click the Reply All button, which bears two left arrows, on the Mail window toolbar. (This is a great way to quickly facilitate a festive gathering, if you get my drift.)
You can also add carbon copies of your message to other new recipients, expanding the party exponentially; more on carbon copies later in the section, “Raise the Little Flag: Sending Email.”
Mail opens the Reply window that you see in Figure 2-4. Note that the address has been added automatically and that the default Subject is Re: <the original subject>. Mail automatically adds a separator line in the message body field that reads
On <day><date>at<time>, <addressee> wrote:
followed by the text of the original message, so the addressee can remember what the heck she wrote in the first place to get you so happy/sad/angry/indifferent. The original text is indented and prefaced by a vertical line to set it apart. If you like, you can click in the Subject line and change the default subject line; otherwise, the cursor is already sitting on the first line of the text box, so you can simply start typing your reply.
If you don’t want to include the text of the original message in a reply, choose Mail⇒Preferences. Click the Composing tab, and clear the Quote the Text of the Original Message check box.
Figure 2-4: Replying to an incoming email message.
To choose the text from the original message that you want to include in a reply, select the desired text in the original message before you click the Reply button. - After you complete typing your reply, you can select text in the message body and apply different fonts or formats.
To change your reply’s formatting, click the Format button (with the capital letter A) on the message window toolbar. From the options that appear, you can choose the font family, the type size, and formatting (such as italic or bold) for the selected text. You can also apply color to the selected text by clicking the Colors button — the black square — and then clicking anywhere in the color grid that appears to select that color. (You can set your default fonts and colors from the Fonts & Colors tab of Mail’s Preferences dialog.)
Click the Format button again to hide these controls. (If you like menus, you can also choose Format from the menu and make changes from there.)
To create a list in your reply, choose Format⇒Lists and choose a bulleted or numbered list. Mail thoughtfully prepares your first item for you. Press Return to add another item. Click outside the list item formatting to complete the list. - To add an attachment, click the Attach button (the paper clip icon) on the toolbar.
Mail displays a familiar Open sheet. Navigate to the to-be-attached file, select it, and click the Open button to add it to the message. (More on attachments in the “Attachments on Parade” section, later in this chapter.) If the recipient is running Windows, make sure the Send Windows-Friendly Attachments check box is selected, which results in a slightly larger email message size but helps ensure that PC email programs like Outlook can correctly open your attachments.
If Mail presents you with a dialog offering to send attachments using Mail Drop, your attachments are likely too large in size. I recommend clicking the Use Mail Drop button and allowing Mail to send a link to the file instead. (More on Mail Drop later in this chapter, at the end of the section titled “Attachments on Parade.”) Because most folks end up sending photos through email, Apple includes the Photo Browser button on the toolbar. Click this button on the Reply or New Message window toolbars, and you can choose a photo from your iPhoto or Photos library to insert directly into your message. Heck, you can even take a quick candid shot using Photo Booth! Naturally, your Mac needs a FaceTime HD camera (or other compatible video camera) to use the Photo Booth feature. You can also use iPhoto or Photos to post photos online. For more, check out the sidebar “Is that Facebook, Twitter, and Flickr I spy?” in Book III, Chapter 3. - Choose the message priority.
By default, Mail adds a normal priority flag to your email message. To decrease or increase the urgency, click Message⇒Mark and choose Low or High priority. Choosing a different priority won’t send the message any faster or slower. It merely displays a High or Low priority notification in the recipient’s email application.
- When you’re ready to send your reply, you have two options: send or save.
- Send: Click the Send button (which carries a cool paper airplane icon) to immediately add the message to your Outbox folder. After a message is moved to the Outbox folder, it’s sent either immediately or at the next connection time that you specify in Mail Preferences. Read more on this in the upcoming section, “Check Mail automatically.”
- Save: Click the Close button on the Reply window, and click Save to store it in your Drafts folder for later editing. Saving the message to your Drafts folder doesn’t send it. Read the following section for the skinny on how to send a message stored in your Drafts folder.
You can also forward a message or your reply to someone (other than the original sender). The new addressee receives a message containing both the text of the original message you received and your reply. To forward a message, click the Forward button on the Mail window toolbar (which bears a right arrow) instead of Reply or Reply to All.
By default, Mail checks your spelling while you type and also underlines any words it doesn’t recognize. (Very Microsoftian.) I like this feature, but if you find it irritating, you can turn it off or set Mail to check the spelling just once, when you click Send. Choose Mail⇒Preferences⇒Composing, and use the Check Spelling pop-up menu to choose the desired option.
Raise the Little Flag: Sending Email
To compose and send a new message to someone, follow these steps:
- Click the New Message button on the Mail toolbar, or choose File⇒New Message (or avail yourself of the handy +N keyboard shortcut).
Mail opens the New Message window you see in Figure 2-5.
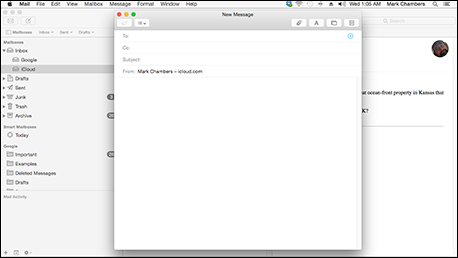
Figure 2-5: An empty Mail message, waiting to be filled.
- Enter the recipient’s (To) address by doing one of these:
- Type it directly.
- Paste it after copying it to the Clipboard.
- Drag an email address from your Contacts window.
- Click the Add button at the right side of the To field, which shows you a truly nifty scaled-down version of the OS X Contacts application called the Contacts panel. This is my favorite method.
From the Contacts panel, click the desired contact and then click the address you want to use.
If you have a huge number of entries in your Contacts application, use the Search box on the Contacts panel toolbar, which operates just like the Finder window’s Search box. - To send carbon copies, click in the Cc field (the spot where you can send optional carbon copies of the message to additional recipients).
Again, you can type the addresses directly, use the contents of the Clipboard, or display the Contacts panel.
Looking for the Blind Carbon Copy (Bcc) field? To display it, choose View⇒Bcc Address Field. A blind carbon copy is a message sent to multiple recipients, just like a regular carbon copy, but the recipients aren’t listed when the message is displayed. (That way, the other recipients don’t know who else got a copy of the message.) You can also click the small Field Display pop-up menu at the left side of the new message window to toggle the display of the Bcc Address Field. - Click in the Subject field, enter the subject of the message, and press Tab.
Your text cursor now rests in the first line of the message text area — type, my friend, type like the wind! It’s considered good form to keep this line short and relatively to the point.
- (Optional) After you type your message, select any of the text that you’ve entered and use the toolbar features I describe in the earlier section “Replying” to apply different fonts or formatting.
Click the Format button in the message window toolbar to open a button bar of formatting choices. (Click the Format button again to hide the Format bar.) If you like menus, you can also click Format and make changes from there.
- (Optional) To add an attachment, click the Attach button on the new message window toolbar, navigate to the to-be-attached file in the dialog that appears, select the file, and click Open to add it to the message.
To include photos in your message, just click the Photo Browser toolbar button to select images from your iPhoto or Photos library, or take a photo with Photo Booth. You can also drag files into the body of your message directly from a Finder window.
- When your new message is ready to post, either click the Send button (bearing the envelope icon) to immediately add the message to your Outbox folder, or click the Close button on the New Message window and then click Save to store it in your Drafts folder (without sending it).
To send a message held in your Drafts folder, click the Drafts folder in the Mailbox list to display all draft messages. Double-click the message you want to send, which displays the message window (you can make edits at this point, if you like), and click the Send button on the message window toolbar.
If you don’t have access to an Internet connection at the moment, Mail allows you to work offline. This way, you can read your unread messages and compose new ones on the road to send later. After you regain your Internet connection, you might need to choose Mailbox⇒Online Status (depending on the connection type).
What? You Get Junk Mail, Too?
Spam — it’s the Crawling Crud of the Internet, and I hereby send out a lifetime of bad karma to those who spew it. However, chucking the First Amendment is not an option, so I guess we’ll always have junk mail. (Come to think of it, my paper mailbox is just as full of the stuff.)
Thankfully, Apple Mail has a net that you can cast to collect junk mail before you have to read it. There are two methods of handling junk mail:
- Manually: You can mark any message in the message list as Junk Mail. Select the unwanted flotsam in the message list, and click the Junk button (the negative “thumbs down” icon) on the Mail window toolbar. Mail marks the message, as shown in Figure 2-6, and displays it using a particularly fitting, grungy brown color. (Ocean-front property in Kansas … yeah, right.) If a message is mistakenly marked as junk but you actually want it, display the message in the preview pane and click the Not Junk button at the top-right corner of the preview pane.

Figure 2-6: “Begone, sludge demons of Junk Mail!”
- Automatically: Apple Mail has a sophisticated Junk Mail filter that you train to better recognize what’s junk. (Keep reading to discover how.) After you train Mail to recognize spam with a high degree of accuracy, turn it to full Automatic mode, and it moves all those worthless messages to your Junk folder.
You customize and train the Junk Mail filter from the Preferences dialog (available from your trusty Mail menu); click the Junk Mail tab to show the settings. I recommend that you first try the Mark as Junk Mail, But Leave It in My Inbox option. Junk Mail then takes its best shot at determining what’s junk. When you receive more mail and mark more messages as junk (or mark them as not junk), you’re teaching the Junk Mail feature how to winnow the wheat from the chaff. In this mode, junk messages aren’t moved anywhere, and they’re just marked with an icon in the Message list.
After you’re satisfied that the Junk Mail filter is catching just about everything it can (and not tagging messages it shouldn’t), display the Mail preferences again and choose the Move It to the Junk Mailbox option. Mail creates a Junk folder and prompts you for permission to move all junk messages to this folder. After you review everything in the Junk folder, you can delete what it contains and send it to the Trash folder. To save a message from junkdom, click the Not Junk button in the preview window and drag the message from the Junk folder message list to the desired folder in the Mailbox list.
Finally, you can create a complete set of custom rules for your Junk Mail filtering by clicking Perform Custom Actions. The Advanced button displays your Junk Mail rule set and allows you to edit your rules. I explain rules in more depth at the end of this chapter.
If you don’t receive lots of spam — or if you want to be absolutely sure that nothing gets labeled as junk until you review it — clear the Enable Junk Mail Filtering check box. (And good luck.)
By default, Mail exempts certain messages from Junk Mail status based on three criteria: if the sender is in your Contacts database, if you’ve sent the sender a message in the past, or if the message is addressed to you with your full name. To tighten up your Junk Mail filtering to the max, you might want to clear these check boxes as well.
To reset the Junk Mail filter and erase any training you’ve done, visit the Junk Mail settings in Preferences again and click Reset. Then click the Yes button to confirm your choice.
Attachments on Parade
Attachments are a fun way to transfer files through email. However, it’s imperative that you remember these three important caveats:
- Attachments can contain both Mac and PC viruses. Even a message attachment that was sent by your best friend can contain a virus or malevolent macro — either because your friend unwittingly passed one along or because the virus took control of your friend’s email application and replicated itself automatically. (Ugh.)
- Corpulent attachments don’t make it. Most corporate and ISP mail servers have a 4–6MB limit for the total size of a message, and the attachments (and any Photo stationery background you might have added) count toward that final message size. Therefore, I recommend sending a file as an attachment only if it’s less than 3MB in size. If the recipient’s email server sends you an automated message saying that the message was refused because it was too big, this is the problem.
- Not all email applications and firewalls accept attachments. Not all email programs support attachments in the same way, and others are simply set for pure text messages. Some corporate firewalls even reject messages with attachments. If the message recipient gets the message text but not the attachment, these are the likely reasons.
With all that said, it’s back to attachments as a beneficial feature. Follow these steps to save an attachment you receive:
- Click the message with an attachment in your message list.
Messages with attachments appear with a tiny paper-clip icon in the Message list, but it’s sometimes hard to spot them. Click the Sort By pop-up menu button at the top of the Message list and choose Attachments, and Mail places all messages with attachments at the top of the list.
If Mail recognizes the attachment format, it displays or plays the attachment in the body of the message; if not, the attachment is displayed as a file icon.
- To open an attachment that’s displayed as a file icon, click the file icon and choose Open Attachment from the pop-up menu that appears.
If you know what application should be used to open the attachment, click the Open With button and choose the correct application from the submenu that appears.
To save an attachment, right-click the attachment (however it appears in the message) and choose Save Attachment from the pop-up menu that appears. Then, in the Save dialog that appears, navigate to the location where you want to save the file, and click Save.
If you often need to send files up to 5GB in size, you’re in luck! Yosemite introduces a new feature called Mail Drop, which actually uploads large attachments to your iCloud storage and automatically includes a download link to those attachments in your Mail message.
To download the file through Mail Drop, the message recipient simply clicks the link provided within the body of your message. (Note that Mail Drop stores attachment files for a maximum of 30 days, so the recipient must download the linked file within that time period.) The Mail Drop dialog appears only when you click Send and (naturally) only if the message you’re sending has a large file attachment.
To turn Mail Drop on or off, open the Mail Preferences dialog, click the Accounts button, click the desired account, click the Advanced tab, and select (or deselect) the Send Large Attachments with Mail Drop check box as necessary.
Fine-Tuning Your Post Office
Like all other Apple software, Mail is easily customized to your liking. In this section, I discuss some preferences you might want to change.
Add an alert sound
To choose a sound that plays whenever you receive new mail, choose Mail⇒Preferences and click the General tab. Either open the New Messages Sound pop-up menu and choose one of the sounds that Apple provides, or choose Add/Remove Custom Sounds from the pop-up menu to choose a sound file from the Sounds folder. (You can also add a sound to your Sound folder from this sheet.)
If you change your mind and long for silence again, choose None from the New Messages Sound pop-up menu to disable the new mail sound.
Check Mail automatically
By default, Mail automatically checks for new mail (and sends any mail in your Outbox folder) every five minutes. To change this delay period, click the General tab in the Preferences dialog, choose the Check for New Messages pop-up menu, and then choose one of the time periods.
To disable automatic mail checking, choose Manually; you can click the Get Mail toolbar button to manually check your mail any time you like. Disabling mail checking is handy for those folks using dial-up analog modem connections who may not fancy Mail taking control of the telephone line every five minutes.
Automate junk mail and message deletion
Mail can be set to automatically delete sent mail and junk messages as well as permanently erase messages that you relegate to the Trash. To configure these settings, display the Accounts pane in the Preferences window, click the desired account, and then click the Mailbox Behaviors tab.
- To delete Sent messages automatically: Open the Delete Sent Messages When pop-up menu, and choose the delay period or action. You can choose to delete mail after a day, a week, or a month, or immediately upon quitting Mail. If you leave this field set to Never, Mail never automatically deletes any messages from the Sent folder.
- To delete Junk messages automatically: Open the Delete Junk Messages When pop-up menu, and choose the delay period or action. These are the same options available for Sent mail.
- To delete messages from the Trash: Open the Permanently Erase Deleted Messages When pop-up menu, and choose the delay period or action. Again, the choices are the same as those for Sent messages.
Add a signature
To add a block of text to the bottom of your messages as your personal signature, follow these steps:
- Choose Mail⇒Preferences, and click the Signatures button.
- From the Signatures pane that appears, click the desired account in the list at the left (or if the signature you’re adding applies to all accounts, choose All Signatures).
- Click the Add Signature button (a plus sign).
- Type an identifying name.
Press Return to save the new name.
- Click inside the text entry box at the right to move the cursor.
- Type the signature itself in the text entry box (or copy the signature to the Clipboard and paste it into the text entry box).
It’s considered good etiquette to keep your signature to three lines.
Because downloading a graphic in a signature takes longer — and because some folks still use plain-text email — avoid the temptation to include graphics in your signature. If you do use them, remember that a graphic used as a signature may be handled as an attachment by the recipient’s email application! - If you have multiple signatures, click the Choose Signature pop-up menu to choose which one you want to use or to use them all randomly or in sequence.
If you prefer the signature to appear above the quoted text in a reply, select the Place Signature above Quoted Text check box.
Changing the status of an account
Sometimes you can’t reach one of your accounts. For example, maybe you’re on the road with your laptop and you can’t access your office network. Apple Mail allows you to enable and disable specific accounts without the hassle of deleting an account and having to add it again.
To disable or enable an account, open the Mail Preferences dialog, click the Accounts tab, click the desired account, click the Account Information button, and select (or deselect) the Enable This Account check box as necessary.
If you disable an account, you should also click the Advanced tab and deselect the Include When Automatically Checking for New Mail check box to make sure that Mail doesn’t display an error message. You can always check any account for new mail by choosing Mailbox⇒Get New Mail and then choosing the desired account name from the submenu.
Automating Your Mail with Rules
Before I leave the beautiful shores of Mail Island, I’d be remiss if I didn’t discuss one of its most powerful features: the capability to create rules, which are automated actions that Mail can take. With rules, you can specify criteria that can perform actions such as these:
- Transferring messages from one folder to another
- Forwarding messages to another address
- Highlighting or deleting messages
To set up a rule, follow these steps:
- Choose Mail⇒Preferences, and click the Rules tab on the toolbar.
Mail displays the Rules pane.
- Click the Add Rule button.
- In the Description field, type a descriptive name for the new rule and press Tab to move to the next field.
- Open the If pop-up menu to specify whether the rule is triggered if any of the conditions are met or if all conditions must be met.
- Because each rule requires at least one condition, click the Target pop-up menus to set the target for the condition.
These include whom the message is from or to, which account received the message, whether the message is marked as junk, and whether the message contains certain content. Select the target for the condition.
- Open the Criteria pop-up menu to choose the rule’s criteria.
The contents of this pop-up menu change depending on the condition’s target. For example, if you choose From as the target, the criteria include Contains, Does Not Contain, Begins With, and so forth.
- Click in the expression box, and type the text to use for the condition.
For example, a completed condition might read
Subject Contains Ocean-Front
This particular condition is true if I get an email message with a subject that contains the string Ocean-Front.
- Add more conditions by clicking the plus-sign button at the right of the first condition.
To remove any condition from this rule, click the minus-sign button next to it. Remember, however, that every rule needs at least one condition.
- To specify what action is taken after the condition (or conditions) is met, click the first Perform the Following Actions pop-up menu to see the action that this rule should perform. Then click the second pop-up menu, and select the action for the rule.
Choices include moving a message from one folder to another, playing a sound, automatically forwarding the message, deleting it, and marking it as read.
Each rule requires at least one action. - Depending on the action you select, specify one or more criteria for the action.
For instance, if I select Set Color as my action, I must then choose whether to color the text or the background as well as what color to use.
As with the plus button next to the conditions, you can also click the plus button next to the first action to perform more than one action. To remove an action, click the minus button next to it. - When the rule is complete, click OK to save it.
To save a little time, you can build a rule similar to an existing rule. From the Rules pane (choose Mail⇒Preferences⇒Rules), highlight the original in the list and click the Duplicate button. Tweak to your heart’s content, using the preceding steps.
Here’s an example of a complex rule:
If the message was sent by someone in my Contacts database and the Subject field contains the text FORWARD ME, forward the message to the email address [email protected].
This is a good example of an automated forwarding rule. With this rule in place and Mail running on OS X, any of my friends, family, or co-workers can forward urgent email to my publishing account while I’m on vacation. To trigger the rule, all the sender has to do is include the words FORWARD ME in the message subject. And if the sender isn’t in my Contacts, the rule doesn’t trigger, and I can read the message when I get home. Mondo sassy.
Each rule in the Rules pane can be enabled or disabled by toggling the Active check box next to the rule. You can also edit a rule by selecting it in the Rules pane and clicking the Edit button. To delete a rule completely from the list, select it and click the Remove button; Mail prompts you for confirmation before the deed is done.
If you decide to create a custom junk-mail processing rule, the process is the same, but you get to it from a different place. Click the Junk Mail tab on the Preferences dialog’s toolbar and click the Perform Custom Actions radio button to select it. You see that the Advanced button is now enabled; click it, and you can set up the custom junk-mail rules that handle stuff from any conceivable junk-mail source!