
Chapter 2
Add RAM, Hard Drive Space, and Stir
In This Chapter
![]() Understanding the advantages of extra RAM
Understanding the advantages of extra RAM
![]() Shopping for a RAM upgrade
Shopping for a RAM upgrade
![]() Choosing between internal and external hard drives
Choosing between internal and external hard drives
![]() Determining your hard drive needs
Determining your hard drive needs
![]() Shopping for a new hard drive
Shopping for a new hard drive
![]() Installing your upgrades
Installing your upgrades
Most Macintosh owners will make at least one upgrade — adding additional hard drive space — during the lifetime of their computers. By adding additional hard drive space (and adding more memory [RAM], if your Mac allows it), not only do you make more elbow room for your applications and documents, but everything runs faster: Think of the Six Million Dollar Man, only a heck of a lot cheaper to operate (and no strange noises accompanying your every move).
In this chapter — meant for those of you who aren’t well versed in selecting memory modules or weighing the advantages of different types of hard drives — I steer you around the hidden potholes along the way. However, if you buy the wrong piece of hardware, remember that using a hammer to make it fit is not a workable option.
Adding Memory: Reasons for More RAM
Of all the possible upgrades that you can make to your Macintosh, adding more random access memory (RAM) is the single most cost-effective method of improving the performance of OS X. (Your machine will likely run faster with more memory than a reasonably faster processor!) OS X uses available RAM for the following:
- Applications: Naturally, OS X needs system RAM to run the applications that you launch. The more memory in your machine, the larger the applications that you can open and the faster they’ll run.
- Overhead: This category includes the operating system (OS) itself, as well as various and sundry buffers and memory areas devoted for temporary work. As you would guess, the more memory here, the merrier.
“But Mark, what happens if my Mac runs out of system memory?” A-ha! Great question, and the answer is virtual memory — something that I mention lightly and politely in Book I, but hasn’t really amounted to a hill of beans until this moment. (Can you tell I’m a big fan of Bing Crosby?) Virtual memory allows OS X to use empty hard drive space as temporary system memory, as shown in Figure 2-1. Data is written to your hard drive instead of being stored in RAM, and then is erased when it’s no longer needed. This neat trick is also used by Windows and Linux. Virtual memory works automatically in OS X.
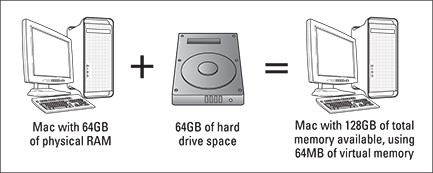
Figure 2-1: The mysterious beauty of virtual memory — but it still doesn’t beat real RAM!
At first, virtual memory sounds like absolute bliss, and it does indeed allow your Macintosh to do things that would otherwise be impossible, such as running an application that requires 4GB of RAM in just 2GB of physical RAM. However, here come the caveats:
- Virtual memory is as slow as molasses in December. Today’s fastest magnetic hard drive is many, many times slower than RAM (and even solid-state hard drives, which use memory chips as well, are still much slower than your Mac’s system RAM), so any use of virtual memory instead of RAM slows down OS X significantly.
- Virtual memory abuses your hard drive. If you’ve ever run Photoshop on a Windows PC with 2GB of RAM, you’re having flashbacks right now. Whenever your Macintosh is using virtual memory, your hard drive remains almost constantly active. (Hardware types, myself included, call this phenomenon thrashing because we know what’s happening inside that poor hard drive.) Over time, running any computer with insufficient RAM and behemoth applications will result in a significant increase in hard drive wear and tear.
- Virtual memory costs you processing power. With sufficient RAM, OS X gleefully runs as efficiently as it can. When virtual memory kicks in, however, your Mac has to spend part of its quality time shuttling data to and from the hard drive, which robs your computer of processing power.
The moral of the story is very simple, so it’s time for another of Mark’s Maxims:
 The less OS X needs to use virtual memory, the better.
To put it another way, physical memory (meaning memory modules) is always a better choice than virtual memory. This is why power users and techno-types crave as much system memory as possible — and why my iMac supercomputer boasts 32GB of RAM. (Yep, I’m maxed out!)
 About ten years ago, 256MB of RAM was a quite comfortable figure for most folks. All current Macs can use at least 4GB (that’s short for gigabyte, or 1,024 megabytes) of system RAM. (At the extreme end of the scale, the King Kahuna — Apple’s latest Mac Pro — can now accommodate an unbelievable minimum of 64GB of RAM!) Current MacBook Pro Retina and MacBook Air models come from Apple preconfigured with RAM, and they are sealed units (so the RAM can’t be expanded).
Before you order a new Mac, it’s always a good idea to visit your local Apple dealer and inquire whether a particular model can be upgraded with more RAM in the future. (Apple also provides this information in the Tech Specs for every Mac model.) If you can’t upgrade your Mac later, order it with as much memory as you can afford — you’ll thank me every time OS X Yosemite boots.
 Now for the concrete recommendation on RAM that my readers always crave: In my humble opinion, 8GB is the minimum amount of memory for a Mac running Yosemite. As for the maximum RAM you should order (or install), invest in as much as you can afford.
Shopping for a RAM Upgrade
Before you click some online computer store’s Buy button, you need to determine two things that will help you determine which memory module to buy: how much RAM you already have and how much more your system can handle.
Finding out the current memory in your Mac
Memory modules are made in standard sizes, so you need to determine how much memory you already have and which of your memory slots are filled. To do this, click the Apple menu (![]() ) and choose About This Mac. In the dialog that appears, click the Memory toolbar button.
) and choose About This Mac. In the dialog that appears, click the Memory toolbar button.
Here you can see exactly how many memory modules you have, what type they are, and how much memory each provides. For example, in Figure 2-2, my iMac supercomputer has four memory slots, each of which uses a 1333 MHz DDR3 module. All four slots are filled with 8GB modules, giving me a total physical memory of 32GB. Jot down the name and contents of each slot on a piece of paper — or, if you’re a real OS X power user, add a sticky to your Desktop with this information. (Stickies are covered in Book II, Chapter 2.)

Figure 2-2: Look under the hood with Apple’s About This Mac dialog.
 Click the Memory Upgrade Instructions link at the bottom of the dialog, and OS X Yosemite automatically opens a Safari browser window with online instructions on how to upgrade the RAM in your specific Mac model. If you’re confident about your technical skills, you can use this documentation as a guide to removing and installing memory modules. (Because I can’t cover the process for every Mac model, I highly recommend that you review these instructions closely!)
Unfortunately, on some machines, only one or two memory modules can be upgraded by a mere mortal — and as I mention earlier, the memory in the MacBook Air and Retina MacBook Pro laptops can’t be upgraded at all. The memory modules you can reach are called “user-accessible” by Apple.
Potentially confusing? You bet. This arrangement differs on just about every model of Macintosh ever made: Some have more memory slots, and others allow you to upgrade all the system memory instead of just one or two modules. The only way to determine which modules are accessible on your Mac is to identify the exact model of your computer.
Determining the exact model of your computer
Most folks know the type and model of their computers, but there’s a catch here, too: Sometimes the memory that you need varies by the processor in your Macintosh. For instance, many different versions of iMacs have been made since the Bondi Blue Beast debuted, and over the course of those years, Apple has made a slew of changes inside. Your eye should be on the actual processor speed and bus speed — the transfer speed that data reaches whilst speeding across your motherboard — because they’re the identifying factors here. An older iMac with a 2.93 GHz Intel Core 2 Duo processor, for example, uses a different type of memory than an iMac with a 3.4 GHz Intel Core i7 processor.
Again, your salvation turns out to be the About This Mac dialog. Just click the Overview toolbar button to display both the machine speed (processor speed) and the common identifier that Apple uses to refer to your specific model. For example, my iMac has a quad-core 2.7 GHz Intel i5 processor, and it’s identified as a “27-inch Mid 2011 model.” Grab that same piece of paper (or open that same sticky), and add these two figures to your list.
Now armed with the information you need, go online and buy the right memory — or, if you’d rather work directly with a human being, you can visit your local Apple dealer, present that most august personage with the list, and have the memory upgrade ordered for you.
Buying memory online is much cheaper, though. I recommend the following online stores:
- MacMall: www.macmall.com
- Other World Computing: www.macsales.com
- MacConnection: www.macconnection.com
The Tao of Adding Hard Drive Territory
Next, turn your attention to the other popular Mac upgrade — adding extra hard drive space. With today’s cutting-edge, 3D games using several gigabytes of space each and application requirements expanding every day, IDC (short for Insidious Data Creep) is a growing problem. (Bad pun most certainly intended.)
Of course, you can always reclaim wasted space by deleting those files and folders you don’t need. And yes, you guessed it; you can even determine how much free space remains on a hard drive from our old friend, the About This Mac dialog! Click the Storage toolbar button to display all your glorious hard drive information, as shown in Figure 2-3. (I’m a major-league classical music fan-boy, hence the name of my internal hard drive — my other drives are named after other composers as well.)

Figure 2-3: Checking your drive’s free space.
As a general rule, the following factors indicate that you’re ready to upgrade your hard drive territory:
- You have less than 20GB of space on your hard drive.
- You’ve cleaned all unnecessary files, and your Mac is still lagging behind in storage.
- You need to share a large amount of data between computers that aren’t on the same network. (Read on to discover why.)
Internal versus External Storage
Most people who upgrade their existing hard drive do so because they need extra space; however, you might also need to add a hard drive to your system that can go mobile whenever necessary. Unlike an internal drive (residing hidden inside your Mac’s case), an external drive is a lean, mean, self-contained traveling storage machine that’s perfect for road warriors.
External drives
Although most external drives carry their own power supply, some models don’t need a separate power supply because they draw their power through your Mac’s Universal Serial Bus (USB), FireWire port, or Thunderbolt port. (The next chapter in this minibook tells all about Thunderbolt, USB, and FireWire.)
External drives also have a number of other advantages:
- No installation hassle: You can easily install a Thunderbolt, USB, or FireWire drive in seconds. Simply plug in the drive to the proper connector on the side or back of your Mac, connect the power supply (if necessary), and turn it on. (No software installation necessary. As the folks in Cupertino are fond of saying, “Look, Ma — no drivers!”)
- No extra space needed: Current Mac models simply don’t have the internal space for another drive. Therefore, if you want to keep your existing internal drive as-is while you’re adding more storage, an external drive is your only choice.
- File sharing with ease: With an external drive, you can share your data among multiple computers or bring your files with you on your next trip.
- Safe from prying eyes: Unlike an internal drive, external drives are easy to secure. Take your sensitive information home with you, or lock it in a safe.
After you plug in an external drive, OS X displays it just like any other hard drive volume. Figure 2-4 illustrates my 1TB (terabyte) USB external drive in action with Time Machine, as shown in the Storage pane.
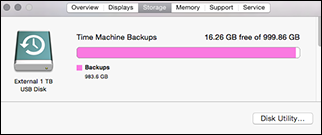
Figure 2-4: A typical USB external drive.
I’d be remiss if I didn’t mention that older iMac, Mac mini, Mac Pro, and MacBook models have a DVD-R drive, which makes it easy to send up to 8.5GB of data through the mail on a single recordable disc. No one wants to box up an expensive external hard drive to transport 4GB worth of photos to Aunt Martha!
Internal drives
Your other alternative is to upgrade your internal drive, which can be a hassle. Like undertaking a memory upgrade, adding or swapping an internal drive involves opening your Mac’s case. The procedure is somewhat more complex than adding memory.
I usually recommend adding a second drive rather than swapping out an existing drive. You’ll avoid the hassle of backing up and restoring your system on a new drive or (even worse) reinstalling OS X and then reinstalling all the applications that you use. (Swapping a hard drive should be the definition of the word hassle.) Instead, add a second drive and leave your current hard drive as-is.
However, here are some important reasons why many Mac owners choose updating internal drives, even with the hassle of swapping:
- Cost: You’ll spend significantly less on an internal drive because it doesn’t need the case and additional electronics required by an external drive.
- Speed: A typical USB 3.0 or FireWire 800 drive isn’t as fast as an internal drive.
- Space: An internal drive eliminates the space taken by an external drive, which can range anywhere from the size of a deck of cards to the size of a hardback book.
After you establish that you are ready for more space — and you’ve decided whether you want to add an internal drive, an external drive, or (if you enjoy punishment) upgrade your existing internal drive — you’re ready to consider how big a drive you need.
Determining How Much Space You Need
Your next step is to decide just how much hard drive space is enough. I suppose that if your last name is Zuckerberg and you had something to do with that Facebook thing, you can probably choose just about any drive on the market. However, I have a family, a mortgage, a kid in college, and lust in my heart for the latest computer games; therefore, I must be a little more selective.
I have two hard-and-fast rules that I follow when I’m determining the capacity of a new drive:
- If you’re buying a replacement for your existing internal drive, shop for a drive with at least twice the capacity of the existing drive (if possible).
- If you’re buying an external drive, shop for a drive with at least the same capacity as your existing internal drive (if possible). One exception: If you’re adding an external drive for use with Time Machine, you’ll want at least twice the capacity of your existing drive.
Those rules seem to work pretty doggone well in most circumstances, with two exceptions: gamers and digital video gurus. These folks need to shoehorn as much space as they possibly can into their systems. If you’re a hard-core gamer or if you work primarily with digital video, you need a wheelbarrow’s worth of hard drive capacity. Trust me: Buy the biggest hard drive you can afford.
Shopping for a Hard Drive
Ready to brave the local Wireless Shed superstore (or perhaps its website)? Here’s a list of guidelines to keep handy while you’re shopping for a new internal or external hard drive:
- Faster is indeed better. You’ll pay more for a 10,000 revolutions per minute (rpm) drive than a slower 5,400 or 7,200 rpm drive, but the extra expense is worth it. Faster drives can transfer more data to your Mac in less time, especially if you’re replacing your Mac’s internal Serial ATA drive.
Faster drives are especially important for storing digital video.
- Serial ATA and EIDE drives are different. If you’re replacing your internal drive, you have to get the same type of drive that you already have: EIDE or Serial ATA. (EIDE, short for Enhanced Integrated Drive Electronics, is a common parallel ATA standard hard drive used in PCs and older Macs.) Again, the About This Mac dialog can tell you which type of drive your Mac is using. Click the Overview button in the toolbar, and then click the System Report button to launch the System Information utility. Your drive is listed under either the Serial ATA heading or the Parallel ATA heading.
- Solid state drives (SSD) are hot. An SSD has no moving parts. It uses RAM modules to store your data, much like the USB flash drives so common today. Silicon storage allows for superfast performance (and avoids the possibility of a hard drive crash, where the internal moving parts in a traditional magnetic hard drive decide to take a permanent vacation). Check the specifications on any SSD you’re considering to make sure it’s compatible with your Mac.
- Avoid used or refurbished drives. Traditional magnetic hard drives are one of the few components in your computer that still have a large number of moving parts. (Again, the exception is a solid state drive.) Therefore, buying a used drive isn’t a good idea unless it’s priced very low.
Because the prices on new hard drives are constantly dropping, make sure that you check on the price for a new, faster drive of the same capacity before you buy that “bargain” used drive.
- Choose USB 3.0 over USB 2.0. If your Mac is equipped with USB 3.0 ports, make very sure that you buy a USB 3.0 drive! (Of course, if your Mac has a Thunderbolt port and you can afford a Thunderbolt external drive, you can invest in some of the fastest external performance on the planet.)
A FireWire 800 port is roughly twice as fast as either a USB 2.0 port or the older FireWire 400 port, but a FireWire 800 port is far slower than a USB 3.0 port. If you’re running a Mac without USB 3.0 or Thunderbolt ports, stick with FireWire 800 peripherals. (For a complete discussion of USB, FireWire, and Thunderbolt, turn to the next chapter in this minibook. It’s thrilling reading, let me tell you.)
- Watch the size of the drive when buying internal drives. Most SATA (Serial ATA) and EIDE drives are standard half-height 3.5" units, but check to make sure that you’re not investing in a laptop drive — unless, of course, you’re upgrading a laptop.
Installing Your New Stuff
After you get your memory modules or hard drive, choose one of two methods of installing them: easy or hard. Guess which method costs you money?
The easy way
Your Apple dealer can perform either type of hardware installation for you. You can rest easy knowing that the job will be done right, but money will definitely change hands.
I always recommend that MacBook Air and MacBook Pro laptop owners allow their dealers to install hard drives because these laptops are much more complex than a desktop and much easier to damage. (The Mac mini is a bear to work on, as well.)
The hard way
If you’re familiar with the inside of your Macintosh, you can install your own upgrade and save that cash. A memory upgrade is one of the simpler chores to perform, but that doesn’t mean that everyone feels comfortable taking the cover off and plunging their hands inside a computer; hard drives are a tad more complex.
If you have a knowledgeable friend or family member who can help you install your hardware, buy him or her in your cause with the purchase of the proverbial NSD (Nice Steak Dinner). Even if you still do the work yourself, it’s always better to have a second pair of experienced eyes watching, especially if you’re a little nervous.
Because the installation procedures for both memory modules and hard drives are different for every model of Mac — heck, even removing the cover on each model of Macintosh involves a different challenge — I can’t provide you with any step-by-step procedures in this chapter. (As I mention earlier, Apple provides instructions for upgrading memory in the About This Mac dialog.) Many online stores include installation instructions with their hardware. Other sources for installation instructions include the Apple website (www.apple.com/usergroups) and your Apple dealer. You can use Safari’s Google search feature to scan the Internet for installation information for your particular model. However, here are guidelines to follow during the installation:
- Watch out for static electricity. When opening your Macintosh and handling hardware, make certain that you’ve touched a metal surface beforehand to discharge any static electricity on your body. (You can also buy a static wrist strap that you can wear while working in the bowels of your Mac.)
- Check the notch on the memory module. Most types of memory modules have a notch cut into the connector. This notch makes sure that you can install the module only one way, so make certain that the notch aligns properly with the slot.
- Make sure you’re using the right memory slot. As I mention earlier in this chapter, most Macs have multiple memory slots, so check the label on the circuit board to make sure that you’re adding the memory to the correct slot. (Naturally, this won’t be a problem if you’re installing a module into an unoccupied slot.)
- Take good care of older hardware. If you replace an existing memory module or hard drive with a new one, put the old hardware in the leftover antistatic bag from your new hardware and immediately start thinking of how you’ll word your eBay auction … Used 1GB Memory Module for Intel iMac, for example. (Heck, some online stores even give you a rebate if you return the original Apple memory modules.)
- Check your hard drive jumper settings. If your Mac uses EIDE hard drives, you must set the master and slave jumpers correctly on the back (or underside) of the new drive. A jumper is simply a tiny metal-and-plastic connector that is used to change the configuration on a hard drive. Setting jumpers indicates to your Mac which drive is the primary drive and which is the secondary drive. (I don’t know how engineers came up with the whole master/slave thing … they’re normally not quite so exotic when naming things.)
If you’re adding a second drive to a desktop with an EIDE drive, you’ll probably have to change the jumper settings on the original drive as well. (If you’re replacing the existing drive, you’re in luck; simply duplicate the jumper settings from the old drive and use them on the new drive.) Because the configuration settings are different for each hard drive model, check the drive’s documentation for the correct jumper position.
To determine whether a memory upgrade was successful, you can again turn to the About This Mac dialog. Display the dialog again, and click the Memory toolbar button; then compare the memory overview specifications with the original list that you made earlier. If the total amount of memory has increased and the memory module is recognized, you’ve done your job well. If not, switch off the Mac and check the module to make sure it’s completely seated in the slot.