
Chapter 2. Our First OpenGL Program
What You’ll Learn in This Chapter
• How to create and compile shader code.
• How to draw with OpenGL.
• How to use the book’s application framework to initialize your programs and clean up after yourself.
In this chapter, we introduce the simple application framework that is used for almost all of the samples in this book. This shows you how to create the main window with the book’s application framework and how to render simple graphics into it. You’ll also see what a very simple GLSL shader looks like, how to compile it, and how to use it to render simple points. The chapter concludes with your very first OpenGL triangle.
Creating a Simple Application
To introduce the application framework that’ll be used in the remainder of this book, we’ll start with an extremely simple example application. Of course, to write a large-scale OpenGL program you don’t have to use our framework—in fact, we wouldn’t recommend it, as it’s quite simple. However, it does simplify things a little and allows you to get to writing OpenGL code sooner.
The application framework is brought into your application by including sb7.h in your source code. This is a C++ header file that defines a namespace called sb7 that includes the declaration of an application class, sb7::application, from which we can derive our examples. The framework also includes a number of utility functions and a simple math library called vmath to help you with some of the number crunching involved in OpenGL.
To create an application, we simply include sb7.h, derive a class from sb7::application, and, in exactly one of our source files, include an instance of the DECLARE_MAIN macro. This defines the main entry point of our application, which creates an instance of our class (the type of which is passed as a parameter to the macro) and calls its run() method, which implements the application’s main loop.
In turn, this performs some initialization by first calling the startup() method and then calling the render() method in a loop. In the default implementation, both methods are defined as virtual functions with empty bodies. We override the render() method in our derived class and write our drawing code inside it. The application framework takes care of creating a window, handling input, and displaying the rendered results to the user. The complete source code for our first example is given in Listing 2.1 and its output is shown in Figure 2.1.
// Include the "sb7.h" header file
#include "sb7.h"
// Derive my_application from sb7::application
class my_application : public sb7::application
{
public:
// Our rendering function
void render(double currentTime)
{
// Simply clear the window with red
static const GLfloat red[] = { 1.0f, 0.0f, 0.0f, 1.0f };
glClearBufferfv(GL_COLOR, 0, red);
}
};
// Our one and only instance of DECLARE_MAIN
DECLARE_MAIN(my_application);
Listing 2.1: Our first OpenGL application

The example shown in Listing 2.1 simply clears the whole screen to red. This introduces our first OpenGL function, glClearBufferfv(). The prototype of glClearBufferfv() is
void glClearBufferfv(GLenum buffer,
GLint drawBuffer,
const GLfloat * value);
All OpenGL functions start with gl and follow a number of naming conventions, such as encoding some of their parameter types as suffixes on the end of the function names. This allows a limited form of overloading even in languages that don’t directly support this ability. In this case, the suffix fv means that the function consumes a vector (v) of floating-point (f) values, where arrays (generally referenced by pointers in languages like C) and vectors are used interchangeably by OpenGL.
The glClearBufferfv() function tells OpenGL to clear the buffer specified by the first parameter (in this case GL_COLOR) to the value specified in its third parameter. The second parameter, drawBuffer, is used when there are multiple output buffers that could be cleared. Because we’re using only one here and drawBuffer is a zero-based index, we’ll just set it to 0 in this example. Here, that color is stored in the array red, which contains four floating-point values—one each for red, green, blue, and alpha, in that order.
The red, green, and blue terms should be self-explanatory. Alpha is a fourth component that is associated with a color and is often used to encode the opacity of a fragment. When used this way, setting alpha to 0 will make the fragment completely transparent, and setting it to 1 will make it completely opaque. The alpha value can also be stored in the output image and used in some parts of OpenGL’s calculations, even though you can’t see it. You can see that we set both the red and alpha values to 1 and the others to 0. This specifies an opaque red color. The result of running this application is shown in Figure 2.1.
This initial application isn’t particularly interesting,1 as all it does is fill the window with a solid red color. You will notice that our render() function takes a single parameter—currentTime. This contains the number of seconds since the application was started, and we can use it to create a simple animation. In this case, we can use it to change the color that we use to clear the window. Our modified render() function2 is shown in Listing 2.2.
1. This sample is especially uninteresting if you are reading this book in black and white!
2. If you’re copying this code into your own example, you’ll need to include <math.h> to get the declarations of sin() and cos().
// Our rendering function
void render(double currentTime)
{
const GLfloat color[] = { (float)sin(currentTime) * 0.5f + 0.5f,
(float)cos(currentTime) * 0.5f + 0.5f,
0.0f, 1.0f };
glClearBufferfv(GL_COLOR, 0, color);
}
Listing 2.2: Animating color over time
Now our window fades from red through yellow, orange, green, and back to red again. Still not that exciting, but at least it does something.
Using Shaders
As we mentioned in the introduction to the graphics pipeline in Chapter 1, OpenGL works by connecting a number of mini-programs called shaders together with fixed-function glue. When you draw, the graphics processor executes your shaders and pipes their inputs and outputs along the pipeline until pixels3 come out the end. To draw anything at all, you’ll need to write at least a couple of shaders.
3. Actually, there are a number of use cases of OpenGL that create no pixels at all. We will cover those in a while. For now, let’s just draw some pictures.
OpenGL shaders are written in a language called the OpenGL Shading Language, or GLSL. This language has its origins in C, but has been modified over time to make it better suited to running on graphics processors. If you are familiar with C, then it shouldn’t be hard to pick up GLSL. The compiler for this language is built into OpenGL. The source code for your shader is placed into a shader object and compiled, and then multiple shader objects can be linked together to form a program object. Each program object can contain shaders for one or more shader stages. The shader stages of OpenGL are vertex shaders, tessellation control and evaluation shaders, geometry shaders, fragment shaders, and compute shaders. The minimal useful pipeline configuration consists of only a vertex shader4 (or just a compute shader), but if you wish to see any pixels on the screen, you will also need a fragment shader.
4. If you try to draw anything when your pipeline does not contain a vertex shader, the results will be undefined and almost certainly not what you were hoping for.
Listing 2.3 shows our first vertex shader, which is about as simple as it gets. In the first line, we have the “#version 450 core” declaration, which tells the shader compiler that we intend to use version 4.5 of the shading language. Notice that we include the keyword core to indicate that we intend to use only features from the core profile of OpenGL.
Next, we have the declaration of our main function, which is where the shader starts executing. This is exactly the same as in a normal C program, except that the main function of a GLSL shader has no parameters. Inside our main function, we assign a value to gl_Position, which is part of the plumbing that connects the shader to the rest of OpenGL. All variables that start with gl_ are part of OpenGL and connect shaders to each other or to the various parts of fixed functionality in OpenGL. In the vertex shader, gl_Position represents the output position of the vertex. The value we assign (vec4(0.0, 0.0, 0.5, 1.0)) places the vertex right in the middle of OpenGL’s clip space, which is the coordinate system expected by the next stage of the OpenGL pipeline.
#version 450 core
void main(void)
{
gl_Position = vec4(0.0, 0.0, 0.5, 1.0);
}
Listing 2.3: Our first vertex shader
Our fragment shader is given in Listing 2.4. Again, this is an extremely simple example. It, too, starts with a #version 450 core declaration. Next, it declares color as an output variable using the out keyword. In fragment shaders, the value of output variables will be sent to the window or screen. In the main function, it assigns a constant to this output. By default, that value goes directly onto the screen and is vector of four floating-point values, one each for red, green, blue, and alpha, just like in the parameter to glClearBufferfv(). In this shader, the value we’ve used is vec4(0.0, 0.8, 1.0, 1.0), which is a cyan color.
#version 450 core
out vec4 color;
void main(void)
{
color = vec4(0.0, 0.8, 1.0, 1.0);
}
Listing 2.4: Our first fragment shader
Now that we have both a vertex and a fragment shader, it’s time to compile them and link them together into a program that can be run by OpenGL. This is similar to the way that programs written in C++ or other similar languages are compiled and linked to produce executables. The code to link our shaders together into a program object is shown in Listing 2.5.
GLuint compile_shaders(void)
{
GLuint vertex_shader;
GLuint fragment_shader;
GLuint program;
// Source code for vertex shader
static const GLchar * vertex_shader_source[] =
{
"#version 450 core
"
"
"
"void main(void)
"
"{
"
" gl_Position = vec4(0.0, 0.0, 0.5, 1.0);
"
"}
"
};
// Source code for fragment shader
static const GLchar * fragment_shader_source[] =
{
"#version 450 core
"
"
"
"out vec4 color;
"
"
"
"void main(void)
"
"{
"
" color = vec4(0.0, 0.8, 1.0, 1.0);
"
"}
"
};
// Create and compile vertex shader
vertex_shader = glCreateShader(GL_VERTEX_SHADER);
glShaderSource(vertex_shader, 1, vertex_shader_source, NULL);
glCompileShader(vertex_shader);
// Create and compile fragment shader
fragment_shader = glCreateShader(GL_FRAGMENT_SHADER);
glShaderSource(fragment_shader, 1, fragment_shader_source, NULL);
glCompileShader(fragment_shader);
// Create program, attach shaders to it, and link it
program = glCreateProgram();
glAttachShader(program, vertex_shader);
glAttachShader(program, fragment_shader);
glLinkProgram(program);
// Delete the shaders as the program has them now
glDeleteShader(vertex_shader);
glDeleteShader(fragment_shader);
return program;
}
Listing 2.5: Compiling a simple shader
In Listing 2.5, we introduce a handful of new functions:
• glCreateShader() creates an empty shader object, ready to accept source code and be compiled.
• glShaderSource() hands shader source code to the shader object so that it can keep a copy of it.
• glCompileShader() compiles whatever source code is contained in the shader object.
• glCreateProgram() creates a program object to which you can attach shader objects.
• glAttachShader() attaches a shader object to a program object.
• glLinkProgram() links all of the shader objects attached to a program object together.
• glDeleteShader() deletes a shader object. Once a shader has been linked into a program object, the program contains the binary code and the shader is no longer needed.
The shader source code from Listing 2.3 and Listing 2.4 is included in our program as constant strings that are passed to the glShaderSource() function, which copies them into the shader objects that we created with glCreateShader(). The shader object stores a copy of our source code; then, when we call glCompileShader(), it compiles the GLSL shader source code into an intermediate binary representation that is also stored in the shader object. The program object represents the linked executable that we will use for rendering. We attach our shaders to the program object using glAttachShader() and then call glLinkProgram(), which links the objects together into code that can be run on the graphics processor. Attaching a shader object to a program object creates a reference to the shader; we can then delete it, knowing that the program object will hold onto the shader’s contents as long as it needs it. The compile_shaders function in Listing 2.5 returns the newly created program object.
When we call this function, we need to keep the returned program object somewhere so that we can use it to draw things. Also, we really don’t want to recompile the whole program every time we want to use it. So, we need a function that is called once when the program starts up. The sb7 application framework provides just such a function: application::startup(), which we can override in our sample application and use to perform any one-time setup work.
One final thing that we need to do before we can draw anything is to create a vertex array object (VAO), which is an object that represents the vertex fetch stage of the OpenGL pipeline and is used to supply input to the vertex shader. As our vertex shader doesn’t have any inputs right now, we don’t need to do much with the VAO. Nevertheless, we still need to create the VAO so that OpenGL will let us draw. To create the VAO, we call the OpenGL function glCreateVertexArrays(); to attach it to our context, we call glBindVertexArray(). Their prototypes are shown here:
void glCreateVertexArrays(GLsizei n,
GLuint * arrays);
void glBindVertexArray(GLuint array);
The vertex array object maintains all of the state related to the input to the OpenGL pipeline. We will add calls to glCreateVertexArrays() and glBindVertexArray() to our startup() function. This pattern will become familiar to you as you learn more about OpenGL. Most things in OpenGL are represented by objects (like vertex array objects). We create them using a creation function (like glCreateVertexArrays()), and let OpenGL know that we want to use them by binding them to the context using a binding function (like glBindVertexArray()).
In Listing 2.6, we have overridden the startup() member function of the sb7::application class and put our own initialization code in it. Again, as with render(), the startup() function is defined as an empty virtual function in sb7::application and is called automatically by the run() function. From startup(), we call compile_shaders and store the resulting program object in the rendering_program member variable in our class. When our application is done running, we should also clean up after ourselves. Thus we have also overridden the shutdown() function; in it, we delete the program object that we created at start-up. Just as when we were done with our shader objects we called glDeleteShader(), so when we are done with our program objects we call glDeleteProgram(). In our shutdown() function, we also delete the vertex array object we created in our startup() function by calling the glDeleteVertexArrays() function.
class my_application : public sb7::application
{
public:
// <snip>
void startup()
{
rendering_program = compile_shaders();
glCreateVertexArrays(1, &vertex_array_object);
glBindVertexArray(vertex_array_object);
}
void shutdown()
{
glDeleteVertexArrays(1, &vertex_array_object);
glDeleteProgram(rendering_program);
glDeleteVertexArrays(1, &vertex_array_object);
}
private:
GLuint rendering_program;
GLuint vertex_array_object;
};
Listing 2.6: Creating the program member variable
Now that we have a program, we need to execute the shaders in it and actually start drawing something on the screen. We modify our render() function to call glUseProgram() to tell OpenGL to use our program object for rendering and then call our first drawing command, glDrawArrays(). The updated listing is shown in Listing 2.7.
// Our rendering function
void render(double currentTime)
{
const GLfloat color[] = { (float)sin(currentTime) * 0.5f + 0.5f,
(float)cos(currentTime) * 0.5f + 0.5f,
0.0f, 1.0f };
glClearBufferfv(GL_COLOR, 0, color);
// Use the program object we created earlier for rendering
glUseProgram(rendering_program);
// Draw one point
glDrawArrays(GL_POINTS, 0, 1);
}
Listing 2.7: Rendering a single point
The glDrawArrays() function sends vertices into the OpenGL pipeline. Its prototype is
void glDrawArrays(GLenum mode,
GLint first,
GLsizei count);
For each vertex, the vertex shader (the one in Listing 2.3) is executed. The first parameter to glDrawArrays() is the mode parameter, which tells OpenGL what type of graphics primitive we want to render. In this case, we specified GL_POINTS because we want to draw a single point. The second parameter (first) is not relevant in this example, so we’ve set it to zero. Finally, the last parameter is the number of vertices to render. Each point is represented by a single vertex, so we tell OpenGL to render only one vertex, resulting in just one point being rendered. The result of running this program is shown in Figure 2.2.

As you can see, there is a tiny point in the middle of the window. For your viewing pleasure, we’ve zoomed in on the point and shown it in the inset at the bottom right of the image. Congratulations! You’ve made your very first OpenGL rendering. Although it’s not terribly impressive, it lays the groundwork for more interesting drawing and proves that our application framework and our first, extremely simple shaders are working.
To make our point a little more visible, we can ask OpenGL to draw it a little larger than a single pixel. To do this, we’ll call the glPointSize() function, whose prototype is
void glPointSize(GLfloat size);
This function sets the diameter of the point in pixels to the value you specify in size. The maximum value that you can use for points is implementation defined. We will get deeper into the subject and go beyond stock OpenGL functionality, but for the time being, we will rely on the fact that OpenGL guarantees that the maximum supported point size is at least 64 pixels. By adding the line
glPointSize(40.0f);
to our rendering function in Listing 2.7, we set the diameter of points to 40 pixels. The output is shown in Figure 2.3.

Drawing Our First Triangle
Drawing a single point is not really that impressive (even if it is really big!)—we already mentioned that OpenGL supports many different primitive types, and that the most important are points, lines, and triangles. In our toy example, we draw a single point by passing the token GL_POINTS to the glDrawArrays() function. What we really want to do is draw lines or triangles. As you may have guessed, we could have passed GL_LINES or GL_TRIANGLES to glDrawArrays() but there’s one hitch: The vertex shader in Listing 2.3 places every vertex in the same place, right in the middle of clip space. For points, that’s fine: OpenGL assigns area to points for you. But for lines and triangles, having two or more vertices in the exact same place produces a degenerate primitive, which is a line with zero length or a triangle with zero area. If we try to draw anything but points with this shader, we won’t get any output at all because all of the primitives will be degenerate. To fix this, we need to modify our vertex shader to assign a different position to each vertex.
Fortunately, GLSL includes a special input to the vertex shader called gl_VertexID, which is the index of the vertex that is being processed at the time. The gl_VertexID input starts counting from the value given by the first parameter of glDrawArrays() and counts upward one vertex at a time for count vertices (the third parameter of glDrawArrays()). This input is one of the many built-in variables provided by GLSL, which represent data that is generated by OpenGL or that you should generate in your shader and give to OpenGL. (gl_Position, which we just covered, is another example of a built-in variable.) We can use this index to assign a different position to each vertex (see Listing 2.8, which does exactly this).
#version 450 core
void main(void)
{
// Declare a hard-coded array of positions
const vec4 vertices[3] = vec4[3](vec4(0.25, -0.25, 0.5, 1.0),
vec4(-0.25, -0.25, 0.5, 1.0),
vec4(0.25, 0.25, 0.5, 1.0));
// Index into our array using gl_VertexID
gl_Position = vertices[gl_VertexID];
}
Listing 2.8: Producing multiple vertices in a vertex shader
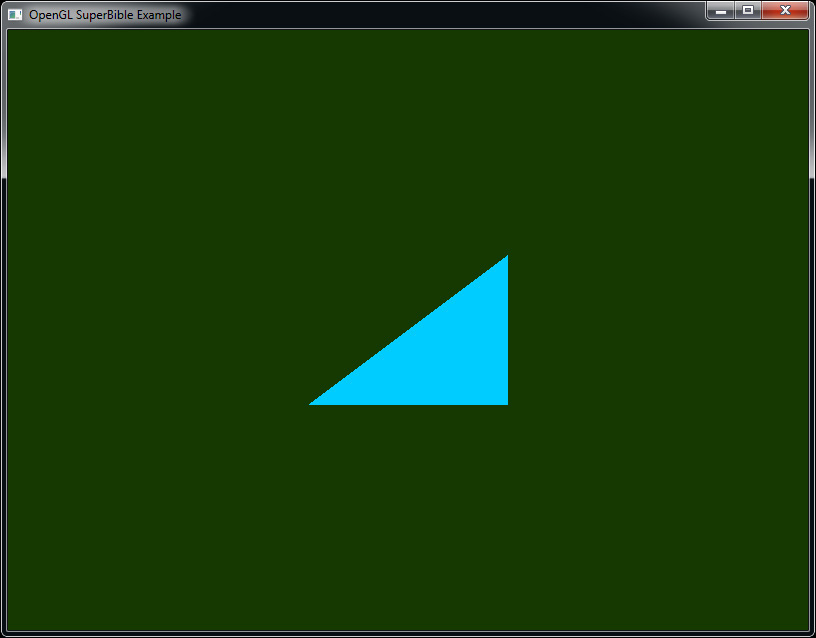
By using the shader of Listing 2.8, we can assign a different position to each of the vertices based on its value of gl_VertexID. The points in the array vertices form a triangle, and if we modify our rendering function to pass GL_TRIANGLES to glDrawArrays() instead of GL_POINTS, as shown in Listing 2.9, then we obtain the image shown in Figure 2.4.
// Our rendering function
void render(double currentTime)
{
const GLfloat color[] = { 0.0f, 0.2f, 0.0f, 1.0f };
glClearBufferfv(GL_COLOR, 0, color);
// Use the program object we created earlier for rendering
glUseProgram(rendering_program);
// Draw one triangle
glDrawArrays(GL_TRIANGLES, 0, 3);
}
Listing 2.9: Rendering a single triangle
Summary
This concludes the construction of our first OpenGL program. We will soon cover how to get data into your shaders from your application, how to pass your own inputs to the vertex shader, how to pass data from shader stage to shader stage, and more.
In this chapter, you have been briefly introduced to the sb7 application framework, compiled a shader, cleared the window, and drawn points and triangles. You have seen how to change the size of points using the glPointSize() function and have seen your first drawing command—glDrawArrays().