HDSLR cameras generally have large rear LCD screens for live viewing and playback. The technology has matured since the early days of DSLRs where the screens were small and dim with lousy resolution. It’s not uncommon now to find rear LCD screens that are three inches or larger, and some even flip or swing out for better viewing angles. With the naked eye, these screens can give you a glimpse of what you’re shooting and can aid in composition and exposure decisions but aren’t optimal for determining critical focus. There are zooming capabilities built into most camera systems, but they are slow to access, and I have found them minimally useful without a viewing loupe or external monitor.
Don’t even think about making a paying client, director, agency rep, or talent review scenes using the small LCD on the back of a camera. Huddling around your camera might be cozy, but it isn’t a good way to establish yourself as a professional. These people all have a lot at stake with most commercial endeavors, and their jobs are often on the line. It’s your job to make sure the shoot comes off smoothly, and having an external monitor could make the difference in getting hired again.
I’ll get to external monitors in a moment, but first let’s talk about enhancing the shooting experience by using a viewfinder loupe. One of the first purchases any HDSLR owner should make is a decent viewfinder loupe to aid in focusing and composition when shooting video and when shooting stills outdoors in bright light. Using a viewfinder loupe to view the camera’s LCD preview screen offers a huge advantage over eyeballing fine detail on a three-inch screen.
My first video shoot with a Canon 5D Mark II was in June 2009, on the day that the firmware was released that allowed manual exposure control while shooting video. Until then, I considered DSLR video a novelty that wasn’t ready for professional work. For this test, I arranged to use a Redrock micro support kit, Marshall LCD monitor, and a Hoodman HoodLoupe. I was skeptical of using a loupe on the LCD screen and really only tried it in order to rule it out as a viewing method. However, once I put it on the camera, I was pleasantly surprised.
I had no problem judging focus when using the loupe to enlarge the camera’s LCD preview screen. My only complaint is that I like to go back and forth between using the loupe and seeing the LCD screen. I would like the ability to set a critical focus and then flip the viewing loupe out of the way while shooting on a tripod.
This ability has been addressed many different ways, including adhesive frames stuck to the camera, rubber bands, Velcro, and even articulated arms that ride the camera’s hotshoe. Finding the right loupe and attachment method is a matter of personal choice and preference. The good news is, as you can tell from the numerous attachment methods, there are a variety of viewfinder loupes on the market.
The first loupe I became aware of was the HoodLoupe 3.0 from Hoodman. At $80, it is a very affordable solution that gets the job done. I haven’t tried their rubber band Cinema Strap connection kit, but the HoodLoupe works great with the Redrock microFinder loupe accessory kit.
The HoodLoupe 3.0 offers a one-to-one viewing ratio, but there is a HoodLoupe Mag 3.0 adapter that increases magnification by three times for $39. Hoodman also offers the HoodCrane, which is an arm assembly that attaches to the camera’s hotshoe, thus allowing the loupe to be flipped up and out of the way when not being used.
Bruce Dorn’s IDC company makes a bottom plate adapter kit for the HoodLoupe that is very stable and has the added benefit of allowing for quick slide-off removal.
The next loupe that popped onto my radar was the Zacuto Z-Finder, which now comes in several different models under the Jr and the Pro monikers. The Pro series seems to be the one most video professionals and cinematographers like the best. At $395, it is also one of the more expensive choices, but I doubt anyone who can afford this loupe has had buyer’s remorse. It’s a sturdy, well-made, professional looking piece of gear. The original method for attachment was a stick-on frame that fits around the camera’s LCD screen, but the product line has matured now to include a bottom plate adapter like the one IDC uses for their HoodLoupe attachment kit.
A couple of newer players in the viewfinder loupe market are LCDVF and Letus. The LCDVF falls right between the HoodLoupe and the Z-Finder Pro in price, at $169. It uses a sticky frame and magnetic system to attach the finder to the camera LCD screen.
Letus is raising the bar at the high end of the viewfinder loupe spectrum with its new carbon fiber loupe called the Hawk. This system utilizes a bottom plate attachment system (which seems to be the direction everyone is going), high-tech materials, and its own custom manufactured optics. Letus seems to have found the magnification sweet spot at 2.75x where, unlike 3x magnified loupes, you don’t have to move your eye around in the viewfinder to see the whole zoomed image at once. The Letus system is designed to accommodate changing camera LCD sizes. The optics from the Hawk can be moved to a different housing if the screen sizes suddenly change to help protect your investment. There is also an anodized aluminum version of the Hawk. Both retail for about $385. Both models are made of high-quality materials and don’t tend to scratch up the way the plastic housings do on the other loupes, and both models have effective anti-fog coatings.
A good viewfinder is a good investment for HDSLR video shooters, and there are very capable low-, mid-, and big-budget choices on the market today. The HoodLoupe is no slouch at $80; the LCDVF is a nice upgrade with more magnification, and the price is close to the HoodLoupe with the 3x adapter. At the top of the market for working pros and connoisseurs is the Zacuto Z-Finder Pro and now the Letus Hawk. They all get the job done, so it’s just a matter of finding one to match your budget and esthetic. I have been happy with the HoodLoupe and find myself wanting a Letus Hawk, but with the recent announcement of the microEVF from Redrock Micro, I’m not so sure I would spend $400 on a loupe.
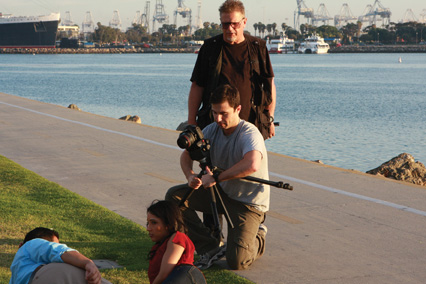
Various photos of each viewfinder type
EVFs (electronic viewfinders) have been in use in the digital cinema world for a while now. They are expensive pieces of gear aimed at the professional cinematographer who wants flexible positioning of the eyepiece when shooting. At the 2010 PhotoCine Expo, Brian Valente from Redrock Micro announced the microEVF and showed a working prototype to an enrapt audience. An EVF changes everything by allowing flexible placement, quick ergonomic changes, and shrinking the rig size/weight. Having an EVF that isn’t attached to the camera allows the camera to be placed anywhere along the support rails. With the camera farther back on a shoulder rig, the counter weights needed to balance what is usually a front heavy situation can be lightened and brought closer into the body, thus creating a shorter and lighter shoulder rig.
Getting the viewing angle dialed in and being able to make ergonomic changes when your neck gets tired is also a huge benefit. Normally, you get set up and shoot all day, adjusting your body and posture to the rig because once dialed in, it’s not always practical to change the setup while shooting. The microEVF allows for quick and easy adjustments in a sleek and well-designed package for around $600. It also has an HDMI pass-through that allows you to send the monitor feed to an external LCD for your focus puller or to a larger monitor at video village without adding an external HDMI splitter. The microEVF has a backlit LED with a resolution of 1.2 million dots (higher than the Canon LCD screen), and its 9V battery will last about 10 hours.
Several other manufacturers are also releasing products in the EVF category, but they have taken a less streamlined approach by developing small LCD monitors that work in conjunction with existing products—viewing loupes. Zacuto announced its Z-Finder EVF right on the tail of Redrock’s announcement. It’s expected to cost $800, but you will still need to have a loupe (Z-finder costs $395) and an assortment of rigging parts to attach it to the support rails (probably another $200 in parts) and an extra camera battery to run it (another $75). This doesn’t seem like a very sophisticated solution because it adds bulk and weight to the rig. It’s probably a better solution for Zacuto to not decimate their best selling product line than it is for HDSLR filmmakers. I think the only reason to go down this road is if you already own a Z-Finder and Zacuto rigging, but you’re still going to spend more money than if you buy the sleek Redrock microEVF.
Another manufacturer that was actually first to announce a monitor/viewfinder EVF is the unfortunately named Cineroid. Its device is pretty much the same form factor and design as the Zacuto, or vice-versa. I give them props for calling it like it is, a Digital LCD viewfinder. I don’t really think slapping a loupe on a monitor is equivalent to an EVF.
Another option to aid focus and composition is to use an external LCD monitor. Most HDSLR cameras have a mini HDMI out port that will send the video signal in varying degrees of resolution to an external monitor for live viewing or playback. Popular LCD monitors’ sizes currently range from five inches diagonally up to and over 10 inches. Some LCD monitors, like the ones from Marshal Electronics and ikan, can be set up to accept your camera battery so that you have to carry only one type of battery and charger in your kit. These lightweight monitors are designed for riding on the camera rig, becoming an extension of the camera-viewing screen. There are many legacy connector options available, but if you’re shooting solely with HDSLRs or recent video cameras and don’t already own older video gear, I wouldn’t worry about any ports other than HDMI. A recent innovation from Marshal on its MD (modular design) series of monitors is the ability to switch out the rear connector panel on-the-fly to accommodate virtually any type of video connection. Just plug in the module that matches your camera’s output port and off you go. The V-LCD84STX is an 8.4-inch HD monitor in the MD line that’s aimed at the HDSLR user. In addition to being modular, it has what’s called a super transmissive LCD that is designed specifically for outdoor applications and challenging viewing environments.
For low-angle shots or steadicam rigs, small five-inch monitors are available that work well when size and weight matter. The five-inch screen allows for a good viewing environment from a few feet away. The top contenders in this category are the Marshall Electronics V-LCD50-HDMI, the ikan V5600 and the Small HD DP-SLR. My preference is for Marshall monitors and one of my favorites in its line is the V-LCD651STX-HDMI, which is a 6.5-inch screen that has false color, peaking, and HDMI pass-through. Being over 40, I appreciate the extra 1.5 inches of screen real estate and don’t mind the small weight increase.

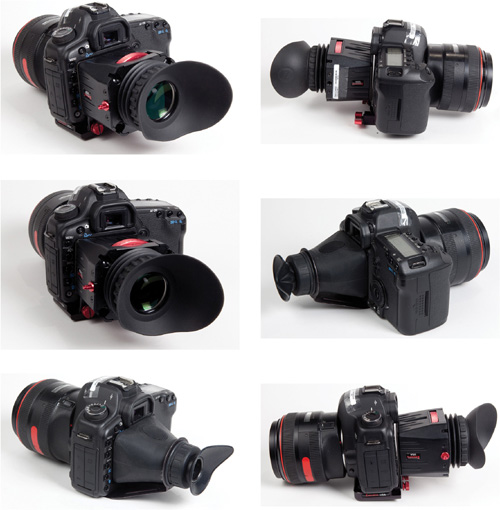
ikan VX9 monitor
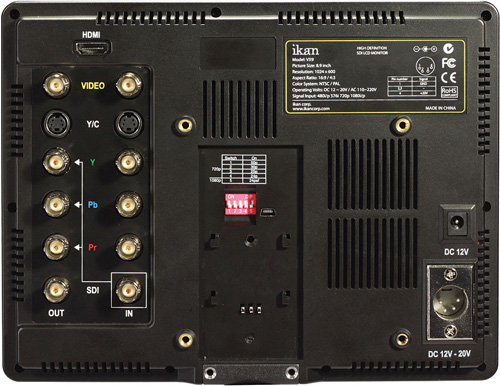
Back shot of ikan VX9 monitor


Top handle rig from Redrock using a Marshal monitor to shoot low angle
Photo courtesy of Taylor Stableford
In addition to aiding in playback and focusing, external cinema-style LCD monitors can provide visual feedback tools like the False Color and Peaking filters.
The False Color filter is used to aid in the setting of camera exposure. As the camera iris is adjusted, elements of the image will change color based on the luminance or brightness values. Normally, when shooting subjects like people, it is common practice to set exposure of faces to the equivalent of approximately 56 IRE. The False Color filter will show this area as the color pink on the monitor. Therefore, as you increase exposure (open the iris), your subject will change color as indicated on the chart: first pink, then gray, then a few shades of yellow. Overexposed subjects (above 101IRE) on the monitor are shown as red. In addition, underexposed subjects will show as deep blue to dark blue, with clipped-blacks indicated with a fuchsia-like color. Lastly, the color green is used to indicate elements of the image that are approximately 45IRE. This represents a “neutral” or “mid-level” exposure commonly used for objects (not people).
The Peaking filter is used to aid the camera operator in obtaining the sharpest possible picture. When activated, all color will be removed from the display and a black-and-white image will remain. The internal processor will display a red color on the screen where sharp edges appear. When the camera operator adjusts (or “racks”) the focus control (on the camera lens), different parts of the image will have red colored edges. This indicates that this portion of the image is sharp or in focus. Final focus is achieved by racking the camera lens focus control back and forth until the desired portion of the image has red-colored edges.


Large LCD monitors for playback and editing also have an important role in HDSLR filmmaking. Typical computer monitors don’t handle video the same way as television monitors. A photographer filmmaker is going to need a good monitor for Photoshop work that can be accurately calibrated as well as a monitor capable of video playback via HDMI. As a photographer, I am familiar with high-quality Eizo monitors, so I asked Joey Sanchez from Eizo which one he would recommend, keeping in mind budgetary constraints (I’m only a doctor photographer, Jim!). He recommended the Eizo Foris FX2431, which currently retails for around $1,000. The FX2431 is technically a gaming monitor, so I asked him if the multiple HDMI inputs were what make it appropriate for video work, and what percentage of Adobe RGB color space the monitor achieves. His response follows:
“We obviously feel the multiple ports are helpful for supporting multiple inputs for gaming but have found that it is outstanding for film viewing as well since it is high definition with flawless 1080/24p HD image playback. With our proprietary chip technology, we are getting really crisp images by boosting the contrast ratio on the monitor and have found a way to reduce blurring. This monitor also utilizes I/P (interlace/progressive) conversion onscreen to minimize picture artifacts that normally occur with interlace video signals. This monitor also reduces “judder” onscreen, which ensures video playback as smooth as you would see in a cinema.
It’s reproducing about 96% of Adobe RGB color space so it’s actually really good for both moving and still image work, thus making it incredibly versatile. We think this could fit in well for the more price-conscious HDSLR filmmaking market.”
I have used the Eizo Foris FX2431 for a while now and love it. My only complaint with Eizo is that its industrial design makes the monitors look just like the ones in low rent offices and cheap cubicle farms. I applaud putting most of its resources into the inner workings of the product, but presentation and style play an important role in consumer electronics purchasing decisions, and I’d like to see a little design savvy added to the Eizo product line. The FX2431 works great on my desk connected to my PowerBook and on set as the video village monitor. Being someone who brings full-sized towers and 30-inch monitors to digital photo shoots, I have no problem carting around a 24-inch screen that I can use as my color-corrected computer monitor and for playback when connected to the camera via HDMI.
To that end, Tenba makes an amazing rolling case for the 24-inch Apple iMac that I have traveled with extensively. It’s called the Transport Air Case, and I highly recommend it for taking the FX2431 on location. Not only will it protect your monitor, but it looks a lot more professional than lugging a beat-up cardboard box around with your monitor in it.
If you are looking for an even cheaper option for client viewing on set, you can do like my friend Marcelo Lewin from NewMediaWebinars.com. He went to Costco and bought an inexpensive Vizio brand LCD television with HDMI inputs. His clients loved being able to see the footage on a larger screen without Marcelo having to drop a grand for the monitor, and he gets to use it to watch cable TV in his office when not shooting. As I type this, the current price for a 23-inch LCD Vizio TV from Costco is $199.

FilmTools’ LCD monitor bracket
If you are using a larger monitor on set, it’s a good idea to mount it on a stand for viewing flexibility and safety. FilmTools sells an affordable solution for $95. It’s an LCD monitor bracket VESA mounted to 5/8-inch baby receiver that fits onto any baby pin or spud (http://www.filmtools.com/lcdvemobrfib.html). I’ve used this, and it’s sturdy and works as advertised. You can spend close to $300 on other mounts that might offer a little more flexibility, but the monitor bracket from FilmTools (which I think is made by Backstage Equipment) is an effective and reasonable option.
Sooner or later you will need a larger monitor for client approval, video village, or just to aid in focus and composition. The good news is that there are several options, and you can easily find a solution that fits production requirements without breaking the bank.

Marcelo Lewin using a 23-inch monitor on-set
Running a cable from the camera to a video village setup can sometimes be problematic, such as with long dolly track shots, steadicam shots, or when shooting from a jib or crane. Luckily, there are several choices for sending a wireless video signal to a remote monitor or computer. At the affordable end of the market is the Wireless DSLR Monitor from Robert Benson. Robert needed a solution for remote client viewing while shooting with an HDSLR, so he went into his garage and created a new product category of inexpensive video monitors. So many people wanted him to make them one that he decided to make it a business and sell them for $200 (http://www.dslrwirelessmonitors.com/). It’s a nice viewing solution but may be too low-res for checking focus, and as I said, this is a garage-built device. As such, your expectations for fit and finish as well as construction and turnaround time should be adjusted accordingly, but you can’t beat a wireless client monitor for $200.
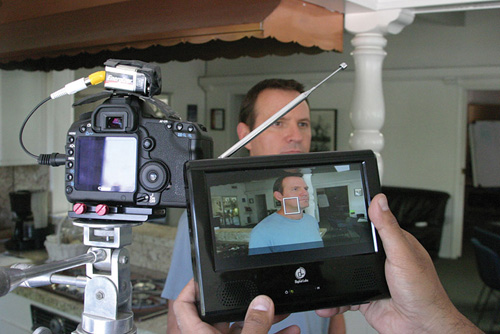
At the 2010 PhotoCine Expo, Teradek showed its wireless HD video transmitter called the Cube to a very receptive crowd. The Cube is a small wifi transmitter that takes the HDMI out from your camera and streams it over a wireless network where it can be viewed on a laptop, iPad, or iPhone. It’s a bit pricey for the enthusiast crowd, but at $1,500, it solves a lot of problems for professional productions. After the expo, cinematographer Shane Hurlbut tweeted that “anyone not using the Cube is 10 years behind in digital filmmaking.”
The wireless market for viewing and capturing DSLR video is just getting off the ground, and soon an HDSLR filmmaker should have a number of choices at various price points as the markets settle and technologies mature.
DSLR Wireless Monitor from Robert Benson

The Teradek Cube
If you’ve ever worked with me or heard me speak, you know that I am all about redundancy and backup. Even to the point where, in a buffet line, I get backup meat in case one of the choices is bad. Electronic equipment fails and batteries can lose their charge. Having an optical viewfinder along with an EVF and/or a Marshall monitor can make the difference in finishing a shoot or packing up and going home. A good LCD viewfinder loupe can be a solid investment and, at around $100, it’s a no-brainer as part of your HDSLR kit. On the other hand, $400 isn’t a lot to some people who always want the best and enjoy the user experience of finely crafted things, so the decision is up to you and your budget. I would recommend spending the money on a real EVF like the microEVF and considering a viewing loupe as a complementary or backup analog device. The next step would be to add a portable Marshall monitor, large LCD computer/video unit, and to start solving viewing problems with a wireless device as your career advances.
Recently I was at Bandito Brothers talking to Shane Hurlbut and his wife Lydia, when Bernie Keach from Marshall Electronics came by with a cool little HDMI to Ethernet bridge adapter from Apantac (http://apantac.com/product-info.php?id=25) called the Mount Hood HDMI-1-E/HDMI-1-R - HDMI CATx Extender/Receiver. This little pair of devices (one transmitter and one receiver) converts the HDMI signal to travel over Cat 5 cable with a range of 115 feet. It looks like a pretty good solution for hard-wired long-distance video monitoring.

Mount Hood CATx Extender