
Chapter 3. Deconstructing Play application architecture
This chapter covers
- Learning the key concepts of a Play application’s architecture
- Understanding the relationships between Play application components
- Configuring a Play application and its HTTP interface
- Play’s model-view-controller and asynchronous process APIs
- Modularizing a Play application
This chapter explains Play at an architectural level. We’ll be covering the main parts of a Play application in this chapter, and you’ll learn which components make up a Play application and how they work together. This will help you gain a broad understanding of how to use Play to build a web application, without going into detail at the code level. This will also allow you to learn which concepts and terms Play uses, so you can recognize its similarities to other web frameworks and discover the differences.
3.1. Drawing the architectural big picture
Play’s API and architecture are based on HTTP and the model-view-controller (MVC) architectural pattern. These are familiar to many web developers, but if we’re being honest, no one remembers how all of the concepts fit together without looking them up. That’s why this section starts with a recap of the main ideas and terms.
When a web client sends HTTP requests to a Play application, the request is handled by the embedded HTTP server, which provides the Play framework’s network interface. The server forwards the request data to the Play framework, which generates a response that the server sends to the client, as figure 3.1 shows.
Figure 3.1. A client sends an HTTP request to the server, which sends back an HTTP response.

3.1.1. The Play server
Web server scalability is always a hot topic, and a key part of that is how many requests per second your web application can serve in a particular setup. The last 10 years haven’t seen much in the way of architectural improvements for JVM web application scalability in the web tier, and most improvements are due to faster hardware. But the last couple of years have seen the introduction of Java NIO non-blocking servers that greatly improve scalability: instead of tens of requests per second, think about thousands of requests per second.
NIO, or New I/O, is the updated Java input/output API introduced in Java SE 1.4 whose features include non-blocking I/O. Non-blocking—asynchronous—I/O makes it possible for the Play server to process multiple requests and responses with a single thread, instead of having to use one thread per request. This has a big impact on performance, because it allows a web server to handle a large number of simultaneous requests with a small fixed number of threads.
Play’s HTTP server is JBoss Netty, one of several Java NIO non-blocking servers. Netty is included in the Play distribution, so there’s no additional download. Netty is also fully integrated, so in practice you don’t have to think of it as something separate, which is why we’ll generally talk about the Play server instead. The main consequence of Play’s integration with an NIO server architecture is that Play has an HTTP API that supports asynchronous web programming, differing from the Servlet 2.x API that has dominated the last decade of web development on the JVM. Play also has a different deployment model.
This web server architecture’s deployment model may be different from what you’re used to. When you use a web framework that’s based on the Java Servlet API, you package your web application as some kind of archive that you deploy to an application server such as Tomcat, which runs your application. With the Play framework it’s different: Play includes its own embedded HTTP server, so you don’t need a separate application server to run your application.
3.1.2. HTTP
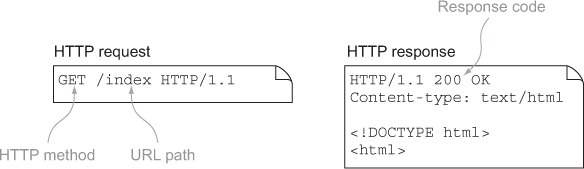
HTTP is an internet protocol whose beauty is in its simplicity, which has been a key factor in its success. The protocol is structured into transactions that consist of a request and a response, each of which is text-based, as figure 3.2 shows. HTTP requests use a small set of commands called HTTP methods, and HTTP responses are characterized by a small set of numeric status codes. The simplicity also comes from the request-response transactions being stateless.
Figure 3.2. An HTTP request and an HTTP response have text content.
3.1.3. MVC
The MVC design pattern separates an application’s logic and data from the user interface’s presentation and interaction, maintaining a loose coupling between the separate components. This is the high-level structure that we see if we zoom in on a Play framework application, as shown in figure 3.3.
Figure 3.3. A Play application is structured into loosely coupled model, view, and controller components.

Most importantly, the application’s model, which contains the application’s domain-specific data and logic, has no dependency on or even knowledge of the web-based user-interface layer. This doesn’t mean that Play doesn’t provide any model layer support: Play is a full-stack framework, so in addition to the web tier it provides a persistence API for databases, as illustrated by figure 3.4.
Figure 3.4. Play is persistence API agnostic, although it comes with an API for SQL databases.

The Play framework achieves all of this with fewer layers than traditional Java EE web frameworks by using the controller API to expose the HTTP directly, using HTTP concepts, instead of trying to provide an abstraction on top of it. This means that learning to use Play involves learning to use HTTP correctly, which differs from the approach presented by the Java Servlet API, for example.
Depending on your background, this may sound scarier than it actually is. HTTP is simple enough that you can pick it up as you go along. If you want to know more, you can read everything a web developer needs to know about HTTP in the first three chapters of the book Web Client Programming with Perl, by Clinton Wong, which is out of print and freely available online.[1]
1 O’Reilly Open Books Project, http://oreilly.com/openbook/webclient/.
3.1.4. REST
Finally, on a different level, Play allows your application to satisfy the constraints of a REST-style architecture. REST is an architectural style that characterizes the way HTTP works, featuring constraints such as stateless client-server interaction and a uniform interface.
In the case of HTTP, the uniform interface uniquely identifies resources by URL and manipulates them using a fixed set of HTTP methods. This interface allows clients to access and manipulate your web application’s resources via well-defined URLs, and HTTP’s features make this possible.
Play enables REST architecture by providing a stateless client-server architecture that fits with the REST constraints, and by making it possible to define your own uniform interface by specifying different HTTP methods to interact with individually designed URL patterns. You’ll see how to do this in section 3.4.
All of this matters because the goals of REST have significant practical benefits. In particular, a stateless cacheable architecture enables horizontal scalability with components running in parallel, which gets you further than scaling vertically by upgrading your single server. Meanwhile, the uniform interface makes it easier to build rich HTML5-based client-side user interfaces, compared to using tightly coupled, client-server user-interface components.
3.2. Application configuration—enabling features and changing defaults
When you create a new Play application, it just works, so you don’t have to configure it at all. Play creates an initial configuration file for you, and almost all of the many configuration parameters are optional, with sensible defaults, so you don’t need to set them all yourself.
From an architectural point of view, Play’s configuration file is a central configuration for all application components, including your application, third-party libraries, and the Play framework itself. Play provides configuration properties for both third-party libraries, such as the logging framework, as well as for its own components. For configuring your own application, Play lets you add custom properties to the configuration and provides an API for accessing them at runtime.
3.2.1. Creating the default configuration
You set configuration options in the conf/application.conf configuration file. Instead of creating this configuration file yourself, you can almost always start with the file that Play generates when you create a new application.
This default configuration, shown in listing 3.1, includes a generated value for the application’s secret key, which is used by Play’s cryptographic functions; a list of the application’s languages; and three properties that configure logging, setting the default logging level (the root logger) as well as the logging level for Play framework classes and your application’s classes.
Listing 3.1. Initial minimal configuration file—conf/application.conf
application.secret="l:2e>xI9kj@GkHu?K9D[L5OU=Dc<8i6jugIVE^[`?xSF]udB8ke"
application.langs="en"

logger.root=ERROR
logger.play=INFO
logger.application=DEBUG
This format will look familiar if you’ve used Play 1.x, but with one difference. You must use double quotes to quote configuration property values, although you don’t need to quote values that only consist of letters and numbers, such as DEBUG in the previous example or 42.
The configuration file also includes a wider selection of commented-out example options with some explanation of how to use them. This means that you can easily enable some features, such as a preconfigured in-memory database, just by uncommenting one or two lines.
3.2.2. Configuration file format
Play uses the Typesafe config library (https://github.com/typesafehub/config). This library’s format supports a superset of JavaScript Object Notation (JSON), although plain JSON and Java Properties files are also supported. The configuration format supports various features:
- Comments
- References to other configuration parameters and system environment variables
- File includes
- The ability to merge multiple configuration files
- Specifying an alternate configuration file or URL using system properties
- Units specifiers for durations, such as days, and sizes in bytes, such as MB
Other libraries, such as Akka, that use the same configuration library also use the same configuration file: you can also configure Akka in conf/application.conf.
Environment variables and references
A common configuration requirement is to use environment variables for operating system–independent, machine-specific configuration. For example, you can use an environment variable for database configuration:
db.default.url = ${DATABASE_URL}
You can use the same ${ ... } syntax to refer to other configuration variables, which you might use to set a series of properties to the same value, without duplication:
logger.net.sf.ehcache.Cache=DEBUG
logger.net.sf.ehcache.CacheManager=${logger.net.sf.ehcache.Cache}
logger.net.sf.ehcache.store.MemoryStore=${logger.net.sf.ehcache.Cache}
You can also use this to extract the common part of a configuration value, in order to avoid duplication without having to use intermediate configuration variables in the application:
log.directory = /var/log
log.access = ${log.directory}/access.log
log.errors = ${log.directory}/errors.log
Includes
Although you’ll normally only use a single application.conf file, you may want to use multiple files, either so that some of the configuration can be in a different format, or just to add more structure to a larger configuration.
For example, you might want to have a separate file for default database connection properties, and some of those properties in your main configuration file. To do this, add the following conf/db-default.conf file to your application:
db: {
  default: {
    driver: "org.h2.Driver",
    url: "jdbc:h2:mem:play",
    user: "sa",
    password: "",
  }
}
This example uses the JSON format to nest properties instead of repeating the db.default prefix for each property. Now we can include this configuration in our main application configuration and specify a different database user name and password by adding three lines to application.conf:

Here we see that to include a file, we use include followed by a quoted string filename. Technically, the unquoted include is a special name that’s used to include configuration files when it appears at the start of a key. This means that a configuration key called include would have to be quoted:
![]()
Merging values from multiple files
When you use multiple files, the configuration file format defines rules for how multiple values for the same parameter are merged.
You’ve already seen how you can replace a previously defined value when we redefined db.default.user. In general, when you redefine a property using a single value, this replaces the previous value.
You can also use the object notation to merge multiple values. For example, let’s start with the db-default.conf default database settings we saw earlier:
db: {
  default: {
    driver: "org.h2.Driver",
    url: "jdbc:h2:mem:play",
    user: "sa",
    password: "",
  }
}
Note that the format allows a trailing comma after password, the last property in the db.default object.
In application.conf, we can replace the user name and password as before, and also add a new property by specifying a whole db object:
db: {
  default: {
    user: "products"
    password: "clippy must die!"
    logStatements: true
  }
}
Note that the format also allows us to omit the commas between properties, provided that there’s a line break ( ) between properties.
The result is equivalent to the following “flat” configuration:
db.default.driver = org.h2.Driver
db.default.url = jdbc:h2:mem:play
db.default.user = products
db.default.password = "clippy must die!"
db.default.logStatements = true
The configuration format is specified in detail by the Human-Optimized Config Object Notation (HOCON) specification (https://github.com/typesafehub/config/blob/master/HOCON.md).
3.2.3. Configuration file overrides
The application.conf file isn’t the last word on configuration property values: you can also use Java system properties to override individual values or even the whole file.
To return to our earlier example of a machine-specific database configuration, an alternative to setting an environment variable is to set a system property when running Play. Here’s how to do this when starting Play in production mode from the Play console:
$ start -Ddb.default.url=postgres://localhost:products@clippy/products
You can also override the whole application.conf file by using a system property to specify an alternate file. Use a relative path for a file within the application:
$ run -Dconfig.file=conf/production.conf
Use an absolute path for a machine-specific file outside the application directory:
$ run -Dconfig.file=/etc/products/production.conf
3.2.4. Configuration API—programmatic access
The Play configuration API gives you programmatic access to the configuration, so you can read configuration values in controllers and templates. The play.api.Configuration class provides the API for accessing configuration options, and play.api.Application.configuration is the configuration instance for the current application. For example, the following code logs the database URL configuration parameter value.
Listing 3.2. Using the Play API to retrieve the current application’s configuration

As you should expect, play.api.Configuration provides type-safe access to configuration parameter values, with methods that read parameters of various types. Currently, Play supports String, Int, and Boolean types. Acceptable Boolean values are true/yes/enabled or false/no/disabled. For example, here’s how to check a Boolean configuration property:
current.configuration.getBoolean("db.default.logStatements").foreach {
  if (_) Logger.info("Logging SQL statements...")
}
Configurations are structured hierarchically, according to the hierarchy of keys specified by the file format. The API allows you to get a subconfiguration of the current configuration. For example, the following code logs the values of the db.default.driver and db.default.url parameters:
Listing 3.3. Accessing a subconfiguration

Although you can use this to read standard Play configuration parameters, you’re more likely to want to use this to read your own custom application configuration parameters.
3.2.5. Custom application configuration
When you want to define your own configuration parameters for your application, add them to the existing configuration file and use the configuration API to access their values.
For example, suppose you want to display version information in your web application’s page footer. You could add an application.revision configuration parameter and display its value in a template. First add the new entry in the configuration file:
application.revision = 42
Then read the value in a template, using the implicit current instance of play.api.Application to access the current configuration:
@import play.api.Play.current
<footer>
  Revision @current.configuration.getString("application.revision")
</footer>
The getString method returns an Option[String] rather than a String, but the template outputs the value or an empty string, depending on whether the Option has a value.
Note that it would be better not to hardcode the version information in the configuration file. Instead, you might get the information from a revision control system by writing the output of commands like svnversion or git describe --always to a file, and reading that from your application.
3.3. The model—adding data structures and business logic
The model contains the application’s domain-specific data and logic. In our case, this means Scala classes that process and provide access to the application’s data. This data is usually kept in persistent storage, such as a relational database, in which case the model handles persistence.
In a layered application architecture, the domain-specific logic is usually called business logic and doesn’t have a dependency on any of the application’s external interfaces, such as a web-based user interface. Instead, the model provides an object-oriented API for interface layers, such as the HTTP-based controller layer.
3.3.1. Database-centric design
One good way to design an application is to start with a logical data model, as well as an actual physical database. This is an alternative to a UI-centric design that’s based on how users will interact with the application’s user interface, or a URL-centric design that focuses on the application’s HTTP API.
Database-centric design means starting with the data model: identifying entities and their attributes and relationships. Once you have a database design that structures some of the application’s data, you can add a user interface and external API layers that provide access to this data. This doesn’t necessarily mean up-front design for the whole database; just that the database design is leading for the corresponding user interface and APIs.
For example, we can design a product catalog application by first designing a database for all of the data that we’ll process, in the form of a relational database model that defines the attributes and relationships between entities in our domain:
- Product— A Product is a description of a manufactured product as it might appear in a catalog, such as “Box of 1000 large plain paperclips,” but not an actual box of paperclips. Attributes include a product code, name, and description.
- Stock Item— A Stock Item is a certain quantity of some product at some location, such as 500 boxes of a certain kind of paperclip, in a particular Warehouse. Attributes include quantity and references to a Product and Warehouse.
- Warehouse— A Warehouse is a place where Stock Items are stored. Attributes include a name and geographic location or address.
- Order— An Order is a request to transfer ownership of some quantity of one or more Products, specified by Order Lines. Attributes include a date, seller, and buyer.
- Order Line— An Order Line specifies a certain quantity of some Product, as part of an Order. Attributes include a quantity and a reference to an Order and Product.
Traditionally, this has been a common approach in enterprise environments, which often view the data model as a fundamental representation of a business domain that will outlive any single software application. Some organizations even go further and try to design a unified data model for the whole business.
Don’t waste your life searching for a unified model
If you use database-centric design in a commercial organization, don’t attempt to introduce a unified enterprise data model. You’re unlikely to even get everyone to agree on the definition of customer, although you may keep several enterprise architects out of your way for a while.
The benefit of this approach is that you can use established data modeling techniques to come up with a data model that consistently and unambiguously describes your application’s domain. This data model can then be the basis for communication about the domain, both among people and in code itself. Depending on your point of view, a logical data model’s high level of abstraction is also a benefit, because this makes it largely independent of how the data is actually used.
3.3.2. Model class design
There’s more than one way to structure your model. Perhaps the most significant choice is whether to keep your domain-specific data and logic separate or together. In the past, how you approached this generally depended on which technology stack you were using. Developers coming to Play and Scala from a Java EE background are likely to have separated data and behavior in the past, whereas other developers may have used a more object-oriented approach that mixes data and behavior in model classes.
Structuring the model to separate the data model and business logic is common in Java EE architectures, and it was promoted by Enterprise JavaBeans’s separation between entity beans and session beans. More generally, the domain data model is specified by classes called value objects that don’t contain any logic. These value objects are used to move data between an application’s external interfaces and a service-oriented business logic layer, which in turn often uses a separate Data Access Object (DAO) layer that provides the interface with persistent storage. This is described in detail in Sun’s Core J2EE Patterns.
Martin Fowler famously describes this approach as the Anemic Domain Model antipattern, and doesn’t pull any punches when he writes that “The fundamental horror of this anti-pattern is that it’s so contrary to the basic idea of object-oriented design, which is to combine data and process together.”[2]
Play’s original design was intended to support an alternative architecture, whose model classes include business logic and persistence layer access with their data. This “encapsulated model” style looks somewhat different from the Java EE style, as shown in figure 3.5, and typically results in simpler code.
Figure 3.5. Two different ways to structure your application’s model layer
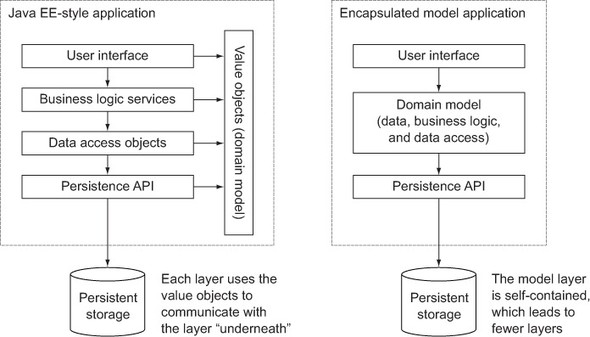
Despite all of this, Play doesn’t have much to do with your domain model. Play doesn’t impose any constraints on your model, and the persistence API integration it provides is optional. In the end, you should use whichever architectural style you prefer.
3.3.3. Defining case classes
It’s convenient to define your domain model classes using Scala case classes, which expose their parameters as public values. In addition, case classes are often the basis for persistence API integration. Section 5.3.2 discusses the benefits of using case classes for the model, such as immutability.
For example, suppose that we’re modeling stock-level monitoring as part of a warehouse management system. We need case classes to represent quantities of various products stored in warehouses.
Listing 3.4. Domain model classes—app/models/models.scala
case class Product(
  id: Long,
  ean: Long,

  name: String,
  description: String)

case class Warehouse(id: Long, name: String)

case class StockItem(
  id: Long,
  productId: Long,
  warehouseId: Long,
  quantity: Long)
The EAN identifier is a unique product identifier, which we introduced in section 2.1.4.
3.3.4. Persistence API integration
You can use your case classes to persist the model using a persistence API. In a Play application’s architecture, shown in figure 3.6, this is entirely separate from the web tier; only the model uses (has a dependency on) the persistence API, which in turn uses external persistent storage, such as a relational database.
Figure 3.6. Persistence architecture in a Play application
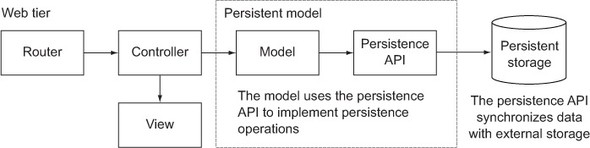
Play includes the Anorm persistence API so that you can build a complete web application, including SQL database access, without any additional libraries. But you’re free to use alternative persistence libraries or approaches to persistent storage, such as the newer Slick library.
For example, given instances of our Product and Warehouse classes, you need to be able to execute SQL statements such as the following:
insert into products (id, ean, name, description) values (?, ?, ?, ?);
update stock_item set quantity=? where product_id=? and warehouse_id=?
Similarly, you need to be able to perform queries and transform the results into Scala types. For example, you need to execute the following query and be able to get a List[Product] of the results:
select * from products order by name, ean;
3.3.5. Using Slick for database access
Slick is intended as a Scala-based API for relational-database access. Showing you how to use Slick is beyond the scope of this book, but the following examples should give you an idea of what the code looks look.
The idea behind Slick is that you use it instead of using JDBC directly or adding a complex object-relational mapping framework. Instead, Slick uses Scala language features to allow you to map database tables to Scala collections and to execute queries. With Scala, this results in less code and cleaner code compared to directly using JDBC, and especially compared to using JDBC from Java.
For example, you can map a database table to a Product data access object using Scala code:

Next, you define a query on the Product object:
val products = for {
  product <- Product.sortBy(product => product.name.asc)
} yield (product)
To execute the query, you can use the query object to generate a list of products, in a database session:
val url = "jdbc:postgresql://localhost/slick?user=slick&password=slick"
Database.forURL(url, driver = "org.postgresql.Driver") withSession {
  val productList = products.list
}
Without going into any detail, we have already shown the important part, which is the way you create a type-safe data access object that lets you perform type-safe database queries using the Scala collections API’s idioms, and the mapped Scala types for database column values.
You don’t have to use Slick for database access, and chapter 5 will show you how to use two alternative persistence APIs.
3.4. Controllers—handling HTTP requests and responses
One aspect of designing your application is to design a URL scheme for HTTP requests, hyperlinks, HTML forms, and possibly a public API. In Play, you define this interface in an HTTP routes configuration and implement the interface in Scala controller classes.
Your application’s controllers and routes make up the controller layer in the MVC architecture introduced in section 3.1.3, illustrated in figure 3.7.
Figure 3.7. Play routes HTTP requests to action methods in controller classes.

More specifically, controllers are the Scala classes that define your application’s HTTP interface, and your routes configuration determines which controller method a given HTTP request will invoke. These controller methods are called actions—Play’s architecture is in fact an MVC variant called action-based MVC—so you can also think of a controller class as a collection of action methods.
In addition to handling HTTP requests, action methods are also responsible for coordinating HTTP responses. Most of the time, you’ll generate a response by rendering an HTML view template, but a response might also be an HTTP error or data in some other format, such as plain text, XML, or JSON. Responses may also be binary data, such as a generated bitmap image.
3.4.1. URL-centric design
One good way to start building a web application is to plan its HTTP interface—its URLs. This URL-centric design is an alternative to a database-centric design that starts with the application’s data, or a UI-centric design that’s based on how users will interact with its user interface.
URL-centric design isn’t better than data model–centric design or UI-centric design, although it might make more sense for a developer who thinks in a certain way, or for a certain kind of application. Sometimes the best approach is to start on all three, possibly with separate people who have different expertise, and meet in the middle.
HTTP resources
URL-centric design means identifying your application’s resources, and operations on those resources, and creating a series of URLs that provide HTTP access to those resources and operations. Once you have a solid design, you can add a user-interface layer on top of this HTTP interface, and add a model that backs the HTTP resources. Figure 3.8 summarizes this process.
Figure 3.8. URL-centric design starts with identifying HTTP resources and their URLs.

The key benefit of this approach is that you can create a consistent public API for your application that’s more stable than either the physical data model represented by its model classes, or the user interface generated by its view templates.
This kind of API is often called a RESTful web service, which means that the API is a web service API that conforms to the architectural constraints of representational state transfer (REST). Section 3.1.4 discussed REST.
Resource-oriented Architecture
Modeling HTTP resources is especially useful if the HTTP API is the basis for more than one external interface, in what can be called a resource-oriented architecture—a REST-style alternative to service-oriented architecture based on addressable resources.
For example, your application might have a plain HTML user interface and a JavaScript-based user interface that uses Ajax to access the server’s HTTP interface, as well as arbitrary HTTP clients that use your HTTP API directly.
Resource-oriented architecture is an API-centric perspective on your application, in which you consider that HTTP requests won’t necessarily come from your own application’s web-based user interface. In particular, this is the most natural approach if you’re designing a REST-style HTTP API. For more information, see chapter 5—“Designing Read-Only Resource-Oriented Services”—of RESTful Web Services by Leonard Richardson, Sam Ruby, and David Heinemeier Hansson (O’Reilly, 2007).
Clean URLs are also relatively short. In principle, this shouldn’t matter, because in principle you never type URLs by hand. But you do in practice, and shorter URLs have better usability. For example, short URLs are easier to use in other media, such as email or instant messaging.
3.4.2. Routing HTTP requests to controller action methods
There isn’t much point working on a URL-centric design unless you can make those URLs work in practice. Fortunately, Play’s HTTP routing configuration syntax gives you a lot of flexibility about how to match HTTP requests.
For example, a URL-centric design for our product catalog might give us a URL scheme with the following URLs:
GET /

GET /products
GET /products?page=2
GET /products?filter=zinc

GET /product/5010255079763

GET /product/5010255079763/edit

PUT /product/5010255079763
To implement this scheme in your application, you create a conf/routes file like this, with one route for the three URLs that start with /products and differ only by query string:
GET /                       controllers.Application.home()

GET /products               controllers.Products.list(page: Int ?= 1)

GET /product/:ean           controllers.Products.details(ean: Long)

GET /product/:ean/edit      controllers.Products.edit(ean: Long)

PUT /product/$ean<d{13}>   controllers.Products.update(ean: Long)
Each line in this routes configuration file has the syntax shown in figure 3.9.
Figure 3.9. Routing syntax for matching HTTP requests

The full details of the routes file syntax are explained in chapter 4. What’s important for now is to notice how straightforward the mapping is, from an HTTP request on the left to a controller method on the right.
What’s more, this includes a type-safe mapping from HTTP request parameters to controller method parameters. This is called binding.
3.4.3. Binding HTTP data to Scala objects
Routing an HTTP request to a controller and invoking one of its action methods is only half of the story: action methods often have parameters, and you also need to be able to map HTTP request data to those parameters. In practice, this means parsing string data from the request’s URL path and URL query string, and converting that data to Scala objects.
For example, figure 3.10 illustrates how a request for a product’s details page results in both routing to a specific action method and converting the parameter to a number.
Figure 3.10. Routing and binding an HTTP request

On an architectural level, the routing and the subsequent parameter binding are both part of the mapping between HTTP and Scala’s interfaces, which is a translation between two very different interface styles. The HTTP “standard interface” uses a small fixed number of methods (GET, POST, and so on) on a rich model of uniquely identified resources, whereas Scala code has an object-oriented interface that supports an arbitrary number of methods that act on classes and instances.
More specifically, whereas routing determines which Scala method to call for a given HTTP request, binding allows this method invocation to use type-safe parameters. This type safety is a recurring theme: in HTTP, everything is a string, but in Scala, everything has a more specific type.
Play has a number of separate built-in binders for different types, and you can also implement your own custom binders.
This was just an overview of what binding is; we’ll provide a longer explanation of how binding works in section 4.4.
3.4.4. Generating different types of HTTP response
Controllers don’t just handle incoming HTTP requests; as the interface between HTTP and the web application, controllers also generate HTTP responses. Most of the time, an HTTP response is just a web page, but many different kinds of responses are possible, especially when you’re building machine-readable web services.
The architectural perspective of HTTP requests and responses is to consider the different ways to represent data that’s transmitted over HTTP. A web page about product details, for example, is just one possible representation of a certain collection of data; the same product information might also be represented as plain text, XML, JSON, or a binary format such as a JPEG product photo or a PNG bar code that encodes a reference to the product.
In the same way that Play uses Scala types to handle HTTP request data, Play also provides Scala types for different HTTP response representations. You use these types in a controller method’s return value, and Play generates an HTTP response with the appropriate content type. Section 4.6 shows you how to generate different types of responses—plain text, HTML, JSON, XML, and binary images.
An HTTP response is not only a response body; the response also includes HTTP status codes and HTTP headers that provide additional information about the response. You might not have to think about these much when you write a web application that generates web pages, but you do need fine control over all aspects of the HTTP response when you implement a web service. As with the response body, you specify status codes and headers in controller method return values.
3.5. View templates—formatting output
Web applications generally make web pages, so we’ll need to know how to make some of those.
If you were to take a purist view of a server-side HTTP API architecture, you might provide a way to write data to the HTTP response and stop there. This is what the original Servlet API did, which seems like a good idea until you realize that web developers need an easy way to generate HTML documents. In the case of the Servlet API, this resulted in the later addition of JavaServer Pages, which wasn’t a high point of web application technology history.
HTML document output matters: as Mark Pilgrim said (before he disappeared), “HTML is not just one output format among many; it is the format of our age.” This means that a web framework’s approach to formatting output is a critical design choice. View templates are a big deal; HTML templates in particular.
Before we look at how Play’s view templates work, let’s consider how you might want to use them.
3.5.1. UI-centric design
We’ve already looked at database-centric design that starts with the application’s data, and URL-centric design that focuses on the application’s HTTP API. Yet another good way to design an application is to start with the user interface and design functionality in terms of how people interact with it.
UI-centric design starts with user-interface mockups and progressively adds detail without starting on the underlying implementation until later, when the interface design is established. This approach has become especially popular with the rise of SAAS (software as a service) applications.
SAAS applications
A clear example of UI-centric design is the application design approach practiced by 37signals, an American company that sells a suite of SAAS applications. 37signals popularized UI-centric design in their book Getting Real (http://gettingreal.37signals.com/ch09_Interface_First.php), which describes the approach as “interface first,” meaning simply that you should “design the interface before you start programming.”
UI-centric design works well for software that focuses on simplicity and usability, because functionality must literally compete for space in the UI, whereas functionality that you can’t see doesn’t exist. This is entirely natural for SAAS applications, because of the relative importance of front-end design on public internet websites.
Another reason why UI-centric design suits SAAS applications is because integration with other systems is more likely to happen at the HTTP layer, in combination with a URL-centric design, than via the database layer. In this scenario, database-centric design may seem less relevant because the database design gets less attention than the UI design, for early versions of the software, at least.
Mobile applications
UI-centric design is also a good idea for mobile applications, because it’s better to address mobile devices’ design constraints from the start than to attempt to squeeze a desktop UI into a small screen later in the development process. Mobile-first design—designing for mobile devices with “progressive enhancement” for larger platforms—is also an increasingly popular UI-centric design approach.
3.5.2. HTML-first templates
There are two kinds of web framework templating systems, each addressing different developer goals: component systems and raw HTML templates.
User-interface components
One approach minimizes the amount of HTML you write, usually by providing a user-interface component library. The idea is that you construct your user interface from UI “building blocks” instead of writing HTML by hand. This approach is popular with application developers who want a standard look and feel, or whose focus is more on the back end than the front end. Figure 3.11 illustrates this application architecture.
Figure 3.11. UI components that span client and server and generate HTML

In principle, the benefit of this approach is that it results in a more consistent UI with less coding, and there are various frameworks that achieve this goal. But the risk is that the UI components are a leaky abstraction, and that you’ll end up having to debug invalid or otherwise non-working HTML and JavaScript after all. This is more likely than you might expect, because the traditional approach to a UI-component model is to use a stateful MVC approach. You don’t need to be an MVC expert to consider that this might be a mismatch with HTTP, which is stateless.
HTML templates
A different kind of template system works by decorating HTML to make content dynamic, usually with syntax that provides a combination of tags for things like control structures and iteration, and an expression language for outputting dynamic values. In one sense, this is a more low-level approach, because you construct your user interface’s HTML by hand, using HTML and HTTP features as a starting point for implementing user interaction. Figure 3.12 shows this approach’s architecture.
Figure 3.12. Server-side HTML templates
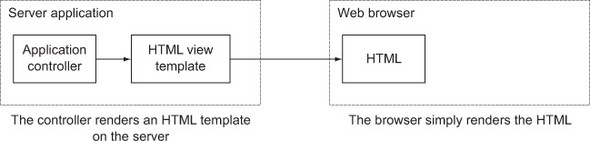
The benefits of starting with HTML become apparent in practice, due to a combination of factors.
The most important implication of this approach is that there’s no generated HTML, no HTML that you don’t write by hand yourself. This means that not only can you choose how you write the HTML, but you can also choose which kind of HTML you use. At the time of writing, you should be using HTML5 to build web applications, but many UI frameworks are based on XHTML. HTML5 matters not just because it’s new, but because it’s the basis for a large ecosystem of JavaScript UI widgets.
JavaScript widgets
The opportunity to use a wide selection of JavaScript widgets is the most apparent practical result of having control over your application’s HTML. Contrast this to web framework UI widgets: a consequence of providing HTML and JavaScript, so that the developer doesn’t have to code it, is that there’s only one kind of HTML and therefore a fixed set of widgets. However big a web framework’s component library is, there will always be a limit to the number of widgets.
JavaScript widgets are different from framework-specific widgets, because they can work with any server-side code that gives you control over your HTML and the HTTP interface. Significantly, this includes PHP: there are always more JavaScript widgets intended for PHP developers, because there are more PHP developers. Being in control of the HTML your templates produce means that you have a rich choice of JavaScript widgets. Figure 3.13 illustrates the resulting architecture.
Figure 3.13. Client-side JavaScript components, decoupled from the server

This is a simpler architecture than client-server components because you’re using HTML and HTTP directly, instead of adding a UI-component abstraction layer. This makes the user interface easier to understand and debug.
3.5.3. Type-safe Scala templates
Play includes a template engine that’s designed to output any kind of text-based format, the usual examples being HTML, XML, and plain text. Play’s approach is to provide an elegant way to produce exactly the text output you want, with the minimum interference from the Scala-based template syntax. Later on, in chapter 6, we’ll explain how to use these templates; for now we’ll focus on a few key points.
Starting with a minimal template
To start with, minimum interference means that all of the template syntax is optional. This means that the minimal template for an HTML document is simply a text file containing a minimal (valid) HTML document:[3]
3 A minimal template is actually an empty file, but that wouldn’t be a very interesting example.
Listing 3.5. A minimal HTML document—app/views/minimal.scala.html
<!DOCTYPE html>
<html>
<head>
<title></title>
</head>
</html>
An “empty” HTML document like this isn’t very interesting, but it’s a starting point that you can add to. You literally start with a blank page and add a mixture of static and dynamic content to your template.
One nice thing about this approach is that you only have to learn one thing about the template syntax at a time, which gives you a shallow learning curve on which you can learn how to use template features just in time, as opposed to learning them just in case.
Adding dynamic content
The first dynamic content in an HTML document is probably a page title, which you add like this:
Listing 3.6. Template with a title parameter—app/views/title.scala.html

Although this is a trivial example, it introduces the first two pieces of template syntax: the parameter declaration on the first line, and the @title Scala expression syntax. To understand how this all works, we also need to know how we render this template in our application. Let’s start with the parameter declaration.
Basic template syntax
The parameter declaration, like all template syntax, starts with the special @ character, which is followed by a normal Scala function parameter list. At this point in the book, it should be no surprise that Play template parameters require a declaration that makes them type-safe.
Type-safe templates such as these are unusual, compared to most other web frameworks’ templates, and they make it possible for Play to catch more kinds of errors when it compiles the application—see section 6.2.2 for an example. The important thing to remember at this stage is that Play templates have function parameter lists, just like Scala class methods.
The second thing we added was an expression to output the value of the title parameter. In the body of a template, the @ character can be followed by any Scala expression or statement, whose value is inserted into the rendered template output.
HTML-friendly syntax
At first sight, it may seem odd that none of this is HTML-specific, but in practice it turns out that a template system with the right kind of unobtrusive syntax gets out of the way and makes it easier to write HTML. In particular, Play templates’ Scala syntax doesn’t interfere with HTML special characters. This isn’t a coincidence.
Next, we need to look at how these templates are rendered.
3.5.4. Rendering templates—Scala template functions
Scala templates are Scala functions ... sort of. How templates work isn’t complicated, but it isn’t obvious either.
To use the template in the previous example, we first need to save it in a file in the application, such as app/views/products.scala.html. Then we can render the template in a controller by calling the template function:
val html = views.html.title("New Arrivals")
You can also do this by starting the Scala console (see section 1.6) in a Play project that contains the app/views/title.scala.html template (listing 3.6).
This results in a play.api.templates.Html instance whose body property contains the rendered HTML:
<!DOCTYPE html>
<html>
<head>
<title>New Arrivals</title>
</head>
</html>
We can now see that saving a template, with a title:String parameter, in a file called title.scala.html gives us a title function that we can call in Scala code to render the template; we just haven’t seen how this works yet.
When Play compiles the application, Play parses the Scala templates and generates Scala objects, which are in turn compiled with the application. The template function is really a function on this compiled object.
This results in the following compiled template—a file in target/scala-2.10/src_managed/main/views/html/:
Listing 3.7. Compiled template title.template.scala
package views.html

import play.api.templates._
import play.api.templates.PlayMagic._
import models._
import controllers._
import play.api.i18n._
import play.api.mvc._
import play.api.data._
import views.html._

object title
  extends BaseScalaTemplate[play.api.templates.Html,
  Format[play.api.templates.Html]](play.api.templates.HtmlFormat)
  with play.api.templates.Template1[String,play.api.templates.Html] {

    def apply(title:String):play.api.templates.Html = {
        _display_ {

Seq[Any](format.raw("""
<!DOCTYPE html>
<html>
<head>
<title>"""),_display_(Seq[Any](title)),format.raw("""</title>
</head>
</html>"""))}
    }

    def render(title:String): play.api.templates.Html = apply(title)

    def f:((String) => play.api.templates.Html) =
      (title) => apply(title)

    def ref: this.type = this
}
There are various details here that you don’t need to know about, but the important thing is that there’s no magic: now we can see that a template isn’t really a Scala function in its initial form, but it becomes one. The template has been converted into a products object with an apply function. This function is named after the template filename, has the same parameter list as the template, and returns the rendered template when called.
This Scala code will be compiled with the rest of your application’s Scala code. This means that templates aren’t separate from the compiled application and don’t have to be interpreted or compiled at runtime, which makes runtime template execution extremely fast.
There’s an interesting consequence in the way that templates use Scala and compile to Scala functions: in a template, you can render another template the way you’d call any function. This means that we can use normal Scala syntax for things that require special features in other template engines, such as tags. You can also use more advanced Scala features in templates, such as implicit parameters. Chapter 6 includes examples of these techniques.
Finally, you can use Play templates to generate any other text-based syntax, such as XML, as easily as you generate HTML.
3.6. Static and compiled assets
A typical web application includes static content—images, JavaScript, stylesheets, and downloads. This content is fixed, so it’s served from files instead of being generated by the web framework. In Play, these files are called assets.
Architects and web frameworks often take the view that static files should be handled differently than generated content in a web application’s architecture, often in the interests of performance. In Play this is probably a premature optimization. If you have high performance requirements for serving static content, the best approach is probably to use a cache or load balancer in front of Play, instead of avoiding serving the files using Play in the first place.
3.6.1. Serving assets
Play’s architecture for serving assets is no different from how any other HTTP request is handled. Play provides an assets controller whose purpose is to serve static files. There are two advantages to this approach: you use the usual routes configuration and you get additional functionality in the assets controller.
Using the routes configuration for assets means that you have the same flexibility in mapping URLs as you do for dynamic content. This also means that you can use reverse routing to avoid hardcoding directory paths in your application and to avoid broken internal links.
On top of routing, the assets controller provides additional functionality that’s useful for improving performance when serving static files:
- Caching support— Generating HTTP Entity Tags (ETags) to enable caching
- JavaScript minification— Using Google Closure Compiler to reduce the size of JavaScript files
Section 4.6.5 explains how to use these features, and how to configure assets’ URLs.
3.6.2. Compiling assets
Recent years have seen advances in browser support and runtime performance for CSS stylesheets and client JavaScript, along with more variation in how these technologies are used. One trend is the emergence of new languages that are compiled to CSS or JavaScript so that they can be used in the web browser. Play supports one of each: LESS and CoffeeScript, languages that improve on CSS and JavaScript, respectively.
At compile time, LESS and CoffeeScript assets are compiled into CSS and JavaScript files. HTTP requests for these assets are handled by the assets controller, which transparently serves the compiled version instead of the source. The benefit of this integration with Play compilation is that you discover compilation errors at compile time, not at runtime.
Section 6.6 includes a more detailed introduction to LESS and CoffeeScript and shows you how to use them in your Play application.
3.7. Jobs—starting processes
Sometimes an application has to run some code outside the normal HTTP request-response cycle, either because it’s a long-running task that the web client doesn’t have to wait for, or because the task must be executed on a regular cycle, independently of any user or client interaction.
For example, if we use our product catalog application for warehouse management, we’ll have to keep track of orders that have to be picked, packed, and shipped. Picking is the task that involves someone finding the order items in the warehouse, so that they can be packaged for shipment and collected from the warehouse by a transporter. One way to do this is to generate a pick list (nothing to do with HTML forms) of the backlog of items that still need to be picked, as shown in figure 3.14.
Figure 3.14. A simple pick list

For a long time, system architectures assumed that these tasks would be performed outside any web applications, like batch jobs in an old-school system. Today, architectures are frequently web-centric, based around a web application or deployed on a cloud-based application hosting service. These architectures mean that we need a way to schedule and execute these jobs from within our web application.
To make this more concrete, let’s consider a system to generate a pick list and email it to the warehouse staff. For the sake of the example, let’s suppose that we need to do this in a batch process because the generation job spends a long time calculating the optimal list ordering, to minimize the time it takes to visit the relevant warehouse locations.
3.7.1. Asynchronous jobs
The simplest way to start the pick-list generation process in our web application is to add a big Generate Pick List button somewhere in the user interface that you can use to start generating the list. (It doesn’t have to be a big button, but big buttons are more satisfying.) Figure 3.15 shows how this would work.
Figure 3.15. User interface to manually trigger an asynchronous job

Each entry in the pick list is a request to prepare an order by picking an order line (a quantity of a particular product) from the given warehouse location. We’ll use a simple template to render a list of preparation objects.
Listing 3.8. Pick list template—app/views/pickList.scala.html
@(warehouse: String, list: List[models.Preparation],
  time: java.util.Date)

@main("Warehouse " + warehouse + " pick list for " + time) {

  <table>
    <tr>
      <th>Order #</th>
      <th>Product EAN</th>
      <th>Product description</th>
      <th>Quantity</th>
      <th>Location</th>
    </tr>
  @for((preparation, index) <- list.zipWithIndex) {
    <tr@(if (index % 2 == 0) " class='odd'")>
      <td>@preparation.orderNumber</td>
      <td>@preparation.product.ean</td>
      <td>@preparation.product.description</td>
      <td>@preparation.quantity</td>
      <td>@preparation.location</td>
    </tr> }
  </table>
}
The usual way to display this on a web page would be to render the template directly from a controller action, like this, as we might to preview the pick list in a web browser:
Listing 3.9. Pick list controller—app/controllers/PickLists.scala

Instead, we want to build, render, and send the pick list in a separate process, so that it executes independently of the controller action that sends a response to the web browser.
The first thing we’ll use Scala futures for is to execute some code asynchronously, using the scala.concurrent.future function.
Listing 3.10. Pick list controller—app/controllers/PickLists.scala

Like the preview action, this example passes the rendered pick list to a send method in our application. For the sake of this example, let’s suppose that it sends the pick list in an email.
This time, the template rendering code is wrapped in a call to scala.concurrent.future, which executes the code asynchronously. This means that however long the call to send takes, this action immediately performs the redirect.
What’s happening here is that the code is executed concurrently in a separate execution context from Play’s controllers and the HTTP request-response cycle. That’s why you can think of this example as a job that executes asynchronously—separately from serving an HTTP response to the user.
3.7.2. Scheduled jobs
Depending on how our warehouse works, it may be more useful to automatically generate a new pick list every half hour. To do this, we need a scheduled job that’s triggered automatically, without needing anyone to click the button in the user interface. Play doesn’t provide scheduling functionality directly, but instead integrates with Akka, a library for actor-based concurrency that’s included with Play.
Most of what you can do with Akka is beyond the scope of this book; for now we’ll look at some special cases of using Akka for executing jobs. For everything else about Akka, see Akka in Action by Raymond Roestenburg, Rob Bakker, and Rob Williams (Manning).
We’ll run the job by using Akka to schedule an actor that runs at regular intervals. We won’t need a user interface; instead we’ll create and schedule the actor when the Play application starts.
Listing 3.11. Global settings object—app/Global.scala

This is the code that creates and schedules an actor for each warehouse when our Play application starts. We’re using Akka’s scheduler API directly here, with implicit conversions from the akka.util.duration._ package that converts expressions like 30 minutes to an akka.util.Duration instance.
Each actor will respond to a send message, which instructs it to send a pick list for its warehouse. The actor implementation is a class that extends the akka.actor.Actor trait and implements a receive method that uses Scala pattern matching to handle the correct method:
Listing 3.12. Pick list generation actor—app/Global.scala

The actual implementation of the send method, which sends the rendered HTML template somewhere, doesn’t matter for this example. The essence of this example is how straightforward it is to use an Akka actor to set up a basic scheduled job. You don’t need to learn much about Akka for this kind of basic task, but if you want to do something more complex, you can use Akka as the basis for a more advanced concurrent, fault-tolerant, and scalable application.
3.7.3. Asynchronous results and suspended requests
The asynchronous job example in section 3.7.1 showed how to start a long-running job in a separate thread, when you don’t need a result from the job. But in some cases you’ll want to wait for a result.
For example, suppose our application includes a dashboard that displays the current size of the order backlog—the number of orders for a particular warehouse that still need to be picked and shipped. This means checking all of the orders and returning a number—the number of outstanding orders.
For this example, we’re going to use some hypothetical model code that fetches the value of the order backlog for a given warehouse identifier:
val backlog = models.Order.backlog(warehouse)
If this check takes a long time, perhaps because it involves web service calls to another system, then HTTP requests from the dashboard could take up a lot of threads in our web application. In this kind of scenario, we’ll want our web application to fetch the order backlog result asynchronously, stop processing the HTTP request, and make the request-processing thread available to process other requests while it’s waiting. Here’s how we could do it.
Listing 3.13. Suspend an HTTP request—app/controllers/Dashboard.scala

Two things happen in this example, both using a play.api.libs.concurrent.Promise to wrap a value that isn’t yet available. First, we use scala.concurrent.future, as before, to execute the code asynchronously. The difference this time is that we use its return value, which has the type Future[String]. This represents a placeholder for the String result that’s not yet available, which we assign to the value backlog.
In Play 2 you’ll come across the term “future” regularly. The term refers to a computation that may or may not have yet finished. This means that you can start a computation that’s expected to take a while—because it’s processor-intensive or because it calls a web service—and not have it block the current computation. Play 2 makes extensive use of futures, both internally and in its APIs, such as the web services API. This is what makes Play 2 so scalable: it makes sure that things that have to wait are handled in the background, while it goes on handling other requests.
Next, we use the Future[String] (the backlog value) to make a Future[Result] by wrapping the String value in an Ok result type. When it’s available, this result will be a plain text HTTP response that contains the backlog number. Meanwhile, the Future[Result] is a placeholder for this HTTP result, which isn’t yet available because the Future[String] isn’t yet available. In addition, we wrap the Future[Result] in a call to the Async function, which converts it to a play.api.mvc.AsyncResult.
The result of this is what we wanted: a controller action that executes asynchronously. Returning a play.api.mvc.AsyncResult means that Play will suspend the HTTP request until the result becomes available. This is important because it allows Play to release threads to a thread pool, making them available to process other HTTP requests, so the application can serve a large number of requests with a limited number of threads.
Although this wasn’t a complete example, it gives you a brief look at a basic example of asynchronous web programming.
3.8. Modules—structuring your application
A Play module is a Play application dependency—either reusable third-party code or an independent part of your own application. The difference between a module and any other library dependency is that a module depends on Play and can do the same things an application can do. Figure 3.16 illustrates these dependencies.
Figure 3.16. Play application dependencies on libraries, modules, and the framework itself

There are several benefits to splitting application functionality into custom modules:
- The core application, based around its domain model, remains smaller and simpler to understand.
- Modules can enhance Play with functionality that appears to be built-in.
- A developer can write and maintain a module without having to understand the main application.
- It’s easier to separately demonstrate, test, and document functionality that’s contained in a module.
- Modules allow you to reuse functionality between applications and to share reusable code with other developers.
This section is a high-level description of what modules are and what you can use them for. You’ll see how to write your own module in chapter 9.
3.8.1. Third-party modules
The first modules you use will probably be third-party modules, which provide additional functionality that could have been in the core framework but isn’t. This is a key role for Play’s module system: modules make it possible to extend Play with functionality that you can use as if it were built-in, without bloating the core framework with features that not everyone needs.
Here are a few examples of third-party modules that provide different kinds of functionality:
- Deadbolt— Role-based authorization that allows you to restrict access to controllers and views
- Groovy templates— An alternative template engine that uses the Play 1.x Groovy template syntax
- PDF— Adds support for PDF output based on HTML templates
- Redis— Integrates Redis to provide a cache implementation
- Sass— Adds asset file compilation for Sass stylesheet files
It doesn’t matter if you don’t know what these do. The important thing to notice is that different modules enhance or replace different aspects of Play’s functionality, and they generally focus on a single thing.
For more information about these and other modules, see the Play Framework web site (www.playframework.org/).
In the same way that third-party modules provide specific functionality that’s not built into Play, you can provide your own custom modules that implement part of your application’s functionality.
3.8.2. Extracting custom modules
One way to approach custom modules is to think of them as a way to split your applications into separate reusable components, which helps keep individual applications and modules simple.
While developing your application, you may notice that some functionality is self-contained and doesn’t depend on the rest of the application. When this happens, you can restructure your application by extracting that code into a module, the same way you might refactor a class by extracting code into a separate class.
For example, suppose we’ve added commenting functionality to our product catalog’s details pages, to allow people to add notes about particular products. Comments are somewhat independent data and have a public interface (user interface or API) that’s separate from the rest of the application. Comment functionality requires the following:
- Persistent model classes for storing comments
- A user interface on the product details page for adding, removing, and listing comments
- A controller that provides an HTTP API for adding and viewing comments
These models, views, and controllers may also be in separate files from other parts of your application. You can take this further by moving them into a new module, separate from your application. To do this, you would create a new (empty) comments module, add the module as an application dependency, and finally move the relevant code to the module.
Add a sample application and documentation to a custom module
When you write a custom module, create a minimal sample application at the same time that lets you demonstrate the module’s functionality. This will make it easier to maintain the module independently of the rest of the application, and makes it easier for other developers to understand what the module does. You can also document the module separately.
3.8.3. Module-first application architecture
Another approach is to always add new application functionality in a module, when you can, only adding to the main application when absolutely necessary. This separates model-specific functionality and domain logic from generic functionality.
For example, once you’ve added comment functionality to your products details pages, you might want to allow people to add tags to products. Tagging functionality isn’t all that different from comments: a tag is also text, and you also need a user interface to add, remove, and list it. If you already have a separate comments module, it’s easier to see how a similar tags module would work, so you can create that independently. More importantly, perhaps, someone else could implement the tags module without having to understand your main application.
With this approach, each application would consist of a smaller core of model-specific functionality and logic, plus a constellation of modules that provide separate aspects of application functionality. Some of these modules would inevitably be shared between applications.
3.8.4. Deciding whether to write a custom module
It’s not always obvious when you should put code in a module and when it should be part of your main application. Even if you adopt a module-first approach, it can be tricky to work out when it’s possible to use a separate module.
The comments module is a good example of the need to decouple functionality in order to move it into a module. The obvious model design for comments on a product includes a direct reference from a comment to the product it relates to. This would mean that comments would depend on the products model, which is part of the application, and would therefore prevent the comments module being independent of the application.
The solution is to make a weaker link from comments to products, using the application’s HTTP API. Instead of linking comments directly to the products model, we can link a comment to an arbitrary application URL, such as a product’s details page URL. As long as products are identified by clean URLs for their details pages, it’s enough to comment on a page instead of on a product.
A similar issue arises in the controller layer, because you want to display comments inline in the product details page. To avoid having to add code for loading comments to the products controller, you can use Ajax to load comments separately. This could work with a comments template that you include in another page and that contains JavaScript code, which loads comments using Ajax from a separate comments controller that returns comments for the specified page as JSON data.
A good rule of thumb is that you can use a separate module whenever possible for functionality that’s orthogonal to your application’s model. Code that doesn’t depend on your model can usually be extracted to a separate independent module, but code that uses your model shouldn’t be in a module because then that module would depend on your application and not be reusable.
If you want to extract functionality that appears to depend on the model, consider whether there’s a way to avoid this dependency, or make it a loose coupling by using an external reference like the page URL rather than a model reference like a product ID.
3.8.5. Module architecture
A module is almost the same thing as a whole application. It provides the same kind of things an application has: models, view templates, controllers, static files, or other utility code. The only thing a module lacks is its own configuration; only the main application’s configuration is used. This means that any module configuration properties must be set in the application’s conf/application.conf file.
More technically, a module is just another application dependency—like third-party libraries—that you manage using the Play console that we introduced in chapter 1. After you’ve written your module, you use the Play console to package the module and publish it into your local dependencies repository, where it’ll be available to applications that specify a dependency on it.
You can also publish a module online so that other developers can use it. Many developers in the Play community open-source their modules to gain feedback and improvements to their work.
A module can also include a plugin, which is a class that extends play.api .Plugin in order to intercept application startup and shutdown events. Plugins aren’t specific to modules—a Play application can also include a plugin—but they’re especially useful for modules that enhance Play. This is because a module may need to manage its own lifecycle on top of the application’s lifecycle. For example, a tags module might have code to calculate a tag cloud, using expensive database queries, which must be scheduled as an hourly asynchronous job when the application starts.
3.9. Summary
This chapter has been a broad but shallow overview of the key components that make up a Play application’s architecture, focusing on the HTTP interface—the focal point of a web application.
Play has a relatively flat HTTP-centric architecture, including its own embedded HTTP server. Web applications use Play via a similarly HTTP-centric action-based model-view-controller API. This API is web-friendly and gives you unconstrained control over the two main aspects of what we mean by “the web”: HTTP and HTML.
The controller layer’s HTTP-friendliness is due to its flexible HTTP routing configuration, for declaratively mapping HTTP requests to controller action methods, combined with an expressive API for HTTP requests and responses.
The view layer’s HTML-friendliness, meanwhile, is a result of the template system’s unobtrusive but powerful Scala-based template syntax, which gives you control over the HTML (or other output) that your application produces. Play’s view templates integrate well with HTML but are not HTML-specific.
Similarly, Play’s MVC architecture doesn’t constrain the model layer to any particular persistence mechanism, so you can use the bundled Slick persistence API or just as easily use an alternative.
The loose coupling with specific view and model persistence implementations reflects a general architectural principle: Play provides full-stack features by selecting components that integrate well, but it doesn’t require those components and makes it just as easy to use a different stack.
Now that we’ve seen an overview of a Play application’s architecture, let’s take a closer look at the part that makes it an internet application: its HTTP interface.