
LibreOffice Writer is the word processing component of LibreOffice. It does pretty much everything useful that Microsoft Word does. It’s been used to write everything from one-page letters to 800-page books. As a matter of fact, this book was originally written using LibreOffice.
You will your adventure with LibreOffice by creating a party invitation. During this process, you will learn about the following:
Getting started with LibreOffice
Selecting fonts
Setting font sizes
Coloring text and backgrounds
Coloring paragraphs
Aligning paragraphs with left, right, and center justification
Inserting graphics into your documents
Figure 2-1 shows the party invitation you will create.

Figure 2-1 Party invitation
Note
If you have a printed copy of this book, you will be unable to see the horrible color choices we’ve made in this document. You can download the actual sample invitation from the book’s web site https://www.apress.com/us/book/9781484230749 .
Starting LibreOffice
To start LibreOffice on Windows, click Start ➤ LibreOffice ➤ LibreOffice Writer.
To start LibreOffice on an Apple system, go to the Finder, select Applications, and then click LibreOffice. From the initial window , select File ➤ New ➤ Text Document.
The blank document screen will appear, as shown in Figure 2-2.

Figure 2-2 Initial LibreOffice Writer screen
Figure 2-3 shows the components of the screen.
At the top is the menu bar with its pull-down menus, similar to most applications you’re probably familiar with. Below that you have your typical toolbar that contains icons for common operations.
At the top of the document is the ruler. This shows you where your margins and tabs are located. On the right side, you’ll see something different: the Proprieties panel. The Properties panel lets you view and set the proprieties of the text you are working on. On the right side of that is the sidebar. You’ll learn how to use this a little later in the book. Finally, at the bottom of the screen is the status bar.

Figure 2-3 LibreOffice Writer screen components
Creating a Party Invite
Enough with the explanation—it’s time to party. Click inside the representation of the page. The insert cursor (a vertical bar) should appear. Now type Party. Figure 2-4 shows the results.

Figure 2-4 After typing Party
One thing to notice is that the word Party is little and rather plain. Drag the cursor over the word Party to highlight it. Now go to the Font pull-down menu on the toolbar and select 48. This will change the size of the word Party to 48 points. Figure 2-5 shows the result.

Figure 2-5 A font size of 48 points
If you want to change the style of the text to bold, click the Bold icon in the toolbar. To turn off the bold, click the Bold icon again. There are similar icons for italics, underline, and strike-through, as shown in Figure 2-6.

Figure 2-6 Text style icons
But the text appears to be a little plain. With the word Party still highlighted, click the Background Color icon to change the background color to yellow. Now click the Text Color icon to turn the text a rust color. The resulting color combination is quite noticeable even if a little garish. Figure 2-7 shows the result.

Figure 2-7 Result of the color change
Now type Party again. You want this text to be a different color, so select it with the cursor, and this time click the little arrow next to the Background Color icon , as shown in Figure 2-8. In this example, we picked light purple, but you can pick any ugly color you want. You can do the same thing for the text color. (Again, click the little arrow, not the icon itself.) In this example, we decided to use cyan, so we have cyan on purple.

Figure 2-8 Color selector menu
Since this going to be a great party, let’s mention it three times. Type Party one more time and select a new set of “interesting” colors for the text and background.
Now let’s center the text by going to the Proprieties panel on the right and, in the Paragraph section, clicking the Center icon , as shown in Figure 2-9.

Figure 2-9 Center icon
The text is now centered, but it’s too close to the top of the page. Let’s move it down 1 inch by going to the Properties panel . (If you don’t see the Properties panel, click the wrench in the sidebar to display it.) In the Paragraph settings, there is a box called “Space above paragraph.” Change that from 0.00" to 1.00" and press Enter to set it. Now the “Party Party Party” paragraph is properly positioned. Figure 2-10 shows the result.

Figure 2-10 The party in its proper place
Adding the “No Good Reason” Paragraph
You’ve played around with changing the text’s background. In this section, you’ll change the paragraph’s background, which produces a slightly different effect.
Press Enter to start the next paragraph. Also, let’s change the text color to black and the background color to no fill (the check box at the top of the pull-down).
For this paragraph you want the point size to be a little bigger, so let’s select 72 from the Font pull-down. Type Party for No Good Reason for the name of the party. Keep the 1-inch space above the previous paragraph since that’s a good spacing for this paragraph.
Now let’s change the background color of the paragraph. Click the Background Color selector in the Paragraph section of the Proprieties panel, as shown in Figure 2-11. (While you’re there, you can scratch your head at LibreOffice’s choice of icons.) Clicking the icon causes a pop-up to appear showing you a choice of colors. In this example, we chose mustard yellow.

Figure 2-11 Paragraph background
Notice that the paragraph’s background color extends from margin to margin. The text background color stays with the text. In the “Party Party Party” paragraph, the space on both sides of the paragraph is white, while on the new paragraph, it’s yellow.
Indenting and Justifying a Paragraph
You’ve used the default margins and centered things in the previous paragraphs. In this section, you’ll use indentation and justification to put paragraphs at different locations across the page.
Press Enter to go to the next paragraph. This is going to be a normal paragraph consisting of the single word When with a colon after it. You’ll notice you have the same paragraph background color, space above, and font size as the previous paragraph. This is not what you want; you just want a normal paragraph. Click the Style list and select Default Style . LibreOffice will reset all the paragraph and font values to their defaults for this style, as shown in Figure 2-12.

Figure 2-12 Default style
You may have noticed that the Style list was already set to Default Style. But by reselecting it, you cleared all the custom settings, resulting in the type of paragraph you want.
Now you can type When: and press Enter.
The paragraph after that should be indented a little (0.5"). There are multiple ways of doing this. The first is to grab the margin indicator on the ruler and move it. There is an Increase Indent icon that increases the indentation by a fixed amount. If LibreOffice’s idea of a “good indent amount” does not suit you, you can set it using the “Before text” blank in the Properties panel.
Indention Method 1: Moving the Indicator
You can select the bottom margin indicator and drag it to the right to about the half-inch mark, as shown in Figure 2-13.
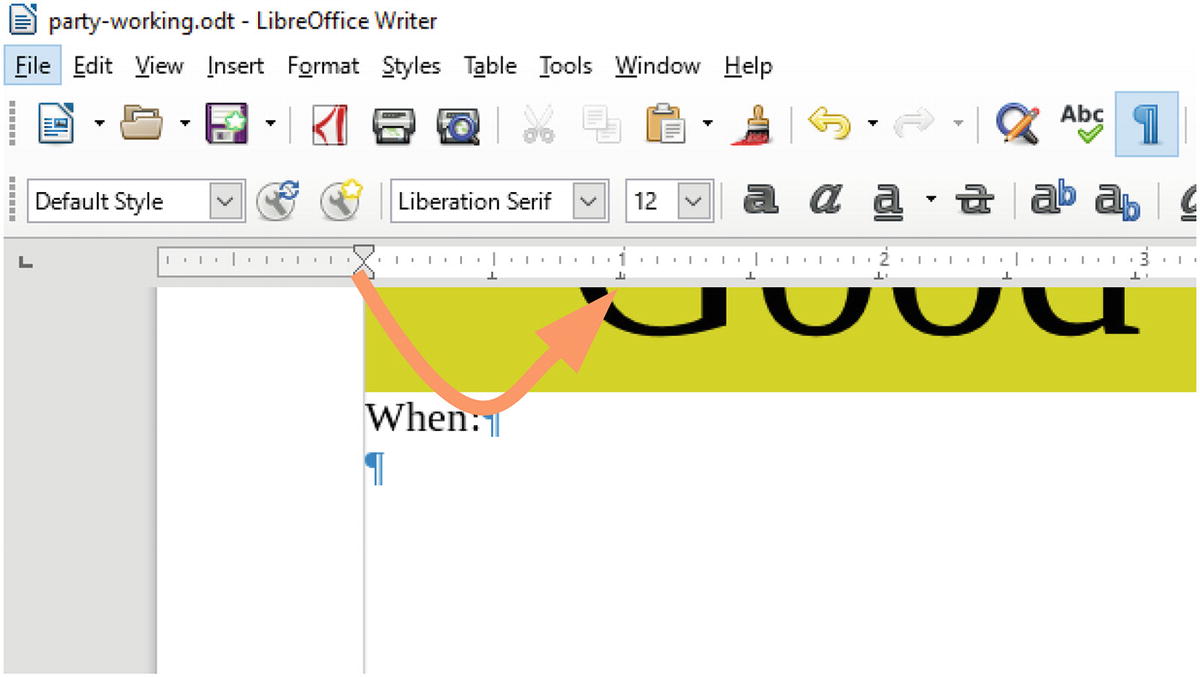
Figure 2-13 Moving the margin
Moving the bottom marker will move both the top and bottom markers and thus affect both the first line (top marker) and subsequent lines (bottom marker).
Indention Method 2: Increasing the Indent
There is an icon in the Paragraph section of the Properties panel called Increase Indent, as shown in Figure 2-14. Clicking that icon will increase the current indent by 0.5".
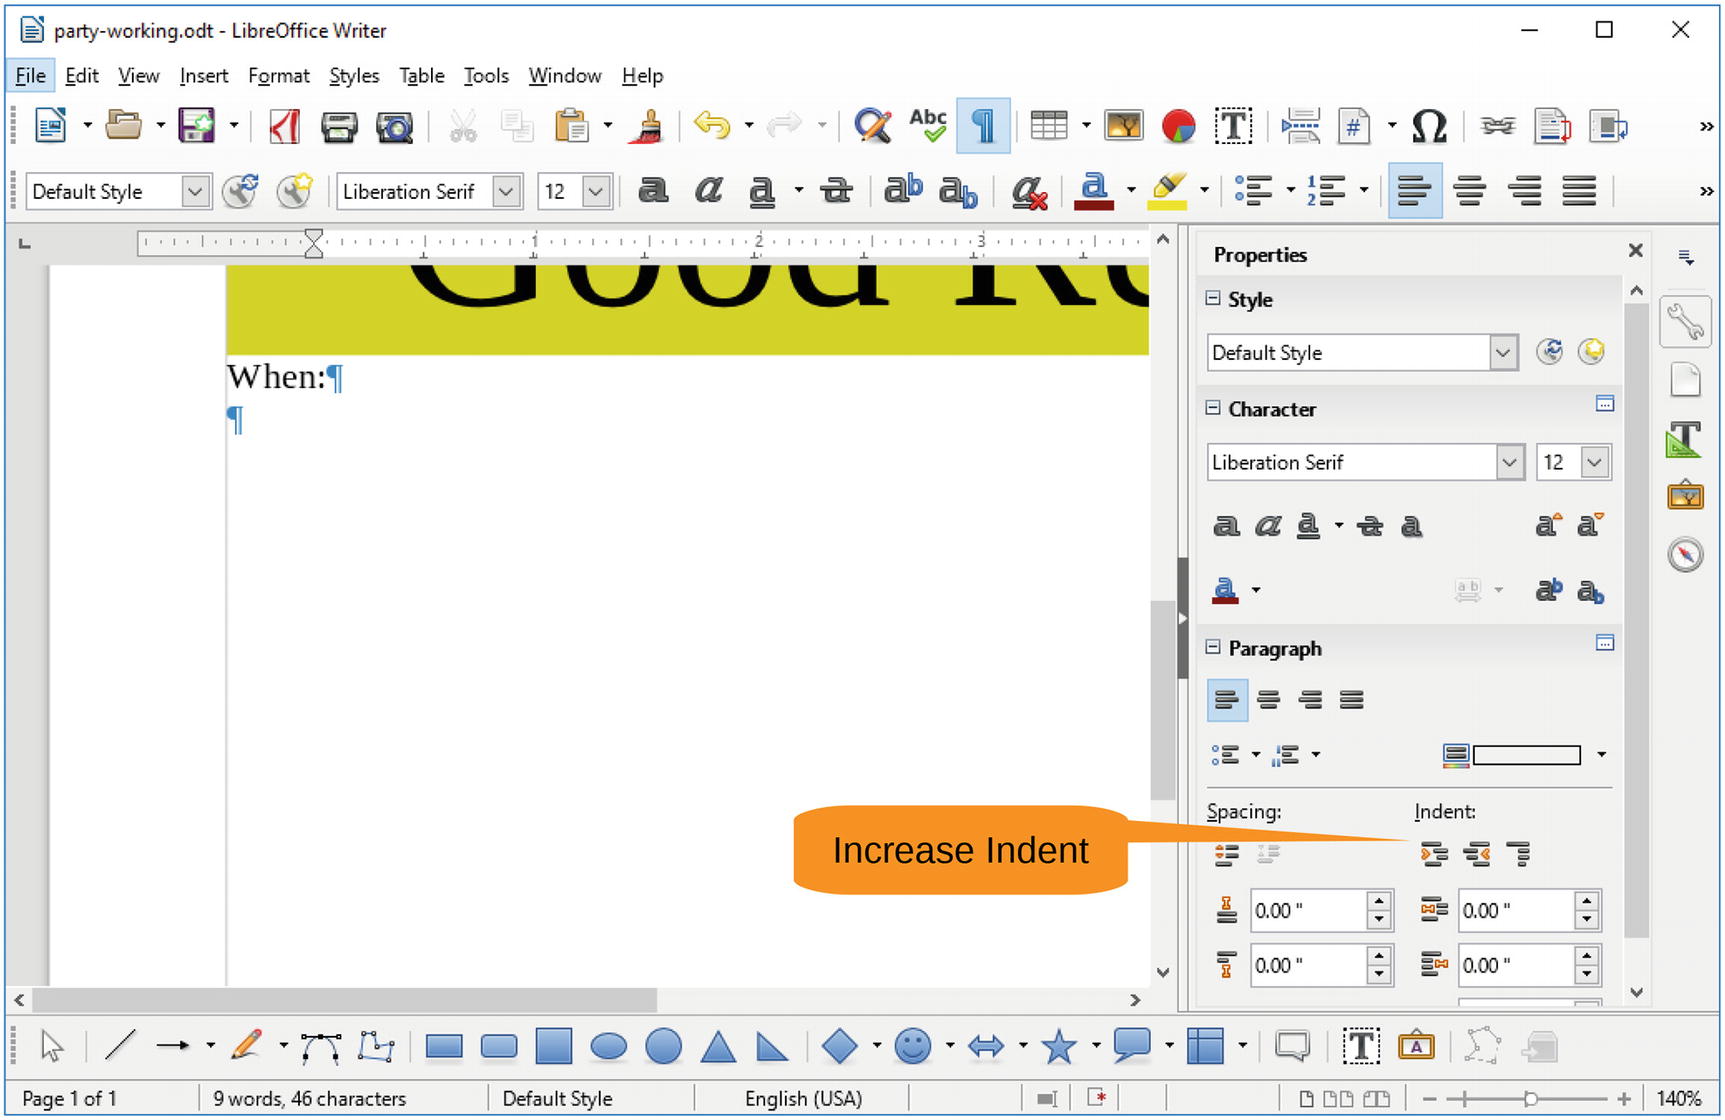
Figure 2-14 Increasing the indent
Indention Method 3: Setting the Before Text Indent
Also in the Paragraph section of the Properties panel is a Before Text Indent setting, as shown in Figure 2-15. Enter 0.5" and press Enter to set the value.

Figure 2-15 Setting the before text indent
No matter which way you do it, you’ll get an indented paragraph. Let’s type two paragraphs describing the time: Saturday and July 7. Figure 2-16 shows the results.

Figure 2-16 Invitation with date added
Creating the “Where” Section
Now let’s type the word Where with a colon after it. But the word Where: is not where you want it to be. It’s sitting on the left side, and you want it more to the right. To move it, drag the lower margin indicator on the ruler to the right until it’s about 75 percent of the way across the page. Figure 2-17 illustrates this process.
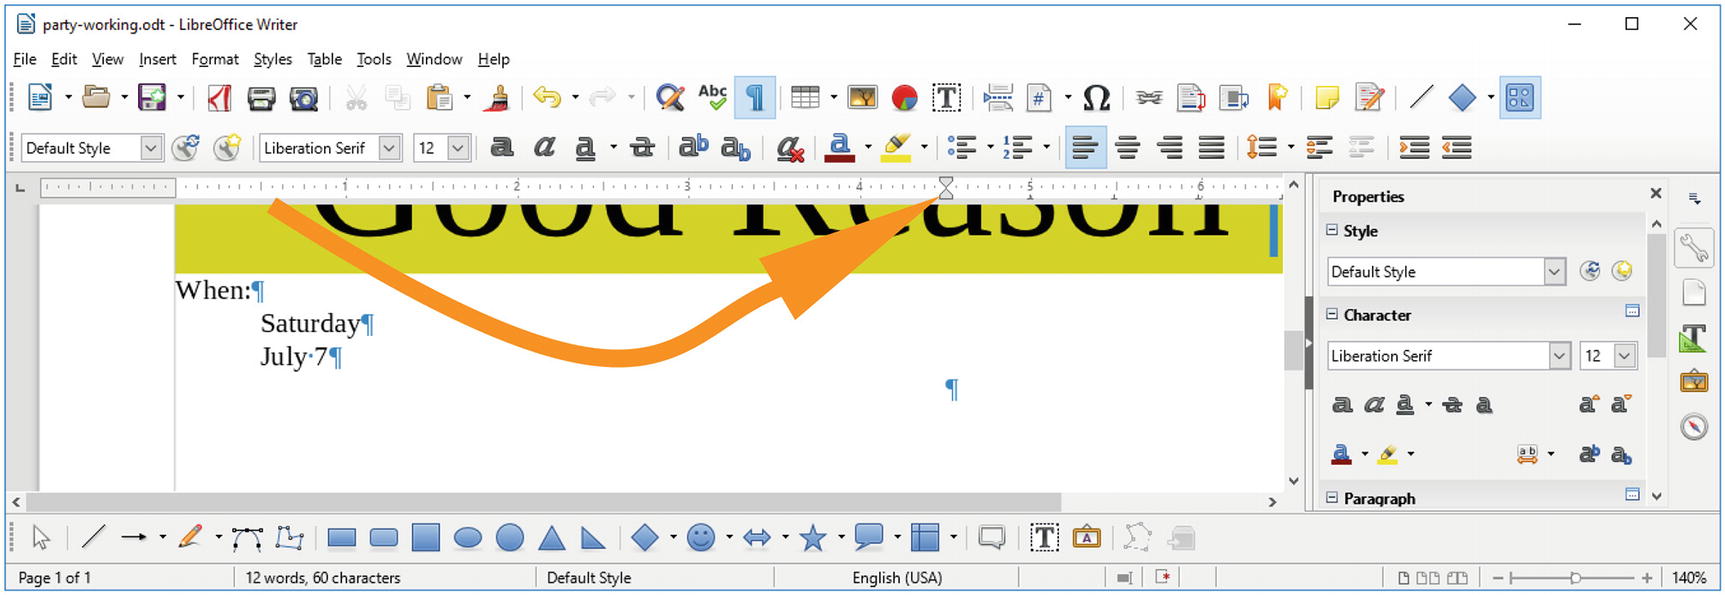
Figure 2-17 Dragging the margin
Now you can enter the Where: line.
You want the actual address to be lined up on the right side. So, let’s click the Align Right icon to make this happen. Actually, there are two Align Right icons; there is one on the toolbar and one on the Properties panel, as shown in Figure 2-18. Either one will work.

Figure 2-18 Align Right settings
Now let’s enter the address. Figure 2-19 shows the result.

Figure 2-19 Final text
Adding Graphics
Now let’s decorate things by adding graphics. Click the Gallery icon located on the right sidebar. See Figure 2-20.

Figure 2-20 Gallery icon
The Proprieties panel disappears and is replaced by the Gallery. A quick search through the list of themes yields nothing that looks like it might have a balloon it, so let’s click the Properties icon to restore the Properties panel.
Now bring up your browser and do a Google search for balloon free clip art. Clicking images displays a set of possible graphics, as shown in Figure 2-21.

Figure 2-21 Balloons
Click one and then select View Image. Right-click the image and select Copy Image. Now you can go back to the party invitation and move the cursor to the beginning. (Click to the left of the P in our first Party). Select Edit ➤ Paste from the menu bar or just press Ctrl+V. The balloon appears in the document, as shown in Figure 2-22.

Figure 2-22 Balloon pasted
The size of the image is a way too big. Let’s position the cursor over one of the green handles. It will change into a resize cursor. If you are on a corner, the cursor looks like an arrow pointing to the corner. If you are on a middle resize handle, the cursor turns into a double-ended arrow. You can now drag the handle to increase or decrease the size of the balloon , as shown in Figure 2-23.

Figure 2-23 Resizing an image
Notice that the picture maintains the same aspect ratio, meaning that it does stretch or distort. This is the default in LibreOffice. If you want to stretch the picture in one direction only, you need to hold down the Shift key while resizing.
You need to move the image where you want it to be and change its size. But before you do that, you need to change its anchor point. The anchor point controls where the image appears on the page. Right now it’s set to Paragraph, meaning if the paragraph it is attached to moves, the image moves.
Right-click the image and select Anchor ➤ To Page. This makes the image stick to wherever you want it on the page, as shown in Figure 2-24.

Figure 2-24 Anchoring an image on a page
Now let’s move the cursor over the image. It will change from a pointer to a hand. You can now drag the image any place on the page you want it to be. In this example, that’s the upper-right corner, as shown in Figure 2-25.

Figure 2-25 Image in its proper location
You’ll notice that the text keeps moving out of the way of the figure. You don’t want that because you put the text in the proper place when you created it. You can fix that by selecting the figure, right-clicking, and selecting Wrap ➤ Wrap Through , as shown in Figure 2-26.

Figure 2-26 Wrapping through
You now have the image the right shape and size. Let’s duplicate it by selecting it and then copying it (press Ctrl+C or select Edit ➤ Copy). Click outside the margin to deselect the image you just copied. (This is important because if you don’t deselect it, then when you paste, you will overwrite the original image.) Now you can paste in your copy (press Ctrl+V or select Edit ➤ Paste). Now you can move it to the right side of the screen.
Things look better when they are symmetrical, and this image is facing the wrong way. So, let’s fix that by selecting from the menu Format ➤ Flip ➤ Flip Horizontally , as shown in Figure 2-27.

Figure 2-27 Flipping an image vertically
Now you can move it by dragging it with the cursor and change the size using the resize handles as you did with the first balloon.
Now you are ready to party, except for the details…printing 100 copies of the invitation, handing them out, buying the food and drink, reserving the location, inviting the people, and everything else. But the invitation is ready!
Summary
The party invitation was designed to be a fun introduction to the basics of LibreOffice Writer. There’s a lot you can play around with in this word processor. In the next few chapters, you’ll take a look at how to do useful work with this tool.
For now, if you’re interested, you can explore some of the more frivolous aspects of this program, including the following:
Fontworks: Creating fancy text effects
Gradients: Changing color backgrounds
Drawing tools: Drawing things on your document
Since this is not a 400-page book on LibreOffice, we’ll let you explore these topics on your own.