
Due to the increase in user awareness and the ease of functionality, there has been an exponential increase in the usage of passcode options to lock Android devices. Hence, bypassing the device's screen lock during a forensic investigation becomes increasingly important. The applicability of the screen lock bypass techniques discussed so far are based on the situation. Note that some of these methods may result in making changes to the device. Make sure that you test and validate all the steps listed on non-evidentiary Android devices. The examiner must have authorization to make the required changes to the device, document all steps taken, and be able to describe the steps taken if a courtroom testimony is required.
Currently, there are three types of screen lock mechanisms offered by Android. Although there are some devices which have voice lock, face lock, and fingerprint lock options, we will limit our discussion to the following three options since these are most widely used on all Android devices:
- Pattern lock: The user sets a pattern or design on the phone and the same must be drawn to unlock the device. Android was the first smartphone to introduce a pattern lock.
- PIN code: This is the most common lock option and is found on many mobile phones. The PIN code is a 4-digit number that needs to be entered to unlock the device.
- Passcode (alphanumeric): This is an alphanumeric passcode. Unlike the PIN, which takes four digits, the alphanumeric passcode takes more than just digits.
The following section details some of the techniques to bypass these Android lock mechanisms. Depending on the situation, these techniques might help an investigator to bypass the screen lock.
If USB debugging appears to be enabled on the Android device, it is wise to take advantage of it by connecting with adb using USB, as discussed in the earlier sections. The examiner should connect the device to the forensic workstation and issue the adb devices command. If the device shows up, it implies that USB debugging is enabled. If the Android device is locked, the examiner must attempt to bypass the screen lock. The following are the two methods that may allow the examiner to bypass the screen lock when USB debugging is enabled.
Deleting the gesture.key file will remove the pattern lock on the device. However, it's important to note that this will permanently change the device as the pattern lock is gone. This should be considered if conducting cover operations. This is how the process is done:
- Connect the device to the forensic workstation (a Windows machine in our example) using a USB cable.
- Open the command prompt and execute the following instructions:
adb.exe shell
cd /data/system
rm gesture.key
- Reboot the device. If the pattern lock still appears, just draw any random design and observe that the device should unlock without any trouble.
To update the settings.db file, perform the following steps:
- Connect the device to the forensic workstation using a USB cable.
- Open the command prompt and execute the following instructions:

- Exit and reboot the device.
- The Android device should be unlocked. If not, attempt to remove
gesture.keyas explained earlier.
In Android, recovery refers to the dedicated partition where the recovery console is present. The two main functions of recovery are to delete all user data and install updates. For instance, when you factory reset your phone, recovery boots up and deletes all the data. Similarly, when updates are to be installed on the phone, it is done in recovery mode. There are many enthusiastic Android users who install custom ROM through a modified recovery module. This modified recovery module is mainly used to make the process of installing custom ROM easy. Recovery mode can be accessed in different ways depending on the manufacturer of the device, which is easily available on the Internet. Usually, this is done by holding different keys together such as the volume button and power button. Once in recovery mode, connect the device to the workstation and try to access the adb connection. If the device has a recovery mode which is not modified, the examiner may not be able to access the adb connection. The modified recovery versions of the device present the user with different options and can be easily noticed as shown in the following screenshot:

There are mechanisms available to flash the recovery partition of an Android device with a modified image. The Fastboot utility would facilitate this process. Fastboot is a diagnostic protocol that comes with the SDK package, used primarily to modify the flash file system through a USB connection from a host computer. For this, you need to start the device in boot loader mode, in which only the most basic hardware initialization is performed. Once the protocol is enabled on the device, it will accept a specific set of commands that are sent to it via the USB cable using a command line. Flashing or rewriting a partition with a binary image stored on the computer is one such command that is allowed. Once the recovery is flashed, boot the device in recovery mode, mount the /data and /system partitions, and use adb to remove the gesture.key file. Reboot the phone and you should be able to bypass the screen lock. However, this works only if the device bootloader is unlocked. Also, flashing permanently alters the device. Instead of flashing, you could use the fastboot boot command to boot to a recovery image temporarily to delete the key file without permanently changing the recovery partition.
There are several automated solutions available in the market for unlocking Android devices. Commercial tools such as Cellebrite and XRY are capable of bypassing the screen locks, but most of them require USB debugging to be enabled. We will now examine how to unlock an Android device using the UFED user lock code recovery tool. Also, this tool only works on those devices that support USB OTG. This process also requires a UFED camera, Cable No. 500-Bypass lock, and Cable No. 501-Bypass lock. Once the tool is installed on the workstation, follow these steps to unlock an Android device:
- Run the tool on the work station and press 1, as shown in the following screenshot:
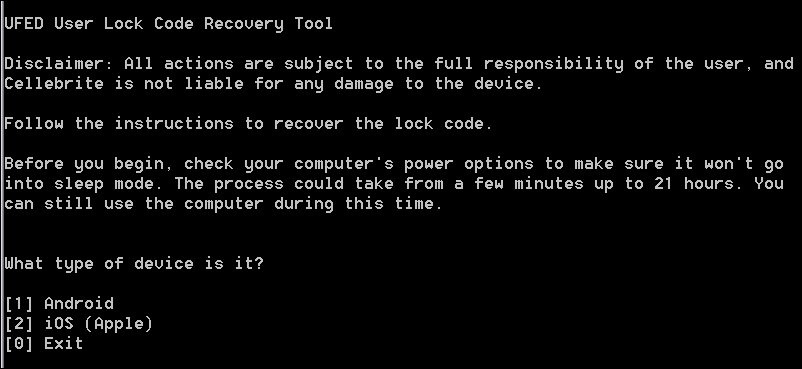
UFED user lock code recovery tool
- Now, connect side A of Cable No. 500-Bypasslock to a USB port of the workstation. Also connect side B of Cable No. 500-Bypasslock to Cable No. 501-OTG, and then connect the other end to the device.
- Once connected, the tool prompts you to select the recovery profile. Select 1 (Manually select the recovery profile).

- Now, select the lock type used on the device and the recovery profile and proceed by following the instructions on the screen.
- After this, make sure that the keypad appears on the device screen and that it's ready to accept the PIN code.
- Close any message windows that may appear. Press 1 and hit Enter. Now make five incorrect login attempts by entering random input, and click on Forgot pattern at the bottom of the device.
- Follow the instructions on the screen, wait for the camera window to open, and then click on the camera window.
- Use the cursor to select any non-empty area on the device's screen by placing the green square over it. For example, select any number on the screen. This is used by the tool to detect if the device is unlocked. Press Enter to start the process.
- The tool will try a number of combinations to unlock the device. Once unlocked, it would prompt you to end the process.
Most of the latest Android phones come with a service called Android Device Manager, which helps owners of a device to locate their lost phone. This service can also be used to unlock a device; however, this is possible only when you know the Google account credentials that are configured on the device. If you have access to the account credentials, then follow these steps to unlock the device:
- Visit
http://google.com/android/devicemanageron your workstation. - Sign in using the Google account that is configured on the device.
- Select the device you need to unlock and click on Lock, as shown in the following screenshot:

Android Device Manager
- Enter a temporary password and click on Lock again.
- Once it's successful, enter the temporary password on the device to unlock it.
It can be done without knowing the credentials of the computer where the login is saved (that is, the suspect's PC). Similarly, if you are dealing with a Samsung device, you can also try Samsung's FindMyMobile service, which enables you to set a temporary password to unlock the device.
In rare cases, a smudge attack may be used to deduce the password of a touchscreen mobile device. This attack relies on identifying the smudges left behind by the user's fingers. While this may present a bypass method, it must be said that a smudge attack is unlikely since most Android devices are touchscreen and smudges will also be present from using the device. However, it has been demonstrated that under proper lighting, the smudges that are left behind can easily be detected as shown in the following screenshot. By analyzing the smudge marks, we can discern the pattern that is used to unlock the screen. This attack is more likely to work while discerning the pattern lock on the Android device. In some cases, PIN codes can also be recovered depending upon the cleanliness of the screen. So, during a forensic investigation, care should be taken when the device is first handled to make sure that the screen is not touched.

Smudges visible on a device under proper lighting (source: https://www.usenix.org/legacy/events/woot10/tech/full_papers/Aviv.pdf)
If you know the username and password of the primary Gmail address that is configured on the device, you can change the PIN, password, or swipe on the device. After making a certain number of failed attempts to unlock the screen, Android provides an option named Forgot Pattern or Forgot Password, as shown in the following screenshot:
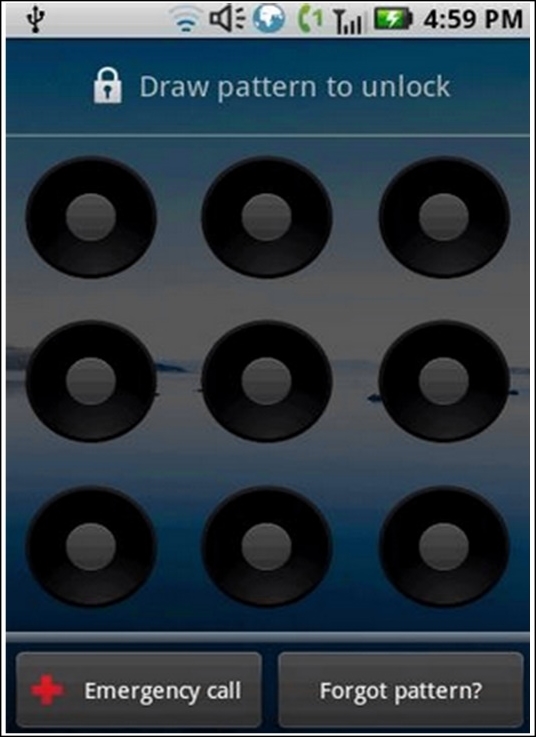
Forgot pattern option on an Android device
Tap on that link and sign in using the Gmail username and password. This will allow you to create a new pattern lock or passcode for the device.
If the screen lock is a third-party app rather than the inbuilt lock, it can be bypassed by booting into safe mode and disabling it. To boot into safe mode on Android device 4.1 or later, long-press the power button until the power options menu appears. Then long-press the Power Off option and you'll be asked if you want to reboot your Android device into safe mode. Tap the OK button as shown in the following screenshot.

Safe mode in Android
Once you're in safe mode, you can disable the third-party lock screen app or uninstall it completely. After this, reboot the device and you should be able to access it without any lock screen.
As mentioned earlier, while using USB debugging, if the Always allow from this computer option is checked, the device will not prompt for authorization in future. This is done by storing certain keys, namely adbkey and adbkey.pub, on the computer. Any attempt to connect to adb from an untrusted computer is denied. In this case, the adbkey and the adbkey.pub files can be pulled from the suspect's computer and copied to the investigators workstation. The device will then assume that it is communicating with a known, authorized computer. The adbkey and adbkey.pub files can be found at C:Users<username>.android on Windows machines.
As explained in the earlier sections, the secure USB debugging feature introduced in Android 4.4.2 allows only authorized workstations to connect to the device. However, there's a bug in this feature as reported at https://labs.mwrinfosecurity.com/ which allows bypassing the Secure USB debugging feature and connecting the device to any workstation. Here are the steps to follow to bypass Secure USB debugging on an Android 4.2.2 device:
- On an unlocked device, attempt to use adb and observe that an error message is shown by the device.
- Now, navigate to either the emergency dialer or the lock-screen camera and execute the following commands:
    $ adb kill-server
    $ adb shell
- Observe that the confirmation dialog is now triggered and the workstation can be authorized without unlocking the device. As shown in the following screenshot, the confirmation dialog box is displayed on the emergency dialer.
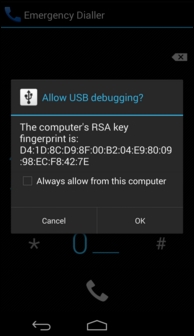
Bypassing Secure USB debugging in Android 4.2.2
- Once connected to the device through adb, try to bypass the lock screen using following command:
$ adb shell pm clear com.android.keyguard
On devices running Android 5.0 to 5.1.1, the password lock screen (not pin or pattern lock) can be bypassed by crashing the screen UI. This can be accomplished by following these steps as explained at http://android.wonderhowto.com/:
- Click on the Emergency Call option on the lock screen and then enter any random input (for example, 10 asterisks) on the dialer screen.
- Double-tap the field to highlight the entered text, as shown in the following screenshot, and choose Copy. Now paste it into the same field.

Crashing lock screen UI
- Repeat this process of copying and pasting to add more characters until double-tapping the field no longer highlights the characters.
- Go back to the lock screen and open the camera shortcut. Now, pull down the notifications screen and tap the Settings icon. You will then be prompted to enter a password.
- Long-press the input field and choose Paste and repeat this process several more times. After pasting enough characters into the field, the lock screen will crash and allow you to access the device.
All of the previously mentioned techniques and the commercial tools available prove to be useful to the forensic examiner trying to get access to the data on the Android devices. However, there could be situations where none of these techniques work. To obtain a complete physical image of the device, techniques such as chip-off and JTAG may be required when commercial and open source solutions fail. A short description of these techniques is mentioned here.
While the chip-off technique removes the memory chip from a circuit and tries to read it, the JTAG technique involves probing the JTAG Test Access Ports (TAPs) and soldering connectors to the JTAG ports in order to read data from the device memory. The chip-off technique is more destructive because once the chip is removed from the device, it is difficult to restore the device back to its original functional state. Also, expertise is needed to carefully remove the chip from the device by desoldering the chip from the circuit board. The heat required to remove the chip can also damage or destroy the data stored on that chip. Hence, this technique should be looked upon only when the data is not retrievable by open source or commercial tools or the device is damaged beyond repair. When using the JTAG technique, JTAG ports help an examiner to access the memory chip to retrieve a physical image of the data without needing to remove the chip. To turn off the screen lock on a device, an examiner can identify where the lock code is stored in the physical memory dump, turn off the locking, and copy that data back to the device. Commercial tools, such as Cellebrite Physical Analyzer, can accept the .bin files from chip-off and JTAG acquisitions and crack the lock code for the examiner. Once the code is either manually removed or cracked, the examiner can analyze the device using normal techniques.
Note
Both the chip-off and JTAG techniques require extensive research and experience to be attempted on a real device. A great resource for JTAG and chip-off on devices can be found at http://www.forensicswiki.org/wiki.