
3
Getting Started with Unit Testing
Unit testing is the core of TDD and a prerequisite for practicing it. I want to briefly go through the minimal necessary theory and focus more instead on familiarizing you with the tools and techniques that unit testing practitioners utilize in their daily code.
Here, you will learn how to write unit tests that cover moderate coding scenarios. In Part 2, Building an Application with TDD, of this book, we will take the knowledge acquired in this chapter to a higher level and use it in a lifelike fashion.
In the previous chapter, we built the weather forecasting application (WFA) and made it a dependency injection (DI)-ready. We will use this application in this chapter as the basis for learning about unit testing. If you are not familiar with DI and DI containers, I recommend starting with Chapter 2, Understanding Dependency Injection by Example, first.
In this chapter, we will do the following:
- Introduce unit testing
- Explain the structure of a unit testing project
- Analyze the anatomy of a unit test class
- Discuss the basics of xUnit
- Show how SOLID principles and unit testing are related
By the end of the chapter, you will be able to write basic unit tests.
Technical requirements
The code for this chapter can be found at the following GitHub repository:
Introducing unit testing
As a TDD practitioner, you will be writing much more unit test code than production code (the regular application code). Unlike other test categories, unit tests will dictate some architectural decisions of your application and enforce DI.
We won’t dwell on long definitions. Instead, we will demonstrate unit testing with a plethora of examples. In this section, we will discuss the xUnit unit testing framework and the unit test structure.
What is unit testing?
Unit testing is testing a behavior while swapping real dependencies with test doubles. Let me back up this definition with an example from WeatherForecastController in the WFA:
private readonly ILogger<WeatherForecastController>
    _logger;
public double ConvertCToF(double c)
{
    double f = c * (9d / 5d) + 32;
    _logger.LogInformation("conversion requested");
    return f;
}
This method converts Celsius to Fahrenheit and logs every call. Logging is not the concern here because this method’s concern is the conversion.
The behavior of this method is converting input degrees from Celsius to Fahrenheit, and the logging dependency here is accessed through the _logger object. At runtime, we are injecting a Logger<> that will be writing to a physical medium, but we possibly want to eliminate the writing side effect when testing.
Based on the earlier definition, we need to swap the real dependency that _logger uses at runtime with its test double counterpart and test the conversion behavior. We will show how to do this later on in this chapter.
Take another example from the same class:
private readonly IClient _client;
public async Task<IEnumerable<WeatherForecast>> GetReal()
{
    …
    OneCallResponse res = await _client.OneCallAsync(…
    …
}
The behavior of this method is getting the real weather forecast and passing it to the caller. The _client object here represents the OpenWeather dependency. This method’s behavior is not about interacting with the details of the RESTful protocol of the OpenWeather API or the HTTP protocol. This is handled by _client. We need to swap the real dependency, Client, that _client uses at runtime, and replace it with one that is suitable for testing (we call this a test double). I will show how this is done, in many ways, in Chapter 4, Real Unit Testing with Test Doubles.
At this stage, the concept is still cryptic, I know; just bear with me, and we will start expanding gently. In the next section, we will discuss unit testing frameworks. We will need this to unit test the preceding examples and the WFA.
Unit testing frameworks
.NET 6 has three major unit testing frameworks. The most popular one is xUnit, which we will use across this book. The other two are NUnit and MSTest:
- NUnit is an open source library. It started as a port from Java’s JUnit framework and was then completely rewritten. You will still encounter it in legacy projects, but the majority of today’s projects start with xUnit.
- MSTest is Microsoft’s unit testing framework that gained popularity because it used to be shipped with Visual Studio and no extra effort was needed to install it, especially since NuGet did not exist back then. It became open source in version 2, and it was always lagging behind NUnit and then xUnit in terms of features.
- xUnit is an open source project that was started by developers from NUnit. It is feature-rich and in constant development.
Note
The term XUnit is an umbrella term for different languages’ unit test frameworks, such as JUnit (Java), NUnit (.NET), xUnit (.NET), and CUnit (C language). This should not be confused with the library name xUnit, which is a .NET unit test library, where the founders picked an already-taken and confusing name.
Learning one framework and then switching to another should take no time, as they are similar, and you just need to figure out the terminology used by the specific framework. Next, we will add an xUnit project to the solution to unit test the WFA.
Understanding test projects
xUnit templates come as part of VS. We will show how to add an xUnit project using the .NET CLI approach. At this stage, if you have not opened the companion source code that is ported from Chapter 2, Understanding Dependency Injection by Example, to this chapter, I encourage you to do so.
Adding xUnit via the CLI
Currently, we have a solution with one ASP.NET Core project. Now, we want to add the unit tests library to our solution. To do so, create a new xUnit project called Uqs.Weather.Tests.Unit in a directory with the same name, and use .NET 6.0:
dotnet new xunit -o Uqs.Weather.Tests.Unit -f net6.0
Add the newly created project to the solution file:
dotnet sln add Uqs.Weather.Tests.Unit
Now, we have two projects in our solution. As the unit test project will be testing the ASP.NET Core project, the unit test project should have a reference to the ASP.NET Core project.
Add a project reference from Uqs.Weather.Tests.Unit on Uqs.Weather:
dotnet add Uqs.Weather.Tests.Unit reference Uqs.Weather
We now have our solution fully constructed via the CLI. You can see the full interaction here:

Figure 3.1 – Creating a new xUnit project in a solution via the CLI
We now have a project to contain our unit tests.
Test project naming convention
You have noticed that we have appended .Tests.Unit to the original project name, so the unit test project became Uqs.Weather.Tests.Unit. This is a common convention in naming test projects.
This convention extends to other testing projects, such as integration testing and Sintegration testing, to be discussed in the More testing categories section in Chapter 4. You might also have the following:
- Uqs.Weather.Tests.Integration
- Uqs.Weather.Tests.Sintegration
The wisdom behind this convention is that you can look at your list of projects and rapidly find the test projects related to one production code project ordered next to each other, as follows:

Figure 3.2 – Ordered unit test projects
The convention also helps in targeting all your test projects in the continuous integration, which will be covered in Chapter 11, Implementing Continuous Integration with GitHub Actions, in case you wanted to run all categories of tests. Here is an example: Uqs.Weather.Tests.*.
Running the sample unit test
The xUnit template comes with a sample unit test class called UnitTest1.cs that has a sample unit test method with the following content:
using Xunit;
namespace Uqs.Weather.Tests.Unit;
public class UnitTest1
{
    [Fact]
    public void Test1()
    {
    }
}
This has a single unit test called Test1 that is empty and does nothing at the moment. To check that the xUnit framework and the integration with VS does work, you can try executing this single test.
From the VS menu, select Test | Run All Tests or similarly use the Ctrl + R, A keyboard shortcut. This will execute all your tests in the project (which is currently one test), and you will have the following tool, known as Test Explorer.
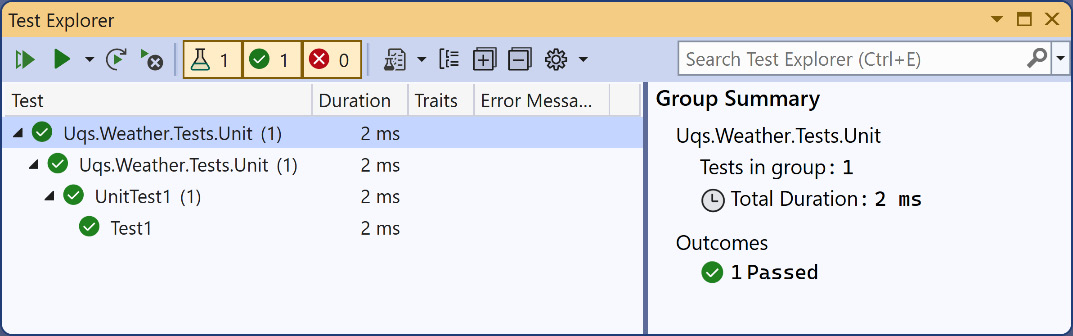
Figure 3.3 – Test Explorer
The hierarchy displayed here is Project Name | Test Class Namespace | Test Class Name | Test Method Name.
If you are the CLI kind of person, you can go to the solution directory with the command prompt and execute the following:
dotnet test
This is what you may get:
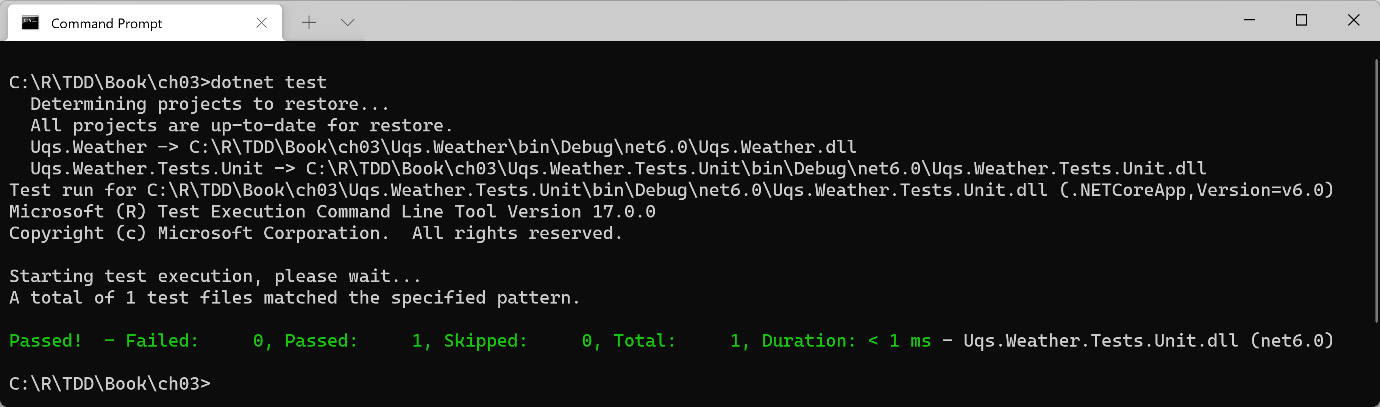
Figure 3.4 – CLI dotnet test results
I have seen Test Explorer used more in day-to-day TDD-style development than the CLI. The CLI is useful for running the whole solution or for continuous integration and automated runs.
Test Explorer
Test Explorer comes with VS. Additionally, xUnit adds a few libraries that allow Test Explorer and VS to interact with xUnit tests. There are third-party providers that have more advanced test runners. One of them is JetBrains ReSharper Unit Test Explorer. We have everything ready to start writing unit test code.
Unit test class anatomy
When we unit test, we tend to write a unit test class that is targeting a parallel production class – one test class against one production class.
Applying this concept to our WFA project, our production class is WeatherForecastController and the unit test class is going to be called WeatherForecastControllerTests. So, rename the UnitTest1 sample class to WeatherForecastControllerTests.
Tip
You can set your text cursor anywhere within the class name in the source code (in the previous case, it was UnitTest1) and hit Ctrl + R, R (hold Ctrl then press R quickly twice). Type the new name WeatherForecastControllerTests and hit Enter. This will also rename the file if the Rename symbol’s file checkbox is ticked.
Next, we will see how to organize our unit test class and its methods.
Class naming convention
I found the most commonly used convention is calling the unit test class name the same as the production code class name, appending the Tests suffix. For example, the MyProductionCode test class counterpart would be MyProductionCodeTests.
When practicing TDD, you will need to switch between the test class and its counterpart production code class multiple times in a short period. Naming them using this pattern allows you to find the test and its related counterpart easily, or vice versa. It also clarifies the relationship between the two classes.
Test methods
Each test class contains methods that test pieces of functionality, known as units, from the production code class. Let’s take the example of testing the ConvertCToF method.
Test example 1
Part of the requirements that we have is testing the conversion with a single decimal point accuracy. So, let’s consider one testing case by taking a zero degree (0.0 C) and testing if the method is returning 32.0 F. To do that, we can delete the Test1 method in the unit tests class and replace it with the following:
[Fact]
public void ConvertCToF_0Celsius_32Fahrenheit()
{
    const double expected = 32d;
    var controller = new WeatherForecastController(
        null!, null!, null!, null!);
    double actual = controller.ConvertCToF(0);
    Assert.Equal(expected, actual);
}
This code initializes the production code class, calls the method under test, and then assesses the results of the test with our expectations.
Fact is an attribute that makes a method a unit test. Assert is a static class that has useful methods for comparing expected results to actual results. Both Fact and Assert are part of the xUnit framework.
Run this test with Test Explorer using Ctrl + R, A, and the test will yield the following screen:

Figure 3.5 – Fail output in Test Explorer
If we look inside the controller, we find that VS has a red sign to map the route that led to this failure:

Figure 3.6 – VS showing the failed test route
It is apparent from the error message what is causing ArgumentNullException:
_logger.LogInformation("conversion requested");This is expected, as we have passed the logger parameter from the unit test as null. We want _logger.LogInformation to do nothing, and in order to do that, we will be using NullLogger<>, which does nothing, as indicated by the official documentation. Our unit test code needs to change to the following so that we can replace the real logger with a dummy one:
var logger =
    NullLogger<WeatherForecastController>.Instance;
var controller = new WeatherForecastController(
    logger, null!, null!, null!);
If you run the test again, all the reds will turn green, and the test will pass.
Test example 2
To test another input and output for the method, we can add more unit tests to the class and follow the same test method name pattern. We can have the following:
public void ConvertCToF_1Celsius_33p8Fahrenheit() {…}
…
public void ConvertCToF_Minus1Celsius_30p2Fahrenheit() {…}
But, there is a succinct solution for avoiding writing a similar unit test for every value combination, as follows:
[Theory]
[InlineData(-100 , -148)]
[InlineData(-10.1,  13.8)]
[InlineData(10   ,  50)]
public void ConvertCToF_Cel_CorrectFah(double c, double f)
{
    var logger =
        NullLogger<WeatherForecastController>.Instance;
    var controller = new WeatherForecastController(
        logger, null!, null!, null!);
    double actual = controller.ConvertCToF(c);
    Assert.Equal(f, actual, 1);
}
Notice that we are using Theory rather than Fact. Every InlineData will act as a single unit test. You can even eliminate example 1 and make it an InlineData attribute. No need to say that Theory and InlineData are attributes from xUnit.
You can go ahead and run the tests.
Other examples are covered in Chapter 1, Writing Your First TDD Implementation, similar to the previous ones in this chapter, so you could have a look for more clarity.
Examples 1 and 2 target a simple method, ConvertCToF, that has a single dependency, _logger. We will cover more sophisticated testing scenarios after learning about test doubles in Chapter 4, Real Unit Testing with Test Doubles. In reality, your production code will be more complicated than a simple conversion method and will contain multiple dependencies, but there is a first step for everything.
Naming convention
Unit test method names follow a popular convention: MethodUnderTest_Condition_Expectation. We have seen this convention used earlier. Here are more hypothetical examples:
- SaveData_CannotConnectToDB_InvalidOperationException
- OrderShoppingBasket_EmptyBasket_NoAction
This book contains plenty of other examples that should clarify this convention further.
The Arrange-Act-Assert pattern
The previous test method, and generally all unit test methods, follows a similar pattern:
- Create a state, declare some variables, and do some preparations.
- Call the method under test.
- Assert the actual results against expectations.
Practitioners decided to give these three stages the following names:
Arrange, Act, and Assert (AAA).
They mark the code with a comment to show the stages and emphasize the separation. According to this, we can write one of the previous test methods as follows:
[Fact]
public void ConvertCToF_0Celsius_32Fahrenheit()
{
    // Arrange
    const double expected = 32d;
    var controller = new WeatherForecastController(…);
    // Act
    double actual = controller.ConvertCToF(0);

    // Assert
    Assert.Equal(expected, actual);
}
Notice the comments that were added to the code.
Important Note
Some teams dislike having the separation by writing comments. Instead, they choose a different way to mark AAA, for example, by leaving a single line space between each section.
The AAA practice is more than a convention. It makes the method easier to read on-the-fly. It also emphasizes that there should be only one Act in a unit test method. Consequently, a unit test, based on best practices, is not supposed to have more than a single AAA structure.
Using VS code snippets
Every unit test is going to have the same structure. VS allows you to cut down on writing the same structure with the help of code snippets. I have included a code snippet file for unit testing in the CodeSnippets directory in this chapter source code. It is called aaa.snippet. You can open it and view/edit its content via a regular text editor (not a word processor).
To use this snippet on Windows, copy aaa.snippet to this directory (choosing the right VS version):
%USERPROFILE%DocumentsVisual Studio 2022Code SnippetsVisual
C#My Code Snippets
Once this is copied, in your unit test class, type aaa, then hit the Tab button, and you will get the following generated code:
[Fact]
public void Method_Condition_Expectation()
{
    // Arrange
    // Act
    // Assert
}
Rather than speaking more about having a single AAA in your unit test, we will demonstrate this across this book to illuminate the style that seniors use in writing unit tests.
Now that we had an overview of the class anatomy and the unit test method structure, we will explore the unit test class’s counterpart: the system under test.
System under test
A unit test is meant to test a single functionality of a production code. Each unit test class has a production code counterpart that is being tested. We refer to the production code being tested as the system under test (SUT). You can see here an illustration of what the SUT is:
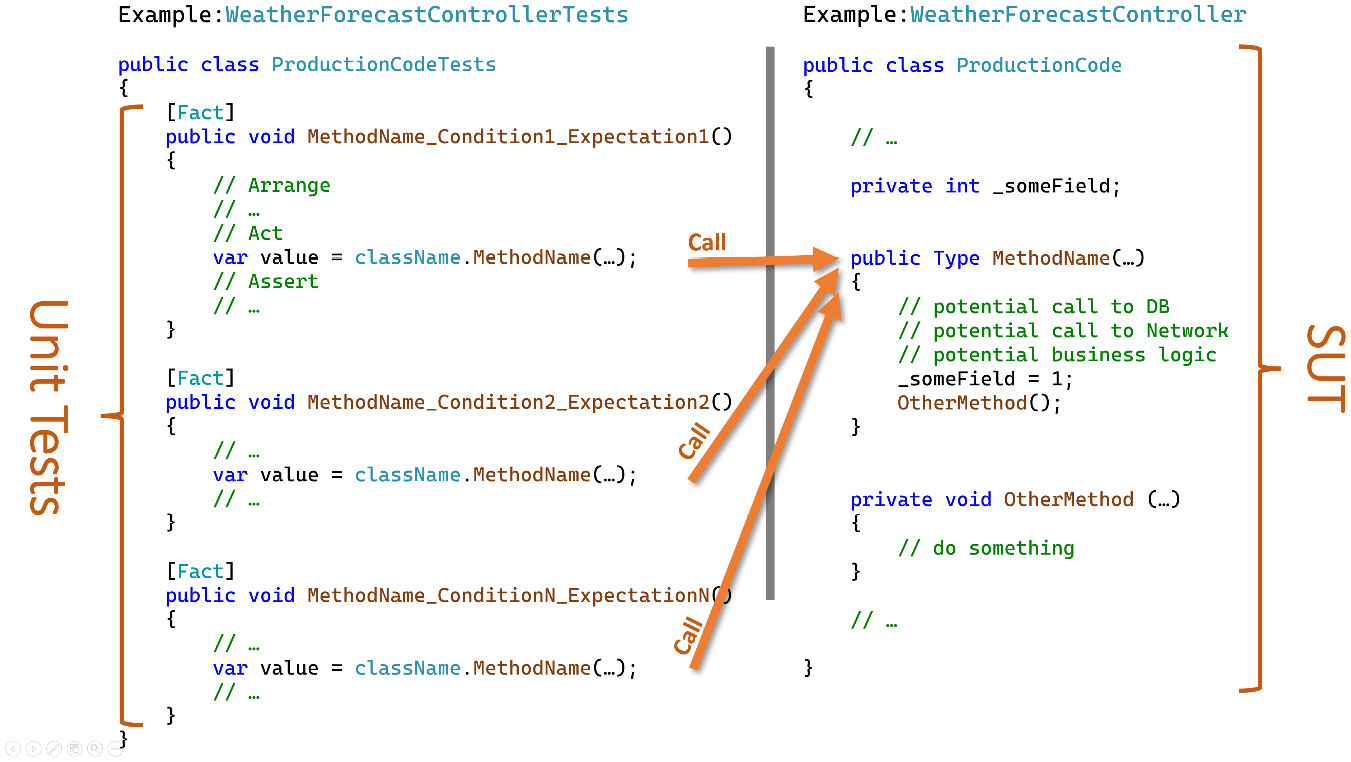
Figure 3.7 – Unit tests operating against the SUT
The term SUT is the most dominant one, but you might find others refer to it as class under test (CUT), code under test (CUT – yes, it is the same acronym), or method under test (MUT).
The term SUT is used in developers’ conversations, and it is also commonly used in the code to make it clear what is being tested, like this:
var sut = new ProductionCode(…);
It is important to understand the SUT of your unit test class. You will gradually notice as your project grows that you will have a pattern being formed, as follows:

Figure 3.8 – Unit test project versus production code project
Every unit test class is paired with an SUT counterpart.
Now that we have seen a few features of xUnit both here and in Chapter 1, Writing Your First TDD Implementation, it is time to have a closer look at xUnit.
The basics of xUnit
xUnit provides the hosting environment for your tests. One important feature of xUnit is that it is AAA-convention friendly. It also integrates with the VS IDE and its Test Explorer.
Extensive examples using xUnit appear naturally in this book. However, it is worth dedicating a few sections to discussing the principal features of this framework.
Fact and theory attributes
In your test project, any method that is decorated with Fact or Theory will become a test method. Fact is meant for a non-parametrized unit test, and Theory is for a parametrized one. With Theory, you can add other attributes, such as InlineData, for parametrization.
Note
VS will give you a visual indication above the method name that you can run the methods decorated with these attributes, but sometimes it doesn’t until you run all the tests.
Running the tests
Each unit test will run independently and instantiate the class. The unit tests do not share each other’s states. So, a unit test class runs differently than a normal class. Let me elaborate with a sample code, shown here:
public class SampleTests
{
    private int _instanceField = 0;
    private static int _staticField = 0;
    [Fact]
    public void UnitTest1()
    {
        _instanceField++;
        _staticField++;
        Assert.Equal(1, _instanceField);
        Assert.Equal(1, _staticField);
    }
    [Fact]
    public void UnitTest2()
    {
        _instanceField++;
        _staticField++;
        Assert.Equal(1, _instanceField);
        Assert.Equal(2, _staticField);
    }
}
The previous unit tests do pass. Notice that while I am incrementing _instanceField in both test methods, the value of _instanceField is not shared between the two methods, and every time xUnit is instantiating a method, all my class is instantiated again. This is why the value is reset back to 0 before every method execution. This characteristic of xUnit promotes a unit test principle known as no interdependency, which will be discussed in Chapter 6, The FIRSTHAND Guidelines of TDD.
On the other hand, the static field was shared between the two methods and its value has changed.
Important Note
While I have used both instance and static fields to illustrate the distinctive behavior of a unit test class, I want to emphasize that using a static read-write field in a unit test is an anti-pattern because this breaks the no interdependency principle. In general, you should have no common write fields in unit test classes, and fields are better to be marked with the readonly keyword.
Instead, if the same methods are part of a regular code class (not a unit test class) and both are called, we expect to find the value of _instanceField incremented to 2, but this was not the case here.
Assert class
Assert is a static class, and it is part of xUnit. This is how the official documentation defines the Assert class:
Contains various static methods that are used to verify0 that conditions are met.
Let’s have a quick overview of some of the methods of Assert:
- Equal(expected, actual): These are a series of overloads that will compare the expectations to actuals. You have seen a few examples of Equal in Chapter 1, Writing Your First TDD Implementation, and in this chapter.
- True(actual): Rather than using Equal to compare two objects, you can use this one where relevant to promote readability. Let’s clarify this with an example:
Assert.Equal(true, isPositive);
// or
Assert.True(isPositive);
- False(actual): The opposite of the previous method.
- Contains(expected, collection): A group of overloads that check for the existence of a single element in a collection.
- DoesNotContain(expected, collection): The opposite of the previous method.
- Empty(collection): This verifies that a collection is empty.
- Assert.IsType<Type>(actual): This verifies whether an object is of a certain type.
As there are more methods, I encourage you to visit the official xUnit site to have a look, or to do what most developers do: write Assert in a unit test class, and type a dot after it to trigger IntelliSense and view the displayed methods.
The methods of Assert will communicate with the test runner, such as Test Explorer, to report back the result of the assertions.
Record class
The Record class is a static class that records exceptions so that you can test whether your method is throwing or not throwing the right exception. This is an example of one of its static methods, which is called Exception():
public static System.Exception Exception(Action testCode)
The previous code returns the exception that is thrown by Action. Let’s take this example:
[Fact]
public void Load_InvalidJson_FormatException()
{
    // Arrange
    string input = "{not a valid JSON";
    // Act
    var exception = Record.Exception(() =>
        JsonParser.Load(input));

    // Assert
    Assert.IsType<FormatException>(exception);
}
Here, we are checking whether the Load method will throw FormatException if it is presented with an invalid JSON input.
This was a summary of xUnit’s functionality, and this should get you started writing basic unit tests.
Applying SOLID principles to unit testing
The SOLID principles are highly covered and advertised on the web and in books. Chances are that this is not the first time that you’ve heard or read about them. They are a popular interview question as well. SOLID principles stand for the following:
- Single-responsibility principle
- Open-closed principle
- Liskov Substitution principle
- Interface Segregation principle
- Dependency Inversion
In this section, we are interested mostly in the relationship between the SOLID principles and unit testing. While not all the principles have strong ties with unit testing, we will cover all of them for completion.
Single-responsibility principle
The single-responsibility principle (SRP) is about having each class with one responsibility only. This will lead it to have one reason to change. The benefits of this approach are as follows:
- Easier to read and understand classes:
The classes will have fewer methods, which should cause less code. Its interface will have fewer methods as well.
- Less rippling effect when changing a feature:
There are fewer classes to change, which would lead to an easier change.
- Less probability of change, which means fewer potential bugs:
More code means more potential bugs, and changing code would also lead to potential bugs. Having less code in the first place means fewer code changes.
Example
The SRP is not an exact science, and the challenge is being able to decide what responsibility is. Every developer has their own view. The next example illustrates the idea.
Let’s assume you have created your own file format called ABCML to solve a particular problem, as the existing file formats (such as JSON, XML, and others) do not satisfy your specific need. A set of classes with each having a single responsibility could be as follows:
- A class to validate whether the content of the file is in the right structure
- A class to export ABCML to a generic format
- A class that inherits the generic ABCML export to support exporting to JSON, and another class that supports exporting to XML
- A class that represents a node in your ABCML
- More classes
You can see how I split responsibilities into individual classes, although there is no single design for having a single responsibility.
SRP and unit testing
Naturally, when doing unit testing, you think of a single responsibility for a class, and you call your unit test class the same name with the tests suffix. So, if you are thinking of testing the validation of the ABCML file format, you might have ABCMLValidationTests.
In your unit test class, each unit test targets a single behavior in your SUT. Those behaviors combined lead to a single responsibility.

Figure 3.9 – Multiple single behavior tests targeting a single responsibility
The previous figure shows multiple tests, each test is focused on a single behavior, and they are targeting one responsibility: validation. On the right, there is one method, but this is only for illustration, as you might have multiple public methods and you can still have a single responsibility.
In Chapter 6, The FIRSTHAND Guidelines of TDD, we will introduce a guideline known as the single-behavior guideline. This guideline works with TDD and unit tests to encourage the SRP.
Open-closed principle
The open-closed principle (OCP) is about preparing your class to be inheritable (having it open) so that any feature addition could just inherit this class without modifying it (having it closed).
The essence of this principle is to minimize unnecessary changes every time a new feature is added.
Example
Let’s take an example that will make this clearer. Assume we have created a library to do arithmetic calculations. Let’s start by not being OCP-compliant, as shown here:
public interface IArithmeticOperation {}
public class Addition : IArithmeticOperation
{
    public double Add(double left, double right) =>
        left + right;
}
public class Subtraction : IArithmeticOperation { … }
public class Calculation
{
    public double Calculate(IArithmeticOperation op,
        double left, double right) =>
        op switch
        {
          Addition addition => addition.Add(left, right),
          Subtraction sub => sub.Subtract(left, right),
          //Multiplication mul => mul.Multiply(left,right),
          _ => throw new NotImplementedException()
        };
}
The Calculate method in the preceding code will have to change every time we add a new ArithmeticOperation. If we want to add the multiplication operation, per the commented line, as a feature at a later stage, then the Calculate method will need to change to accommodate the new feature.
We can make this implementation more OCP-compliant by eliminating the need to change the Calculate method every time a new operation is added. Let’s see how this can be done:
public interface IArithmeticOperation
{
    public double Operate(double left, double right);
}
public class Addition : IArithmeticOperation
{
    public double Operate(double left, double right) =>
        left + right;
}
public class Subtraction : IArithmeticOperation { … }
// public class Multiplication : IArithmeticOperation { … }
public class Calculation
{
    public double Calculate(IArithmeticOperation op,
        double left, double right) =>
            op.Operate(left, right);
}
The previous example leveraged polymorphism to stop the Calculation method from being changed every time a new operation is added. You can see from the commented line how a new multiplication operation can be added. This is a more OCP-compliant approach.
Note
While I had all the classes and interfaces listed together here and on the GitHub code, I did this for illustration, as they are usually separated into their own files. So, with the OCP, you also reduce the chance of changing the file and make it easier on the source control level to understand what changed.
OCP and unit testing
Unit testing protects changes in any class by making sure that a change does not inadvertently break an existing feature. The OCP and unit testing work hand in hand. So, while the OCP reduces the chance of avoidable changes, the unit testing adds an additional protection layer when a change is made by verifying business rules.
Liskov substitution principle
The Liskov substitution principle (LSP) states that an instance of a child class must replace an instance of the parent class without affecting the results that we would get from an instance of the base class itself. A child class should be a true representation of its parent class.
Example
We shall use an academic type of example that will make the concept easier to understand. Let’s take the following example:
public abstract class Bird
{
    public abstract void Fly();
    public abstract void Walk();
}
public class Robin : Bird
{
    public override void Fly() => Console.WriteLine("fly");
    public override void Walk() =>
        Console.WriteLine("walk");
}
public class Ostrich : Bird
{
    public override void Fly() =>
        throw new InvalidOperationException();
    public override void Walk() =>
        Console.WriteLine("walk");
}
In the previous code, and according to LSP, Ostrich should not have inherited Bird. Let’s rectify the code to comply with the LSP:
public abstract class Bird
{
    public abstract void Walk();
}
public abstract class FlyingBird : Bird
{
    public abstract void Fly();
}
public class Robin : FlyingBird
{
    public override void Fly() => Console.WriteLine("fly");
    public override void Walk() =>
        Console.WriteLine("walk");
}
public class Ostrich : Bird
{
    public override void Walk() =>
        Console.WriteLine("walk");
}
We have changed the inheritance hierarchy by introducing a new intermediary class called FlyingBird for compliance with the LSP.
LSP and unit testing
Unit testing has no direct impact on the LSP, but the LSP is mentioned here for completion.
Interface segregation principle
The interface segregation principle (ISP) states that child classes should not be forced to depend upon interfaces that they do not use. Interfaces should be smaller so that whoever is implementing them can mix and match.
Example
I always find the way collections implement in .NET is the best example to explain this principle. Let’s look at how List<T> is declared:
public class List<T> : ICollection<T>, IEnumerable<T>,
  IList<T>, IReadOnlyCollection<T>, IReadOnlyList<T>, IList
It is implementing six interfaces. Each interface contains a limited number of methods. List<T> provides a huge number of methods, but the way it does that is by selecting multiple interfaces, with each interface adding a few of the methods.
One method that List<T> exposes is GetEnumerator(). This method comes from the IEnumerable<T> interface; actually, it is the only method on IEnumerable<T>.
By having small interfaces (interfaces of few and related methods), as in this example, List<T> was able to choose what it needs to implement, no more and no less.
ISP and unit testing
Unit testing has no direct impact on the ISP, but the ISP is mentioned here for completion.
Dependency inversion principle
The dependency inversion principle (DIP) states that high-level modules should not depend on low-level modules. Both should depend on abstractions. Abstractions should not depend on details. Details should depend on abstractions. In other words, the DIP is a principle that promotes loose coupling between classes by using abstractions and DI.
Example
Chapter 2, Understanding Dependency Injection by Example, is focused on this topic, and it is rich with examples of changing the code to enable DI.
DIP and unit testing
There is a tight relationship between the DIP and unit testing. Real unit tests cannot function without DI. In fact, the effort spent on making everything injectable and having the proper interface designs for classes without interfaces promotes the DIP as a byproduct.
You can see that the SRP and the DIP are promoted by unit testing. So, while you are increasing your production quality, your design quality is improving as a result. There is no argument that unit testing requires effort, but part of this effort is already paid into your design quality and code readability.
Summary
In this chapter, we touched on basic unit testing-related topics, and we went through several examples.
If I was to categorize unit testing experience from 1 to 5, with level 1 being a beginner and 5 being an expert, this chapter should get you to level 2. Fear not! After going through the rest of the book, where more realistic examples will come, you will be at level 4, so I am glad you have made it so far. Keep going!
Is this book going to take me to level 5? I hear you asking. Well, unit testing is not a sprint, it is a marathon; it takes years of practice to get to that level, and only getting your hands dirty in unit testing will get you there.
We also covered the relationship between SOLID principles and unit testing to show you the big picture and how everything fits nicely together.
In this chapter, I have deliberately avoided examples that require a deep understanding of test doubles, so as to introduce you to unit testing in a gentle way. However, in reality, most unit tests will require test doubles. Let’s move forward to a more realistic spectrum and dive into this concept in the next chapter.
Further reading
To learn more about the topics discussed in the chapter, you can refer to the following links:
- Walkthrough: Create a code snippet: https://docs.microsoft.com/en-us/visualstudio/ide/walkthrough-creating-a-code-snippet
- xUnit: https://xunit.net