
During my presentations, I always ask, "How many of you use Excel?" and "How many of you use Excel with SharePoint?" And the answers are always the same. A lot of people use Excel. And many of them use Excel with SharePoint by collaborating on workbooks. But there's lots more you can do, using Excel Services. Of all the SharePoint facilities, Excel Services offers you perhaps the greatest "bang for the buck" value. Let's start exploring Excel Services.
As we delve into Excel Services, we'll be covering a lot of ground, as you can see from the following list of topics.
Introduction to Excel Services
Setting up Excel Services
Authoring and publishing Excel to SharePoint 2010
What's new in Excel Services 2010
Consuming Excel Services through SOAP interface
Connecting Excel and SSAS
Excel and PowerPivot
Connecting through REST based API
ECMAScript (JavaScript Object Model) and Excel Services
Managing Excel Services
To get the most out of this chapter, you'll need the following software:
SharePoint Server 2010 Enterprise Edition
Office Excel 2010 x86 or x64 (though the 64-bit version is required when you want to handle large datasets).
SQL Server 2008 R2 x64 or SQL Server 2008 x64
Adventure Works Database (SQL Server 2008 or R2), downloadable at
msftdbprodsamples.codeplex.com/.SQL Server 2008 R2 Client Tools, downloadable at
technet.microsoft.com/en-us/library/ms143219.aspx.PowerPivot Add-In for Excel 2010, downloadable at
http://www.powerpivot.com/download.aspx,
Excel is a great tool for many reasons. You can use it to perform basic mathematics, compute complex calculations, and even as a database. It is also used as a statistical tool, or rather a business intelligence tool. Excel makes it simple to transform data from one format to another. For instance, importing a CSV file into Excel is a very common task that you've probably done at least once in some scenario. We could go on and on—Excel offers an almost endless variety of possibilities and functions useful in almost every organization.
Due to the rich features of the Excel client, it is very heavily used in the real world. Excel has so many built-in functions and formulas that users can easily write their own macros to meet specific needs. And they do. So here, what we'll discuss is not how to use Excel, but how to share it.
What does this mean, practically speaking? It means a business user who is Excel savvy, can craft complex Excel sheets with lots of embedded logic and intelligence, then publish the worksheets to the server right through the Excel client. And by doing so, the entire calculation logic will be exposed on the server for many clients to consume. Moreover, business users need to be able to secure the data and formulas on the calculated columns, and prevent others from reauthoring the sheets.
To sum up, we need a server (preferably a web server) where
The Excel calculation engine is available.
Workbooks can run just as they run on your Excel client.
Workbooks can be shared.
Data and formulas are secure to prevent reauthoring.
Excel Services in SharePoint Server 2010 renders workbooks that are authored using the Excel thick client in a read-only and optionally parameterized format in the web browser. The worksheets that are published on SharePoint present the Excel calculation engine, and also have the ability to connect with various data sources. And they can enhance Excel's calculation abilities through the use of custom user-defined functions (UDFs).
Now that we know where we're going, let's take a look at the Excel Services architecture.
Excel Services architecture consists of a number of components that can be grouped as follows:
Front-end or web front-end server: REST API service, ECMAScript (the JavaScript Object Model or JSOM), Excel Web Access (EWA) and Excel Web Services (EWS).
Application Server: User-defined functions (UDF) and Excel Calculation Services (ECS).
Data Sources: All other data sources.
Of course, you can scale the infrastructure to meet your organization's needs. While the components are logically separated as shown in Figure 5-1, they can all be installed one server if you like.

Note
Excel Web Services and the Excel Web Access web part are not the same. The Excel Web Access web part is the UI element that renders the workbooks as HTML output, while Excel Web Services provide access to web services by which you can programmatically set, calculate, and retrieve values from workbooks.
Before going any further, let's set up the basic infrastructure for using Excel Services.
Excel Services are installed by default with the SharePoint Server 2010 Enterprise version; you don't need to install anything else. But you do need to configure it. First, on your SharePoint site, ensure that the SharePoint Server Enterprise Site Collection Features feature is activated under the Site Collection Features.
Excel Services in MOSS 2007 are managed via the Shared Service Provider (SSP). In SharePoint 2010, however, the Shared Service Provider is no longer available; it has been replaced with Service Applications, which allow better management, control, and deployment. You can access them from Central Administration
To create a new Excel Services application, click the New button on the Service Applications menu and choose Excel Services Application (Figure 5-2). In the Create New Excel Services Application pop-up window, fill in the values for Name and Application Pool and choose whether the service application should be added to farm's default proxy list.

To edit and configure an existing Excel Service application instance, click on the Excel Service Application link from the list of available Service Applications (see Figure 5-3). You can also select the row and click the Manage button.

The Manage Excel Services Application page (Figure 5-4) shows the various settings that can be configured.
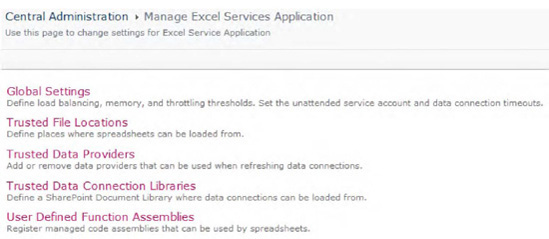
While most of the settings can be left to the default values, some need to be configured to address specific requirements.
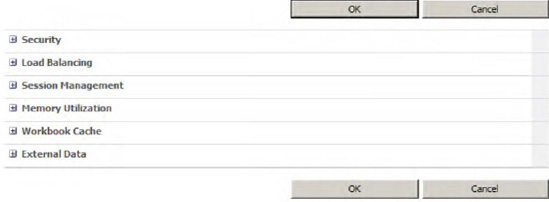
Use global settings to configure the security model, session management, load balancing of ECS sessions, and memory utilization (Figure 5-5).
File Access Method: Set the authentication method either to impersonate or to use the process account that ECS will use for all non-SharePoint trusted file locations. Use impersonation when you want ECS to authorize users when they try to access workbooks stored in UNC and HTTP locations. Impersonation also allows a thread to run in a different security context from the context in which the process that owns the thread runs. (Note that this setting doesn't have any impact on the workbooks that are stored in a SharePoint Server 2010 database.) Use a process account when users can't be impersonated and the ECS application server opens UNC shares or HTTP web sites. A process account is technically a local Windows account that has permissions on the shared folder where the workbook files are stored.
Note
The use of a process account in combination with anonymous access to SharePoint Foundation presents the risk that information may be disclosed. For more information on best practices, follow the recommendations at msdn.microsoft.com/en-us/library/ms545631.aspx.
Connection Encryption: Choose whether or not to encrypt the communication between the client and the front-end components of the Excel Services Application. The default setting is not required, so change the setting to Required to enable encryption. When you choose to encrypt communication, ECS transmits data over an SSL connection that you need to configure manually.
Allow Cross Domain Access: Select this option if a page in one HTTP domain needs to display files from a different HTTP domain.
Load-Balancing Scheme: If your infrastructure has multiple application servers, Excel Services handles the load by distributing requests across ECS occurrences on the application servers in the farm. For the scheme, you can choose among Workbook URL, Round Robin with Health Check, and Local in order to load-balance sessions across ECS processes. With Workbook URL, a URL specified in the workbook is used to indicate which ECS process should run the workbook. This way, requests are always routed to the same ECS session. When Round Robin with Health Check is used, the ECS process is selected using the round-robin load-balancing mechanism to open a selected workbook. Finally, local should be used when the ECS process and workbook are on the local computer. If a local ECS process is not available, the round-robin scheme will be assigned to the ECS process.
Maximum Sessions Per User: Set the maximum sessions allowed per user with the ECS. Any positive integer is a valid value. If the maximum number of sessions is reached, a new session will take the place of the oldest session. Set the value to −1 to enable unlimited sessions per user. Note that the higher the value, the greater the resource consumption for these concurrent ECS sessions. So, keep this value low for better performance.
Maximum Private Bytes: Set the maximum number of private bytes (in MB) that ECS processes can use. Valid values are any positive integer or −1. If the value is −1, the limit is set to 50 percent of the physical memory of the machine hosting the ECS process.
Memory Cache Threshold: Set the memory cache threshold (as a percent) for inactive objects. Valid values are 0 through 95. Caching of inactive objects is disabled if the value is set to zero. Unused cached objects are released when the maximum value is exceeded.
Maximum Unused Object Age: Set the value (in minutes) that inactive objects can remain in the memory cache. Valid values are from 1 through 34560 (24 days maximum). Set the value to −1 for unlimited utilization of the memory.
Workbook Cache Location: Set the location of the file system hosting the ECS server where workbook files are cached. If the location isn't set, the subdirectory under system temporary directory will be used.
Maximum Size of Workbook Cache: Set the maximum workbook cache (in MB) that ECS can use on the disk. This value also counts for recently used files that are currently not opened. Valid values are any positive integers.
Caching of Unused files: If you need to cache files that are unused in any session by ECS, check the Caching Enabled box.
Connection Lifetime: Set the external data connection lifetime. Valid values are −1 and 0 through 2073600 (24 days). In the event of new queries, older, expired connections are reopened. If no connections are to be closed or reopened, set the value to −1. It is highly recommended you limit this value to reduce the risk of a denial-of-service attack.
Unattended Service Account and Application ID: Set the Unattended Service Account ID for single sign-on using the Secure Store Service application. The Application ID must be preconfigured in the Secure Store Services application. You'll learn how to configure Secure Store Services shortly in the "Excel Services and SSAS" section.
Remember how you used SSP in MOSS 2007 to make an Excel file location trusted? In SharePoint 2010, by default all SharePoint (Microsoft SharePoint Foundation) locations are trusted. However, administrators can set rules to protect or unprotect specific file locations. Click on Add Trusted File Location (Figure 5-6) to add and configure trusted file locations.

Address: Set the trusted location from which workbooks should be loaded. These can be any Microsoft SharePoint Foundation or network file share or a web folder address.
Location Type: Choose the storage location type based on the address you set. If the address is a SharePoint document library, select Microsoft SharePoint Foundation. If the address is a network share, choose UNC Path. And for a web folder address, select http web site.
Trust Children: Choose whether or not directories or child libraries can be trusted.
When a user requests a workbook from server, the server creates a new session and opens the latest version of the workbook. Note that there may be different users accessing the same workbook and hence you may have multiple sessions opened for the same workbook. It's important to control the resource consumption as well as duration of any concurrently open ECS sessions. With the help of the following settings, you can manage resource availability and sessions, which can improve the performance of ECS.
Session Timeout: Set the maximum timeout value (in seconds) for an ECS session to open and remain inactive before shut down. This value is measured from the end of each open request. Valid values are −1 through 2073600 (24days). If the value is set to zero, the session expires by end of each single request. Set the value to −1 for no time out.
Short Session Timeout: Set the maximum timeout value (in seconds) for an Excel Web Access session to open and remain inactive without any user interaction before shutting down. This value is measured from the end of original open request. Valid values are −1 through 2073600 (24 days). If the value is set to zero, the session expires by the end of each single request. Set value to −1 in order to disable short session timeout.
New Workbook Session Timeout: Set the maximum timeout value (in seconds) for an ECS session to open a new workbook and remain inactive before shutting down. This value is measured from the end of each request. Valid values are −1 through 2073600 (24days). If the value is set to zero, the session expires by the end of each single request. Set the value to −1 for no time out.
Maximum Request Duration: Set the maximum duration (in seconds) of a single request in a session. Valid values are −1 through 2073600 (24 days). For no limit, set the value to −1.
Maximum Chart Render Duration: - Set the maximum duration (in seconds) to render a single chart. Valid values are −1 through 2073600 (24 days). For no limit, set the value to −1.
Maximum Workbook Size: Set the maximum size (in MB) for a workbook that can be opened by ECS. Valid values range from 1 to 2000 MB.
Maximum Chart or Image Size: Set the maximum size (in MB) of chart or image that ECS can open. Valid values are any positive integers.
These values impact the performance and resources of the server. The bigger the workbook size or the chart or image size, the greater the resource consumption and, thus, the worse performance.
Volatile Function Cache Lifetime: The maximum time a volatile function is cached in order to compute values for automatic recalculations of sheets containing volatile information. Volatile functions, such as RAND(), TODAY(), and NOW(), are those that are always calculated. Valid values range −1 to 2073600 (24 days). If set to −1, calculations are loaded once while opening. Set to zero in order to always calculate.
Workbook Calculation Mode: Set the value to
Manual to recalculate only when a request is received.
Automatic to recalculate on any change to a value that all other values are dependent on,
Automatic except data tables to recalculate on any change to a value that all other values are dependent on as long as the values are not in a data table.
Allow External Data: To allow ECS to process external data connections, set to
None to disable all external data connections.
Trusted data connection libraries only to allow data connections that are saved to a trusted data connection library and ignore those embedded in the worksheet.
Trusted data connection libraries and embedded to allow data connections to data sources that are saved to a trusted data connection library. If the connection fails, the server will enable connections embedded in the worksheet.
Warn on Refresh: Choose this option to display a warning message before refreshing the external data for files in this location.
Display Granular External Data Errors: Choose to display error messages when files in the location have data failures.
Stop when Refresh on Open Fails: Choose to stop opening a file when the user does not have permissions to open the workbook.
External Data Cache Lifetime: Set the maximum time that external data query results can be used by the system. Set the maximum refresh time value in seconds for either automatically or manually refreshing external query results the system can use. Valid values range from 0 to 2073600 (24 days). Set to −1 to prevent data refresh after initial query.
Maximum Concurrent Queries Per Session: Set the maximum number of data queries that can run simultaneously in a single session. Valid values are positive integers.
Allow External Data Using REST: Choose to enable the data refresh from REST APIs. However, if the Allow External Data is set to none, this wouldn't be in effect.
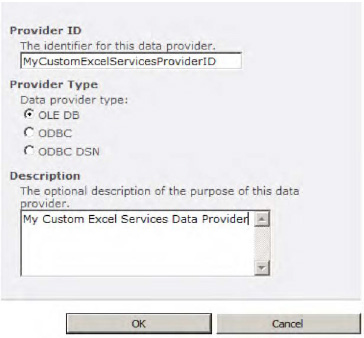
ECS uses data providers that are trusted to access data from external data sources for use in Excel workbooks. There are many data providers that are trusted natively. However, when you have to retrieve external data using custom data provider information in the connection, you need to manually define the provider as trusted. Click on Add Trusted Data Provider and furnish Provider ID, Type (OLE DB, ODBC, or ODBC DSN), and Description values (Figure 5-7). After adding the trusted data provider, use the Provider ID in the connection string.
You can set a SharePoint document library as trusted. Data connection files (*.odc) hosted in this document library will be loaded by ECS for connecting to databases. To create a Trusted Data Connection Library click on the Add Trusted Data Connection Library link. Type the document library Address where files will be saved and fill in the Description as shown in Figure 5-8.

Click on Add User-Defined Function Assembly to set and enable .NET assemblies containing user-defined functions that extend ECS capabilities. The assembly details are shown in Figure 5-9.
Assembly: Type the assembly path, either the full path or the strong name of the assembly.
Assembly Location: Choose between GAC or the file path for the assembly location.
Enable Assembly: If checked, ECS will load and use the assembly. Unchecking this option disables the assembly without deleting the assembly from the entry list.
Description: Optional text describing the user-defined function assembly.

Note
For more information on what UDFs are and how to create your own, visit blog.srinisistla.com/Lists/Posts/Post.aspx?ID=207.
Now that we've have set up Excel Services, let's author a simple Excel file and publish it to Excel Services.
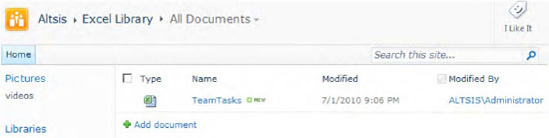
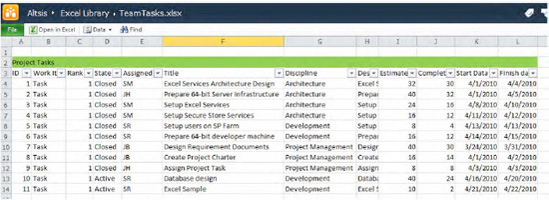
One fine morning my program manager came to me and said, "Hey, why not take the tasks from Team Foundation Server (TFS), export them to Excel, and display status charts based on those tasks on our intranet web site?" Well, that's a great idea—and it can serve as a dashboard for our project status. So we exported tasks for all work items from TFS and saved the file to one of our local drives as TeamTasks.xlsx, as shown in Figure 5-10.

Note
We recommend you create an Excel file with the data as shown in Figure 5-10 since we'll be using it in most of the examples in this chapter.
Since the idea is to have this information on our intranet SharePoint site, we created a document library named Excel Library to act as a container for the TeamTasks.xlsx file. We then followed these steps to publish TeamTasks.xlsx to Excel Library.
Selected Save to SharePoint from the Backstage View[20] of Excel.
Clicked the Save As button under Locations.
In the Save As dialog, provided the URL and the document library name and clicked on Save.
Tip
To do this in a Windows Server 2008 R2 environment, follow the instructions at
blog.srinisistla.com/Lists/Posts/Post.aspx?ID=209. You may not have any issues with Windows 7 or Windows Vista.Note
To open an Excel file in your browser, you'll have to perform a preliminary step. On the ribbon, click Library Tools

Opened our intranet SharePoint site and accessed the Excel Library document library.
From the context menu on the TeamTasks.xlsx item under the Name column, selected the View in Browser option (Figure 5-11).
The file was rendered in the browser as shown in Figure 5-12.
That was pretty simple. Well, you can add a lot of other functionality to the file. But first, let's discuss some of the highlights of Excel Services, which
Note
An Excel workbook accessed via the Excel viewer or Excel Web Access web part cannot be edited.
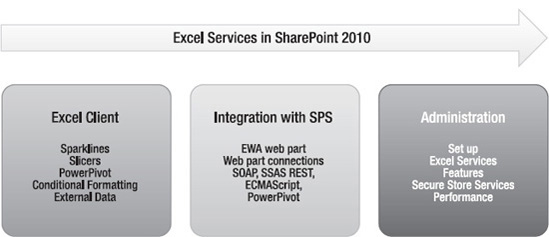
Using Excel as the client and SharePoint 2010 with Excel Services as the platform is the perfect blend for Business Intelligence. Excel Services 2010 includes a number of new enhancements, as we'll see.
Security using Unattended Service Account: use a low-privilege unattended service account to authenticate and retrieve data from various data sources using Secure Store Services.
Windows PowerShell Capabilities: use PowerShell commands to administer Excel Services. Perform operations such as retrieving or setting trusted locations, user-defined functions, etc.
Manage Service Application: Manage any Excel Services you have permissions to administer using the Service Application.
Trusted Locations: except UNC path(s), all SharePoint library locations are by default trusted. Additional manual configuration is required for UNC paths.
Delegate Service permissions: You can delegate specific permissions to a user to handle service applications.
Client Fidelity: Workbooks are rendered with high visual fidelity and maintain compatibility of content and formulas between the Excel rich client and the Excel web app. Most browsers are supported.
Multi-user collaboration: multiple users can simultaneously edit workbooks. Updates are applied based on the sequence of changes: the most recent change overwrites the rest.
PowerPivot: PowerPivot[21] is an add-on to Excel and SharePoint that provides a platform for performing end-to-end solutions and BI analysis.
New APIs (REST[22] and JSOM[23]): These two new functionalities have been added to this version.
Slicers: You can filter data based on a member using Slicer window under Pivot Charts and Tables.
Sparklines: Add Sparklines or miniature charts on columns based on data.
Workbook interactions: You can turn on interactivity on the Excel Web Access web part to interact with data on the Excel workbook.
So far we've experienced Excel Services from the UI. Now we'll take a look at some alternative mechanisms for configuring Excel Services settings.
The functionalities we'll discuss now are the same ones we looked at earlier in the "Setting up Excel Services" section, but now we'll use PowerShell commands.
These commands can be classified into four basic groups: Create (new) operations, Set operations, Get operations, and Delete (remove) operations, as described in Tables 5-1 through 5-4. You will notice that these commands use the Excel Service Application name to get the identity. Make sure you are using the correct name. Again, these commands use other commands to get references, so we recommend you go through all the commands first and then use them according to your needs.
Tip
To get help with PowerShell commands, use the following from the PowerShell command window to obtain full details and examples:
Get-Help <PS Cmdlet> for details and Get-Help <PS Cmdlet> -examples for samples |
Table 5-1. Create / New Operations
Command | Description |
|---|---|
New-SPExcelBlockedFileType | Block a specified file type during loading. Example: Get-SPExcelServiceApplication -identity "Excel Services Application" | New-SPExcelBlockedExcelFileType -FileType XLSX |
New-SPExceldataConnectionLibrary | Add a data connection library to trusted location. Example: Get-SPExcelServiceApplication -Identity "Excel Services Application" | New-SPExcelDataConnectionLibrary -address " |
New-SPExcelDataProvider | Add a new safe data provider to Excel Services application. Example: Get-SPExcelServiceApplication -identity "Excel Services Application" | New-SPExcelDataProvider -providerID "provider ID Name" -ProviderType OleDb -description "some description" |
New-SPExcelFileLocation | Add a new trusted file location to Excel service application. Example: Get-SPExcelServiceApplication -identity "Excel Services Application" | New-SPExce lFileLocation -address "http://yoursite/" -location Type SharePoint -description "some description" |
New-SPExcelServiceApplication | Create a new Excel service application. Example: New-SPExcelServiceApplication -Name "New Excel Service" -ApplicationPool "your application pool" -SessionsPerUserMax 10 |
New-SPExcelUserDefinedFuntion | Add a new user-defined function to an Excel service application. Example: New-SPExcelUserDefinedFunction -ExcelServiceApplication "yourexcelserviceapplication" -Assembly "yourassembly" -AssemblyLocation GAC |
Table 5-2. Set Operations
Command | Description |
|---|---|
Set-SPExcelDataConnectionLibrary | Set properties of the data connection library for an Excel service application. Example: Get-SPExcelServiceApplication -Identity "Excel Services Application" | Get-SPExcelDataConnectionLibrary | where {$_.address -eq "http://yoursite" } | Set-SPExcelDataConnectionLibrary -Address "http://yoursite/doclib" |
Set-SPExcelDataProvider | Set properties of a safe data provider for an Excel Services application. Example: Get-SPExcelServiceApplication -Identity "Excel Services Application" | Get-SPExcelDataProvider | where {$_.providerID -eq "SQLOLEDB" } | Set-SPExcelDataProvider -Description "some description" |
Set-SPExcelFileLocation | Set a trusted file location for an Excel Services application. Example 1: Get-SPExcelFileLocation -ExcelServiceApplication "yourexcelserviceapplication" | where { $_.externaldataallowed -eq "DclAndEmbedded"} | Set-SPExcelFileLocation -ExternalDataAllowed Dcl Example 2: Get-SPExcelServiceApplication | Get-SPExcelFileLocation | where {$_.Address -eq http://} | Set-SPExcelFileLocation -Description "some_description" |
Set-SPExcelServiceApplication | Set the global properties of an Excel Services application. Example: Set-SPExcelServiceApplication ExcelServiceApplication -sessionsperusermax 10 |
Set-SPExcelUserDefinedFunction | Set the properties for a user-defined function in an Excel Services application. Example: Set-SPExcelUserDefinedFunction -ExcelServiceApplication "ExcelService" -Identity "yourassemblydetails" -Description "some_description"; |
Table 5-3. Get Operations
Command | Description |
|---|---|
Get-SPExcelBlockedFileType | Get file type(s) that are blocked from loading. Example: Get-SPExcelServiceApplication -Identity "Excel Services Application" | Get-SPExcelBlockedFileType | format-table |
Get-SPExcelDataConnectionLibrary | Get a list of trusted data connection libraries. Example: Get-SPExcelserviceapplication -Identity "Excel Services Application" | Get-SPExcelDataConnectionLibrary |
Get-SPExcelDataProvider | Get a list of safe data provider(s). Example: Get-SPExcelServiceApplication -Identity "Excel Services Application" | Get-SPExcelDataProvider | where {$_.ProviderID -eq "SQLOLEDB"} |
Get-SPExcelFileLocation | Get a list of trusted file location(s). Example: Get-SPExcelServiceApplication -Identity "Excel Services Application" | Get-SPExcelFileLocation |
Get-SPExcelServiceApplication | Get the Excel Service Application object. Example: Get-SPExcelServiceApplication "ExcelService" |
Get-SPExcelUserDefinedFunction | Get user-defined function(s). Example: Get-SPExcelServiceApplication -Identity "Excel Services Application" | Get-SPExcelUserDefinedFunction -Identity "yourUDFfunction" |
Table 5-4. Delete / Remove Operations
Excel Services support backup and restore operations with a few exceptions that are mentioned below. You will have to manually take care of backing up these files and settings unless you are doing a content database backup and restore.
As we've seen, Excel 2010 has a lot of new features. Let's implement some of them with an example and then publish the workbook to Excel Services.
We will use some of the new features to add more functionality to the TeamTask.xlsx file we created earlier.
PROBLEM CASE
Author and publish the TeamTasks.xlsx file to SharePoint Excel Services, and use an Excel Web Access web part to view the workbook.
Solution:
Open the TeamTask.xlsx file you created earlier. Create a new calculated column to compute the difference between Estimated Hours and Completed Hours. Name this column heading Remaining Work (hours).
Select all the other rows in the Remaining Work column and click on the Conditional Formatting button on the Home tab of the ribbon, then select Data Bars
Select all rows under the Title and the Remaining Work columns. From the Insert tab, click on Pie and select 3-D Pie, as shown in Figure 5-14. Choose one of the Chart Styles available from Chart Tools
Once the Chart is rendered, set Chart Layouts to display the legend and slice details (Layout 1 in this example). From Chart Tools
Create another calculated column of data for computing Task Allocation estimated hours per assignee. To compute the sum of task allocation estimated hours per assignee, you can create a pivot table from the Excel data. From the Insert tab, select Pivot Table. In the Create PivotTable window, choose the range to extend from the Assigned To column to the Estimated Work (hours) column, then choose to place the PivotTable in a New Worksheet and click OK. A new sheet will be created and you'll see a PivotTable added to the sheet. From the PivotTable Field List, select the Assigned To and Estimated work (hours) items and see how that data is added to the PivotTable as shown in Figure 5-16.
Return to Sheet1 and insert another 3-D Pie chart, then select the previously created pivot table as the data range for this chart. Set the chart layout (Layout 1) to display percentage of task allocation.
Your Excel worksheet should now look similar to the one in Figure 5-17.
From the Backstage View, click on Save & Send. Choose Save to SharePoint and save the worksheet to the SharePoint document library you created. Overwrite or provide a new file name if a file already exist with the same name.
Open the SharePoint site, and go to the document library where you saved the Excel file.
Click the Excel file. It should render in the browser as shown in Figure 5-18.


Amazing, isn't it? All the calculation, conditional formatting, and charts are rendered very much as in the Excel client.
Note
The Excel viewer supports 3-D charts by converting them to 2-D charts. Graphic effects such as Shadow, Glow, Soft Edges, Bevel, 3-D Rotation will be converted to their respective 2-D counterparts.
Now we've seen how a published Excel file renders in a browser. It can also be loaded using an Excel Web Access (EWA) web part, which has the same rendering behavior—but EWA comes with more functionality that we will discuss now.
Using an Excel Web Access Web Part (EWA)
Using the Copy Shortcut link from the context menu, retrieve the URL of TeamTasks.xlsx.
Create a page under Site Pages library called Excel Demo.
Open and edit the page. Choose Web Part item from the Editing Tools
Edit the EWA web part or choose to open the tool pane. From the configuration window, enter the TeamTasks.xlsx URL path under the workbook input box. You can also use the text box's pick URL icon.
Leave all other entries with the default settings and click OK.
Team Tasks.xlsx will render in the EWA web part, as shown in Figure 5-19.

Note
Excel Services vs. Excel Web Apps. Note that Excel Services in SharePoint is a platform for hosting Excel client files on a server using the Excel calculation engine. Excel Web Apps, on the other hand, is an online version of Office Excel. For more information, read the article "Excel Service and Excel Web Apps common/different features" at blogs.technet.com/b/tothesharepoint/archive/2010/07/21/Excel-services-and-Excel-web-apps-common-different-features.aspx.
Now let's see how easy it is to extract content from this Excel sheet—including the charts—and use it in a Word application. To do this, we'll use the REST-based API.
As mentioned earlier, the REST API was introduced in Excel Services in SharePoint 2010. It enables simple yet flexible and secure access to Excel workbook content via a URL. You can either manually or programmatically access resources such as ranges, charts, tables, PivotTables, and Atom feeds over HTTP.
A URL through which you can access workbook content consists of three parts:
URI: the Excel REST page
Location of workbook: the relative path to the workbook, including the file name
Location of resource: the path of the resource for the workbook
Here is a sample URL that contains all three elements.
http://<site>/_vti_bin/ExcelRest.aspx/<exceldocumentlibraryname>/<excelfilename>/<resoucelocat
ion>
In the this example,
http://<site>/_vti_bin/ExcelRest.aspx is the URI;
/<exceldocumentlibraryname>/<excelfilename> is the location of the workbook; and
<resourcelocation> is the location of the resource.
Note
For more information on accessing the resource location using the REST API, read "Resources URI for Excel Services REST API" at msdn.microsoft.com/en-us/library/ff394530.aspx.
Let's use the TeamTasks.xlsx file and retrieve the embedded chart using the REST API. But first let's generate an Atom feed from the Excel workbook using the discovery user interface in the Excel Services REST API. This mechanism enables us to explore the elements that exist in the workbook. Copy the shortcut to the Excel file from the document library. Construct a URL like the following that generates output as shown in Figure 5-20.
http://<yourServerName>/_vti_bin/excelrest.aspx/<Excel lib>/<Excel file>.xlsx/modelIf www.sharepointsite.com is your SharePoint site, Excel Library is the document library where your Excel file is published, and TeamTasks_data.xlsx is your Excel file, the URL to obtain the feed would look like this:
http://www.sharepointsite.com/_vti_bin/excelrest.aspx/Excel%20Library/TeamTasks_data.xlsx/model

In order to access and retrieve the chart image from your Excel workbook using REST, you need to build the URL with a different resource location. Remember the Chart Name you provided in the previous exercise (Figure 5-15)? You'll have to use that chart name to retrieve the chart from your Excel workbook. Construct the URL as shown here and enter it in the address location of the browser to get the output.
http://<yourServerName>/_vti_bin/excelrest.aspx/<Excel lib>/<Excelfile>.xlsx/model/charts('<chart name>')?$format=image
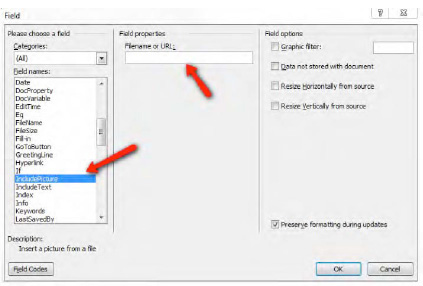
Let's use the previously constructed URL to generate the chart image and embed it into a Word document. Open the Word 2010 client. From the Insert tab, choose Quick Parts, then Field. In the Field window, choose IncludePicture from Field names section, then paste the URL in the Filename or URL text box as shown in Figure 5-21.
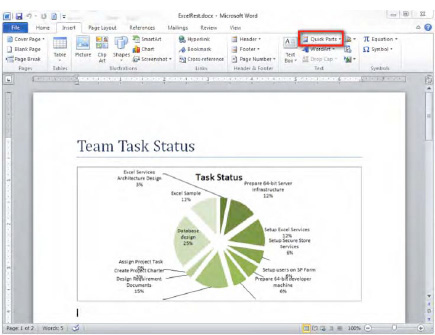
In this example, if www.sharepointsite.com is your SharePoint site, Excel Library is the document library where your Excel file is published, TeamTasks_data.xlsx is your Excel file, and Task Status is the chart name, then the URL to obtain the chart as an image should look like this:
http://www.sharepointsite.com/_vti_bin/excelrest.aspx/Excel%20Library/TeamTasks_data.xlsx/mode
l/charts('Task%20Status')?$format=image
Leave other settings to the defaults and click the OK button. The chart embedded in the Excel workbook that is chosen using the <chart name> parameter in the URL will be rendered as an image in the document as shown in Figure 5-22. You can add a title to the chart and any additional information related to the chart as needed.
Tip
You can use this technique to display an object on a non-SharePoint web site or a SharePoint web site in another farm using the Content Editor web part.
What's so interesting about the chart image in Figure 5-22 is that it is real-time, live, and up-to-date. This embedded chart image will reflect changes immediately, as soon as data changes in the workbook and the field is updated in the Word document.
Note
To retrieve external data using REST, ensure that the "Allow external data using REST" box is checked under Central Administration
That was easy, effective, and very useful. However, there are few features that are not supported in Excel Services REST API.
Floating charts: If you request a range through REST that contains a chart, only the range will be returned, not the chart.
Sparklines and conditional formatting: Sparklines on columns and conditional formatting are not supported.
Output not as pixel perfect as EWA: HTML output generated by REST and EWA are similar. However, when CSS is used, the REST API can't access all the classes as the EWA does.
Tables: All cells are treated without any distinction when accessed through the Atom feed. You can't differentiate among table, cell, header, or general data.
URL size: If there are many subfolders or parameters, the URL may not be set properly as there's a limitation of approximately 2,000 characters.
Special characters: characters such as ? or # are not supported.
Excel Services 2010 can now also use the Excel Services SOAP API. By using the SOAP API, you can not only read the workbook content but also edit and save the workbook programmatically. In the next section, we will demonstrate on how to use the Excel Services SOAP API with a simple example.
Excel Web Services can now expose an Excel workbook and its sheets using the SOAP API. You can both read and write programmatically to the Excel worksheet while other users are editing the workbook, which allows multiuser collaboration. All you need is a simple reference to the SOAP API.
You can communicate with the Excel file securely either by impersonation or by using credentials while connecting to data. Let's see how to connect with TeamTasks.xlsx file using the SOAP API.
PROBLEM CASE
Connect to the TeamTasks Excel worksheet that we've published to our SharePoint environment, programmatically retrieve data, add tasks to the sheet, and then retrieve the updated data.
Solution:
We will use the Excel Services SOAP API to retrieve the Title information and the Remaining Work (hours) from TeamTasks.xlsxin this example.
Open Visual Studio 2010. From the File menu, select New and click on Project.
In the New Project window, choose Windows from the Installed Templates section under Visual C#.
Choose .NET Framework 3.5 and select Console Application.
Enter a proper Name, Location, and Solution Name, and click OK. After successful creation of the project, you'll see that the program.cs and app.config files are added by default to the project.
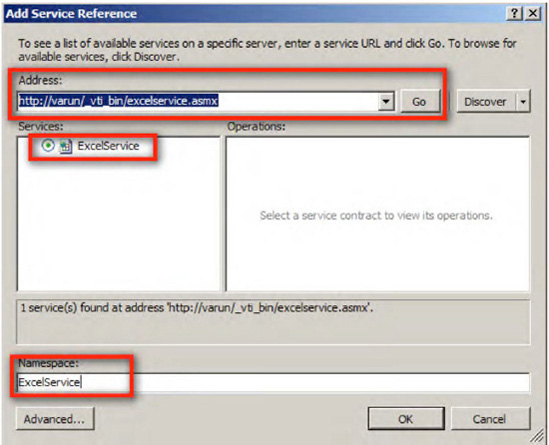
Right-click on References and choose Add Service Reference....
In the Address box in the Add Service Reference window, enter the URL
http://<servername>/_vti_bin/excelservice.asmxand hit the Go button (see Figure 5-23).This action will discover and display the ExcelService service in Services section.
Choose the ExcelService service and provide a valid name in the Namespace text box (Figure 5-23) and click OK.
Right-click on References. From the Add Reference window, on the .NET tab choose System.Web.Services Component.
Open the Program.cs file and add a reference to the namespaces as follows:
using ES_Soap.ExcelService; // ES_Soap is your console application project namespace
using System.Web.Services.Protocols;
Declare variables and set values under the program class:
static string sheet = "Sheet1";
static string excelFilePath = "http://<site>/<doc lib>/<excelfile>.xlsx";
Add a static method called
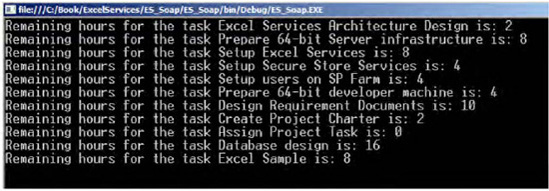
GetDataand copy and paste the following code in the method:ExcelService.ExcelServiceSoapClient es = new ExcelService.ExcelServiceSoapClient(); es.ClientCredentials.Windows.AllowedImpersonationLevel = System.Security.Principal.TokenImpersonationLevel.Impersonation; Status[] status; RangeCoordinates rangeCoordinates = new RangeCoordinates(); try{ string session = es.OpenWorkbook(excelFilePath, "en-US", "en-US", out status); for (int i = 3; i <= 13; i++) { Console.WriteLine("Remaining hours for the task " + es.GetCell(session, sheet, i, 5, false, out status) + " is: " + es.GetCell(session, sheet, i, 12, false, out status)); } Console.Read(); } catch (SoapException soapException) { Console.WriteLine(soapException.Message); }Call the
GetDatamethod from theMainmethod:[STAThread] static void Main(string[] args) { GetData(); }Open the app.config file and modify the security section under
basicHttpBinding, as shown here:<security mode="TransportCredentialOnly"> <transport clientCredentialType="Ntlm" proxyCredentialType="Ntlm" realm="" /> <message clientCredentialType="UserName" algorithmSuite="Default" /> </security>Hit F5 to view the output of the application as shown in Figure 5-24.
As you've seen, this functionality is built to retrieve information from an Excel workbook. Let's now extend the functionality and write to this Excel file.
Copy and paste the following code toward the end of previously added code under the
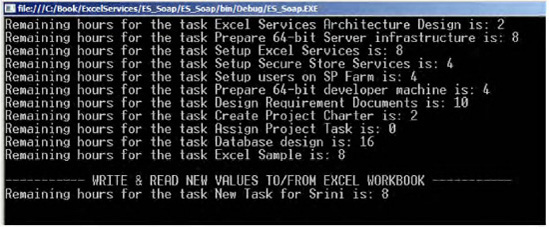
GetDatamethod.Console.WriteLine();
Console.WriteLine("----------- WRITE & READ NEW VALUES TO/FROM EXCEL WORKBOOK ----------
-");
es.SetCell(session, sheet, 14, 5, "New Task for Srini"); // Assign new task to Srini
es.SetCell(session, sheet, 14, 12, "8"); // Assign estimated hours as 8 for the task
Console.WriteLine("Remaining hours for the task " + es.GetCell(session, sheet, 14, 5,
false, out status) + " is: " + es.GetCell(session, sheet, 14, 12, false, out status));
Press F5. View the output and notice that the code first performs a read operation on the workbook, then a write operation. Finally the updated rows are retrieved and displayed as shown in Figure 5-25.
Instead of impersonating the user, you can also submit user credentials (Network) for authentication, like so:
es.ClientCredentials.Windows.ClientCredential = new
System.Net.NetworkCredential("UserName", "Password", "Domain");
The final logic looks like this:
using System;
using System.Collections.Generic;
using System.Linq;
using System.Text;
using ES_Soap.ExcelService;
using System.Web.Services.Protocols;
namespace ES_Soap
{
    class Program
    {
        static string sheet = "Sheet1";
        static string excelFilePath = "http://<site>/<doc lib>/<excelfile>.xlsx";
        [STAThread]
        static void Main(string[] args)
        {
            GetData();
        }
static void GetData() { ExcelService.ExcelServiceSoapClient es = new ExcelService.ExcelServiceSoapClient(); es.ClientCredentials.Windows.AllowedImpersonationLevel = System.Security.Principal.TokenImpersonationLevel.Impersonation; //es.ClientCredentials.Windows.ClientCredential = new System.Net.NetworkCredential("UserName", "Password", "Domain"); Status[] status; RangeCoordinates rangeCoordinates = new RangeCoordinates(); try { string session = es.OpenWorkbook(excelFilePath, "en-US", "en-US", out status); for (int i = 3; i <= 13; i++) { Console.WriteLine("Remaining hours for the task " + es.GetCell(session, sheet, i, 5, false, out status) + " is: " + es.GetCell(session, sheet, i, 12, false, out status)); } Console.WriteLine(); Console.WriteLine("----------- WRITE & READ NEW VALUES TO/FROM EXCEL WORKBOOK -----------"); es.SetCell(session, sheet, 14, 5, "New Task for Srini"); // Assign new task to Srini es.SetCell(session, sheet, 14, 12, "8"); // Assign estimated hours as 8 for the task Console.WriteLine("Remaining hours for the task " + es.GetCell(session, sheet, 14, 5, false, out status) + " is: " + es.GetCell(session, sheet, 14, 12, false, out status)); Console.Read(); } catch (SoapException soapException) { Console.WriteLine(soapException.Message); } } } }So far the data we've been using has been quite simple. However, with Excel you can connect and integrate with huge data sources such as OLAP databases. You can even use cube data in Excel with very little configuration and the default settings. Let's see how to connect with multidimensional data sources and gain some insights into using Excel Services.
SQL Server Analysis Services (SSAS) and Excel together—now that's a great combination for those who would like to analyze and slice and dice cube data. To do this, we will use the AdventureWorks DW database and demonstrate how to configure and connect to SSAS.
As a prerequisite, Secure Store Services need to be configured to authenticate with SSAS. This is similar to what you've done in previous chapters, but we will run through the exercise once again.
From Central Administration

In the credentials fields, choose Windows User Name and Windows Password as shown Figure 5-27 and click Next.

Enter user(s) who can manage the application as Target Application Administrators, and users who are Members who are allowed to use the application (Figure 5-28) and click OK.

After returning to the SSS home screen, choose the Application from the store you just created and set the credentials by clicking on the Set button as shown in Figure 5-29.

Enter values in the credential fields for the Target Application that has access to the SSAS database as shown in Figure 5-30.

Now that your credential cache is ready, let's see how to connect Excel with SSAS using the Secure Store Service Application ID.
PROBLEM CASE
Connect Excel with the multidimensional cube and analyze the Internet Sales information from Adventure Works DW database
Solution:
Open the Excel 2010 client. On the Data tab, choose From Analysis Services, as shown in Figure 5-31.
In the Data Connection Wizard, enter a Server name and choose the Log-on credentials. Use Windows Authentication for impersonation or enter a User Name and Password to use specific credentials. Click the Next button.
On the Select Database and Table screen, choose the Adventure Works DW 2008 database as shown in Figure 5-32.
Under Connect to a specific cube or table, select the Adventure Works cube as shown in Figure 5-32. Click Next to continue.
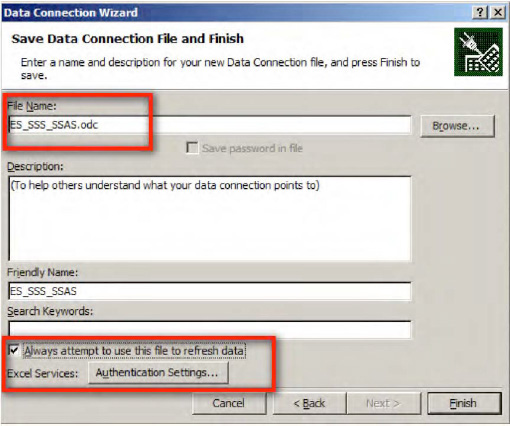
In the Save Data Connection File and Finish window (Figure 5-33), enter a valid file name and choose a location to save the data connection file (*.odc).
Enter a logical description and a friendly name.
Make sure to check the Always attempt to use this file to refresh data box.
Click the Authentication Settings button to choose the type of authentication that will be used for the data.
In the Excel Services Authentication Settings window (Figure 5-34), choose SSS - SSS ID and provide the Application ID you created in earlier section (ExcelServices_SSS), then click OK. After returning to the Save Data Connection File and Finish window, click Finish to complete the Data Connection Wizard.
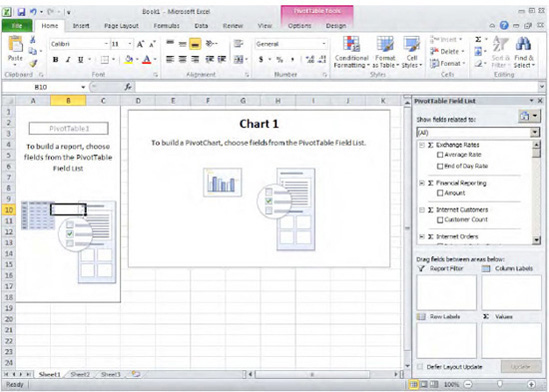
In the Import Data window, choose PivotChart and PivotTable Report and for the existing worksheet leave the default selection (=Sheet1!$A$1) as shown in Figure 5-35. Click on the Properties button to view and alter connection settings, then click OK to close the window.
Note
If you choose only PivotTable Report, only the Pivot Table wizard is displayed. If you need both PivotTable and PivotChart, choose the PivotChart and PivotTable Report.
The Excel sheet will prepopulate the PivotTable and Pivot Chart, as shown in Figure 5-36. The worksheet includes the PivotTable, PivotChart, and PivotTable Field List. You use the PivotTable field list to select the fields for the PivotTable and the PivotChart.
From the PivotTable Field List, choose Sales Amount from the Sales Summary.
From Date
From Product, choose Product Categories.
Choosing these three fields adds a pivot table with data and the chart to the worksheet. Now let's now add a little more functionality to the sheet. We will create some trends based on the data using sparklines.
Select cells ranging from B3 through F7 and from the Insert tab choose Sparklines, then choose Line.
In the Create Sparklines window with the data range selected, enter the location range where you want to display the Sparklines (in this case, use G3:G7) and click OK. Sparklines will be created in the selected range as shown in Figure 5-37.
Choose a specific design format for the sparklines from Sparkline Tools
Let's add a trend to this sheet, a rather simple one. Let's get trends on the difference in Sales Amount from FY 2004 and FY 2002. Note that if you're using the Adventure Works DW 2008R2 database, you'll have data for FY2006 through FY2009.
Place the difference formula between D3 and B3 and choose column H to display the results. Repeat the step for the range D4:D7 and B4:B7.
Select all the calculated columns (H3:H7). From the Styles section on the Home tab, click on Conditional Formatting, then on Data Bars. Select the green data bar and then Gradient Fill.
Note
There are many other conditional formats, designs, and layouts you can use. We recommend you try other options for styling the sparklines and charts.
After you add sparklines and conditional formatting to the sheet, it should look similar to what's shown in Figure 5-38.
What would be more interesting is if you could add an intuitive mechanism to the sheet for analyzing data. And you can—the Slicer is another utility available in Excel that you can use to filter data, and slice and dice it.
From the Filter section on the Insert tab, click on Slicer. If you have more than one connection file related to this Excel workbook, you'll be prompted to choose the Existing Data Connections. Select the previously created data source connection and click the Open button. Otherwise, skip this step.
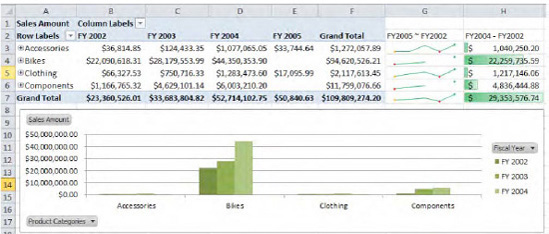
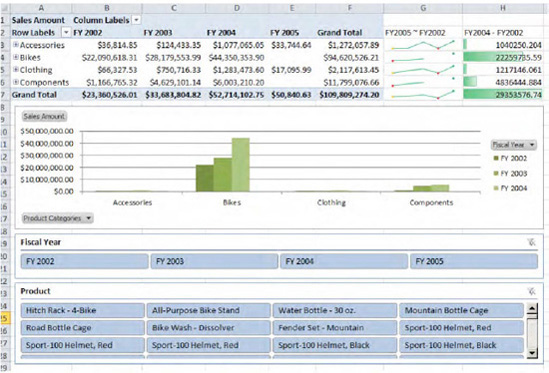
From the Insert Slicers window, choose Fiscal Year from the Date section and Product from the Product Categories section and click on OK. This adds two slicers, Fiscal Year and Product, as shown in Figure 5-39.
Place the slicers below the graph and from Slicer Tools Options buttons, change the value in the Columns input. Increase the value to fit the columns in single row.
The final sheet should look like the one in Figure 5-39.
Click on any of the Slicer filters and see how the data gets filtered on the PivotTable and Chart.
You saw earlier how to publish an Excel workbook to a SharePoint library. Figure 5-40 shows the final Excel workbook sheet after publishing to SharePoint. On the Product slicer, click on Hitch Rack-4-Bike and view the output as shown Figure 5-40.


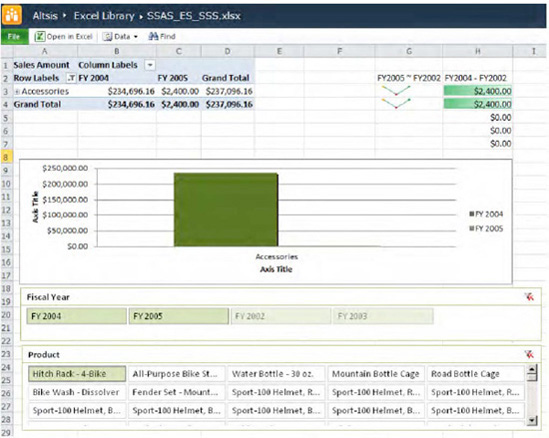
Important: Let's understand an important step in the previous exercise: precisely, step #5. You've saved the data connection file (.odc) to the local file system. As you are aware, this will definitely not be the scenario in a production environment. You will have to save the file to a location that is trusted. To accomplish this, you'll have to upload the .odc file to the Data Connection Library (DCL) on your SharePoint site.
To create a DCL, go to your SharePoint site, then to Site Actions

After approving the file, click on it. This opens a new Excel workbook using the Excel client on your local machine, which will be readily connected to the data source embedded the .odc file.
The Excel workbook will be prepopulated with the PivotTable. However, to add a PivotChart, select a chart from the Charts section of the Insert tab. Following steps 8 through 16 in the previous exercise would produce the results shown in the Figure 5-40.
Important: Since SQL Server Analysis Server uses an Active Directory account, be sure to do the following:
Monitor errors in the
%program files%/common files/Microsoft shared/web server extensions/14/logsfolder.Ensure that the logged-in user or the unattended account under Secure Store Services has the required level of access permissions for SQL Server Analysis Services.
Make sure that Windows Firewall between the SharePoint server and the SSAS server allows SSAS ports for operations (the defaults are 2382 and 2383).
Ensure that the firewall is not blocking SQL Server Analysis Services or Excel Services.
Be aware that if SSS is not configured properly, you might end up with the error shown in Figure 5-42 when refreshing or filtering the data in the Excel workbook. In such situations, verify that the unattended service account credentials are accurate and have sufficient privileges. Also ensure that in the Trusted File Locations (Excel Service Application on Central Administration)

So far we've seen how to consume data from data sources small and large in Excel and how to publish Excel workbooks to SharePoint. However, an even bigger question is whether Excel is capable of doing complex calculations and processing lots of information in a short time. Let's see how some of these challenges can be addressed in the next section.
As it becomes increasingly important to support large amounts of data, the need for additional infrastructure that can support Excel also becomes significant. The PowerPivot add-in helps support such requirements. Here's a summary of PowerPivot features and capabilities.
Handle larger data sets
Process large amounts of data much more quickly
Access various data sources including databases, feeds, text files, reporting services etc.
Rich-client interface running over the PowerPivot engine
Integrate with existing Excel features such as Slicers, PivotCharts and Tables.
Excellent BI and data management capabilities, such as the PowerPivot Management Dashboard.
Run analytics on data and calculations faster; uses powerful capabilities such as Data Analysis Expressions (DAX). To learn more about DAX, go to
http://technet.microsoft.com/en-us/library/ee835613.aspx.Enhanced Security.
The major components involved are the Excel 2010 client, the PowerPivot Excel add-in, and PowerPivot for SharePoint. Excel workbooks with PowerPivot data can be published to SharePoint Server 2010 with Excel Services. You can open workbooks with PowerPivot data using Excel 2007 in read-only and non-interactive mode. However, to use all the features of PowerPivot, you need Excel 2010.
Download and install PowerPivot for Excel from www.powerpivot.com/download.aspx. For instructions related to PowerPivot for SharePoint 2010, visit msdn.microsoft.com/en-us/library/ee210654(SQL.105).aspx. And for hardware and software requirements, go to msdn.microsoft.com/en-us/library/ee210640.aspx.
Note
SharePoint standalone installations as well as a developer edition that runs on Windows 7 are supported for PowerPivot. You need a SharePoint server farm with Excel Services, Secure Store Services, and Claims to Windows Token Services running on the same application server where you plan to set up PowerPivot.
After installing PowerPivot on compatible hardware (x86 or x64), the Excel client will include a new PowerPivot menu, as shown in Figure 5-43. It is highly recommended to use the 64-bit edition of Excel 2010 as well as a 64-bit operating system.

Launching PowerPivot opens a new design window. With PowerPivot, you can simply copy and paste a large chunk of data into the Excel sheet and perform analysis on the data. You can also connect to other data sources and perform the same operations as you can perform with Excel.
Figure 5-44 shows various data sources that can be connected to PowerPivot. You can access the list of data sources from Get External Data

Before you begin to use PowerPivot, you do need to perform a few manual steps. After installing PowerPivot for SharePoint Server 2010, two solutions are deployed at the farm level, namely powerpivotfarm.wsp and powerpivotwebapp.wsp. You can view them under Central Administration
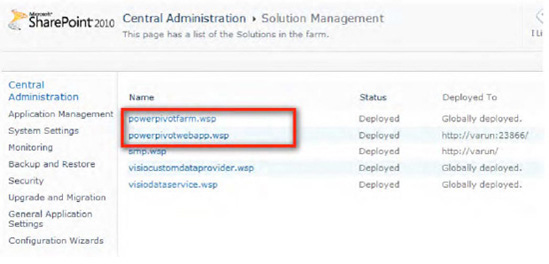
After the initial setup, powerpivotwebapp.wsp will only be deployed to a Central Administration web application. Click on the .wsp link to open the properties window (Figure 5-46).

Click Deploy Solution to deploy the solution to the required web application as shown in Figure 5-47.

After successful deployment, make sure that PowerPivot Feature Integration for Site Collection is activated in the Site Collection Features of your SharePoint site (Figure 5-48).

You are now ready and can fully utilize the capabilities of PowerPivot in your SharePoint site. Let's do a simple exercise and see what PowerPivot brings to the table.
PROBLEM CASE
Connect the Sales data cube and use PowerPivot to retrieve data and populate charts.
Solution:
PowerPivot for SharePoint Server 2010 brings with it a special document library called the PowerPivot Gallery. To create a PowerPivot Gallery, go to your SharePoint site and from Site Actions
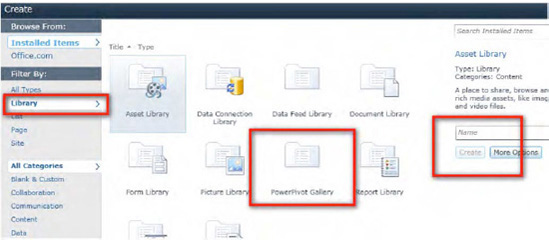
Once the PowerPivot Gallery library is created, go to Library Tools
Open the PowerPivot Library. From Library Tools
In the PowerPivot window, in Get External Data
In the Table Import Wizard, provide a friendly connection name, a server to connect, and the log-on credentials.
For the database, choose either Adventure Works DW or Adventure Works DW 2008R2, whichever you selected earlier. Click on Test Connection to ensure the success of the connection.
Click on the Advanced button to view the connection properties. After successful verification, you can click either OK or Test Connection.
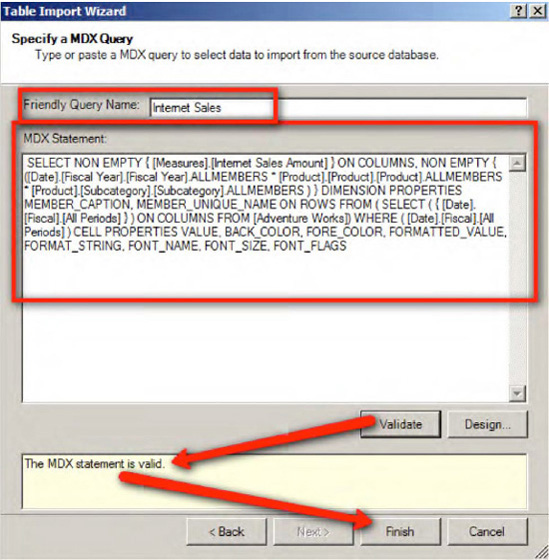
Click Next to configure the MDX query. Provide a valid Friendly Query Name and click on Design to open the Table Import Wizard.
The Table Import Wizard lets you select dimensions and measures from the available cube in the Adventure Works database.
In the Measure Group pane, expand the Measures. Select and expand Internet Sales and choose Internet Sales Amount. Drag and drop to the pane on the right.
From the Dimensions, choose Date
Drag and drop the attribute Date Fiscal to the section on the right.
Repeat step 9 for the Dimension - Product. Choose Category and drag and drop Category on to section on the right.
Add Subcategory in the case of Adventure Works DW (or Sub-Categories in case of Adventure Works DW 2008 R2) to the section on the right.
Your final window, before you click OK, should look like the one in Figure 5-51. Once you verify, click OK.
The window returns to the Specify a MDX Query screen and the MDX Statement is now populated with the MDX query as shown in Figure 5-52. Click the Validate button to ensure the generated query is correct. Once it's been validated, click the Finish button.
Note
If you already know how to build a MDX query, you can create and paste it in the MDX Statement window and avoid the design step.
When you click the Finish button, the wizard imports the data and displays a success or failure notification. You can close the window on successful confirmation. PowerPivot will display the data from the MDX query. Change the column header names (titles) to make them more logical; for instance, change MeasureInternet Sales Amount to Internet Sales Amount.
Select the column Internet Sales Amount and from the Formatting section, select the Data Type and choose Currency.
After formatting the data and changing the column names, the final PowerPivot data should look like what's shown in Figure 5-53.
From the Reports section, choose PivotTable (or Chart and Table) from the PivotTable drop-down menu. In the Create PivotChart and PivotTable window, select New Worksheet and click OK.
From the PowerPivot Field List, drag and drop Internet Sales Amount to the Values section of the configuration window
Drag and drop Fiscal Year to the Row Labels section of the configuration window
Drag and drop Product and Subcategory to the Slicers Vertical section of the configuration window
Click on Chart and configure it in the same way as the previous steps. Drag and drop Internet Sales Amount to Values section of the configuration window.
Drag and drop Fiscal Year to the Axis Fields section of the configuration window.
Drag and drop Category to the Axis Fields section of the configuration window. Rename the sheet to an appropriate name and save the file.
You can save the file by using the Save & Send option from the Backstage and saving it directly to the SharePoint library (PowerPivot Library), or you can first save the file manually to the file system and later upload it to SharePoint PowerPivot library.
Your final Excel workbook with the PowerPivot data will look like the one in Figure 5-54.
In the Connections section of the Data tab, click on Properties. In the Connection Properties window, select the Definition tab and click on the Authentication Settings button. Select SSS - SSS ID and provide the SSS Application ID you set earlier to connect to the SSAS database. Click OK as needed to close all the open windows. Finally, save the Excel sheet to your local disk.
Open the SharePoint site and go to the PowerPivot Library. From the ribbon, choose Upload Document to upload your saved Excel file. Enter the Name and Title and save the file. Your PowerPivot library will now display the document as shown in Figure 5-55, using a Silverlight control.
Click on the Internet Sales sheet to load the Excel worksheet in the browser as shown in Figure 5-56.
You can now click on the slicer (filter) to analyze the filtered data.


Tip
There is much more to this Excel data. You can use the path of the published Excel file as a data source and connect using SQL Server Analysis Services. You can also load the data while using SQL Server Reporting Services.
Silverlight PivotViewer is a powerful web control that can be used for Business Intelligence. You can download Silverlight PivotViewer and get more information at www.silverlight.net/learn/pivotviewer/.
You've already seen how to use Excel Services with the REST-based API. Another API introduced in SharePoint 2010 is the JavaScript Object Model (JSOM) for Excel Services. With JSOM you can handle events on user actions and connect with one or more EWA web parts on the page.
You can use JSOM to retrieve data from sheets, tables, PivotTables, chart, and cells or a range of cells. You can subscribe to many events in order to handle various user actions, such as active selection changed or cell value editing.
Tip
You'll find a full object model diagram at blogs.msdn.com/blogfiles/Excel/WindowsLiveWriter/IntroducingtheJavaScriptObjectModelforEx_1231E/image_2.png.
JSOM is very simple to use. All you need is to write some JavaScript and add it to the page either directly or by using Content Editor web part. The JSOM classes and members are available in the EwaMoss.js file located in the %ProgramFiles%Common FilesMicrosoft SharedWeb server extensions14 emplatelayouts directory.
Note
Reference to EwaMoss.js is by default available in the default master page. You need to refer the file when custom master pages are designed.
Let's now see how to use JSOM to retrieve data from an Excel workbook that is published to SharePoint 2010.

Now that you have seen some working examples, you need to be aware of best practices, as well as some of the known issues and tips for Excel Services 2010.
It's not just enough to use what is available. You need to plan very well before implementing them. You'll find guidelines from Microsoft for Mitigating Threats, Setting up of UDFs, and other general topics at msdn.microsoft.com/en-us/library/ms545631.aspx.
You can read about some of the known issues and tips for Excel Services at msdn.microsoft.com/en-us/library/ms501525.aspx.
And, finally, here are the Error Codes generated by Excel Services during various errors msdn.microsoft.com/en-us/library/ms575980.aspx.
As shown in Figure 5-58, in this chapter we have looked at the following:
Capabilities and new features of Excel Services in SharePoint 2010
The Excel client and its new features
Setting up Excel Services (Administration)
Integrating Excel with SharePoint using EWA
Extracting Excel graphs using the REST API
SOAP, SSAS, and ECMAScript support in Excel
PowerPivot for Excel
In the next chapter, you will learn about PerformancePoint Services and its BI capabilities. This is the platform where everything comes together. We will walk you through installation and setting up of PerformancePoint Services, as well as administration and migration. We will also demonstrate authoring KPIs and scorecards, and integrating dashboards with various other services.
[20] Backstage View, introduced in Office 2010, has an interface you can view when you click it on the File tab. This view has features that are not available as part of the ribbon.
[21] PowerPivot is explained in more detail in the "PowerPivot and Excel" section.
[22] REST is explained in more detail in the "Collaboration with REST API" section.
[23] JSOM is explained in more detail in "Excel Services and ECMAScript" section.
[24] We'll use the Chart Name to access the chart when we examine the REST API later in this chapter.