
![]()
Publish Cross-Site Content with Catalogs
The core of any Web Content Management (WCM) solution ultimately is content. We find that having the ability to effectively manage and reuse your web site’s content is paramount. We can expect to have a large amount of content over time and this will eventually (and inevitably) affect the web site back end in terms of capacity and performance if not planned accordingly. Therefore, planning for reusable content can pay off in the long term. SharePoint 2010 had a built-in feature that allowed content owners to reuse content; one could save snippets of text such as copyright and footer content. When creating or editing pages, the Ribbon provided access to this reusable content, which could then be inserted into the publishing page. This capability still exists in SharePoint 2013; however, this is quite limited and not enough, as it does not cover other content type such as media and images that are prime candidates for reusability.
In addition, SharePoint 2010 had the Content Deployment feature, which allowed the controlled publishing of content from one site collection to another or from Farm A to Farm B. Content deployment could be as granular as a page, for example. Content deployment could also be scheduled. We believe SharePoint 2013 Cross-Site Collection Publishing effectively replaces the Content Deployment feature.
In Chapter 1 we introduced you to cross-site publishing; this chapter aims at further acquainting you with the feature by providing you with additional insight. The second portion of this chapter walks you through a step-by-step exercise in implementing cross-site publishing in the context of the Specter Group Cross-Site Publishing scenario as cross-site collection publishing is best explained with a concrete example. Using the theories, concepts, and examples provided, you should be able to adapt the examples to your specific projects.
Our Scenario
Up to this point, the solution we have been building throughout this book has all of the major branding applied, but only has basic content pages within the http://spectergroup.com site itself. Recall in Chapter 3 that we discussed how content would be authored in one site collection, yet consumed by the public site, found in a separate site collection. It is now time to build the authoring and content presentation solution using cross-site collection publishing, Content Search web parts, and display templates.
About Cross-Site Publishing
Cross-Site Collection Publishing is a new SharePoint 2013 feature that allows for authoring content in one or more site collections, and then surfacing or displaying the content to one or more other site collections. Cross-Site Collection Publishing essentially replaces the need for content deployment introduced in previous versions of SharePoint. In particular, in SharePoint 2010, content created in one site collection could not be easily surfaced in another site collection without third-party tools or content deployment. With Cross-Site Collection Publishing in SharePoint 2013, this limitation no longer exists. Content in one site collection can be quickly surfaced in another site collection.
The new content model for SharePoint 2013 sites is centered on two main components: search index and shared metadata. With the content stored in the search index, metadata stored in the Term Store database, and analytics stored in the SharePoint database, all the published content can be surfaced to users through query rules and the recommendation engine after the content is crawled and added to the search index that catalog result sources leverage. The cross-site publishing feature uses search technology to retrieve content from the search index as the content gets crawled and added to the search index. The content can then be displayed in another site collection by using web parts, in particular the new Content Search web part or the Search Results web part.
Catalogs themselves can be Pages Libraries as well as selected lists in which cataloging is enabled and configured. Figure 8-1 shows the diagram of how cross-site publishing works.
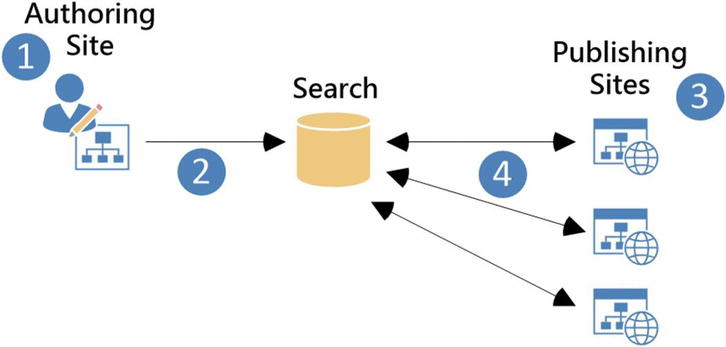
Figure 8-1. How cross-site publishing works
- Content is authored (publishing pages, lists, asset libraries).
- SharePoint 2013 Search crawls the content and builds the index.
- The publishing site pages are viewed, and search queries previously configured on Content Search web parts and Search Results web parts are triggered.
- Results are returned and viewed on publishing page, which contains the Content Search and Search Results web parts. Items are displayed via display templates.
Why Use Cross-Site Publishing?
One of the key benefits of using Cross-Site Collection Publishing is the ability to reuse different types of content across sites. There are many other benefits of using this feature, which include the separation in how content is authored and how or where the content is actually presented. There are also no boundaries for sharing content across various SharePoint object levels (i.e., site collections and web applications). Authored content can be publishing pages that themselves contain embedded media such as pictures and other metadata dictated by the page layout as well as content found in lists and libraries.
Cross-Site Publishing Possible Scenarios
Although different situations all have specific needs, the scenarios identified and described in Table 8-1 will satisfy many publishing needs. Of course, at times, using cross-site publishing will not make sense at all; for example, when simplicity and authoring content in place is sufficient and there is no need to reuse content. Again, however, these scenarios are frequently useful. In this chapter, we implement the Internet Site scenario.
Table 8-1. Cross-Site Publishing Scenarios
| Scenario | Details |
|---|---|
| Internet Site | Cross-site publishing can be used to create an e-commerce web site that contains typical products and details. The navigation of the entire product catalog can be driven by metadata and can be filtered or refined. All content is developed within an internal authoring site and shared with anonymous users outside of the firewall as is typical of any public web site. |
| Intranet Site | Cross-site publishing can be used to author all of an intranet’s content within an authoring site collection. It can then be published to a separate site collection where all employees have access to consume said content and have read-only permissions. |
| Extranet Site | Imagine deploying a Partner Extranet, content is authored internally by a small group of authors. Content is then published to the Partner Extranet web site, which can have very different permissions, say based on the Partner type. |
| Multilingual Site | Imagine the ability to author your public web site in multiple languages such as Spanish, Italian, and English. You can do exactly that by using cross-site publishing together with the variations and translation features to create multiple sites that show translated content for said languages or locales and still reuse or share other content applicable to all web sites. Each web site can then have its own appropriate URL; for example, the Spanish web site can be www.spectergroup.mx or the Italian version could be www.spectergroup.it. |
![]() Tip Sometimes, depending on the cross-site collection publishing scenario, you might wish to share the same branding on both the authoring and the consumer sites. To do this, you could opt to create a design package and deploy this across the consuming sites. See Chapter 4 on how to create a design package.
Tip Sometimes, depending on the cross-site collection publishing scenario, you might wish to share the same branding on both the authoring and the consumer sites. To do this, you could opt to create a design package and deploy this across the consuming sites. See Chapter 4 on how to create a design package.
Cross-Site Publishing Limitations
There are some limitations, gotchas, and constraints when using cross-site publishing that you should be aware of before jumping in head first (see Table 8-2). Knowing these limitations up front can save you time on future projects that you might think are good candidates for cross-site publishing.
Table 8-2. Cross-Site Publishing Limitations
| Limitation | Comment |
|---|---|
| Content Indexing | Cross-site publishing is dependent on content indexing; therefore it is not shown until the content is crawled. SharePoint 2013 does have continuous crawling capabilities which can be configured to crawl in short intervals. There is also full and incremental crawl. Note: You must run a full crawl prior to creating any result sources and when the catalog definition is changed. |
| Term Set Version Control | Making changes to terms is affected immediately, therefore there might be a scenario where content is not authored yet, but the terms have been added. |
| No Approval | Lists do not have approval workflow, therefore the use of versioning is highly recommended so that the index only picks up the items that have major versions approved. Alternatively, simply do not add items to lists if you are not ready to publish. |
Catalogs and Cross-Site Collection Publishing
A core component of Cross-Site Collection Publishing is catalogs. What exactly do we mean by catalogs? Catalogs, as used by Cross-Site Collection Publishing, can be any SharePoint list or library that will be shared across site collections. A list or library is configured as a catalog by being set as a shared catalog via a particular list’s List settings. Pages libraries, lists, and asset libraries must be configured as catalogs to be able to reuse content across site collections.
Once a catalog has been shared, a consuming site can connect to it by using the Catalog Connections setting found under Site ![]() Site Administration
Site Administration ![]() Manage Catalog Connections. Then by using search-driven web parts and specific queries to retrieve items from a given catalog result source, the consuming web site can display content as needed. This content can also be rendered via special pages that are automatically created by SharePoint called category and category item pages. The category page displays the catalog items when a user clicks on an item; it is displayed using the category item page. SharePoint also creates a category page layout and category item layout automatically at the time of connecting to a shared catalog.
Manage Catalog Connections. Then by using search-driven web parts and specific queries to retrieve items from a given catalog result source, the consuming web site can display content as needed. This content can also be rendered via special pages that are automatically created by SharePoint called category and category item pages. The category page displays the catalog items when a user clicks on an item; it is displayed using the category item page. SharePoint also creates a category page layout and category item layout automatically at the time of connecting to a shared catalog.
Introduction to the Content Search Web Part
As we mentioned, the catalog contents are consumed via the new Content Search web part, which are placed on any given page within a publishing site. The Content Search web part is extremely powerful and contains a configuration panel to highly customize the queries as shown in Figure 8-2; one can test queries instantaneously to ensure results are returned and can easily configure refiners, sorting, and other query settings.
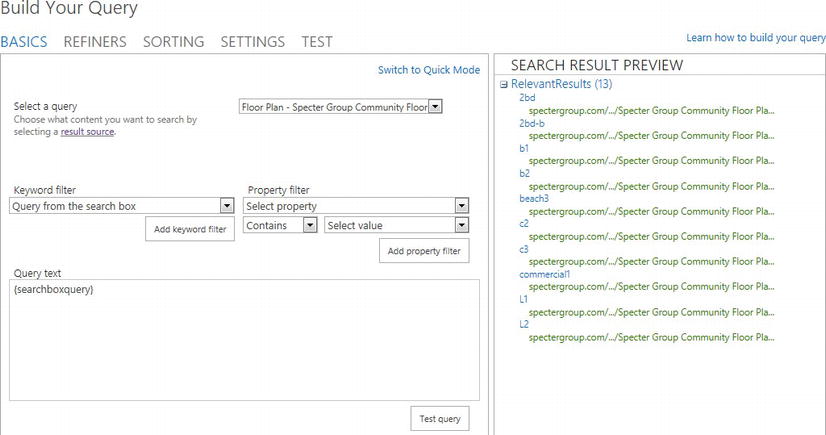
Figure 8-2. Content Search web part query configuration panel
![]() Tip Get an in-depth overview of the Content Search web part, display templates, and query rules in Chapter 9.
Tip Get an in-depth overview of the Content Search web part, display templates, and query rules in Chapter 9.
Because Cross-Site Collection Publishing depends on search and search results, a method is needed to control how search results get displayed on a given page. Display templates allow for custom rendering of search-driven content that resides in the result source created automatically by SharePoint when connecting to a shared catalog. SharePoint comes with several display templates that generally meet our needs. However, when branding a SharePoint site, there is a high likelihood a custom one will need to be created to display items branded appropriately. See the section “Applying Branding to Search Results with Display Templates” later in this chapter to learn how to create and brand your own display templates.
Another way to look at display templates is in the context of how we used to surface indexed data in SharePoint 2010, that being the Content Query web part. If you have used the Content Query web part in SharePoint 2010 (it is still available in SharePoint 2013), then you might have worked with the XSLT style sheets that the Content Query web part relied on to display query results. Display templates in Design Manager seek to replace XSLT, which few developers ever learned, with more standard HTML. We get into the specifics of creating display templates later in this chapter as well as in Chapter 9, as Cross-Site Collection Publishing and display templates are at the heart of the new WCM paradigm in SharePoint 2013.
There are two kinds of components that help render catalog contents via the Content Search web part. There is a Control display template, which handles the rendering of the entire filtered result, and an Item display template, which renders each individual item. These two templates are set in the web part tool pane as shown in Figure 8-3.
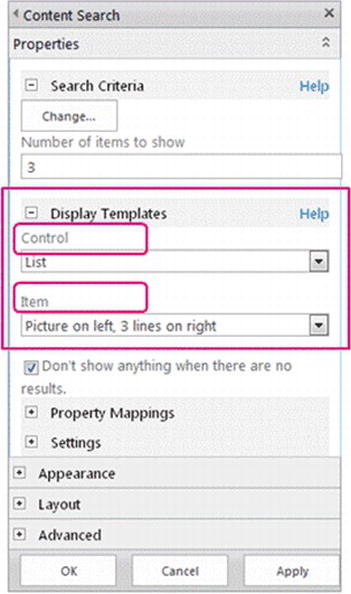
Figure 8-3. The Content Search web part configuration tool pane shows the two kinds of display templates
You can find the out-of-the-box display templates in the Master Page Gallery in a folder called Display Template. You also can browse to ∼sitecollection/_layouts/15/DesignDisplayTemplates.aspx, i.e. http://spectergroup.com/_layouts/15/DesignDisplayTemplates.aspx, in a browser for a list of all display templates. In addition to selecting the display templates, the Content Search web part allows you to specify the metadata or managed properties you would like to display. In this chapter’s walkthrough you will learn how to surface your own metadata and display it using your own look and feel.
![]() Tip To learn more about creating display templates, see Chapter 9.
Tip To learn more about creating display templates, see Chapter 9.
Items in a catalog must be tagged with metadata or terms. Once crawled, the search index adds this metadata, which can then be used in the consuming site collection via the Content Search web part configuration pane. In addition, a term set field can be used for managed navigation in the consuming site.
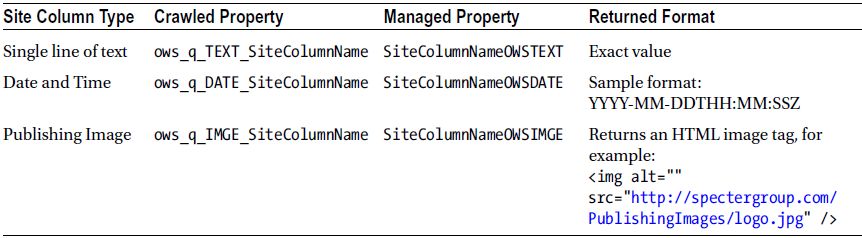
It is worth nothing that SharePoint 2013 automatically creates managed properties for site columns that are part of the metadata contained within a catalog. Also all managed properties that are automatically created are of type Text. There is a specific format SharePoint uses when it automatically creates managed properties. Table 8-3 shows the naming conventions.
Table 8-3. Partial List of Managed Properties Automatically Created for Site Columns
![]() Tip Automatic creation of managed properties is not supported for site columns of type Lookup, Calculated, Summary Links data, and Rich media data for publishing. For a full list of managed properties automatically created for site columns visit http://sprwd.com/22hg4qu.
Tip Automatic creation of managed properties is not supported for site columns of type Lookup, Calculated, Summary Links data, and Rich media data for publishing. For a full list of managed properties automatically created for site columns visit http://sprwd.com/22hg4qu.
Cross-Site Publishing Use: Case Example
We will further show how Cross-Site Collection Publishing can be used by extending our example site. The Specter Group authoring site will be located at http://authoring.specter.com; this is where all content is authored. The public web site located at http://spectergroup.com has to consume the content from the authoring site. The pages and blog lists required to store content are stored in the authoring site and these lists are configured as catalogs so that they can be indexed properly by the search index. In our scenario, we will fully leverage the Publishing features and hence will use publishing page layouts and content pages.
Our solution will also include a globally accessible assets repository, otherwise we might run into a problem of broken image links between the authoring and public sites. Therefore, we have created a separate web application with a single site collection and anonymous access enabled. This assets site can contain all media assets, which will allow for authors to pick and choose media to include in content and the source URL used within the Content Search web part will not appear broken. The authoring site collection is configured to use the Suggested Browser Locations to point to the global assets site collection located at http://assets.spectergroup.com. Figure 8-4 shows the different web applications used in the solution.
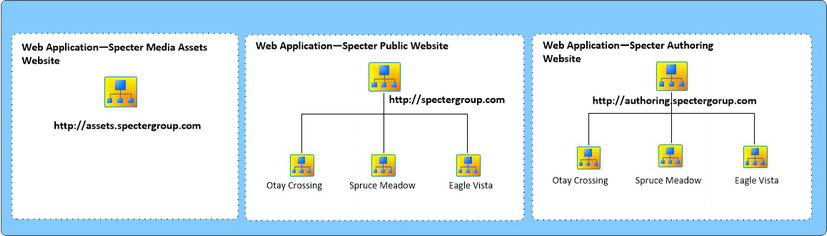
Figure 8-4. The web applications we are using include Assets, Public Website, and Authoring Site
Now that we’ve given you a more complete overview of the sample Specter Group Cross-Site Collection Publishing solution, we walk you through the steps to implement Cross-Site Collection Publishing and related steps for our specific scenario. The following list gives the overall process in order. We then break down each step throughout the remainder of this chapter.
- 1. Configuring the authoring site collection.
- a. Configure the pages library as a shared catalog.
- b. Configure the blog list as a shared catalog.
- 2. Configuring the consuming site collection.
- a. Connect to the blog catalog, integrating navigation.
- b. Change the metadata displayed on the blog category page.
- c. Connect to the communities catalog without integrating navigation.
- d. Create landing pages for the communities catalog.
- e. Create the community detail page.
- f. Set the community detail URL.
- g. Configure catalog navigation for communities.
- h. Apply the Specter Group branding via display templates.
- i. Create the List control.
- ii. Create the Item display template.
![]() Note Please ensure you have the required metadata, as we mentioned earlier, prior to catalog content being available for a consuming site. Content must be tagged with the appropriate metadata. Chapter 6 walked through the process of creating the community content type as well as term sets.
Note Please ensure you have the required metadata, as we mentioned earlier, prior to catalog content being available for a consuming site. Content must be tagged with the appropriate metadata. Chapter 6 walked through the process of creating the community content type as well as term sets.
Both the Specter Group content type and the ability to leverage catalogs with managed navigation require us to have a global term set. Depending on your term set configuration, you can share terms on the site navigation. Figure 8-5 shows the structure we have come up with for the Communities term set. The Specter Group community content type contains metadata columns that map to nodes such as Property Type, which are used to fill in metadata when creating new property pages and other artifacts such as images to allow tagging them with the appropriate community.
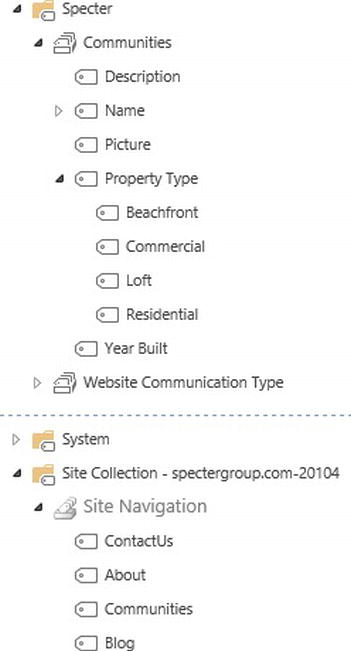
Figure 8-5. The initial Global term set and Site Collection term set
The term set nodes under the Site Collection ![]() Site Navigation group includes the term “Blog”. We use this term later in this chapter to leverage the metadata navigation for the blog catalog when we configure the catalog connection on the Specter Group public web site (the consuming site). This will allow us to browse all blogs and blog entry details with dynamically built category pages, which we also discuss in more detail in the following section.
Site Navigation group includes the term “Blog”. We use this term later in this chapter to leverage the metadata navigation for the blog catalog when we configure the catalog connection on the Specter Group public web site (the consuming site). This will allow us to browse all blogs and blog entry details with dynamically built category pages, which we also discuss in more detail in the following section.
Configuring Cross-Site Publishing for Specific Content an Authoring Site Collection
In Chapter 3 we came up with the design comps that showed various dynamic content, such as for communities and blog posts. This section walks you through the process of enabling and configuring cross-site publishing for each of these items, in addition to ensuring these are displayed as per the branding requirements. There are two catalogs we configure on our authoring site collection: Specter Community and Specter Blog Post.
- New Community information (Pages Library): This is the standard publishing pages library, which makes use of page fields and layouts and our Specter Group community content type.
- Specter Blog Posts (Posts List): This is the standard posts list that resides within the blog subsite on the authoring site collection.
![]() Note Refer to Chapter 9 for detailed instructions on configuring search for cross-site publishing.
Note Refer to Chapter 9 for detailed instructions on configuring search for cross-site publishing.
Add a Suggested Browser Location
As stated earlier, while authoring content, users need the ability to pick media assets. We can leverage suggested browser locations on the Authoring Site so that content authors are able to easily pick media assets via the SharePoint Asset Picker modal window.
To add a suggested location, navigate to the Site Settings page on the main site of the authoring site collection and follow these steps:
- Under Site Collection Administration, click Suggested Browser Locations to load the Suggested Content Browser Locations page.
- Click New item to open the new form page.
- Provide a display name, URL, and optional description of the suggested browser location, as shown in Figure 8-6.
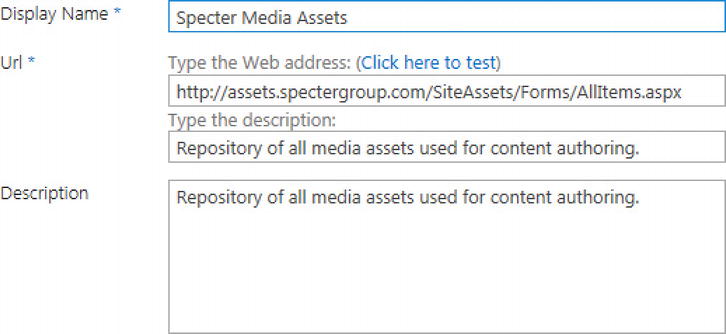
Figure 8-6. The configured suggested browser location on the authoring site
- Click Save to save the suggestion location.
We first configure the Community catalog. This catalog enables sharing of actual publishing pages as a catalog. The pages library uses the custom content type Specter Community. The publishing page also contains image field controls that will enable authoring of new community pages with text and embedded images.
Configure the Pages Library to Use the Community Content Type
To start, we add the community content type to the pages library and then create a new publishing page. We follow these steps for adding the content type:
- Go to Site Settings
 Site Content, then select the Pages Library Settings as shown in Figure 8-7.
Figure 8-7. Under Site Content, single-click Pages Library, then click the Settings link on the modal dialog box
- Click Add from existing site content types to add the Specter Community content type.
Now that we have the Specter Community content type added to the pages library, we create a new publishing page to create the Spruce Meadow Community or property.
![]() Tip See Chapter 7 to learn how to create page layouts and content types, and how to enable them on your site.
Tip See Chapter 7 to learn how to create page layouts and content types, and how to enable them on your site.
- Go to Site Settings Add Page, and provide a page name in the modal dialog box. Then in page edit mode, fill in the appropriate metadata as shown in Figure 8-8.
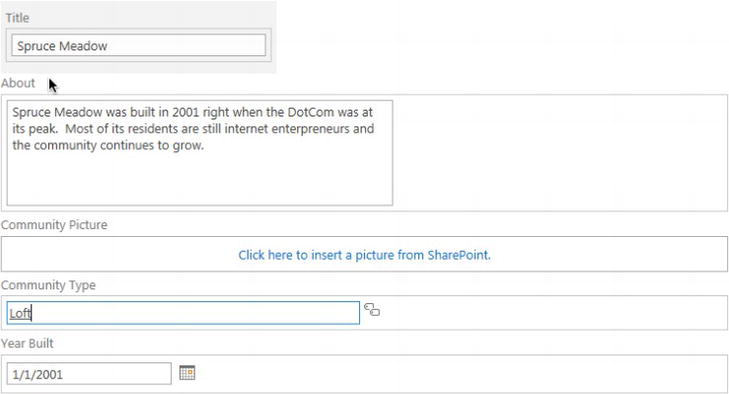
Figure 8-8. The Spruce Meadow publishing page metadata
- To select a picture for this community, click the Community Picture field control. The Asset Picker dialog box will appear, but because we already configured Suggested Browser Locations, at the top left of the dialog box we see the Specter Media Assets option as shown in Figure 8-9.
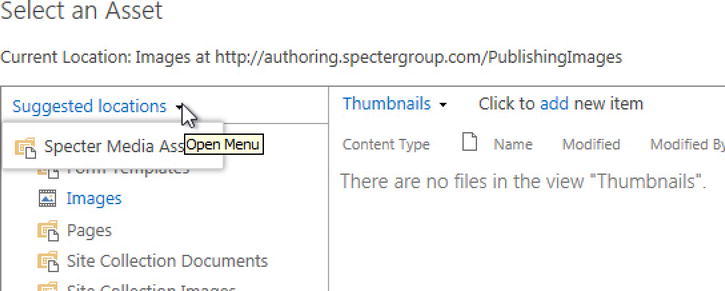
Figure 8-9. The Specter Media Assets location available via the Asset Picker dialog box
- When you click the Specter Media Assets location, you are able to browse to the Assets Library where all media is stored (see Figure 8-10) and directly select a picture for the Spruce Meadow Community. You will notice that the location URL is http://assets.spectergroup.com/SiteAssets, which is the central repository previously configured and available to all web sites. See the section “Cross-Site Publishing Use: Case Example” earlier in this chapter for details. Select the image you wish to associate with this page and then click Insert.

Figure 8-10. The Specter Media Assets location
At this point the Specter Group community page for Spruce Meadow has all metadata filled in, including a picture, and it is ready to be saved and published. The page in edit mode is shown in Figure 8-11. We’ve created pages for other properties and have tagged and published them to ensure they are aggregated on the next search crawl.
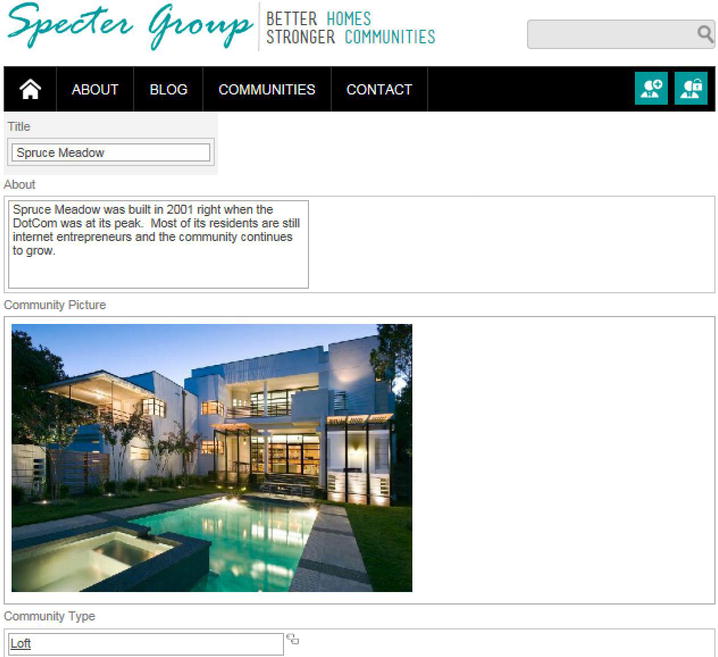
Figure 8-11. The newly created Spruce Meadow Community page
Configuring the Catalog on the Pages Library
The next step is to configure the pages library and enable it for catalogs. We are using this library to author and publish new Specter Group communities. To do this, follow these steps:
- On the authoring site, go to Site Settings Site Content. When the Site Content loads, hover over the right side of the pages library (see Figure 8-12) and click the ellipsis. Then click Settings.
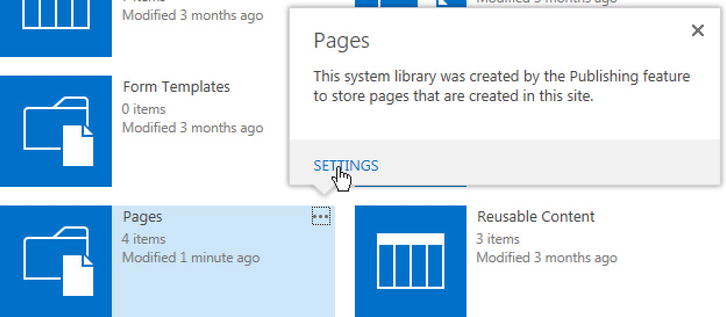
Figure 8-12. Use the ellipsis shortcut to get to the Pages Library Settings
- Under General Settings, click Catalog Settings to open the screen shown in Figure 8-13.
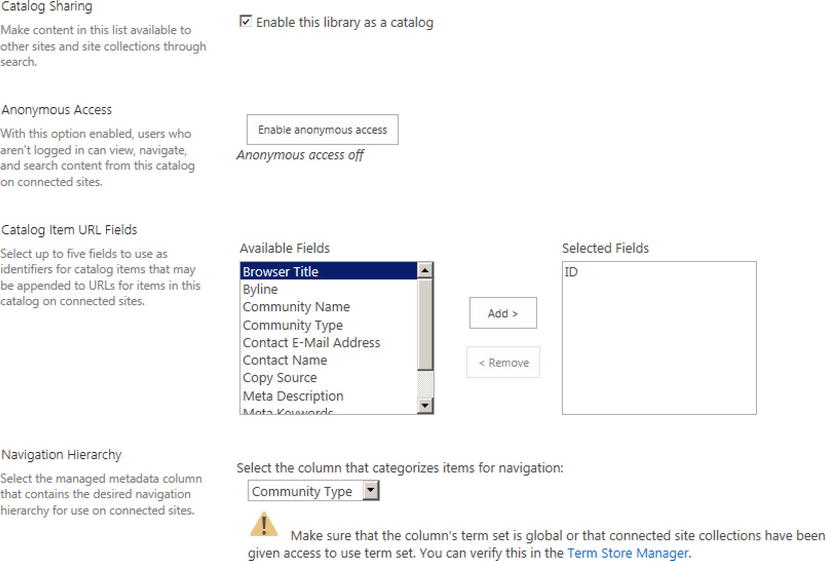
Figure 8-13. The catalog settings for the authoring pages library used to create new Specter communities
- For Catalog Sharing, select the Enable this library as a catalog check box.
- In the Catalog Item URL Fields section, select the ID field.
- In the Navigation Hierarchy section, select the column Community Type metadata column, as this categorizes our communities accordingly and will help drive navigation on the public web site.
At this point the settings for this catalog are as shown on Figure 8-13 and this library is ready to be crawled. We configure the Blog Catalog next.
Configuring Catalog Sharing for Integration with Managed Navigation
The blog posts are authored on a subsite within the authoring site collection. This is also the Cross-Site Collection Publishing example we use to integrate with managed navigation. One of the key requirements from Specter Group was to have an image for each blog post. We simply add the existing site column Page Image, which is also used on publishing pages, but most certainly can be used on our blog post. Our first step is to configure the catalog. To accomplish this, follow these steps while on the authoring blog subsite.
- On the authoring site, go to Site Settings Site Content. When the Site Content loads, hover over the right side of the blog library and click the ellipsis. Then click Settings.
- Under General Settings, click Catalog Settings.
- Select the Enable this library as catalog check box.
- Under Anonymous Access, enable anonymous access.
- Under Catalog Item URL Fields, select the ID field (this is the best option as it is unique).
When to Enable Catalog Anonymous Access
In what scenario would it make sense to enable anonymous access for a catalog? This can be helpful when we are sharing catalogs with a public web site so anonymous users would be able to see the catalog content once it is indexed. However, if we enabled anonymous access but wish to change individual item permissions within our catalog, the search system will respect said permissions. Therefore the search system will not show these items to anonymous users, yet will still make them available to the specific users and groups as specified by the specific item permissions. This is helpful to know when planning catalogs.
The catalog configuration is now completed, and it should look like the one shown in Figure 8-14.
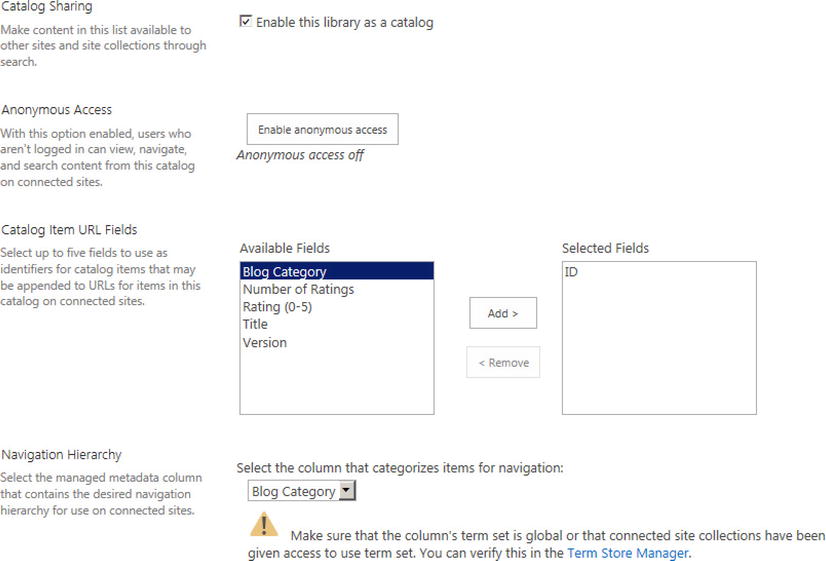
Figure 8-14. Posts SharePoint list catalog configuration
Augmenting the Out-of-the-Box Posts List
Out of the box, the SharePoint posts list does not provide a blog post image; therefore we can add the Site Column, Page Image. Also, to be able to browse posts by a given category on the Specter Group public web site, we can create a global term set (see Figure 8-15) that outlines these categories and adds it as a metadata column to the posts list. This in turn allows us to specify the metadata column as the one used to categorize blog posts.

Figure 8-15. The Specter Global Group, which contains the Website Communication Type term set, which contains the Blog term and child blog category terms
In addition, due to an issue with post HTML content not being escaped when shown on the catalog consuming site, we add the publishing page content column as well.
With this configuration in place, blog posts are now able to be tagged, published, and shared as a catalog, provided we run a full crawl on our search crawler. Once the search crawler runs, this catalog is available and can be consumed by the Specter Group public web site.
![]() Tip Learn how to configure a search in Chapter 9.
Tip Learn how to configure a search in Chapter 9.
Configuring a Web Site for Catalog Consumption
The second part of configuring Cross-Site Collection Publishing is on the consuming web site. In our case this is the Specter Group public web site. Each of the catalogs we created on the authoring site in the previous section is now available to connect to, assuming the search crawler has run. Remember that the two catalogs we configured are slightly different, as the communities catalog does not use managed metadata navigation, whereas the blog catalog does. We walk through connecting to the blog catalog (with managed metadata navigation) first, followed by the community catalog.
Connecting to the Catalog with Managed Metadata Navigation
Now that we’ve configured our shared catalogs within our authoring portal, we next configure the connection to these catalogs for use by the Specter Group public web site.
Catalog connections are managed at the site collection level. On the content consuming site (i.e., the public site), follow these steps.
- Go to Site Settings and under Site Administration, click Manage Catalog Connections.
- Click Connect to Catalog. Refer to Figure 8-16, which shows the available catalogs. Notice the Blog - Posts and Specter Authoring Portal - Pages catalogs.
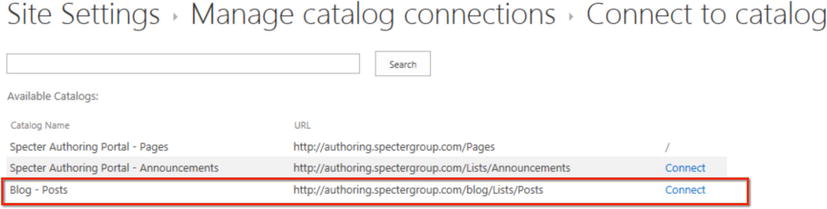
Figure 8-16. The available Blog - Posts catalog previously set up on the authoring portal is shown on the Specter public web site
- To the right of the catalog to which you wish to connect, in this case, Blog - Posts, click Connect.
- You can now configure the connection. Refer to Figure 8-17, which shows the first two options, in particular how to integrate the connection and how the navigation hierarchy should be configured.
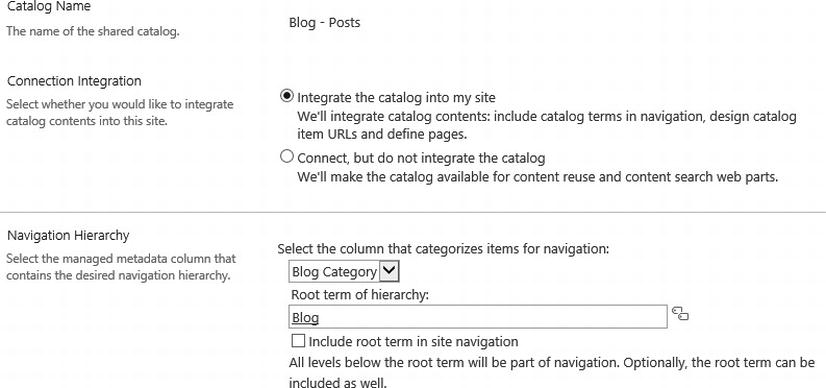
Figure 8-17. Blog catalog connection configuration shows the first two options: connection integration and navigation hierarchy
- Under Connection Integration, select the Integrate the catalog into my site option because we are looking to be able to navigate blog posts driven by the categories. When this option is selected, there are many options that can be configured and we walk through those in the next steps.
- Under Navigation Hierarchy, ensure the metadata column Blog Category is selected in the drop-down list. The root term of the hierarchy is automatically selected for you. It is the one previously configured on the global term set. You do not want to include this root term on the site navigation if you already have a local term on your site navigation. In our case, in Chapter 6 we added the term “blog” to the navigation menu, so we would leave the Include root term in site navigation check box unchecked.
 Tip If you choose to include the root navigation node, SharePoint automatically creates the site navigation. You can then change the order under the Site Settings Navigation. For an in-depth look at new navigation features, see Chapter 6.
Once this configuration option is in place, the terms from the global term set labeled “Blog” will be shared with the local site navigation node labeled “Blog” and will appear with a pin icon in the Term Store Management Tool, as shown in Figure 8-18.
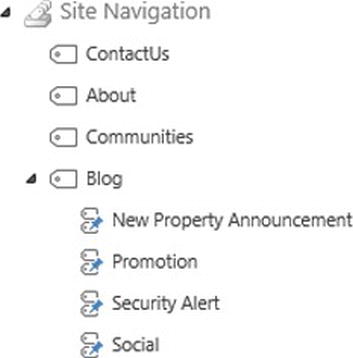
Figure 8-18. Blog Post category terms pinned to the Site Navigation Blog term set
The next configuration is Navigation Position. This option is extremely useful in our case, as the Specter Group public web site already contains a managed navigation node named Blog.
- Our objective is to drop the blog categories under this node and allow for browsing the posts by category. Therefore, select the Select an alternate location in site navigation option as shown in Figure 8-19, and browse or type the name of the node you wish to drop the categories under. The intellisense should pick up the site navigation Blog node so you can select it.
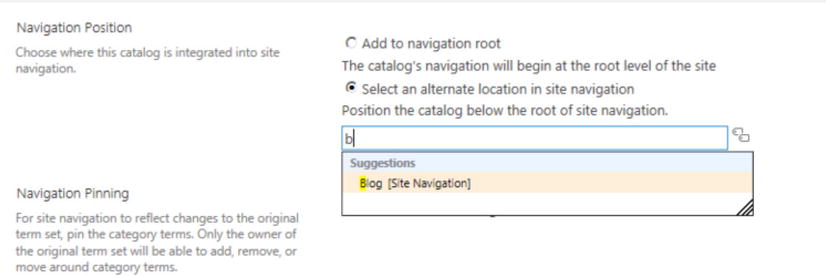
Figure 8-19. Navigation position allows flexibility in integrating the Catalog Navigation and positioning it exactly where we need to, in our case the Blog existing global navigation node
The next important aspect of configuring the catalog connection is the Catalog Item URL Behavior and Catalog Item URL Format shown in Figure 8-20. Both are equally important.
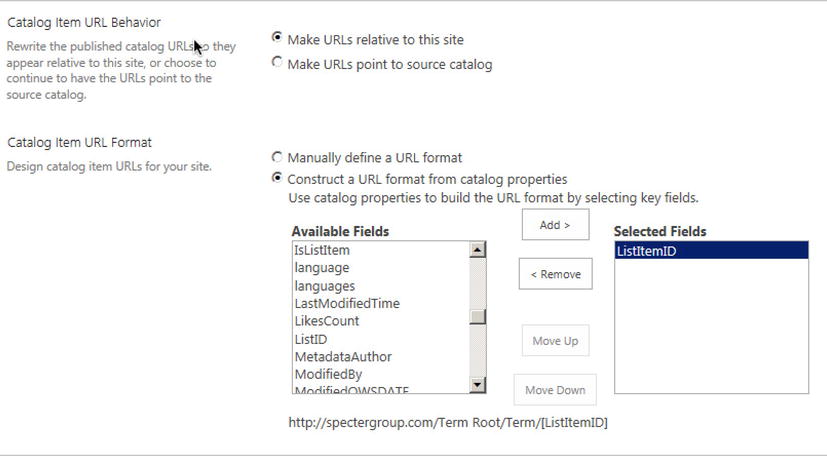
Figure 8-20. The Blog Catalog URL behavior and format configuration settings
- Because we do not want users to browse to the authoring portal when clicking on a blog post, proceed to configure the Catalog Item URL Behavior and select the Make URLs relative to this site option.
- For Catalog Item URL Format, select the second option to construct the URL based on the catalog properties and select the ListItemID field. This field is the unique identifier for a particular blog post. You will notice the URL preview underneath, which tells us how our navigation will look based on the original terms selected. In our case, this is the public site base URL followed by the Blog term root followed by the selected Category followed by the ID of the blog post.
Now that we have connected to our blog catalog, we see the dynamic navigation under the global site navigation with each blog category underneath the original blog node as the label (shown in Figure 8-21). You will also notice how SharePoint automatically builds a breadcrumb based on the selected blog category.
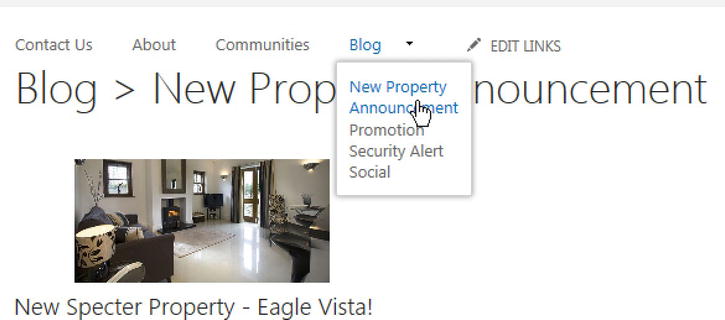
Figure 8-21. The new blog catalog managed navigation and the blog post displayed below it
Using the Category and Category-Item Pages
When we create a connection to any catalog, SharePoint has the capability to create two key pages that are used to browse the catalog. These two pages are the category page and the category-item page. In addition to these two pages, two corresponding page layouts are provisioned and the category and category-item pages are created based on these layouts. In the example from the previous section, with our blog catalog, SharePoint automatically created page layouts named Category-Blog.aspx and CatalogItem-Blog.aspx as shown in Figure 8-22 at the time when we connected to the catalog.
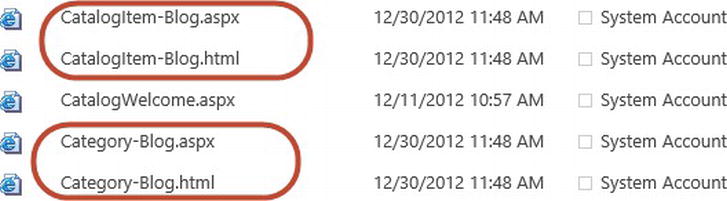
Figure 8-22. Auto-provisioned HTML page layouts for the blog catalog connection
We have the ability to customize these pages at various levels. We can customize the page layout or we can choose to only modify the page for a specific category. In Figure 8-23 you can see the modal dialog box that is displayed when a new category page is created.
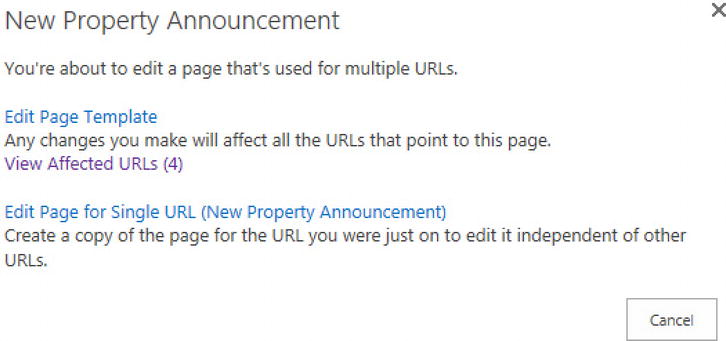
Figure 8-23. When editing the Category page, SharePoint displays available editing options
![]() Tip Whenever we disconnect from a catalog, there is some manual cleanup work that must be completed. This includes deleting the category and category-item pages that reside within the pages library. Further, you must remove the two corresponding page layouts that were automatically created and are found in the Master Page Gallery. Finally, you must manually delete the terms previously shared under a navigation node if the catalog included managed metadata similar to our example blog list. Removing all of these artifacts will allow you to connect to the catalog again without potential problems if you need to re-create the connection.
Tip Whenever we disconnect from a catalog, there is some manual cleanup work that must be completed. This includes deleting the category and category-item pages that reside within the pages library. Further, you must remove the two corresponding page layouts that were automatically created and are found in the Master Page Gallery. Finally, you must manually delete the terms previously shared under a navigation node if the catalog included managed metadata similar to our example blog list. Removing all of these artifacts will allow you to connect to the catalog again without potential problems if you need to re-create the connection.
Changing Metadata Displayed on a Category Page
By default, a category page might not display all of the metadata your scenario requires. In our scenario, the blog metadata displayed by default on the catalog consuming page is not enough. The category page only displays the image and title (see Figure 8-21). How about if you would like to display additional metadata such as the following:
- Title
- Body text
- Picture
- Published date
- Published by
- Comment count
To change what metadata is displayed you can edit the category page template or page layout via the web browser. Browse to a blog post category and place the page in editing mode. A dialog box very similar to Figure 8-24 will appear. Click Edit Page Template so that all related categories reflect your change. Once in edit mode, determine what metadata you can display by using the diagnostic view available in the configuration pane of the SharePoint content search web part. Yes, the content search web part is actually used within the category page to display the catalog content. This allows you to map columns and view the detailed information on the output as shown in Figure 8-24.
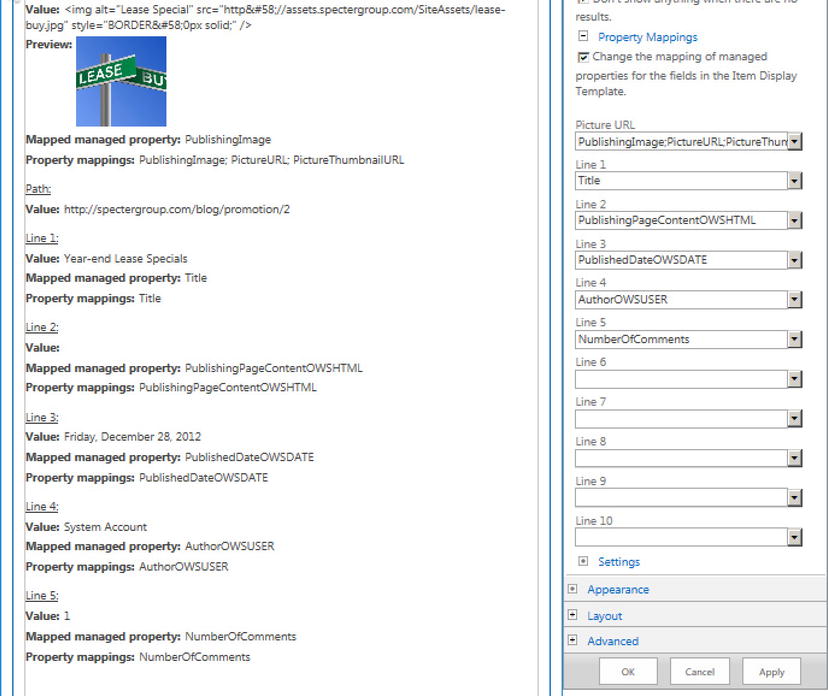
Figure 8-24. The category page contains the Content Search web part, which can be further configured, including displaying additional metadata by mapping custom columns that are part of our custom content type
![]() Tip The SharePoint user interface calls a category page layout a template, which can be confusing given the fact that template is used to refer to other capabilities or features. To be clear, it is a page layout and we are in fact editing the page layout when we opt to edit the category page template.
Tip The SharePoint user interface calls a category page layout a template, which can be confusing given the fact that template is used to refer to other capabilities or features. To be clear, it is a page layout and we are in fact editing the page layout when we opt to edit the category page template.
![]() Caution You will notice that the blog body content HTML is not escaped when using the multiple line of text column, which is used by default on the posts list.
Caution You will notice that the blog body content HTML is not escaped when using the multiple line of text column, which is used by default on the posts list.
To ensure the blog post body HTML is escaped, we have decided to add the publishing page content column to the posts list and use that to enter the content of a post. This in return outputs the HTML correctly when displaying posts via the Content Search web part using Cross-Site Collection Publishing.
Connecting to a Catalog without Integrating Navigation
Now that we have seen how to connect to a catalog with managed metadata navigation, we want to look at how connecting to a catalog without integrated navigation might be different. In our example, the Specter Group communities catalog does not leverage the catalog navigation. We connect to the communities catalog, and then we show the properties and required metadata styled as per the Specter branding in combination with using the Content Search web part and a custom display template.
![]() Note Because the communities catalog does not integrate with navigation, we manually create the pages to view communities including the community detail page.
Note Because the communities catalog does not integrate with navigation, we manually create the pages to view communities including the community detail page.
To get started, first connect to the communities catalog you previously shared on the authoring site by following these steps:
- On the consuming site, go to Site Settings. Under Site Administration, click Manage Catalog Connections.
- Click Connect to a Catalog. If the communities catalog was configured properly and crawled by the search indexer, it will appear as shown in Figure 8-25.

Figure 8-25. The communities catalog available on the Specter public web site
- Click Connect and then under Connection Integration, select the Connect, but do not integrate the catalog option, as shown in Figure 8-26. Using this configuration you are able to use the specific Content Reuse web parts available in the Snippet Gallery.

Figure 8-26. Communities catalog integration options
- All other options are unavailable at this point, so click OK to complete the connection.
Note Because we did not integrate the communities with the Specter Group web site (including catalog item navigation), there will be problems if we simply insert a Content Search web part onto a page. The page will display the catalog contents, but if you hover over any item, you will notice the URL to the item was only partially generated. This is because we must further configure the catalog.
- Go back to the catalog settings on the consuming site and set the Catalog Item URL Behavior to Make URLs relative to this site as shown in Figure 8-27.
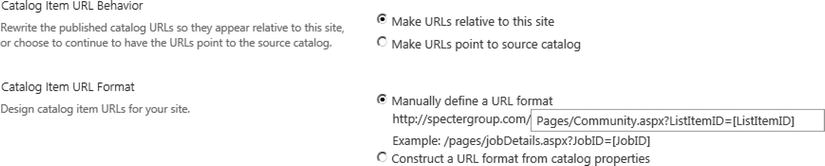
Figure 8-27. Community catalog URL behavior and format configuration
- Under the Catalog Item URL Format, select the Manually define a URL format option and set the text box value also shown in Figure 8-27. Notice the custom page Community.aspx, as you will need to create that as well. (See the next section, “Creating Landing Pages for a Catalog.”)
One can think of category pages as the ones responsible for displaying the list of data items, and the category-item page as the item detail page. This is very much like the typical ASP.NET data-driven web application pattern. In fact, we can also use the QueryString to pass the item ID to the details page, again much like traditional data-driven web applications.
Creating Landing Pages for a Catalog
As we saw earlier, SharePoint creates catalog landing pages only when we do in fact integrate with navigation at the time of connecting to a catalog. Because we did not integrate navigation for our communities catalog, we must manually build the appropriate pages where users can see all communities and the community detail page. In the following sections we see how we can create a catalog landing page and a catalog details page and define a catalog detail URL.
Creating a Category Landing Page
Our first step is to create the page that a user will go to when browsing friendly URLs for a catalog, in our case the communities catalog.
![]() Note These are in fact the equivalent of the category pages previously discussed, except we are creating them manually.
Note These are in fact the equivalent of the category pages previously discussed, except we are creating them manually.
We create a page where we will display all of the communities via the search-driven web part. We call this page Communities and add it to the global navigation on our site.
- Go to Settings Add Page on the top right. When the Add Page modal dialog box appears, type the name Communities.
- Select the appropriate page layout you wish to use. Review Chapter 7 if you want to create a new page layout.
- Once the page has been created, edit the page and insert a Content Search web part found under the content rollup category in the Web Part Gallery as shown in Figure 8-28.
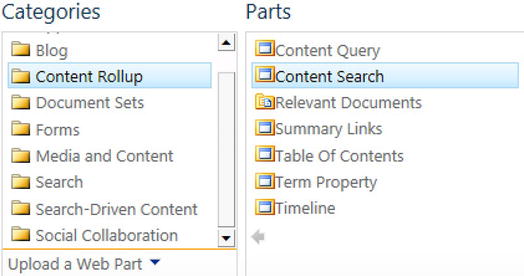
Figure 8-28. The Content Search web part is used to display communities from the catalog
![]() Note We use the Content Search web part as it contains richer capabilities to query result sources, some of them being the catalogs we've enabled and that are automatically created by SharePoint. You might consider using the Recently Changed Items web part under the “Search-Driven Category,” but it does not contain the result sources when building a query.
Note We use the Content Search web part as it contains richer capabilities to query result sources, some of them being the catalogs we've enabled and that are automatically created by SharePoint. You might consider using the Recently Changed Items web part under the “Search-Driven Category,” but it does not contain the result sources when building a query.
Our next step is to configure the Content Search web part to display the communities catalog content. To do this, edit the newly added web part settings.
- In the Configuration pane, under Search Criteria, click Change Query. A Change modal dialog box will appear.
- Under Basics, select the Result Source named Specter Authoring Portal - Pages Results, which is the result source automatically created when you connected to this catalog. Once you select this result source, the catalog content is retrieved, as shown in Figure 8-29. In our example, we immediately see two communities in the Search Result Preview pane as these two communities were previously added.
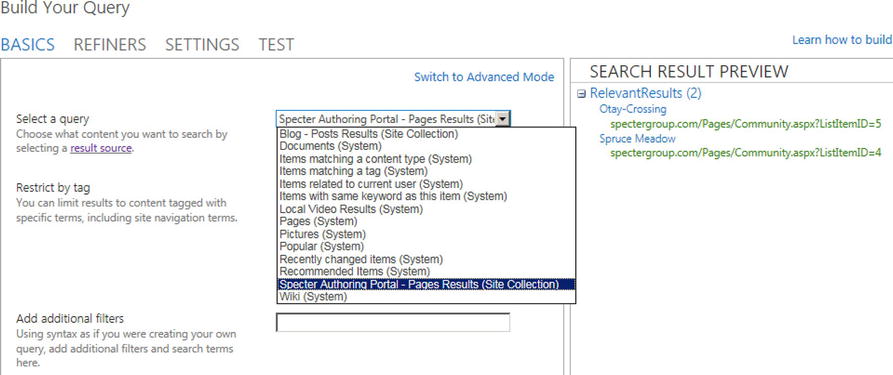
Figure 8-29. Selecting the communities catalog and previewing results
- The catalog contents are displayed using the standard display template, which is specified in the web part tool pane. You can now configure additional metadata to display by editing the Content Search web part settings as shown in Figure 8-30. To display the community picture, you can include the appropriate managed property.
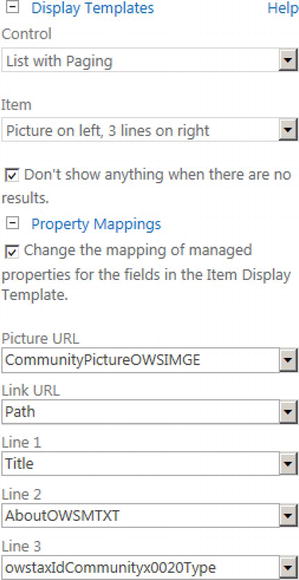
Figure 8-30. Search web part metadata configuration for communities catalog
At this point we can see the communities including the picture and some of the metadata, as shown in Figure 8-31.
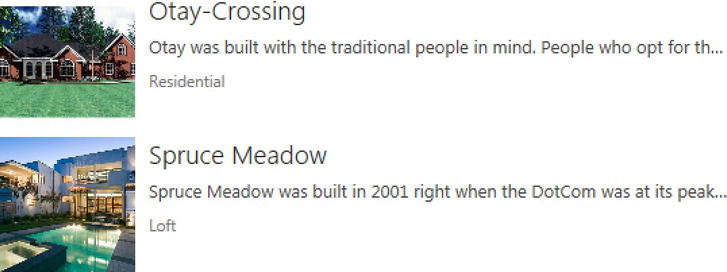
Figure 8-31. Content Search web part configured to retrieve Specter Group communities catalog results using an out-of-the-box display template
When a user clicks on a given category for a category landing page, a category detail page for that specific category should load. For us, when visitors land on the community landing page created in the previous section and they click on a specific community, we want to be able to display further details. To do this, we first create a new publishing page and call it Community as shown on Figure 8-32.
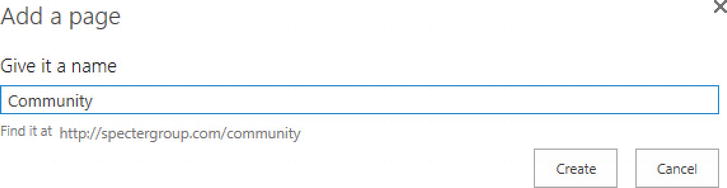
Figure 8-32. Creating the Community details page
On this page we insert a Content Search web part as we did in the previous section; however, the web part configuration is a bit different. Our objective for this web part is to retrieve the value of the URL QueryString passed to the page so that we can display the specific community details. One of the new features of the Content Search web part allows us to do this by specifying the QueryString name as shown in Figure 8-33 in the web part’s query builder. In addition, we ensure we select the appropriate results on the drop-down menu to only show items from the communities catalog.
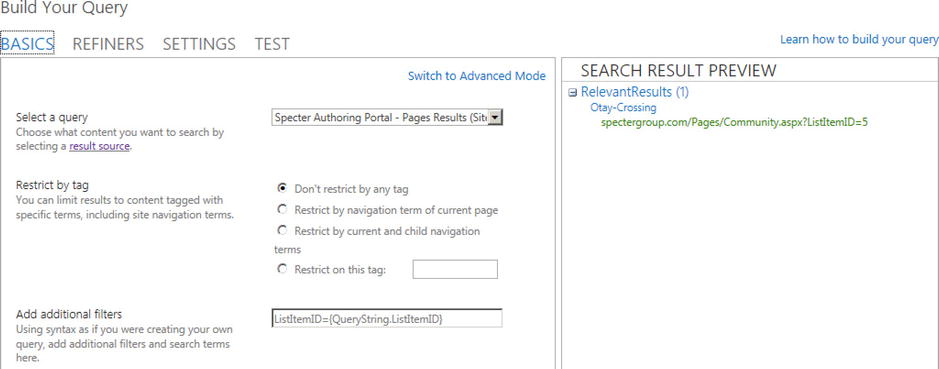
Figure 8-33. Content Search web part configured to retrieve only one item as per the URL QueryString
Once we have configured the Content Search web part and then click on a given community, the detail page displays additional information or metadata.
![]() Tip To learn more about full text queries and available variables when working with the Content Search web part, refer to Chapter 9 or visit http://sprwd.com/ffqhxnr.
Tip To learn more about full text queries and available variables when working with the Content Search web part, refer to Chapter 9 or visit http://sprwd.com/ffqhxnr.
Defining a Category-Item Page URL
During our catalog configuration, we specified that the URL behavior was to make URLs relative to the current site. We can easily validate this configuration by hovering over any of the catalog items on the category landing page and verifying the catalog item URL. In our case, if we hover over the Spruce Meadow community, as shown in Figure 8-34, we see the browser status bar displays the URL to this item’s detail page and passes the ListItemID, as previously configured.
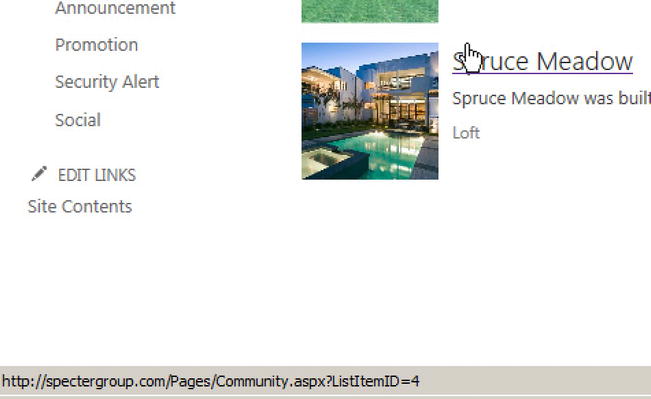
Figure 8-34. The community catalog item URL format and behavior as previously configured and pointing to the Community.aspx custom page
Configuring Catalog Navigation for Catalogs without Integrated Navigation
Our last step is to configure the Specter Group web site term labeled “Communities” so that when a user clicks on it via the top navigation, the link goes to a page we specify that displays all of the communities. To do this, go to Site Settings, and click Term Store Managed. With the Term Store Management Tool, expand the site navigation term set, and then click on the term labeled Communities. On the navigation tab, select the Simple Link or Header option. To provide a link to the communities page, you can either browse the web site and pick the page, or simply type it in the textbox as shown in Figure 8-35. Click Save and your top navigation now includes a Community link that points to the communities page.

Figure 8-35. Site navigation Communities node static page configuration
Applying Branding to Search Result with Display Templates
Now that we have the communities catalog completely set up we are able to style it according to the previously created Specter Group design. To achieve this, we need to create two key components. The first is a list Control display template, and the second is an Item display template. Together these two display templates allow us to place and style Content Search web part results.
![]() Tip For in-depth coverage on how to create list Control and Item display templates, see Chapter 9.
Tip For in-depth coverage on how to create list Control and Item display templates, see Chapter 9.
Creating a Custom List Control Display Template
A list Control display template is used once per search results to wrap the collection of returned items. Each item in turn is displayed using an Item display template, once per item. Our objective is to use the appropriate HTML markup so that the entire collection of items is displayed as per the Specter Group design.
- To create a new list control, it is best practice to start with an existing display template. You can make a copy of an existing Control display template by navigating to the Master Page Gallery Display Templates Content WebParts folder.
- Make a copy of the Control_List.html file, and rename it Control_List_Specter.html. The full HTML source code for the out-of-the-box Control_List.html file is shown in Listing 8-1.
Listing 8-1. The Full HTML Source Code for the Out-of-the-Box Control_List.html File
<html xmlns:mso="urn:schemas-microsoft-com:office:office"
        xmlns:msdt="uuid:C2F41010-65B3-11d1-A29F-00AA00C14882">
<head>
<title>List</title>
<!--[if gte mso 9]><xml>
<mso:CustomDocumentProperties>
<mso:TemplateHidden msdt:dt="string">0</mso:TemplateHidden>
<mso:MasterPageDescription msdt:dt="string"><!--a description--></mso:MasterPageDescription>
<mso:ContentTypeId msdt:dt="string">0x010100203...</mso:ContentTypeId>
<mso:TargetControlType msdt:dt="string">;#Content Web Parts;#</mso:TargetControlType>
<mso:HtmlDesignAssociated msdt:dt="string">1</mso:HtmlDesignAssociated>
</mso:CustomDocumentProperties>
</xml><![endif]-->
</head>
<body>
    <!--
    Warning: Do not try to add HTML to this section.
    Only the contents of the first <div>
    inside the <body> tag will be used while executing
    Display Template code. Any HTML that
    you add to this section will NOT become part of your Display Template.
    -->
    <script>
        $includeLanguageScript(this.url,
            "∼sitecollection/_catalogs/masterpage/Display Templates/Language Files/
            {Locale}/CustomStrings.js");
    </script>
    <!--
        Use the div below to author your Display Template.Here are some things to keep in mind:
        * Surround any JavaScript logic as shown below using a "pound underscore"
         (#_ ... _#) token inside a comment.
        * Use the values assigned to your variables using an "underscore pound equals"
        (_#= ... =#_) token.
    -->

    <div id="Control_List">
        <!--#_
        if (!$isNull(ctx.ClientControl) && !$isNull(ctx.ClientControl.shouldRenderControl) &&
                !ctx.ClientControl.shouldRenderControl()) {
            return "";
        }
        ctx.ListDataJSONGroupsKey = "ResultTables";
        var $noResults = Srch.ContentBySearch.
              getControlTemplateEncodedNoResultsMessage(ctx.ClientControl);
        var noResultsClassName = "ms-srch-result-noResults";
        var ListRenderRenderWrapper = function(itemRenderResult, inCtx, tpl) {
            var iStr = [];
            iStr.push('<li>'),
            iStr.push(itemRenderResult);
            iStr.push('</li>'),
            return iStr.join(''),
        }
        ctx['ItemRenderWrapper'] = ListRenderRenderWrapper;
        _#-->
        <ul class="cbs-List">
            _#= ctx.RenderGroups(ctx) =#_
        </ul>
        <!--#_
        if (ctx.ClientControl.get_shouldShowNoResultMessage()) {
        _#-->
            <div class="_#= noResultsClassName =#_">_#= $noResults =#_</div>
        <!--#_
        }
        _#-->
    </div>
</body>
</html>
Note SharePoint will automatically generate and sync the corresponding .js file, which has the same name.Looking at the original entire HTML code in Listing 8-1, toward the bottom you will find the <UL> tag used to render the groups as shown in the following snippet. Our task is to change the class name and ID used to match our Specter Design. The out-of-the-box list control HTML code used to wrap items is shown in Listing 8-2.
Listing 8-2. Control Template HTML that Wraps and Calls the Item Templates
<ul class="cbs-List">
    _#= ctx.RenderGroups(ctx) =#_
</ul>
Our task is to change the class name and ID used to match our Specter Group design. The out-of-the-box list control HTML code used to wrap items is shown in Listing 8-2.
- The Specter Group design uses the <UL> tag as well, but we must specify a different class name and we change the HTML to look like Listing 8-3.
Listing 8-3. The New Class Name Specified for the HTML Code That Wraps Items
<ul id="filter-container" class="feature cf">
    _#= ctx.RenderGroups(ctx) =#_
</ul> - One thing we would like to make sure is that when we are specifying this custom control via the Content Search web part tool pane, the appropriate name shows up in the drop-down list that allows for selecting the available list controls. To do this, we simply change the <Title> tag contents at the top of the Control_List_Specter.html file. In our case, we named it Specter Communities List and can be seen in Figure 8-36 as found in the Content Search web part tool pane.
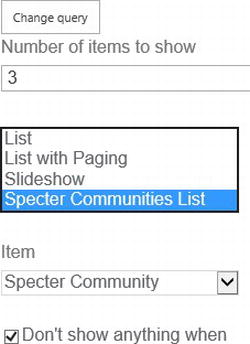
Figure 8-36. The new Specter list control available via the drop-down list in the Content Search web part tool pane
- At this point, we have finished creating our custom list Control display template so we are ready to save and publish it.
Creating a Custom Item Display Template
We just saw how to create a list Control display template that is used to wrap a list of items returned by a Content Search web part. Creating a custom Item display template that is used once per item returned is not any more difficult. Again, we start by creating a copy of an existing Item display template and then modify this custom template as required.
We start with making a copy of the Item_Large_Picture.html, which can also be found in the Master Page Gallery under the /Display Templates/Content WebParts folder. We make a copy of the existing Display Template and rename it Item_LargePicture.html. Most of the HTML markup provided in the Item display template will stay the same as it is used by SharePoint to configure the file. We only want to change the HTML markup right before the last closing </DIV> tag to render the item as shown in Listing 8-4.
Listing 8-4. The HTML Markup That Uses the Custom Specter Classes to Render the Item
<span class="_#= specterPropertyType =#_">
   <a href="_#= linkURL =#_" class="thumb" >_#= pictureMarkup =#_
   <div class="date"><div class="d">_#= date =#_</div>
       <div class="m">_#= month =#_</div></div>
   </a>
   <div class="caption">_#= specterPropertyType =#_</div>
</span>
Because our master page includes the appropriate style sheet (refer to Chapter 5 and Chapter 7), our Item display template renders a particular item as expected and is shown in Figure 8-37.

Figure 8-37. Custom display template shows the Specter community item from the catalog
![]() Tip For a more in-depth look at how display templates work, see Chapter 9.
Tip For a more in-depth look at how display templates work, see Chapter 9.
Summary
In this chapter we walked you through a step-by-step exercise on configuring Cross-Site Collection Publishing from the Specter Group authoring site to the public web site. We designed our solution to include a globally available media assets repository that is accessible via the asset picker while authoring content. Our solution included the use of publishing pages that use a custom content type, which demonstrates how you can use Cross-Site Collection Publishing in a real-world project. We then walked you through configuring catalog connections on the Specter Group public web site for consumption for authored content. We demonstrated how to retrieve custom metadata using the Content Search web part and display it using the Specter Group branding with custom display templates. We finished with a look at how display templates are deployed and available via the settings panel of Content Search web parts.