CHAPTER 10
Configuring Ubuntu Server
As a Mail Server
Sending and Receiving
Mail Easily
One of the most common functions of a Linux system is to serve mail. Several Linux-based mail server programs are available for this purpose. Several programs are available to accomplish this task. In this chapter you will learn what is necessary to build a solution to send and receive e-mail on a network. Because Ubuntu Server uses the Postfix mail server by default to send mail to other networks, this chapter covers Postfix. Different solutions are available to allow users to connect to their mailboxes to fetch mail. One of the easiest to use of these solutions is Qpopper, so that is the solution of choice in this chapter.
Understanding the Components of a Mail Solution
If you want to understand what is needed to build a mail server that can handle e-mail for a complete network, you need to understand the three different agents that are used to process Internet e-mail:
- Mail transfer agent (MTA): This is the software that sends e-mail. This e-mail is sent by the client that the user has used to compose and send the message. This recipient MTA sends the e-mail to an MDA (defined next). Some well-known MTAs are Postfix, Sendmail, and qmail. SMTP is an example of a protocol that can be used by an MTA to deliver e-mail.
- Mail delivery agent (MDA): The MDA works together with the MTA on the server that is used by the recipient. The MDA makes sure the e-mail is stored in a location in which the user can access it. Postfix comes with an integrated MDA as well.
- Mail user agent (MUA): After the mail is stored by the MDA, the MUA is the program that the user uses to read the mail. The MUA can retrieve-mail in several ways: by using a protocol such as IMAP or POP, remotely by using a file access protocol, or through access to local files. When the MUA uses IMAP or POP, there always is a server component (for example, Qpopper) and a client component that is used by the client.
The core component of a mail solution is the MTA. This component makes sure that mail can be exchanged by hosts on the Internet. When sending mail on the Internet, the MTA analyzes the mail address of the recipient. This mail address includes a reference to the DNS domain used by the client. The MTA then contacts the authoritative DNS server of the recipient to find out which server is used as the MTA ("mail exchanger") in that domain. When the MTA knows which server to contact, it sends the mail over to the MTA of the recipient's domain. Once it arrives there, the MTA of the recipient checks whether the recipient is a user that exists on the local machine. If so, the mail is handed over to the MDA, which stores the mail in the mailbox of that user. If not, the MTA sends it to another MTA that helps to deliver the message to the mailbox of the recipient.
When the mail has been stored by the MDA in the mailbox of a local user, the user can access it in one of several ways, the most common of which is to use POP or IMAP. If the user uses POP, the mail is transferred to the user, but the user can choose to keep the message on the server instead. If IMAP is used, all messages are stored on the server and are not transferred to the client computer. When setting up a mailbox for a user, an administrator can choose to make it either a POP mailbox or an IMAP mailbox. In the following section you'll read how to configure the Postfix MTA. After that, you'll learn how to set up Qpopper and Cyrus IMAPd to receive mail messages.
Configuring the Postfix MTA
Postfix is a very modular mail server, comprising several programs that work together to make the Postfix mail server function. This is in contrast to Sendmail, an alternative UNIX MTA. The advantage of Postfix being a modular mail server is that it is easier for the administrator to manage all individual programs that comprise the Postfix mail server. The disadvantage is that, as an administrator, you need to know how all these separate programs function. Wietse Venema originally developed Postfix as a mail server that would be easier to administer and more secure than Sendmail. Because it is monolithic, Sendmail is in general much harder to secure properly. Postfix also is a very rich mail server that has many features.
Tip You can find a complete list of all Postfix features and instructions on how to configure them at http://www.postfix.org/documentation.html.
How Postfix works as a modular mail server becomes clearer from a discussion of how mail traffic is handled by Postfix, so that is presented first. After that, you will learn how to install and configure Postfix.
Handling Inbound and Outbound Mail
Generally speaking, Postfix can handle two kinds of mail: inbound mail and outbound mail. The inbound mail that Postfix handles may be messages sent from a local user to another local user or messages sent over the network to a local user. The outbound mail that Postfix handles may be messages intended for a recipient on the same server as the sender, messages intended for a recipient on a remote server, or undeliverable messages.
Processing Inbound Mail from a Local User to Another Local User
The following list explains how Postfix processes inbound mail, a graphical representation of which is shown in Figure 10-1:
- When Postfix receives mail that is sent by another local user, Postfix uses the
postdrop command to place the mail in the maildrop queue, to ensure that the mail stays on the same machine.
- The
pickup daemon picks up the mail from the maildrop queue and checks whether the mail matches given rules regarding such things as the content, size, and other factors.
- The
pickup daemon passes the e-mail to the cleanup daemon, which makes sure the mail is formatted in the proper way, by doing the following:
- Replaces missing header lines in the e-mail if the mail program of the end user didn't do that already
- Deletes double recipient addresses
- Uses the
trivial-rewrite daemon to convert the e-mail address in the header into a name in the proper user@somedomain format, using the lookup tables found at /etc/postfix/canonical and /etc/postfix/virtual (as covered in "Tuning Postfix with Lookup Tables" later in this chapter)
- Reformats data in the header according to all rules that apply
- The
cleanup daemon copies the e-mail to the incoming queue and sends a message to the queue manager (qmgr) to notify it that this mail has arrived.
Figure 10-1. Handling mail sent by a local user to another local user
Processing Inbound Mail Sent over the Network to a Local User
If incoming mail was received over the network, the process is slightly different from that presented in the preceding section, mainly because Postfix doesn't need to use the postdrop and pickup daemons to handle mail sent over the network to a local user. The procedure is as follows (see Figure 10-2):
- Postfix first uses the
smtpd process to handle mail coming in over the network. This process performs some basic checks on the e-mail before handing it over to the cleanup daemon.
- The
cleanup daemon performs the same tasks as when processing local mail (see the bulleted list in step 3 in the preceding section).
- After the
trivial-rewrite daemon has done its work, the mail is placed in the incoming queue, where the queue manager takes further care of it.
Figure 10-2. Handling inbound mail coming from the same network
Processing Outbound Mail Intended for a Local User
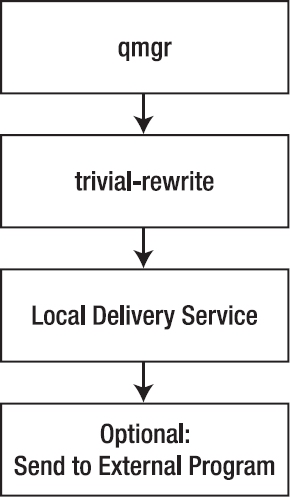
Being the MTA, Postfix is responsible as well for processing outbound mail. Basically, all outbound messages are placed in the incoming queue first. From there, the procedure is as follows for outbound mail intended for a local user (see Figure 10-3):
- The queue manager (
qmgr) picks up the mail from the incoming queue and places it in the active queue as soon as no other mail is in that queue.
- The
trivial-rewrite daemon determines where the mail should go: to a local user (the case here), to a user over the Internet, or to a UNIX user that uses UUCP to retrieve the mail (the latter method is somewhat primitive, so I don't discuss it here).
- The
trivial-rewrite daemon kicks the mail back to the queue manager, which orders the local delivery service /usr/lib/postfix/local to put it in the mailbox of the local user. Before doing that, the local delivery service takes into account all aliases and forwarding rules that apply to the mail.
- The
local daemon decides where to send the mail. It can, for example, send it to the procmail system, which analyzes the mail and puts it in the right folder.
Figure 10-3. Processing mail for a local user
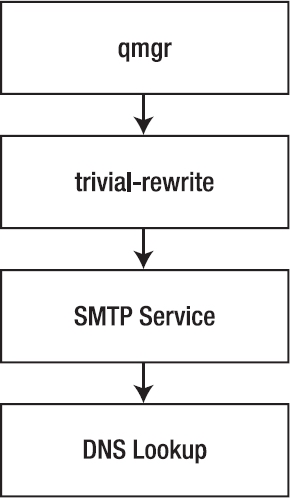
Processing Outbound Mail Intended for a User on a Remote System
When the mail is intended for a user on a remote system, the procedure is as follows (see Figure 10-4):
- Again, the queue manager fetches the mail from the incoming queue and copies it to the active queue as soon as it is empty.
- The
trivial-rewrite daemon checks whether the mail is for a local user (see the previous section) or a remote user (as in this example). If the mail is intended for a remote user, all lookup tables that apply to that user are checked and then the mail is passed to the queue manager.
- The queue manager activates the SMTP service that delivers the e-mail to the other server.
- The
smtpd process uses DNS to find the MTA for the target host and delivers it that MTA.
Figure 10-4. Delivering mail to remote users
Processing Undeliverable Mail
Finally, there is always a possibility that an e-mail cannot be delivered by the queue manager to either a local or a remote user. If that's the case, qmgr puts the mail in the deferred queue. When it is in there, the queue manager copies it back to the active queue at regular intervals and tries again to deliver it, until either a defined threshold is reached or the mail is delivered successfully.
Installing Postfix and Configuring the Initial Settings
To install Postfix, use apt-get install postfix. This command also launches a configuration program in which you can enter the most important settings for your mail server. The following procedure describes the steps that this configuration program guides you through:
- Specify what kind of mail server you want to configure. The following choices are available (see Figure 10-5):
- Enter the DNS domain name that should be used in the mail addresses of your users (see Figure 10-6). For example, if you want the mail address of some user to be [email protected], the name you enter here should be example.com.
Figure 10-6. Enter the DNS domain name for your mail server.
- The Postfix files are copied to your server and the basic configuration is written. Once completed, your Postfix mail server is ready for further configuration.
Configuring Postfix Further
The initial configuration that you set up when installing Postfix works fine, but it isn't very comprehensive. Therefore, right after you finish the initial configuration, I recommend continuing the configuration by running dpkg-reconfigure postfix. The following procedure describes how to configure Postfix from that interface:
- The first two steps are exactly the same as the first two steps of the installation program. Accept the values that you entered earlier.
- The third screen asks you what to do with mail for the user's
postmaster, root, and other system accounts (see Figure 10-7). It is a good idea to forward this mail, and you have to do that to an existing user. So enter the name of a user account here.
Figure 10-7. Mail for system accounts such as root and postmaster should be forwarded to an existing user account.
- Specify for which mail domains this mail server should consider itself the final destination (see Figure 10-8). Only domain names entered here will be accepted in user mail addresses. If your server is responsible for several domain names, you should enter all of them here. Also make sure to list
localhost, because you need it to handle mail between local users.
Figure 10-8. Enter the DNS domain names of all domains your mail server is responsible for.
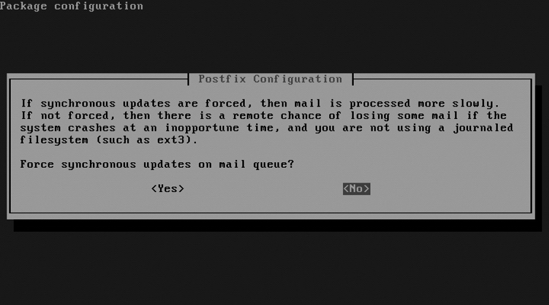
- If you are on a slow Internet connection, it is a good idea to force synchronous mail updates. Mail takes longer to come through, but less bandwidth is wasted. If mail is not processed synchronously and you are not using a journaling file system, there is a chance you will lose mail. If you have a fast Internet connection and your server is using a journaling file system (which is true in almost all cases), select No, as shown in Figure 10-9.
Figure 10-9. If you are using a journaling file system on your server, choose No.
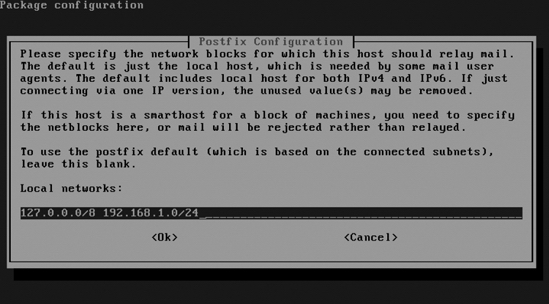
- Tell Postfix for which networks it is allowed to forward (relay) e-mail. By default, it does so only for its own IP address. If you are configuring this server as the local mail server for your network, make sure that you enter the IP address and subnet mask for that network in the screen shown in Figure 10-10. So, for example, if you are on the local network
192.168.1.0, enter 192.168.1.0/24 here, to allow relaying for every IP address that starts with 192.168.1.
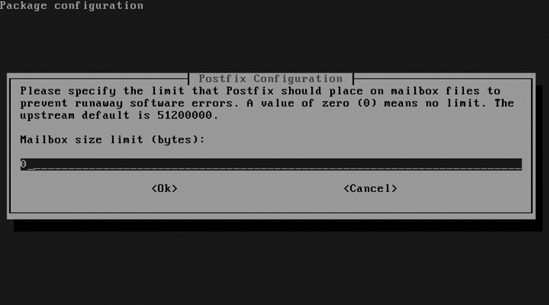
- If you want to put a limit on the maximum size of local mailboxes, enter that limit, in bytes, in the screen shown in Figure 10-11. If you don't need a limit, keep the default value of 0.
Figure 10-10. Enter the IP address of your local network here to allow relaying.
Figure 10-11. If you want to limit mailboxes to a maximum size, enter that limit here, specifying it in bytes.
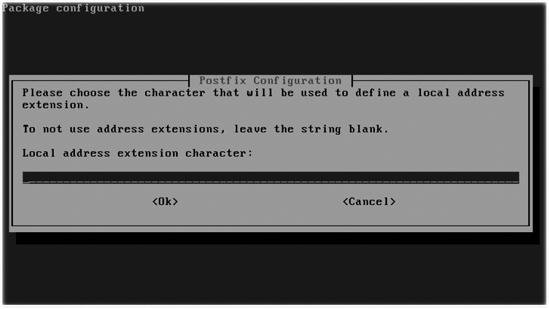
- If you want to add an extension to the name of local recipients, add that extension in the screen shown in Figure 10-12. By default, a + sign is added. If you don't need such an extension, you can leave this field blank.
Figure 10-12. If you don't need to use local address extensions, leave this field blank.
- Specify which Internet protocols you want to use in Postfix (see Figure 10-13). By default, it takes all protocols that are enabled on your server. If you just want to use IPv4, select only that protocol.
Figure 10-13. By default, Postfix will use all enabled Internet protocols.
- The settings you've specified are written to the Postfix configuration files and Postfix is restarted.
You now have a functioning Postfix mail server. However, there are many options that you can still configure. In the following sections you'll learn which options are available and which configuration file to change to modify these options.
Managing Postfix Components
The Postfix mail server consists of several components. First, on Ubuntu Server, you find the init script in /etc/init.d, which you can use to start to the server, among other things. This script listens to all common arguments that can be used on most init scripts:
start: Starts the serverstatus: Displays the current status of the serverreload: Tells Postfix to reread its configuration files after changes have been appliedrestart: Stops and then restarts Postfixstop: Stops the server
To troubleshoot a Postfix server, you must be aware of all the different components that are written to your server when Postfix is installed. Following is a list of all files and default directories that are created when installing Postfix (more details on the components mentioned in this list are provided later in this chapter):
/etc/aliases: Contains aliases for local mail addresses. These aliases can be used to redirect to some other address mail that comes in on a given address. The initial configuration program has made sure that all mail that comes in for user root is forwarded to the user account that you have specified./etc/postfix/: Contains all configuration files used by the Postfix mail server. Among them are the most important files, main.cf and master.cf, which contain all generic settings necessary to operate the Postfix mail server./usr/lib/postfix/: Contains all binary components of the Postfix mail server. Some components mentioned in the section "Handling Inbound and Outbound Mail," such as local and qmgr, are in this directory. The binaries in this directory are started when needed; there is no need for an administrator to start them manually./usr/sbin/: Contains all programs needed by the administrator to manage the Postfix mail server./usr/bin/: Contains two symbolic links, mailq and newaliases. Both refer to the /sbin/exim4 program. They allow an administrator who is used to managing the Exim MTA to manage Postfix in an Exim-like style./var/spool/postfix/: Contains all queues used by Postfix. Also, if Postfix runs in a chroot-jail, this directory contains the subdirectories etc and lib that contain necessary configuration files./usr/share/doc/postfix/: Contains some documentation for Postfix.
Configuring the Master Daemon
Postfix is a modular service. In this modular service, one daemon is used to manage all other components of the Postfix server: the master daemon /usr/lib/postfix/master. This is the first process that is started when you activate the Postfix script from /etc/init.d. To do its work, the master daemon reads its configuration file /etc/postfix/master.cf, which includes for every Postfix process an entry that specifies how it should be managed. Listing 10-1 provides an example of the top lines from this configuration file.
Listing 10-1. Example Lines from /etc/postfix/master.cf
#

==================================================================

# service type private unpriv chroot wakeup maxproc command+args

#              (yes)   (yes)  (yes)  (never) (100)

#

==================================================================

smtp             inet n       -      n      -        -       smtpd

#submission inet n            -      n      -        -       smtpd

#        -o smtpd_etrn_restrictions=reject

#        -o smtpd_client_restrictions=permit_sasl_authenticated

...

pickup           fifo n       -      n      60       1       qmqpd

cleanup          unix n       -      n      -        0       pickup

qmgr             fifo n       -      n      300      1       qmgr

...

rewrite          unix -       -      n      -        -       trivial-rewrite
In the master.cf file, all services that are a part of Postfix are specified by using some predefined fields. Following is a list of all fields and a summary of the values that you can use for these fields. Note that not all field options can be chosen randomly for the Postfix components; if you are not absolutely sure of what you are doing, changing them is not recommended. The default values ensure that the processes will normally work just fine.
service: Specifies the name of the process. Normally, just the name of the service is mentioned.type: Specifies the connection type. The possible values are inet if a TCP/UDP socket is used, unix if a local UNIX domain socket is used for communication within the system, or fifo if it is a named pipe.private: Specifies how the service can be accessed. Use y if the service must be accessible only from within the mail system; use n if you want to allow external access as well. Choosing n is required if the service is of the type inet, because otherwise you wouldn't be able to access it.unpriv: Specifies whether or not the service will run with root privileges. Use y to tell the component it should run with the privileges of the Postfix user account; use n to let the service run as root.chroot: Specifies whether or not the service should run in a chroot environment. If set to y, the root path is normally set to /var/spool/postfix/, but an alternative root path can be set from /etc/postfix/main.cf.wakeup: This option is relevant for only the pickup daemon and the queue manager, because they have to become active at regular intervals. For these daemons, provide a number. All other processes have the value 0, which disables the wakeup feature.maxproc: Gets its value from the default_process_limit value in /etc/postfix/main.cf and determines the maximum number of instances of this process that can run simultaneously. The default is normally set to 100.command +args: Defines what command must be activated with what arguments to run this component. The name of this command is relative to the directory in which the Postfix binaries are installed (/usr/lib/postfix). If you want the command to be verbose, make sure to include the -v option.
Configuring Global Settings
Most of the settings that determine how Postfix does its work are set in the file /etc/postfix/main.cf. Listing 10-2 provides an example of its contents.
Listing 10-2. main.cf Defines How Postfix Should Do Its Work
root@ubuntu:/etc/postfix# cat main.cf

# See /usr/share/postfix/main.cf.dist for a commented, more complete version


# Debian specific:  Specifying a file name will cause the first

# line of that file to be used as the name.  The Debian default

# is /etc/mailname.

#myorigin = /etc/mailname


smtpd_banner = $myhostname ESMTP $mail_name (Ubuntu)

biff = no


# appending .domain is the MUA's job.

append_dot_mydomain = no


# Uncomment the next line to generate "delayed mail" warnings

#delay_warning_time = 4h


readme_directory = no


# TLS parameters

smtpd_tls_cert_file=/etc/ssl/certs/ssl-cert-snakeoil.pem

smtpd_tls_key_file=/etc/ssl/private/ssl-cert-snakeoil.key

smtpd_use_tls=yes

smtpd_tls_session_cache_database = btree:${data_directory}/smtpd_scache

smtp_tls_session_cache_database = btree:${data_directory}/smtp_scache


# See /usr/share/doc/postfix/TLS_README.gz in the postfix-doc package for

# information on enabling SSL in the smtp client.


myhostname = ubuntu.home.nl

alias_maps = hash:/etc/aliases

alias_database = hash:/etc/aliases

myorigin = /etc/mailname

mydestination = sandervanvugt.com, localhost

relayhost =

mynetworks = 127.0.0.0/8 192.168.1.0/24


mailbox_size_limit = 0

recipient_delimiter =

inet_interfaces = all

inet_protocols = all
You can use many parameters in main.cf. Some of the most useful parameters are listed and described here:
command_directory: Specifies the directory in which the Postfix Administration tools are located. The default value is /usr/sbin.daemon_directory: Specifies the directory in which the Postfix daemon is located.inet_interfaces: Specifies where Postfix listens for incoming mail. The default value for this setting is the loopback UP address. If you want Postfix to listen on external interfaces as well, you must specify either the IP address to listen on or all, the latter of which makes sure Postfix listens on all interfaces for incoming mail.mail_owner: Specifies the user who is owner of the mail queue. By default, this is the user postfix.mydestination: Specifies a list of domains for which the server accepts incoming mail. If incoming mail is sent to a domain not listed here, it will be rejected.mynetworks: Specifies which network is used as the local network. This setting is important, because other parameters (such as smtpd_recipient_restrictions) rely on it.mydomain: Specifies the DNS domain of the computer that runs Postfix.myorigin: Specifies the domain that appears as sender for e-mails sent locally. By default, the fully qualified domain name (FQDN) of the host sending the mail is used.queue_directory: Specifies the location of the directory in which the mail queues are held. The default location is /var/spool/postfix.smtpd_recipient_restrictions: Specifies which is the trusted network. Normally, the networks defined with the mynetworks variable are considered trusted networks. Mail clients from this network are allowed to relay mail through your Postfix mail server, whereas other clients are not.smtpd_sender_restrictions: Specifies which senders should always be ignored, to prevent your server from accepting spam. The default value for this parameter is reject_maps_rbl, which contains a default list of senders to reject.
Configuring a Simple Postfix Mail Server
Enough settings, parameters, and variables for now. The interesting question is, what work do you really need to do to enable a simple Postfix mail server? We've already gone through the configuration module, so let's see now if we can configure the mail server from the configuration files as well. In the scenario presented in this section, the simple mail server needs to send mail to the Internet for local users only. It also needs to be able to receive mail from the Internet, destined for users on the local domain.
Sending Mail to Other Servers on the Internet
To make this procedure as easy as possible, the following instructions show how to forward mail to the mail server of the Internet provider, which is a very common scenario:
- Stop the Postfix server by using
/etc/init.d/postfix stop.
- Open
/etc/postfix/main.cf in an editor and edit the following settings. Make sure to use the settings that are appropriate for your network.
inet_interfaces = all: This line allows Postfix to work on all network interfaces of your server.mynetworks = 192.168.1.0/24: This line is an important security measure, because it tells Postfix which networks it should service.smtp_recipient_restrictions = permit_mynetworks, reject: This line tells Postfix to accept recipients only from the networks specified in the mynetworks line.masquerade_domains = yourdomain.com: This line is used to make sure that all the names of all subdomains in your mail domain are linked to your DNS domain name.relayhost = host.internetprovider.com: If you want to forward mail to the mail host of an Internet provider, this line identifies the host that is used for this purpose.
- Save the file, close the editor, and restart Postfix by using the
/etc/init.d/postfix start command.
Accepting Mail from Other Servers on the Internet
Often, your mail server also needs to accept mail coming from the Internet that is sent to local users on your network. In such a configuration, it is very important that you set up some basic protection. You want to prevent your mail server from being misused as an open relay by spammers. Also, the DNS system must know that your mail server is the responsible mail server for your domain. You can do this by adding an MX record in the DNS database. After you make the required modifications to DNS, you have to configure your mail server for (at least) three extra tasks:
- Accept incoming mail that is addressed to your domain
- Reject incoming mail that is not addressed to your domain
- Reject mail from known spam sources
To configure your mail server to receive mail from the Internet, follow this procedure:
- Stop the Postfix server by using
/etc/init.d/postfix stop.
- Open
/etc/postfix/main.cf with your favorite editor and edit the following settings. Make sure to use the proper settings for your environment.
inet_interfaces = all: Allows Postfix to receive and send mail on all network interfaces.mynetworks = 192.168.1.0/24, 127.0.0.0/8: Specifies the IP addresses of the network(s) you are on.myhostname = myserver.mydomain.com: Specifies the fully distinguished DNS name of your host.mydomain = mydomain.com: Specifies the name of the DNS domain that your Postfix server is servicing.mydestination = $myhostname, localhost.$mydomain, $mydomain: Identifies the hosts that should be handled by the MTA as its destinations. All other destinations will be rejected.maps_rbl_domains = rbl-domains.mydomain.com: Works as very primitive spam protection to identify unauthorized servers.smtpd_sender_restrictions = reject_maps_rbl: Allows you to work with black lists, which are lists of servers that always should be denied use of this MTA for mail transfer.smtpd_recipient_restrictions = permit_mynetworks, reject_unauth_destination: Makes sure that only mail going to trusted networks, and to no other networks, is handled by your MTA.
- Save the modifications you have made to the
main.cf file and start the Postfix process again by using /etc/init.d/postfix start. Your mail server is now ready to receive mail from the Internet.
Tuning Postfix with Lookup Tables
The main task of the Postfix mail server is to process mail. Based on the configuration you have created so far, your Postfix mail server is capable of doing so. You can also enhance the functionality of Postfix by applying rules. For this purpose, you can configure Postfix to use lookup tables. Many lookup tables are available, but none are created by default. For every lookup table that you want to use, you have to define it as a separate file in the directory /etc/postfix and activate it from variables in the file /etc/postfix/main.cf. After defining the lookup table, you need to convert it to the proper format by using the postmap command. In general, applying settings from a lookup table is a three-step procedure:
- Refer to the lookup table in
/etc/postfix/main.cf. For example, to indicate what file should be used for the sender_canonical lookup table, in /etc/postfix/main.cf, you would create the following line:
sender_canonical_maps = hash:/etc/postfix/sender_canonical
- Edit the lookup table file (for example,
/etc/postfix/sender_canonical) with an editor and make all required modifications.
- Use the
postmap command to write the lookup table in the appropriate format; for example, postmap hash:/etc/postfix/sender_canonical.
All lookup tables are created according to the same syntax rules. It may not surprise you that a line starting with a # is not interpreted as a command line. Less obvious is that a line that begins with a space is regarded as a continuation of the previous line. You should therefore be very careful not to include any spaces in a line by accident. You can use the following lookup tables:
access: Use to deny or accept mail from given hosts.canonical: Use to specify an address mapping for local and nonlocal addresses.recipient_canonical: Use to specify address mappings for the address of the recipient of a message.relocated: Use to provide information about a new location a user has moved to.sender_canonical: Use to specify address mappings for the address of the sender of an outgoing or incoming mail message.transport: Use to specify a mapping from a mail address to a message delivery or relay host.virtual: Use to rewrite recipient addresses for all local, virtual, and remote mail destinations. This is not like the aliases table, described next, which is used for local destinations only.
The aliases lookup table is the only lookup table that does not have a configuration file in /etc/postfix; it is in the /etc directory instead. The purpose of the aliases lookup table is to rewrite recipient addresses for local destinations.
The following sections provide more information on the use of all these lookup tables.
The access Lookup Table
You can use the access lookup table to reject or allow messages from a list of defined senders. This table is evaluated by the smtpd daemon for all incoming messages. To activate this table, add the line smtpd_sender_restrictions = hash:/etc/postfix/access to main.cf. Then, in the /etc/postfix/access file, you specify a list of mail addresses (in the first column) and an action for each mail address (in the second column). You can specify the e-mail addresses as patterns. You can refer to an actual e-mail address ([email protected]), but you also can refer to complete or partial IP addresses or domain names. The following are the possible actions that you can specify for each mail address:
nnn message: The e-mail is rejected with a numerical code (nnn) as defined in RFC 821, followed by the text message specified here.REJECT: The e-mail is rejected with a generic error message.OK: The message is accepted.DISCARD: The message is discarded and no information is sent to the sender.
An example of the contents of the access lookup table follows:
mydomain.co          OK

[email protected]  550 No Spam allowed on this server

19.145.0.10          REJECT

1.2.3                REJECT

1.2.3.4              OK
The canonical Lookup Table
The canonical lookup table is very powerful: it rewrites both sender and recipient addresses of both incoming and outgoing mail. These addresses are rewritten not only in the header of your message, but also in the envelope. The canonical lookup table is processed by the cleanup daemon. To activate this table, add the following line to /etc/postfix/main.cf:
canonical_maps = hash:/etc/postfix/canonical
In the first column of the canonical table, you specify addresses or domain names that should be rewritten. The second column of the canonical table specifies the e-mail address to which the mail has to be routed. An example of the contents of the canonical table follows:
[email protected]      [email protected]

@west.mydomain.com      [email protected]
You should be aware that the canonical lookup table works on both e-mail recipients and senders. If you want to rewrite only recipient addresses or only sender addresses, use the recipient_canonical or sender_canonical lookup table, respectively, instead.
The recipient_canonical Lookup Table
The recipient_canonical table is used in the same way as the canonical table to rewrite e-mail addresses. Whereas the canonical table works on both recipient and sender addresses, the recipient_canonical table is used just on recipient addresses of incoming and outgoing mail. The syntax of this table is exactly the same as the syntax of the canonical table. To activate it, use the following entry in /etc/postfix/main.cf:
recipient_canonical_maps = hash:/etc/postfix/recipient_canonical
The sender_canonical Lookup Table
Whereas the recipient_canonical table is used to rewrite recipient addresses, the sender_canonical table is used to rewrite sender addresses of incoming and outgoing mail. This table is read as well by the cleanup daemon, and you can activate the table by including the following in main.cf:
sender_canonical_maps = hash:/etc/postfix/sender_canonical
The relocated Lookup Table
When a user is no longer valid on your mail system, you can choose to just let the mail messages to that user bounce. As an alternative, you can send a reply to the sender of an incoming mail to that user, informing the sender where the user currently can be found. To activate the relocated lookup table, add the following to main.cf:
relocated_maps = hash:/etc/postfix/relocated
When processing mail, the smtpd daemon checks the relocated file to see if there is a matching line. The first column in this file contains a reference to the e-mail address of the former user. This may be the plain mail address of this user, or it may be a regular expression that makes sure that a series of mail addresses is matched. In the second column, there is an informational message. This can be just the new e-mail address, but it can also include other information on how to contact the user. An example of the contents of the relocated table follows:
[email protected]       [email protected]

 @nowhere.com               This company doesn't exist anymore

[email protected]   Doesn't work here anymore
The transport Lookup Table
The main purpose of the transport table is to route e-mail messages. It makes a decision on incoming mail: is this message going to be processed by the local mail server, or by another mail server? To use this table, add the following to main.cf:
transport_maps = hash:/etc/postfix/transport
The first column provides a description of the recipient address in the message. This can be a user ([email protected]) or a domain. If a domain is used, there is a difference between somedomain and .somedomain. The former is for messages that are sent just to that domain, whereas the latter includes its subdomains as well. Including information on subdomains is the default behavior, so it is normally not necessary to include them. The second column indicates how the message should be handled, using the notation transport:nexthop. For transport, possible values are local, smtp, or uucp, specifying the method to use to contact the next hop. nexthop refers to the machine that should be contacted to process this message. An example of the transport table follows:
awesomedomain.com        smtp:mx1.awesomedomain.com

nodomain                 uucp:mx10
The virtual Lookup Table
To make sending messages to the right person easier to understand, the administrator can choose to use virtual domains. These can be considered subdomains of a real DNS domain. The virtual domain is a domain that does not really exist in DNS; it only exists on the MTA. When mail comes in for a user in the virtual domain, the virtual table makes sure it is delivered to the correct user in the real domain. To activate the virtual domain table, add the following to main.cf:
virtual_maps = hash:/etc/postfix/virtual
The first line of the virtual domain file can be considered a header for the rest of the file. The first column of the first line lists the name of the virtual domain itself. In the second column, you can put a random description. In the subsequent lines, users in the virtual domain are specified in the first column. The second column mentions the name of the real user to whom the mail has to be forwarded. An example of the contents of a virtual domain table follows:
virtualdomain.com        some text

[email protected]   john

[email protected]  kylie

[email protected]  julie
The aliases Lookup Table
The aliases lookup table is used to define aliases in the file /etc/aliases; it is the only table that is not in /etc/postfix, probably to maintain compatibility with the Sendmail mail server, which can use the same file. To activate this table, add the following to main.cf:
alias_maps = hash:/etc/aliases
The following is an example of the contents of the /etc/aliases file. The use of root ensures that the mail is delivered to a local user, whereas all other names can exist on a network system like NIS or LDAP as well. Also note that the use of multiple aliases in the same aliases file is possible, which allows you to make the system more flexible.
root:
oot, franck

mailer-daemon:   root

postmaster:      root

webmaster:       root

sales:           [email protected]

wwwrun:          webmaster
If changes are made to the aliases file, make sure these changes are processed. You can use either of two commands to do that: postalias /etc/aliases, to process the changes in the Postfix style, or newaliases, to process the changes in the Sendmail style.
Using Postfix Management Tools
Managing Postfix is not only about creating the configuration files with the correct syntax. Some management tools are available as well. These administration tools all run from the command line. The following is an overview of the most important tools:
newaliases: Used to generate the database file /etc/aliases.db from the file /etc/aliases.mailq: Lists all e-mail in the mail queue that has not yet been sent.postalias: Same as newaliases.postcat: Displays in a readable form the contents of a file in the queue directories.postconf: Used to change the content of Postfix variable. If you run it without arguments, an overview is provided of the current configuration of all variables.postfix: Used as a troubleshooting command. Use postfix check to find any configuration errors. Use postfix flush to force all e-mail from the deferred queue to be sent immediately. After making changes to the Postfix configuration files, use postfix reload to reload configuration files.postmap: Used to convert the lookup tables in the /etc/postfix directory to hash files.postsuper: An important maintenance command. postsuper -s removes all unneeded files and directories; running this command before starting the Postfix server is always recommended. If after a system crash old files still remain, postsuper -p removes all unneeded old files.
Receiving E-mail Using IMAP or POP3
Postfix is the MTA that makes sure that mail is sent over the Internet. When this mail arrives at the destination server, a mechanism is needed to retrieve the e-mail and deliver it to the computer of the end user. Basically, two methods are available: If using IMAP, the user establishes a connection to the server and interacts with their mail directly on the server. This is a good solution if the end user always has a connection to the mail server. If that isn't the case, it is more useful to use POP3, which transfers all mail to the computer of the client. Be aware, however, that a client using POP3 has the option to keep the mail messages on the mail server, and that most IMAP mail clients offer an option to store mail offline.
Ubuntu Server offers different solutions to receive e-mail. In this chapter we'll cover the following:
- Cyrus IMAPd: A complete solution that allows users to access mail by using either IMAP or POP3
- Procmail: A solution that allows you to filter incoming mail.
- Qpopper: An easy solution that offers POP3 functionality only
Fetching E-mail Using Cyrus IMAPd
Cyrus IMAPd is a very flexible service that can be used to get incoming mail. In this section, you will learn how to install and configure this MDA.
Installing Cyrus IMAPd
The first step is to install Cyrus IMAPd. For this purpose, you need the cyrus-imapd package; use apt-get install cyrus22-imapd to install it. To install the management utilities as well, use apt-get install cyrus22-adm in. Once the package is installed, you have to configure Postfix to provide e-mail through Cyrus IMAPd. Include the following in the Postfix master.cf file:
cyrus  unix  -  n  n  -  -  pipe

  user=cyrus argv=/usr/lib/cyrus/bin/deliver -e -r ${sender} -m

  ${extension} ${user}
From master.cf, Postfix calls the deliver program, which delivers all e-mail to recipients on the system. This program replaces the Postfix local program. In order for Cyrus IMAPd to do this, all recipients must exist as local users in /etc/passwd on the server where Postfix is used. Another task you need to perform to make Cyrus IMAPd responsible for all incoming mail is to modify /etc/postfix/transport. In the transport lookup table, you enter a line in which specify your domain and specify that cyrus is the responsible handler for incoming mail:
somedomain.com cyrus:
After you make this modification, generate the corresponding lookup table with the command postmap hash:/etc/postfix/transport.
Understanding Cyrus IMAPd
To implement Cyrus IMAPd successfully, you first need to understand all the components that are written to your system when installing Cyrus IMAPd:
/etc/cyrus.conf: This is the basic configuration file Cyrus works with. The file contains generic settings that define how Cyrus will work. Normally, it is not necessary to make changes to this file./etc/imapd.conf: In this file, the working of the IMAP protocol is defined. Some important settings are made in this file, as you can read later in this chapter./var/lib/cyrus/: In this directory, you find several important files that Cyrus works with. These include log files, database files, and files that contain information about mailboxes of users on your system./var/lib/cyrus/mailboxes.db: This file includes all mailboxes. Make sure you back it up on a regular basis./var/lib/cyrus/log/: If you are using the Cyrus mechanism for logging, its log files are stored here. In this directory, a file is created that has a name that is equivalent to the PID of the Cyrus IMAPd process./var/lib/cyrus/quota/: In this directory, you can add quotas for the accounts on your server./var/lib/cyrus/shutdown: If you need to shut down the system, create this file. In the file, you can include a line that will be sent to connected clients. Normally this line would be a warning telling the clients to disconnect. Also, when this file exists, no new connections can be made, thus allowing you to shut down the system for maintenance./var/lib/cyrus/msg/motd: Use this file to send a message to clients when they connect. The first line in this file will be displayed to connecting clients.
Configuring /etc/imapd.conf
The main configuration file for the Cyrus server is /etc/imapd.conf. This file contains several settings that define how the server is to be used. Some of the most important settings are listed and described next:
configdirectory: Specifies the directory that contains the working environment and important configuration files for your server. By default, it is set to /var/lib/imap.partition-default: Specifies the location in which the mailboxes are stored. By default, it is set to /var/spool/imap.admins: Lists users with administrative permissions for the Cyrus IMAPd server. By default, only the user cyrus has administrative permissions.allowanonymouslogin: Specifies whether a user is allowed to connect without providing a username and password. This is very bad practice with regard to security, so always make sure this is set to no.autocreatequota: Specifies the maximum amount of e-mail data that can be stored in a user's mailbox. By default, it is set to 10000, which equals 10 MB; you probably want to increase that. If set to 0, the user is not allowed to create new mail folders, and if set to -1, no quota is applied.quotawarn: Specifies when the user should get a warning that he is running out of available disk space. By default, this parameter is set to 90%.timeout: Specifies the number of minutes after which an inactive client is disconnected automatically.sasl_pwcheck_method: Specifies the authentication method that should be used. By default, saslauthd is used for this purpose. This makes sure that passwords are transmitted over the network with some basic encryption applied to them.
After making modifications to the imapd.conf file, you should restart the IMAPd server. If saslauthd is used for secure transmission of authentication data over the network, two processes are needed: first start saslauthd, and then use /etc/init.d/cyrus start to start the Cyrus mail server as well. To make sure that saslauthd is started, edit the configuration file /etc/default/saslauthd and set the parameter START=yes.
Managing User Mailboxes
The first step in managing user mailboxes is to add users to the system. These users are normal Linux users that you add to /etc/passwd. These users don't need a home directory, because all they use is their mailboxes that are stored in /var/lib/cyrus. Also, no shell is needed. However, the users do need the ability to reset their passwords. Therefore, make sure /usr/bin/passwd is specified as the default shell.
After you install the mail server and add users to your system, you can start administration. To perform administration tasks, you need the user account cyrus. Be aware that no default password is added for this user, so you need to set it manually. After setting it, you can use the cyradm command for administration of the Cyrus server. This command opens an interactive shell in which you can use several administration commands. To activate this shell, use the cyradm -user cyrus -auth login localhost command. Next, you can start administration tasks. A summary of the most important commands that you can use follows:
listmailbox: Lists the names of all mailboxes.createmailbox: Creates a mailbox. The user for whom you are creating the mailbox must have a valid account in /etc/passwd.deletemailbox: Deletes a mailbox.renamemailbox: Renames a mailbox.setquota: Sets a quota on a mailbox.listquota: Gives an overview of quotas that are applied currently.
If, for example, you want to create a mailbox for user alex, follow these steps:
- Make sure that user
alex exists in /etc/passwd.
- Open the
cyradm tool using cyradm -user cyrus -auth login localhost.
- From the
cyradm interactive shell, use createmailbox user.alex to create a mailbox for your user. Make sure the username is specified as user.alex. This also sets default permissions to the mailbox, which allows the user to use his own mailbox.
- Use
listmailbox to check that the mailbox has been created successfully.
- Close the interactive interface, using the
exit command.
Basically, this is everything you need to create a mailbox for users. Of course, many more options are available from the cyradm interface. You can get an overview of all options by using the help command from within the administration interface.
Filtering Incoming E-mail with procmail
When mail is coming in to your server, you can filter this mail and determine where the mail needs to be stored by using the procmail MDA. Use apt-get install procmail to install it. procmail can sort e-mail automatically, forward it to other recipients, or delete it automatically according to some criteria the user has specified. This can be useful as a kind of primitive spam filter.
To use procmail, you have to call it from the /etc/postfix/main.cf file. This is normally done with the following line, so make sure it exists:
mailbox_command = /usr/bin/procmail
When it is activated, you can use procmail to set up automatic e-mail filtering and redistribution. By default, e-mail is delivered to the user mailboxes in /var/spool/mail/. You can change this default behavior by creating a .procmail file in the home directory of the individual user. Listing 10-3 provides an example of automatic mail filtering performed by procmail.
Listing 10-3. Example of .procmail Mail Filtering File
PATH=/bin:/usr/bin

MAILDIR=$HOME/Mail

LOGFILE=$MAILDIR/mail.log


:0

* ^From.*somedomain

$MAILDIR/Somedomain


:0 ^Subject.*viagra

$MAILDIR/spam


:0

*

$MAILDIR/Inbox
In this example, after some specific variables have been set that specify where mail binaries can be found, three rules are applied. The first rule specifies that data in the From field will be compared to *somedomain. If there is a match, the mail is automatically forwarded to the Somedomain folder in the mailbox of the user. The second rule specifies that all messages that have "viagra" in the message subject line are forwarded automatically to the spam folder. This is a very primitive way of handling spam. The third rule specifies that all other mail (matching the * criterion) is placed in the folder Inbox.
Getting E-mail with POP3 Using Qpopper
Qpopper is an excellent choice if you want to set up a simple POP3 server. To install it, use apt-get install qpopper. This adds a line to /etc/inetd.conf to start it automatically. Since using inetd is not a recommended method, I suggest starting Qpopper through xinetd. To do this, use apt-get install xinetd first to install it, and then create a file with the name /etc/xinetd.d/qpopper that has the same contents as the example file in Listing 10-4.
Note Running Qpopper through xinetd is a viable solution if the mail server is not too busy. If it is, you should make sure that it is started as a real daemon that is available at all times. If not, Qpopper will suffer from bad performance.
Listing 10-4. Example of the /etc/xinetd.d/qpopper Configuration File
#

# qpopper - pop3 mail daemon

#

service pop3

{

#

     disable         = no

     socket_type     = stream

     protocol        = tcp

     wait            = no

     user            = root

     server          = /usr/sbin/qpopper

     server_args     = -s

     flags           = IPv4

}
In this example, the most important line is disable = no. This line makes sure the Qpopper service is started automatically when a POP request is incoming. After you make the required modifications to this file, make sure to (re)start xinetd by using /etc/init.d/xinetd [re]start. After you make sure that Qpopper is started, just one task remains. As an end user, you have to configure your favorite POP client and connect to the POP3 server. You will see that e-mail automatically starts coming in to your mailbox.
Summary
This chapter explained the basics of how to set up Ubuntu Server as a mail server. You learned how to configure Postfix as an easy-to-maintain MTA that exchanges mail with other servers on the Internet and makes sure users in your network can be reached from everywhere. You also learned how to set up Cyrus IMAPd as an IMAP mail server and how to use Qpopper as a very easily configured POP mail client. This chapter didn't cover every aspect of setting up a successful mail server, only the basics. You should be aware that setting up a mail server involves more than just making the processes work. For example, you should configure spam and virus protection, which goes beyond the scope of this chapter.