CHAPTER 14
Ubuntu Server Troubleshooting
Fixing the Most Common
Problems
Although Ubuntu Server is an extremely stable server operating system, you might encounter problems occasionally, ranging from a Linux-related issue to a simple hardware failure. In this chapter you'll learn how to troubleshoot some of the most common problems.
Some say troubleshooting is difficult and requires years of experience. Experience indeed helps, but a good analytical mind is the most important troubleshooting tool. In day-to-day troubleshooting, you first have to determine where exactly a given problem has occurred. If, for example, you have a problem with a kernel module, it doesn't make much sense to troubleshoot your web server.
After determining the location and scope of the problem as well as you can, you can apply your skills to fix the problem. This requires that you have a good understanding of how the erratic system component is supposed to function and can choose the correct tool to repair it. This chapter first explains how to determine where exactly a problem has occurred. Next, it introduces you to some of the best troubleshooting tools to use. Finally, this chapter identifies some of the most common problems and explains how to fix them.
Note This chapter assumes that you are familiar with basic principles of Ubuntu system administration. If you want to refresh your knowledge, try Beginning Ubuntu LTS Server Administration, Second Edition, in which I explain essential concepts such as the boot procedure and kernel management.
Identifying the Problem
The most common first step when trying to identify a problem is to reboot your server and wait until the problem occurs. Most problems reveal themselves as your server boots, because most services are activated during the boot process. Therefore, knowing the different stages of the boot process is very important. If you succeed in determining the stage in which a problem occurs, you have made a good start in troubleshooting the problem. The following list summarizes the different phases in the boot process:
- Hardware initialization: Hardware initialization occurs during the Power On Self Test (POST). During this phase, your computer reads the BIOSes of the different hardware components and performs a check to see if all devices can initialize properly. If any of them can't initialize properly, you will not see the Grub prompt appear on your server and your server will warn you with clear error messages or beeps. If that happens, consult the documentation of your server to find out how to fix the hardware issue.
- Grub loading: After initializing the hardware, the server accesses the boot device and reads the boot loader in the master boot record (MBR), which is the first sector of 512 bytes at the beginning of the bootable hard drive. The MBR includes two important components. First is the Grub boot loader. This system component is installed in the first 446 bytes of the MBR and makes sure that the operating system on your server can load. To do this, Grub accesses its configuration in the directory
/boot/grub. Second in the MBR is the partition table. This component is essential for accessing all files on your server. If in this stage there is an error, you typically get a Grub error and, most important, the kernel will not start to load. If there is no error, you can access the Grub menu, displayed in Figure 14-1. So if you see that the kernel has started to load (see Figure 14-2), you know that your server has passed stages 1 and 2 successfully.
Figure 14-1. If you see the Grub menu, the first 446 bytes of the MBR have been read.
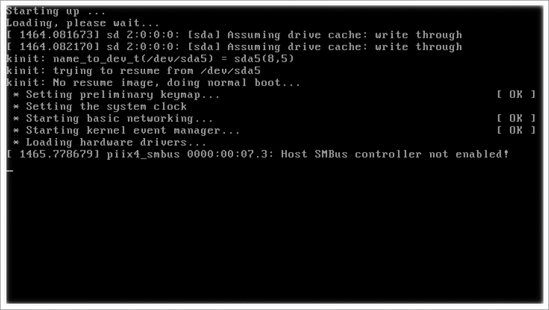
Figure 14-2. The kernel has started to load, which indicates the first two stages of your server's boot procedure have completed successfully.
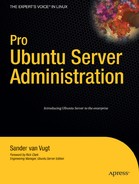
- Kernel and initrd loading: If you see that the kernel starts loading, that doesn't guarantee success with regard to the kernel and the ramfs image that contains some required drivers. It's possible that either the kernel itself or some of the drivers associated with the kernel still may not load. If that is the case, you will see the message "kernel panic" in most cases, or sometimes the kernel just stops loading, as in the example shown in Figure 14-3. Either way, you know for sure that the error is related to the kernel. You might get a kernel panic if you have tried to recompile the kernel and failed, or if one of the parameters that you have passed to Grub is wrong. A kernel panic can also be caused by a failing kernel module, but this is rare. So, if you've just recompiled your kernel and then get a kernel panic when you attempt to reboot, you know what is wrong (you did keep a copy of your old kernel, didn't you?). If you didn't recently recompile your kernel, check whether something has changed recently with regard to Grub parameters. If not, you may have a failing driver, or initrd.
Tip Grub by default is configured not to show information about the kernel initialization. To make troubleshooting easier, I recommend removing the line that reads
quietfrom the/boot/grub/menu.lstfile. If you see asplash=statement, remove that as well.
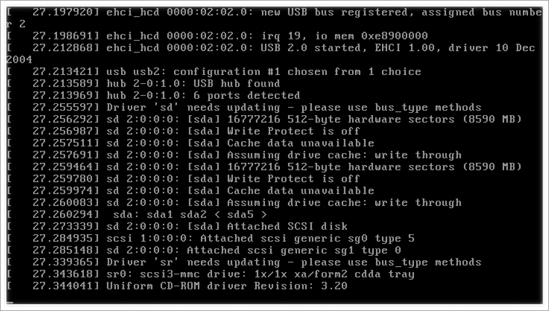
Figure 14-3. If the kernel just stops loading, the problem is definitely in phase 3 of the boot procedure.
- Upstart: On Ubuntu Server, Upstart is responsible for starting the
initprocess and associated essential services. To do this, Upstart executes all scripts it finds in the directory/etc/event.d(see Listing 14-1). You will rarely see messages that are related to Upstart itself, because it is just the service that is responsible for loading other services. If, however, none of the services on your server can initialize, or you get an error related toinit(such as you can see in Figure 14-2), something may be wrong with Upstart. Make sure that its configuration directory,/etc/event.d, is readable.Listing 14-1. To Start Important System Services, Upstart Reads the Configuration Files in /etc/event.d
root@MYL:/etc/event.d# ls

control-alt-delete   rc1   rc4   rc-default   sulogin       tty3   tty6

logd                       rc2   rc5          rcS           tty1   tty4

rc0 rc3 rc6 rcS-sulogin tty2 tty5 - Essential services: Once Upstart has loaded, it starts executing the scripts it finds in
/etc/event.d. Basically, these scripts don't execute anything, but just redirect you to other scripts that are in the directory/etc/init.dand executed from the directory that corresponds to the current runlevel. For example, if you are currently in runlevel 3, the services that are started are started from the directory/etc/rc3.d(see Listing 14-2).There is such a directory for every runlevel between 0 and 6, inclusive, determining exactly what should be started when entering a runlevel. As you can see in Listing 14-2, the runlevel directories don't contain real files, but instead contain symbolic links to files that are located in the directory
/etc/init.d. Here the system finds the real services that it should start. If one of these script fails, you typically see an error. Because these are essential services, such as the service that loads file systems, your system will most likely stop, giving you a clear indication of what is wrong. If the problem is obvious, you can just fix the problem. In some cases, the problem might not be obvious, in which case you should look at the order in which the scripts are started and try to deduce from that order which script failed. For instance, if you notice that the SSH process never gets loaded, it is obvious that the problem is in one of the scripts executed just before that.Listing 14-2. The Order of the Runlevel Scripts May Help You to Find Which Script Failed
root@mel:/etc/rc3.d# ls -l

total 4

-rw-r--r-- 1 root root 556 2008-04-19 01:05 README

lrwxrwxrwx 1 root root  18 2008-04-29 14:52 S10sysklogd -> ../init.d/sysklogd

lrwxrwxrwx 1 root root  34 2008-05-01 06:15 S10xserver-xorg-input-wacom ->

../init.d/xserver-xorg-input-wacom

lrwxrwxrwx 1 root root  15 2008-04-29 14:52 S11klogd -> ../init.d/klogd

lrwxrwxrwx 1 root root  14 2008-06-22 14:48 S12dbus -> ../init.d/dbus

lrwxrwxrwx 1 root root  17 2008-08-25 14:42 S16openvpn -> ../init.d/openvpn

lrwxrwxrwx 1 root root  14 2008-04-30 14:55 S16ssh -> ../init.d/ssh

lrwxrwxrwx 1 root root  23 2008-08-15 05:57 S17mysql-ndb-mgm ->

../init.d/mysql-ndb-mgm

lrwxrwxrwx 1 root root  17 2008-05-17 11:34 S17portmap -> ../init.d/portmap

lrwxrwxrwx 1 root root  19 2008-08-15 05:57 S18mysql-ndb -> ../init.d/mysql-ndb

lrwxrwxrwx 1 root root  14 2008-05-17 11:34 S18nis -> ../init.d/nis

lrwxrwxrwx 1 root root  15 2008-08-15 05:57 S19mysql -> ../init.d/mysql

lrwxrwxrwx 1 root root  24 2008-05-01 14:52 S19postgresql-8.3 ->

../init.d/postgresql-8.3

lrwxrwxrwx 1 root root  15 2008-08-11 02:53 S19slapd -> ../init.d/slapd

lrwxrwxrwx 1 root root  21 2008-06-11 09:22 S20dhcp3-relay -> ../init.d/dhcp3-relay

lrwxrwxrwx 1 root root  14 2008-05-01 14:52 S20ebox -> ../init.d/ebox

lrwxrwxrwx 1 root root  15 2008-07-09 03:05 S20exim4 -> ../init.d/exim4

lrwxrwxrwx 1 root root  17 2008-05-27 15:35 S20ifplugd -> ../init.d/ifplugd

lrwxrwxrwx 1 root root  21 2008-07-30 04:09 S20iscsitarget -> ../init.d/iscsitarget

lrwxrwxrwx 1 root root  14 2008-06-20 15:02 S20kvm -> ../init.d/kvm

lrwxrwxrwx 1 root root  21 2008-08-11 10:46 S20libnss-ldap -> ../init.d/libnss-ldap

lrwxrwxrwx 1 root root  21 2008-06-20 15:02 S20libvirt-bin -> ../init.d/libvirt-bin

lrwxrwxrwx 1 root root  20 2008-05-17 11:34 S20nfs-common -> ../init.d/nfs-common

lrwxrwxrwx 1 root root  27 2008-05-17 11:34 S20nfs-kernel-server ->

../init.d/nfs-kernel-server

lrwxrwxrwx 1 root root  23 2008-05-17 11:34 S20openbsd-inetd ->

../init.d/openbsd-inetd

lrwxrwxrwx 1 root root  16 2008-06-23 09:12 S20quagga -> ../init.d/quagga

lrwxrwxrwx 1 root root  15 2008-04-29 14:01 S20rsync -> ../init.d/rsync

lrwxrwxrwx 1 root root  15 2008-04-30 16:58 S20samba -> ../init.d/samba

lrwxrwxrwx 1 root root  17 2008-05-17 18:29 S20sysstat -> ../init.d/sysstat

lrwxrwxrwx 1 root root  19 2008-05-17 11:34 S20tftpd-hpa -> ../init.d/tftpd-hpa

lrwxrwxrwx 1 root root  17 2008-08-14 09:36 S20winbind -> ../init.d/winbind

lrwxrwxrwx 1 root root  16 2008-06-11 09:40 S20xinetd -> ../init.d/xinetd

lrwxrwxrwx 1 root root  18 2008-08-14 04:08 S21quotarpc -> ../init.d/quotarpc

lrwxrwxrwx 1 root root  14 2008-05-17 11:34 S23ntp -> ../init.d/ntp

lrwxrwxrwx 1 root root  15 2008-04-29 14:52 S25mdadm -> ../init.d/mdadm

lrwxrwxrwx 1 root root  17 2008-07-09 03:05 S30nagios2 -> ../init.d/nagios2

lrwxrwxrwx 1 root root  15 2008-06-25 14:28 S30squid -> ../init.d/squid

lrwxrwxrwx 1 root root  22 2008-05-17 11:34 S40dhcp3-server ->

../init.d/dhcp3-server

lrwxrwxrwx 1 root root  26 2008-05-17 16:51 S40drbl-clients-nat ->

../init.d/drbl-clients-nat

lrwxrwxrwx 1 root root  14 2008-07-30 04:02 S70drbd -> ../init.d/drbd

lrwxrwxrwx 1 root root  19 2008-07-30 04:02 S75heartbeat -> ../init.d/heartbeat

lrwxrwxrwx 1 root root  14 2008-04-29 14:00 S89atd -> ../init.d/atd

lrwxrwxrwx 1 root root  14 2008-04-29 14:00 S89cron -> ../init.d/cron

lrwxrwxrwx 1 root root  17 2008-05-01 14:51 S91apache2 -> ../init.d/apache2

lrwxrwxrwx 1 root root  18 2008-04-29 14:52 S99rc.local -> ../init.d/rc.local

lrwxrwxrwx 1 root root 19 2008-04-29 14:52 S99rmnologin -> ../init.d/rmnologin - Networking: Among the most important of the nonessential services is networking. If networking fails, many other services will fail as well. So if you see that many services that depend on networking fail, check your network configuration. The network is started from the script
/etc/init.d/networking. This script reads in/etc/network/interfaceswhich network configuration it should start (see Listing 14-3). If something is wrong with your network, the most likely problem is an error in this script. Test network connectivity after you think you have fixed a network problem; ping is still the best utility to perform such tests.Listing 14-3. The /etc/init.d/networking Script Learns from /etc/network/interfaces Which Configuration to Initialize
root@mel:/etc/network# cat interfaces

# This file describes the network interfaces available on your system

# and how to activate them. For more information, see interfaces(5).


# The loopback network interface

auto lo

iface lo inet loopback

# The primary network interface

#auto eth0

#iface eth0 inet static

#       address 192.168.1.99

#       netmask 255.255.255.0

#       network 192.168.1.0

#       broadcast 192.168.1.255

#       gateway 192.168.1.254

#       # dns-* options are implemented by the resolvconf package, if

installed

#       dns-nameservers 193.79.237.39

#       dns-search sandervanvugt.nl

auto br0

iface br0 inet static

        address 192.168.1.99

        network 192.168.1.0

        netmask 255.255.255.0

        broadcast 192.168.1.255

        gateway 192.168.1.254

        bridge_ports eth0

        bridge_fd 0

        bridge_hello 2

        bridge_maxage 12

        bridge_stop off

auto eth1

iface eth1 inet static

        address 10.0.0.10

        netmask 255.255.255.0

        network 10.0.0.0

broadcast 10.0.0.255 - Nonessential services: If you have made it this far, basically, your server is operational. You still might have a service fail, though. If one of your services fails, the most likely problem is a configuration error in the service script. Check the documentation about your service and try to repair the script. Once you have arrived at this stage, at least you know for sure that the problem exists in a particular service, so you can start troubleshooting at the right location.
Troubleshooting Tools
There are some very useful tools that you must have available before you start a troubleshooting session:
init=/bin/bash: This Grub option enables you to load a shell immediately after the kernel has loaded successfully.- Rescue a Broken System option: This option on the Ubuntu Server installation CD takes you to an environment in which you can apply your troubleshooting techniques.
- A Linux live CD: One of my personal favorites, and thus covered in this section, is Knoppix (http://www.knoppix.com), a live CD that contains lots of useful utilities that help you to troubleshoot a failing server. If you choose a different live CD, find one that doesn't have restrictions and takes you to an unlimited root shell as fast as possible.
Working with init=/bin/bash
The tool that is easiest to use is the option init=/bin/bash that you can pass to Grub when booting. It takes you to the end of the third stage of the boot procedure, right after the kernel and initrd have been loaded. This option is useful in cases where you have found that the kernel can load successfully, but there is an essential problem later in the boot procedure. Here is how you can activate it:
- Reboot your server. During the three seconds that Ubuntu Server by default shows the Grub prompt, press Escape to access the options available in the Grub menu, an example of which is shown in Figure 14-4.
- Select the line that has the kernel image you want to start (typically, this is the first line) and press e to edit the commands that are in this boot loader menu option. This shows you the lines in the
/boot/grub/menu.lstfile that are defined for this section (see Figure 14-5).
Figure 14-4. From the Grub menu, you can pass options to the boot loader.

Figure 14-5. By selecting the section you want to start, you see the different lines that comprise that section.
- Select the line that starts with
kerneland press e to edit this line. You'll now see a new window in which you can edit this line. Go to the end of its text and add the option init=/bin/bash. Next, press Enter, followed by b to boot the kernel with this option. This takes you to a bash shell prompt from which you can start your troubleshooting session (see Figure 14-6). - You are now in a bash shell, without anything being mounted or started for you. This offers you an excellent starting point for troubleshooting. Mount your file systems and execute all services that you want to test by hand.
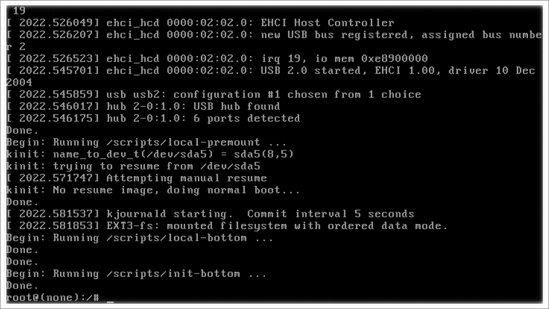
Figure 14-6. Using the option init=/bin/bash is the quickest way to access a troubleshooting shell.
Rescue a Broken System
The Ubuntu Server installation CD includes an option named Rescue a Broken System. This option is useful if you find that you can no longer boot your normal kernel image. Its main advantage is that it has its own kernel. Therefore, if for whatever reason init=/bin/bash doesn't work for you, use this option. The following procedure describes how it works:
- Put the Ubuntu Server installation CD in your server's optical drive and reboot your server. Make sure it boots from the optical drive.
- When you see the installation interface shown in Figure 14-7, select Rescue a Broken System and press Enter.

Figure 14-7. On the Ubuntu Server installation CD, you'll find an option to rescue a broken system.
- You now see a few screens asking for your language and related settings. Enter the required information to make sure that your server loads the correct code table and keyboard settings.
- After loading the appropriate keyboard settings, if your server has multiple network cards, you have to specify which network card you want to use. Your server then tries to get an IP address from the DHCP server on your network. Next, enter a temporary hostname. It doesn't really matter what you choose here, so the default hostname Ubuntu is fine (see Figure 14-8).
- After asking you for time zone information, the rescue system tries to detect your hard disk layout. If it succeeds, it gives you a list of partitions (see Figure 14-9) and you have to tell it which partition you want to use as the root file system. It doesn't matter if you don't know which one to use; if you make an error here, you can just try another partition.

Figure 14-8. Using the option Rescue, a Broken System gives you a temporary hostname and network configuration.

Figure 14-9. To initialize the root file system, you have to tell the rescue system which partition it should use to mount it.
- At this point, you get an overview of the different rescue operations that are available (see Figure 14-10). You can choose from the following options:
- Execute a shell in
/dev/yourrootdevice: Use this option to launch a shell in which your root file system is mounted already. - Execute a shell in the installer environment: Use this option to launch a shell without anything mounted yet. This allows you to perform all mounts manually.
- Reinstall GRUB boot loader: If you know that your Grub boot loader is faulty, use this option to reinstall it.
- Choose a different root file system: If you want to try a different root file system and mount that automatically, use this option.
- Reboot the system: Select this option to reboot your server.
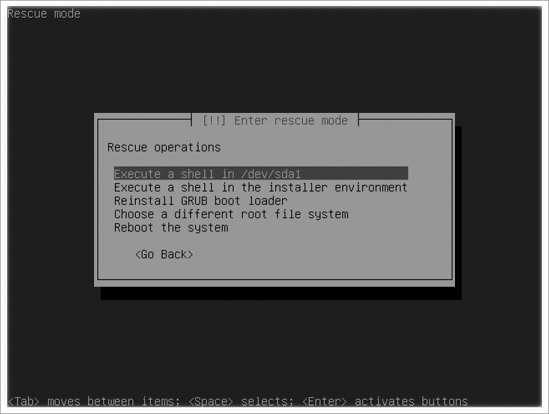
Figure 14-10. In rescue mode you have five different options.
- Execute a shell in
- After you select the rescue option that you want to use, you are dropped in a shell in which you can repair your system. Once you are done with that, press Exit to return to the Rescue Operations menu (see Figure 14-10) and choose to reboot your server.
Note When I wrote this, there was a bug that takes you back to the main installation menu, in which the next step allows you to partition your disks. When you see this menu, you can select the option Finish the Installation or just hard reset your server. Both options restart your server.
Working with a Knoppix Rescue CD
If you choose to work from a generic rescue disk, Knoppix is a good choice that offers you complete flexibility in repairing your server. You can download Knoppix from http://www.knoppix.com. In this section you'll read how to boot from Knoppix and how to enter a chroot environment in which you can troubleshoot your Linux server.
Troubleshooting goes much better from a chroot environment because you don't work with your Ubuntu Server file system from a mounted directory; instead, you actually change the root of the rescue disk to this directory. The advantage of this is that all utilities will work with their native paths. For instance, if a command like grub-install expects its menu.lst file to be in /boot/grub/menu.lst, the utility is not going to work if, due to the fact that you have mounted your server disks somewhere else, the path to this file has become /mnt/boot/grub/menu.lst. By using chroot, you can change root to the /mnt directory, with the advantage that your commands will find all configuration files at the right location.
The following procedure describes how to activate such a chroot environment from the Knoppix live CD:
- Boot your server from the Knoppix CD. You'll see the Knoppix welcome screen (see Figure 14-11). Press Enter to start loading Knoppix.
- During the load procedure, Knoppix prompts you to choose the language that you want to use. (In this procedure, I assume that you have started in English.) You next see the Knoppix desktop from which you start your work.
- Click the terminal screen icon in the icon bar. This opens the Shell Konsole, with a prompt at which you have only user permissions. Enter
sudo suto getrootpermissions. - Enter the
mountcommand. The output of this command shows that you don't yet have any file system mounted on your server and that you are working completely from RAM file systems that have been initialized from the Knoppix CD (see Figure 14-12).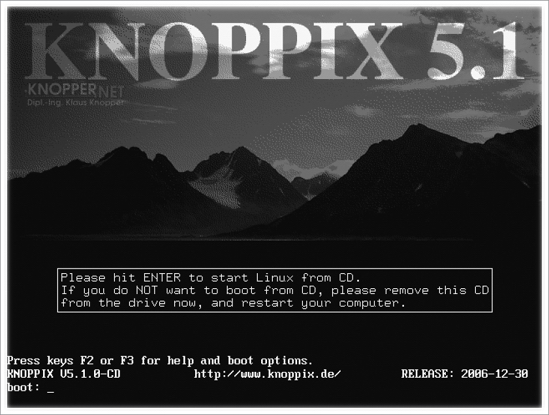
Figure 14-11. From the Knoppix desktop, you can start repairing your server.
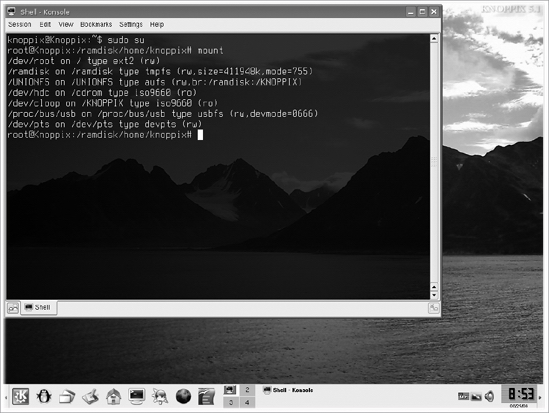
Figure 14-12. Knoppix doesn't load your server's file systems automatically.
- Identify which partition is the root partition. You may not know exactly how your server is organized, so a good command to start with is
fdisk -l. This shows you a list of all partitions that exist on your server. There are two possibilities here. You may see disk devices only, or you may also see dm devices (which refer to LVM logical volumes). If the latter is true, you are using LVM and need to take some extra steps; the section "Problems with LVM Logical Volumes," later in this chapter, explains how to initialize logical volumes manually. The present procedure assumes that you are working with local disk devices only, in which casefdisk -lmay give you a result similar to the output shown in Listing 14-4.Listing 14-4. fdisk -l Enables You to Check the Partition Layout of Your Server
root@Knoppix:˜# fdisk -l


Disk /dev/sda: 8589 MB, 8589934592 bytes

255 heads, 63 sectors/track, 1044 cylinders

Units = cylinders of 16065 * 512 = 8225280 bytes


   Device Boot   Start    End    Blocks   Id  System

/dev/sda1   *        1    993   7976241   83  Linux

/dev/sda2          994   1044    409657+   5  Extended

/dev/sda5          994   1044    409626   82  Linux swap / Solaris
In the example in Listing 14-4, there isn't much doubt about which is the root partition. The
/dev/sda1partition is the only one that has Id 83, so it is the only one that contains a Linux file system. If you have more than one Linux partition, you just have to try to mount all of them one by one to find out which contains the root file system. - Mount the partition that you think is the root partition. Use the
/mntdirectory in the Knoppix file system as the temporary mount point:
mount /dev/sda1 /mnt
- Before you go into the
chrootenvironment, it is a good idea to make sure your/procand/devdirectories are working. These directories are generated dynamically and will be needed by many of the tools you use. To make sure these tools still work, you should mount both directories, by using the following two commands:
mount -o bind /dev /mnt/dev

mount -t proc proc /mnt/proc
- Go to the
/mntdirectory usingcd /mnt. At this point, you still see the promptroot@Knoppix: /mnt#. Enterchroot .to change the current directory to be presented as the root directory. You are in thechrootenvironment now, as shown in Listing 14-5, and can start troubleshooting.Listing 14-5. Use chroot for Troubleshooting
root@Knoppix:/mnt# chroot .

root@Knoppix:/#
At this point you are ready to use your troubleshooting environment. In the next section you will read about some scenarios in which a rescue environment like the Knoppix Live CD is useful.
Note There is no fundamental difference between using the Knoppix Live CD and using the Ubuntu Server Installation CD for your rescue operations. I prefer Knoppix, though, because the Knoppix CD offers many useful utilities. In the next section, use whichever solution you prefer.
Common Problems and How to Fix Them
Although Ubuntu Server is a fairly stable server platform, you may encounter some problems. This section gives you some hints for troubleshooting the following common problems:
- Grub errors
- No master boot record
- Partition problems
- LVM logical volume problems
- Kernel problems
- File system problems
- Lost administrator password
Grub Errors
The very first thing that happens on your computer is Grub initialization. In some situations you may find that Grub simply tells you that it cannot load. You may encounter different results from Grub errors:
- Grub is completely wiped
- Grub gives a Grub error message
- Grub gives a missing-file error
The following sections explain how you can reinstall Grub if it is completely wiped, and how you can manually load Grub if you see a Grub error or a missing file error message.
Reinstalling Grub
If Grub is completely wiped, you will see nothing but a blinking cursor when your server boots; no Grub message is displayed. If this happens, it is likely that you have lost the complete MBR of your server, so there is no way that you can boot it. Take a rescue CD and boot your server from there. Then, activate a chroot environment and enter grub-install, followed by the name of the device on which you want to install Grub (for instance, grub-install /dev/sda, as shown in Listing 14-6). This will read /boot/grub/menu.lst (make sure that you have mounted it if boot is on a separate partition!) and reinstall Grub for you.
Listing 14-6. grub-install Offers an Easy Solution to Reinstall Grub
root@Knoppix:/# grub-install /dev/sda

You shouldn't call /sbin/grub-install. Please call /usr/sbin/grub-install instead!


Searching for GRUB installation directory ... found: /boot/grub

Installation finished. No error reported.

This is the contents of the device map /boot/grub/device.map.

Check if this is correct or not. If any of the lines is incorrect,

fix it and re-run the script 'grub-install'.


(hd0)   /dev/sda
grub-install offers a good solution if the Grub code in the MBR doesn't work anymore. It may also fix some of the cases in which Grub gives you an error message and refuses to load any further. In some situations, you may encounter a problem in the Grub configuration file. If that happens, troubleshooting from the Grub prompt is useful, because you can manually load all lines that normally are loaded automatically from menu.lst. The advantage? You will see exactly where the problem occurs and thus be able to fix it easily.
The following procedure shows how to load the Grub configuration from the Grub prompt:
- Restart your server. When it shows you that Grub is loading, press Escape to display the Grub menu, listing all available boot options from
/boot/grub/menu.lst. - From the menu, press c to get to the Grub command-line interface, shown in Figure 14-13.
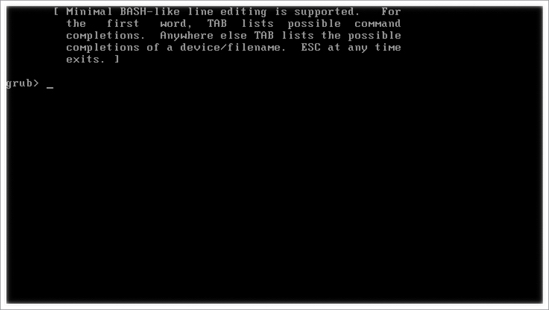
Figure 14-13 The Grub command-line interface enables you to manually load the complete Grub configuration.
- At this point, it is a good idea to type help at the command prompt, just to get an idea of the commands that are available from within the Grub command line (see Figure 14-14 for an example).
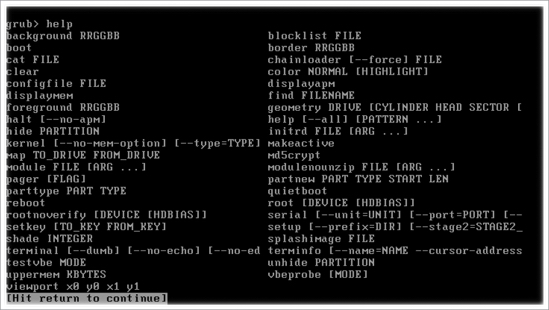
Figure 14-14. The Grub command-line interface offers its own commands to troubleshoot Grub.
- To load Grub manually, you now have to execute all lines from the
menu.lstfile. Fortunately, you don't have to remember them, but instead can display themenu.lstfile by usingcat /boot/grub/menu.lst. Normally, at the end of the file you can read the boot information that your server uses (see Figure 14-15 for an example).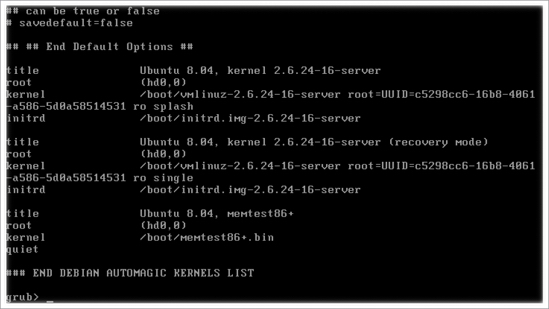
Figure 14-15. Read the menu.lst file for an example of the options your server normally uses when booting.
- Enter the
root, kernel, andinitrdlines from your default section inmenu.lst. Then, type boot to start booting your server. Observe your server at the same time to make sure that no error messages are displayed. Because your server didn't start automatically from this configuration, there is probably an error in the configuration it uses. If there is, read the error code and fix the problem. This may require that you mount your server's file system from a rescue CD first to see the exact filenames and device names you are using. - Found the error? Then your server will boot completely. If you fixed the wrong part, it will stop while loading the kernel. In the latter case, try again until you have found and fixed the error.
Tip Ubuntu Server uses the UUID of your root partition to boot. If that doesn't work, replace the UUID with the normal device name (for example, /dev/sda1). It is a lot easier to type and will show you immediately whether or not the error is in the UUID part.
No Master Boot Record
If you don't have a backup of the MBR, restoring it requires that you first fix your partition table and then restore Grub. These procedures are covered elsewhere in this chapter, so I won't repeat them here. The next section explains how to fix your partition table. After restoring the partition table, you'll be able to access your disk partitions and logical volumes again, enabling you to restore Grub. You learned how to do that in the previous section.
Of course, you can avoid going through the complex process of restoring your MBR by creating a backup MBR before you encounter trouble. This is a relatively simple procedure. As root, from the command line enter the following command (replace /dev/sda with the actual name of your server's boot device):
dd if=/dev/sda of=/boot/mbr_backup bs=512 count=1This command makes a copy of the first 512 bytes on your hard drive (the MBR) and copies that to a file named mbr_backup in /boot. Repeat this command after every change you make to the partition table or Grub code. If some day you run into troubles with your MBR, you just have to boot your server from the rescue CD and restore the MBR using the following command:
dd if=/boot/mbr_backup of=/dev/sda bs=512 count=1Partition Problems
Generally speaking, you may encounter two different kinds of partition problems. You may have lost the complete partition table, or you may have a problem with the file system on a partition. If the latter is the case, read the section "File System Problems" later in this chapter. If you have lost all partitions, you need a rescue CD and gpart to find the exact information about the beginning and end of the partitions on your server's hard disk. Once you've found that, use fdisk to re-create the partitions, as follows:
- Start your server from the rescue CD and make sure that you open a console in which you have
rootpermissions. - Type gpart /dev/sda to scan your hard drive for all partitions. This may take quite some time (count on anything from 5 seconds to an hour). Once the scan is finished, you will see your partition information, as in the example in Listing 14-7.
Listing 14-7. Use gpart to Help Find Lost Partitions
root@Knoppix:˜# gpart /dev/sda


Begin scan...

Possible partition(Linux ext2), size(7789mb), offset(0mb)

Possible extended partition at offset(7789mb)

   Possible partition(Linux swap), size(400mb), offset(7789mb)

End scan.


Checking partitions...

Partition(Linux ext2 filesystem): primary

Partition(Linux swap or Solaris/x86): primary

Ok.


Guessed primary partition table:

Primary partition(1)

   type: 141(0x83)(Linux ext2 filesystem)

   size: 7789mb #s(15952480) s(63-15952542)

   chs:  (0/1/1)-(992/254/61)d (0/1/1)-(992/254/61)r


Primary partition(2)

   type: 140(0x82)(Linux swap or Solaris/x86)

   size: 400mb #s(819248) s(15952608-16771855)

   chs:  (993/1/1)-(1023/254/63)d (993/1/1)-(1043/254/59)r

Primary partition(3)

   type: 000(0x00)(unused)

   size: 0mb #s(0) s(0-0)

   chs:  (0/0/0)-(0/0/0)d (0/0/0)-(0/0/0)r


Primary partition(4)

   type: 000(0x00)(unused)

   size: 0mb #s(0) s(0-0)

   chs:  (0/0/0)-(0/0/0)d (0/0/0)-(0/0/0)r
Evaluate the information that
gpartgives you carefully; after all,gpartstands for Guess Partition. It guesses—nothing more, nothing less. For instance, on my example server I have swap in a logical partition/dev/sda5. As you can see,gpartdid find the swap partition with its correct size, beginning, and end on disk, but it couldn't determine that it is a logical partition. Based on this information, you would try to re-create the swap partition on/dev/sda2. Your server would boot with that, but would give errors as well. That doesn't really matter, though, because once your server has booted, you can check system files like/etc/fstabto find on what partition your swap originally was, and then repair the partitions. - Now that you have found the original partition boundaries, write them down and start
fdiskusingfdisk /dev/sda. Ignore the message about your disk's size and press n to start the interface to create a new partition. Next, press p to create the first primary partition. When it asks what partition number you want to assign, press 1. - Next comes the important part: you have to specify where the partition originally started and ended. To find this information, you need the
chs(cylinder, heads, sector) line in thegpartoutput for this partition. Consider the following line:
chs: (0/1/1)-(992/254/61)d (0/1/1)-(992/254/61)r
In this line, the first number between brackets indicates the original starting cylinder, which in this example is cylinder 0. The second series of numbers between brackets tells you where the partition originally ended, in this case on cylinder 992. There is one catch, though: in
fdiskthe first cylinder is cylinder 1. That means that all other cylinders as displayed withgpartneed to be incremented by 1. So, you have to create a partition now that starts at cylinder 1 and ends on cylinder 993. Repeat steps 3 and 4 to re-create your other partitions as well and then closefdiskby pressing w. You'll probably see a message stating that the new partition table can be used only after a reboot. Listing 14-8 shows you what has happened so far.Listing 14-8. Re-creating a Partition Using fdisk
root@Knoppix:˜# fdisk /dev/sda


The number of cylinders for this disk is set to 1044.

There is nothing wrong with that, but this is larger than 1024,

and could in certain setups cause problems with:

1) software that runs at boot time (e.g., old versions of LILO)

2) booting and partitioning software from other OSs

   (e.g., DOS FDISK, OS/2 FDISK)


Command (m for help): n

Command action

   e   extended

   p   primary partition (1-4)

p

Partition number (1-4): 1

First cylinder (1-1044, default 1): 1

Last cylinder or +size or +sizeM or +sizeK (1-1044, default 1044): 993


Command (m for help): n

Command action

   e   extended

   p   primary partition (1-4)

p

Partition number (1-4): 2

First cylinder (994-1044, default 994):

Using default value 994

Last cylinder or +size or +sizeM or +sizeK (994-1044, default 1044):

Using default value 1044


Command (m for help): w

The partition table has been altered!


Calling ioctl() to re-read partition table.


WARNING: Re-reading the partition table failed with error 16: Device or

resource busy.

The kernel still uses the old table.

The new table will be used at the next reboot.

Syncing disks. - Reboot your server to activate the changes.
You now have recovered your partitions. It may work, it may not. If it doesn't work, I recommend starting by re-creating the first partition first. Try to mount it from the rescue CD, and if that works, continue from there, re-creating all other partitions you need. Once you have successfully reconstructed the root partition, read /etc/fstab, because it gives you invaluable information about the original device names that you've used.
Tip LVM, extended, and swap partitions use another partition type. In fdisk, press l to get an overview of available partition types, and press t to change the type of a partition. Don't forget to reboot after changing your partition table.
LVM Logical Volume Problems
If your server is configured with LVM, troubleshooting is slightly more difficult. You may encounter the following problems with LVM volumes:
- On bootup, the server doesn't find LVM logical volumes.
- Scanning a device for LVM problems causes problems on that device.
- A device is not activated automatically.
Fixing LVM Boot Problems
When your server boots, it scans for LVM volumes. It does this by executing the pvscan command from the startup scripts. If something is wrong, the pvscan process will fail and, as a result, you'll have to initialize LVM yourself. This is not too hard if you understand how LVM works. The bottom layer in LVM consists of physical devices. These are storage devices that have an LVM signature added to them (they can also be partitions). Not every storage device is a physical device. You need to initialize these storage devices by using the pvcreate command before you can use them.
The second layer in LVM consists of volume groups. A volume group is a collection of storage devices (or only one storage device) from which logical volumes can be created. During your configuration of LVM, you created one or more volume groups, using the vgcreate command. Your server uses vgscan to activate the volume groups when booting.
Logical volumes are the storage devices that you will create a file system on and mount on your server. You use lvcreate to create them, and lvscan to scan them. Figure 14-16 gives an overview of the LVM setup.
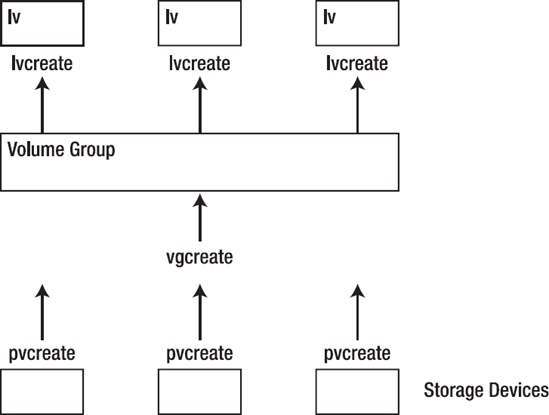
Figure 14-16. Overview of the LVM structure
The following procedure explains how to troubleshoot LVM logical volumes:
- Before you start to troubleshoot, it is good to get an overview of your logical volumes. The best way to do that is by using
lvdisplay. If it encounters a problem, it will tell you "No volume groups found," in which case you need to check the LVM chain to see if everything is set up right. - If your LVM structure has never worked, start by checking the storage devices themselves. If you've added partitions to the LVM setup, the partition should be marked as partition type 8e. Use
fdisk -l /dev/sdato confirm this. If it isn't set to type 8e, usefdisk /dev/sdato openfdiskon your server's hard drive, press t, and then enter the number of the partition whose type you want to change. Next enter 8e, save the settings, and reboot. It might work now. - If your LVM structure still doesn't work, use
pvdisplayto check whether the storage devices are marked as LVM devices. If they are not, but you are sure that you have set them up as LVM devices earlier, usepvscan /dev/sda. If this also doesn't work, usepvcreate /dev/sdato set up your storage device as an LVM device. Listing 14-9 shows the result thatpvdisplayandpvscanwould normally give you.Listing 14-9. Use pvscan and pvdisplay to Initialize Existing Physical Volumes
root@mel:~# pvscan /dev/md0

  PV /dev/md0   VG system   lvm2 [912.69 GB / 10.69 GB free]

  Total: 1 [912.69 GB] / in use: 1 [912.69 GB] / in no VG: 0 [0   ]

root@mel:~# pvdisplay

  --- Physical volume ---

  PV Name               /dev/md0

  VG Name               system

  PV Size               912.69 GB / not usable 1.69 MB

  Allocatable           yes

  PE Size (KByte)       4096

  Total PE              233648

  Free PE               2736

  Allocated PE          230912

PV UUID Z0qNiT-ZWH3-Yqfh-8jmi-jdW7-pNR4-IY6JW1 - Repeat the preceding steps, but this time for the volume groups on your server. So, first use
vgdisplayto see your current volume groups. If that doesn't give you a result, usevgscanto tell your server to scan for volume groups on your storage devices. Listing 14-10 shows the result of these commands.Listing 14-10. vgscan and vgdisplay Can Be Very Helpful When Fixing Volume Group Problems
root@mel:~# vgscan

  Reading all physical volumes.  This may take a while...

  Found volume group "system" using metadata type lvm2

root@mel:~# vgdisplay

  --- Volume group ---

  VG Name               system

  System ID

  Format                lvm2

  Metadata Areas        1

  Metadata Sequence No  6

  VG Access             read/write

  VG Status             resizable

  MAX LV                0

  Cur LV                5

  Open LV               5

  Max PV                0

  Cur PV                1

  Act PV                1

  VG Size               912.69 GB

  PE Size               4.00 MB

  Total PE              233648

  Alloc PE / Size       230912 / 902.00 GB

  Free  PE / Size       2736 / 10.69 GB

VG UUID 9VeHJR-nkCX-2Ofg-3BUq-l52H-WqFW-3B2Sw7 - Now that both your physical volumes and your volume groups are available, you may still have to scan your logical volumes (use
lvdisplayfirst to see if they were activated automatically). The command sequence repeats itself: first uselvscanto scan for available volumes and then uselvdisplayto see whether the volumes came up successfully. Listing 14-11 shows you the result of these two commands.Listing 14-11. Use lvscan and lvdisplay to Initialize Your Logical Volumes
root@mel:~# lvscan

  ACTIVE            '/dev/system/root' [100.00 GB] inherit

  ACTIVE            '/dev/system/swap' [2.00 GB] inherit

  ACTIVE            '/dev/system/var' [100.00 GB] inherit

  ACTIVE            '/dev/system/srv' [100.00 GB] inherit

  ACTIVE            '/dev/system/clonezilla' [600.00 GB] inherit

root@mel:~# lvdisplay

  --- Logical volume ---

  LV Name                /dev/system/root

  VG Name                system

  LV UUID                C2QCPB-vtTJ-E3QN-hoZE-dfZE-cBiZ-zzO6mN

  LV Write Access        read/write

  LV Status              available

  # open                 1

  LV Size                100.00 GB

  Current LE             25600

  Segments               1

  Allocation             inherit

  Read ahead sectors     0

  Block device           254:0

  --- Logical volume ---

  LV Name                /dev/system/swap

  VG Name                system

  LV UUID                1NY8gw-TZgt-9Xxp-6FnA-2HEa-HUmv-tnqnI5

  LV Write Access        read/write

  LV Status              available

  # open                 2

  LV Size                2.00 GB

  Current LE             512

  Segments               1

  Allocation             inherit

  Read ahead sectors     0

  Block device           254:1


  --- Logical volume ---

  LV Name                /dev/system/var

  VG Name                system

  LV UUID                0yzvpN-U1uC-3Hra-7iOn-Sljz-pweh-1J8FsO

  LV Write Access        read/write

  LV Status              available

  # open                 2

  LV Size                100.00 GB

  Current LE             25600

  Segments               1

  Allocation             inherit

  Read ahead sectors     0

  Block device           254:2


  --- Logical volume ---

  LV Name                /dev/system/srv

  VG Name                system

  LV UUID                zUwbXR-7T1T-2yAJ-34Ri-FiFf-Wruc-ql5QtS

  LV Write Access        read/write

  LV Status              available

  # open                 1

  LV Size                100.00 GB

  Current LE             25600

  Segments               1

  Allocation             inherit

  Read ahead sectors     0

  Block device           254:3

  --- Logical volume ---

  LV Name                /dev/system/clonezilla

  VG Name                system

  LV UUID                zh1jLm-k3ut-UjwD-fBkh-GArt-HxII-i5342d

  LV Write Access        read/write

  LV Status              available

  # open                 1

  LV Size                600.00 GB

  Current LE             153600

  Segments               1

  Allocation             inherit

  Read ahead sectors     0

Block device 254:4 - Make sure that all LVM logical volumes are marked as available. You can see this in the
LV Statusline of the output oflvdisplay. If the status is anything other thanavailable, read the upcoming subsection "A Device Is Not Activated Automatically."
Excluding Devices for LVM
Imagine a situation in which you are working with virtualization. Your host server uses LVM, and you decide that your virtual servers should each get an LVM logical volume as the storage back end. In the virtual servers, you want to use LVM as well. When your virtual machine boots, it can't initialize LVM volumes. It complains that the devices are already being used.
The problem in the preceding scenario occurs if you don't exclude your LVM devices from being scanned for LVM volumes on bootup of the host server. Therefore, the host server will find LVM volumes within the LVM devices and just activate them. The result is that the virtual server that is supposed to use these volumes finds that they are already in use and concludes that it can't use them. The solution is to exclude the LVM devices from being scanned for LVM volumes when the host server boots.
To exclude LVM devices, you have to modify the LVM configuration file /etc/lvm/lvm.conf. Listing 14-12 provides some example lines that you can use to exclude devices.
Listing 14-12. Some Example Lines to Exclude Devices from lvm.conf
# By default we accept every block device:

filter = [ "a/.*/" ]


# Exclude the cdrom drive

# filter = [ "r|/dev/cdrom|" ]


# When testing I like to work with just loopback devices:

# filter = [ "a/loop/", "r/.*/" ]


# Or maybe all loops and ide drives except hdc:

# filter =[ "a|loop|", "r|/dev/hdc|", "a|/dev/ide|", "r|.*|" ]
As you can see, the filter statement uses regular expressions both to include and exclude devices. All devices that you want to include start with a| and all devices that you want to exclude start with r|. So, for example, if you want to make sure that while booting your /dev/drbd0 device is not scanned by pvscan, vgscan, or lvscan, include the following line somewhere in the configuration file:
filter = [ "r|/dev/drbd0" ]Next, restart your server to activate the new configuration. The newly designated devices should now be excluded.
Tip Personally, I don't like all the comments in the /etc/lvm/lvm.conf file, because I want to see very clearly which devices I'm including and which devices I'm excluding in the LVM setup. Thus, I recommend removing all comment lines so that you have a configuration file that is easy to read and in which it is easy to identify any mistakes that you've accidentally made.
A Device Is Not Activated Automatically
Another problem that you might encounter is that LVM volumes are all discovered fine but their status remains inactive. If that happens, you can use lvchange to change their state to active. Consider the following example line:
lvchange -a y /dev/system/srv
This command changes the state of the volume from inactive to active. This normally works, but in some particular cases, it doesn't. I have seen a situation in which a snapshot volume was linked to the original volume, but the snapshot volume was completely filled up and therefore deactivated automatically. That's good, you would think, because it can't do any harm that way, but it also deactivates the original volume. If the original volume is deactivated because of a failing snapshot, there is no way to get it up again with lvchange. In that case, you would first have to remove the snapshot, using a command like
lvremove /dev/system/snapshotOnce the snapshot volume has been removed properly, you can change the state of the original volume back to active.
Tip Always remember that a snapshot is for temporary use only. Remove it immediately if you don't need it anymore.
Kernel Problems
Fortunately, serious kernel problems are relatively rare, but they do occur. Typically, when the kernel has a problem on a machine that has been functional for quite some time, the machine will just hang. If this happens, the first thing to do is to find out what kind of "hang" it is. There are interruptible hangs and noninterruptible hangs. To find out which kind of hang your server is experiencing, press the Caps Lock key. If the Caps Lock light switches on or off, you have an interruptible hang. If it doesn't, you have a noninterruptible hang.
Interruptible Hang
The best thing to do when you have an interruptible hang is to dump a stack trace of the responsible process. To do this, you must have Magic SysRq enabled. Check if this is the case in the file /proc/sys/kernel/sysrq. If it is not enabled, use zcat /proc/config.gz | grep SYSRQ to see whether or not this feature is compiled. If it is enabled, it has the value 1; if it's not, it has the value 0. On Ubuntu Server, it is enabled by default. If on your server it is not enabled for some reason, put the following line in /etc/sysctl.conf and reboot your server to make sure that sysrq is enabled by default (see Chapter 4 for more information on sysctl):
kernel.sysrq=1Now when the server hangs, press Alt+Print Screen+t to tell your system to dump a stack trace to the console. Next, use the dmesg command to dump the stack trace on your server's screen. You can also reboot, and after the reboot read /var/log/messages, because the stack trace is dumped there as well. Listing 14-13 shows partial output of the stack trace.
Listing 14-13. A Stack Trace Can Help Troubleshoot Interruptible Hangs
[ 1451.314592]  [<c01a6918>] do_ioctl+0x78/0x90

[ 1451.314596]  [<c01a6b5e>] vfs_ioctl+0x22e/0x2b0

[ 1451.314599]  [<c02230ed>] rwsem_wake+0x4d/0x110

[ 1451.314603]  [<c01a6c36>] sys_ioctl+0x56/0x70

[ 1451.314607]  [<c010839a>] sysenter_past_esp+0x6b/0xa1

[ 1451.314616]  =======================

[ 1451.314617] console-kit-d S f3ddbde8     0  6784      1

[ 1451.314619]        f3d64b80 00000086 00000002 f3ddbde8 f3ddbde0 00000000

 c04980e0 c049b480

[ 1451.314623]        c049b480 c049b480 f3ddbdec f3d64cc4 c35a3480 ffffd253

 00000000 000000ff

[ 1451.314626]        00000000 00000000 00000000 0000003a 00000001 c35aa000

 00005607 c027858a

[ 1451.314630] Call Trace:

[ 1451.314640]  [<c027858a>] vt_waitactive+0x5a/0xb0

[ 1451.314643]  [<c012b0c0>] default_wake_function+0x0/0x10

...

[ 1451.314123]   .jiffies                       : 114039

[ 1451.314124]   .next_balance                  : 0.114020

[ 1451.314126]   .curr->pid                     : 0

[ 1451.314127]   .clock                         : 247950.082330

[ 1451.314128]   .idle_clock                    : 0.000000

[ 1451.314140]   .prev_clock_raw                : 1451264.185399

[ 1451.314141]   .clock_warps                   : 0

[ 1451.314142]   .clock_overflows               : 92068

[ 1451.314143]   .clock_deep_idle_events        : 0

[ 1451.314145]   .clock_max_delta               : 9.999478

[ 1451.314146]   .cpu_load[0]                   : 0

[ 1451.314147]   .cpu_load[1]                   : 0

[ 1451.314148]   .cpu_load[2]                   : 0

[ 1451.314149]   .cpu_load[3]                   : 0

[ 1451.314140]   .cpu_load[4]                   : 0

[ 1451.314141]

[ 1451.314141] cfs_rq

[ 1451.314142]   .exec_clock                    : 0.000000

[ 1451.314143]   .MIN_vruntime                  : 0.000001

[ 1451.314145]   .min_vruntime                  : 9571.283382

[ 1451.314146]   .max_vruntime                  : 0.000001

[ 1451.314147]   .spread                        : 0.000000

[ 1451.314149]   .spread0                       : −3276.906118

[ 1451.314150]   .nr_running                    : 0

[ 1451.314151]   .load                          : 0

[ 1451.314152]   .nr_spread_over                : 0

[ 1451.314153]

[ 1451.314153] cfs_rq

[ 1451.314154]   .exec_clock                    : 0.000000

[ 1451.314156]   .MIN_vruntime                  : 0.000001

[ 1451.314157]   .min_vruntime                  : 9571.283382

[ 1451.314158]   .max_vruntime                  : 0.000001

[ 1451.314160]   .spread                        : 0.000000

[ 1451.314161]   .spread0                       : −3276.906118

[ 1451.314162]   .nr_running                    : 0

[ 1451.314163]   .load                          : 0

[ 1451.314164]   .nr_spread_over                : 0

[ 1451.314166]

[ 1451.314166] runnable tasks:

[ 1451.314167]             task   PID         tree-key  switches  prio

exec-runtime

        sum-exec        sum-sleep

[ 1451.314168] ----------------------------------------------------------------------

----------------------

[ 1451.314172]
The best thing to do with this stack trace is to have it reviewed by someone who specializes in this kind of troubleshooting. Doing it yourself requires extensive knowledge of the C programming language and goes far beyond the scope of this book. If you have purchased support with Canonical, send the stack trace to them for analysis. They will be able to find the offending process and tell you why it caused a system to hang.
Tip In many cases, system hangs are caused by tainted (unsupported) kernel modules. It is easy to find out whether your kernel is tainted: cat /proc/sys/kernel/tainted gives the value 1 if your kernel is tainted. Basically, all kernel modules that come from commercial organizations and do not fall under the GPL license are considered tainted modules. Try to avoid such modules as much as possible.
If you have an interruptible hang, consider yourself lucky. At least you can make a stack trace dump and send that to your support organization. If you have a hang and your server doesn't reply to anything anymore (noninterruptible), that is a much worse situation, because it is hard to get debugging information.
If your system experiences noninterruptible hangs often, you can force your kernel to generate an Oops (which is an error message that it generates when it stops) and dump its stack trace to STDOUT. To obtain this information, you need to pass the boot option nmi_watchdog to the kernel when booting the kernel with Grub. This will poll your CPU every 5 seconds. If the CPU responds, nothing happens. If it doesn't respond, the NMI handler kernel component generates an Oops and dumps information to STDOUT. To obtain this information, it is useful to connect a serial console to your server (you don't want to write down all this information manually, do you?).
Tip If a noninterruptible hang has never occurred but suddenly occurs after you've added a new piece of hardware, the new hardware likely is causing the hang. Try to configure your server without this piece of hardware to avoid the problems.
File System Problems
Normally, you won't encounter too many problems with your server's file systems. However, in some cases, if things do go wrong, you may end up with a damaged file system. In this section you'll learn how to still access a damaged Ext3 file system and how to repair a ReiserFS file system that has problems.
Accessing a Damaged Ext3 File System
If after an error you apparently can no longer access your Ext2 or Ext3 file system, you still might be able to access it. This section presents advanced mount options that allow you to access data that you might have considered lost.
In order to access a file system, you need the superblock, a 1 KB block that contains all metadata about the file system. This data is needed to mount the file system. It normally is the second 1 KB block on an Ext3 file system. Listing 14-14 shows part of the contents of the superblock as displayed with the debugfs utility.
Listing 14-14. A Superblock As Displayed with debugfs
Filesystem volume name:   <none>

Last mounted on:          <not available>

Filesystem UUID:          09979101-96e0-4533-a7f3-0a2db9b07a03

Filesystem magic number:  0xEF53

Filesystem revision #:    1 (dynamic)

Filesystem features: has_journal ext_attr filetype needs_recovery

sparse_super large_file

Default mount options:    (none)

Filesystem state:         clean

Errors behavior:          Continue

Filesystem OS type:       Linux

Inode count:              5248992

Block count:              10486428

Reserved block count:     524321

Free blocks:              3888202

Free inodes:              4825214

First block:              0

Block size:               4096

Fragment size:            4096

Blocks per group:         32768

Fragments per group:      32768

Inodes per group:         16352

Inode blocks per group:   511
Problems with your file system arise if, due to some error, the superblock isn't accessible anymore. Fortunately, some backup copies of the superblock are written on the Ext2 and Ext3 file systems by default. You can use these backup copies to mount a file system that you may have considered lost.
The actual position on disk of the first backup of the superblock depends on the size of the file system. On modern, large file systems, you will always find it at block 32768. To access it, you can use the mount option -o sb. The issue, however, is that mount expects you to specify the position of the superblock in 1024-byte blocks, whereas the default block size for a modern Ext3 volume or partition is 4096 bytes. Therefore, to tell the mount command where it can find the superblock, you have to multiply the position of the superblock by 4, which would result in the block value 141072 in most cases. For example, if your /dev/sda5 file system has a problem, you can try mounting it with the command mount -o sb=141072 /dev/hda5 /somewhere.
Now that you have mounted the problematic file system and thus limited the scope of the problem to the superblock, it is time to fix the problem. You can do so by copying the backup superblock to the location of the old superblock, using dd if=/dev/hda5 of=/dev/hda5 bs=1024 skip=141072 count=1 seek=1. Once finished, your file system should be accessible again just as it was before the problem occurred.
Repairing ReiserFS
The best and at the same time worst thing about ReiserFS is the database it uses to store files. The database makes ReiserFS a very fast file system that deals with lots of small files especially well, but when it breaks, it seriously breaks and you risk losing all your data. Fortunately, the Ubuntu Server version of reiserfsck does a decent job of repairing database problems.
At the moment the database seriously goes wrong and a normal fsck can't save you anymore, you need its power options. Before using them, you should always try reiserfsck --fix-fixable. This is a nondestructive option in which you don't risk losing your data. If that doesn't help, there are two advanced options. If you suspect that the problem is in the superblock, use reiserfsck --rebuild-sb. This option analyzes information in the file system and tries to rebuild the superblock. In some situations, just using this option is not enough, and you need to use reiserfsck --rebuild-tree after that. This option completely rebuilds the database tree based on information in the file system. Note, however, that this may seriously go wrong; I have started this option on a damaged file system that had thousands of files in hundreds of directories, only to end up with one large directory named /lost+found. If that happens to you, you really do need your backup tape, but anyway, it is worth a try.
Caution Before using reiserfsck --rebuild-tree, make sure that you have a decent backup of your file system.
Lost Administrator Password
To administer your server, you need administrative privileges. If you didn't change any defaults, the first user you created while installing the server has permissions to use the sudo command to perform administration tasks. (This isn't true for any of the subsequent users you created.) If you delete this user account by accident, you have a problem. In this section you'll learn how to fix it.
If you subsequently lose the password for the user account that can use the sudo command, just log in as root and grant this user a new password. If you can't log in as root, the following procedure explains how to log in as root using a rescue CD and then re-create a user that has administrative permissions on your server:
- Boot from a rescue CD as described in the section "Working with a Knoppix Rescue CD" earlier in this chapter. Make sure to mount the
/devand/procdirectories and establish achrootenvironment that points to your server's root directory. - You are now
rooton your server's file system. Use thepasswdcommand to reset the password for the userroot. You have reestablished access to therootaccount. - Reboot your server without the Knoppix CD and verify that you can log in as
root, using the password that you've just set. - Re-create an administrative user account that is not
root. If, for example, the name of this user account islinda, useuseradd -m linda. To be able to usesudoto execute commands asroot, you must make sure that this user account is a member of the groupadm. To make userlindaa member of the groupadm, useusermod -G adm linda. - Use
passwd lindato give the user you've just created a password. You have now reestablished a user account that can be used to perform administration tasks on your server.
Tip A good precautionary measure to take before you lose the administrator password it to give the user root a password (by default, this user doesn't have a password). Use sudo su to become root, and then use the passwd command to set a password for root. Use a complex password, but one that you will be sure to remember.
Summary
In this chapter you learned how to troubleshoot Ubuntu Server. You have read how to fix some common issues that may arise when working with Ubuntu Server. Of course, covering all possible problems in one chapter is impossible, but the knowledge that you have acquired from this chapter should help you to fix quite a few common problems.
This is the last chapter in this book. I certainly hope you have enjoyed it!