
Chapter 21: New Content Management Capabilities in SharePoint 2010
What’s In This Chapter?
- Using metadata for Enterprise Content Management
- Creating and configuring document sets
- Using the Document ID service for persistent links
- Automatic routing with the Content Organizer
This chapter covers the new document management capabilities in SharePoint 2010. Specifically, these new capabilities include the following:
- Managed metadata — This is the capability to centrally define taxonomies that can be leveraged within and across the SharePoint farm to categorize, navigate, and locate content quickly. This topic was covered in-depth in Chapter 16; this chapter focuses on how to establish the right metadata for the organization.
- Document sets — Documents can now be grouped together and treated as one asset. Document sets share the same metadata, and you can version the entire document set as a whole or version each document individually.
- Document IDs — Documents can be assigned a unique ID, which can be used to locate the document regardless of its physical location within the farm. This ID remains the same even when the document is moved manually or moved by an automated process. If a copy is made, the copy is assigned a new ID.
- Content Organizer and automatic routing — This very powerful feature provides the capability to automatically route content to a desired location based on its metadata and content type. When users submit content, it is routed to the proper library and/or folder based on a set of rules established by the site owner or administrator.
As in previous chapters, the focus here is to provide administrators with the necessary knowledge to understand, configure, and utilize the details of each of these new capabilities.
MOSS 2007 introduced the concept of content types to the SharePoint platform. A content type describes specific details about content, such as the properties or metadata that will be associated with the content. For example, a Word document could have been associated with the Change Request content type and therefore, by definition, have a predefined set of metadata called date, originator, approver, and so on. The metadata would remain with the document and surface as the names of the columns in the document library for this specific type of content. This provided a mechanism for associating metadata with content and for storing different types of content in a single document library. Because this was the first introduction of this capability to SharePoint, it did not have all the functionality necessary for enterprise adoption. Specifically, this capability was lacking as follows:
- It didn’t enable a standardized set of corporate approved content types and metadata to be deployed easily.
- It didn’t provide the capability to utilize hierarchies of metadata.
- It lacked an easy mechanism for navigating and filtering content based on content type or metadata.
- It didn’t provide an easy way to manage content types and metadata across the farm.
- It was difficult for end users to enter data.
- It did not provide an easy extensibility mechanism.
- It lacked the ability to use the terms as enterprise search filters.
Managing and utilizing metadata is essential to establishing enterprise taxonomy and the tagging of content. SharePoint 2010 addresses each of these gaps by introducing the Metadata Service and Enterprise Content Types.
SharePoint 2010 Metadata Service and Enterprise Content Types
The Metadata Service and Enterprise Content Types are central to providing the Enterprise Content Management (ECM) capability across the enterprise. ECM refers to capabilities and features that are utilized across numerous web sites or across all web sites in the company, as opposed to just a few sites. The creation and configuration of the Metadata Service and its use was covered extensively in Chapter 16. Enterprise Content Types (ECTs), which solve the problem of having to keep content types synchronized across site collections, refer to the same content type being used across site collections. Content type publishing, also covered in Chapter 16, provides the capability to reuse content types across the enterprise. Keep in mind that in the past you had to create a content type in one site collection and then duplicate the content type in another site collection (or use the feature framework to deploy). Then, you were responsible for updating all the instances when changes were made. The power of ECTs is that they enable you to define one site collection as the hub and then the Metadata Service periodically updates all other site collections with any changes.
You are encouraged to review Chapter 16 for a refresher because of its tremendous application to ECM.
Because several metadata-related words are used throughout this chapter, they are summarized in Table 21-1 for reference.
Table 21-1 SharePoint 2010 Vocabulary
| Name | Definition |
| Term | A word or phrase that is associated with content. A term can be a managed term or a managed keyword. Terms are also referred to as facets. |
| Term set | A collection of related terms that can be hierarchical. Terms and term sets are referred to as taxonomy. |
| Managed term | A term that is controlled and can only be created by those with appropriate permission |
| Keywords | Words defined by users to “tag” content. This is referred to by some as creating a folksonomy. |
| Managed keywords | Keywords kept in a non-hierarchical list |
A managed keyword can also be a managed term, which enables SharePoint 2010 to blend both taxonomy and folksonomy.
Establishing the “Right” Metadata
Now that you have the capability to utilize enterprise metadata, you must define the specific vocabulary you wish to use across the corporation. Even though many organizations appreciate the value of metadata, there is no general consensus about how it should be created, stored, and applied across the enterprise. Therefore, there is no one-size-fits-all approach to establishing and managing relevant metadata, but we can provide a few suggestions based on experience with numerous companies and their successful or not so successful use of metadata. The definition of metadata terms is not a technical exercise; you should have representation from several key business areas throughout your enterprise. SharePoint 2010 merely facilitates the technical implementation of a business definition of terms.
The benefits of establishing the right metadata can be summarized as follows:
- Uniformity and consistency of metadata and taxonomy across the organization improves the information’s value and makes the system more useful.
- Defining the business value for metadata use establishes the need for adoption.
- Documenting and understanding metadata use identifies gaps so that information can be located and utilized much more efficiently.
- Establishing metadata taxonomy provides an agreed upon approach to how content should be communicated and discussed.
Clearly, there is value in planning your metadata deployment, just as you would plan any other deployment. The intent here is to educate administrators about a few key concepts, as these are the people who will be involved in implementing and managing any enterprise system. They will definitely not have to design the system themselves, but rather work with a multi-functional team. The following steps should get them started:
- Perform a metadata audit — The first step is to define what you already have and are using, if anything. Along with the audit, you should document not only the terms being used, but also how they are being used, where they are being used, and the purpose of each. This includes defining which terms and content types should be standardized across the enterprise. Because metadata will be added, deleted, and changed, it is important to know where the metadata is being used and the applications that rely on it so that the effects of any change will be understood. You should also define who, if anyone, owns the metadata and how often it changes.
- Define how metadata is used — Once you establish an inventory of the metadata, the next step is to understand how metadata is being assigned. This includes how the people in the organization, the business processes, and the information systems assign metadata. Typically, numerous business processes are involved, and it is important not to get bogged down trying to specify everything; focus on the key processes. Your assessment should include who or what is applying metadata to the content, how it is being applied, and where in the process it occurs.
- Define where the metadata is stored — It’s likely that every system and application associated with content creation and possibly storage is storing some type of metadata. Metadata can be associated with the content or found within the content itself. As you can see, multiple systems, varying formats, and different storage mechanisms can result in a very complex metadata picture. It is essential that you understand where your existing metadata is located, but don’t get bogged down in the complexity and attempt to unify these systems to a single location. Your purpose here is to identify where it is, how it is applied, and its potential uses.
At this point, you should have a much better idea of where you are with regard to metadata use and you can begin to plan your way forward. Just as any SharePoint implementation is more apt to succeed with an executive sponsor, your implementation of managed metadata will have a greater chance of succeeding if you have an owner from the business overseeing and owning the definition of metadata terms. The more relevant the data is, the more value your users will find in using it. Remember, SharePoint 2010 merely facilitates the implementation of a business definition. As you proceed, here are a few questions that you will need to answer:
- What are the business needs that drive the use of the metadata system?
- Who are the key decision makers that need to agree to the metadata system?
- What industry standards can and should be used to simplify metadata creation and management?
- Who should take responsibility and ownership for the enterprise metadata system?
- How will the system be maintained and updated?
Table 21-2 provides key online references for establishing and implementing your enterprise metadata system.
Table 21-2 Metadata System Key References
| Topic | Reference |
| Planning Managed Metadata | http://technet.microsoft.com/en-us/library/ee530389(office.14).aspx |
| Managed Metadata Roles | http://technet.microsoft.com/en-us/library/ee424398(office.14).aspx |
| Planning Terms and Term Sets | http://technet.microsoft.com/en-us/library/ee519604(office.14).aspx |
| Planning to Import Managed Metadata | http://technet.microsoft.com/en-us/library/ee424393(office.14).aspx |
| Planning to Share Terminology and Content Types | http://technet.microsoft.com/en-us/library/ee519603(office.14).aspx |
SharePoint 2010 provides the capability to group documents together in sets that can be treated as one logical unit. A document set is a content type. Specifically, it’s a folder content type, which means that other items can attach to the document set, as you’ll see in the “Configuring Document Sets” section of this chapter. Just like other content types, the documents in the set can share metadata, workflows, and policies.
New to SharePoint 2010 is the welcome page. The welcome page of a document set is a customizable page that enables users to discover the content in the set, view and synchronize metadata between items in the set, and manage the set. Key functionality includes the following:
- Document sets utilize SharePoint 2010 content types, and they are enabled at the site collection level by feature activation. Similar to how content types were used in SharePoint 2007, they can be can be used as is, they can be customized and used as a standard template for enterprise-wide use, and they can be customized after they are added to a document library.
- Document sets can share the same metadata.
- Document sets can be versioned. This mechanism is independent of individual document versioning, and it does not replace versioning of individual documents in the set. Both versioning features can both be used simultaneously.
- Workflows can be associated with the group.
- Permissions can be defined for the group.
- New pages are provisioned for the document set. The welcome page is essentially a landing page that displays the contents of the set and its properties. This Web Part page can be used directly or it can be customized as needed.
Clearly, this type of capability has immediate use for things like sales proposals or Request for Proposal (RFP) documents, which are composites of multiple documents. Both of these examples typically require the creation of multiple documents, and document sets automate this process. The customizable landing page, or welcome page, provides users with guidance on how to use the document set and what is contained in the set. The capability to update metadata for all content within the set at one time is a huge advantage.
Configuring and Creating Document Sets
Before attempting to configure a document set, ensure that the Document Sets feature has been activated. Navigate to the Site Settings page for your site collection as shown in Figure 21-1 and click the link for Site Collection features beneath the Site Collection Administration heading.

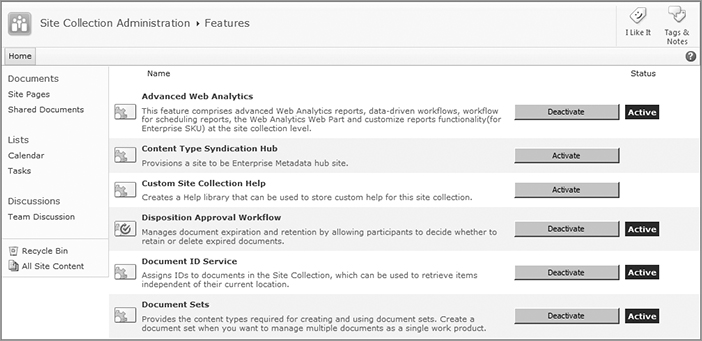
Scroll down the list of features until you see the Document Sets feature and activate the feature if it is not already activated, as shown in Figure 21-2. Once the feature has been activated, use the following steps to configure the specific document library to allow document sets:

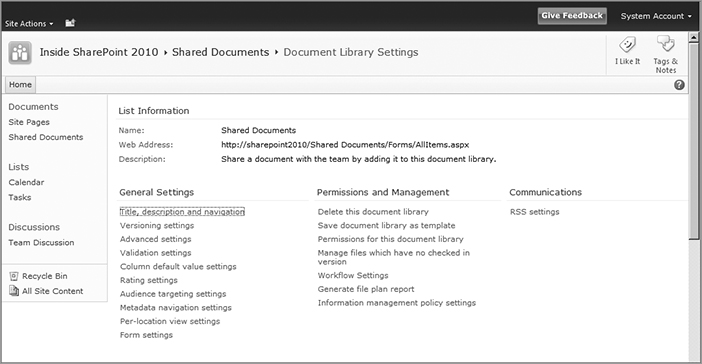
1. Navigate to the specific library of interest and select the Library tab that is part of Library Tools on the Ribbon. Click the Library Settings button on the far right of the ribbon to reveal the Document Library Settings page, as shown in Figure 21-3.
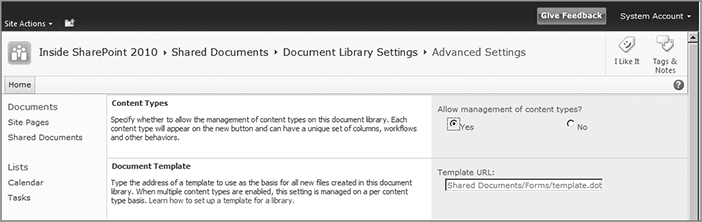
2. Under the General Setting category on the Document Library Settings page, click the Advanced settings link. Ensure that “Allow management of content types?” is set to Yes, as shown in Figure 21-4, and click OK.
3. You now need to add the Document Set content type to the library. From the Document Library Settings page, you will notice a new section called Content Types, as shown in Figure 21-5. Notice that the Document content type is the only content type defined in this library. This is the default content type. Click the “Add from existing site content types” link. This should take you to the Add Content Types page.

4. From the Add Content Types page, select the All Groups option in the “Select site content types from:” drop-down box. Choose Document Set from the list of Available Site Content Types: and click the Add > button as shown in Figure 21-6. Then click OK.

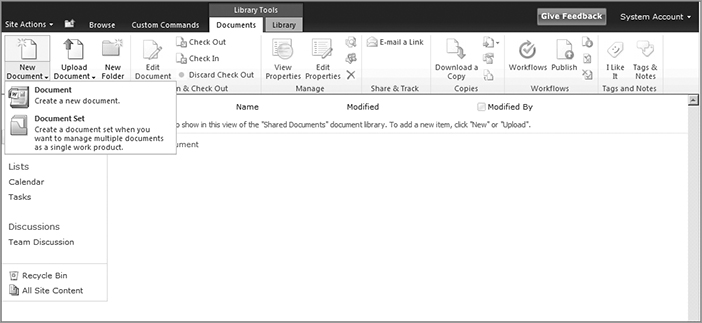
5. This completes the configuration and now it’s time to create a new document set. Click the New Document button from inside the configured library and you should see that the Document Set content type has been added to the list (see Figure 21-7).
You can change the order of the two different content types from the Library Settings page if necessary. This could be important if a large number of content types have been configured.
6. Click the Document Set option from the New Document menu. Enter a name and a description for the document set and then click the OK button as shown in Figure 21-8.

This will produce the document set’s welcome page, shown in Figure 21-9. Notice that a new group called Document Set has been added to the Ribbon, and this includes the Manage tab. Administrators should familiarize themselves with the options available on the Manage tab.

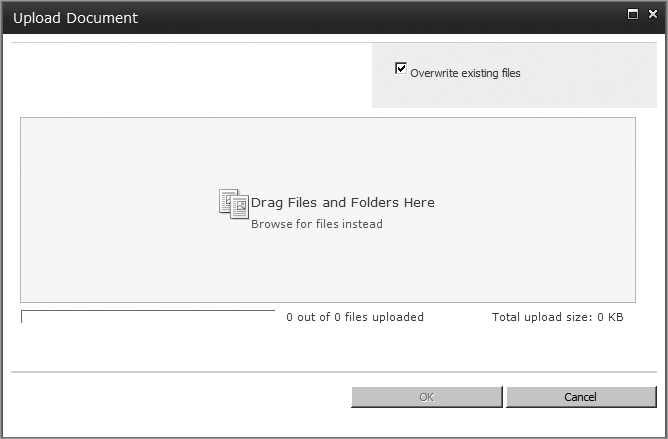
7. To upload multiple documents, select Upload Document from the Ribbon, and then select Upload Multiple Documents. The new Upload Document dialog is displayed, as shown in Figure 21-10. Documents and folders can be dragged directly onto the window or you can browse for the documents. Upload several documents to the document set. An example is shown in Figure 21-11. Notice that several options are available from the Manage tab. If the Capture Version and Version History buttons are disabled, you need to enable versioning for this document library.

Returning to the default library view, note that the document set is classified as a single object. Take some time to review the options available from the drop-down menu for the document set.
Customizing the Document Set
Document sets can be customized. There is a settings page that provides additional configuration options so let’s take a brief look. In general, a specific document set that is associated with a document library can be customized using the process described here. In addition, an enterprise document set could also be created. If so, it is best to create a custom Document Set content type that inherits from the base Document Set content type, and then perform the customization on the inherited content type. This keeps the out-of-the-box Document Set content type unmodified.
You can view the settings for a Document Set content type that has been associated with a library by clicking the Document Set link on the library settings page in the Content Types section, and then clicking the Document Set Settings link on the Document Set page. This will reveal the settings page shown in Figure 21-12. The figure shows only some of the available options; scroll down to review all of them. Table 21-3 describes the Document Set content type options.

Because the Document Set is a content type, you can in fact add additional content types to your document set. You can also predefine content that you would like included in the document set and it will be automatically added when new sets are created. Metadata columns can be shared across items in the set. If you add a new column to the document set itself, that column becomes available for sharing with the documents contained in the document set. The columns that are displayed on the document set home page can also be defined. Lastly, you can even edit the home page’s layout, design, and contents.
Table 21-3 Document Set Content Type Settings
| Option | Description |
| Allowed Content Types | Other existing content types can be added and removed from the Document Set content type. |
| Default Content | This allows the newly created document set to include specific items, content, documents, etc. Content can be selected by browsing directly to the files. |
| Shared Columns | A shared column is a column that is available for all documents in the set. Each of the columns in the content type can be shared, which means the column values will be automatically synchronized to all documents in the set. |
| Welcome Page Columns | This option defines which columns are displayed on the welcome page for the document set. |
| Welcome Page View | The specific view that is used to display the document set’s contents can be chosen with this option. |
| Welcome Page | This option enables the welcome page to be customized either directly in the browser or using SharePoint Designer 2010. |
The Document ID service is a new capability at the site collection level that adds a unique identifier to all documents throughout the site collection. This ID is used to locate and retrieve documents regardless of their current or future location.
In SharePoint 2007, links break if you rename or move a file. Therefore, one of the desired features that users of SharePoint 2007 asked for is persistent links. This is the capability to link directly to a unique object ID. Using this system, each document or individual piece of content, or content object, would have its own unique ID that doesn’t change regardless of where it is stored or moved in the repository. Persistent linking enables the management of compound documents, as discussed earlier in the section on document sets, and the capability to link directly to an older version of a document. In SharePoint 2010, document IDs provides absolute reference to objects regardless of file renames or content moves.
Document ID capability is activated and managed at the site collection level. This capability includes an ID value and the ID service. IDs can be used to retrieve items independent of their current location. The ID service supports this process by generating and assigning the IDs. Once the ID is assigned, a static URL can be used to locate the document based on its ID. Static URLs work correctly at the site collection level because the web browser manages the redirect before it invokes the specific Office client application. The ID service generates IDs for all documents in the site collection, but it does not generate IDs for other types of list items. IDs are generated every time a new document is created. The ID is retained during move operations and a new ID is created when a document is copied.
Configuring the Document ID Service
The Document ID capability is enabled and configured at the site collection level. This provides more granular control for implementing this functionality. The following instructions walk you through this configuration.
1. Activate the Document ID Service feature for the specific site collection of interest, as shown in Figure 21-13. Figure 21-13 shows the status of several different features. The Document ID Service feature is the fifth feature from the top, right beneath the Disposition Approval Workflow feature. Administrators can also activate this feature using the following PowerShell cmdlet (the -Url parameter needs to be changed to match the URL of your site collection):
Enable-SPFeature -Identity DocID -Url http://sharepoint2010
2. Once activated, a new link called Document ID Settings will appear in the Site Collection Administration group of the Site Settings page. Click this link to display the Document ID Settings page, shown in Figure 21-14.

The Assign Document IDs section section contains three different configuration options:
- The Assign Document IDs checkbox is enabled by default, which ensures that IDs are automatically assigned to all documents in the site collection.
- A randomly generated ID for each document will begin with the characters displayed in the textbox immediately below the checkbox. By default, this ID prefix is a set of numbers and letters that varies by site collection, which ensures uniqueness across the entire farm. Administrators can enter their own set of characters, but then they need to ensure that these represent a unique value.
- There is an option to reset all IDs in the site collection using the defined character string.
The second section, Document ID Lookup Search Scope, allows a specific search scope to be used to look up documents using their IDs. Searching for a specific document based on its ID is a key advantage of the ID.
One last thing to note is the text (shown in bright red on screen) which indicates that the ID feature is scheduled to be completed by an automated process. This indicates that there must be a timer job responsible for completing feature activation. Once this page has been configured, click the OK button.
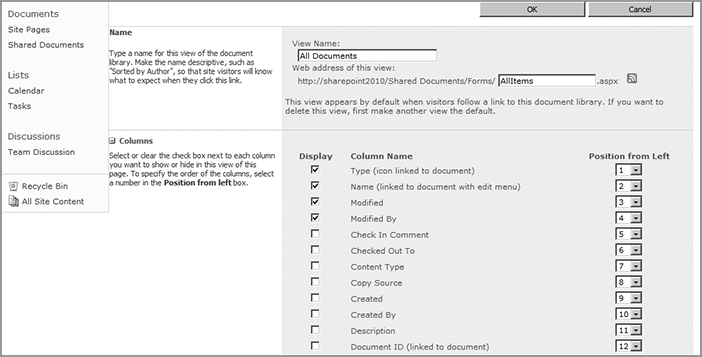
3. Ensure that the IDs are being assigned by uploading a document to a library in the site collection, as shown in Figure 21-15. Also open the default view of the document library to ensure that the Document ID field is available, as shown in Figure 21-16. In this case, the Document ID column is in position 12, but you can change the position by altering the Position from Left attribute.

If you used a Document Center template to create the site collection, the Document ID feature is enabled by default. If you manually activated the Document ID feature, then the feature is enabled by a daily timer job. You can manually run the timer job; it is called the Document ID enable/disable job. You can also run the Document ID assignment job to assign IDs to all of the documents in your site collection. New documents will be assigned a document ID immediately.
4. To ensure that the ID column is available and IDs have been assigned, you can manually execute the timer jobs that complete these processes. By default, these jobs execute once per day. From the Central Administration website, click the Check job status link in the Monitoring group. Then click the Scheduled Jobs link on the left-hand side of the page to reveal the Scheduled Jobs page. Scroll down the page until you locate the Document ID enable/disable job and the Document ID assignment job links, as shown in Figure 21-17. Click either one of the links to reveal the Edit Timer Job page, shown in Figure 21-18. For both jobs, you can configure when the timer job is executed and you can manually execute the job by clicking the Run Now button. Once completed, all documents should be assigned an ID, and the ID column should be available.


5. View the properties of any of the documents in the library and copy the shortcut for the Document ID value in the properties dialog. The URL should resemble the following:
http://sharepoint2010/_layouts/DocIdRedir.aspx?ID=635MQKZQ43RS-1-15
The general URL has the following format, with the specific ID of the document at the end of the string:
http://<sitecollectionurl>/<web>/_layouts/DocIdRedir.aspx?ID=635MQKZQ43RS-1-15
The preceding URL indicates that there is a new web page in the layouts directory called DocIdRedir.aspx; this is the document redirector page. This page accepts the ID as a parameter value in the query string. As is evident from the URL, there is no specific reference to the document’s actual location. You can use this link to provide others with a consistent link to your documents. Even if the document is moved to another folder in the same document library or to a different document library in the same site collection, the ID will still enable the document to be located.
6. Now that you’ve seen how the ID approach works, let’s deactivate the ID feature and see what is affected. Deactivating the Document ID Service feature removes the Document ID settings link from the Site Collection Settings page. The ID column is still visible in the document library. If you click the hyperlink in the ID column or click the hyperlink in the document properties window, you will receive the error shown in Figure 21-19. Deactivating the feature has disabled the redirector functionality and turned off the ID service, and IDs are no longer being assigned. Any document that has been assigned an ID will retain its ID. If and when the service is restarted, any document with an ID can once again be located.

7. Recall from Chapter 14 that you can define managed search columns, which then enable you to search directly on the values in these columns. Therefore, you can configure the search service to look up documents based on their IDs by adding the ID column as a managed search column. Refer to Chapter 14 to review how to create the managed column. You can also use the New-SPEnterpriseSearchMetadataManagedProperty PowerShell cmdlet to perform this function.
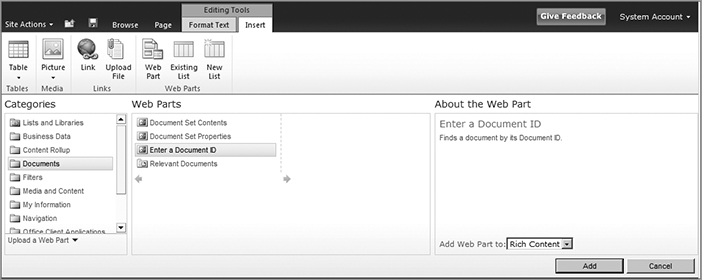
8. The last configuration option we will discuss is the Document ID Lookup Box Web Part, which is displayed in Figure 21-20. This Web Part enables you to enter an ID. It then constructs a static URL, looks up the item, and then opens the appropriate viewer or application.
Information routing, or content routing, is a very powerful capability. Those of you who are familiar with and use Outlook are very familiar with content routing. Outlook’s rule capability enables the automatic routing of different types of e-mail messages to different folders. This is extremely efficient for organizing and managing your Outlook Inbox. In SharePoint 2007, the Records Center site template has a routing engine that routes records to the proper location within the Records Center site collection. The Content Organizer feature in SharePoint 2010 is a new routing feature that extends, enhances, and makes more broadly available the routing engine used in the Records Center site template from SharePoint 2007.
The Content Organizer automatically routes documents that users upload to libraries and folders based on rules that are defined by site administrators. Document routing is based on content types and the metadata within those content types. The following list summarizes the Content Organizer features:
- The Content Organizer feature must first be activated to provide this capability. This feature is installed and visible at the site level by default, not the site collection level, but it is not activated. Once the feature has been activated, site administrators can configure both the organizer settings and the organizer rules. Organizer settings determine whether to route documents and rules determine where the documents are routed.
- Feature activation also creates a special document library called the Drop Off Library (DOL). This library acts as location where users can upload content, where content that needs to be routed is temporarily stored, and where content that needs to be routed but does not contain all the necessary metadata can be stored. For example, when users upload multiple documents at the same time, the documents are stored in the DOL until metadata is defined and the documents are checked-in.
- The organizer only routes documents that are based on the Document content type or are derived from the Document content type. Therefore, it cannot be used to automatically organize and manage lists.
- Documents can be automatically routed to different libraries, and folders within those libraries. This is accomplished without user intervention.
- It can be used to control the number of documents in a specific folder, and create a new folder when the document limit has been met. This is yet another way that SharePoint 2010 works to ensure that large lists (in this case, libraries) are appropriately managed as were discussed in Chapter 3.
- The user who uploads a new document is notified that the document has been routed and given the URL to the document’s location so that it can be found in the future.
Configuring the Content Organizer
Configuring the Content Organizer involves choosing options for both the organizer settings and the creation of rules. Because each of these has several different options, the configuration discussion is divided into two sections, one for settings and one for rules.
Organizer Settings
The first step in configuring the content organizer is to configure the settings.
1. You first need to activate the Content Organizer feature at the site level. The Manage site features link is located in the Site Actions section on the Site Settings page. Click the Activate button on the Site Features page to activate the organizer feature, as shown in Figure 21-21.

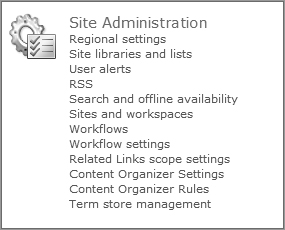
Feature activation adds two new menu items, or links, to the Site Administration section of your Site Settings page: Content Organizer Settings and Content Organizer Rules, as shown at the bottom of the list in Figure 21-22. The settings determine whether to route documents that are added to the site collection based on rules. Any changes made here affect routing for the entire site. Rules are used to route individual documents based on metadata attributes, which are configured by the site administrator.
Also added is the new Drop Off Library document library, described earlier. The link to the DOL should be added to the Documents sections on the left-hand navigation pane of the site. It is just a standard SharePoint document library with a timer job that processes outstanding items. This library is used for several different purposes. Essentially, this library is a temporary location for documents that will eventually be moved to the correct library or folder. Once their metadata have been filled out, files uploaded to this library are automatically moved according to rules created by the site owner or administrator. Users can upload their documents to this library when they are unsure where they go, and this library can be used as a staging area for documents that do not have all the required metadata. The document’s properties need to be edited and all required metadata filled out in order to have the routing rules applied.
If none of the rules apply, then the document remains in the DOL and the user who uploaded the document receives a message indicating that. In addition, the site owner is notified that a new rule may need to be created. Items that remain in the DOL generate e-mails to those individuals defined as rule managers in the Content Organizer settings page. Those e-mails are only sent, however, if the Content Organizer Settings page is properly configured — for example, the options to send e-mails when submissions do not match a rule, and/or send e-mails when content has been left in the DOL for three days have been enabled.
Because the DOL is a standard SharePoint document library, it has all the features available to a library. Therefore, the following features can be used with automatic document routing: SharePoint workflow and content approval, check in and check out, alerts, and permissions.
2. The next step is to configure the organizer’s settings. Several different options are available for configuring the organizer. This will be accomplished over the next several steps. Navigate to the Settings page and review the different options. This page is partially shown in Figure 21-23, and the options are summarized in Table 21-4 (which appears at the end of this section).
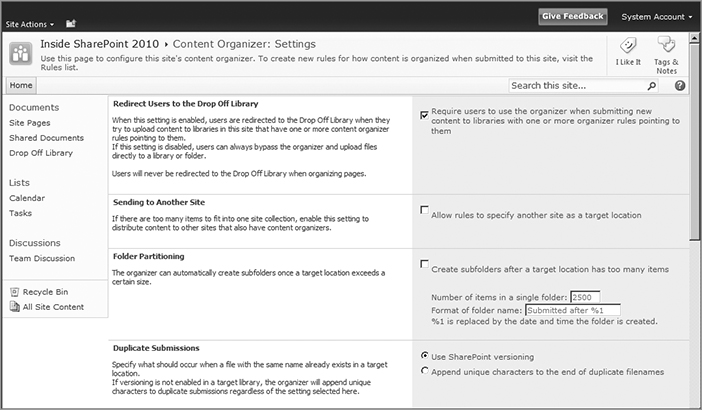
The Settings page contains configuration options that will affect document routing for the entire site. The Redirect Users to the Drop Off Library option is enabled by default. Leave this option enabled so that all users will be required to use the organizer for this site.
3. Enable the Allow rules to specify another site as a target location option. Doing so enables you to see what configuration needs to be done to support this option. You will see the benefit of this option when you configure the organizer’s rules in the next section. Navigate to the Central Administration home page, click the General Application Settings link, and then click the Configure send to connections link, which will reveal the page shown in Figure 21-24 (only the bottom half of the page is shown in the figure). Note that Send To connections are created and configured on a per-Web-application basis. We will focus on creating a new connection, so review the Connection Settings section. Enter the title Test into the Display name textbox. For the Send To URL value, you need to configure another site for organizer use, as shown previously. Once you have done this, the URL you will need is shown at the bottom of the Settings page in the Submission Points section. Copy this value to the Send To URL textbox and click the option Click here to test to ensure you have copied a URL that is an accessible location. Note the format of this URL, and that the reference is calling a Web service:
http://sharepoint2010/_vti_bin/OfficialFile.asmx

The general format of this URL is shown below. You will not be allowed to add a URL to a site in which the organizer feature has not been activated:
http://server/site/_vti_bin/OfficialFile.asmx
Select the Move option for the Send To action. Once complete, click the Add Connection button, which will add the Test connection to the Send To Connections textbox on the same page. Select Test and click the OK button at the bottom of the page. You will then be returned to the Settings page.
4. From the Settings page, enable Folder Partitioning by selecting the checkbox. Set the number of items in a single folder to a value of 1. This option enables administrators to manage libraries with a large number of items. For SharePoint 2007, it was recommended to limit the number of items in a single container or view to fewer than 2,000. This was managed through the use of folders, but it had to be implemented manually. The Content Organizer in SharePoint 2010 can automate this process. In SharePoint 2010, the recommendation is to limit a container or view to fewer than 5,000 items. Farm administrators can use the organizer and list throttling to help manage this on a per-Web-application basis.
5. For the Duplicate Submissions section, leave the Use SharePoint versioning option enabled.
6. Enable the option for Preserving Context. This option is especially important when using Records Center websites so that you retain all of the historical information about an item. When retained, you can click Compliance Details from the View Properties page of an item to review this information.
7. Keep the remaining options with their default configuration settings, and click the OK button at the bottom of the page to save the options configured for the organizer. This completes the configuration.
Table 21-4 reviews the Content Organizer settings.
Table 21-4 Content Organizer Settings
| Option | Description |
| Redirect Users to the Drop Off Library | This option requires users to use the Content Organizer. If this option is enabled, then all document uploads are automatically placed in the DOL regardless of which library the user initially chose in the site for their upload. If this option is not checked, documents can still be routed but users have to upload their documents directly to the DOL. Once uploaded, they will be routed according to the organizer’s rules. |
| Sending to Another Site | This option allows rules to be created that will route documents in the current site to another site that also has the Content Organizer feature enabled. Rules utilize a Send To connection, which is configured in Central Administration, so the site owner may need to work with a farm administrator to complete this process. |
| Folder Partitioning | This option enables the Content Organizer to automatically create subfolders once the target location exceeds a pre-defined size. Site owners can provide two additional parameters: the maximum number of items per container before a new one is created, and the format of the folder name that will be automatically created. |
| Duplicate Submissions | This option controls what the Content Organizer does when a submitted item has the same name as a document already in the destination library. Administrators can either use SharePoint versioning or append unique characters to the end of duplicate filenames. |
| Preserving Context | This option ensures that the original audit logs and properties of the document are retained after the item is routed. |
| Rule Managers | Users who will create, edit, and manage rules need to be added here. These users also need the Manage Web Site permission in order to modify rules. You can also configure whether to e-mail the rule managers either when content has been added to the DOL and not moved out of it, or when an item was moved there during upload but an applicable routing rule was not found to apply to it. In that case, after it sits in the DOL for three days, an e-mail will be sent to all rule managers informing them that items are still in the DOL. |
| Submission Points | The URL provided is used for configuring Send To connections so that other sites can send documents or e-mail to this site. |
Organizer Rules
The final step in configuring the content organizer is to define the rules used by the organizer to route the content.
1. Click the Content Organizer Rules link on the Site Settings page to display the Content Organizer Rules: Group by Content Type page. This page is a standard SharePoint list that uses the custom Rule content type. Notice that the Group by Content Type heading is actually a drop-down list containing several options for displaying the items in the list, as shown in Figure 21-25. The items in this drop-down menu represent different views of the list. The Group by Content Type view is the default view because content types are the primary criteria upon which rules are based. There is an All Items view, and a Group by Target Library view, plus several other items for modifying, configuring, and creating a new view.

Each rule contains all of the criteria used to determine where new items should be routed. Rules provide a wide array of configuration options to ensure that you can develop a routing plan for almost any situation. A summary of the options available for creating rules are shown in Table 21-5 at the end of this section.
2. Now it’s time to create a new rule. Click the Add new item link or the New Item button in the Ribbon to reveal the Content Organizer Rules: New Rule dialog, shown in Figure 21-26. Only a portion of the New Rule web page is shown in the figure.
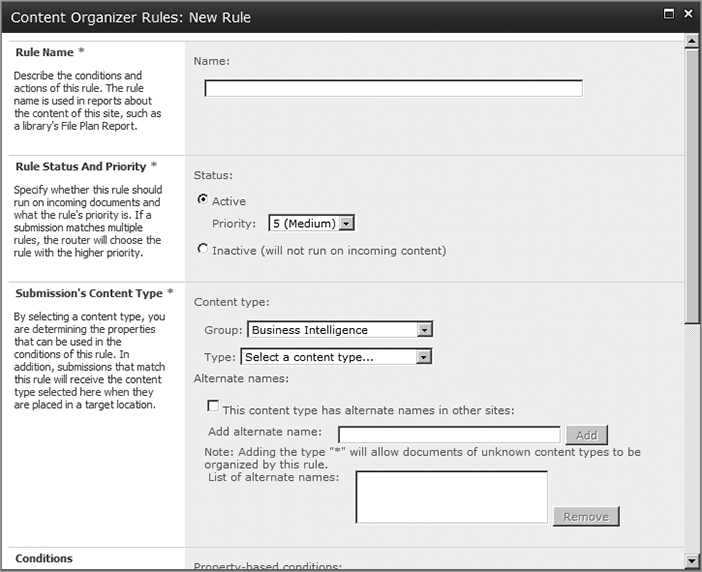
3. Assign a name to the rule, such as “My First Rule” or similar. In general, you should adopt a naming convention that describes the function of the rule so that its function can be distinguished from other rules, since multiple rules will usually be present. Leave the status and priority at their default values of Active and 5.
4. You need to make a few choices in the Submission’s Content Type section, where you make selections in two drop-down lists. First, for the group content type, choose Document Content Types or any other group you prefer. The Group drop-down list contains the content type group names that are being used in the site collection and the current site. Once you pick a group name, the values in the Type drop-down list are filtered to show only those content types that are part of the selected group. Routing in the Content Organizer feature works only for Document content types or content types that inherit from the Document content type. If a group doesn’t contain any content types that inherit from Document, then it won’t be included in the Group drop-down list. As you might expect then, if a content type is not Document or inherit from Document, it will not show up in the Type drop-down list. Choose the Document content type for the Type value. You can also use content type aliases, as used in Record Center sites in SharePoint 2007. Aliases are alternative names for content types that may exist in other sites. These can be also be configured in this section.
5. The two remaining sections on the New Rule page are Conditions and Target Location. These sections are not shown in Figure 21-26 so you will have to browse to the New Rule web page and scroll to the bottom of the page to view these sections. You can specify up to six different conditions in the Conditions section. This is a very powerful option that governs whether a submitted document matches the rule and will be routed according to the rule’s target location. The Property drop-down list contains all of the properties associated with the content type selected previously in the Content Type section. To create a new property-based filter, you select the property on which you want to filter. Use the Operator drop-down list to define how you want to interpret the property value when evaluating an incoming document. You can choose from is equal to, is not equal to, is greater than, is less than, is greater than or equal to, is less than or equal to, begins with, does not begin with, ends with, does not end with, contains, and does not contain. For this example, choose the begins with operator. The Value box lets you type in the value you want to compare against when the rule is processed. Enter a value of Sales into the Value box.
6. The final section is the Target Location. This option defines where a document will be routed once it meets the rule conditions. Note the first radio button in the section, Another content organizer in a different site, and the value appearing in the drop-down window. If you followed along in the previous Organizer Settings section and configured a test Send To connection, and enabled the Sending to Another Site option, then it will show up in this list; otherwise, this list will be empty. It is this option that enables you to route documents to other sites. Otherwise, if you want to route the document within the site, choose the radio button “A library or folder in this site:” and click the Browse button. This will open a built-in picker-type dialog from which you can select from a list of document libraries in the current site. For this exercise, choose another document library you have created previously, such as Enterprise Content.
After you’ve made your selection it is plugged into the Edit box in a URL format that is relative to the specific site collection. For example, if you are in the top-level site and you are routing to a library called Enterprise Content, the value in the Edit box would be /Enterprise Content. You can also choose to have folders created automatically for items based on one of the properties of the content type. To do so, enable the “Automatically create a folder for each unique value of a property:” checkbox. It also has a drop-down list of properties associated with the content type. However, unlike the drop-down list used in the property-based filters above, this drop-down contains only properties required by your content type. This prevents adding folders that have no values for a property. You can also specify a format for the folder name. By default, it is “%1 — %2”, where %1 is replaced with the name of the property, and %2 is replaced with the value of the property. There is no need to make any other additions to the rule for our testing purposes, so this completes the rule configuration. At this point, click OK, and the new rule is added as shown in Figure 21-27. Whenever a new rule is created, the Content Organizer checks whether that specific content type has been added to the DOL. If it hasn’t, then the content type is added to the library so that when the edit form is displayed after an item has been uploaded, users can select any one of the content types used in the routing rules.

7. Add a second rule called “My Second Rule” or similar and configure the Group and Type content types to be Document Set Content Types and Document Set, respectively. Configure the condition to use the Name property, the ends with operator, and a value of “IT.” Route all documents to a different library called Enterprise Document Sets. If your target library does not have the content type specifically chosen in the rule, you will receive the message shown in Figure 21-28 and the new rule will not be saved. Therefore, you need to add this content type to the Enterprise Document Sets library and then re-create the rule. Once you have successfully created the rule, confirm that the Document Set content type has been automatically added to the DOL Content Type list.

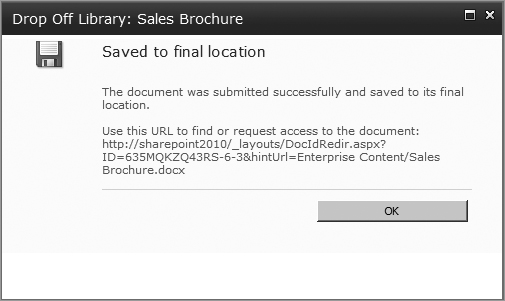
8. To test the functionality, upload a Word document called Sales Brochure to the Enterprise Content library. You will see the dialog shown in Figure 21-29. Choose the Document content type and click the Submit button. The dialog shown in Figure 21-30 will appear. This dialog informs the submitter that the uploaded document has been saved to its final location and provides a URL for the location. Confirm that it was successfully routed to the Enterprise Content library.

9. Upload a Word document titled Sales Business Rules to the Enterprise Document Sets library, and configure Document as the content type. Confirm that the document was routed to the Enterprise Content library; but notice that the confirmation dialog indicates that a folder was created, as shown by the link in Figure 21-31. You can confirm this by navigating to the Enterprise Content library, as shown in Figure 21-32. The folder appears exactly as you configured it in the Organizer Settings earlier.


10. You can confirm that an uploaded document of content type Document Set was routed to the Enterprise Document Sets library. This completes the configuration and testing of the Content Organizer routing capability.
Table 21-5 summarizes the options for creating new rules.
Table 21-5 New Rule Configuration Options
| Option | Description |
| Rule Name | The name of the rule. When creating the name, keep in mind that the rule name is used in reports, so make the name as descriptive as possible. |
| Rule Status and Priority | The status of a rule is either active or inactive. If active, you can choose a priority for the rule, from 1 (highest priority) to 9 (lowest priority); an active status with a priority of 5 is the default. If more than one rule matches the criteria for a document, the rule with the highest priority is applied. |
| Submission’s Content Type | The site owner or administrator must choose a content type, which will determine which properties (metadata) can be used in the rule’s conditions. Uploaded documents that match this rule will be assigned this content type when they are routed to the target location. |
| Conditions | This defines the conditions for matching the rule. An uploaded document’s properties must match all of the specified property conditions. A maximum of six conditions can be specified. |
| Target Location | This specifies the location where submitted content will be redirected once the conditions of the rule have been satisfied. |
This chapter introduced several new content management features of SharePoint 2010, including managed metadata, document sets, document IDs and the Content Organizer. The focus has been on understanding each of these tools, the different options available for each tool, and how to configure them. These features have broad-scale application to a large number of uses for SharePoint websites, so administrators should take the time to understand them thoroughly.