
Chapter 5
Connecting LinkedIn and SharePoint Profile Data
What's In This Chapter?
- Understanding the SharePoint social computing platform
- Understanding the LinkedIn social networking programming model
- Using JavaScript and Silverlight to connect LinkedIn and SharePoint profile data
SharePoint provides a rich social computing platform for users to share and collaborate on information. Users accustomed to working with social technologies on the Web expect to use those same techniques and technologies in the enterprise as well, and SharePoint provides support for many of these features. For example, social sites such as Facebook and LinkedIn include a personal dashboard page that enables users to see everything about their social worlds in one place. SharePoint includes a comparable social dashboard, called the My Site.
The key concept of social computing is the notion of a profile. Your profile is a collection of data about you — your likes, hobbies, pets, skills, and so on. Sharing this information and making connections with your friends (or colleagues, as they are called in SharePoint) is at the heart of the social movement. While it is fun to keep track of your friends and family on Facebook, collaborating on this same type of information in your enterprise becomes critical for teams to work together; and collaborating with external colleagues and professionals on LinkedIn can be critical to your professional career.
In this chapter you will learn how to program against some of the social features in SharePoint and LinkedIn and how you can bring together information from both platforms onto your SharePoint site.
Overview of SharePoint Social Computing
SharePoint pulls together in one platform social features that will be familiar to users in your enterprise. This section looks at some of those features, such as My Site, user profiles, tagging, and blogging. Although SharePoint has an opportunity to improve any individual feature, the real power lies in the fact that you have one consistent platform to install, program, learn, and use.
My Site
My Site is SharePoint's social dashboard. It enables you to discover information about your colleagues. It is also your own personal portal space where you can share documents, blogs, wikis, and almost any other SharePoint list or library type. By default, your My Site has a Shared Documents library that enables you to share documents publicly with everyone in your enterprise. It also contains a Private Documents library, which you can use to store personal documents that are visible only to you. As in other SharePoint sites, you can control the permissions to any of these lists and libraries to grant or deny permissions to the resource. Figure 5.1 shows the My Site for Dan Jump, the CEO of Contoso.

A SharePoint My Site is a site collection. By default, you are the site collection administrator of your My Site, which means you can create any artifacts that you could in any regular site collection, such as lists and libraries. You can edit the pages of your My Site, adding and removing web parts and pages. You can also turn features on and off and create any number of subsites. Finally, because you are the site collection administrator, you can upload and run sandboxed solutions on your My Site.
SharePoint Profiles
Profiles are the foundation of all social networking. Your profile contains all the metadata about you — for example, your name, work phone, department, title, and profile picture. You can also enter a description about yourself and list other hobbies, skills, or work-related projects. This information is the key to collaborating and finding others within your organization. Suppose you are looking for someone who is a subject matter expert on expense reporting or who has worked on the expense application. If everyone maintains updated profile information or the information is synchronized for external systems, finding the right expert in your organization is easy to do using SharePoint. Figure 5.2 shows Dan's profile information in edit mode.

Often your company is already collecting profile information about you in other systems, such as Active Directory and back-end human resources systems. SharePoint enables this information to be synchronized with the SharePoint profile using the User Profile Synchronization service. In many cases this information is synchronized in both directions so that updates you make to your profile on your My Site flow back to your Active Directory profile.
![]() To learn more about SharePoint 2010 user profile synchronization, visit http://technet.microsoft.com/en-us/library/ee721049.aspx.
To learn more about SharePoint 2010 user profile synchronization, visit http://technet.microsoft.com/en-us/library/ee721049.aspx.
Adding Custom User Profile Properties
SharePoint includes dozens of properties out of the box, and you can enable others and add your own custom properties as well. To add additional properties, perform the following steps:
1. Open the Central Administration website and select Manage Service Applications under the Application Management section.
2. Select the User Profile Service Application and then click Manage from the ribbon.
The User Profile Service management page, as shown in Figure 5.3, enables you to manage all aspects of the SharePoint profiles. You can also see statistics about the number of profiles in use.
3. Under the People group, click Manage User Properties to open the property management page (see Figure 5.4).
This page lists all the properties and the order and grouping that they will appear in on the My Site page. You can add a custom property by clicking the New Property link at the top of the page. While it is beyond the scope of this chapter to go into all the details about how to manage, sync, and add properties, you should explore this area on your own.

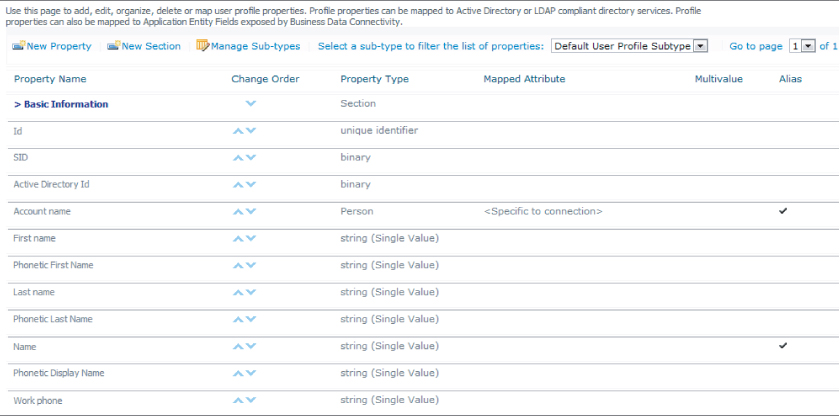
Adding custom properties is a good way to directly map properties from another profile provider (such as Facebook or, as you will see in this chapter, LinkedIn) directly to a property in your SharePoint My Site. For example, a LinkedIn profile contains a property called Patents, which is where you list all the patents you hold. A SharePoint profile does not contain a patents field or a similar field onto which you could map the value, but you could add a custom field called Patents to hold this information.
Social Tagging and Notes
Another key aspect to social computing is the capability to tag and comment on what others are doing. Tagging documents enables users to find and categorize information faster by searching or browsing by the tags. SharePoint provides the capability to add social tags to almost any item in SharePoint, including documents and pages. You can also attach comments or notes to any item. SharePoint also supports a specific type of tagging called rating. You can assign rating values to documents so that the search engine can weight the documents in the search results as higher or lower based on the rating score.
On your My Site, all the tags that you have used are organized into a tag cloud. A tag cloud displays tags and sizes them based on frequency of use. The more you use a tag value, the larger the font will be. This helps you quickly pick out the most commonly used and, presumably, important tags. Figure 5.5 shows Dan's tag cloud.
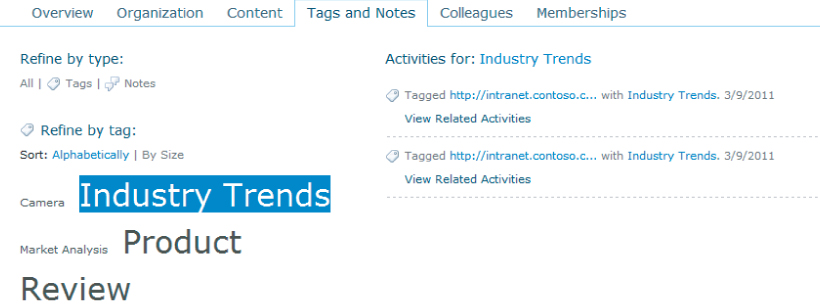
Social tagging, just like profile data, increases the chances of users finding the documents and people they are looking for. Users of the information can help shape the search results, pushing the right content, as determined by the expertise of many users, to the top.
Activity Feeds
SharePoint automatically tracks some of your actions — such as tagging, rating, adding notes, and updating your profile — and aggregates this information into an activity feed. Others can view your activity feed, and you can view the feeds of others. This enables colleagues to follow what each other is doing and which documents they think are important. You can also extend the type of activities that are captured using custom code, an advanced topic beyond the scope of this chapter. If you are interested in more details, there is a good sample at http://code.msdn.microsoft.com/activityfeedsconsole. Figure 5.6 shows a number of Dan's activities.

Blogs
Blogs were one of the first tools for socializing on the Internet. SharePoint 2010 also supports blogging, and users can create a blog for their My Site as well. Typically, blogs are written by one author and displayed in the order they were posted. This makes it easy to browse the blog entries in order. Many people use blogs to write short articles or posts that explain how to do a particular task or process. SharePoint makes it as easy to create a blog post as it is to create a Word document: simply use the ribbon to format the text and insert diagrams and photos. SharePoint blogs are also syndicated in an RSS feed, making it easy for users to follow your posts in Outlook or another feed reader. Figure 5.7 shows the default blog page created by SharePoint.

Blogging and wikis, described in the next section, go hand in hand as tools that enable users to quickly and easily participate in the organization's knowledge base. The goal of social computing in the enterprise is to reduce the barriers to users sharing information.
Wikis
Many of the pages in a SharePoint site are based on the wiki model. Wikis enable many users to edit the content of a page. User changes are automatically tracked by the system. The premise of the wiki model is that the transparency of the editors helps to police the system, ensuring that users make changes responsibly. Each user is empowered to update the information and easily create new pages on-the-fly, although changes can be rolled back or denied by the page owner. Wikis are very organic and grow based on what users determine to be the best structure for the information. A wiki is a good vehicle for collecting and sharing knowledge within the company. They often are used to document fast-changing status updates or processes. The sample wiki page in Figure 5.8 shows that wiki page editing is just rich text editing.

Traditionally, wikis have their own markup syntax; however, SharePoint can hide this from average users by providing a rich text editing experience using the ribbon. If you are a wiki power user, however, you can use standard wiki markup tags that you may have used on other wiki platforms.
Understanding the LinkedIn Social Networking Programming Model
LinkedIn is a social networking site for professionals. It provides a place to collaborate and exchange ideas with other professionals who share common interests with you. Although both LinkedIn and Facebook are centered on user profile data, Facebook traditionally focused on friends and family, whereas LinkedIn focused on professionals and building working relationships. Over the past few years, however, the lines have blurred between friends and colleagues, between fun and work. Both platforms have followed this trend, increasingly pushing into each other's space.
![]() Everything you learn in this chapter could equally apply to SharePoint and Facebook, but this chapter focuses on SharePoint and LinkedIn. At first glance, this appears to be a more natural fit, as LinkedIn is providing many of the same features outside the firewall as SharePoint is inside the firewall.
Everything you learn in this chapter could equally apply to SharePoint and Facebook, but this chapter focuses on SharePoint and LinkedIn. At first glance, this appears to be a more natural fit, as LinkedIn is providing many of the same features outside the firewall as SharePoint is inside the firewall.
Developers can use two APIs to create applications against LinkedIn data. The first place to start is the LinkedIn Developer Network, at http://developer.linkedin.com. The first API is a traditional REST-based API using OAUTH 1.0. The REST API is complete and covers all the exposed data and functionality of LinkedIn. A newer API is a JavaScript-based API (JSAPI) using OAUTH 2.0. The JSAPI is much easier to use and get started with, but it does not contain all the functionality that you may need. However, the JSAPI provides a number of ways for you to break out and call all the functions in the REST API. In an interesting twist, you will also learn how to leverage Silverlight, creating a Silverlight web part that calls functions in the JSAPI. This mixing of the three technologies is very easy to do, and it leverages the best features of each one.
LinkedIn Profiles
Like SharePoint, LinkedIn is centered on a user's profile. LinkedIn is all about who you are, who you know, and what you share. LinkedIn also has a dashboard-like home page similar to SharePoint's My Site. This page enables you to see information about what is going on in your network of friends. You can also see and manage all your profile properties from the Profile tab. Figure 5.9 shows the View Profile tab of Dan's Profile page, which includes his photo and recent status updates. Like SharePoint profiles, status updates in LinkedIn are considered micro-blogs, similar to Twitter. You can enter a brief message about your current status or anything else you want to blast out to all your friends.

Creating a LinkedIn Silverlight Web Part
One way to expose LinkedIn profile data in SharePoint is by using a Silverlight web part. Although it's possible to use OAUTH from Silverlight to interact with LinkedIn directly, doing so requires a good understanding of OAUTH. Instead, in this section you are going to leverage the JavaScript version of the LinkedIn API (JSAPI) and the HTML bridge functionality of Silverlight. This avoids needing to understand and program OAUTH, as the JSAPI handles all these details.
You will use the Silverlight Web Part VSIX project from the Visual Studio Gallery. Visit http://bit.ly/SLWebPartVSIX to see details about installing and using this Visual Studio extension. After you have it installed, you will create a custom Silverlight web part. This web part will enable you to put the JSAPI into the web part in addition to the Silverlight control.
1. Start by creating an empty Silverlight application and then add an empty SharePoint project to the solution.
2. Wire the Silverlight and SharePoint projects together by adding the Silverlight Custom Web Part project item template to the SharePoint project.
3. Because you are working with profile information, it would be nice to see this web part appear on your My Site. Update the Site URL property of the SharePoint project to point to your My Site.
In this example, I am playing the role of Dan Jump, the CEO of Contoso, so the Site URL would be http://intranet.contoso.com/my/personal/danj/. I also created a test page, SPLinkedInProfileApp.aspx, to host the LinkedIn web part; and to make development easier, I set the Debug Start Action to http://intranet.contoso.com/my/personal/danj/SitePages/SPLinkedInProfileAppWebPartPage.aspx from the SharePoint project's property pages.
4. Press F5 in Visual Studio to launch the page.
At this point you have an empty Silverlight web part hosted on your My Site. Now let's look at how to add the JSAPI and authenticate against LinkedIn.
Authenticating in LinkedIn
Authenticating against LinkedIn is very easy to do using the JSAPI. First, you need to register your application in LinkedIn, at https://www.linkedin.com/secure/developer, in order to generate the application API key and secret key. Once you have the keys, simply add the JSAPI script tag to your Silverlight Custom web part page. This page is an .ascx page that already contains the Silverlight object tag. Add the following script tag to the bottom of the page after the Silverlight control:

<script
    type="text/javascript"
    src="http://platform.linkedin.com/in.js">
    api_key: c148iSP2NUaMtY4fujGSzGfUyDxwZiVEf16QtekI9JoErc0g98fczpIAEYYbxxSb
    onLoad: onLinkedInLoad
    authorize: true
</script>
code snippet 076576 Ch05_Code.zip/SPLinkedIn.ascx
At runtime this will download the in.js file from the LinkedIn server and call the onLinkedInLoad function when the user is authenticated. If the user has already been authenticated, this function is called directly after the script is loaded. Conversely, if this is the first time the user has accessed the page, he or she will need to authenticate. The JSAPI looks for a special div tag placed on the page. The LinkedIn login button will be inserted into this div tag. Add the following div tag someplace on the page. Place it wherever you want the login button to appear. In this case, it is placed above the Silverlight control.
<!-- LinkedIn Login Button -->
<script type="IN/Login"></script>
code snippet 076576 Ch05_Code.zip/SPLinkedIn.ascx
Press F5 to run the page. You will see the LinkedIn login button appear just above the Silverlight control, as shown in Figure 5.10.
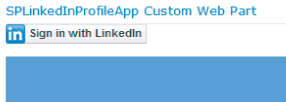
Clicking the login button will open a browser window for you to authenticate against LinkedIn and grant the application permission to access your account information. Figure 5.11 shows the LinkedIn authentication page.

After you authenticate, the authentication cookies will be stored in your browser and the OnLinkedInLoaded function will be called. On subsequent visits to the page, you will not see the login button, as the authentication cookies will automatically log you in and call the OnLinkedInLoaded function.
That's it. The JSAPI handles all the details of OAUTH, making the whole process very easy. One last thing to add to the page, to help with building JavaScript applications in general, is a reference to JQuery and any other script libraries that you typically use. Add the following script tags to the page to load the JQuery and JQuery UI libraries:
<script
    type="text/javascript"
    src="http://ajax.aspnetcdn.com/ajax/jQuery/jquery-1.6.1.js">
</script>
<script
    type="text/javascript"
    src="http://ajax.aspnetcdn.com/ajax/jquery.ui/1.8.14/jquery-ui.js">
</script>
code snippet 076576 Ch05_Code.zip/SPLinkedIn.ascx
After you have successfully authenticated, you have access to the JavaScript variable called IN. The IN variable is the entry point to the JSAPI.
Reading LinkedIn Profile Properties
After authenticating, you can retrieve the LinkedIn profile properties and pass them to Silverlight. Add the following XAML code to the Silverlight control to display the properties. You can copy the logo from the LinkedIn site and add to the Visual Studio project in the images folder to display the LinkedIn logo. It will then display the user's name, title, and profile picture.
    <Grid
        x:Name="LayoutRoot"
        Background="CornflowerBlue"
        Height="480" Width="640">
        <!-- LinkedIn Profile Properties-->
        <Image
            Source="images/LinkedIn_Logo60px.png"
            Margin="8,8,0,0"
            Stretch="Fill"
            HorizontalAlignment="Left"
            VerticalAlignment="Top"
            Height="50"
            Width="60"/>
        <sdk:Label
            Name="FullName"
            Margin="89,72,0,0"
            HorizontalAlignment="Left"
            VerticalAlignment="Top"
            FontSize="29.333"
            Width="388" />
        <Image
            Name="ProfilePicture"
            Margin="8,72,0,0"
            HorizontalAlignment="Left"
            VerticalAlignment="Top"
            Height="75"
            Width="75"/>
        <sdk:Label
            Name="Title"
            Margin="89,104,0,0"
            HorizontalAlignment="Left"
            VerticalAlignment="Top"
            FontSize="16"
            Width="388" />
    </Grid>
code snippet 076576 Ch05_Code.zip/ MainPage.xaml
You will need to create a function in Silverlight to be called from JavaScript once the call returns from LinkedIn. In the Silverlight code-behind file, MainPage.xaml.cs, add the following code. The key point here is adding the ScriptableMember attribute to the function. This is what makes this function callable from JavaScript. Also, be sure that its visibility is set to public.
        [ScriptableMemberAttribute]
        public void LoadProfile(string id,
                                string firstName,
                                string lastName,
                                string pictureUrl,
                                string headline)
        {
            FullName.Content = firstName + " " + lastName;
            Title.Content = headline;

            //Get the profile image
            BitmapImage image = new BitmapImage();
            image.UriSource = new Uri(pictureUrl);

            ProfilePicture.Source = image;
        }
code snippet 076576 Ch05_Code.zip/ MainPage.xaml.cs
The previous example passes each value from JavaScript to the function in Silverlight. It is also possible to pass the full profile object without parsing out the values first. Here is what the function would look like:
        [ScriptableMember]
        public void LoadProfile(ScriptObject profile)
        {
            string id = (string)profile.GetProperty("id");

            FullName.Content =
                (string)profile.GetProperty("firstName") +
                " " +
                (string)profile.GetProperty("lastName");

            Title.Content =
                (string)profile.GetProperty("headline");

            //Get the profile image
            BitmapImage image = new BitmapImage();
            image.UriSource =
                new Uri((string)profile.GetProperty("pictureUrl"));

            ProfilePicture.Source = image;
        }
code snippet 076576 Ch05_Code.zip/ MainPage.xaml.cs
Both of these examples produce the same results. In Figure 5.12, you can see the user's name and title. LinkedIn returns a URL to the user's profile picture, so in Silverlight you need to create a bitmap image object to host the image.

That was the Silverlight side of the code. Now let's take a look at the JavaScript side. Once the LinkedIn JSAPI loads, you can hook the authentication (auth) process and call the onLinkedInAuth function on the SPLinkedIn.ascx file when it completes.
    //Waits for the user to log in to LinkedIn
    function onLinkedInLoad() {
        // Hook the auth event
        IN.Event.on(IN, "auth", onLinkedInAuth);
    }
code snippet 076576 Ch05_Code.zip/SPLinkedIn.ascx
In the onLinkedInAuth function, call LinkedIn to retrieve the user's profile information. When the profile object is returned, call the Silverlight function that you created earlier to display this on the Silverlight control. Before you can call functions in Silverlight from JavaScript, get a reference to the Silverlight control. Add the XML node, <param name=“onLoad” value=“pluginLoaded” />, to the Silverlight control in the SPLinkedIn.ascx file. This will cause the Silverlight control to call the pluginLoaded function once it has loaded. Call the getHost method of the Silverlight control to get a reference that you can call functions on from JavaScript:
    //Get the Silverlight control
    var slCtl = null;
    function pluginLoaded(sender, args) {
        slCtl = sender.getHost();
    }
code snippet 076576 Ch05_Code.zip/SPLinkedIn.ascx
You need to register the Silverlight object with the browser's object model. Call the RegisterScriptableObject method of the HTMLPage class to register it.
        void MainPage_Loaded(object sender, RoutedEventArgs e)
        {
            HtmlPage.RegisterScriptableObject("MainPage", this);
        }
code snippet 076576 Ch05_Code.zip/MainPage.xaml.cs
The last step is to actually call LinkedIn and then call Silverlight. The way to call LinkedIn functions is using the IN.API object. In this case, you want to return the profile, so you will use the Profile method, passing “me” as the parameter. This will return the profile of the currently logged-in user. You can chain together modifiers to return a specific set of fields — in this case, id, firstName, lastName, pictureUrl, and headline. Use the result function to call the Silverlight LoadProfile function. Note that the results are an array of objects, and because you are only expecting one, just take the first value in the array.
    //Retrieve LinkedIn profile
    function onLinkedInAuth() {
        var profile = "";
        IN.API.Profile("me")
        .fields(["id", "firstName", "lastName", "pictureUrl", "headline"])
        .result(function (result) {
            profile = result.values[0];
            slCtl.Content.MainPage.LoadProfile(
                profile.id,
                profile.firstName,
                profile.lastName,
                profile.pictureUrl,
                profile.headline);
        });
    }
code snippet 076576 Ch05_Code.zip/SPLinkedIn.ascx
If you prefer to just pass the whole profile object to Silverlight, the code would look like the following function. The only difference is the signature of the call to the Silverlight LoadProfile function:
    //Retrieve LinkedIn profile
    function onLinkedInAuth() {
        var profile = "";
        IN.API.Profile("me")
        .fields(["id", "firstName", "lastName", "pictureUrl", "headline"])
        .result(function (result) {
            profile = result.values[0];
            slCtl.Content.MainPage.LoadProfile(
                profile);
        });
    }
code snippet 076576 Ch05_Code.zip/SPLinkedIn.ascx
Many properties are available in LinkedIn. More than 50 general profile fields are documented in detail at http://developer.linkedin.com/docs/DOC-1061. Many more are also defined in complex data structures, such as the publication property. The publication object contains 10 fields that describe the publication, such as authors, title, dates, and so on. As you program against LinkedIn, you will need to reference the documentation to ensure that you are using the correct fields.
Reading SharePoint Profile Properties
At this point, you have learned how to read the user profile from LinkedIn. This section looks at how to do the same using SharePoint. Add the following XAML code to your Silverlight control to display all the SharePoint profile fields and values in a list box. In this example, a button retrieves the values from SharePoint.
        <!-- SharePoint Profile Fields -->
        <Button
            Name="button1"
            Content="Get Profile"
            Click="button1_Click"
            Margin="12,170,0,0"
            HorizontalAlignment="Left"
            VerticalAlignment="Top"
            Height="23"
            Width="75"  />
        <ListBox
            Name="spProfileProperties"
            Height="205"
            Margin="12,200,0,0"
            HorizontalAlignment="Left"
            VerticalAlignment="Top"
            Width="616" />
        <sdk:Label
            Name="label1"
            Content="SharePoint Profile"
            FontSize="16"
            Margin="93,169,0,0"
            HorizontalAlignment="Left"
            VerticalAlignment="Top"
            Width="272" />
code snippet 076576 Ch05_Code.zip/ MainPage.xaml
You program SharePoint user profiles using the userprofileservice.asmx web service. Add a reference to the user profile service using the path http://intranet.contoso.com/my/personal/danj/_vti_bin/userprofileservice.asmx. This is the path to the service endpoint under the My Site site collection for Dan Jump. You could also use the service at the root site. On the button1 click handler, call the user profile service to retrieve Dan Jump's profile:
string ctx = ClientContext.Current.Url;

private void button1_Click(object sender, RoutedEventArgs e)
        {
            //Create a binding and endpoint
            BasicHttpBinding binding = new BasicHttpBinding();
            EndpointAddress endpoint = new EndpointAddress(
                ctx + "/_vti_bin/userprofileservice.asmx");

            //Create the SOAP client
            UserProfileServiceSoapClient client =
                new UserProfileServiceSoapClient(binding, endpoint);

            // Add the behavior to fix the SOAP messages
            client.Endpoint.Behaviors.Add(new AsmxBehavior());

            client.GetUserProfileByNameCompleted +=
                client_GetUserProfileByNameCompleted;

            // Get the user profile
            client.GetUserProfileByNameAsync("danj");
        }
code snippet 076576 Ch05_Code.zip/ MainPage.xaml.cs
You can use the SharePoint ClientContext object to obtain the current root site and set the endpoint of the user profile web service. Most of the code is just normal web service code, with one caveat: You need to fix some of the data types returned from SharePoint that are not compatible with Silverlight. This is accomplished using the helper class called AsmxBehavior. Behaviors enable you to hook into the WCF pipeline to tweak the types before Silverlight sees them. Visit http://blogs.microsoft.co.il/blogs/johnnyt/archive/2010/08/13/getting-sharepoint-s-user-properties-in-your-silverlight-4-application.aspx to read more about using Silverlight with the SharePoint User Profile Services.
All calls in Silverlight are asynchronous, so the client_GetUserProfileByNameCompleted function is called when the web service call returns. The GetUserProfileByName function returns an ObservableCollection of PropertyData objects. Iterate over this collection to add each property and value to the list box. Note that some of the values may be empty or contain multiple values. This code checks for null values and returns either an empty string or the first item. For example, the Interests field is a multi-value field of interests. In this example, Dan has two interests, camping and dogs. However, when you look at the results, you will see only Camping because you return the first item.
        void client_GetUserProfileByNameCompleted(
            object sender,
            GetUserProfileByNameCompletedEventArgs e)
        {
            if (e.Error == null)
            {
                ObservableCollection<PropertyData>
                    profileProperties = e.Result;
                // Add each profile field and value to listbox
                foreach (UserProfileService.PropertyData propertyData
                                                    in profileProperties)
                {
                    string profilePropertyAndValue =
                        String.Format("{0} ({1})",
                        propertyData.Name,
                        (propertyData.Values.Count > 0 ?
                        propertyData.Values[0].Value : String.Empty));
                }
            }
            else
            {
                Debug.WriteLine(e.Error.Message);
            }
        }
code snippet 076576 Ch05_Code.zip/ MainPage.xaml.cs
The result is a list box displaying all the user profile properties in SharePoint (see Figure 5.13).

As shown in Table 5.1, SharePoint also provides many profile properties. In the SharePoint UI, all the properties are filled in with data. Looking at this list, you can see that many properties are empty. Some of these are filled in by other parts of the system or they may be valid empty fields. For example, the Manager field is empty because Dan is the CEO and therefore doesn't have a manager.
Table 5.1 SharePoint Profile Properties
| Property | Value |
| UserProfile_GUID | 582da9a9-987e-436a-82ab-383f44ea8d78 |
| AccountName | contosodanj |
| FirstName | Dan |
| SPS-PhoneticFirstName | |
| LastName | Jump |
| SPS-PhoneticLastName | |
| PreferredName | Dan Jump |
| SPS-PhoneticDisplayName | |
| WorkPhone | (425) 555-0179 |
| Department | Executive |
| Title | CEO |
| SPS-JobTitle | |
| Manager | |
| AboutMe | Dan Jump has been CEO of Contoso since 1985. Since becoming CEO of Contoso, Dan has successfully grown the company from 1 million dollars in annual sales to 2.3 billion. Dan is a graduate of MIT with an MBA, with a concentration in foreign affairs. Dan was also an officer in the U.S. Marines, doing a tour in Desert Storm. In his off time he enjoys his 4 grandchildren and his golden retriever, Zephyr. |
| PersonalSpace | /my/personal/danj/ |
| PictureURL | http://intranet.contoso.com:80/my/User%20Photos/Profile%20Pictures/contoso_danj_MThumb.jpg |
| UserName | danj |
| QuickLinks | |
| WebSite | |
| PublicSiteRedirect | |
| SPS-Dotted-line | |
| SPS-Peers | |
| SPS-Responsibility | Promoting Change |
| SPS-SipAddress | [email protected] |
| SPS-MySiteUpgrade | |
| SPS-DontSuggestList | |
| SPS-ProxyAddresses | |
| SPS-HireDate | |
| SPS-DisplayOrder | |
| SPS-ClaimID | |
| SPS-ClaimProviderID | Windows |
| SPS-ClaimProviderType | Windows |
| SPS-LastColleagueAdded | |
| SPS-OWAUrl | |
| SPS-SavedAccountName | |
| SPS-ResourceAccountName | |
| SPS-ObjectExists | |
| SPS-MasterAccountName | |
| SPS-DistinguishedName | CN=Dan Jump, CN=Users, DC=contoso, DC=com |
| SPS-SourceObjectDN | |
| SPS-LastKeywordAdded | 6/25/2011 12:00:00 AM |
| WorkEmail | [email protected] |
| CellPhone | (425) 555-0178 |
| Fax | (425) 555-0180 |
| HomePhone | (425) 555-0181 |
| Office | Seattle, WA |
| SPS-Location | Redmond |
| SPS-TimeZone | SPLinkedInProfileApp.UserProfileService.SPTimeZone |
| Assistant | CONTOSO onip |
| SPS-PastProjects | Process Re-engineering |
| SPS-Skills | C++ |
| SPS-School | Ironwood College |
| SPS-Birthday | 7/4/2000 12:00:00 AM |
| SPS-StatusNotes | Check Out my LinkedIn Profile |
| SPS-Interests | Camping |
| SPS-EmailOptin | 0 |
This table is also helpful to understand the values that are stored in the fields. Note that the field names are not very user- or code-friendly. In fact, the server API contains an enumeration class that has descriptions for each of these fields and maps them to friendlier names. This also makes it easier to code, as you don't need to remember the string name of all the fields. You will find a copy of this class in the sample project included for you to use when coding in Silverlight on the client.
Posting LinkedIn Status Messages
Another common feature of social networking sites such as SharePoint and LinkedIn is the capability to post short status messages. Status messages are displayed on the My Site of SharePoint and the home page of LinkedIn. The messages also appear in the activity feeds, enabling others to follow your status over time. Figure 5.14 shows Dan's activity on LinkedIn.

You saw earlier in this chapter how to call Silverlight functions from JavaScript. In this example, you learn how to call JavaScript functions from Silverlight in order to leverage the LinkedIn JSAPI to update the status in LinkedIn.
1. Update the Silverlight application to display the SharePoint status and add a button to write the status to LinkedIn. Add the follow XAML code to your Silverlight application:
        <!-- Set Status-->
        <Button
            Name="setStatusButton"
            Content="Set Status"
            Click="setStatusButton_Click"
            Margin="12,411,0,0"
            HorizontalAlignment="Left"
            VerticalAlignment="Top"
            Height="23"
            Width="75"  />
        <TextBox
            Name="MyStatus"
            Margin="96,409,0,0"
            HorizontalAlignment="Left"
            VerticalAlignment="Top"
            Height="48"
            Width="531" />
code snippet 076576 Ch05_Code.zip/ MainPage.xaml
This will add a button and a textbox to the page.
2. Update the preceding code to populate the list box with the profile properties and values with the following code:
                // Add each profile field and value to listbox
                foreach (UserProfileService.PropertyData propertyData
                                                    in profileProperties)
                {
                    string profilePropertyAndValue =
                        String.Format("{0} ({1})",
                        propertyData.Name,
                        (propertyData.Values.Count > 0 ?
                        propertyData.Values[0].Value : String.Empty));

                    // Add item to List
                    spProfileProperties.Items.Add(profilePropertyAndValue);

                    // Get the status
                    if (propertyData.Name == PropertyConstants.StatusNotes)
                    {
                        MyStatus.Text = (string)(propertyData.Values.Count > 0 ?
                                propertyData.Values[0].Value : String.Empty);
                    }
                }
code snippet 076576 Ch05_Code.zip/ MainPage.xaml.cs
The change in this code is to get the status value from the SharePoint profile properties. SharePoint stores the status updates in a profile property called SPS-StatusNotes. To make it easier to read and understand, you can use the enumeration value from the PropertyConstants called StatusNotes. Figure 5.15 shows Dan's status displayed on his My Site.
3. Add the following code to handle the click event of the button. This will call the postLinkedInStatus JavaScript function to make the update in LinkedIn to the user's profile status.
        private void setStatusButton_Click(
            object sender, RoutedEventArgs e)
        {
           // Call JavaScript function to update
           // the LinkedIn status from the SharePoint status
           HtmlPage.Window.Invoke(
                    "postLinkedInStatus",
                    MyStatus.Text);
        }
code snippet 076576 Ch05_Code.zip/ MainPage.xaml.cs

As mentioned earlier, the LinkedIn JSAPI does not cover all the functionality that the REST API covers. One of the biggest gaps is in updating your status. However, the JSAPI does have an escape hatch that enables you to access the REST API calls using the Raw method. The Raw method enables you to call any of the REST calls. The trick is that you have to code the body by hand. Next, you will see a very simple way to update the status without needing to understand how to code the message body. Add the following JavaScript function, which will be called from Silverlight to update the LinkedIn status:
    function postLinkedInStatus(statusMessage) {

          IN.API.Raw("/people/∼/current-status")
          .method("PUT")
          .body(JSON.stringify(statusMessage))
    }
code snippet 076576 Ch05_Code.zip/SPLinkedIn.ascx
The Raw method takes the path to the REST function call. You must also specify the type of REST call — GET, PUT, or POST. These are defined in the REST API docs at http://developer.linkedin.com/docs/DOC-1007. One area that can be a little complicated is passing the body to the REST call. The REST APIs can take the body as XML or JSON, but the Raw call only allows you to pass the body as JSON. This becomes more difficult as the body gets more complex, because all the docs show the XML body but not the JSON body. There is a help doc that explains how to convert from XML to JSON, but for new developers it's an error-prone and time-consuming process. For example, here is the XML body for updating the status:
<?xml version="1.0" encoding="UTF-8"?>
<current-status>is setting their status using the LinkedIn API.</current-status>
Another one of the rules for calling the REST API specifies that if there is only one parameter, as is the case here, you can just pass the value. In this example, you take the statusMessage passed from Silverlight and pass it to the body function, using the JSON.stringify function to clean up any special characters.
As with most programming, there are several ways to accomplish the same task. Another way to update the status method in LinkedIn is to use the person-activities function (you can view the full documentation at http://developer.linkedin.com/docs/DOC-1009):
    function postLinkedInStatus(statusMessage) {

        activityURL = "/people/∼/person-activities";
        activityBODY = {
            "contentType": "linkedin-html",
            "body": "statusMessage"
        };

        IN.API.Raw(activityURL)
                            .method("POST")
                            .body(activityBODY.toString)
                            .result(function (result) {
                                alert(‘posted activity’);
                            })
                            .error(function (error) {
                                alert(‘error’);
                            });
    }
code snippet 076576 Ch05_Code.zip/SPLinkedIn.ascx
This example is interesting because it demonstrates a more complex body that has been converted to JSON. Here is the XML format example from the documentation. There are two parameters: content-type and body. Notice that the body can contain an HTML-formatted message.
<activity locale="en_US"> <content-type>linkedin-html</content-type> <body><a href="http://www.linkedin.com/profile?viewProfile=&key=ABCDE FG">Richard Brautigan</a> is reading about <a href="http://www.tigers.com">Tigers</a>http://www.tigers.com >Tigers</a>.</body> </activity>
Converting your status message to JSON becomes the following (use the conversion rules of the Raw function located at http://developer.linkedin.com/docs/DOC-1287 to convert the XML to JSON):
{
       "contentType": "linkedin-html",
       "body": "statusMessage"
   }
code snippet 076576 Ch05_Code.zip/SPLinkedIn.ascx
Finally, note that LinkedIn is throttled to limit status updates to five per day; and, like Twitter, there is a 140-character limit.
SharePoint's social computing features enable you to easily collaborate with your colleagues across the boundaries of geography and internal organizational structures. Whether you are in the next department or the next state, SharePoint makes it easy to find, follow, and interact with experts and others who share your interests or skills. However, SharePoint is not an island; leveraging the synchronization capabilities built into SharePoint enables you to consume and share your profile data with a number of internal resources. You can also leverage other social platforms in the cloud, such as Facebook and LinkedIn, to consume and share profile information to a larger Internet audience.
Following are some additional references that you might find useful:
- LinkedIn Developer Center — http://developer.linkedin.com
- Silverlight Web Part Extension — http://bit.ly/SLWebPartVSIX
- Social Computing in SharePoint 2010 — http://technet.microsoft.com/en-us/sharepoint/ee263906
- SharePoint 2010 Social Computing Resource Center — http://msdn.microsoft.com/en-us/sharepoint/gg987020