
Chapter 8
Financial Modeling with Excel Services and Windows Azure
What's In This Chapter?
- Understanding opportunities for integrating Windows Azure with Office and Office Services in SharePoint 2010
- Understanding the concepts behind the Windows Azure Table service
- Extending an Excel financial model to access Windows Azure table data using WCF Data Services
- Building an ECMAScript Content Editor web part that calls an Azure-hosted WCF service to retrieve Windows Azure table data for use in the financial model under Excel Services
Using Microsoft Excel on the desktop for financial models is a broad practice across all vertical industries and helps enable both daily decision making and analysis for long-range planning. There are two excellent options to enhance financial models to give them greater reach.
First, in many cases, financial models are bound to the desktop — that is, although they can be shared via e-mail or saved to a file share, the models are used only on the desktop in the Excel client application. However, financial models uploaded to SharePoint are unbound from the desktop, enabling users who don't have Excel to experience the power of the model via Excel Services in their browser.
Second, the financial models often contain data connections that generally access on-premises data. With the advent of SQL Azure, the Windows Azure Blob service, and the Windows Azure Table service, cloud-based data sources are also available to these models.
Whether the financial models are used in the Excel client or under Excel Services, Azure cloud-based data can be accessed to enrich the models. This chapter describes the patterns for accessing Azure table data from both the client and SharePoint.
Overview of Excel Financial Models
Since its release to business customers in May 2010, Microsoft Office 2010 has sold at a record pace. One might have anticipated this would be the case, because during one seven-month stretch of the product's public beta, one million downloads were being installed each month. This demand, coupled with the fact that more than 90 million businesses worldwide have chosen Office for their end user productivity suite, means there is a significant surface area for developers to land business solutions built on Office.
One such business solution is an Excel financial model. Microsoft Excel has been used extensively across the private and public sector for creating financial models. These models range from fairly simple mortgage and debt reduction calculators to complex amortization schedules and Monte Carlo simulations to help with risk and decision analysis when there is uncertainty in the mix. These and other models created in Excel across the spectrum of engineers, statisticians, financial analysts, scientists, and others have proven invaluable in supporting day-to-day business decisions and long-term planning.
Figure 8.1 shows a simple financial model for calculating and comparing a number of monthly mortgage payment amounts. As with all financial models, this model requires a set of inputs to generate the outputs. In this model, a real estate agent provides the mortgage amount, the number of years for the loan, and the fixed interest rate. The financial model then calculates additional interest rates with corresponding monthly payments for comparison and a chart. Although the real estate agent provides only the single fixed interest rate, the model uses that to calculate two lower interest rates and a monthly payment at a half percent lower for each. It also calculates four higher interest rates and monthly payments at a half percent higher for each. This simple example shows the power of a financial model to take key input values and calculate outcomes that can support analysis and decision-making.

In the mortgage payment financial model example, the end user — in this case, the real estate agent — needs to know and provide the fixed interest rate values, but financial models can also rely on data retrieved from disparate sources. How much better would this financial model be if the real estate agent could make interest rate selections based on authoritative data? Rather than needing to know or find the interest rate being offered that day for the number of years desired for the loan, what if the agent could select that value, or values, from a data source? What if the selection could be made based on the rate being offered by any given lending institution for that day? Excel provides a number of built-in ways to access external data — e.g., SQL Server, Analysis Server, OLE DB, and Microsoft Query and ODBC. These data-access technologies have been relied upon for years both to simplify the end-user experience and to enrich the outputs of financial models.
Now, cloud-based options are available for hosting your authoritative data, such as SQL Azure, Azure blobs, and Azure tables. The great news is that these sources for authoritative data also can be tapped for use in your financial models. This chapter focuses on accessing data in Azure tables. You will see two patterns for integrating Azure table data into the mortgage financial model: when it's used in the Excel client and when it's used in SharePoint under Excel Services.
Integrating Windows Azure with Office
Windows Azure and the pervasive use of Office offer a significant opportunity for Office solution developers and end users alike. Solution developers can have confidence that their data endpoints are always available at scale and that their Office solution integrates directly within a context the end user has already mastered. For the end user, Office solutions bring Azure-based data and information to them within the applications they are already using.
However, it's not only Office client application use that end users are familiar with; tens of thousands of users also interact daily with SharePoint and Excel Services. Consider the mortgage financial model. If you provide an Azure-enabled version of this in the Excel client, end users will also expect the same functionality when they use the model under Excel Services. Therefore, it is important to architect your solutions to take advantage of your Azure-based data from both contexts. From the client, you can use .NET to build your solution; from SharePoint, you can use a variety of web-related technologies to access your Azure data. Let's take a closer look.
Office Clients and Azure
In the Office clients, you can exploit the power of the .NET Framework to build your Office and Azure solutions. If you have not previously developed Office solutions but have developed rich client applications on .NET, consider landing your next solution within Office. The benefit is that you'll be able to leverage all your current skills and then learn some new ones related to the different Office client APIs. Figure 8.2 shows the various Office 2010 project templates available in Visual Studio 2010.
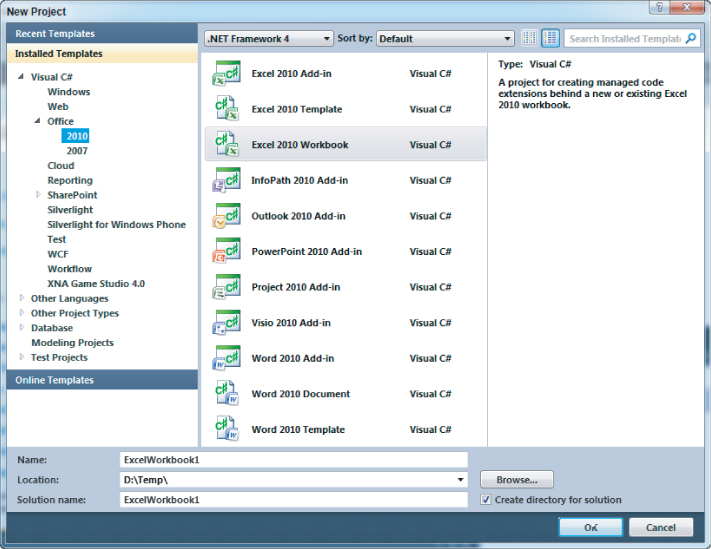
Each project template is an opportunity to land Azure-based data in an Office client. Notice that some of the project names end with Add-in, whereas others end with Workbook, Document, or Template. An Office client add-in (considered an application-level add-in) will load each time the client starts. Therefore, once installed, the add-in is always available when the Office client is running. Workbook, document, and template projects (considered document-level add-ins) are add-ins, but they are associated with a specific workbook, document, or template, respectively. A document-level add-in will load only when that specific workbook, document, or template is opened.
When you are building your Office add-in, application-level add-ins surface their UI in a task pane, whereas document-level add-ins surface theirs in an action pane. Although this is a small nuance, in either case you design the end user experience for the task or action pane as you would for a rich client application. You can use either Windows Forms controls or Windows Presentation Foundation (WPF). Some developers host a browser control in the pane and surface the UI as a Silverlight application. You simply use what you are already familiar with to design the end user task or action pane experience. Additionally, document-level solutions let you place controls directly onto the document's surface for the end user to use. These, too, can be sourced with external data, so there's a tremendous range of solutions you can build.
For data access in Office client add-ins, you can use WCF Data Services to connect directly to your Azure data, or you can build a WCF service to front your Azure data. Again, in either case, you are using the tools you already know when developing for Office. You'll be working through a document-level solution in this chapter, so you will get some experience in developing an Office add-in. For additional information about Office development, visit msdn.microsoft.com/office.
Office Services and Azure
Essentially, Office Services made their debut in MOSS 2007 with Excel Services and InfoPath Forms Services. However, with the advent of SharePoint 2010, the presence of Office Services increased to include Word Automation Services, Access Services, and Visio Services as well. This further incorporation of Office capabilities, coupled with enriched capabilities in both Excel Services and InfoPath Forms Services, has enabled powerful end-to-end Office solutions that incorporate both the Office clients and Office Services.
However, the significant difference between the Office clients and their respective Office Services counterparts is that for the most part, Office Services are not extensible. For instance, you cannot develop an add-in for the Excel, Word, or Visio client and have that add-in function under Excel, Word, or Visio Services, respectively. Add-ins built for the client do not function on the server.
Of course, this has implications when, for example, you upload your fully functional, Azure data-dependent financial model to SharePoint. Although end users can interact with the document itself under Excel Services, the client add-in methods to retrieve the Azure data are no longer functional. How, then, do you compensate for this reduction in functionality? After all, end users expect client functionality to be available under Excel Services, too.
To resolve this in SharePoint, you need to use web-based technologies, as the documents are being accessed in the browser, not in the rich client. For Excel Services and Visio Services, you can use the ECMAScript (think JavaScript) object model. Although it is not a deep object model for manipulating the documents, the ECMAScript object model opens up the world of JavaScript's capabilities for accessing Azure-based storage services and enables you to manipulate Excel and Visio documents in the browser.
In this chapter you'll use the Excel ECMAScript object model in a SharePoint Content Editor web part to retrieve your Azure table data via an Azure-hosted WCF service. The user will interact with the Content Editor web part to select the desired input data for a mortgage financial model hosted in an Excel Web Access web part on the same page. Here again you'll see the capability to reach Azure data for Office but from SharePoint using web-based technologies.
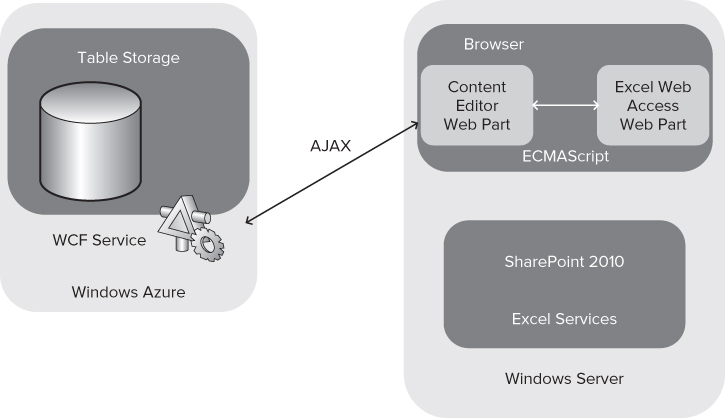
The architecture for this solution is relatively straightforward. You'll use a single Azure table and access it in two different ways. First, from the Excel client, you'll access the Azure table using WCF Data Services. The document-level add-in for Excel has all the data access plumbing built in, so the Azure table data is being retrieved by the add-in itself. As shown in Figure 8.3, the Excel client add-in accesses the Windows Azure Table service via WCF Data Services.

Second, to make the Azure table data available from ECMAScript on SharePoint, an Azure-hosted WCF service is used. The WCF service itself simply uses the same WCF Data Services constructs that are used in the Excel client add-in. However, for access via ECMAScript, a service endpoint is provided for the requested data; the ECMAScript does not access the Azure table directly. This same WCF service could have been used by the Excel client, but this example demonstrates two different patterns for accessing Azure table data: one direct and one via a service.
Figure 8.4 shows that the Azure-based WCF service is called from the Content Editor web part.
Accessing Azure Table Data via WCF Data Services
Before you can access Azure table data, you must first set up your storage account. If you haven't done so yet, navigate to your Windows Azure management portal, click Storage Accounts in the left navigation bar, and then click New Storage Account in the ribbon. As shown in Figure 8.5, the storage account name you choose will be used across your Blob, Table, and Queue data stores. When you choose OK, the Windows Azure management portal page will show the URLs for each store and provide a View button to see your <Hidden> access keys. You will need to use one of these keys, generally the primary access key, in your application that is connecting to any of these data stores.

Now that you have your Windows Azure Table account, you can add data to it — but first some concepts. The first concept to wrap your mind around is that Azure table storage is not a relational data store — that's SQL Azure. One way to think of Azure table storage is that it is a highly scalable store for data that can be characterized by rows and columns. Each row can contain a maximum of 255 columns, and data in the entire row cannot exceed 1 MB in size. Each column can be defined by any one of the data types: Binary, Bool, DateTime, Double, GUID, Int, Int64, and String. Although visualizing table data laid out as rows and columns provides a nice mental model, these are not the terms used to describe the table data model.
Figure 8.6 shows the data model for Windows Azure tables. At the highest level is your table storage account. Your account can contain a set of tables, which can contain a set of entities (rows), which can contain a set of properties (columns).

When you create a table, you provide a table name that must be unique across all your tables. Each entity (row) has two required properties (columns): a PartitionKey and a RowKey, which together are the unique key for the entity. You must provide a unique value for the PartitionKey, but providing the value for the RowKey is optional. The RowKey must be unique within its PartitionKey, but if you do not provide the unique value, Azure will generate the RowKey value automatically.
![]() The PartitionKey key values you use are significant in terms of how Windows Azure will optimize and manage your table's partitions across its storage nodes. A discussion of this is beyond the scope of this chapter, so refer to the Windows Azure documentation, at www.microsoft.com/windowsazure/Whitepapers/WindowsAzureTable/, to learn how to select partition names that enable your tables to perform at scale.
The PartitionKey key values you use are significant in terms of how Windows Azure will optimize and manage your table's partitions across its storage nodes. A discussion of this is beyond the scope of this chapter, so refer to the Windows Azure documentation, at www.microsoft.com/windowsazure/Whitepapers/WindowsAzureTable/, to learn how to select partition names that enable your tables to perform at scale.
With your account in place, it's time to get to work. In the following steps, you'll build a quick console application to create a table, and load a couple of entities into it. You'll then view your table in the Visual Studio 2010 Server Explorer. The work you do here will serve as the basis for what you'll do later in the chapter.
1. Open Visual Studio 2010 as Administrator.
2. Select File ⇒ New Project.
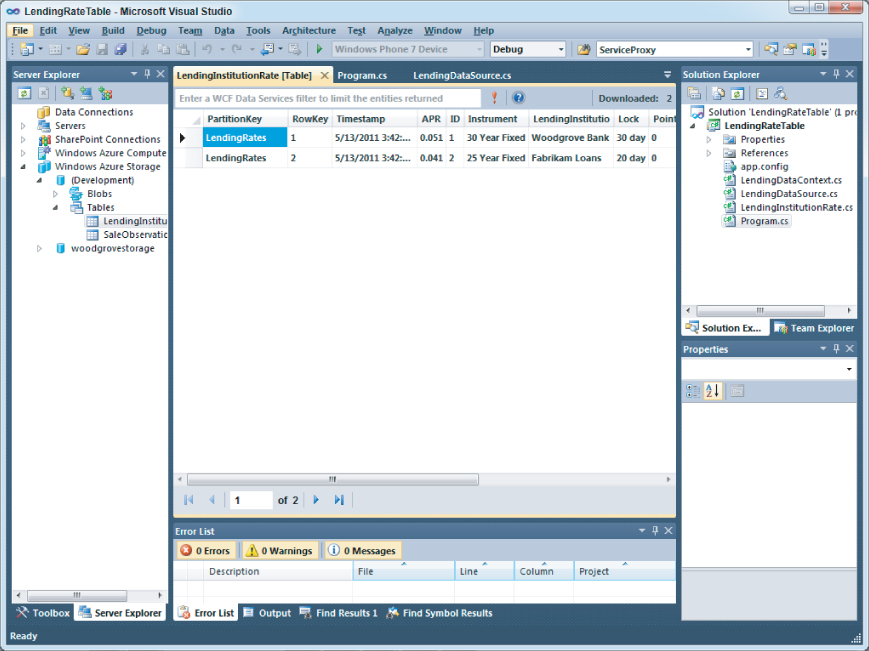
3. In the New Project dialog, click Windows ⇒ Console Application, provide a name for the project (e.g., LendingRateTable) and a location for the project, and click then OK (see Figure 8.7).
4. After the project is created, right-click on the LendingRateTable project in the Solution Explorer and choose Add References. From the .NET tab, select System.Data.Services.Client and Microsoft.WindowsAzure.StorageCient, and then click OK. (If you are prompted to retarget to the .NET Framework 4, do so by confirming the prompts.)
5. Right-click the LendingRateTable project and choose Add ⇒ New Item. Select Class and name it LendingInstitutionRate.cs.
6. Replace all the code in the class with the following code:

using System;
using System.Collections.Generic;
using System.Linq;
using System.Text;
using Microsoft.WindowsAzure.StorageClient;

namespace LendingRateTable
{
 public class LendingInstitutionRate : TableServiceEntity
 {
   public string LendingInstitution { get; set; }
   public string ID { get; set; }
   public string Instrument { get; set; }
   public int Year { get; set; }
   public double Rate { get; set; }
   public double Points { get; set; }
   public double APR { get; set; }
   public string Lock { get; set; }
   public string InstrumentRateDisplayName { get; set; }

   public LendingInstitutionRate(string ID)
   {
     PartitionKey = "LendingRates";
     RowKey = ID;
   }

   public LendingInstitutionRate()
   {
     PartitionKey = "LendingRates";
   }
 }
}
code snippet 076576 Ch08_Code.zip/LendingInstitutionRate.cs
7. Press F6 to confirm that your project builds. If there are errors, it may be because you need to retarget the project to the .NET Framework 4. Save all the files, right-click on the project in the Solution Explorer, and select Properties. Confirm that the Target Framework is the .NET Framework 4, not the .NET Framework 4 Client Profile. If necessary, change it to .NET Framework 4 and respond Yes to reload the solution.
The LendingRateTable class models the schema for this entity (again, think row) in the Azure table; and each property (think column) in the class is defined with one of the supported data types for Azure tables. By adding the Microsoft.WindowsAzure.StorageClient namespace, you can derive your class from TableServiceEntity, which already defines the mandatory table properties for an entity, such as PartitionKey and RowKey. Notice that there are two constructors for the class. For simplicity, each constructor has a hard-coded value for the PartitionKey, but the first constructor also accepts a string for the unique RowKey value. The second constructor has no RowKey provided, so Azure will create a unique RowKey value when this constructor is used to create a new entity.
8. Add another new class named LendingDataContext.cs to the project.
9. Replace all the code in the class with the following code:
using System;
using System.Collections.Generic;
using System.Linq;
using System.Text;
using Microsoft.WindowsAzure.StorageClient;
using Microsoft.WindowsAzure;

namespace LendingRateTable
{
 public class LendingDataContext : TableServiceContext
 {
   public LendingDataContext(string baseAddress, StorageCredentials credentials)
     : base(baseAddress, credentials)
   {

   }

   public IQueryable<LendingInstitutionRate> LendingInstitutionRate
   {
     get
     {
       return this.CreateQuery<LendingInstitutionRate>("LendingInstitutionRate");
     }
   }
 }
}
code snippet 076576 Ch08_Code.zip/LendingDataContext.cs
10. Press F6 to confirm that your project builds.
The TableServiceContext is an Azure-specific DataServiceContext, which is one of the main classes in WCF Data Services. In this class, LendingDataContext derives from TableServiceContext and will provide the runtime context for this data service. Although the nature of a data service is stateless, the context within which an application interacts with the data service is not. Therefore, at runtime, lendingRateContext will represent a connection in WCF Data Services to your storage account and will provide the APIs for querying, inserting, updating, and deleting entities.
Lastly, you will add a data source class to your project.
11. Add another new class named LendingDataSource.cs to the project.
12. Replace all the code in the class with the following code:
using System;
using System.Collections.Generic;
using System.Linq;
using System.Text;
using Microsoft.WindowsAzure;
using Microsoft.WindowsAzure.StorageClient;

namespace LendingRateTable
{
 public class LendingDataSource
 {
   private static CloudStorageAccount storageAccount;
   private LendingDataContext context;

   static LendingDataSource()
   {
     try
     {
       storageAccount = CloudStorageAccount.DevelopmentStorageAccount;

       CloudTableClient c = new CloudTableClient(
           storageAccount.TableEndpoint.AbsoluteUri, storageAccount.Credentials);

       if (!c.DoesTableExist("LendingInstitutionRate"))
       {
           CloudTableClient.CreateTablesFromModel(typeof(LendingDataContext),
               storageAccount.TableEndpoint.AbsoluteUri,
               storageAccount.Credentials);
       }
     }
      catch (Exception e)
      {
          Console.WriteLine(e.Message);
      }
    }

    public LendingDataSource()
    {
      this.context = new LendingDataContext(
        storageAccount.TableEndpoint.AbsoluteUri, storageAccount.Credentials);

      this.context.RetryPolicy = RetryPolicies.Retry(3, TimeSpan.FromSeconds(1));
    }

    // Retrieve all lending institution rates entities in the table
    public IEnumerable<LendingInstitutionRate> Select()
    {
      var results = from g in this.context.LendingInstitutionRate
                    where g.PartitionKey == "LendingRates"
                    select g;
        return results;
    }

    // Add a single lending institution rate entity
    public void AddLendingInstitutionRate(LendingInstitutionRate newItem)
    {
      this.context.AddObject("LendingInstitutionRate", newItem);
      this.context.SaveChanges();
    }

    // Use to add multiple lending institutions in a batch - one at a time.
    // Then, call Save() after adding the institutions
    public void AddLendingInstitutionRates(LendingInstitutionRate newItem)
    {
      this.context.AddObject("LendingInstitutionRate", newItem);
    }

    // Save the entities to Azure
    public void Save()
    {
      this.context.SaveChanges
(System.Data.Services.Client.SaveChangesOptions.Batch);
    }

    // Delete a specific entity
    public void DeleteLendingInstitutionRate(LendingInstitutionRate item)
    {
      this.context.DeleteObject(item);
      this.context.SaveChanges();
    }

    // Delete ALL entities in the table at one time
    public void DeleteLendingInstitutionRates()
    {
      foreach (var p in this.Select())
      {
          this.context.DeleteObject(p);
      }
      this.context.SaveChanges
(System.Data.Services.Client.SaveChangesOptions.Batch);
    }
  }
}
code snippet 076576 Ch08_Code.zip/LendingDataSource.cs
13. Press F6 to confirm that your project builds.
Although this is a chunky code snippet, it's doing some very straightforward things. The LendingDataSource class is the glue that brings everything together. Find the static LendingDataSource() constructor. This constructor is executed first and essentially determines whether the table already exists in Azure. If not, it creates the table using the static CreateTablesFromModel method in the CloudTableClient class. Then the public LendingDataSource() constructor is executed. Its role is to wire up the data context by passing in the necessary parameters to connect to your Azure table.
Next, as you browse down the code, you'll see the methods that enable querying, adding, saving, and deleting entities in the table. In the Select method, you can see how easy it is to use a LINQ query against the table. The context is connected to the table, so this query retrieves all the entities with the PartitionKey equal to LendingRates. In this case, you have only one partition in the table, but you can see how easy it is to access table data.
To add an entity, look at the AddLendingInstitutionRate method. Here, you pass in a LendingInstitutionRate object representing your entity, and it is passed to the AddObject method on the context. The data context tracks all pending changes but does not apply them until its SaveChanges method is called. In the AddLendingInstitutionRate method, the entity is added and then SaveChanges is called immediately. One entity is added and then saved.
The data context also supports the notion of batches. In some cases, you may want to do a series of adds or deletes and then only commit those when these are completed. This is how the methods AddLendingInstitutionRates and Save are used. The AddLendingInstitutionRates method can be called multiple times to add entities; but it's not until the Save method is called that the entities are actually stored in the Azure table. Notice that the context SaveChanges method passes in the enum System.Data.Services.Client.SaveChangesOptions.Batch. This notifies the context to save all pending changes in a single batch. Another example of this can be observed in the DeleteLendingInstitutionRate and DeleteLendingInstitutionRates methods.
Now that you have all the classes in place to access your Azure table, you're ready to put them to use.
14. In Visual Studio, click the Program.cs tab.
15. Place the following code in the Main method:
     Console.WriteLine("Creating two test entities…");

     LendingDataSource ds = new LendingDataSource();

     // So this can be run more than one time
     // (i.e. RowKeys must be unique)
     ds.DeleteLendingInstitutionRates();

     // Create an entity and add it
     LendingInstitutionRate lir = new LendingInstitutionRate();
     lir.PartitionKey = "LendingRates";
     lir.RowKey = "1";
     lir.LendingInstitution = "Woodgrove Bank";
     lir.ID = "1";
     lir.Instrument = "30 Year Fixed";
     lir.Year = 30;
     lir.Rate = 0.05;
     lir.Points = 0.0;
     lir.APR = 0.051;
     lir.Lock = "30 day";
     lir.InstrumentRateDisplayName = "Woodgrove Bank 30 Year 5%";
     ds.AddLendingInstitutionRates(lir);

     // Create a second entity and add it
     LendingInstitutionRate lir2 = new LendingInstitutionRate();
     lir2.PartitionKey = "LendingRates";
     lir2.RowKey = "2";
     lir2.LendingInstitution = "Fabrikam Loans";
     lir2.ID = "2";
     lir2.Instrument = "25 Year Fixed";
     lir2.Year = 25;
     lir2.Rate = 0.04;
     lir2.Points = 0.0;
     lir2.APR = 0.041;
     lir2.Lock = "20 day";
     lir2.InstrumentRateDisplayName = "Fabrikam Loans 25 Year 4%";
     ds.AddLendingInstitutionRates(lir2);

      // Save all pending changes in a single batch
      ds.Save();

      Console.WriteLine("
Entities created.");
      Console.WriteLine("
Retrieving Lending Institution Entities...");

      foreach (var r in ds.Select())
      {
          Console.WriteLine("Institution name: {0}",
              r.LendingInstitution);
      }

      Console.WriteLine("
Press <enter> to end...");
      Console.ReadLine();
code snippet 076576 Ch08_Code.zip/Program.cs
16. Press F5 to run the application. The entities will be stored in the development table storage account via the Azure storage emulator.
Here you see the magic come together. First, a new LendingDataSource object is instantiated. Note an immediate call to DeleteLendingInstitutionRates to remove any previously stored entities. This is because you are adding only two entities and the RowKey values are hard-coded. If you run this application a second time without deleting the previously added entities, you'll receive a runtime error.
After adding and saving the two entities, you immediately call the Select method to retrieve all the entities and display them in the console window. When the execution is complete, your console window should look like Figure 8.8.
You can further verify your table data in Visual Studio.
17. Open the Server Explorer and navigate down the tree to the LendingInstitutionRate node under Tables. When you double-click the table name, you should see the entities, as shown in Figure 8.9.


You now have mastered the basic components for implementing Azure table data into your solutions. You'll apply this knowledge in a couple of different ways — to build a WCF service that provides your table data to any calling program, and to build an Excel add-in that accesses the table data directly.
Using a WCF Service to Provide Azure Table Data
Accessing Windows Azure Table data directly using WCF Data Services is great, but it's not necessarily the only way to go. This section describes how to build an Azure-hosted WCF service that accesses Azure table data and returns JavaScript Object Notation (JSON) to the calling application. In this scenario, the WCF service is a publicly available service, so it requires no authentication (whereas accessing the Windows Azure Table service directly always requires authentication, so that doesn't work well when you want to make the table data broadly available). Therefore, in this case, the WCF service authenticates to the Table service, but there is no requirement for the caller to authenticate to use the WCF service.
Perform the following steps to create a JSON-enabled Azure WCF service that accesses table data:
1. Open Visual Studio 2010 as Administrator.
2. Select File ⇒ New Project.
3. In the New Project dialog, click Cloud ⇒ Windows Azure Project, provide a name (e.g., LendingRatesJSON) and a location for the project, and then click OK.
4. In the New Windows Azure Project dialog, shown in Figure 8.10, click WCF Service Web Role and then click the top arrow between the panes.
5. Hover over the WCFServiceWebRole in the right-hand pane, click the pencil icon, and rename the web role (e.g., LendingRateRoleJSON). Click OK.
This project creates a default Service.svc file that you will not use because your WCF service will return JSON to the calling program.
6. Right-click on the LendingRateRoleJSON project and choose Add ⇒ New Item. Choose Web from the installed templates list and select AJAX-enabled WCF Service. Rename the service (e.g., LendingRateJSONService.svc), and then click OK.
7. Replace all the code for the service with the following:
using System;
using System.Collections.Generic;
using System.Linq;
using System.Runtime.Serialization;
using System.ServiceModel;
using System.ServiceModel.Activation;
using System.ServiceModel.Web;
using System.Text;

namespace LendingRateRoleJSON
{
 [AspNetCompatibilityRequirements(RequirementsMode =
  AspNetCompatibilityRequirementsMode.Allowed)]
 public class LendingRateJSONService:ILendingRateJSONService
 {
     // To use HTTP GET, add [WebGet] attribute. (Default ResponseFormat is
     // WebMessageFormat.Json)
     // To create an operation that returns XML,
     //     add [WebGet(ResponseFormat=WebMessageFormat.Xml)],
     //     and include the following line in the operation body:
     //         WebOperationContext.Current.OutgoingResponse.ContentType =
     // "text/xml";

     public String[] GetLendingInstitutions()
     {

         LendingDataSource ds = new LendingDataSource();

         //Get the specific lending institution names (sorted) that have rates
         var results = (from i in ds.Select()
                          orderby i.LendingInstitution
                          select i.LendingInstitution).Distinct();

          return results.ToArray();
      }

      public IEnumerable<OutputInstitutionRate>
      GetALendingInstitutionsRates(string lendingInstitutionName)
      {
          //lendingInstitutionName = "Fabrikam Loans";
          LendingDataSource ds = new LendingDataSource();

          List<OutputInstitutionRate> oirList = new List<OutputInstitutionRate>();

          //Get all the rates a specific lending institution offers
          foreach (var i in
          ds.GetALendingInstitutionsRates(lendingInstitutionName))
          {
              OutputInstitutionRate oir = new OutputInstitutionRate();
              oir.APR = i.APR;
              oir.ID = i.ID;
              oir.Instrument = i.Instrument;
              oir.InstrumentRateDisplayName = i.InstrumentRateDisplayName;
              oir.LendingInstitution = i.LendingInstitution;
              oir.Lock = i.Lock;
              oir.Points = i.Points;
              oir.Rate = i.Rate;
              oir.Year = i.Year;
              oirList.Add(oir);
          }

          oirList = (from u in oirList
                      orderby u.InstrumentRateDisplayName
                      select u).ToList();

          return oirList;
      }

      public OutputInstitutionRate
      GetASpecificLendingInstitutionsRate(string lendingRateIdentifier)
      {
          //lendingRateIdentifier = "1";
          LendingDataSource ds = new LendingDataSource();

          List<OutputInstitutionRate> oirList = new List<OutputInstitutionRate>();

          //Get a specific lending rate for a lending institution by ID
          foreach (var i in
          ds.GetASpecificLendingInstitutionsRate(lendingRateIdentifier))
          {
              OutputInstitutionRate temp = new OutputInstitutionRate();
              temp.APR = i.APR;
              temp.ID = i.ID;
              temp.Instrument = i.Instrument;
              temp.InstrumentRateDisplayName = i.InstrumentRateDisplayName;
              temp.LendingInstitution = i.LendingInstitution;
              temp.Lock = i.Lock;
              temp.Points = i.Points;
              temp.Rate = i.Rate;
              temp.Year = i.Year;
              oirList.Add(temp);
          }

          OutputInstitutionRate oir = new OutputInstitutionRate();

          if (oirList.Count > 0)
          {
              oir.APR = oirList[0].APR;
              oir.ID = oirList[0].ID;
              oir.Instrument = oirList[0].Instrument;
              oir.InstrumentRateDisplayName =
                oirList[0].InstrumentRateDisplayName;
              oir.LendingInstitution = oirList[0].LendingInstitution;
              oir.Lock = oirList[0].Lock;
              oir.Points = oirList[0].Points;
              oir.Rate = oirList[0].Rate;
              oir.Year = oirList[0].Year;
          }
          else
          {
              oir = null;
          }

          return oir;
      }
  }
}
code snippet 076576 Ch08_Code.zip/LendingRateJSONService.svc.cs
Ignore the syntax errors for now because you need to add the interface for the AJAX-enabled service next. Primarily, what you have here are the three methods that will return the Azure table data to the calling program.
The first method, GetLendingInstitutions(), returns an array with a sorted list of the lending institutions that have interest rate data available. The GetALendingInstitutionsRates() method takes an input parameter of the lending institution's name and passes back a collection of all the interest rate programs it offers. Lastly, the GetASpecificLendingInstitutionsRate() method accepts an input parameter of a specific program identifier to return all the information about a given lending rate.
8. To add the interface, right-click on the LendingRateRoleJSON project and choose Add ⇒ New Item. Choose Code from the installed templates list and then select Interface. Rename the interface (e.g., ILendingRateJSONService.cs) and click OK.
9. Replace all the code for the interface with the following:
using System;
using System.Collections.Generic;
using System.Linq;
using System.Text;
using System.ServiceModel;
using System.ServiceModel.Web;

namespace LendingRateRoleJSON
{
 [ServiceContract(Namespace = "LendingRates", Name = "JSONService")]
 interface ILendingRateJSONService
 {
   [OperationContract, WebGet]
   string[] GetLendingInstitutions();

   [OperationContract, WebGet]
   IEnumerable<OutputInstitutionRate> GetALendingInstitutionsRates(String
     lendingInstitutionName);

   [OperationContract, WebGet]
   OutputInstitutionRate GetASpecificLendingInstitutionsRate(String
     lendingRateIdentifier);
 }
}
code snippet 076576 Ch08_Code.zip/ILendingRateJSONService.cs
The preceding interface defines the methods that the client application will call via GET. The client proxy will refer to these method names verbatim in the call to the JSON-enabled WCF service.
Now that you have the service and the interface defined, you need to finish with two classes and the WCF Data Services context and data source, like you built previously.
10. Right-click on the LendingRateRoleJSON project and choose Add ⇒ Class. Rename the class (e.g., LendingInstitutionRate.cs) and then click OK.
11. Replace all the code in the class with the following:
using System;
using System.Collections.Generic;
using System.Linq;
using System.Web;
using Microsoft.WindowsAzure.StorageClient;

namespace LendingRateRoleJSON
{
 public class LendingInstitutionRate : TableServiceEntity
 {
   public string LendingInstitution { get; set; }
   public string ID { get; set; }
   public string Instrument { get; set; }
   public int Year { get; set; }
   public double Rate { get; set; }
   public double Points { get; set; }
   public double APR { get; set; }
   public string Lock { get; set; }
   public string InstrumentRateDisplayName { get; set; }

   public LendingInstitutionRate(string ID)
   {
       PartitionKey = "LendingRates";
       RowKey = ID;
   }

   public LendingInstitutionRate()
   {
       PartitionKey = "LendingRates";
   }
 }
}
code snippet 076576 Ch08_Code.zip/LendingInstitutionRate.cs
Just like the earlier example, this is the class for the Azure table entity, complete with PartitionKey and RowKey. However, because the calling program has no notion of the structure of the Azure entity, you'll use a second class to model the structure of the object that will be returned as a JSON object. It's identical to the table entity class except it does not have the keys.
12. Right-click on the LendingRateRoleJSON project and choose Add ⇒ Class. Rename the class (e.g., OutputInstitutionRate.cs) and then click OK.
13. Replace all the code in the class with the following:
using System;
using System.Collections.Generic;
using System.Linq;
using System.Web;
using System.Runtime.Serialization;

namespace LendingRateRoleJSON
{
 [DataContract]
 public class OutputInstitutionRate
 {
   [DataMember]
   public string LendingInstitution { get; set; }
   [DataMember]
   public string ID { get; set; }
   [DataMember]
   public string Instrument { get; set; }
   [DataMember]
   public int Year { get; set; }
   [DataMember]
   public double Rate { get; set; }
   [DataMember]
   public double Points { get; set; }
   [DataMember]
   public double APR { get; set; }
   [DataMember]
   public string Lock { get; set; }
   [DataMember]
   public string InstrumentRateDisplayName { get; set; }
 }
}
code snippet 076576 Ch08_Code.zip/OutputInstitutionRate.cs
The OutputInstitutionRate class is decorated with the DataContract attribute so that the class can be serialized and deserialized as it is passed between the service and the client. The DataMember attribute marks each of the properties so that they can be serialized as well.
Next, you add the data context class to your AJAX-enabled WCF service. This is essentially the same code you used previously.
14. Right-click on the LendingRateRoleJSON project and choose Add ⇒ Class. Rename the class (e.g., LendingDateContext.cs) and then click OK.
15. Replace all the code in the class with the following:
using System;
using System.Collections.Generic;
using System.Linq;
using System.Web;
using Microsoft.WindowsAzure;
using Microsoft.WindowsAzure.StorageClient;

namespace LendingRateRoleJSON
{
 public class LendingDataContext : TableServiceContext
 {

    public LendingDataContext(string baseAddress, StorageCredentials credentials)
        : base(baseAddress, credentials)
    {

    }

    public IQueryable<LendingInstitutionRate> LendingInstitutionRate
    {
      get
      {
          return this.CreateQuery<LendingInstitutionRate>
("LendingInstitutionRate");
      }
    }
  }
}
code snippet 076576 Ch08_Code.zip/LendingDataContext.cs
16. To add the data source to your service, right-click on the LendingRateRoleJSON project and choose Add ⇒ Class. Rename the class (e.g., LendingDataSource.cs) and then click OK.
17. Replace all the code in the class with the following:
using System;
using System.Collections.Generic;
using System.Linq;
using System.Web;
using Microsoft.WindowsAzure;
using Microsoft.WindowsAzure.StorageClient;

namespace LendingRateRoleJSON
{
 public class LendingDataSource
 {
   private static CloudStorageAccount storageAccount;
   private LendingDataContext context;

   static LendingDataSource()
   {
       try
       {

         storageAccount =
CloudStorageAccount.Parse("DefaultEndpointsProtocol=https;
AccountName={youraccountname};AccountKey={youraccountkey}");

           CloudTableClient c = new CloudTableClient(
             storageAccount.TableEndpoint.AbsoluteUri,
storageAccount.Credentials);

           if (!c.DoesTableExist("LendingRates"))
           {
             CloudTableClient.CreateTablesFromModel(typeof(LendingDataContext),
                  storageAccount.TableEndpoint.AbsoluteUri,
                  storageAccount.Credentials);
            }
        }
        catch (Exception e)
        {
          //System.Windows.Forms.MessageBox.Show(e.Message);
        }
    }

    public LendingDataSource()
    {
        this.context = new LendingDataContext(
          storageAccount.TableEndpoint.AbsoluteUri, storageAccount.Credentials);

        this.context.RetryPolicy = RetryPolicies.Retry(3,
TimeSpan.FromSeconds(1));
    }

    public IEnumerable<LendingInstitutionRate> Select()
    {
        var results = from g in this.context.LendingInstitutionRate
                      where g.PartitionKey == "LendingRates"
                      select g;

        return results;
    }

    public IEnumerable<LendingInstitutionRate> GetALendingInstitutionsRates(String
lendingInstitutionName)
    {
        var results = from g in this.context.LendingInstitutionRate
            where g.PartitionKey == "LendingRates" && g.LendingInstitution ==
lendingInstitutionName
            select g;

        return results;
    }

    public IEnumerable<LendingInstitutionRate>
GetASpecificLendingInstitutionsRate(String lendingRateIdentifier)
    {

        var results = from g in this.context.LendingInstitutionRate
            where g.PartitionKey == "LendingRates" && g.ID ==
lendingRateIdentifier
            select g;

        return results;
    }

    public void AddLendingInstitutionRate(LendingInstitutionRate newItem)
    {
        this.context.AddObject("LendingInstitutionRate", newItem);
        this.context.SaveChanges();
    }

    // Use to add multiple lending institutions in a batch
    // Call Save() after adding the institutions
    public void AddLendingInstitutionRates(LendingInstitutionRate newItem)
    {
        this.context.AddObject("LendingInstitutionRate", newItem);
    }

    public void Save()
    {
        this.context.SaveChanges
(System.Data.Services.Client.SaveChangesOptions.Batch);
    }

    public void DeleteLendingInstitutionRate(LendingInstitutionRate item)
    {
        this.context.DeleteObject(item);
        this.context.SaveChanges();
    }

    public void DeleteLendingInstitutionRates()
    {
        foreach (var p in this.Select())
        {
            this.context.DeleteObject(p);
        }
        this.context.SaveChanges
(System.Data.Services.Client.SaveChangesOptions.Batch);
    }
  }
}
code snippet 076576 Ch08_Code.zip/LendingDataSource.cs
Because the preceding code is essentially the same code you used previously, we won't step through it again. You are just making the same methods available to the WCF service.
Notice in the preceding code that you must fully replace the placeholder value {youraccountname} (including braces) with your storage account name and the placeholder {youraccountkey} with your storage account access key.
18. Right-click on the LendingRateRoleJSON project and choose Add ⇒ Reference. Add the following reference from the .NET tab: System.Data.Services.Client. Click OK.
With the coding complete for the service, the last part to wire up is the web.config file. Open the web.config file for the service and you'll notice that the endpoint and service information in the <system.serviceModel> have been updated. In addition, the <behavior> element in the <endpointBehavior> element has <enableWebScript /> so that the service can send and receive JSON.
19. Add the following XML fragment just under the <serviceBehaviors> element:
        <behavior name="LendingRateJSONServiceBehavior">
          <serviceMetadata httpGetEnabled="true" />
          <serviceDebug includeExceptionDetailInFaults="true" />
        </behavior>
20. Find the <service name=”LendingRateRoleJSON.LendingRateJSONService”> element and modify it to include the behaviorConfiguration attribute, as follows:
   <service name="LendingRateRoleJSON.LendingRateJSONService"
       behaviorConfiguration="LendingRateJSONServiceBehavior">
This ties the specific service behavior to the service.
The last step is to modify the contract attribute on the service. Rather than contract=”LendingRateRoleJSON.LendingRateJSONService”, you need it to be the interface, not the service. Here the interface behaves like the contract for the service, as observed in the interface previously.
21. Change the contract to the following:
contract="LendingRateRoleJSON.ILendingRateJSONService"
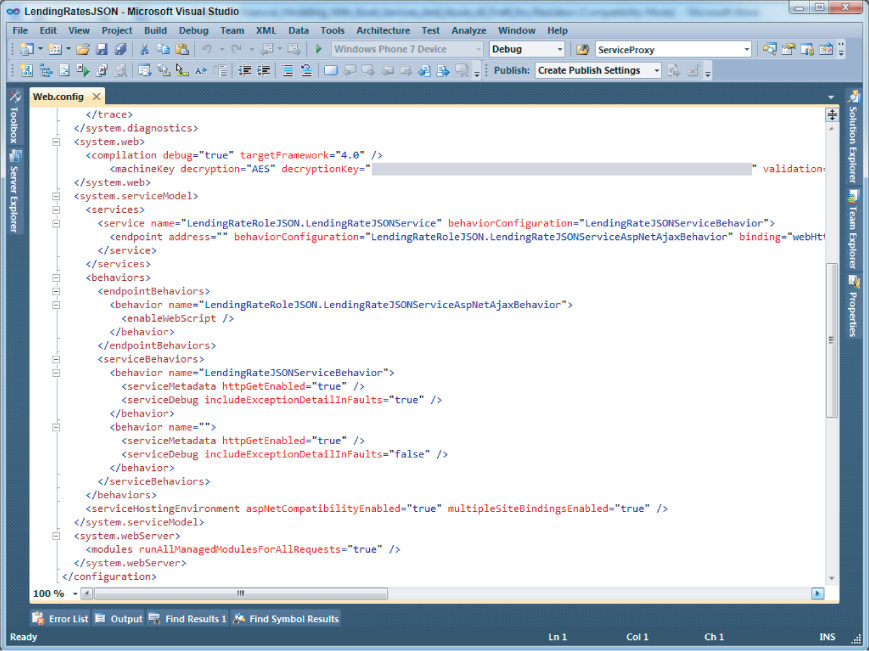
When completed, your web.config system.serviceModel should look like Figure 8.11.

Once you have built your service, take the steps necessary to deploy the service to your Azure account in a staging environment. Note the DNS name for your deployment, as you will need this for your client application. Following are four code snippets that you'll use to create four files. The first is the LendingRates_TestHarness.html file. From this HTML page you'll call methods in the second file, LendingServiceProxy.js, to retrieve the desired information from the AJAX-enabled WCF service. The retrieved data will populate drop-down lists for end user selection. The purpose here is to test your WCF service. The two additional files, LendingStyles.css and Rate.htm, help enhance the presentation of the lending rate information on the web page.
Note that two other JavaScript files are referenced: jquery.js and jquery-templates.js. This example used the jQuery JavaScript Library v1.3.2 and jTemplates 0.7.5, so you'll need to reference these versions or later. Information about these files and links to download them are available at jquery.org.
<!DOCTYPE html PUBLIC "-//W3C//DTD XHTML 1.0 Transitional//EN"
"http://www.w3.org/TR/xhtml1/DTD/xhtml1-transitional.dtd">
<html xmlns="http://www.w3.org/1999/xhtml">
 <head>
   <script src="jquery.js" type="text/javascript"></script>
   <script src="jquery-jtemplates.js" type="text/javascript"></script>
   <script src="LendingServiceProxy.js" type="text/javascript"></script>
   <link href="LendingStyles.css" rel="stylesheet" type="text/css" />
   <title>Lending Institution Rate Selection</title>
 </head>
 <body>
   <div>
      <div id="Institutions">
        <div id="InstitutionSelection">
          <b>Lending Agency:</b>
            <select id=‘lendinginstdd’ style=‘width:175px’
               onchange=‘dropdownlending_onchange(this)’></select>
               <br /><br />
               <b>Lending Program:</b>
            <select id=‘lendingratesdd’ style=‘width:175px’
               onchange=‘dropdownlendingrates_onchange(this)’></select>
               <br /><br />
        </div>
        <div id="RateDisplay">
          <img id="RetrievingImg" src="ajax-loader.gif" class="Hidden" />
            <div id="SingleRate">
            </div>
      </div>

    </div>
  </body>

  <script type="text/javascript">

  var proxy = new LendingServiceProxy();

  // Code executes after page loading is complete
  $(document).ready(function ()
  {
    // Retrieve all lending institutions
    $("#RetrievingImg").removeClass("Hidden");
    proxy.GetLendingInstitutions(institutionsRetrieved,
serviceDefaultErrorHandler);
  });

  // institutionsRetrieved()
  // called when the service returns a list of lending institutions
  // loads lendinginstdd dropdown list
  function institutionsRetrieved(results) {
    if (results) {
      if (results.length > 0) {
        var list = document.getElementById(‘lendinginstdd’);
        // Clear options before loading
        list.selectedIndex = 0;
        list.options.length = 0;
        for (n in results) {
            var opt = document.createElement("option");
            opt.text = results[n];
            opt.value = results[n];
            list.options.add(opt);
          }
        }
        else {
          alert("no lending institutions found");
        }
      }
      $("#RetrievingImg").addClass("Hidden");
  }

  // ratesRetrieved()
  // called when the service returns a list of lending institution rates
  // loads lendingratesdd dropdown list
  function ratesRetrieved(results)
  {
    if (results) {
      if (results.length > 0) {
        var list = document.getElementById(‘lendingratesdd’);
        // clear options before loading
        list.selectedIndex = 0;
        list.options.length = 0;
        for (n in results) {
            var opt = document.createElement("option");
            opt.text = results[n].InstrumentRateDisplayName;
            opt.value = results[n].ID;
            list.options.add(opt);
        }
      }
      else {
        alert("no lending rates found for this institution");
      }
    }
    $("#RetrievingImg").addClass("Hidden");
  }

  // loadexcelwebpart()
  // called when the service returns a specific lending institution rate
  // loads the Excel Web Access web part
  function loadexcelwebpart(results) {
    if (results) {
        //alert(results.LendingInstitution);
        var templateItem = $("#SingleRate").setTemplateURL("Rate.htm", null,
{ filter_data: false });
        templateItem.processTemplate(results);
    }
    else {
        alert("no specific lending rate found for this institution");
    }
  }

  // dropdownlending_onchange()
  // Event handler for changes with the selection drop down
  function dropdownlending_onchange(event) {
    if (event == null || event.selectedIndex < 0)
        return;
    var listIndex = event.options[event.selectedIndex].value;
    // If first item in the list not an actual selection.
    if (listIndex == "null")
        return;
    // Retrieve the lending rate programs offered by lending institution
    var lendingInstitutionName = event.options[event.selectedIndex].text;
    $("#RetrievingImg").removeClass("Hidden");
    proxy.GetALendingInstitutionsRates(lendingInstitutionName, ratesRetrieved,
serviceDefaultErrorHandler);
  }

  // dropdownlendingrates_onchange()
  // Event handler for changes with the selection drop down
  function dropdownlendingrates_onchange(event) {
    if (event == null || event.selectedIndex < 0)
        return;
    var listIndex = event.options[event.selectedIndex].value;
    // If first item in the list not an actual selection.
    if (listIndex == "null")
        return;
    // Retrieve the lending rate programs offered by lending institution
    var lendingRateID = event.options[event.selectedIndex].value;
    proxy.GetASpecificLendingInstitutionsRate(lendingRateID, loadexcelwebpart,
serviceDefaultErrorHandler);
  }

  // serviceDefaultErrorHandler()
  // called when service returns an error
  function serviceDefaultErrorHandler(xhr, context, method)
  {
    alert(xhr.statusText);
    if (!$("#RetrievingImg").hasClass("Hidden"))
$("#RetrievingImg").addClass("Hidden");
  }
  </script>
</html>
code snippet 076576 Ch08_Code.zip/LendingRates_TestHarnes.html
As soon as the HTML page is loaded, the GetLendingInstitutions method in the proxy is called. Then subsequent methods are called on the proxy in response to the onchange event as the end users make their selections in the drop-down lists.
The following LendingServiceProxy.js file handles the calls between the client and the service. Parameters are passed where appropriate, and the returned data is parsed and loaded into the response object for use. Note that the method and data parameter names passed into the _doAjax method must be identical to the method and data parameter names used in the WCF service ILendingRateJSONService interface.
// Proxy for calling WCF JSON service in Windows Azure
// constructor for the LendingServiceProxy
LendingServiceProxy = function()
{
 this._baseURL =
"http://YourAzureGUID.cloudapp.net/LendingRateJSONService.svc/"
;
};
LendingServiceProxy.prototype =
{
 GetLendingInstitutions: function (success, error) {
   this._doAjax("GetLendingInstitutions", null, success, error);
 },
 GetALendingInstitutionsRates: function (lendingInstitutionName, success, error)
 {
   var data = { lendingInstitutionName: lendingInstitutionName };
     this._doAjax("GetALendingInstitutionsRates", data, success, error);
 },
 GetASpecificLendingInstitutionsRate: function (lendingRateIdentifier, success,
error) {
   var data = { lendingRateIdentifier: lendingRateIdentifier };
     this._doAjax("GetASpecificLendingInstitutionsRate", data, success, error)
   },
 _defaultErrorHandler: function(xhr, status, error)
 {
   alert(xhr.statusText);

  },

  _doAjax: function(method, data, fnSuccess, fnError)
  {
    if (!data) data = {};

    if (!fnError) fnError = this._defaultErrorHandler;

    $.ajax({
      type: "GET",
      url: this._baseURL + method,
      data: data,
      contentType: "application/json; charset=utf-8",
      dataType: "json",
      success: fnSuccess,
      error: fnError,
      dataFilter: function(data)
      {
        var response;

        if (typeof (JSON) !== "undefined" && typeof (JSON.parse) === "function")
          response = JSON.parse(data);
        else
          response = val("(" + data + ")");

        if (response.hasOwnProperty("d"))
          return response.d;
        else
          return response;
      }
    });
  }
};
code snippet 076576 Ch08_Code.zip/LendingServiceProxy.js
Following is a simple CSS file, LendingStyles.css:
body {background-color:#D3D7DA;}

h3 {margin-top: 4px;}
li {margin-bottom:5px;}

#InstitutionSelection {border-width:thin; width:200px;
background-color: #E1E1FF; font-size:13px; font-weight:bold; float:left; }
#InstitutionSelection a {text-decoration:none; color:Black;}

#RateDisplay {float:left; margin-left:20px;}

#SingleRate {width:400px; padding-right:4px; background-color: #FFF8E6;}

.Hidden {display:none; visibility:hidden;}
code snippet 076576 Ch08_Code.zip/LendingStyles.css
LendingStyles.css provides a simple layout style for displaying the lending institutions and their rates for end user viewing and interaction.
The final file to add to enhance the test harness user presentation is the Rate.htm file.
<h3>
 {$T.LendingInstitution}
   <br />
   APR: <b>{$T.APR}</b>
   <br />
   Name: <b>{$T.Lock}</b>
   <br />
   Instrument: <b>{$T.Instrument}</b>
   <br />
   Instrumentname: <b>{$T.InstrumentRateDisplayName}</b></h3>
<p>
</p>
code snippet 076576 Ch08_Code.zip/Rate.htm
In the LendingRates_TestHarness.html page's JavaScript function loadexcelwebpart, the Rate.htm file is used as a template to display the additional information for the user-selected lending institution and interest rate. This additional information includes the APR and the number of days that the user can lock the interest rate.
Place the LendingRates_TestHarness.html, LendingServiceProxy.js, LendingStyles.css, and Rate.htm files in a common directory such as TestHarness, with the jquery.js and jquery-templates.js files. There is also a .gif file available in the .zip file for this chapter that you can use to simulate progress while the data is being retrieved from the WCF service, but it is not required for successful execution. Double-click the LendingRates_TestHarness.html file in your folder to open in a browser. Your code should successfully execute, with a result like Figure 8.12.

Extending an Excel Financial Model to Leverage Azure Table Data
You now have the fundamentals in place for leveraging Windows Azure table data directly from an application using WCF Data Services. You have also seen how to set up an Azure WCF service that serves as a public-facing endpoint for your Azure table data and returns JSON to calling programs. In the next two sections you will put both bits of knowledge to practical use by extending an Excel financial model to benefit from Azure table data, regardless of whether the model is running on the client or on SharePoint under Excel Services.
This scenario extends the mortgage financial model. Up to this point, when using the model, the real estate agent provides three input parameters: the mortgage amount, the term in years, and the fixed interest rate. In this case, the agent needs to know these values. Of course, knowing the mortgage amount and the number of years for which the buyer wants the loan is a simple matter. What is not known is the potentially large number of interest rates being offered by different lending institutions on a given day. These rates change daily and can vary widely across lending institutions. That's where the Windows Azure Table storage comes in.
To frame this example, suppose you develop an application that crawls the Web, collects lending institution rate data, and places it in an Azure table with an entity structure like the one you have been using all along. Then, once you have the data collected, you can make it available to your financial model so that real estate agents can simply make appropriate lending rate selections and the model will be updated appropriately. This way, agents no longer need to look up daily rates from diverse sources. The authoritative data is available to them directly within their working context. That's a productivity gain and a huge win for end users!
Creating an Excel Client Add-In
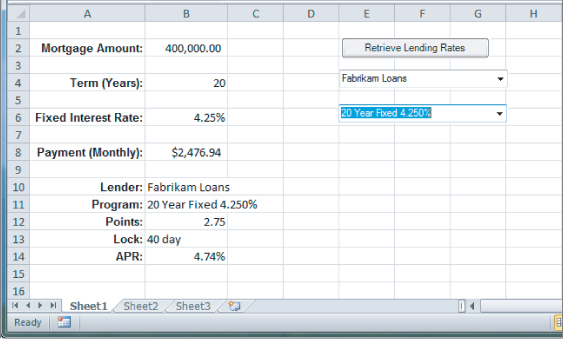
Figure 8.13 shows a mortgage financial model. You will be building a financial model like this for your Excel client add-in. In the Excel client, you will be accessing the table data directly using WCF Data Services. End users will retrieve the lending rate table data with a button click, and then select a lending institution and the year term with its corresponding rate. The APR, the number of days for which the borrower can lock the rate, and the points they will need to pay for the loan at this rate are retrieved from the table and placed in the model below the computed monthly payment for reference.

This is considered a document-level solution, as you want the add-in to load only when the mortgage financial model workbook is opened.
1. Open Visual Studio 2010 as Administrator.
2. Select File ⇒ New Project.
3. In the New Project dialog, click Office 2010 then the Excel 2010 Workbook project template, provide a name (e.g., ExcelMortgageAzure) and a location for the project, and then click OK.
4. In the Visual Studio Tools for Office Project Wizard, click Create a New Document, provide a name for the document (e.g., ExcelMortgageAzure), and then click OK.
5. To begin the model, enter text, starting in cell A2, and modify the cell for bold font with the text adjusted to the right so that your sheet looks similar to Figure 8.14.
If you haven't used Excel before, it uses the concept of named ranges. Any cell or collection of cells can have an arbitrary name associated with it. This named range can then be used within formulas and accessed programmatically. In order to programmatically place data into each cell in column B that corresponds to its respective label, you need to provide a named range for each of these cells.
6. Click cell B2. Then click in the area just left of the fx, type AMOUNT, and press Enter. Your result should look like Figure 8.15.
7. Complete creating named ranges for each of the cells; TERM, FIR, skip Payment (Monthly) for now, LENDER, INSTRUMENT, POINTS, LOCK, and APR, respectively.
8. Because Payment is a computed value, you use a formula to calculate this. Click cell B8 and type =ROUNDUP(-PMT(FIR/12,TERM*12,AMOUNT,,0),2).
Notice in this formula that the named ranges you created are being used. As you type the formula, Excel provides an IntelliSense experience so that you can choose the valid values available. When you finish entering the formula and press Enter, you will see a #NUM! error in the cell. This is normal because you have not yet entered values in the other named range cells.
9. To validate that your formula is correct, enter 400000 for the Mortgage Amount, 25 for the Term (Years), and 0.0475 for the Fixed Interest Rate. You may need to widen column B2 for the computed value to show, but it should be $2,280.47.
Your financial model is now complete with respect to a real estate agent needing to know and manually enter the input values. Now let's take it to the next level.
First, as with the previous sample, you'll add classes for the lending institution rate, the data context, and the data source. Because you have stepped through this before, these instructions are abbreviated.
10. Add references to Microsoft.WindowsAzure.StorageClient and System.Data.Services.Client to the project. If you are prompted to retarget to .NET Framework 4, confirm the prompts to do so.
11. In the Solution Explorer, right-click on the project and add a new class named LendingInstitutionRate.cs.
12. Replace all the code with the following:
using System;
using System.Collections.Generic;
using System.Linq;
using System.Text;
using Microsoft.WindowsAzure.StorageClient;

namespace ExcelMortgageAzure
{
 public class LendingInstitutionRate:TableServiceEntity
 {
   public string LendingInstitution { get; set; }
   public string ID { get; set; }
   public string Instrument { get; set; }
   public int Year { get; set; }
   public double Rate { get; set; }
   public double Points { get; set; }
   public double APR { get; set; }
   public string Lock { get; set; }
   public string InstrumentRateDisplayName { get; set; }

   public LendingInstitutionRate(string ID)
   {
       PartitionKey = "LendingRates";
       RowKey = ID;
   }

   public LendingInstitutionRate()
   {
       PartitionKey = "LendingRates";
   }
 }
}
code snippet 076576 Ch08_Code.zip/LendingInstitutionRate.cs
13. Add a new class named LendingDataContext.cs.
14. Replace all the code with the following:
using System;
using System.Collections.Generic;
using System.Linq;
using System.Text;
using Microsoft.WindowsAzure;
using Microsoft.WindowsAzure.StorageClient;

namespace ExcelMortgageAzure
{
 public class LendingDataContext:TableServiceContext
 {

   public LendingDataContext(string baseAddress, StorageCredentials credentials)
           : base(baseAddress, credentials)
   {

   }

   public IQueryable<LendingInstitutionRate> LendingInstitutionRate
   {
     get
     {
         return
this.CreateQuery<LendingInstitutionRate>("LendingInstitutionRate");
     }
   }
 }
}
code snippet 076576 Ch08_Code.zip/LendingDataContext.cs
15. Add a new class named LendingDataSource.cs.
16. Replace all the code with the following:
using System;
using System.Collections.Generic;
using System.Linq;
using System.Text;
using Microsoft.WindowsAzure;
using Microsoft.WindowsAzure.StorageClient;

namespace ExcelMortgageAzure
{
 public class LendingDataSource
 {
   private static CloudStorageAccount storageAccount;
   private LendingDataContext context;

   static LendingDataSource()
   {
     try
     {

         storageAccount =
CloudStorageAccount.Parse("DefaultEndpointsProtocol=https;
AccountName={youraccountname};AccountKey={youraccountkey}");

         CloudTableClient c = new CloudTableClient(
             storageAccount.TableEndpoint.AbsoluteUri,
storageAccount.Credentials);

         if (!c.DoesTableExist("LendingInstitutionRate"))
         {
             CloudTableClient.CreateTablesFromModel(typeof(LendingDataContext),

                  storageAccount.TableEndpoint.AbsoluteUri,
                  storageAccount.Credentials);
          }
      }
      catch (Exception e)
      {
          System.Windows.Forms.MessageBox.Show(e.Message);
      }
    }

    public LendingDataSource()
    {
      this.context = new LendingDataContext(
          storageAccount.TableEndpoint.AbsoluteUri, storageAccount.Credentials);

      this.context.RetryPolicy = RetryPolicies.Retry(3, TimeSpan.FromSeconds(1));
    }

    public IEnumerable<LendingInstitutionRate> Select()
    {
        var results = from g in this.context.LendingInstitutionRate
                      where g.PartitionKey == "LendingRates"
                      select g;

        return results;
    }

    public void AddLendingInstitutionRate(LendingInstitutionRate newItem)
    {
        this.context.AddObject("LendingInstitutionRate", newItem);
        this.context.SaveChanges();
    }

    // Use to add multiple products in a batch
    // call Save() after adding the products
    public void AddLendingInstitutionRates(LendingInstitutionRate newItem)
    {
        this.context.AddObject("LendingInstitutionRate", newItem);
    }

    public void Save()
    {
        this.context.SaveChanges
(System.Data.Services.Client.SaveChangesOptions.Batch);
    }

    public void DeleteLendingInstitutionRate(LendingInstitutionRate item)
    {
        this.context.DeleteObject(item);
        this.context.SaveChanges();
    }

    public void DeleteLendingInstitutionRates()
    {
        foreach (var p in this.Select())
        {
            this.context.DeleteObject(p);
        }
        this.context.SaveChanges
(System.Data.Services.Client.SaveChangesOptions.Batch);
    }

  }
}
code snippet 076576 Ch08_Code.zip/LendingDataSource.cs
17. Click the Save All icon on the Visual Studio toolbar.
18. Right-click on the project and select Properties.
19. If you were not previously prompted to target the .NET Framework 4, on the Application tab, select .NET Framework 4 from the drop-down below Target framework. When prompted, respond Yes, but make sure you saved your work first.
20. Press F6 to confirm that your project builds. As you did previously, make sure you fully replace the placeholder values {youraccountname} and {youraccountkey} with your appropriate values.
You now have the financial model and data access pieces in place so that you can access Azure table data. Now you'll add the UI elements for the user to interact with to load the named ranges with the retrieved values from the table.
21. In the Solution Explorer, expand the ExcelMortgageAzure.xls node and double-click on Sheet1.cs to open the workbook sheet.
22. Open the toolbox and place a Windows Forms button on the sheet in the area of cell D2. Name the button buttonRetrieveRates and change its Text property to Retrieve Lending Rates.
23. Double-click on the button to create the click event handler.
24. Just prior to the Sheet1_Startup method, add the following class-level variable:
List<LendingInstitutionRate> liRates = new List<LendingInstitutionRate>();
25. In the buttonRetrieveRates_Click method, add the following code:
//Instantiate the data source
LendingDataSource ds = new LendingDataSource();

//Retrieve Azure data from table storage and save into a list for reuse

foreach (var lir in ds.Select())
 {
   LendingInstitutionRate tempLir = new LendingInstitutionRate();
   tempLir.ID = lir.ID;
   tempLir.LendingInstitution = lir.LendingInstitution;
   tempLir.Instrument = lir.Instrument;
   tempLir.Year = lir.Year;
   tempLir.Rate = lir.Rate;
   tempLir.Points = lir.Points;
   tempLir.APR = lir.APR;
   tempLir.Lock = lir.Lock;
   tempLir.InstrumentRateDisplayName = lir.InstrumentRateDisplayName;

   liRates.Add(tempLir);
  }

//Load a variable with only the lending institutions
var lendingInstitutions = (from i in liRates
   select i.LendingInstitution).Distinct();

//Load the combobox with the institution names
comboBoxLenders.DataSource = lendingInstitutions.ToArray();
comboBoxLenders.DisplayMember = "LendingInstitution";
code snippet 076576 Ch08_Code.zip/Sheet1.cs
Here you call the Select method on the data source object to retrieve all the entities from table storage and cache them in a List object. You then use a LINQ query to select .Distinct on the institution name and use this to load the ComboBox drop-down with the lending institution names.
26. Return to the ExcelMortgageAzure.xlsx tab and place a ComboBox from the toolbox just below the button. Change its Name property to comboBoxLenders. Delete the value in its Text property.
27. Double-click the ComboBox to create its event handler.
28. Place the following code inside the method:
//On selection change selects only the institution's
//rates from the list
var lendingInstitutionRates = from i in liRates
   where i.LendingInstitution ==
         comboBoxLenders.SelectedValue.ToString()
         orderby i.LendingInstitution,
         i.Instrument, i.Year, i.Rate
         select i;

//Load the rates combobox for the lending institution
comboBoxRates.DataSource = lendingInstitutionRates.ToArray();
comboBoxRates.DisplayMember = "InstrumentRateDisplayName";
comboBoxRates.ValueMember = "ID";
code snippet 076576 Ch08_Code.zip/Sheet1.cs
The selection change event for the Lenders ComboBox queries the liRates list and selects all the lending institutions that match the value of the end user's selection. Matching objects in the list are selected, sorted, and used as the DataSource for the comboBoxRates object.
29. Return to the ExcelMortgageAzure.xlsx tab and place a ComboBox from the toolbox just below the previous ComboBox. Change its Name property to comboBoxRates. Delete the value in its Text property.
30. Double-click the ComboBox to create its event handler.
31. Place the following code inside the method:
//Select the specific rate for the institution and
//apply the data appropriately to
//the named ranges on the spreadsheet.
var lendingInstitutionRates = from i in liRates
   where i.ID ==
   comboBoxRates.SelectedValue.ToString()
   select i;

//Load the named ranges
foreach (var lir in lendingInstitutionRates)
 {
   this.TERM.Cells.Value = lir.Year;
   this.FIR.Cells.Value = lir.Rate;
   this.LENDER.Cells.Value = lir.LendingInstitution;
   this.POINTS.Cells.Value = lir.Points;
   this.INSTRUMENT.Cells.Value = lir.InstrumentRateDisplayName;
   this.LOCK.Cells.Value = lir.Lock;
   this.APR.Cells.Value = lir.APR;
   }
code snippet 076576 Ch08_Code.zip/Sheet1.cs
Lastly, when end users select the specific rate they want to apply to the financial model, this OnSelectionChanged event fires. In this method, the specific rate object is retrieved from the liRates list. Its property values are used to set the values for each of their corresponding named ranges in the Excel sheet via the Excel object model. Excel automatically recalculates the sheet when the values change in the cells.
32. Press F5 to run the project. Your financial model should look similar to Figure 8.16.


As you can see from this simple financial model, the opportunities are vast for building rich add-ins that reach out to external sources for data; and the Office client applications offer deep object models for developers to tap into the benefits of developing Office client solutions.
Using the ECMAScript Object Model with the Excel Web Access Web Part
Excel workbooks running on the desktop are powerful and handy tools, but workbooks tend to be replicated widely throughout an organization, and this can be problematic. For example, it's common to send an e-mail with an Excel document attached. The problem with this is that workbooks tend to morph as individuals add their own customizations, and then one begins to wonder if these broadly distributed documents still maintain integrity with the original computations in the model. And what if the original model is updated? One would need to broadly distribute the updated model again.
This is where Excel Services under SharePoint provides tremendous value. The author of the model can upload it to SharePoint, where the model becomes broadly available across the organization, from a single location, via the Web. From here, end users can open the document in either the Excel client or the new Excel Web App in SharePoint 2010.
However, there is one caveat; the Excel Web App does not support the same notion of add-ins that can be implemented in the client. Therefore, the add-in that you built in the previous section will not access the Azure table data when running under the Excel Web App. The button to retrieve the data and the two drop-down lists are simply not accessible in the Excel Web App.
Therefore, to provide end users with the same functionality to easily manipulate the mortgage financial model in the Excel Web App, you need to employ a couple of other nice features in SharePoint: the Excel Web Access web part and the Content Editor web part, in combination with the new ECMAScript object model for Excel. This is also where your JSON-enabled WCF service comes into play. You will call this web service from your ECMAScript code in the Content Editor web part. First, however, you need to set up everything on the SharePoint side.
![]() To keep this exercise straightforward, you are not going to create a Visual Studio Tools for Office (VSTO) deployment package for your Excel document-level add-in. That discussion is beyond the scope of this chapter. Here you will simply upload a saved version of your Excel mortgage financial model to SharePoint.
To keep this exercise straightforward, you are not going to create a Visual Studio Tools for Office (VSTO) deployment package for your Excel document-level add-in. That discussion is beyond the scope of this chapter. Here you will simply upload a saved version of your Excel mortgage financial model to SharePoint.
In the following steps, you will upload your financial model workbook to SharePoint and use a Content Editor web part to access Azure table data via a WCF service and manipulate the financial model in an Excel Web Access web part.
1. Open your ExcelMortgageAzure project in Visual Studio and press F5.
2. When Excel opens, chose File ⇒ Save As and save it to any location on your disk with the name ExcelMortgageAzureSP.xlsx. Close Excel.
3. On your SharePoint site, navigate to any document library and upload the ExcelMortgageAzureSP.xlsx file.
When you view the document in the Excel Web App, you can see that the Web App recognizes that unsupported features are present in the document — that is, those not available in the browser. Click on Details in the information bar and you can see the types of features that are not supported, as shown in Figure 8.17. This restricts end users from editing the document in the browser, so they cannot manipulate the model.
To get past this restriction, you will create a SharePoint web part page that contains an Excel Web Access web part and a Content Editor web part. You will then add ECMAScript code to the Content Editor web part to access the Azure table data and manipulate the document with the Excel ECMAScript object model.
4. In SharePoint, select Site Actions ⇒ View All Site Content ⇒ Create ⇒ Page ⇒ Web Part Page ⇒ Create.
5. For the name, enter MortgageModel. Select Header, Left Column, Body for the template, and then choose Site Pages for the document library. Click Create.
6. In the Body container, click Add a Web Part.
7. Select Business Data under Categories, and then select Excel Web Access under Web Parts. Click Add.
8. Click the link “Click here” to open the tool pane.
9. In the tool pane, click the ellipses (…) beside the Workbook text box.
10. In the Select an Asset — Webpage dialog, click on the document library to which you uploaded your model and select ExcelMortgageAzureSP.xlsx. Click OK.
11. In the tool pane, set the Type of Toolbar to None, click the checkbox for Typing and Formula Entry, change Height to 375, and set the Chrome Type to None. Click OK.
12. In the left column, click Add a Web Part.
13. Click Media and Content under Categories, and Content Editor under Web Parts. Click Add.
14. Hover over the Content Editor title, click the drop-down arrow, and select Edit Web Part.
15. Set the Title to Select Lending Institution, the width to 200, and the Chrome to Title Only. Click OK.
16. In the SharePoint ribbon, choose Stop Editing.
Although you cannot interactively access the table data at this point, you can give your model a quick test under Excel Services in the Excel Web Access web part. In the web part, provide values for the mortgage amount, years, and interest rate to see the model adjust. It's good to see the model working at this level, and the following steps will bring this solution on par with the client add-in you built. Some of the previous code used in your test harness to call the Azure WCF service will look familiar to you here, but it is modified with the Excel ECMAScript object model to push retrieved data values into the document cells.
17. Add the following code snippet file to the directory where you saved your LendingRates_TestHarness.html file:
<!DOCTYPE html PUBLIC "-//W3C//DTD XHTML 1.0 Transitional//EN"
"http://www.w3.org/TR/xhtml1/DTD/xhtml1-transitional.dtd">

<html xmlns="http://www.w3.org/1999/xhtml">
 <head>
   <script src="/Shared%20Documents/MortgageAssetsJS/jquery.js"
type="text/javascript"></script>
   <script src="/Shared%20Documents/MortgageAssetsJS/jquery-jtemplates.js"
type="text/javascript"></script>
   <script src="/Shared%20Documents/MortgageAssetsJS/LendingServiceProxy.js"
type="text/javascript"></script>
   <link href="/Shared%20Documents/MortgageAssetsJS/LendingStyles.css"
rel="stylesheet" type="text/css" />
   <title>Lending Institution Rate Selection</title>
 </head>

 <body>
   <div>
     <div id="Institutions">
       <div id="InstitutionSelection">
         <b>Lending Agency:</b>
         <select id=‘lendinginstdd’ style=‘width:175px’
               onchange=‘dropdownlending_onchange(this)’></select>
           <br /><br />
         <b>Lending Program:</b>
         <select id=‘lendingratesdd’ style=‘width:175px’
               onchange=‘dropdownlendingrates_onchange(this)’></select>
           <br /><br />
         </div>
       <div id="RateDisplay">

          <img id="RetrievingImg"
            src="/Shared%20Documents/MortgageAssetsJS/ajax-loader.gif"
              class="Hidden" />
          <div id="SingleRate">
          </div>
        </div>
      </div>
    </div>
  </body>

  <script type="text/javascript">

    // Script level variables
    var xlWebPart;
    var proxy = new LendingServiceProxy();
    var APR = null;
    var Instrument = null;
    var LendingInstitution = null;
    var Lock = null;
    var Points = null;
    var Rate = null;

    // Set the page event handlers for onload and unload.
    if (window.attachEvent) {
      window.attachEvent("onload", Page_Load);
    }
    else {
      // For some browsers window.attachEvent does not exist.
      window.addEventListener("DOMContentLoaded", Page_Load, false);
    }

    // Load the page.
    function Page_Load() {
      Ewa.EwaControl.add_applicationReady(GetEwa);
    }

    // Get handle to EWA instance, set event handlers and initialize content
    function GetEwa() {
      xlWebPart = Ewa.EwaControl.getInstances().getItem(0);

      // Retrieve all lending institutions
      $("#RetrievingImg").removeClass("Hidden");
      proxy.GetLendingInstitutions(institutionsRetrieved,
serviceDefaultErrorHandler);
    }

  // institutionsRetrieved()
  // called when the service returns a list of lending institutions
  // loads lendinginstdd dropdown list
  function institutionsRetrieved(results) {
    if (results) {
      if (results.length > 0) {
          var list = document.getElementById(‘lendinginstdd’);
          // Clear options before loading
          list.selectedIndex = 0;
          list.options.length = 0;
          for (n in results) {
              var opt = document.createElement("option");
              opt.text = results[n];
              opt.value = results[n];
              list.options.add(opt);
          }
        }
        else {
          alert("no lending institutions found");
        }
      }
      $("#RetrievingImg").addClass("Hidden");
  }

  // ratesRetrieved()
  // called when the service returns a list of lending institution rates
  // loads lendingratesdd dropdown list
  function ratesRetrieved(results)
  {
    if (results) {
      if (results.length > 0) {
          var list = document.getElementById(‘lendingratesdd’);
          // Clear options before loading
          list.selectedIndex = 0;
          list.options.length = 0;
      for (n in results) {
          var opt = document.createElement("option");
          opt.text = results[n].InstrumentRateDisplayName;
          opt.value = results[n].ID;
          list.options.add(opt);
      }
    }
      else {
        alert("no lending rates found for this institution");
      }
    }
    $("#RetrievingImg").addClass("Hidden");
  }

  // loadexcelwebpart()
  // called when the service returns a specific lending institution rate
  // loads the Excel Web Access web part
  function loadexcelwebpart(results) {
    if (results) {
      APR = results.APR;
      Instrument = results.Instrument;
      LendingInstitution = results.LendingInstitution;
      Lock = results.Lock;
      Points = results.Points;
      Rate = results.Rate;
      // load web part named ranges
      xlWebPart.getActiveWorkbook().getRangeA1Async(‘’Sheet1‘!FIR’,
setFIRNamedRangeValue);
      xlWebPart.getActiveWorkbook().getRangeA1Async(‘’Sheet1‘!LENDER’,
setLENDERNamedRangeValue);
      xlWebPart.getActiveWorkbook().getRangeA1Async(‘’Sheet1‘!INSTRUMENT’,
setINSTRUMENTNamedRangeValue);
      xlWebPart.getActiveWorkbook().getRangeA1Async(‘’Sheet1‘!POINTS’,
setPOINTSNamedRangeValue);
      xlWebPart.getActiveWorkbook().getRangeA1Async(‘’Sheet1‘!APR’,
setAPRNamedRangeValue);
      xlWebPart.getActiveWorkbook().getRangeA1Async(‘’Sheet1‘!LOCK’,
 setLOCKNamedRangeValue);
    }
    else {
      alert("no specific lending rate found for this institution");
    }
  }

  // dropdownlending_onchange()
  // Event handler for changes with the selection drop down
  function dropdownlending_onchange(event) {
    if (event == null || event.selectedIndex < 0)
        return;
    var listIndex = event.options[event.selectedIndex].value;
    // If first item in the list not an actual selection.
    if (listIndex == "null")
        return;
        // Retrieve the lending rate programs offered by lending institution
    var lendingInstitutionName = event.options[event.selectedIndex].text;
    $("#RetrievingImg").removeClass("Hidden");
    proxy.GetALendingInstitutionsRates(lendingInstitutionName, ratesRetrieved,
serviceDefaultErrorHandler);
  }

  // dropdownlendingrates_onchange()
  // Event handler for changes with the selection drop down
  function dropdownlendingrates_onchange(event) {
    if (event == null || event.selectedIndex < 0)
        return;
    var listIndex = event.options[event.selectedIndex].value;
    // If first item in the list not an actual selection.
    if (listIndex == "null")
        return;
    // retrieve the lending rate programs offered by lending institution
    var lendingRateID = event.options[event.selectedIndex].value;
    proxy.GetASpecificLendingInstitutionsRate(lendingRateID, loadexcelwebpart,
serviceDefaultErrorHandler);
  }

  // serviceDefaultErrorHandler()
  // called when service returns an error
  function serviceDefaultErrorHandler(xhr, context, method)
  {
    alert(xhr.statusText);
    if (!$("#RetrievingImg").hasClass("Hidden"))
$("#RetrievingImg").addClass("Hidden");
  }

  function setFIRNamedRangeValue(asyncResult) {
    var range = asyncResult.getReturnValue();
    var valueArray = new Array(1);
    valueArray[0] = new Array(1);
    valueArray[0][0] = Rate * 100;
    range.setValuesAsync(valueArray);
  }

  function setLENDERNamedRangeValue(asyncResult) {
    var range = asyncResult.getReturnValue();
    var valueArray = new Array(1);
    valueArray[0] = new Array(1);
    valueArray[0][0] = LendingInstitution;
    range.setValuesAsync(valueArray);
  }

  function setINSTRUMENTNamedRangeValue(asyncResult) {
    var range = asyncResult.getReturnValue();
    var valueArray = new Array(1);
    valueArray[0] = new Array(1);
    valueArray[0][0] = Instrument;
    range.setValuesAsync(valueArray);
  }

  function setPOINTSNamedRangeValue(asyncResult) {
    var range = asyncResult.getReturnValue();
    var valueArray = new Array(1);
    valueArray[0] = new Array(1);
    valueArray[0][0] = Points;
    range.setValuesAsync(valueArray);
  }

  function setAPRNamedRangeValue(asyncResult) {
    var range = asyncResult.getReturnValue();
    var valueArray = new Array(1);
    valueArray[0] = new Array(1);
    valueArray[0][0] = APR * 100;
    range.setValuesAsync(valueArray);
  }

  function setLOCKNamedRangeValue(asyncResult) {
    var range = asyncResult.getReturnValue();
    var valueArray = new Array(1);
    valueArray[0] = new Array(1);
    valueArray[0][0] = Lock;
    range.setValuesAsync(valueArray);
  }

  </script>
</html>
code snippet 076576 Ch08_Code.zip/LendingRates.html
The major difference between this code snippet and the test harness you previously worked with is that this code includes the use of the Excel ECMAScript object model for manipulating the Excel workbook in the web part.
First, you need to initialize your connection to the Excel Web Access web part. This is an established pattern. You add an .add_applicationReady() event listener so that when the Excel Web Access web part loads and is ready on the page, a callback to GetEwa is made. In the GetEwa callback method, you can get a reference to a specific instance of an Excel Web Access web part on the page. In your code, you then refer to the object, in this case xlWebPart, to interact with that specific web part.
For your purposes, you only want to interact with the web part once the end user selects a specific lending rate from the drop-down. At that time, you need to push each of the appropriate data values into the grid so that the mortgage model can recalculate accordingly, and display the other data values for end user reference. To do this, you use the .getRangeA1Async() method on the active workbook and pass in the name of the sheet to access, the named range value, and a callback method.
For example, when you want to set the cell value for the FIR (fixed interest rate) named range, you pass in the sheet name (sheet1), the named range (FIR), and then a callback (setFIRNamedRangeValue). When the cell has been selected in the grid, the callback method is called. The rate data value is placed in the array structure that Excel expects, and the range.setValuesAsync() method is called, passing in the array. The value is updated in the web part, and the sheet is recalculated automatically. The pattern for getting and setting the values for the additional named range cells is the same.
With your code complete, now you need to get it into the Content Editor web part you added to your SharePoint web page previously. However, first you need to get the appropriate files you used locally uploaded to a SharePoint document library. This could be the same one where your Excel document is located.
1. On your SharePoint site, navigate to the document library of your choice and upload the LendingRates.html, jquery.js, jquery-jtemplates.js, LendingServiceProxy.js, and LendingStyles.css files.
2. Once the files are uploaded, open the LendingRates.html file and modify the <script src> tag with the path to your JavaScript files, and the <link href> tag with the path to the CSS file, and then save the LendingRates.html file back to the document library.
3. Right-click the LendingRates.html file and choose Copy Shortcut.
4. Navigate to your MortgageModel site page.
5. Click on the Page tab and select Edit on the ribbon. Hover over the Content Editor web part title bar, click the drop-down arrow on the right, and then select Edit Web Part.
6. In the Content Link text box, paste the URL you copied in step 3 to the LendingRates.html file into the text box, and then choose OK.
7. Choose Save & Close from the SharePoint ribbon.
You should see the first drop-down immediately load with the list of lending institutions. Using the drop-downs on the left, select a lending agency and a lending program. Your financial model should update with a result similar to what is shown in Figure 8.18.
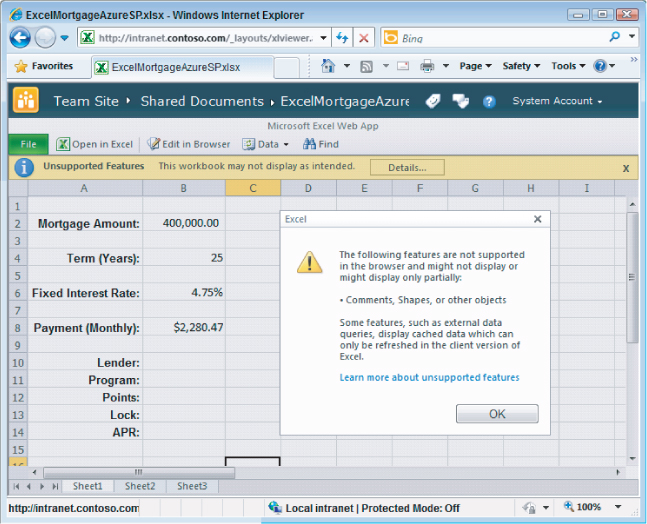

You have come full circle. What was only a client-based solution has now also become a web-based solution that many end users can use, even if they don't have Excel on their desktop. It's an excellent strategy to start thinking about how you can better utilize Excel as a service in order to leverage the business logic in Excel documents in web-based solutions.
There are millions of Office users worldwide, and all the tools are in place for developers to deliver the next generation of cloud-based solutions on Office and SharePoint. In this chapter, you used an Office 2010 project template in Visual Studio 2010 to create an Excel document-level add-in that brought Windows Azure Table data directly into the financial model. Then you learned how to build a JSON-enabled WCF service and how to use the Excel ECMAScript object model in a Content Editor web part to provide end users with the same functionality when the model is uploaded to Excel Services in SharePoint 2010. If you have not previously developed for Office, consider incorporating the Office clients into your next SharePoint solution.
Following are some additional references that you might find useful:
- Office Developer Center on MSDN — http://msdn.microsoft.com/office
- Windows Azure Table Service API — http://msdn.microsoft.com/en-us/library/dd179423.aspx
- Microsoft Excel Team Blog — http://blogs.office.com/b/microsoft-excel/
- Office 2010 Developer Training Course on MSDN — http://msdn.microsoft.com/en-us/Office2010DeveloperTrainingCourse.aspx
- Office 2010 Developer Training Kit Download — http://go.microsoft.com/?linkid=9702452