
Chapter 7
Using Bing Maps in Your SharePoint Business Solutions
What's in This Chapter?
- Understanding Bing Maps and geographical (geo) web services
- Using Bing Maps controls in applications
- Integrating the Bing Maps Silverlight control and geo web services in a SharePoint application
Increasingly, developers are building applications that introduce geographical (geo) data into the main user experience. With the help of geo data, this additional context (such as customer addresses within a map control or meteorological data superimposed on maps) provides improved decision-making and insight into application data. In this chapter, you'll explore how to integrate geo data into SharePoint using Bing Maps. Specifically, this chapter will provide you with an overview of Bing Maps, discuss how you can integrate the SharePoint client object model with the Bing Maps API, and then walk you through how to create a simple application that displays store information stored within a SharePoint list in a Bing Maps Silverlight control.
Over the past few years, applications have become more integrated with different types of geo data. Geo data can help inform business decisions of all types. For example, integrating geo data into the context of applications such as reporting dashboards, sales management applications, or even customer management solutions has become important to help business professionals visualize which territories are doing well versus those that are doing poorly. Furthermore, plant and facility managers who manage multiple plants across the country, climatologists who are seeking weather patterns, or even pleasure-craft retirees all require some degree of geo data-bound knowledge.
With the growing popularity of SharePoint, many developers are asking how to integrate geo data applications with SharePoint, and which types of solutions can be built. The answer to the first question is that you can use Bing Maps as the geo service for SharePoint, and the answer to the second question is that there are many ways to integrate these two technologies.
Bing Maps is a set of services offered by Microsoft as part of the Bing suite of services. Bing Maps provides a number of geo services that can be accessed via the browser. For example, Figure 7.1 shows a number of native Bing Maps services, such as get directions, view traffic, view businesses, and so on.

You can also find a number of Bing Maps Map Apps, which provide additional functionality beyond what is offered by Bing Maps. To explore the Map Apps, click the Map Apps button, which opens the Map Apps gallery (see Figure 7.2).

Given all the earthquake activity of late, one interesting application is the Earthquakes in Last 7 Days Map App, which shows current earthquake activity in the world that exceeds a Richter scale magnitude of 2.5. Figure 7.3 shows what this application looks like with a focus on North America.

While there are many useful Map Apps and native browser features of Bing Maps, as a developer you can also create your own applications with a core set of flexible APIs and web services. The APIs and services that Bing Maps offers are extensive and rich. For example, you can do all of the following:
- Leverage a core set of SOAP web services to do geo look-ups on addresses.
- Use the REST services to create maps with pushpins, look up addresses, retrieve imagery metadata, and so on.
- Use Silverlight or AJAX controls to create a map that integrates with your application (or extend that map for your application).
These options are not mutually exclusive; for example, you can use the geocoding web services within a Silverlight Bing Maps control, if desired.
Using the APIs and services, you can design and build map-centric applications that use Bing Maps. For example, IDV Solutions provides a number of interesting applications that leverage Bing Maps, including one that uses automobile accident data to display the pervasiveness of accidents within a given area. As shown in Figure 7.4, different geographical areas can be specified, and you can filter based on a given time period and other metadata.

To help you get started with development, Bing Maps not only provides you with rich developer documentation, you also have interactive SDKs at your disposal. The interactive SDKs provide a way for you to toggle across code and previews that show application possibilities through a dynamic preview. In the code-behind, you can see, for example, HTML or XAML markup, JavaScript, or managed code. (XAML is the UI markup language that sits behind a Silverlight application.) Figure 7.5 shows the Show Me and Source Code views in the Silverlight Control Interactive SDK.

The default view for the Silverlight Control Interactive SDK is the Show Me view. Conversely, clicking the Source Code view displays the following XAML code-behind, which you need to have in your Silverlight application to render the map (refer to Figure 7.5):
<UserControl x:Class="MapControlInteractiveSdk.Tutorials.TutorialRoadMode"
    xmlns="http://schemas.microsoft.com/winfx/2006/xaml/presentation"
    xmlns:x="http://schemas.microsoft.com/winfx/2006/xaml"
    xmlns:m="clr-namespace:Microsoft.Maps.MapControl;assembly=Microsoft.Maps .MapControl">
    <Grid x:Name="LayoutRoot" Background="White">
        <m:Map CredentialsProvider="{StaticResource MyCredentials}" Mode="Road" Center="37.806029,-122.407007" ZoomLevel="16" />
    </Grid>
</UserControl>
In the code-behind, you'll notice a couple of important things. The first is the reference to the Microsoft.Maps.MapControl, and the second is the CredentialsProvider property on the Map element. These represent, respectively, the Silverlight Map control, which you must download and add as a reference to your Silverlight project, and a set of developer credentials that you need to sign up for at the Bing Maps Developer site.
In this chapter, you'll use the Silverlight control to create an integrated application for SharePoint. To download this control, visit www.microsoft.com/maps/developers/web.aspx. This will get you started with the Bing Maps developer experience. You can go straight to the Silverlight control download page, if you want. The link is listed in the Additional References section in this chapter (or you could simply Bing “Bing Maps Silverlight Control.”
After you download the Silverlight control, you must set up a developer account. This is very easy to do and requires only that you have a Live ID. To sign up for a Bing Maps developer account, visit www.bingmapsportal.com/. The most important item you need to build your Bing Maps application is the developer key; this key will be used in your application to authenticate the application against a valid ID when using the core APIs and web services. The process to set up your account takes only a few minutes.
Bing Maps Controls
You now know a little bit about Bing Maps and likely have had a chance to explore the Bing Maps sites and the Map Apps gallery. Hopefully, you've also downloaded the Bing Maps Silverlight control and set up your developer account. So, what now? Because this chapter focuses on using the Silverlight control to integrate Bing Maps with SharePoint, it's worth pointing out that you have a couple of options for Bing Maps controls. That is, you don't necessarily need to use the Silverlight control if you don't want to.
The first option is the Bing Maps AJAX control. This is a JavaScript-driven Bing Maps control that can be used in a flexible manner. If you're looking for a simple, client-side control that requires no managed code, this is the control for you. In the following code snippet, the JavaScript loads a map called myBingMap into a DIV. The required JavaScript library is loaded dynamically (as opposed to adding a reference to a project with the Silverlight control), and, voilà, your Bing Map Ajax control magically appears.
<!DOCTYPE html PUBLIC "-//W3C//DTD XHTML 1.0 Transitional//EN"
   "http://www.w3.org/TR/xhtml1/DTD/xhtml1-transitional.dtd">
<html>
   <head>
      <title></title>
      <meta http-equiv="Content-Type" content="text/html; charset=utf-8">
      <script type="text/javascript" src="http://ecn.dev.virtualearth.net/mapcontrol/
          mapcontrol.ashx?v=6.2"></script>
      <script type="text/javascript">
      var map = null;

      function GetMap()
      {
         map = new VEMap(‘myBingMap’);
         map.LoadMap();
      }
      </script>
   </head>
   <body onload="GetMap();">
      <div id=‘myBingMap’ style="position:relative; width:600px;
          height:700px;"></div>
   </body>
</html>
The preceding code is not overly impressive; it merely adds an instance of the map to the page using the AJAX Bing Maps control. However, you can extrapolate how adding JavaScript functions that leverage the core AJAX APIs would enhance the Bing Maps experience. You can also integrate seamlessly with SharePoint by using the SharePoint client object model (which supports JavaScript, Silverlight, and .NET applications). We'll explore the SharePoint client object model more deeply later in the chapter.
The second option is the Silverlight Bing Maps control. I am partial to this for three reasons. First, you can create a great user experience by virtue of Silverlight. True, it may not be fully cross-platform and cross-device, and if you're looking to maximize your device and platform compatibility (e.g., integrate with web and iPad), then your default choice should be the AJAX Bing Maps control. However, if your target deployment is less broad and you want to amp up your user experience, you can tap into the Silverlight capabilities to create very rich and compelling solutions.
Second, if you want to tie your solution into cross-domain platforms such as Windows Azure, leveraging the Silverlight control for this is also an easier and richer proposition, especially if you're looking at porting your application to SharePoint Online and Office 365 and storing data or services in Windows Azure.
Lastly, for those of you who want to create a great user experience and keep within the managed-code world, the Silverlight control should be your choice. The advantage here is that not only can you use Visual Studio for your coding and debugging experience, you can use Expression Blend as a design tool, a perfect complement.
Leveraging Geo-Location Web Services
One of the key applications of Bing Maps is geo-coding location data. You can use Bing Maps in a variety of ways to get the information you need for your solution, ranging from using a specific type of control (e.g., Silverlight Bing Maps control) to a specific API (e.g., SOAP web services). When building apps that integrate with SharePoint, you'll likely use either the REST APIs or the SOAP services.
For the SOAP services, you can use four core services. Table 7.1 lists the services, along with the service references.
Table 7.1 Service URLs
| Service Name | Service URL |
| Geocode Service | http://dev.virtualearth.net/webservices/v1/geocodeservice/geocodeservice.svc |
| Imagery Service | http://dev.virtualearth.net/webservices/v1/imageryservice/imageryservice.svc |
| Route Service | http://dev.virtualearth.net/webservices/v1/routeservice/routeservice.svc |
| Search Service | http://dev.virtualearth.net/webservices/v1/searchservice/searchservice.svc |
Enter the service URL in your browser to explore the service definition. If you want to test the functionality, you can create a simple console app that implements the service.
![]() Bing Maps provides a rich set of developer documents. To get started with the Bing Maps API and services, see http://msdn.microsoft.com/en-us/library/dd877180.aspx.
Bing Maps provides a rich set of developer documents. To get started with the Bing Maps API and services, see http://msdn.microsoft.com/en-us/library/dd877180.aspx.
You can also use REST to interact with Bing Maps. When using the REST URIs, you can return the results in either XML or JSON. For example, create a new Windows Forms application, add a button called btnGet to the form, and double-click the button to add a new event handler. If you add the following code to the code-behind, you'll see the return data as either XML or JSON. By adding bingRestURIXML in the Create method, you'll see XML as the return data, and with bingRestURIJSON, you'll see JSON. (If you set a breakpoint where the MessageBox.Show method is called, you'll be able to see the contents of responseString.) The major difference in the URI is the omission of o=xml& from the first URI, which by default returns the data as JSON:
…
        Uri bingRestURIXML = new Uri("http://dev.virtualearth.net/REST/v1/Locations/US/WA/98052/Redmond/1%20Microsoft%20Way?o=xml&key=<your bing developer key here>");

        Uri bingRestURIJSON = new Uri("http://dev.virtualearth.net/REST/v1/Locations/US/WA/98052/Redmond/1%20Microsoft%20Way?key=<your bing developer key here>");
        string responseString = string.Empty;

        public Form1()
        {
            InitializeComponent();
        }

        private void btnGet_Click(object sender, EventArgs e)
        {
            HttpWebRequest req = WebRequest.Create(bingRestURIXML) as HttpWebRequest;
            using (HttpWebResponse resp = req.GetResponse() as HttpWebResponse)
            {
                StreamReader reader = new StreamReader(resp.GetResponseStream());
                responseString = reader.ReadToEnd();
            }
            MessageBox.Show("done");
        }

…
Although the REST services are more lightweight than the Windows Communication Foundation (WCF) services (custom services you would build, deploy, and manage yourself), you need to parse the return data (whether XML or JSON) to use the specific data points that are returned.
Integrating the Bing Maps API with SharePoint
In the application you'll build in this chapter, you'll use the Bing Maps Silverlight control. You can integrate the Silverlight control with SharePoint in a couple of ways. For example, you can use the native Silverlight web part, which is by far the easiest way to deploy a Silverlight application to SharePoint, or wrap the Silverlight application with a web part and deploy as a SharePoint Solution Package (WSP) — a special build package of your application that is native to SharePoint. With the latter, you have more granular control over your web part (see the “Additional References” section for links to more information).
Within the Silverlight application that you deploy to SharePoint, you can use one of two ways to push and pull data from SharePoint. You can use the SharePoint client object model or you can use the native web services that ship with SharePoint. The web services are good (and out of the box), but in some cases you'll need to manage complex XML return data objects — this can be tricky to parse. The client object model, especially for the Silverlight or Bing Maps AJAX controls, provides a more efficient and streamlined way to interact programmatically with SharePoint.
Leveraging the Client Object Model
The SharePoint client object model (SP COM) is a remote API that enables you to work with SharePoint from a .NET, Silverlight, or JavaScript application. For Bing Maps, this works well and gives you options for the AJAX and Silverlight Bing Maps controls.
If you've used the SharePoint server object model, you'll recognize a lot of the syntax; it's similar in structure. For example, as shown in the following code snippet, you first set up the context with your SharePoint site. This code snippet configures the context explicitly using the SharePoint site URL, but you can also set it dynamically using the Current property.
…
       private void Connect()
        {
            context = new ClientContext("http://blueyonderdemo");
            context.Load(context.Web);
            context.Load(context.Web.Lists);
            stores = context.Web.Lists.GetByTitle("Store Sales");
            context.Load(stores);
            context.Load(stores.RootFolder);
            var camlQuery = new CamlQuery();
            camlQuery.ViewXml = "<View/>";
            storeItems = stores.GetItems(camlQuery);
            context.Load(storeItems);
            context.ExecuteQueryAsync(OnLoadItemsSucceeded, onQueryFailed);
        }
…
One of the key differences in the SP COM (as opposed to the SharePoint server object model) is that you batch process the communication with the SharePoint site. This provides users with a more efficient and manageable experience when interacting with SharePoint. For example, as shown in the preceding code snippet, you create the context object and then issue a number of methods and properties against that object. In this case, you load the Web (SharePoint site), and a specific list called Store Sales from the SharePoint site, and create a generic CAML query (roughly equivalent to a SELECT * in SQL) to return all the list items. You then execute all the batched properties and methods by calling the ExecuteQuery method (in .NET applications) or the ExecuteQueryAsync method (in Silverlight and JavaScript applications). Because the preceding code snippet is executed within a Silverlight application, it uses the ExecuteQueryAsync method, which has two delegates as parameters — one that executes on success and another on fail.
Given that you are going to create an application in the space of one chapter, we want to keep the solution architecture fairly straightforward. That said, you'll be creating an application that will be deployable on either SharePoint Server 2010 or SharePoint Online in Office 365. With this parity in mind, you need to architect your solution with an external service call mediated from a Silverlight application (because you cannot execute an external service call from a sandboxed solution in SharePoint Online).
The architecture of the solution is outlined at a high level in Figure 7.6. Note that the Bing Maps Silverlight control will be integrated with a wider Silverlight application and deployed to SharePoint. The Silverlight application will not only leverage the Bing Maps Silverlight control, but also use the SOAP service to do a dynamic geo-lookup for latitude and longitude. The Silverlight application will then interact with a SharePoint list in two ways:
- It will enable the addition of user-entered data and the look-up from the Bing SOAP service.
- It will support a read from that same list to display the store and sales information in a data-bound control.

With the architecture in hand, let's begin coding the solution.
![]() Before you start, be sure to download the Silverlight Bing Maps control and obtain your Bing Maps developer key.
Before you start, be sure to download the Silverlight Bing Maps control and obtain your Bing Maps developer key.
Creating a SharePoint Solution Using Bing Maps
Assuming you have downloaded the Silverlight control and signed up for a Bing Maps developer account, you are ready to open Visual Studio 2010 and create a new Silverlight application that will house the Bing Maps and SharePoint integration. This is the first step in creating the Bing Maps solution.
The solution you'll create in this chapter will enable a user to do four main things:
- Read a list into a data-bound list box
- Do a geo-code look-up for the latitude and longitude of a specific address
- Programmatically add a new store (list item) to a SharePoint list
- Add a pushpin for a specific store to a Bing map
This solution will leverage the SharePoint client object model to interact with a SharePoint site and integrate the Bing Maps functionality using the Silverlight Bing Maps control and SDK.
Let's get started building the application!
Creating the Bing Map Application
First, you need to create a new Silverlight application to display the Bing Maps application.
1. Open Visual Studio 2010.
2. Select File ⇒ New Project.
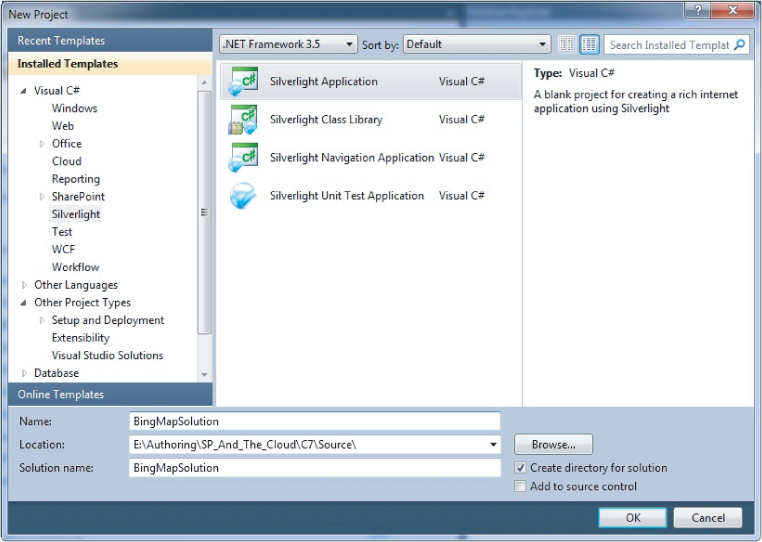
3. In the New Project dialog that appears, under Installed Templates, click Silverlight ⇒ Silverlight Application, and then provide a name for the project (e.g., BingMapSolution) and a location. When you are done, click OK (see Figure 7.7).
4. Accept the default options in the New Silverlight Application dialog, and click OK.
5. After the Silverlight project has been created, right-click it and select Add Reference.
6. Click the Browse tab and then browse to Microsoft.Maps.MapControl.dll. (You should find it in C:Program Files (x86)Bing Maps Silverlight ControlV1Libraries.) You need to add this DLL to the project to access the core Bing Maps APIs. Click OK to add it to the project.
7. Double-click the MainPage.xaml file and amend the XAML code as per the following bolded code:
<UserControl x:Class="BingMapSolution.MainPage"
    xmlns="http://schemas.microsoft.com/winfx/2006/xaml/presentation"
    xmlns:x="http://schemas.microsoft.com/winfx/2006/xaml"
    xmlns:d="http://schemas.microsoft.com/expression/blend/2008"
    xmlns:mc="http://schemas.openxmlformats.org/markup-compatibility/2006"
    mc:Ignorable="d"
   xmlns:m="clr-namespace:Microsoft.Maps.MapControl;assembly=Microsoft.Maps .MapControl"
    d:DesignHeight="300" d:DesignWidth="400">
    <Grid x:Name="LayoutRoot" Background="White">
        <m:Map x:Name="MainMap" CredentialsProvider="<Bing Map Developer Key Here>"
                        AnimationLevel="Full"
                        Mode="Aerial"
                        Center="47.620574,-122.34942"
                        ZoomLevel="16">
            <m:Pushpin Location="47.620574,-122.34942" />
        </m:Map>
    </Grid>
</UserControl>
When you've added the preceding XAML code, your application should now look like Figure 7.8.
8. Press F6 to build the project. When the project builds successfully, press F5 to debug it. Figure 7.9 shows an aerial shot of the specified location.


At this point, you have a working, albeit simple, application that exposes the Bing Maps map with a center point of 47.620574 latitude and -122.34942 longitude, which points to the Space Needle in Seattle, Washington. However, to map the solution to the architecture, you need some sort of data-management capability. This means you need a way to do the following:
- Input data
- Read the data into the Bing Maps application
For an application like this, you have a number of data-management options. For example, if you're planning to deploy this application to an on-premises instance of SharePoint, you could leverage SQL Server, SharePoint list data, or a locally (in-domain) deployed web service. If you were deploying this to SharePoint Online, you would not be able to access the on-premises SharePoint list data or SQL Server without an intermediary service bus, such as the Windows Azure AppFabric service bus. You could do this, but you could also keep things a little more lightweight and store the data in SQL Azure or in a SharePoint list in SharePoint Online. For our purposes, because we want an application that deploys to both SharePoint Server (that is on-premises) or SharePoint Online, we'll choose the SharePoint list as our source of data management.
![]() At the time of writing, SharePoint Online does not yet support SQL Azure and Business Connectivity Services (BCS). However, by the time you are reading this book, you should have BCS support in SharePoint Online. Thus, you'll be able to integrate SQL Azure data with SharePoint Online using BCS to create an external list. You can then use the external list as the data input to the Silverlight application.
At the time of writing, SharePoint Online does not yet support SQL Azure and Business Connectivity Services (BCS). However, by the time you are reading this book, you should have BCS support in SharePoint Online. Thus, you'll be able to integrate SQL Azure data with SharePoint Online using BCS to create an external list. You can then use the external list as the data input to the Silverlight application.
Let's go ahead and extend the user interface in the Silverlight application to enable data entry into the list and create the store information list in SharePoint.
Creating the Application UI
Follow these steps to extend the simple Bing Maps UI to include a set of other controls that will enable users to add and view SharePoint list information (which represent store locations within the Pacific Northwest in the United States):
1. Open the Visual Studio solution and double-click the MainPage.xaml file.
2. Amend the earlier XAML code as per the following bolded code. Note that if you copy and paste, you'll need to add System.Windows.Controls.Data.Input to the project, but if you drag and drop the controls from the Toolbox, this library will be automatically added to the project for you.

<UserControl xmlns:sdk="http://schemas.microsoft.com/winfx/2006/xaml/presentation/sdk"  x:Class="BingMapSolution.MainPage"
   xmlns="http://schemas.microsoft.com/winfx/2006/xaml/presentation"
   xmlns:x="http://schemas.microsoft.com/winfx/2006/xaml"
   xmlns:d="http://schemas.microsoft.com/expression/blend/2008"
   xmlns:mc="http://schemas.openxmlformats.org/markup-compatibility/2006"
   mc:Ignorable="d"
  xmlns:m="clr-namespace:Microsoft.Maps.MapControl;assembly=Microsoft.Maps.MapControl"
   d:DesignHeight="700" d:DesignWidth="884">
   <Grid x:Name="LayoutRoot" Width="872" Height="694">
        <Grid.Background>
            <LinearGradientBrush EndPoint="0.5,1" StartPoint="0.5,0">
                <GradientStop Color="LightBlue" Offset="1"/>
                <GradientStop Color="White" Offset="0"/>
            </LinearGradientBrush>
        </Grid.Background>

        <Grid.RowDefinitions>
            <RowDefinition/>
        </Grid.RowDefinitions>

        <ListBox x:Name="lstStores" Margin="13,49,585,0" Height="247" VerticalAlignment="Top">
            <ListBox.ItemTemplate>
                <DataTemplate>
                    <Border Margin="5" BorderThickness="2" BorderBrush="DarkBlue" CornerRadius="4" HorizontalAlignment="Stretch">
                        <Grid Margin="3">
                            <Grid.RowDefinitions>
                                <RowDefinition></RowDefinition>
                                <RowDefinition></RowDefinition>
                                <RowDefinition></RowDefinition>
                                <RowDefinition></RowDefinition>
                                <RowDefinition></RowDefinition>
                                <RowDefinition></RowDefinition>
                                <RowDefinition></RowDefinition>
                            </Grid.RowDefinitions>
                            <TextBlock x:Name="txtbxStoreName" Width="250" FontFamily="Arial" FontSize="10" FontWeight="Bold" Text="{Binding StoreName}"></TextBlock>
                            <TextBlock x:Name="txtbxStoreAddress" Grid.Row="1" FontFamily="Arial" FontSize="8" Text="{Binding StoreAddress}"></TextBlock>
                            <TextBlock x:Name="txtbxStoreCity" Grid.Row="2" FontFamily="Arial" FontSize="8" Text="{Binding StoreCity}"></TextBlock>
                            <TextBlock x:Name="txtbxStoreState" Grid.Row="3" FontFamily="Arial" FontSize="8" Text="{Binding StoreState}"></TextBlock>
                            <TextBlock x:Name="txtbxStoreZip" Grid.Row="4" FontFamily="Arial" FontSize="8" Text="{Binding StoreZip}"></TextBlock>
                            <TextBlock x:Name="txtbxStoreLat" Grid.Row="5" FontFamily="Arial" FontSize="8" Text="{Binding StoreLatitude}"></TextBlock>
                            <TextBlock x:Name="txtbxStoreLong" Grid.Row="6" FontFamily="Arial" FontSize="8" Text="{Binding StoreLongitude}"></TextBlock>
                        </Grid>
                    </Border>
                </DataTemplate>
            </ListBox.ItemTemplate>
        </ListBox>

        <m:Map x:Name="MainMap" CredentialsProvider="<insert your Bing developer key here>"
                        AnimationLevel="Full"
                        Mode="Aerial"
                        Center="47.620574,-122.34942"
                        ZoomLevel="16" Margin="301,49,27,42">
            <m:MapLayer x:Name="StorePushpins"/>
            <m:Pushpin Location="47.620574,-122.34942" />
        </m:Map>
        <Button Content="Add Store" Height="23"
                HorizontalAlignment="Left" Margin="60,647,0,0"
                Name="btnGetStores" VerticalAlignment="Top" Width="75" Click="btnGetStores_Click" />
        <Button Content="Get Stores" Height="23" HorizontalAlignment="Left"
                Margin="59,312,0,0" Name="btnAddStores"
                VerticalAlignment="Top" Width="75" Click="btnAddStores_Click" />
        <sdk:Label Content="Store Locations" Foreground="Black" FontFamily="Arial Black" Height="28"
                   HorizontalAlignment="Left"
                   Margin="15,21,0,0" Name="lblStores" VerticalAlignment="Top" Width="120" />
        <sdk:Label Content="New Store" Foreground="Black" FontFamily="Arial Black" Height="28"
                   HorizontalAlignment="Left" Margin="15,354,0,0" Name="lblNewStore" VerticalAlignment="Top" Width="120" />
        <TextBox Height="23" HorizontalAlignment="Left" Margin="83,381,0,290" Name="txtbxStoreName" Width="187" />
        <TextBox Height="23" HorizontalAlignment="Left" Margin="83,410,0,0" Name="txtbxStoreCity" VerticalAlignment="Top" Width="187" />
        <TextBox Height="23" HorizontalAlignment="Left" Margin="83,439,0,0" Name="txtbxStoreAddress" VerticalAlignment="Top" Width="187" />
        <TextBox Height="23" HorizontalAlignment="Left" Margin="83,468,0,0" Name="txtbxStoreState" VerticalAlignment="Top" Width="187" />
        <TextBox Height="23" HorizontalAlignment="Left" Margin="83,497,0,0" Name="txtbxStoreZipCode" VerticalAlignment="Top" Width="187" />
        <TextBox Height="23" HorizontalAlignment="Left" Margin="83,526,0,0" Name="txtbxStoreSales" VerticalAlignment="Top" Width="187" />
        <sdk:Label Height="20" Content="Name:" HorizontalAlignment="Left" Margin="15,388,0,0" Name="lblStoreName" VerticalAlignment="Top" Width="62" />
        <sdk:Label Content="Address:" Height="20" HorizontalAlignment="Left" Margin="15,419,0,0" Name="lblStoreCity" VerticalAlignment="Top" Width="62" />
        <sdk:Label Content="City:" Height="20" HorizontalAlignment="Left" Margin="15,449,0,0" Name="lblStoreAddress" VerticalAlignment="Top" Width="62" />
        <sdk:Label Content="State:" Height="20" HorizontalAlignment="Left" Margin="15,474,0,0" Name="lblStoreState" VerticalAlignment="Top" Width="62" />
        <sdk:Label Content="Zip Code:" Height="20" HorizontalAlignment="Left" Margin="15,503,0,0" Name="lblStoreZipCode" VerticalAlignment="Top" Width="62" />
        <sdk:Label Content="Sales:" Height="20" HorizontalAlignment="Left" Margin="15,532,0,0" Name="lblStoreSales" VerticalAlignment="Top" Width="62" />
        <sdk:Label Content="Store Map" FontFamily="Arial Black" Foreground="Black" Height="28" HorizontalAlignment="Left" Margin="293,21,0,0" Name="label1" VerticalAlignment="Top" Width="120" />
        <Button Content="Zoom In" Height="23" HorizontalAlignment="Left" Margin="157,312,0,0" Name="btnZoom" VerticalAlignment="Top" Width="75" Click="btnZoom_Click" />
        <Button Content="Clear" Height="23" HorizontalAlignment="Left" Margin="157,647,0,0" Name="btnClear" VerticalAlignment="Top" Width="75" Click="btnClear_Click" />
        <TextBox IsEnabled="True" Height="23" HorizontalAlignment="Left" Margin="83,581,0,0" Name="txtbxLatitude" VerticalAlignment="Top" Width="187" />
        <TextBox IsEnabled="True" Height="23" HorizontalAlignment="Left" Margin="83,610,0,0" Name="txtbxLongitude" VerticalAlignment="Top" Width="187" />
        <sdk:Label Content="Latitude:" Height="20" HorizontalAlignment="Left" Margin="15,587,0,0" Name="lblLatitude" VerticalAlignment="Top" Width="62" />
        <sdk:Label Content="Longtitude:" Height="20" HorizontalAlignment="Left" Margin="15,616,0,0" Name="lblLongitude" VerticalAlignment="Top" Width="62" />
        <CheckBox Content="Look Up Geo-Code" Height="16" HorizontalAlignment="Left" Margin="14,557,0,0" Name="chkbxLatLong"  Checked="chkbxLatLong_Checked"
                  VerticalAlignment="Top" Width="143" />
    </Grid>
</UserControl>
code snippet 076576 Ch07_Code.zip/BingMapSolution.cs
The XAML code is quite lengthy, and there are some items that are worth calling out. One is the formatting of the list box, which uses the Grid.RowDefinition property to provide some structure to the list box. The list box is data-bound using a set of text blocks located in specific rows within the Grid. The MainMap Bing Maps object also contains one MapLayer, which provides a layer within the map for adding items such as pushpins or polygon overlays. You have four buttons, each with a corresponding event:
- The btnGetStores_Click event retrieves the store list items and then populates the list box using the SharePoint client object model.
- The btnAddStores_Click event takes user-entered information from the text boxes and, assuming the chkbxLatLong checkbox is checked, will do a look-up to retrieve the latitude and longitude for the address entered.
- The btnClear_Click event clears the text boxes for data reentry.
- The btnZoom_Click event takes the latitude and longitude from the selected item in the list box and creates a Location object, which is then used to refocus the Bing Maps map on the specified store location.
When you've added the new XAML code to MainPage.xaml, your application should look similar to Figure 7.10.

Now that you've created the core UI for the Bing Maps application, you need to add the service reference that will be used to retrieve the latitude and longitude from the address entered by the end user. The URL for this service is http://dev.virtualearth.net/webservices/v1/geocodeservice/geocodeservice.svc. Go ahead and open your Internet browser and type in this address to ensure you can see the service. You should see something similar to Figure 7.11.
3. Right-click the project and select Add Service Reference. Add the service URI into the Address field and click Go, as shown in Figure 7.12.
4. Provide a name for the service reference (e.g., BingGeoService) in the Namespace field. Click Advanced, and in the Collection Type drop-down list, select System.Array.
5. You now need to add the SharePoint client object model libraries. To do this, right-click the Silverlight project and select Add Reference. Click Browse and then browse to c:Program FilesCommon FilesMicrosoft SharedWeb Server Extensions14TEMPLATELAYOUTSClientBin and add Microsoft.SharePoint.Client.Silverlight.dll and Microsoft.SharePoint.Client.Silverlight.Runtime.dll.
6. Right-click the project and select Add New ⇒ Class. Provide a name for the class (e.g., StoreInfo), and click Add. Amend the class code as shown in bold in the following code snippet. This class is the in-memory representation of the store information and the latitude and longitude that will be returned from the service call.
using System;
using System.Net;
using System.Windows;
using System.Windows.Controls;
using System.Windows.Documents;
using System.Windows.Ink;
using System.Windows.Input;
using System.Windows.Media;
using System.Windows.Media.Animation;
using System.Windows.Shapes;
using Microsoft.Maps.MapControl;

namespace BingMapSolution
{
   public class StoreInfo
   {
        public string StoreName { get; set; }
        public string StoreAddress { get; set; }
        public string StoreCity { get; set; }
        public string StoreState { get; set; }
        public string StoreZip { get; set; }
        public string StoreSales { get; set; }
        public string StoreLatitude { get; set; }
        public string StoreLongitude { get; set; }
   }
}
code snippet 076576 Ch07_Code.zip/StoreInfo.cs
7. Right-click the MainPage.xaml file and select View Code. Amend the code in the MainPage.xaml.cs file as per the following bolded code:
using System;
using System.Collections.Generic;
using System.Linq;
using System.Net;
using System.Windows;
using System.Windows.Controls;
using System.Windows.Documents;
using System.Windows.Input;
using System.Windows.Media;
using System.Windows.Media.Animation;
using System.Windows.Shapes;
using System.Threading;
using Microsoft.SharePoint.Client;
using Microsoft.Maps.MapControl;
using BingMapSolution.BingGeoService;

namespace BingMapSolution
{
    public partial class MainPage : UserControl
    {
        private ClientContext context;
        private ListItemCollection storeItems;
        private List stores;
        private List<StoreInfo> listOfStores;

        List<StoreInfo> listOfStoreSummaries = new List<StoreInfo>();

        string strStoreName = null;
        string strStoreCity = null;
        string strStoreAddress = null;
        string strStoreState = null;
        string strStoreZip = null;
        string strStoreSales = null;
        string strStoreLatitude = null;
        string strStoreLongitude = null;

        private List oList;
        private string siteUrl = "http://blueyonderdemo";

        public MainPage()
        {
            InitializeComponent();
        }

        private void btnAddStores_Click(object sender, RoutedEventArgs e)
        {
            Connect();
        }

        private void Connect()
        {
            context = new ClientContext("http://blueyonderdemo");
            context.Load(context.Web);
            context.Load(context.Web.Lists);
            stores = context.Web.Lists.GetByTitle("Store Sales");
            context.Load(stores);
            context.Load(stores.RootFolder);
            var camlQuery = new CamlQuery();
            camlQuery.ViewXml = "<View/>";
            storeItems = stores.GetItems(camlQuery);
            context.Load(storeItems);
            context.ExecuteQueryAsync(OnLoadItemsSucceeded, onQueryFailed);
        }

        private void OnLoadItemsSucceeded(object sender, ClientRequestSucceededEventArgs args)
        {
            Dispatcher.BeginInvoke(ShowItems);
        }

        private void ShowItems()
        {
            listOfStores = new List<StoreInfo>();

            foreach (ListItem listItem in storeItems)
            {
                listOfStores.Add(
                    new StoreInfo()
                    {
                        StoreName = listItem["Title"].ToString(),
                        StoreAddress = listItem["Address"].ToString(),
                        StoreCity = listItem["City"].ToString(),
                        StoreState = listItem["State"].ToString(),
                        StoreZip = listItem["Zip"].ToString(),
                        StoreSales = listItem["Sales"].ToString(),
                        StoreLatitude = listItem["Latitude"].ToString(),
                        StoreLongitude = listItem["Longitude"].ToString()
                    });
            }

            lstStores.ItemsSource = listOfStores;
        }

        private void btnZoom_Click(object sender, RoutedEventArgs e)
        {
            Location locationFilter = new Location();
            StoreInfo tempStoreRecord = new StoreInfo();

            tempStoreRecord = (StoreInfo)lstStores.SelectedItem;
            string storeLatitude = tempStoreRecord.StoreLatitude;
            string storeLongitude = tempStoreRecord.StoreLongitude;

            locationFilter.Latitude = Double.Parse(storeLatitude);
            locationFilter.Longitude = Double.Parse(storeLongitude);

            MainMap.SetView(locationFilter, 10);
        }

        private void btnGetStores_Click(object sender, RoutedEventArgs e)
        {
            strStoreName = txtbxStoreName.Text;
            strStoreCity = txtbxStoreCity.Text;
            strStoreAddress = txtbxStoreAddress.Text;
            strStoreState = txtbxStoreState.Text;
            strStoreZip = txtbxStoreZipCode.Text;
            strStoreSales = txtbxStoreSales.Text;
            strStoreLatitude = txtbxLatitude.Text;
            strStoreLongitude = txtbxLongitude.Text;

            ClientContext clientContext = new ClientContext(siteUrl);
            Web oWebsite = clientContext.Web;
            ListCollection collList = oWebsite.Lists;
            oList = clientContext.Web.Lists.GetByTitle("Store Sales");
            ListItem oListItem = oList.AddItem(new ListItemCreationInformation());
            oListItem["Title"] = strStoreName;
            oListItem["Address"] = strStoreCity;
            oListItem["City"] = strStoreAddress;
            oListItem["State"] = strStoreState;
            oListItem["Zip"] = strStoreZip;
            oListItem["Sales"] = strStoreSales;
            oListItem["Latitude"] = strStoreLatitude;
            oListItem["Longitude"] = strStoreLongitude;
            oListItem.Update();

            clientContext.Load(oList, list => list.Title);

            clientContext.ExecuteQueryAsync(onQuerySucceeded, onQueryFailed);
        }

        private void onQuerySucceeded(object sender, ClientRequestSucceededEventArgs args)
        {
            Dispatcher.BeginInvoke(AddItem);
        }

        void AddItem()
        {
            Pushpin pushpin = new Pushpin();
            Location pushpinLocation = new Location();
            pushpinLocation.Latitude = Double.Parse(strStoreLatitude);
            pushpinLocation.Longitude = Double.Parse(strStoreLongitude);

            pushpin.Width = 7;
            pushpin.Height = 10;
            pushpin.Tag = strStoreName;
            pushpin.Location = pushpinLocation;
            StorePushpins.AddChild(pushpin, pushpinLocation, PositionOrigin.Center);

            MessageBox.Show("Store was successfully added.");
        }

        private void onQueryFailed(object sender, ClientRequestFailedEventArgs args)
        {
            Dispatcher.BeginInvoke(EventFailed);
        }

        void EventFailed()
        {
            MessageBox.Show("Request failed.");
        }

        private void btnClear_Click(object sender, RoutedEventArgs e)
        {
            txtbxStoreName.Text = "";
            txtbxStoreAddress.Text = "";
            txtbxStoreCity.Text = "";
            txtbxStoreState.Text = "";
            txtbxStoreZipCode.Text = "";
            txtbxStoreSales.Text = "";
        }

        private void chkbxLatLong_Checked(object sender, RoutedEventArgs e)
        {
            GeocodeRequest bingRequest = new GeocodeRequest();

            bingRequest.Credentials = new Credentials();
            bingRequest.Credentials.ApplicationId = "<your key here>";

            bingRequest.Query = txtbxStoreAddress.Text + "," + txtbxStoreCity.Text + "," + txtbxStoreState.Text + "," + txtbxStoreZipCode.Text;

            ConfidenceFilter[] filters = new ConfidenceFilter[1];
            filters[0] = new ConfidenceFilter();
            filters[0].MinimumConfidence = Confidence.High;

            GeocodeOptions bingOptions = new GeocodeOptions();
            bingOptions.Filters = filters;

            bingRequest.Options = bingOptions;

            if (bingRequest.Query != "")
            {
                GeocodeServiceClient geocodeService = new GeocodeServiceClient("BasicHttpBinding_IGeocodeService");
                geocodeService.GeocodeCompleted += new EventHandler<GeocodeCompletedEventArgs>(bingService_GeocodeCompleted);
                geocodeService.GeocodeAsync(bingRequest);
            }
            else
            {
                MessageBox.Show("Please enter a valid Address.");
            }
        }

        void bingService_GeocodeCompleted(object sender, GeocodeCompletedEventArgs e)
        {
            GeocodeResponse bingResponse = e.Result;

            if (bingResponse.Results.Length > 0)
            {
                txtbxLatitude.Text = bingResponse.Results[0].Locations[0].Latitude.ToString();
                txtbxLongitude.Text = bingResponse.Results[0].Locations[0].Longitude.ToString();
            }
            else
            {
                MessageBox.Show("No Results found");
            }
        }
    }
}
code snippet 076576 Ch07_Code.zip/MainPage.xaml.cs
At this point, you've finished adding all of the main code into your Bing maps application, so let's take a look at what it does. The code you added accomplishes four main tasks, each of which is tied to a user control:
- It loads the list data from the SharePoint list and displays it in the data-bound text blocks in the list box.
- It adds data to the SharePoint list.
- It enables users to zoom in on a particular store that has been added to the application.
- It enables data that has been entered into the text boxes to be cleared.
Let's look at each of these in sequence. To load the list data, the user must click the Get Stores button, which invokes the btnAddStores_Click method. The only method within the btnAddStores_Click event is the Connect method, which sets the context for the SharePoint site and then calls the ExecuteQueryAsync method to asynchronously batch process the commands to SharePoint. As discussed earlier, because you are using Silverlight, you need to manage the asynchronous calls and threading, so you invoke the ShowItems method by using the Dispatcher.BeginInvoke method. Using an in-memory object and list collection (listOfStores), you then iterate over the list items and populate the list collection. Lastly, you bind the list collection to the list box (actually the text blocks in the list box), and the information from your SharePoint list is then displayed in the Silverlight application.
…
        private void btnAddStores_Click(object sender, RoutedEventArgs e)
        {
            Connect();
        }

        private void Connect()
        {
            context = new ClientContext("http://blueyonderdemo");
            context.Load(context.Web);
            context.Load(context.Web.Lists);
            stores = context.Web.Lists.GetByTitle("Store Sales");
            context.Load(stores);
            context.Load(stores.RootFolder);
            var camlQuery = new CamlQuery();
            camlQuery.ViewXml = "<View/>";
            storeItems = stores.GetItems(camlQuery);
            context.Load(storeItems);
            context.ExecuteQueryAsync(OnLoadItemsSucceeded, onQueryFailed);
        }

        private void OnLoadItemsSucceeded(object sender, ClientRequestSucceededEventArgs args)
        {
            Dispatcher.BeginInvoke(ShowItems);
        }

        private void ShowItems()
        {
            listOfStores = new List<StoreInfo>();

            foreach (ListItem listItem in storeItems)
            {
                listOfStores.Add(
                    new StoreInfo()
                    {
                        StoreName = listItem["Title"].ToString(),
                        StoreAddress = listItem["Address"].ToString(),
                        StoreCity = listItem["City"].ToString(),
                        StoreState = listItem["State"].ToString(),
                        StoreZip = listItem["Zip"].ToString(),
                        StoreSales = listItem["Sales"].ToString(),
                        StoreLatitude = listItem["Latitude"].ToString(),
                        StoreLongitude = listItem["Longitude"].ToString()
                    });
            }

            lstStores.ItemsSource = listOfStores;
        }
…
When the SharePoint data is loaded into the application, you can zoom in and focus on one of the items displayed in the list box. This requires the use of the Location object, which is specific to the Bing Maps API. You can see in the following code snippet that you are creating a new instance of the Location object, retrieving the latitude and longitude from the selected list box item (with an explicit cast to the StoreInfo object), and then calling the SetView method against your Bing Maps map (MainMap), which repositions the map to the latitude and longitude set on the locationFilter object:
…
        private void btnZoom_Click(object sender, RoutedEventArgs e)
        {
            Location locationFilter = new Location();
            StoreInfo tempStoreRecord = new StoreInfo();

            tempStoreRecord = (StoreInfo)lstStores.SelectedItem;
            string storeLatitude = tempStoreRecord.StoreLatitude;
            string storeLongitude = tempStoreRecord.StoreLongitude;

            locationFilter.Latitude = Double.Parse(storeLatitude);
            locationFilter.Longitude = Double.Parse(storeLongitude);

            MainMap.SetView(locationFilter, 10);
        }
…
Next, you display the data in the Bing Maps application — again using the SharePoint client object model. Here, you're setting the context with a class-level variable (siteUrl) and then creating a list item by calling the AddItem method and creating a new instance of ListItemCreationInformation. Based on what the user entered into the textboxes, you can then map the list item fields (e.g., oListItem[“Title”]) to the strings extracted from the textboxes (e.g., strStoreName). The Update method, via the ExecuteAsyncQuery method, then adds a record to the list. Note that when the item is successfully added to the list, a Pushpin object is created, which is a native object in Bing Maps, and then added to the map.
…
 private void btnGetStores_Click(object sender, RoutedEventArgs e)
        {
            strStoreName = txtbxStoreName.Text;
            strStoreCity = txtbxStoreCity.Text;
            strStoreAddress = txtbxStoreAddress.Text;
            strStoreState = txtbxStoreState.Text;
            strStoreZip = txtbxStoreZipCode.Text;
            strStoreSales = txtbxStoreSales.Text;
            strStoreLatitude = txtbxLatitude.Text;
            strStoreLongitude = txtbxLongitude.Text;

            ClientContext clientContext = new ClientContext(siteUrl);
            Web oWebsite = clientContext.Web;
            ListCollection collList = oWebsite.Lists;
            oList = clientContext.Web.Lists.GetByTitle("Store Sales");
            ListItem oListItem = oList.AddItem(new ListItemCreationInformation());
            oListItem["Title"] = strStoreName;
            oListItem["Address"] = strStoreCity;
            oListItem["City"] = strStoreAddress;
            oListItem["State"] = strStoreState;
            oListItem["Zip"] = strStoreZip;
            oListItem["Sales"] = strStoreSales;
            oListItem["Latitude"] = strStoreLatitude;
            oListItem["Longitude"] = strStoreLongitude;
            oListItem.Update();

            clientContext.Load(oList, list => list.Title);

            clientContext.ExecuteQueryAsync(onQuerySucceeded, onQueryFailed);
        }

        private void onQuerySucceeded(object sender, ClientRequestSucceededEventArgs args)
        {
            Dispatcher.BeginInvoke(AddItem);
        }

        void AddItem()
        {
            Pushpin pushpin = new Pushpin();
            Location pushpinLocation = new Location();
            pushpinLocation.Latitude = Double.Parse(strStoreLatitude);
            pushpinLocation.Longitude = Double.Parse(strStoreLongitude);

            pushpin.Width = 7;
            pushpin.Height = 10;
            pushpin.Tag = strStoreName;
            pushpin.Location = pushpinLocation;
            StorePushpins.AddChild(pushpin, pushpinLocation, PositionOrigin.Center);

            MessageBox.Show("Store was successfully added.");
        }
…
The final event is the clearing of the text boxes, which simply sets each of the text boxes to null.
![]() When you add an address in the textboxes, you'll want to make sure the address is valid. There is no address-to-zip-code check in this code before calling the Bing Maps Web service, so if the zip code does not map to the street and city address, the Pushpin object will not be created because an exception will occur.
When you add an address in the textboxes, you'll want to make sure the address is valid. There is no address-to-zip-code check in this code before calling the Bing Maps Web service, so if the zip code does not map to the street and city address, the Pushpin object will not be created because an exception will occur.
8. Press F6 to build the application. If it successfully builds, you'll be able to deploy the application to SharePoint.


Before you deploy the Silverlight application to SharePoint, you must have a SharePoint list with the appropriate fields in it. Referring back to the client object model code, you need eight columns in your list (name, address, city, state, and zip code for store, sales, and latitude and longitude).
Creating a Store and Sales List in SharePoint
Creating the list for the store and sales information is straightforward:
1. Navigate to your SharePoint site and select Site Actions ⇒ View All Site Content.
2. Click the Create button. In the Filter By pane, select List ⇒ Custom list.
3. Provide a name for your list (e.g., Store Sales) and click Create.
4. In your new list, click the List tab and then select List Settings. Click the Title field and change the title to Name. Then click the Create Column link and add another column called Address of type Single line of text. Do the same for all the other required columns (which should be named City, State, Zip, Sales, Latitude, and Longitude). When you've created all the new columns, your new list should resemble Figure 7.13.

Now that you've added the SharePoint list to your site, you can deploy the Silverlight application you built to SharePoint.
![]() If you want, you can programmatically create a new list. This can be done in a couple of ways. First, you could check your Silverlight application to see if a list exists; and if it doesn't, create it using the SharePoint client object model. Another way is to deploy the Silverlight application along with a SharePoint project that contains the list definition and instance. This also gives you the opportunity to wrap the Silverlight application in a web part project so that you can deploy the entire solution as a WSP.
If you want, you can programmatically create a new list. This can be done in a couple of ways. First, you could check your Silverlight application to see if a list exists; and if it doesn't, create it using the SharePoint client object model. Another way is to deploy the Silverlight application along with a SharePoint project that contains the list definition and instance. This also gives you the opportunity to wrap the Silverlight application in a web part project so that you can deploy the entire solution as a WSP.
Deploying the Silverlight Bing Application
The final process to get your application working is to deploy the Silverlight application to SharePoint. To deploy the Silverlight application to SharePoint, you will use the native Silverlight web part to host the deployed Silverlight application.
1. To create a new document library, navigate to your SharePoint site by clicking Site Actions ⇒ View All Site Content.
2. Click Create. Then, in the Filter-by pane, select Library.
3. Click Document Library, provide a name for the library (e.g., XAPS) and then click Create.
4. Click Add Document in the newly created XAPS document library, and then navigate to where your built .xap file is located (typically in the ∼/bin/debug folder of your project). Your XAP file should now be in the newly created document library, as shown in Figure 7.14.
5. Right-click the shortcut for the added .xap file and select Copy Shortcut.
6. Click Site Actions ⇒ Edit Page.
7. Click Add a New Web Part or select the Insert tab and then select Web Part.
8. Click the Media and Content category and select Silverlight Web Part.
9. Click Add and then paste the shortcut to the .xap file from your XAPS document library into the URL field. After you add the Silverlight application, you may need to adjust the height and width of the web part.

When complete, you now have a Silverlight application in SharePoint that can not only read data from the Store Sales list, but also write data back to that list. Note that you are also leveraging the Bing Maps map to display the newly added records (by doing a dynamic geo-code look-up on the address). Figure 7.15 shows what this experience should look like.

Go ahead and add a record to the application using the textbox controls. Then click the Look Up Geo-Code checkbox, and the application will concatenate the address information and look up the latitude and longitude for you. When you click the Add Store button, your information is then added to SharePoint. The result of this is shown in Figure 7.16.

Note that when you return to the Silverlight application and click the Get Stores button, all entries that have been added to the SharePoint list are displayed in the list box. Figure 7.17 shows another entry added to the list box that is displayed in the Silverlight application.

The last event is triggered by the Zoom In button, so select one of the stores and click it to see the focus of the map change to the selected store.
You can build many more applications using Bing Maps, ranging from the easy to the complex. Bing Maps has a rich set of APIs that cater to many different scenarios, so if you require JavaScript instead of Silverlight, you can use the AJAX control; or for lightweight calls, use the REST APIs. Either way, there is a lot there for you to explore. This chapter has only scraped the surface of what you can do.
You will see many more applications building in the ability to use geo data in some capacity. We're seeing more of these applications come online every day, and the data is just too rich to ignore within web or cloud-based applications. Further, geo data will enable you to build compelling applications that cut across devices and platforms, such as surfacing customer sales and location data on a Windows Phone 7.
That said, the goal of this chapter was to provide you with an introduction to Bing Maps geo services. There are other services out there, such as Google Maps, but Bing Maps provide you with an easy way to integrate directly with SharePoint through the use of the SharePoint client object model. You also have flexibility, with the option of using the Bing Maps Silverlight control or the Bing Maps AJAX control, both of which are compatible with the SharePoint client object model and natively supported in SharePoint.
In this chapter, you learned about Bing Maps; specifically, you learned what they are, the different APIs that you can use to leverage the public services, and how to build an application for SharePoint using the Bing Maps Silverlight control. Using the Silverlight control, you created an application that both reads and writes data to SharePoint and then displays that data in a Bing map and creates a pushpin for a store location. You also did a dynamic look-up to retrieve the latitude and longitude of the store to ensure you have the exact location of the store that Bing understands.
As you explore the functionality and services offered through Bing Maps (and Bing more generally), you'll see an interesting path to enrich your applications with geo data.
In the next chapter, we'll take a turn away from Bing Maps geo services and talk more about building cloud-based financial models using Excel Services.
Following are some additional references that you might find useful:
- Web part extensibility project — http://visualstudiogallery.msdn.microsoft.com/e8360a85-58ca-42d1-8de0-e48a1ab071c7
- Silverlight and SharePoint training kit — www.microsoft.com/download/en/details.aspx?amp;displaylang=en&id=10808
- Bing maps developer center — www.microsoft.com/maps/developers/web.aspx
- Bing Maps Silverlight control download location — www.microsoft.com/downloads/en/details.aspx?displaylang=en&FamilyID=beb29d27-6f0c-494f-b028-1e0e3187e830
- Silverlight web part for SharePoint — http://blogs.msdn.com/b/pstubbs/archive/2011/04/04/add-silverlight-web-parts-to-sharepoint-using-new-visual-studio-extension.aspx