
An OBA at its essence is about surfacing your line-of-business data using Office as the interface. In this chapter, you will see various examples using VB and C# of how to surface a SharePoint list using Office 2007 and VSTO. There are two ways to access a SharePoint list. One uses the SharePoint COM API, which is available only if you are actually running the code on the SharePoint Server. The second way uses the SharePoint Web services API. You can access this API if you are not on the server, such as the case with Office client applications. The difficulty is that Web services API is complicated and more challenging to program against. For this chapter, you will use a hybrid approach by creating a custom Web service component that will use the COM API to return the list as a simple XML document. This solves the problem of using the COM API on the server but calling it from the Office client. Example 2-1 shows you the Web service method called GetListData, which returns the SharePoint list as an XML document. Creating SharePoint custom Web services is outside the scope of this chapter, but the complete source code is included with the book.
Example 2-1. GetListData returns the SharePoint list as an XML document.
[WebMethod]
public XmlDocument GetListData(String ServerName, String ListName)
{
   String str;
   SPList oSPList;

   XmlNode oXmlNode;
   XmlElement oXmlElement, oXmlParent;
   XmlDocument oXmlDocument = new XmlDocument();

   oXmlDocument.LoadXml ("<SPListItems/>");

   using (SPSite oSPSite = new SPSite(ServerName))
   {
      using (SPWeb oSPWeb = oSPSite.OpenWeb())
      {
         oSPList = GetList(oSPWeb, ListName);

         if (oSPList != null)
         {
            foreach (SPListItem oSPListItem in oSPList.Items)
            {
               oXmlParent = oXmlDocument.CreateElement("SPListItem");
               oXmlNode = oXmlDocument.DocumentElement.AppendChild(oXmlParent);

               foreach (SPField oSPField in oSPListItem.Fields)
               {
                  if (oSPField.Hidden)
                  continue;

                  str = oSPField.InternalName.Replace(" ", " ");
                  oXmlElement = oXmlDocument.CreateElement(str);
                  oXmlParent.AppendChild(oXmlElement);

                  try
                  {
                     str = oSPField.Title;
                     str = oSPListItem[str].ToString();
                  }

                  catch (Exception e)
                  {
                       str = "Field error: " + e.Message;
                  }
               oXmlElement.InnerText = str;
               }
            }
         }
      }
   }

   return oXmlDocument;
}
The GetListData function runs on the SharePoint server and uses the SPSite class to get an instance of the SharePoint server. The OpenWeb method will open the site. Once you have the site open, Example 2-2 shows how to iterate over the lists collection to find the list you are looking for.
Example 2-2. GetList returns the list from the lists collection.
private SPList GetList(SPWeb oSPWeb, String strListName)
{
   SPList oRet = null;

   strListName = strListName.Replace("%20", " ");
   strListName = strListName.ToUpper();

   foreach (SPList oSPList in oSPWeb.Lists)
   {
      if (oSPList.Title.ToUpper() == strListName)
      {
        oRet = oSPList;
        break;
      }
   }

   return oRet;
}
Once you have the list, you can iterate over each item and over each field within each item. The requirements for getting this all working correctly with a SharePoint server is a lot, even just to demonstrate the features of VSTO on the client, so we have coded the examples to cache the result set in the projects. The examples use a compiler flag to signal if you are running online or offline. If you are offline, you do not need a SharePoint server, just Office 2007 and VSTO. But we want you to see that the real goal of OBAs is to connect to live business data on the server. Example 2-3 shows a sample list returned from the custom Web service call to GetListData.
Example 2-3. Sample list XML document record returned by the custom SharePoint Web service
<?xml version="1.0" encoding="utf-8" ?>
<SPListItems xmlns="">
   <SPListItem>
      <Title>Wenauer</Title>
      <FirstName>Peter</FirstName>
      <FullName>Peter Wenauer</FullName>
      <Email>[email protected]</Email>
      <Company>Contoso</Company>
      <JobTitle></JobTitle>
      <WorkPhone>229-555-0100</WorkPhone>
      <HomePhone>229-555-0101</HomePhone>
      <CellPhone></CellPhone>
      <WorkFax></WorkFax>
      <WorkAddress>1 Main St</WorkAddress>
      <WorkCity>Albany</WorkCity>
      <WorkState>GA</WorkState>
      <WorkZip>31707</WorkZip>
      <WorkCountry</WorkCountry>
      <WebPage>http://www.Contoso.com</WebPage>
      <Comments></Comments>
      <Gender>male</Gender>
      <ID>13</ID>
      <ContentType>Contact</ContentType>
      <Modified>9/22/2007 4:26:45 PM</Modified>
      <Created>9/22/2007 3:53:27 PM</Created>
      <Author>1;#Paul Stubbs</Author>
      <Editor>1;#Paul Stubbs</Editor>
      <_UIVersionString>1.0</_UIVersionString>
      <Attachments>False</Attachments>
      <Edit></Edit>
      <LinkTitleNoMenu>Wenauer</LinkTitleNoMenu>
      <LinkTitle>Wenauer</LinkTitle>
      <DocIcon></DocIcon>
</SPListItem>The most common way to surface your LOB data is through Outlook. Many users are in Outlook most of the day and conduct much of their business processes using Outlook. One action that users commonly take is using Outlook rules to sort their incoming e-mail. We will create an Outlook add-in that makes a rule that automatically moves e-mail from our customers in SharePoint to a customer folder. You could also just write code to handle the new mail event and move the mail without creating a rule. But a rule has one big advantage in that it runs on the Exchange server. The rule will even sort your mail when Outlook is not running. For this first version, the sync customers rule will run when the add-in is loaded. Later you will create an Office Ribbon tab to start the sync.
Open Visual Studio and create a new Outlook 2007 add-in project in VB. The add-in project will contain a ThisAddin.vb class, seen in Example 2-4. This is the main entry point for all VSTO add-ins. You will put the method to sync the customers rule in the Startup method.
Example 2-4. ThisAddin class contains the Startup and Shutdown methods.
Public Class ThisAddIn

   Private Sub ThisAddIn_Startup(ByVal sender As Object, ByVal e As System.EventArgs)
   Handles Me.Startup
      Dim RulesHelper As New Rules
      RulesHelper.SyncCustomerRule()
   End Sub

   Private Sub ThisAddIn_Shutdown(ByVal sender As Object, ByVal e As System.EventArgs)
   Handles Me.Shutdown

   End Sub

End Class
This creates a new instance of the rules class. The rules class contains all of the methods for managing our Outlook rules. It then calls the SyncCustomerRule to create an Outlook rule with our customers.
SyncCustomerRule first checks if Outlook is in online or offline mode by calling the IsOnline function shown in Example 2-5. Outlook rules can be accessed only if you are connected to Exchange, so you need to check this first. One way to do this is to try and access the Public folder. If you can access it, then you are online; if not, then you are offline.
Example 2-5. Check to see if Outlook is online with Exchange.
'Check if Outlook is Online with Exchange
Private Function IsOnline() As Boolean
   Try
      'This will throw an exception if not online
      Dim cnt As Integer = Globals.ThisAddIn.Application. _
      Session.Folders.Item("Public Folders"). _
      Folders.Item("All Public Folders").Items.Count
      Return True
   Catch ex As Exception
      Return False
   End Try
End Function
Next you need to get the list of customers from SharePoint by calling the GetList function seen in Example 2-6. If the Offline custom compiler flag is set, then just return the customer XML document from the embedded resource.
Example 2-6. Return the SharePoint list of customers.
   'return the List from SharePoint
   Public Shared Function GetList(ByVal serverName As String, ByVal ListName As String)
   As XElement
      'Check if we have SharePoint Online
#If Not OFFLINE Then
      'Custom webservice
      Dim SharePointLists As New ListServices.ListServices

      'Set the current user for the SharePoint lookup
      SharePointLists.Credentials = System.Net.CredentialCache.DefaultCredentials

      'Call the custom webservice
      Dim SPListXml As Xml.XmlNode = SharePointLists.GetListData(serverName, ListName)

      'Convert the XML Node to an XElement
      Dim SPList As XElement = XElement.Parse(SPListXml.OuterXml)
#Else
      Dim SPList As XElement = XElement.Load(New IO.StringReader(My.Resources.OBACustomers))

#End If

      'return the xml results
      Return SPList

   End Function
Example 2-7 shows the GetCustomerRule function, which creates an Outlook rule named "Customers." If this rule already exists, then just return the existing rule. The rule will move incoming mail that matches to a folder called Customers. If the Customers folder does not exist, it will also be created.
Example 2-7. Create an Outlook rule called "Customers."
  'Return the existing rule or create a new one
Private Function GetCustomerRule() As Outlook.Rule

   Dim store As Outlook.Store
   store = Globals.ThisAddIn.Application.Session.DefaultStore

   Dim rules As Outlook.Rules = store.GetRules()
   Dim customerRule As Outlook.Rule = Nothing

   'Get or create the Customer rule
   For Each rule As Outlook.Rule In rules
      If rule.Name = "Customers" Then
         Return rule
      End If
   Next
   'Not found so create a new one
   customerRule = rules.Create("Customers", Outlook.OlRuleType.olRuleReceive)

   'Add the action to move to the Customers folder
   Dim moveAction As Outlook.MoveOrCopyRuleAction
   moveAction = customerRule.Actions.MoveToFolder
   'We need a folder so get it or create it
   moveAction.Folder = GetFolder("Customers")
   moveAction.Enabled = True

   rules.Save()

   Return customerRule
End Function
At this point, the Customer rule has been created. Your next step is to add all of the customers’ e-mail addresses to the Address rule condition, seen in Example 2-8. The Address property takes an array of string objects, which are the e-mail addresses. You can use Language Integrated Query (LINQ) for XML to quickly create a string collection of addresses. In this sample, we take the first ten customers. The ToArray method of the collection will turn the collection into an array, which is the type the Address property requires. In the past, this would take many lines of code, but LINQ makes this work trivial.
Example 2-8. Use LINQ to create a collection of customer e-mail addresses.
'get the customer emails from the SharePoint list
Dim customerEmailAddresses = (From emailColumn In _
                             SPListXElement.Elements("SPListItem").Elements("Email")

                             Where emailColumn.Value IsNot Nothing _
                             Select emailColumn.Value).Skip(0).Take(10)

'Add the customers
Dim from As Outlook.AddressRuleCondition
from = customerRule.Conditions.SenderAddress
from.Address = customerEmailAddresses.ToArray
from.Enabled = True
Example 2-9 completes the sync by saving and running the rule.
Example 2-9. Save and run the customer rule.
'save the rule
Dim rules As Outlook.Rules = customerRule.Parent
rules.Save()

'Run the rule now
customerRule.Execute(True)
Press F5 to build and run the solution. This will launch Outlook and attach the Visual Studio debugger. When the add-in loads, the Startup method will call the SyncCustomerRule. You can verify that the rule was created by opening the Rules and Alerts dialog from the Tools main menu. If you double-click on the Customer rule, you can see the rule’s details in Figure 2-5.

VSTO supports the creation of document-level solutions. Document-level solutions are tied to a specific document. When the document is opened, the solution is loaded, and when the document is closed, the solution is unloaded. The lifetime of the solution is tied to the document, whereas with add-ins the lifetime of the code is tied to the application. VSTO supports document-level projects for Word, Excel, and InfoPath. Another interesting feature of document-level projects is that the host application becomes the designer inside of Visual Studio. This enables you to drag and drop items from the toolbox, including WinForm controls and content controls, onto the surface of the document. It also allows drag-and-drop data binding from the data sources window.
VSTO enables drag-and-drop data binding from a database, an object, and Web services. But in order to data bind to the Web service, it needs to be in a dataset format. It is not always possible to dictate the Web service format, so you will see how to create a list object data bound to a custom SharePoint Web service. You will use the Web service previously discussed in Example 2-1. First create a new Excel 2007 workbook project. The default project creates four project items—one for the workbook and one for each of the three default sheets that a new Excel workbook contains. Open the code window for sheet1.vb and create a new method called CreateListObject. The code, in Example 2-10, will call SharePoint to get the customers list. The XML must be converted to a dataset so that it can be data bound to the list object. Next you can programmatically add a list object control to the cell A1 on sheet1 and name it "List1." When data binding to a dataset, you can specify the columns you wish to bind to. In this example, you can use LINQ for XML to return a collection of all of the column names. You have all of the parameters needed to call the SetDataBinding method of the list object. You can call the CreateListObject from the startup method of sheet1 to create this when the worksheet is opened. Figure 2-6 shows the Excel document with the custom data binding.
Example 2-10. Create a list object data bound to a custom Web service.
Private Sub CreateListObject()
   'populate the gallery from the SharePoint List
   Dim SPListXElement As XElement

   'Get the customers list from SharePoint
   SPListXElement = SharePoint.GetList("http://pstubbs-moss", "OBACustomers")

   'convert the xml to a dataset that can be databound to the Excel ListObject
   Dim tr As New System.IO.StringReader(SPListXElement.ToString())
   Dim SPListDataSet As New DataSet
   SPListDataSet.ReadXml(tr)

   'Create a new ListObject and add it to the sheet
   Dim List1 As Microsoft.Office.Tools.Excel.ListObject = _
      Me.Controls.AddListObject(Me.Range("A1"), "List1")

   List1.AutoSetDataBoundColumnHeaders = True

   'get the customer emails from the SharePoint list using Xlinq
   Dim ColumnNames = From columnName _
                        In SPListXElement.Elements("SPListItem")(0).Elements _
                        Select columnName.Name.LocalName

   'Bind the ListObject to the SPList
   List1.SetDataBinding(SPListDataSet, "SPListItem", ColumnNames.ToArray())
End SubThe most visible new feature of Office 2007 is the Ribbon. The Ribbon replaces the menus and toolbars of previous Office versions. Office developers can customize the Ribbon using RibbonX, which is an XML representation of the Ribbon. While VSTO supports customizing the Ribbon using RibbonX, there is now a better way of using a visual designer. Figure 2-7 shows the visual Ribbon designer in VSTO that allows you to simply drag and drop tabs, groups, and controls onto the designer to visually build a Ribbon. This model is very much like creating a WinForm application. In fact, you simply double-click on the control to write the event handler code. The Ribbon designer in VSTO also contains an object model that makes developing interactions with the Ribbon more natural to a .NET developer. The RibbonX model is a callback model where you provide callback methods, and Office calls those methods when it thinks it’s necessary. There is no way in the RibbonX model to set the label of a button directly. You must invalidate the controls and Office will re-fire all of the callbacks in which you can set the new label. In the VSTO designer model, you can set properties like you would on any other object, and the Ribbon designer object model will take care of updating the Ribbon.

In the first section, you created an Outlook add-in that synchronized a SharePoint list with a custom rule when the add-in was loaded. But calling a Web service and updating a rule in Exchange can take a few seconds. This delay when opening Outlook may not be desirable. A better solution would be to move the synchronize button to the Ribbon. Open the Outlook add-in project and add a new Ribbon designer item from the Add New item dialog box. This will create a new project item called Ribbon1.vb. The default Ribbon type is associated with reading a mail item. This means that when you open an e-mail message, this Ribbon will be displayed in the inspector window. The Ribbon designer also creates a default tab in the Ribbon called TabAddins. This is the same tab that Office uses to put any legacy menu customizations you may have had. What you want to do is create a new tab called "OBA." On the OBA tab, add a group and a button from the Visual Studio toolbox on the left. Set the label property of this button to "Sync Contacts." Double-click on the button to add the code in Example 2-11, which will call the SyncContactList method. Also remember to remove the call from the startup method of the add-in.

Example 2-11. Call the SyncContactList method from the button click event.
Private Sub Button1_Click(ByVal sender As System.Object, ByVal e As
Microsoft.Office.Tools.Ribbon.RibbonControlEventArgs) Handles Button1.Click
   Dim RulesHelper As New Rules
   RulesHelper.SyncCustomerRule()
End Sub
Press F5 to run the project. Open a mail message to see the OBA Ribbon.
Outlook has a hybrid implementation of the Ribbon and Commandbars. The Outlook main window uses Commandbars to add menus and toolbars. This is the traditional way that you would customize the Office user interface. You saw previously how to use the Ribbon designer to create a new Ribbon that can be attached to the various inspectors, but if you want to modify the main window, you will need to use code similar to Example 2-12.
Example 2-12. Create Outlook menu using the CommandBars.
  namespace CustomNewMail
{
  public partial class ThisAddIn
  {
     Office.CommandBarButton myButton;

     private void ThisAddIn_Startup(object sender, System.EventArgs e)
     {
        Office.CommandBar standardCommandBar;
        Office.CommandBarPopup ctrlNewButton;
        Office.CommandBarButton ctrlNewMailMessageButton;

        standardCommandBar = Application.ActiveExplorer().CommandBars["Standard"];
        ctrlNewButton = (Office.CommandBarPopup)standardCommandBar.Controls["New"];
        ctrlNewMailMessageButton = (Office.CommandBarButton)ctrlNewButton.Controls["Mail
                                   Message"];

        myButton = (Office.CommandBarButton)ctrlNewButton.Controls.Add(Office.
                   MsoControlType.msoControlButton, missing, missing,ctrlNewMail
                   MessageButton.Index,true);

        myButton.Caption = "Steve's Mail Message";
        myButton.Visible = true;
        myButton.FaceId = ctrlNewMailMessageButton.FaceId;
        myButton.Style = Office.MsoButtonStyle.msoButtonIconAndCaption;

        myButton.Click += new Office._CommandBarButtonEvents_ClickEventHandler
                          (myButton_Click);

        ctrlNewMailMessageButton.Delete(true);
     }

     void myButton_Click(Microsoft.Office.Core.CommandBarButton Ctrl, ref bool
                         CancelDefault)
     {
        Outlook.MailItem newMail;

        newMail = (Outlook.MailItem)Application.CreateItem(Microsoft.Office.Interop.
                  Outlook.OlItemType.olMailItem);
        newMail.MessageClass = "IPM.Note.SteveMail";
        newMail.Display(false);
        }
...
     }
}
Another common scenario is to populate a drop-down list with items from your line-of-business data. In this example, you will add customers from the SharePoint site to a Ribbon drop-down button. Add a gallery control from the toolbox to the OBA tab next to the Sync button. In the properties window for the gallery, double-click on the Items loading event to create an event handler. Example 2-13 shows the code to load the items from the SharePoint list.
Example 2-13. Code to populate a Ribbon gallery from SharePoint with super tooltips
 Private Sub Gallery1_ItemsLoading(ByVal sender As System.Object, ByVal e As
Microsoft.Office.Tools.Ribbon.RibbonControlEventArgs) Handles Gallery1.ItemsLoading

   'populate the gallery from the SharePoint List
   Dim SPListXElement As XElement

   'Get the customers list from SharePoint
   SPListXElement = SharePoint.GetList("http://pstubbs-moss", "OBACustomers")

   'get the customer emails from the SharePoint list
   Dim DropDownItems = From contact In _
                         SPListXElement.Elements("SPListItem") _
                         Where contact.Element("Email").Value IsNot Nothing _
                         Select New RibbonDropDownItem With { _
                            .Label = contact.Element("FullName").Value, _
                            .ScreenTip = contact.Element("Email").Value, _
                            .SuperTip = contact.Element("Company").Value, _
                            .OfficeImageId = "ClipArtinsert" _
                           }

   'clear the list before adding new ones
   Gallery1.Items.Clear()

   'add the contacts to the drop down list
   For Each galleryItem As RibbonDropDownItem In DropDownItems
      Gallery1.Items.Add(galleryItem)
   Next

End Sub
This code, like all of the other samples, gets the customer list from SharePoint. LINQ for XML makes it easy to turn the XML document into a collection of RibbonDropDownItem objects. This single LINQ statement parses the XML, creates a new RibbonDropDownItem object, and sets some of the properties. LINQ has done all of the work, and all that remains is to iterate through the collection and add each item to the Ribbon gallery control. You can see in Figure 2-8 the names of the customers, and when you hover over each, you see the super tooltip with the corresponding e-mail address and company name. You can see from this code that programming the Office Ribbon is very natural and what you would expect as a .NET developer.

Custom task panes are a new feature in Office 2007 that allow developers to provide an application UI that can be docked to the left, right, top, or bottom of the host application. In this example, you will create a custom task pane that populates with a list of the customers from the SharePoint site. Using VSTO, you can easily add Windows Forms controls to the task pane, including the Windows Presentation Foundation (WPF) host control. This opens up the power of WPF to your Office applications. Open the existing Outlook project that you created in the previous examples. Add a WPF user control to the project from the Add Item dialog. Open the usercontrol1.xaml file that was created. You will use the designer to help you create a WPF style resource that dynamically creates buttons for each customer. The style will define the look and feel for the button and give it a cool rollover effect. In Example 2-14, you can see that there is a style defined named "BlackGlassButton." This is the name we will use when creating our buttons for each customer.
Example 2-14. XAML resource for a glass-looking button with a rollover animation
<UserControl x:Class="UserControl1"
   xmlns="http://schemas.microsoft.com/winfx/2006/xaml/presentation"
   xmlns:x="http://schemas.microsoft.com/winfx/2006/xaml" Width="300" Height="100">
   <UserControl.Resources>
      <Style x:Key="BlackGlassButton" BasedOn="{x:Null}" TargetType="{x:Type Button}">
         <Setter Property="Height" Value="50" />
         <Setter Property="Foreground" Value="#FFFFFFFF" />
         <Setter Property="Template">
            <Setter.Value>
   ...
         </Setter>
      </Style>
   </UserControl.Resources>

   <ScrollViewer HorizontalScrollBarVisibility="Auto">
   <StackPanel x:FieldModifier="Public" Name="StackPanel1" >

      <Button x:FieldModifier="Public"
            Style="{DynamicResource BlackGlassButton}"
            Name="Button1"
            Content="Button 1"/>
      <Button x:FieldModifier="Public"
            Name="b2"
            Style="{DynamicResource BlackGlassButton}"
            Content="Button 2"/>

      </StackPanel>
   </ScrollViewer>
</UserControl>
In the ThisAddIn.vb class, add a new method called "CreateCustomTaskPane" and add the code in Example 2-15. The first thing this code does is retrieve the list of customers from SharePoint. You need to create an instance of the usercontrol so that we can get a reference to the BlackGlassButton style that was defined in Example 2-14. A LINQ for XML query will extract all of the customer names and e-mail addresses from the XML document and create a new WPF button with the BlackGlassButton style. The query returns a collection of the WPF buttons that you will add to the usercontrol after clearing any existing buttons. At this point you have a WPF usercontrol and need to create an ElementHost control, which is the bridge between Windows Forms controls and WPF controls. The WPF control is added to the ElementHost control, which is added to a WinForm usercontrol, which is added to the custom task pane. There are a number of layers here to get everything working, but after you understand the basics of the control model, it is straightforward.
Example 2-15. Create a custom task pane for the glass-looking buttons with a rollover animation.
Public Sub CreateCustomTaskPane()

   Dim SPListXElement As XElement

   'Get the customers list from SharePoint
   SPListXElement = SharePoint.GetList("http://pstubbs-moss", "OBACustomers")
   'create an instance of the WPF control
   Dim u As New UserControl1

   'get the customer emails from the SharePoint list
   Dim CTPItems = (From contact In _
                  SPListXElement.Elements("SPListItem") _
                  Where contact.Element("Email").Value IsNot Nothing _
                  Select New System.Windows.Controls.Button With { _
                  .Style = u.GetStyle("BlackGlassButton"), _
                  .Content = contact.Element("Title").Value _
                  }).Take(10)

   u.StackPanel1.Children.Clear()

   'add a button for each customer
   For Each b As System.Windows.Controls.Button In CTPItems
      u.StackPanel1.Children.Add(b)
   Next

   Dim WPFControl As New Windows.Forms.Integration.ElementHost
      With { _.Child = u, _
      .Dock = System.Windows.Forms.DockStyle.Fill}

   'wrap the wpf control in a winform user control
   Dim uc As New Windows.Forms.UserControl
   uc.Controls.Add(WPFControl)

   CustomTaskPanes.Add(uc, "OBA Task Pane").Visible = True

End Sub
Add a button to the OBA Ribbon to call the CreateCustomTaskPane method. This will look like Figure 2-9 when it is populated with all of the customers.
Prior to custom task panes, there was only the Actions Pane in Office 2003. The Actions Pane is very similar to the custom task pane except that the scope of the Actions Pane was at the document level only. The Actions Pane gives you a document-specific way to display information that pertains only to a specific document instance. Let’s modify the previous custom task pane example to work as an Actions Pane instead. Open a new Word document project and add the usercontrol1.xaml file previously mentioned. Copy the CreateCustomTaskPane method, changing the last couple of lines in Example 2-16 to use the Actions Pane instead of the custom task pane. Figure 2-10 shows the running Word document with the custom WPF actions pane on the right.

OpenOffice XML is the new file format standard for Word, Excel, and PowerPoint in Office 2007. The documents are described using XML parts and are packaged together in a ZIP file. You can see what this looks like if you rename a .docx file to .zip. Then using any ZIP tool, you can explore the contents of the package. The .NET Framework 3.0 contains some classes in the System.IO.Packaging namespace to create and manipulate the parts and packages. But even with the help of the System.IO.Packaging classes, this can still be a little complicated. Microsoft has created a higher level API to create Office Open XML documents. You can download the Microsoft SDK for Open XML Formats from this site: http://www.microsoft.com/downloads/details.aspx?FamilyId=AD0B72FB-4A1D-4C52-BDB5-7DD7E816D046&displaylang=en. The SDK contains samples, documentation, and an API to get you started. In this example, you will create a Word document that contains the names of the customers from the SharePoint site. One of the benefits of using the Office Open XML format is that you can also create these documents on the server or from your Web site without requiring Office to be installed on the server. Open the Outlook add-in project and add a reference to the Microsoft.Office.DocumentFormat.OpenXml.dll from the SDK for Office Open XML formats. Add the method in Example 2-17 to your ThisAddIn class. This will create a new WordProcessingDocument class. Then add the main document part. The main document part is described in the next section, but this is the body of the document. Next you need to define the styles for your document. In this case, I want to use the built-in styles, so I created a blank Word document and extracted the styles.xml part from that document and imported it into my project as a resource file. Reading the styles.xml file into the new style part will save you a lot of time and complexity and allow you to focus on the document body for now.

Example 2-17. Create a new Word document using Office Open XML.
Public Sub CreateNewWordDocument(ByVal documentPath As String)

   Dim wordDoc As WordprocessingDocument = WordprocessingDocument.Create(documentPath,
   WordprocessingDocumentType.Document)
   ' Set the content of the document so that Word can open it.
   Dim mainPart As MainDocumentPart = wordDoc.AddMainDocumentPart()

   SetMainDocumentContent(mainPart)

   Dim stylePart As StyleDefinitionsPart = mainPart.AddNewPart(Of StyleDefinitionsPart)
   ()
   Dim stream As IO.Stream = New FileStream(ThisAddIn.AppPath & "Samplestyles.xml",
   FileMode.Open)
   stylePart.FeedData(stream)

   wordDoc.Close()

End Sub
The SetMainDocumentContent method in Example 2-18 does the heavy lifting for creating the document body. The first thing is to get the list of customers from SharePoint. Once again, this uses LINQ for XML to convert the XML document to a collection of contact objects. You need to iterate through each contact to build the WordprocessingML XML that contains the Fullname with a Title style and the e-mail address as normal text. This uses a new feature of VB called XML Literals. XML Literals allow you to put the literal XML in-line with your code and the VB compiler will understand it. Also within the XML Literal string, you can insert variables using an ASP.NET-style syntax with the <%=variable%>. In this case, you will insert the full name and the e-mail address from the contact. Finally, after you build the paragraphs with all of the customers, you need to wrap it in the document element to make a valid document part and stream it back into the part object. One last step you need to take for the XML Literals, since you are using namespaces, is to add an import at the top of the file to define the "w" namespace:
Imports <xmlns:w="http://schemas.openxmlformats.org/wordprocessingml/2006/main">
Example 2-18. Create the document body with data from SharePoint.
'Set content of MainDocumentPart.
Public Sub SetMainDocumentContent(ByVal part As MainDocumentPart)
'populate the document from the SharePoint List
Dim SPListXElement As XElement
'Get the customers list from SharePoint
SPListXElement = SharePoint.GetList("http://pstubbs-moss", "OBACustomers")
'get the customer emails from the SharePoint list
Dim Contacts = From contact In _SPListXElement.Elements("SPListItem") _
Where contact.Element("Email").Value IsNot Nothing _Select contact
Dim docXmlBody As List(Of XElement) = New List(Of XElement)
For Each contact As XElement In Contacts
docXmlBody.Add( _
<w:p>
<w:pPr>
<w:pStyle w:val="Title"/>
</w:pPr>
<w:r>
<w:t><%= contact.Element("FullName").Value %></w:t>
</w:r>
</w:p>)
docXmlBody.Add( _
<w:p>
<w:r>
<w:t><%= contact.Element("Email").Value %></w:t>
</w:r>
</w:p>)
Next
Dim docX As XDocument = _
<?xml version="1.0" encoding="UTF-8" standalone="yes"?>
<w:document xmlns:w="http://schemas.openxmlformats.org/
wordprocessingml/2006/main">
<w:body>
<%= docXmlBody %>
</w:body>
</w:document>
Dim stream As IO.Stream = part.GetStream()
Dim buf As Byte() = (New UTF8Encoding()).GetBytes(docX.ToString)
stream.Write(buf, 0, buf.Length)
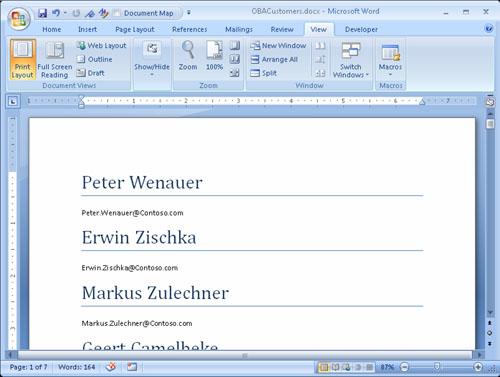
End SubAdd a button to your Ribbon to call the CreateNewWordDocument ("OBACustomers.docx") method to create the Word document. Running this will generate a document like Figure 2-11 in the user’s documents folder.
Content Controls are a new feature in Word 2007 that encapsulate sections of a document. They are the next generation of bookmarks. Bookmarks had many shortcomings that have been addressed by content controls; now, for example, they have an ID and are data bindable. In this example, you will create a fax template that data binds the To and From fields from the SharePoint customer list. Create a new Word document project using the fax template. In order to data bind to the content controls, you need to create a prototype class of the customer object. Example 2-19 shows what the customer prototype class looks like.
Example 2-19. Customer prototype class
Public Class Customer

   Private TitleValue As String
   Public Property Title() As String
      Get
         Return TitleValue
      End Get
      Set(ByVal value As String)
         TitleValue = value
      End Set
   End Property

   Private FirstNameValue As String
   Public Property FirstName() As String
      Get
         Return FirstNameValue
   End Get
      Set(ByVal value As String)
         FirstNameValue = value
      End Set
   End Property
   Private FullNameValue As String
   Public Property FullName() As String
      Get
         Return FullNameValue
      End Get
      Set(ByVal value As String)
         FullNameValue = value
      End Set
   End Property

   Private EmailValue As String
   Public Property Email() As String
      Get
         Return EmailValue
      End Get
      Set(ByVal value As String)
         EmailValue = value
      End Set
   End Property

   ...

End Class
Now that you have a customer class object, add a new data source with the customer object as the data source. Drag a BindingSource control from the toolbox onto the document called FromCustomerBindingSource. Use the drop-down to pick the customer object as the data source property. Add another BindingSource control called ToCustomerBindingSource, setting the data source to the customer object as well. With the fax document open in the designer, you can select text in the document and map it to content controls by dragging the appropriate content control from the toolbox onto the selected text. In this example, you can use the PlainTextContentControl for most of the fields except for the date field, in which case you should use the DatePickerContentControl. Once you have all of your fields wrapped in content controls, you can set the data binding mapping to the correct fields in the customer class. Select the field you wish to map to and set the data binding text property to the correct field. You will have two data sources to choose fields from—the To and the From—so be sure to map to the correct ones. Once you have all of the fields mapped, your document will look like Figure 2-12.
So far, all of the data binding has been done using the VSTO visual designers. Now you must drop to code to fill the data sources with data. Open the ThisDocument.vb code window and add the method in Example 2-20. The code pattern at this point will be familiar. First retrieve the customer list from SharePoint. Using LINQ for XML, parse the customer XML document and create a collection of customer objects. The last step is to set the data source property of the two data binding source objects to an instance of a customer object. For this example you can randomly pick two, one for the To and one for the From. Add the DataBindContentControls method call to the document start-up method so that the data is populated when the document is opened.

Example 2-20. Fill the data sources with data from SharePoint.
Private Sub DataBindContentControls()
   'populate the gallery from the SharePoint List
   Dim SPListXElement As XElement

   'Get the customers list from SharePoint
   SPListXElement = SharePoint.GetList("http://pstubbs-moss", "OBACustomers")

   'get the customer objects from the SharePoint list
   Dim Customers = From customer In _
                   SPListXElement.Elements("SPListItem") _
                   Where customer.Element("Email").Value IsNot Nothing _
                   Select New Customer With { _
                   .FullName = customer.Element("FullName").Value, _
                   .Email = customer.Element("Email").Value, _
                   .Company = customer.Element("Company").Value, _
                   .WorkAddress = customer.Element("WorkAddress").Value, _
                   .WorkCity = customer.Element("WorkCity").Value, _
                   .WorkState = customer.Element("WorkState").Value, _
                   .WorkZip = customer.Element("WorkZip").Value, _
                   .WorkPhone = customer.Element("WorkPhone").Value, _
                   .Title = customer.Element("Title").Value, _
                   .WorkFax = customer.Element("WorkPhone").Value, _
                   .WebPage = customer.Element("WebPage").Value _
                   }

   'for this demo just take 2 random people
   ToCustomerBindingSource.DataSource = Customers(New Random().Next(40))
   FromCustomerBindingSource.DataSource = Customers(New Random().Next(40))

End Sub
Press F5 to build and run the document. When the document loads, the data-bound content controls will be populated with data from the SharePoint list, like in Figure 2-13.

Users for years have been looking for ways to integrate their business applications seamlessly into Outlook. While Outlook has provided various ways to edit parts of the UI, such as the menu, there was never a good solution until now, using form regions. Form regions are areas of the Outlook form that can be customizable by an add-in. There are a number of different places to display your form region, such as a separate form that the user can switch to, or completely replace the Outlook form with your own. You can also attach your form region to a number of different message types, such as mail, contact, or a calendar appointment. VSTO now provides a wizard and the infrastructure to easily make a WinForm user control be the form region. This opens a whole new area of customization for the Office Business Application developer. In this example, you will add a Web browser control as the form region and browse to different Web sites based on the company name selected in the Ribbon gallery of the message inspector.
Add an Outlook form region item from the Add New Item dialog box. This will start a wizard that will walk you through the choices to create a form region. Choose all of the defaults, except make it an adjoining form region. An adjoining form region will display at the bottom of the mail message, similar to a task pane. In some sense, you can think of it as an inspector-level task pane, in that the lifespan is tied to the inspector, in this case your e-mail message. The form region designer looks and behaves just like the user control designer. You can drag and drop controls from the toolbox onto the design surface. You can add WinForm controls and WPF controls just like any other user control. In this example, we will add the Web browser control onto the form region, which will dock to the parent control by default. Example 2-21 shows the code call to the navigate method of the Web browser control from the Ribbon gallery.
Example 2-21. Click event handler for the Ribbon gallery
  Private Sub Gallery1_Click(ByVal sender As System.Object, ByVal e As Microsoft.Office.
Tools.Ribbon.RibbonControlEventArgs) Handles Gallery1.Click

   Globals.ThisAddIn.FormRegionWebBrowser.Navigate( _
"http://search.live.com/results.aspx?q=stock+" & Gallery1.SelectedItem.SuperTip)
 End Sub
You need to create a variable on the ThisAddIn class to hold a reference to the Web browser control from the form region, like in Example 2-22.
Example 2-22. Variable to hold Web browser reference
Public FormRegionWebBrowser As System.Windows.Forms.WebBrowser
When the form region is displayed, Example 2-23 sets this reference so that it can be called from the Ribbon gallery.
Example 2-23. Set Web browser reference on form region display event.
'Occurs before the form region is displayed.
'Use Me.OutlookItem to get a reference to the current Outlook item.
'Use Me.OutlookFormRegion to get a reference to the form region.
Private Sub FormRegion1_FormRegionShowing(ByVal sender As Object, ByVal e As System.
EventArgs) Handles MyBase.FormRegionShowing

'add a reference to the webbrowser
Globals.ThisAddIn.FormRegionWebBrowser = WebBrowser1

End Sub
Press F5 to build and run the project. Open an e-mail message and select a contact from the OBA Ribbon tab. You will see the search page for the contact’s company in the form region similar to Figure 2-14.
