
As you saw in Chapter 2, there are different options for customizing the Excel 2007 interface using VSTO. For example, you can create custom task panes for application add-ins (for document-level solutions, the task panes are custom action panes), extend the Fluent Office Ribbon, and data bind to Word content controls, among other customization opportunities. As an example of one such business intelligence solution, specifically, a search keyword solution, Figure 3-9 illustrates a solution that integrates a custom Ribbon (with custom Office images), custom actions pane, and reporting and analysis that combines both native Excel 2007 functionality with custom business logic.
The actions pane enables you to create an instance of an actions pane object (using the ActionsPane object) and then add controls such as WinForm controls or WPF controls onto the actions pane surface. You can then integrate the controls to, for example, local or external data sources or Web services. That’s the nice thing about actions panes: You can design them with either simplicity or complexity in mind. For example, a useful control is the tab control, which allows you to build out a tabbed view within an actions pane. This does a couple of things. First, it enables you to build more data-centric logic (for example, complex filtering through the use of drop-down lists bound to data or calculations that are triggered by specific data being loaded into the spreadsheet) into your actions pane, and second, it enables you to maximize the real estate of the actions pane (for example, having multiple tabs within the actions pane to provide multiple tab views). This helps filter data into your Excel 2007 spreadsheet, which can further control views into your data—while at the same time managing single or multiple data connections simultaneously.

Another way to integrate data in a straightforward way into your VSTO project is using the ListObject control. This requires a specific type of VSTO project; specifically, a VSTO document-level solution. To create this type of project, open Visual Studio and click File, New, and Project. Browse to the Office node (in either C# or VB) and then click the 2007 node and select the Excel Workbook project. Name your project and click OK.
Visual Studio prompts you to either create a project from a new workbook or load an existing workbook into the project. After you’ve got your project created, you now create a new data source. To add a new data source, click Data, Add New Data Source, and then work through the wizard.
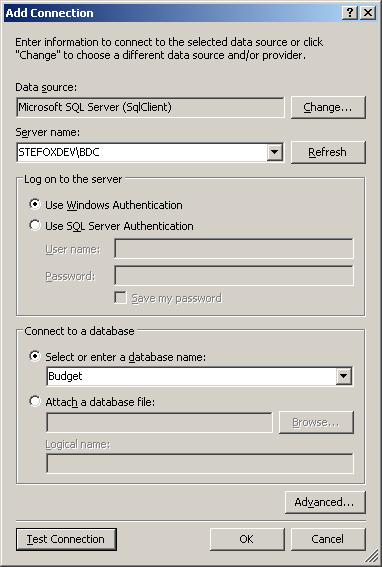
The first dialog in the Data Source Configuration Wizard is the Choose a Data Type dialog box, which prompts you to select a specific data type. Click Database and then click Next. The next dialog box prompts you to add a connection with specific database information, as shown in Figure 3-10.
The final dialog box provides a view of the database objects you want to bind to the ListObject. Here you select the objects you want to bind and click Finish.
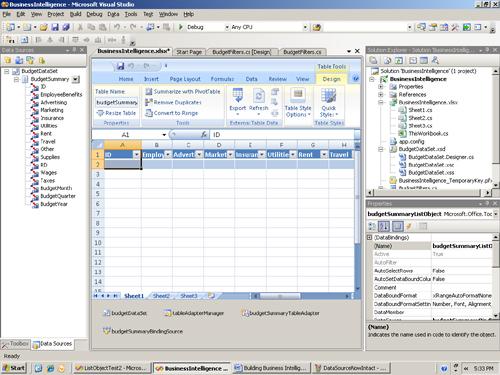
After the data source is bound to the ListObject, you can drag and drop the data-bound ListObject directly onto the worksheet as a host control in your VSTO project. When you do this, VSTO automatically loads the column headings as per the header rows within your bound data source. Figure 3-11 illustrates the data-bound ListObject in the worksheet within the VSTO project.
Using the ListObject within your VSTO project is interesting in a couple of ways. First, it’s relatively straightforward to bind the ListObject to a dataset. And second, you can build some custom functionality against the data that is bound to the ListObject. One thing to remember is that the ListObject is bound to the dataset, so if you want to develop specific filtering mechanisms or functions that apply to the underlying data, you can do so but you’d be building your logic against the bound dataset as opposed to the ListObject that binds the data to the cells in the worksheet. Remember that here we have created the ListObject binding in the context of a VSTO project, so you open up other business intelligence customization opportunities to integrate into your OBA.
Another way to customize your OBA and integrate more business intelligence functionality is to extend the Office Fluent Ribbon and then associate business-data event handlers with the new Ribbon elements that you’ve added. For example, you might add additional filters, add code that controls the visibility of other custom components (for example, actions pane), or even have a review cycle around your business data that is started from your Excel 2007 client interface, thus the mapping of the client functionality to the server (for example, SharePoint). The Ribbon extension is important because it enables you to extend Office functionality to fit your design goals, while at the same time keep your end user within the context of the Office experience. Thus, tools development and support costs are mitigated through the deployment of in-context (to Office) applications.
Chapter 2 outlined how you can use the Visual Ribbon Designer to create a new Ribbon. After you’ve created your Ribbon, you add event handlers by double-clicking the Ribbon element you’ve dragged and dropped on the designer surface. Customizing the Ribbon enables you to build your business intelligence customizations directly into the context of the Excel 2007 Ribbon. This strikes at the heart of the whole concept of OBAs—that is, extending the user interface to bridge the results gap (or gap between the business data and the information worker). Figure 3-12 illustrates a Ribbon that has a number of different business intelligence features built into it. In some cases, this Ribbon can provide you with shortcut functions to features like charting or calculating the averages; however, there are other cases where you can build functionality that is specific to your data, such as specific analytical or sales report generation or quick-filtering based on specific business data.
A more recent technology that is easy to use and enables you to develop powerful business intelligence customizations into the Ribbon is the use of the .NET LINQ. LINQ essentially evolves your older SQL queries (for example, "SELECT * FROM . . .") into a newer querying programming model so you can develop against databases as if they were objects within your project—that is, model your data sources as if they were classes within your application. This means quick and easy expression creation, support for IntelliSense, straightforward data manipulation and transformation, and full type-safety and expression checking as you compile your applications.

You can combine VSTO customizations like Ribbon extensibility and LINQ in a number of ways to create a powerful and rich business intelligence customization within your Office Business Application. For example, you can add specific filtering capabilities, call stored procedures, and transform the presentation of data. Let’s take a look at a relatively straightforward example to show how you can add some specific filtering capabilities to your application.
Before you can use LINQ within your application, though, you must first create what are called entity classes within your project. Essentially, you must create objects that represent your data in the form of classes. Assuming you have a new project created, you right-click your project and select Add New Item. This will invoke the Add New Item dialog box, shown in Figure 3-13, where you select the LINQ to SQL Classes item. Provide a name, and then click Add.
After you’ve added your relational database to your project, the Object Relational Designer view will open, and here you can create a model of your classes or what are also referred to as entity classes (see Figure 3-14).

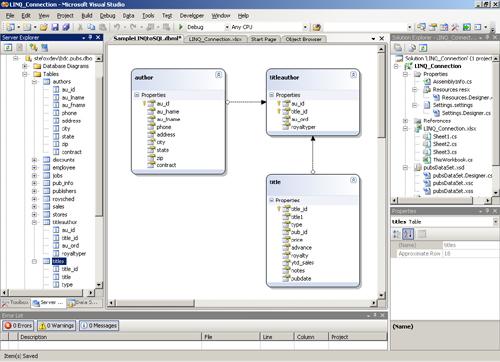
Of note is that properties of the entity class map to the table’s columns and each entity class you define does not necessarily derive from a root base class. Thus, you have more flexibility when it comes to inheritance and object definition. The following example uses the pubs database, which is composed of multiple tables.
To create the entity class for the one table in your database, select the Server Explorer tab and expand the Tables view. You can then select specific tables to drag and drop into the designer. You can model associations and inheritances between your tables within the designer. After you complete this step, Visual Studio will automatically generate entity classes for you. At this point, you can begin to build LINQ statements against your entity classes.
One example I added to my project was the ability to quick-filter on author’s state. The Ribbon element that provides the user interface to the LINQ statement is a combo box comprising all states in the United States. In the following example, I illustrate an event handler extending from the combo box to assign the currently selected text in the combo box to authorState and use this as a parameter to build the LINQ statement. Thus, all authors from the selected state are selected through this LINQ statement.
private void cmboBxState_TextChanged(object sender, RibbonControlEventArgs e)
 {
     string authorState = cmboBxState.Text;

     LINQ_Connection.SampleLINQtoSQLDataContext db =
     new LINQ_Connection.SampleLINQtoSQLDataContext();

     var stateInfo = from authors in db.authors
                     where authors.state == authorState
                     select authors;
       . . .
 }
Another example of a BI customization you might add is currency calculation or other predefined and specific algorithmic functions that may not be native to Excel. Again, these types of customizations can be treated as shortcuts that are particular to your environment and Office Business Application. Previously, in Figure 3-12, I added three buttons for currency conversions. You could either update the data in the spreadsheet based off of hard-coded exchange rates or you could call a Web service that provides up-to-the-minute exchange rates. And while I used buttons to be the Ribbon elements that triggered my events, you could also use other Ribbon elements such as the combo box to optimize Ribbon real estate and further tie the available currencies to a back-end data source. In the code sample below, I’ve created an instance of the Web service and then called that Web service currency exchange method (CurrencyRate), passing the specific currency I want exchanged.
private void btnCDN_Click(object sender, RibbonControlEventArgs e)
 {
     double exchRate = 0.00;

     XL_Sample.CurrencyRate.CurrencyConvertor currencyConversion = new
     XL_Sample.CurrencyRate.CurrencyConvertor();
     exchRate = currencyConversion.ConversionRate(XL_Sample.CurrencyRate.Currency.USD,
                XL_Sample.CurrencyRate.Currency.CAD);

     updateBudgetExchangeRate(exchRate);
 }
I used the returned exchange rate as part of the algorithm that is then used to update my spreadsheet by passing the exchange rate to the updateBudgetExchangeRate method. I’ve added the code that maps to the updateBudgetExchangeRate method below to illustrate how I used the exchange rate in the presentation of my data.
For this example, I used a free Web service (from www.xmethods.net) that ships with predefined rates. However, you could just as easily use other Web services (remembering some will require authentication and/or licensing) to add business intelligence to your application. However, key to OBAs are connectivity to line-of-business systems (such as Microsoft Dynamics, PeopleSoft, and Service Advertising Protocol), and this often requires the consumption of Web services. For example, take the scenario in which an organization wants to integrate SAP within Excel 2007 to expose BI data to the information worker in an environment she is familiar with. Using SAPs Web services, you can programmatically access SAPs Business Application Programming Interface (BAPI) to each SAP Remote Function Call (RFC). Ultimately, BAPIs are Web services accessed via the Web Service Definition Language (WSDL) they publish.
Using the SAP GUI, developers can create and set up Web services manually or opt to use SAP’s generic Web service that creates a WSDL for a particular BAPI. For this example, we used the latter approach to build the custom Web service, which consumed a BAPI called the BAPI_FLTRIP_GETLIST. The purpose of this BAPI was to get flight data from SAP (based on the parameters passed into the BAPI).
After you create your custom Web service, you can then add a Web reference to your project so you can then access the methods within that Web service. To do this, right-click your project, select Add Service Reference, click Advanced, and then click Add Web Reference. Figure 3-15 illustrates this dialog box.
The URL associated with your custom Web service (in this case, the BAPI BAPI_FLTRIP_GETLIST URL) can be passed into the URL combo box, which enables a reference to be created between the current project and the SAP Web service.
Once this URL is selected, succeeding screens will ask for valid SAP credentials. After these credentials are provided, Visual Studio will generate a proxy class that can then be used to programmatically access the aforementioned BAPI. The following code sample demonstrates how to access one of the defined Web services (SAP_FLIGHTTRIPLIST).
public bool GetList(string customerNumber, string travelAgency)
{
   flightTrip = new SAP_FLIGHTTRIPLIST.BAPI_FLTRIP_GETLISTService();
flightTrip.Url = Properties.Settings.Default.ContosoTours_SAPServices_SAP_FLIGHTTRIPLIST_BAPI_
                 FLTRIP_GETLISTService;
 flightTrip.Credentials = SAPIdentity;

 bapiBookDateRange = new SAP_FLIGHTTRIPLIST.BAPISCODRA[0];
 bapiTripDateRange = new SAP_FLIGHTTRIPLIST.BAPISCODRA[0];
 bapiExtIn = new SAP_FLIGHTTRIPLIST.BAPIPAREX[0];
 bapiExtOut = new SAP_FLIGHTTRIPLIST.BAPIPAREX[0];
 bapiTripData = new SAP_FLIGHTTRIPLIST.BAPISTRDAT[0];
 bapiReturn = new SAP_FLIGHTTRIPLIST.BAPIRET2[0];
 bapiFlightTripList = new SAP_FLIGHTTRIPLIST.BAPISTRDAT[0];

 flightTrip.BAPI_FLTRIP_GETLIST(ref bapiBookDateRange, customerNumber, ref bapiExtIn,
     ref bapiExtOut, ref bapiFlightTripList, 0, false, ref bapiReturn, travelAgency,
     ref bapiTripDateRange);
 . . .
}
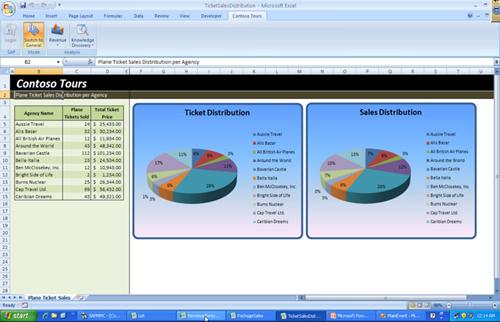
This code sample illustrates a number of parameters that are passed into the call to SAP to get the flight list. The output of this call is a list of available flights that map to the input parameters. The method is further tied to a VSTO customization, which again reinforces the fact that you can tie Web service integrations to user interface customizations (that is, VSTO add-ins) to integrate business intelligence solutions into your OBA. Further, this method is part of a larger OBA that includes some interesting BI customizations. For example, the previous example used flight data to generate specialty sales packages, and as a part of tracking those sales, the OBA provides reports on which packages are selling versus other available packages. Figure 3-16 provides an overview of one of these reports.
The previous SAP sample is a part of the OBA Starter Kit for SAP, a developer kit that provides code samples, a white paper, and an installation guide to help get you on your way to creating your first OBA integrated with SAP. For more information, go to http://msdn2.microsoft.com/en-us/library/bb498189.aspx on MSDN.
Thus far, we’ve predominantly discussed client-side customizations and development that have hopefully shed some light on how you might integrate BI into your OBA. Let’s now move on to discussing how you can develop and integrate BI by using Microsoft Office SharePoint Server 2007.