Settings are configurable for both the Raspbmc distribution itself and XBMC.
To change the XBMC settings, first go to the System option on the menu and then select Settings. You will now be greeted with the Settings menu, which allows you to change key settings as follows:
- To change locale issues, such as your time zone and keyboard layout, go into the submenu entitled Appearance and change it via the International tab
- To change playback settings, such as whether to adjust the refresh rate on playback, go into the submenu entitled Video and adjust it in the Playback tab
- You can also adjust settings such as screensaver settings by going again into the submenu entitled Appearance and selecting the Screensaver tab
XBMC is highly configurable and the best way of exploring its flexibility is to navigate the menus and learn more about the settings available. A good place to start is http://wiki.xbmc.org/index.php?title=Settings.
The Raspbmc Settings application is for configuring the settings applicable to the Raspbmc OS itself rather than XBMC. This is accessible via Programs | Raspbmc Settings from the main menu. The icon looks as follows:

After opening Raspbmc Settings, you will be presented with a dialog box that allows you to configure Raspbmc-specific options. Here are some common changes you may wish to make:
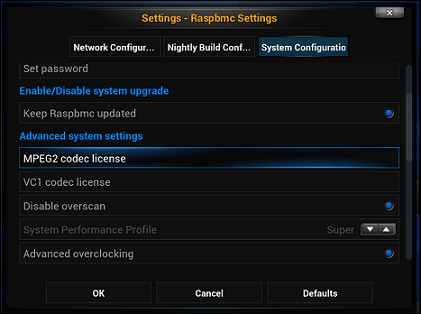
- Raspbmc updates itself by default. This can be turned off by unchecking the radio button entitled Keep Raspbmc updated under the System Configuration tab.
- You can configure wireless networking under the tab entitled Wireless Network Configuration. Simply fill out your access point details using a compatible wireless dongle. Refer to Appendix A, Useful Raspbmc commands for a list of supported adapters.
- You can also change the default password for the pi user, which is raspberry, under the System Configuration tab. This has been shown as asterisks in the add-on for security reasons.
There are many more configuration options, and more of these will be touched on as we expand the capabilities of our media center.
If some video content you wish to play back on Raspbmc is encoded in either VC1 or MPEG2 support, you will need a license pack to support the playback. This is because these codecs require a license for each device they are used on, due to software patents. You only need to do this if some of your content is in VC1 or MPEG2. Most VC1 content played back by users is from direct Blu-ray rips, and most MPEG2 content are in the form of Live TV streams. Getting a codec license involves a few steps, which are as follows:
- Firstly, we need to get the serial number of the Raspberry Pi. This is obtainable by going to System | System Info | Hardware information. This serial number is needed to purchase a license. This is tied to the Pi you purchase from, and the license is not transferrable.

- Now, purchase the codec pack(s) desired using your serial number from http://www.raspberrypi.com/license-keys/.
- Shortly, you will get a license key via an e-mail. This can now be entered via the Raspbmc Settings' System Configuration tab. You should only enter the code after the
=sign. After a reboot, the codec(s) will start working.The following screenshot shows where you would enter the codec keys: