No self-respecting R2D2 robot would be complete without the ability to see. Fortunately, your R2D2 has just the right spot for a webcam. Once you remove the bubble blowing port, you have the perfect spot for a round webcam.
Here is a picture of a round webcam, which is available on amazon.com and other online retailers:

Here is a picture of the webcam mounted in the slot:

You now need to connect the USB camera to the USB port of the Raspberry Pi. To access the USB webcam directly on the Raspberry Pi, you can use a Linux program called guvcview. Install this by powering up the Raspberry Pi, logging in, and entering the sudo apt-get install guvcview command.
To try your USB camera, connect it and reboot your Raspberry Pi. To check if the Raspberry Pi has found your USB camera, go to the /dev directory and type ls. You should see something similar to the following screenshot:

Look for video0, as this is the entry for your webcam. If you see it, the system knows your camera is there.
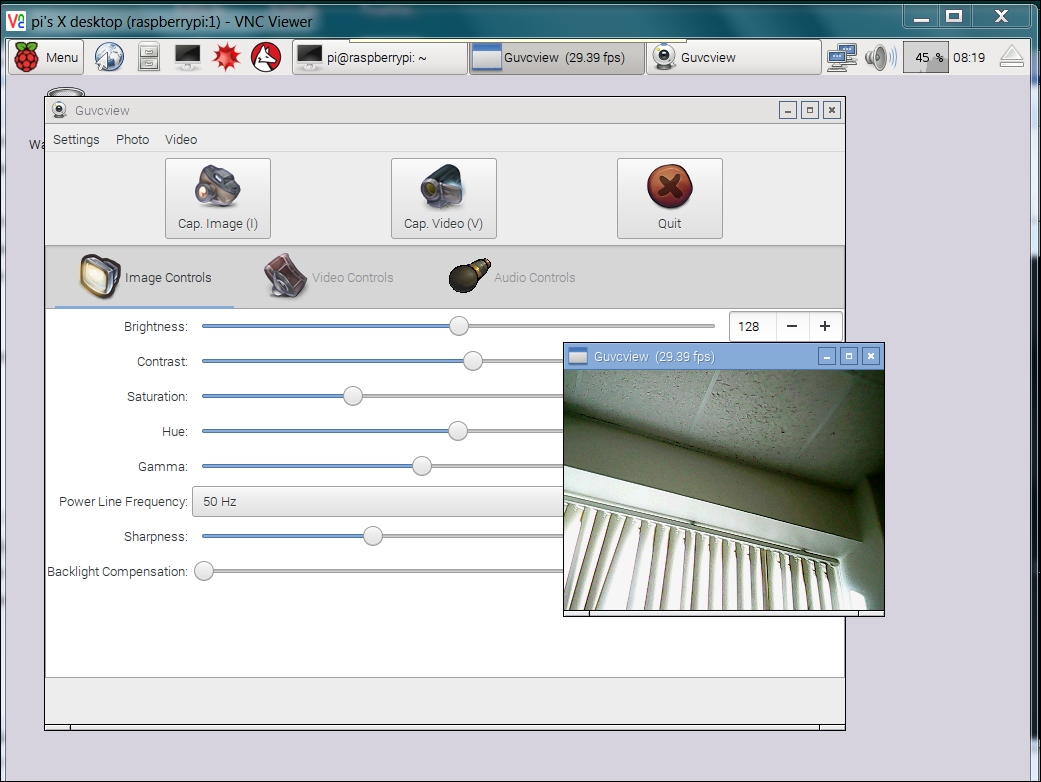
Now, let's use guvcview to see the output of the camera. Since it will need to output some graphics, you either need to use a monitor connected to the board, as well as a keyboard and mouse, or you can use vncserver as described in Chapter 1, Getting Started with the Raspberry Pi. Eventually, you will want to use the wireless access point capability described in the first chapter anyway, so the best course of action is to connect your host computer to the wireless access point, SSH into the Raspberry Pi, then start the vncserver on the Raspberry Pi by typing vncserver through SSH. Then, start up VNC Viewer as described in Chapter 1, Getting Started with the Raspberry Pi. With all these tools installed, you can now run vncview. When you are viewing the graphical screen of the Raspberry Pi Zero, type guvcivew -r 2, and you will be able to see the video from the webcam.
You can control your R2D2 remotely by running the r2d2Control.py program that you wrote earlier. The screen will look similar to the following screenshot:
You will notice that as you adjust the resolution down, the update rate goes up; this is related to the size of the image.
The video window displays what the webcam sees, and the GUVCViewer Controls window controls the different characteristics of the camera. The default settings of the camera work fine. However, if you get a black screen for the camera, you may need to adjust the settings. Select the GUVCViewer Controls window and the Video & Files tab. You will see a window where you can adjust the settings for your camera.
The most important setting is Resolution. If you see a black screen, lower the resolution; this will often resolve the issue. This window will also tell you what resolutions are supported by your camera. Also, you can display the frame rate by checking the box to the right of the Frame Rate setting. Be aware, however, that if you are going through vncviewer, the refresh rate (how quickly the video window will update itself) will be much slower than if you're using a Raspberry Pi and a monitor directly.
Once you have the camera up and running, and the desired resolution set, you can go on to download and install OpenCV.
Note
You can connect more than one webcam to the system. Follow the same steps, but connect to the cameras through a USB hub. List the devices in the /dev directory. Use guvcview to see the different images. One challenge, however, is that connecting too many cameras can overwhelm the bandwidth of the USB port.