Chapter 2. The Bank Statements Analyzer

The Challenge

The FinTech industry is really hot right now. Mark Erbergzuck realizes that he spends a lot of money on different purchases and would benefit from automatically summarizing his expenses. He receives monthly statements from his bank, but he finds them a bit overwhelming. He has tasked you with developing a piece of software that will automate the processing of his bank statements so he can get better insights into his finances. Challenge accepted!

The Goal

In this chapter, you will learn the foundations about good software development before learning more advanced techniques in the next few chapters.

You will start off by implementing the problem statement in one single class. You will then explore why this approach poses several challenges in terms of coping for changing requirements and maintenance of the project.

But do not worry! You will learn software design principles and techniques to adopt to ensure that the code you write meets these criteria. You will first learn about the Single Responsibility Principle (SRP), which helps develop software that is more maintainable, easier to comprehend, and reduces the scope for introducing new bugs. Along the way, you will pick up new concepts such as cohesion and coupling, which are useful characteristics to guide you about the quality of the code and software that you develop.

Note

This chapter uses libraries and features from Java 8 and above, including the new date and time library.

If at any point you want to look at the source code for this chapter, you can look at the package com.iteratrlearning.shu_book.chapter_02 in the book’s code repository.

Bank Statements Analyzer Requirements

You had a delicious hipster latte (no added sugar) with Mark Erbergzuck to gather requirements. Because Mark is pretty tech-savvy, he tells you that the bank statements analyzer just needs to read a text file containing a list of bank transactions. He downloads the file from his online banking portal. This text is structured using a comma-separated values (CSV) format. Here is a sample of bank transactions:

30-01-2017,-100,Deliveroo
30-01-2017,-50,Tesco
01-02-2017,6000,Salary
02-02-2017,2000,Royalties
02-02-2017,-4000,Rent
03-02-2017,3000,Tesco
05-02-2017,-30,Cinema

He would like to get an answer for the following queries:

  • What is the total profit and loss from a list of bank statements? Is it positive or negative?

  • How many bank transactions are there in a particular month?

  • What are his top-10 expenses?

  • Which category does he spend most of his money on?

KISS Principle

Let’s start simple. How about the first query: “What is the total profit and loss from a list of bank statements?” You need to process a CSV file and calculate the sum of all the amounts. Since there is nothing else required, you may decide that there is no need to create a very complex application.

You can “Keep It Short and Simple” (KISS) and have the application code in one single class as shown in Example 2-1. Note that you do not have to worry about possible exceptions yet (e.g., what if the file does not exist or what if parsing a loaded file fails?). That is a topic that you will learn about in Chapter 3.

Note

CSV is not fully standardized. It’s often referred to as values separated by commas. However, some people refer to it as a delimiter-separated format that uses different delimiters, such as semicolons or tabs. These requirements can add more complexity to the implementation of a parser. In this chapter, we will assume that values are separated by a comma (,).

Example 2-1. Calculating the sum of all statements
public class BankTransactionAnalyzerSimple {
    private static final String RESOURCES = "src/main/resources/";

    public static void main(final String... args) throws IOException {

        final Path path = Paths.get(RESOURCES + args[0]);
        final List<String> lines = Files.readAllLines(path);
        double total = 0d;
        for(final String line: lines) {
            final String[] columns = line.split(",");
            final double amount = Double.parseDouble(columns[1]);
            total += amount;
        }

        System.out.println("The total for all transactions is " + total);
    }
}

What is happening here? You are loading the CSV file passed as a command-line argument to the application. The Path class represents a path in the filesystem. You then use Files.readAllLines() to return a list of lines. Once you have all the lines from the file, you can parse them one at a time by:

  • Splitting the columns by commas

  • Extracting the amount

  • Parsing the amount to a double

Once you have the amount for a given statement as a double you can then add it to the current total. At the end of the processing, you will have the total amount.

The code in Example 2-1 will work fine, but it misses a few corner cases that are always good to think about when writing production-ready code:

  • What if the file is empty?

  • What if parsing the amount fails because the data was corrupted?

  • What if a statement line has missing data?

We will come back to the topic of dealing with exceptions in Chapter 3, but it is a good habit to keep these types of questions in mind.

How about solving the second query: “How many bank transactions are there in a particular month?” What can you do? Copy and paste is a simple technique, right? You could just copy and paste the same code and replace the logic so it selects the given month, as shown in Example 2-2.

Example 2-2. Calculating the sum of January statements
final Path path = Paths.get(RESOURCES + args[0]);
final List<String> lines = Files.readAllLines(path);
double total = 0d;
final DateTimeFormatter DATE_PATTERN = DateTimeFormatter.ofPattern("dd-MM-yyyy");
for(final String line: lines) {
    final String[] columns = line.split(",");
    final LocalDate date = LocalDate.parse(columns[0], DATE_PATTERN);
    if(date.getMonth() == Month.JANUARY) {
        final double amount = Double.parseDouble(columns[1]);
        total += amount;
    }
}

System.out.println("The total for all transactions in January is " + total);

final Variables

As a short detour, we’ll explain the use of the final keyword in the code examples. Throughout this book we’ve used the final keyword fairly extensively. Marking a local variable or a field final means that it cannot be re-assigned. Whether you use final or not in your project is a collective matter for your team and project since its use has both benefits and drawbacks. We’ve found that marking as many variables final as possible clearly demarcates what state is mutated during the lifetime of an object and what state isn’t re-assigned.

On the other hand, the use of the final keyword doesn’t guarantee immutability of the object in question. You can have a final field that refers to an object with mutable state. We will be discussing immutability in more detail in Chapter 4. Furthermore, its use also adds a lot of boilerplate to the codebase. Some teams pick the compromise position of having final fields on method parameters, in order to ensure that they are clearly not re-assigned and not local variables.

One area where there is little point in using the final keyword, although the Java language allows it, is for method parameters on abstract methods; for example, in interfaces. This is because the lack of body means that there is no real implication or meaning to the final keyword in this situation. Arguably the use of final has diminished since the introduction of the var keyword in Java 10, and we discuss this concept later in Example 5-15.

Code Maintainability and Anti-Patterns

Do you think the copy-and-paste approach demonstrated in Example 2-2 is a good idea? Time to take a step back and reflect on what is happening. When you write code, you should strive for providing good code maintainability. What does this mean? It is best described by a wish list of properties about the code you write:

  • It should be simple to locate code responsible for a particular feature.

  • It should be simple to understand what the code does.

  • It should be simple to add or remove a new feature.

  • It should provide good encapsulation. In other words, implementation details should be hidden from a user of your code so it is easier to understand and make changes.

A good way to think about the impact of the code you write is to consider what happens if a work colleague of yours has to look at your code in six months and you have moved to a different company.

Ultimately your goal is to manage the complexity of the application you are building. However, if you keep on copy pasting the same code as new requirements come in, you will end up with the following issues, which are called anti-patterns because they are common ineffective solutions:

  • Hard to understand code because you have one giant “God Class”

  • Code that is brittle and easily broken by changes because of code duplication

Let’s explain these two anti-patterns in more detail.

God Class

By putting all of your code in one file, you end up with one giant class making it harder to understand its purpose because that class is responsible for everything! If you need to update the logic of existing code (e.g., change how the parsing works) how will you easily locate that code and make changes? This problem is referred to as the anti-pattern “God Class.” Essentially you have one class that does everything. You should avoid this. In the next section, you will learn about the Single Responsibility Principle, which is a software development guideline to help write code that is easier to understand and maintain.

Code Duplication

For each query, you are duplicating the logic for reading and parsing the input. What if the input required is no longer CSV but a JSON file? What if multiple formats need to be supported? Adding such a feature will be a painful change because your code has hardcoded one specific solution and duplicated that behavior in multiple places. Consequently, all the places will all have to change and you will potentially introduce new bugs.

Note

You will often hear about the “Don’t Repeat Yourself” (DRY) principle. It is the idea that when you successfully reduce repetition, a modification of the logic does not require multiple modifications of your code anymore.

A related problem is what if the data format changes? The code only supports a specific data format pattern. If it needs to be enhanced (e.g., new columns) or a different data format needs to be supported (e.g., different attribute names) you will again have to make many changes across your code.

The conclusion is that it is good to keep things simple when possible, but do not abuse the KISS principle. Instead, you need to reflect on the design of your whole application and have an understanding of how to break down the problem into separate sub-problems that are easier to manage individually. The result is that you will have code that is easier to understand, maintain, and adapt to new requirements.

Single Responsibility Principle

The Single Responsibility Principle (SRP) is a general software development guideline to follow that contributes to writing code that is easier to manage and maintain.

You can think about SRP in two complementary ways:

  • A class has responsibility over a single functionality

  • There is only one single reason for a class to change1

The SRP is usually applied to classes and methods. SRP is concerned with one particular behavior, concept, or category. It leads to code that is more robust because there is one specific reason why it should change rather than multiple concerns. The reason why multiple concerns is problematic is, as you saw earlier, it complicates code maintainability by potentially introducing bugs in several places. It can also make the code harder to understand and change.

So how do you apply SRP in the code shown in Example 2-2? It is clear that the main class has multiple responsibilities that can be broken down individually:

  1. Reading input

  2. Parsing the input in a given format

  3. Processing the result

  4. Reporting a summary of the result

We will focus on the parsing part in this chapter. You will learn how to extend the Bank Statements Analyzer in the next chapter so that it is completely modularized.

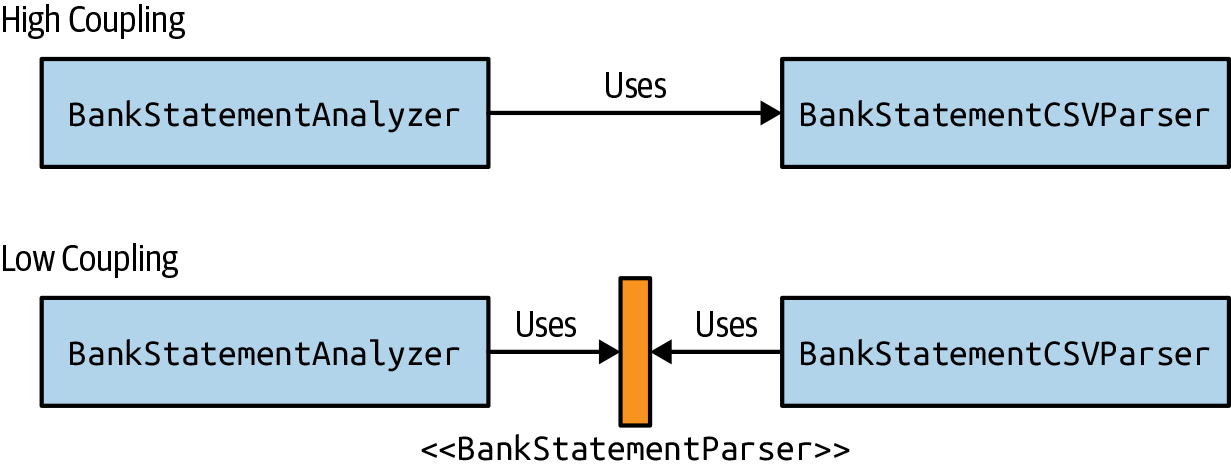
The first natural step is to extract the CSV parsing logic into a separate class so you can reuse it for different processing queries. Let’s call it BankStatementCSVParser so it is immediately clear what it does (Example 2-3).

Example 2-3. Extracting the parsing logic in a separate class
public class BankStatementCSVParser {

    private static final DateTimeFormatter DATE_PATTERN
        = DateTimeFormatter.ofPattern("dd-MM-yyyy");

    private BankTransaction parseFromCSV(final String line) {
        final String[] columns = line.split(",");

        final LocalDate date = LocalDate.parse(columns[0], DATE_PATTERN);
        final double amount = Double.parseDouble(columns[1]);
        final String description = columns[2];

        return new BankTransaction(date, amount, description);
    }

    public List<BankTransaction> parseLinesFromCSV(final List<String> lines) {
        final List<BankTransaction> bankTransactions = new ArrayList<>();
        for(final String line: lines) {
            bankTransactions.add(parseFromCSV(line));
        }
        return bankTransactions;
    }
}

You can see that the class BankStatementCSVParser declares two methods, parseFromCSV() and parseLinesFromCSV(), that generate BankTransaction objects, which is a domain class that models a bank statement (see Example 2-4 for its declaration).

Note

What does domain mean? It means the use of words and terminology that match the business problem (i.e., the domain at hand).

The BankTransaction class is useful so that different parts of our application share the same common understanding of what a bank statement is. You will notice that the class provides implementation for the methods equals and hashcode. The purpose of these methods and how to implement them correctly is covered in Chapter 6.

Example 2-4. A domain class for a bank transaction
public class BankTransaction {
    private final LocalDate date;
    private final double amount;
    private final String description;


    public BankTransaction(final LocalDate date, final double amount, final String description) {
        this.date = date;
        this.amount = amount;
        this.description = description;
    }

    public LocalDate getDate() {
        return date;
    }

    public double getAmount() {
        return amount;
    }

    public String getDescription() {
        return description;
    }

    @Override
    public String toString() {
        return "BankTransaction{" +
                "date=" + date +
                ", amount=" + amount +
                ", description='" + description + ''' +
                '}';
    }

    @Override
    public boolean equals(Object o) {
        if (this == o) return true;
        if (o == null || getClass() != o.getClass()) return false;
        BankTransaction that = (BankTransaction) o;
        return Double.compare(that.amount, amount) == 0 &&
                date.equals(that.date) &&
                description.equals(that.description);
    }

    @Override
    public int hashCode() {
        return Objects.hash(date, amount, description);
    }
}

Now you can refactor the application so that it uses your BankStatementCSVParser, in particular its parseLinesFromCSV() method, as shown in Example 2-5.

Example 2-5. Using the bank statement CSV parser
final BankStatementCSVParser bankStatementParser = new BankTransactionCSVParser();

final String fileName = args[0];
final Path path = Paths.get(RESOURCES + fileName);
final List<String> lines = Files.readAllLines(path);

final List<BankTransaction> bankTransactions
    = bankStatementParser.parseLinesFromCSV(lines);

System.out.println("The total for all transactions is " + calculateTotalAmount(bankTransactions));
System.out.println("Transactions in January " + selectInMonth(BankTransactions, Month.JANUARY));

The different queries you have to implement no longer need to know about internal parsing details, as you can now use BankTransaction objects directly to extract the information required. The code in Example 2-6 shows how to declare the methods calculateTotalAmount() and selectInMonth(), which are responsible for processing the list of transactions and returning an appropriate result. In Chapter 3 you will get an overview of lambda expressions and the Streams API, which will help tidy the code further.

Example 2-6. Processing lists of bank transactions
public static double calculateTotalAmount(final List<BankTransaction> bankTransactions) {
    double total = 0d;
    for(final BankTransaction bankTransaction: bankTransactions) {
        total += bankTransaction.getAmount();
    }
    return total;
}

public static List<BankTransaction> selectInMonth(final List<BankTransaction> bankTransactions, final Month month) {

    final List<BankTransaction> bankTransactionsInMonth = new ArrayList<>();
    for(final BankTransaction bankTransaction: bankTransactions) {
        if(bankTransaction.getDate().getMonth() == month) {
            bankTransactionsInMonth.add(bankTransaction);
        }
    }
    return bankTransactionsInMonth;
}

The key benefit with this refactoring is that your main application is no longer responsible for the implementation of the parsing logic. It is now delegating that responsibility to a separate class and methods that can be maintained and updated independently. As new requirements come in for different queries, you can reuse the functionality encapsulated by the BankStatementCSVParser class.

In addition, if you need to change the way the parsing algorithm works (e.g., a more efficient implementation that caches results), you now have just a single place that needs to change. Moreover, you introduced a class called BankTransaction that other parts of your code can rely on without depending on a specific data format pattern.

It is a good habit to follow the principle of least surprise when you implement methods. It will help ensure that it is obvious what is happening when looking at the code. This means:

  • Use self-documenting method names so it is immediately obvious what they do (e.g., calculateTotalAmount())

  • Do not change the state of parameters as other parts of code may depend on it

The principle of least surprise can be a subjective concept, though. When in doubt, speak to your colleagues and team members to ensure everyone is aligned.

Cohesion

So far you have learned about three principles: KISS, DRY, and SRP. But you have not learned about characteristics to reason about the quality of your code. In software engineering you will often hear about cohesion as an important characteristic of different parts of the code you write. It sounds fancy, but it is a really useful concept to give you an indication about the maintainability of your code.

Cohesion is concerned with how related things are. To be more precise, cohesion measures how strongly related responsibilities of a class or method are. In other words, how much do things belong together? It is a way to help you reason about the complexity of your software. What you want to achieve is high cohesion, which means that the code is easier for others to locate, understand, and use. In the code that you refactored earlier, the class BankTransactionCSVParser is highly cohesive. In fact, it groups together two methods that are related to parsing CSV data.

Generally, the concept of cohesion is applied to classes (class-level cohesion), but it can also be applied to methods (method-level cohesion).

If you take the entry point to your program, the class BankStatementAnalyzer, you will notice that its responsibility is to wire up the different parts of your application such as the parser and the calculations and report back on the screen. However, the logic responsible for doing calculations is currently declared as static methods within the BankStatementAnalyzer. This is an example of poor cohesion because the concerns of calculations declared in this class are not directly related to parsing or reporting.

Instead, you can extract the calculation operations into a separate class called BankStatementProcessor. You can also see that the list of transactions method argument is shared for all these operations, so you can include it as a field to the class. As a result, your method signatures become simpler to reason about and the class BankStatementProcessor is more cohesive. The code in Example 2-7 shows the end result. The additional advantage is that the methods of BankStatementProcessor can be reused by other parts of your application without depending on the whole BankStatement​Analyzer.

Example 2-7. Grouping the calculation operations in the class BankStatementProcessor
public class BankStatementProcessor {

    private final List<BankTransaction> bankTransactions;

    public BankStatementProcessor(final List<BankTransaction> bankTransactions) {
        this.bankTransactions = bankTransactions;
    }

    public double calculateTotalAmount() {
        double total = 0;
        for(final BankTransaction bankTransaction: bankTransactions) {
            total += bankTransaction.getAmount();
        }
        return total;
    }

    public double calculateTotalInMonth(final Month month) {
        double total = 0;
        for(final BankTransaction bankTransaction: bankTransactions) {
            if(bankTransaction.getDate().getMonth() == month) {
                total += bankTransaction.getAmount();
            }
        }
        return total;
    }

    public double calculateTotalForCategory(final String category) {
        double total = 0;
        for(final BankTransaction bankTransaction: bankTransactions) {
            if(bankTransaction.getDescription().equals(category)) {
                total += bankTransaction.getAmount();
            }
        }
        return total;
    }
}

You can now make use the methods of this class with the BankStatementAnalyzer as shown in Example 2-8.

Example 2-8. Processing lists of bank transactions using the BankStatementProcessor class
public class BankStatementAnalyzer {
    private static final String RESOURCES = "src/main/resources/";
    private static final BankStatementCSVParser bankStatementParser = new BankStatementCSVParser();

    public static void main(final String... args) throws IOException {

        final String fileName = args[0];
        final Path path = Paths.get(RESOURCES + fileName);
        final List<String> lines = Files.readAllLines(path);

        final List<BankTransaction> bankTransactions = bankStatementParser.parseLinesFrom(lines);
        final BankStatementProcessor bankStatementProcessor = new BankStatementProcessor(bankTransactions);

        collectSummary(bankStatementProcessor);
    }

    private static void collectSummary(final BankStatementProcessor bankStatementProcessor) {
        System.out.println("The total for all transactions is "
                + bankStatementProcessor.calculateTotalAmount());

        System.out.println("The total for transactions in January is "
                + bankStatementProcessor.calculateTotalInMonth(Month.JANUARY));

        System.out.println("The total for transactions in February is "
                + bankStatementProcessor.calculateTotalInMonth(Month.FEBRUARY));

        System.out.println("The total salary received is "
                + bankStatementProcessor.calculateTotalForCategory("Salary"));
    }
}

In the next subsections, you will focus on learning guidelines to help you write code that is easier to reason and maintain.

Class-Level Cohesion

In practice, you will come across at least six common ways to group methods:

  • Functional

  • Informational

  • Utility

  • Logical

  • Sequential

  • Temporal

Keep in mind that if the methods you are grouping are weakly related, you have low cohesion. We discuss them in order and Table 2-1 provides a summary.

Functional

The approach you took when writing the BankStatementCSVParser was to group the methods functionally. The methods parseFrom() and parseLinesFrom() are solving a defined task: parse the lines in the CSV format. In fact, the method parseLinesFrom() uses the method parseFrom(). This is generally a good way to achieve high cohesion because the methods are working together, so it makes sense to group them so they are easier to locate and understand. The danger with functional cohesion is that it may be tempting to have a profusion of overly simplistic classes grouping only a single method. Going down the road of overly simplistic classes adds unnecessary verbosity and complexity because there are many more classes to think about.

Informational

Another reason to group methods is because they work on the same data or domain object. Say you needed a way to create, read, update, and delete BankTransaction objects (CRUD operations); you may wish to have a class dedicated for these operations. The code in Example 2-9 shows a class that exhibits informational cohesion with four different methods. Each method throws a UnsupportedOperationException to indicate the body is currently unimplemented for the purpose of the example.

Example 2-9. An example of informational cohesion
public class BankTransactionDAO {

    public BankTransaction create(final LocalDate date, final double amount, final String description) {
        // ...
        throw new UnsupportedOperationException();
    }

    public BankTransaction read(final long id) {
        // ...
        throw new UnsupportedOperationException();
    }

    public BankTransaction update(final long id) {
        // ...
        throw new UnsupportedOperationException();
    }

    public void delete(final BankTransaction BankTransaction) {
        // ...
        throw new UnsupportedOperationException();
    }
}
Note

This is a typical pattern that you see often when interfacing with a database that maintains a table for a specific domain object. This pattern is usually called Data Access Object (DAO) and requires some kind of ID to identify the objects. DAOs essentially abstract and encapsulate access to a data source, such as a persistent database or an in-memory database.

The downside of this approach is that this kind of cohesion can group multiple concerns together, which introduces additional dependencies for a class that only uses and requires some of the operations.

Utility

You may be tempted to group different unrelated methods inside a class. This happens when it is not obvious where the methods belong so you end up with a utility class that is a bit like a jack of all trades.

This is generally to be avoided because you end up with low cohesion. The methods are not related, so the class as a whole is harder to reason about. In addition, utility classes exhibit a poor discoverability characteristic. You want your code to be easy to find and easy to understand how it is supposed to be used. Utility classes go against this principle because they contain different methods that are unrelated without a clear categorization.

Logical

Say you needed to provide implementations for parsing from CSV, JSON, and XML. You may be tempted to group the methods responsible for parsing the different format inside one class, as shown in Example 2-10.

Example 2-10. An example of logical cohesion
public class BankTransactionParser {

    public BankTransaction parseFromCSV(final String line) {
        // ...
        throw new UnsupportedOperationException();
    }

    public BankTransaction parseFromJSON(final String line) {
        // ...
        throw new UnsupportedOperationException();
    }

    public BankTransaction parseFromXML(final String line) {
        // ...
        throw new UnsupportedOperationException();
    }
}

In fact, the methods are logically categorized to do “parsing.” However, they are different by nature and each of the methods would be unrelated. Grouping them would also break the SRP, which you learned about earlier, because the class is responsible for multiple concerns. Consequently, this approach is not recommended.

You will learn in “Coupling” that there exist techniques to solve the problem of providing different implementations for parsing while also keeping high cohesion.

Sequential

Say you need to read a file, parse it, process it, and save the information. You may group all of the methods in one single class. After all the output of reading the file becomes the input to the parsing, the output of parsing becomes the input to the processing step, and so on.

This is called sequential cohesion because you are grouping the methods so that they follow a sequence of input to output. It makes it easy to understand how the operations work together. Unfortunately, in practice this means that the class grouping the methods has multiple reasons to change and is therefore breaking the SRP. In addition, there may be many different ways of processing, summarizing, and saving, so this technique quickly leads to complex classes.

A better approach is to break down each responsibility inside individual, cohesive classes.

Temporal

A temporally cohesive class is one that performs several operations that are only related in time. A typical example is a class that declares some sort of initialization and clean-up operations (e.g., connecting and closing a database connection) that is called before or after other processing operations. The initialization and the other operations are unrelated, but they have to be called in a specific order in time.

Table 2-1. Summary of pros and cons for different levels of cohesion
Level of cohesion Pro Con

Functional (high cohesion)

Easy to understand

Can lead to overly simplistic classes

Informational (medium cohesion)

Easy to maintain

Can lead to unnecessary dependencies

Sequential (medium cohesion)

Easy to locate related operations

Encourages violation of SRP

Logical (medium cohesion)

Provides some form of high-level categorization

Encourages violation of SRP

Utility (low cohesion)

Simple to put in place

Harder to reason about the responsibility of the class

Temporal (low cohesion)

N/A

Harder to understand and use individual operations

Method-Level Cohesion

The same principle of cohesion can be applied to methods. The more different functionalities a method performs, the harder it becomes to understand what that method actually does. In other words, your method has low cohesion if it is handling multiple unrelated concerns. Methods that display low cohesion are also harder to test because they have multiple responsibilities within one method, which makes it difficult to test the responsibilities individually! Typically, if you find yourself with a method that contains a series of if/else blocks that make modifications to many different fields of a class or parameters to the method, then it is a sign you should break down the method in more cohesive parts.

Coupling

Another important characteristic about the code you write is coupling. Where cohesion is about how related things are in a class, package, or method, coupling is about how dependent you are on other classes. Another way to think about coupling is how much knowledge (i.e., specific implementation) you rely on about certain classes. This is important because the more classes you rely on, the less flexible you become when introducing changes. In fact, the class affected by a change may affect all the classes depending on it.

To understand what coupling is, think about a clock. There is no need to know how a clock works to read the time, so you are not dependent on the clock internals. This means you could change the clock internals without affecting how to read the time. Those two concerns (interface and implementation) are decoupled from one another.

Coupling is concerned with how dependent things are. For example, so far the class BankStatementAnalyzer relies on the class BankStatementCSVParser. What if you need to change the parser so it supports statements encoded as JSON entries? What about XML entries? This would be an annoying refactoring! But do not worry, you can decouple different components by using an interface, which is the tool of choice for providing flexibility for changing requirements.

First, you need to introduce an interface that will tell you how you can use a parser for bank statements but without hardcoding a specific implementation, as shown in Example 2-11.

Example 2-11. Introducing an interface for parsing bank statements
public interface BankStatementParser {
    BankTransaction parseFrom(String line);
    List<BankTransaction> parseLinesFrom(List<String> lines);
}

Your BankStatementCSVParser will now become an implementation of that interface:

public class BankStatementCSVParser implements BankStatementParser {
    // ...
}

So far so good, but how do you decouple the BankStatementAnalyzer from the specific implementation of a BankStatementCSVParser? You need to use the interface! By introducing a new method called analyze(), which takes BankTransactionParser as an argument, you are no longer coupled to a specific implementation (see Example 2-12).

Example 2-12. Decoupling the Bank Statements Analyzer from the parser
public class BankStatementAnalyzer {
    private static final String RESOURCES = "src/main/resources/";

    public void analyze(final String fileName, final BankStatementParser bankStatementParser)
    throws IOException {

        final Path path = Paths.get(RESOURCES + fileName);
        final List<String> lines = Files.readAllLines(path);

        final List<BankTransaction> bankTransactions = bankStatementParser.parseLinesFrom(lines);

        final BankStatementProcessor bankStatementProcessor = new BankStatementProcessor(bankTransactions);

        collectSummary(bankStatementProcessor);
    }

    // ...
}

This is great because the BankStatementAnalyzer class no longer requires knowledge of different specific implementations, which helps with coping for changing requirements. Figure 2-1 illustrates the difference of dependencies when you decouple two classes.

Decoupling two classes
Figure 2-1. Decoupling two classes

You can now bring all the different parts together and create your main application, as shown in Example 2-13.

Example 2-13. The main application to run
public class MainApplication {

    public static void main(final String... args) throws IOException {

        final BankStatementAnalyzer bankStatementAnalyzer
                = new BankStatementAnalyzer();

        final BankStatementParser bankStatementParser
                = new BankStatementCSVParser();

        bankStatementAnalyzer.analyze(args[0], bankStatementParser);

    }
}

Generally, when writing code you will aim for low coupling. This means that different components in your code are not relying on internal/implementation details. The opposite of low coupling is called high coupling, which is what you definitely want to avoid!

Testing

You have written some software and it looks like things are working if you execute your application a couple of times. However, how confident are you that your code will always work? What guarantee can you give your client that you have met the requirements? In this section, you will learn about testing and how to write your first automated test using the most popular and widely adopted Java testing framework: JUnit.

Automated Testing

Automated testing sounds like yet another thing that could take more time away from the fun part, which is writing code! Why should you care?

Unfortunately in software development, things never work the first time. It should be pretty obvious that testing has benefits. Can you imagine integrating a new auto-pilot software for planes without testing if the software actually works?

Testing does not have to be a manual operation, though. In automated testing you have a suite of tests that runs automatically without human intervention. This means the tests can be executed quickly when you are introducing changes in the code and you want to increase confidence that the behavior of your software is correct and has not suddenly become unexpected. On an average day, a professional developer will often run hundreds or thousands of automated tests.

In this section, we will first briefly review the benefits of automated testing so you have a clear understanding of why testing is a core part of good software development.

Confidence

First, performing tests on the software to validate whether the behavior matches the specification gives you confidence that you have met the requirements of your client. You can present the test specifications and results to your client as a guarantee. In a sense, the tests become the specification from your client.

Robustness to changes

Second, if you introduce changes to your code, how do you know that you have not accidentally broken something? If the code is small you may think problems will be obvious. However, what if you are working on a codebase with millions of lines of code? How confident would you feel about making changes to a colleague’s code? Having a suite of automated tests is very useful to check that you have not introduced new bugs.

Program comprehension

Third, automated tests can be useful to help you understand how the different components inside the source code project works. In fact, tests make explicit the dependencies of different components and how they interact together. This can be extremely useful for quickly getting an overview of your software. Say you are assigned to a new project. Where would you start to get an overview of different components? The tests are a great place to start.

Using JUnit

Hopefully you are now convinced of the value of writing automated tests. In this section, you will learn how to create your first automated test using a popular Java framework called JUnit. Nothing comes for free. You will see that writing a test takes time. In addition, you will have to think about the longer-term maintenance of the test you write since it is regular code, after all. However, the benefits listed in the previous section far outweigh the downsides of having to write tests. Specifically, you will write unit tests, which verify a small isolated unit of behavior for correctness, such as a method or a small class. Throughout the book you will learn about guidelines for writing good tests. Here you will first get an initial overview for writing a simple test for the BankTransactionCSVParser.

Defining a test method

The first question is where do you write your test? The standard convention from the Maven and Gradle build tools is to include your code in src/main/java and the test classes inside src/test/java. You will also need to add a dependency to the JUnit library to your project. You will learn more about how to structure a project using Maven and Gradle in Chapter 3.

Example 2-14 shows a simple test for BankTransactionCSVParser.

Note

Our BankStatementCSVParserTest test class has the Test suffix. It is not strictly necessary, but often used as a useful aide memoire.

Example 2-14. A failing unit test for the CSV parser
import org.junit.Assert;
import org.junit.Test;
public class BankStatementCSVParserTest {

    private final BankStatementParser statementParser = new BankStatementCSVParser();

    @Test
    public void shouldParseOneCorrectLine() throws Exception {
        Assert.fail("Not yet implemented");
    }

}

There are a lot of new parts here. Let’s break it down:

  • The unit test class is an ordinary class called BankStatementCSVParserTest. It is a common convention to use the Test suffix at the end of test class names.

  • The class declares one method: shouldParseOneCorrectLine(). It is recommended to always come up with a descriptive name so it is immediately obvious what the unit test does without looking at the implementation of the test method.

  • This method is annotated with the JUnit annotation @Test. This means that the method represents a unit test that should be executed. You can declare private helper methods with a test class, but they won’t be executed by the test runner.

  • The implementation of this method calls Assert.fail("Not yet implemented"), which will cause the unit test to fail with the diagnostic message "Not yet implemented". You will learn shortly how to actually implement a unit test using a set of assertion operations available in JUnit.

You can execute your test directly from your favorite build tool (e.g., Maven or Gradle) or by using your IDE. For example, after running the test in the IntelliJ IDE, you get the output in Figure 2-2. You can see the test is failing with the diagnostic “Not yet implemented”. Let’s now see how to actually implement a useful test to increase the confidence that the BankStatementCSVParser works correctly.

Running a unit test
Figure 2-2. Screenshot from the IntelliJ IDE of running a failing unit test

Assert statements

You have just learned about Assert.fail(). This is a static method provided by JUnit called an assert statement. JUnit provides many assert statements to test for certain conditions. They let you provide an expected result and compare it with the result of some operation.

One of these static method is called Assert.assertEquals(). You can use it as shown in Example 2-15 to test that the implementation of parseFrom() works correctly for a particular input.

Example 2-15. Using assertion statements
@Test
public void shouldParseOneCorrectLine() throws Exception {
    final String line = "30-01-2017,-50,Tesco";

    final BankTransaction result = statementParser.parseFrom(line);

    final BankTransaction expected
        = new BankTransaction(LocalDate.of(2017, Month.JANUARY, 30), -50, "Tesco");
    final double tolerance = 0.0d;

    Assert.assertEquals(expected.getDate(), result.getDate());
    Assert.assertEquals(expected.getAmount(), result.getAmount(), tolerance);
    Assert.assertEquals(expected.getDescription(), result.getDescription());
}

So what is going on here? There are three parts:

  1. You set up the context for your test. In this case a line to parse.

  2. You carry out an action. In this case, you parse the input line.

  3. You specify assertions of the expected output. Here, you check that the date, amount, and description were parsed correctly.

This three-stage pattern for setting up a unit test is often referred to as the Given-When-Then formula. It is a good idea to follow the pattern and split up the different parts because it helps to clearly understand what the test is actually doing.

When you run the test again, with a bit luck you will see a nice green bar indicating that the test succeeded, as shown in Figure 2-3.

Test passed
Figure 2-3. Running a passing unit test

There are other assertion statements available, which are summarized in Table 2-2.

Table 2-2. Assertion statements
Assertion statement Purpose

Assert.fail(message)

Let the method fail. This is useful as a placeholder before you implement the test code.

Assert.assertEquals​(expected, actual)

Test that two values are the same.

Assert.assertEquals​(expected, actual, delta)

Assert that two floats or doubles are equal to within a delta.

Assert.assertNotNull(object)

Assert that an object is not null.

Code Coverage

You’ve written your first test and it’s great! But how can you tell if that is sufficient? Code coverage refers to how much of the source code of your software (i.e., how many lines or blocks) is tested by a set of tests. It is generally a good idea to aim for high coverage because it reduces the chance of unexpected bugs. There isn’t a specific percentage that is considered sufficient, but we recommend aiming for 70%–90%. In practice, it is hard and less practical to actually reach 100% of code coverage because you may, for example, start testing getter and setter methods, which provides less value.

However, code coverage is not necessarily a good metric of how well you are testing your software. In fact, code coverage only tells you what you definitely have not tested. Code coverage does not say anything about the quality of your tests. You may cover parts of your code with a simplistic test case, but not necessarily for edge cases, which usually lead to problematic issues.

Popular code coverage tools in Java include JaCoCo, Emma, and Cobertura. In practice, you will see people talking about line coverage, which tells you how many statements the code covered. This technique gives a false sense of having good coverage because conditionals (if, while, for) will count as one statement. However, conditionals have multiple possible paths. You should therefore favor branch coverage, which checks the true and false branch for each conditional.

Takeaways

  • God Classes and code duplication lead to code that is hard to reason about and maintain.

  • The Single Responsibility Principle helps you write code that is easier to manage and maintain.

  • Cohesion is concerned with how how strongly related the responsibilities of a class or method are.

  • Coupling is concerned with how dependent a class is on other parts of your code.

  • High cohesion and low coupling are characteristics of maintainable code.

  • A suite of automated tests increases confidence that your software is correct, makes it more robust for changes, and helps program comprehension.

  • JUnit is a Java testing framework that lets you specify unit tests that verify the behavior of your methods and classes.

  • Given-When-Then is a pattern for setting up a test into three parts to help understand the tests you implement.

Iterating on You

If you want to extend and solidify the knowledge from this section, you could try one of these activities:

  • Write a couple more unit test cases to test the implementation of the CSV parser.

  • Support different aggregate operations, such as finding the maximum or minimum transactions in specific date ranges.

  • Return a histogram of the expenses by grouping them based on months and descriptions.

Completing the Challenge

Mark Erbergzuck is very happy with your first iteration of your Bank Statements Analyzer. He takes your idea and renames it THE Bank Statements Analyzer. He is so happy with your application that he is asking you for a few enhancements. It turns out he would like to extend the reading, parsing, processing, and summarizing functionalities. For example, he is a fan of JSON. In addition, he found your tests a bit limited and found a couple of bugs.

This is something that you will address in the next chapter, where you will learn about exception handling, the Open/Closed Principle, and how to build your Java project using a build tool.

1 This definition is attributed to Robert Martin.

..................Content has been hidden....................

You can't read the all page of ebook, please click here login for view all page.
Reset